It will turn out no worse than that of an experienced master! How to make a tandoor with your own hands? Do-it-yourself tandoor at the dacha Do-it-yourself brick tandoor is the simplest
A country holiday cannot be complete without cooking, namely barbecue. As a result of a long search for optimal options for cooking outdoors, multifunctional ones began to appear. But they also do not provide the same taste qualities of food as Central Asian cuisine offers. What are we talking about?
Many summer residents have long been using a tandoor instead of a standard and familiar barbecue. For a summer residence, it is one of the best options, since you can cook many more types of food in it (up to 40 dishes of meat, vegetables, fruits, fish, chicken) than in a grill. In addition, you can make a tandoor at your dacha with your own hands, practically from improvised means, without spending a lot of money.
Tandoor first appeared in Asia. Uzbekistan is considered the birthplace of this miracle stove, although there are numerous modifications by the peoples of such countries as Armenia, Kazakhstan, Azerbaijan, Turkmenistan, and Tajikistan. The Japanese, Russians and Mongols also contributed to the improvement of this Asian stove. The tandoor in Ukraine is just beginning to be introduced into country life.
Tandoor - what is it?
The structure is a kind of brazier oven. There are different forms of Asian tandoor. Its internal shape is in the form of a jug. According to their functional purpose, tandoors can be divided into devices for baking vegetables, meat, and bread. These individual roasters have a very specific purpose. Multifunctional stoves are made in dachas.
There are also different installation methods. You can build it above the ground, or you can dig it into the ground. The construction technologies are almost the same, only in the case of an underground tandoor, an opening 1.2 m deep and of the required diameter (0.8 m) is dug in the ground. Crushed stone with sand is used as the bottom layer, and a concrete pad is used as the base.
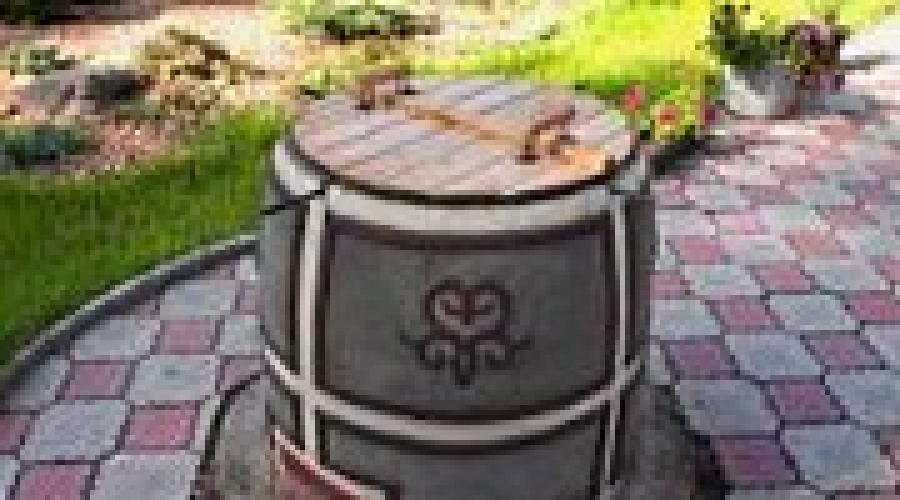
 Externally, a tandoor in a country house (see photo, video) can have completely different designs. It is often used in landscape design projects. Its inner part is necessarily lined with a mixture of straw and clay. It is this element that gives the tandoor its final, complete form and advantageous qualities. This is its highlight and peculiarity. The food it produces is amazing, delicious, and delicious.
The principle of operation of the tandoor is to achieve maximum effect with minimal consumption of the energy source (wood). Simply put, you don’t need a lot of wood to prepare any dish or several dishes in a row. It is enough to burn a few logs in it and that will be enough, since the design of the stove provides ideal thermal insulation and the stove is able to retain heat inside for a long time.  On the modern market you can buy a tandoor for your garden in the form of a portable jug-shaped device. They are mainly made from a mixture of ceramics and slaked clay. Its inner part is also well lubricated with clay, and the outer shell is decorated with decorative elements made of porcelain and ceramics. It includes several stainless steel devices in the form of meshes, grates, and stands for preparing a variety of dishes.
For those summer residents who have construction skills and also know how to handle hand-held power tools and a welding machine, it is quite possible to build a tandoor in the country with their own hands.
How to make a tandoor in the country?
In the classic version, such a brazier oven is made purely of clay with the addition of sheep or camel hair. The walls of such a structure are quite thick. According to the technology of creation, the finished structure should dry well in the southern sun. This period is about 1 month.
 An alternative option is to use publicly available materials - clay, straw, cement mortar, brick, metal, wood. How to build a tandoor at the dacha? It should be noted that the main parameter of the tandoor is the depth and diameter of the internal space.
There are several options for creating Asian stoves. There are large tandoors in which it is possible to place and cook several dishes at once. You can also build compact portable ovens on a special platform cart. They are designed for preparing one type of dish.
The main material for the construction of a brazier oven is brick. It is this method that should be discussed in more detail. So, how to make a tandoor yourself in the country?
Detailed diagram of the construction of a stationary tandoor:

For the convenience of constructing tandoor walls, it is necessary to create their future shape from wood with jumpers for strength. Its lower part will be equal to the radius of the inner part of the roasting oven.

At first glance, building a tandoor is a very troublesome task. To some extent this is true. But the result is worth it. You must adhere to all the recommendations and long-proven schemes and everything will work out.
How to make a tandoor at the dacha with your own hands, video
Do-it-yourself tandoor: features of the structure. Principle of operation. How and what to cook in the oven. Installation options for tandoors. Type of fuel for the stove. Methods for making a structure.
Do-it-yourself tandoor: methods for making a real Uzbek stove in photographs.
The tandoor is a multifunctional oven in which you can cook any dish of oriental cuisine, using a minimum amount of fuel. The structure can be stationary or portable, made of clay or brick. Hardwood is used as fuel for the tandoor. Such a stove can be purchased ready-made or you can make a tandoor with your own hands, following certain stages of the technological process.
Tandoor is a multifunctional oven used in traditional oriental cuisine
A portable tandoor on metal legs can be installed in any convenient place

The Uzbek tandoor in the form of a clay jug-shaped cauldron turned upside down is installed on a foundation that rises 20 cm above the ground and goes just as deep into it. The structure is mainly located in the open area of the yard. Above the foundation there is a built-in ash pit, closed with a door. A cast iron grate is installed above the opening. Next, a chamber is placed in the form of a dome with a smooth inner surface covered with a layer of clay.
The structure is covered with brick, creating a small air gap, which is filled with salt or sand, due to which the temperature inside the tandoor remains high for six hours.
Firewood or coal is placed through the top hole. After the fuel burns out completely, the soot that covers the inner surface falls off, leaving the coating clean. This means that you can load food into the oven. Before baking, the resulting ash is removed. In the case of meat, this is not necessary. Pieces of dough are glued to the inner surface of the oven.

Many tandoors are equipped with a blower for easy ash removal
In a barbecue tandoor, skewers with meat are hung vertically on a special rack, point down. A cauldron with pilaf is placed on the neck of the structure. Next, the tandoor is covered with a lid on top, and the vent is closed. Cooking time depends on the dish and is 15-45 minutes.

The kindling process depends on the time of year. In winter, the temperature should gradually increase, so wood chips are lit first, and then the main fuel is added. In summer you can do without pre-ignition. After the tandoor has cooled completely, it is recommended to completely clear it of ash. Fat deposited on the inner surface of the structure will burn off during subsequent use of the product.
A tandoor in the form of a ceramic hemisphere with a round hole can be above ground, underground or portable. The first design option is installed on a flat surface horizontally or vertically, depending on the orientation of the tandoor. Fuel is loaded through the side or top opening, respectively. The draft occurs through a blower located in the lower part of the furnace. According to reviews from owners, ground-type tandoor is the most popular among other options.

In a tandoor you can cook just about anything - vegetables, meat, fish, etc.
An earthen or pit tandoor is partially or completely submerged underground. Kindling is carried out through the top hole, which also serves to load products. To maintain the necessary traction, a pipe is connected to the bottom of the product, which is buried in the ground at an angle of 450.
A portable tandoor can be installed anywhere. The product is made of fireclay clay in the form of a barrel or jug. Depending on the weight of the oven, tandoor comes in four types: small (up to 50 kg), medium (50-79 kg), large (80-100 kg), very large (over 100 kg). This design is additionally equipped with carrying handles and legs on which it is installed. Also included with the product are skewers, racks, hooks and attachments.

Mobile tandoors have thick walls (up to 70 mm), additionally reinforced with steel strips. For such structures it is necessary to ensure proper protection from moisture during storage, so it is recommended to purchase special covers.
Tnadyr is often used for baking
What type of fuel can be used for tandoors
Traditional tandoors use hardwood or charcoal as fuel. The product is a thick-walled pot with a lid, made of refractory clay. For air flow and ash removal, there is a special hole at the bottom of the product. Firewood is loaded through the top opening. After they are completely burned, you can start cooking. Such products are characterized by the lowest price. You can buy a tandoor from 5,500 rubles.
There are tandoors that use gas as fuel. Such designs are usually used in cafes, bakeries and restaurants. You can install such a tandoor in your home kitchen, but in this case you should worry about purchasing a good hood to remove exhaust air.
Thanks to its design, the tandoor is able to maintain high temperatures inside for quite a long time.
The jug is made from baked white clay and is placed inside a metal body. To preserve heat for a long time, the voids are filled with heat-insulating material in the form of sand, fine expanded clay or salt. Gas furnaces are easy to operate, do not emit harmful substances and are economical. However, the dishes do not have the characteristic smoke smell.
For home cooking, you can purchase an electric tandoor, for which heating elements serve as the heat source. They are located around the perimeter of the lower part of the structure. These are convenient and compact products that do not require firewood and do not emit soot or smoke. The electric tandoor for flatbreads is made of metal. The inside of the product has a ceramic coating. The design of such braziers is varied, which allows you to choose a product for a specific interior style.
Electric tandoors are equipped with mini-computers that control the cooking process by regulating temperature and humidity. You can also buy a tandoor for barbecue and baking, where firewood can be used along with electricity.
Tandoor is an ancient traditional national Uzbek oven-broiler
How much does a tandoor cost depending on the type and type of fuel
The cost of tandoors is influenced by many factors: material of manufacture, type of firebox, design, dimensions of the product and the presence of additional accessories. The products are presented in a wide price range, so any buyer can choose an option to suit their budget.
A large family tandoor can be chosen from a number of wood-fueled household products, such as: Hunter, Nomad, Big Sarmatian and Middle. The height of the structure is in the range of 63-105 cm. Such clay products surprise with their interesting design. Broken glass, brick, natural and artificial stone are used as cladding, which allows you to create original patterns and ornaments on the surface. The average price of a tandoor is 8,500-20,000 rubles.
Electric tandoors are very popular today. Customer reviews of such products are positive. The advantage of electric models is the ability to install them not only on the street, but also in the apartment. The structures are made of refractory clay and heated by heating elements. You can buy an electric tandoor for an average of 15,000-80,000 rubles.

Modern tandoors are made mainly from ceramic clay

What can you cook in a tandoor? Almost any dish. This oven is used for cooking flatbreads, samsa, vegetables, fish and various meat dishes. It does not use open fire, but heat coming from the walls of the structure. This is ideal for obtaining the best quality baked goods. Many recipes for dishes cooked in tandoor can be found on the Internet.
Before starting the first fire, the inner surface of the tandoor is lubricated with cotton-based oil. Then the oven is heated throughout the day, so that the dough cakes will not stick to the clay surface.
Thanks to the ability of the tandoor to maintain temperature, dishes cook faster, and also become juicy and aromatic
Flatbreads should be moistened before baking in the tandoor to ensure better adhesion of the dough to the surface. To collect the fat dripping from meat dishes, a special bowl is used, which is located under the meat.
You can cook barbecue and pizza in the tandoor. However, to do this, you should purchase an additional element in the form of a grate, which is attached to the neck of the structure using special fasteners and lowered to the middle of the stove. In a large tandoor, you can place a pan or kettle on the grill to prepare aromatic pilaf or shurpa.
When preparing shashlik or kebab, skewers are placed in the opening of the tandoor or can be hung on a transverse iron rod. In this case, the neck is covered with a lid. The time spent preparing dishes is much less than when using a barbecue or oven. For pork or lamb it will take 18-25 minutes, for beef - 30-35 minutes, for fish and poultry - 8-15 minutes, for vegetables - 5-7 minutes.
It takes 8-15 minutes to cook fish in a tandoor.
You can place a pan with tough, sinewy meat in a half-cooled tandoor and leave it until the morning. The next day, this product in any dish will melt in your mouth.
Preparing the composition for making a clay tandoor with your own hands
The traditional Uzbek clay tandoor is not built with your own hands, but is molded from clay. A special composition of the material is used here. You will need kaolin clay, which has good plasticity and high thermal insulation properties. To prevent the body of the tandoor from cracking under the influence of high temperatures, camel or sheep wool with a fiber length of 1-1.5 cm is added to the clay mixture. Before making a tandoor, you should prepare a molding mixture, which consists of clay, salt, sand and wool, in a ratio of 4:1:1:2.
The clay is first cleaned of foreign impurities, rubbed through a sieve, mixed and soaked for 48 hours. The remaining elements are added to the prepared substance. The mixture is thoroughly mixed until a viscous state is formed, reminiscent of the consistency of sour cream. Next, the prepared composition should be left for 7 days so that it dries and acquires the necessary condition. During this period, the mixture should be stirred periodically to ensure even drying. Any water that collects on top must be drained.

Traditional Uzbek tandoor is molded from clay using special technology
The less moisture remains in the molding composition, the lower the risk of cracking of the tandoor during firing. The mixture is suitable for further use when the consistency resembles plasticine.
How to make a tandoor with your own hands: the traditional version
The method of making a tandoor from clay is called the strip method, since the material is used to make long strips about 2-3 cm thick, 20-25 cm wide and 2 m long.
The manufacture of the oven should be carried out in the shade under a canopy so that the clay does not lose its elasticity when it dries quickly under the influence of sunlight.
The prepared strips must be left to dry in the sun for some time. Next, a bowl without a bottom is formed from them. The product is placed in a ring with smooth walls. It is recommended to use a metal barrel as a frame for forming the lower part of the product, which will need to be removed immediately. To prevent the clay from sticking to the metal, it should be lubricated with sunflower oil.
To build a tandoor, a specially prepared mixture of clay is used
Then one or two strips need to be attached to the bottom of the product to form a part of the jug that tapers towards the top, which looks like a dome. Next, the process of compacting the walls is carried out. For this, two tools are used: a metal or wooden trowel in the shape of a disk with smooth rounded edges and a wooden spatula with embossed diagonal stripes.
You need to hold the trowel in one hand and press it against the inner surface of the product, and from the outside through the clay wall you should gently tap it with a spatula. This process helps compact the clay and form a pattern on the surface in the form of diagonal stripes.
The final stage is to form the upper part of the tandoor neck with your own hands. The oven narrows at the top. The diameter of the neck should be two times smaller than the bottom of the jug. The clay is compacted and leveled in the same way as for the main part of the tandoor.
The finished product is transferred to the shade for final drying for 30 days. After the product is completely dry, its inner surface should be lubricated with a generous layer of sunflower oil.
Tandoors can be of various sizes - large ones are intended for production purposes
Preparing a site for installing a finished clay inlay
There are two options for installing a clay tandoor: on a foundation followed by brick lining and underground. The location for installation of the product is selected in advance.
If the finished clay insert will be located in a recess, it is necessary to prepare a foundation pit, the depth of which is determined by the height of the product. Its upper part should protrude 7-10 cm from the ground. Thus, the earth performs the function of preserving heat. An additional blower should be installed at the bottom of the tandoor.
To create a foundation, you need to dig a pit. It can be round or square in shape. This depends on the configuration of the thermal casing in the form of a brick wall around the tandoor. The second option is more preferable, since a sufficient gap is formed between the inlay and the wall, which is filled with a heat-accumulating or heat-insulating composition. The size of the pit should exceed the dimensions of the bottom part of the insert by 10-15 cm. The depth of the pit is 15-17 cm.

The tandoor can be installed either on a base or made in the form of a pit
The pit is filled with sand in a layer of 5 cm and compacted well. Next, crushed stone of the middle fraction is added with reinforcement mesh laid, which makes it possible to obtain an additional reinforcing layer. Then formwork is performed with a height of 10-15 cm. The foundation should rise above ground level by 5-7 cm to eliminate the possibility of the masonry being washed away by storm water. A concrete solution consisting of gravel, cement and sand is poured into the formwork. The surface is leveled according to the rule. You can study the installation process in more detail in the video “Do-It-Yourself Tandoor”.
Installation of a clay inlay with the construction of a brick wall
After the concrete base has completely dried, the formwork is removed. The surface is marked according to the dimensions of the clay insert for the construction of a brick wall. First, a brick platform is made with an open area for arranging the ash chamber channel, which is closed with a special door. You can install a metal pipe into a brick insert. It is recommended to install a damper in it, thanks to which the amount of incoming air can be adjusted. The damper can close completely.
A cast iron grate is placed on the ash chamber, where fuel combustion occurs. The ash enters the ash pit, from which it is easily removed through the open door. A clay tab is installed on top of the grate on the platform. For reliability and sealing, the joint between the lower edge of the jug and the brick base is covered with a clay solution. Then a brick wall is erected around the entire perimeter of the tab. The gap between the structure and the tandoor is filled with expanded clay, sand or salt. The brick wall reaches the height of the insert.

Making a tandoor with your own hands from a barrel
In homemade products, the space between the tandoor and the outer frame is filled with sand, expanded clay or other fire-resistant material
The traditional version of making a tandoor from clay requires special knowledge, skills and abilities. The surface is often crooked, and the clay can subsequently crack. To avoid such troubles, a simplified technology was developed. It is based on making your own tandoor from a 200 liter barrel. The essence of the method is to create clay walls around a wooden product.
To build a tandoor with your own hands, you will need kaolin clay, vegetable oil, fine fireclay sand, a wooden barrel with iron hoops and sheep or camel wool. The first step is to fill the barrel to the top with water for 24 hours. This is necessary for impregnation and swelling of the wood. Next, you should prepare a molding mixture of clay, sand and wool in a ratio of 2:4:1, which should dry and become plastic.
All the water is drained from the barrel. It must dry completely, after which its inner surface is soaked in sunflower oil for 24 hours. Then the inside of the barrel is covered with a clay mixture 4-5 cm thick. The composition should be well leveled, wetting your hands with water, so that the result is as smooth a surface as possible. Moving up to the neck, the layer of clay must be increased, due to which the upper part of the oven narrows. At the bottom of the structure there is a small hole for free passage of air.
After manufacturing and firing, the tandoor is decorated with patterns and painted
The structure must dry completely in a dry, dark and ventilated place for 3-4 weeks. After this, the iron hoops are removed and the wooden barrel is dismantled, leaving the clay structure intact. The finished frame is installed on a thick sand cushion, where it is fired. To improve the thermal insulation qualities, you can make a brick wall around the stove.
Do-it-yourself brick tandoor: step-by-step instructions, drawings and photos of the process stages
The traditional version of the tandoor is made from kaolin clay. This is a rather labor-intensive and expensive process that requires the involvement of a specialist or requires a high level of skill. To simplify the task, but still get the desired result, you can make a tandoor with your own hands from brick. The simplest option for making a home stove consists of several processes, each of which will be described in detail in this article.
For construction you will need the following list of building materials:
- kiln brick;
- wooden template;
- masonry sand mixture;
- cement;
- sand;
- kaolin;
- reinforcing mesh.

Preparing a brick base for installing a tandoor
To finish the stove, a solution consisting of clay, salt, sand and wool in a ratio of 4:1:1:2 is used. Sheep or camel wool acts as a reinforcing element and contributes to good thermal insulation. The mortar for laying brick rows is prepared in the same way (with the exception of wool). The brick for the tandoor should be silicate or red heat-resistant, which can withstand high temperatures for a long time.
Before building a tandoor, it is necessary to prepare the foundation. For this purpose, a round pit is prepared with a diameter several centimeters larger than the size of the future structure. A sand cushion 10 cm thick is created at the bottom, which is covered with a metal mesh made from thick wire or reinforcement rods. Next, the hole is filled with concrete mortar, which is carefully leveled using an iron rule. Be sure to check the levelness of the surface by using a level. Then the lower part of the future dome-shaped chamber is marked, defining the outer boundaries of the walls.
To ensure reliable waterproofing, the concrete foundation must be covered with a sheet of roofing felt.

A clay structure is installed on the base and lined with bricks
Before making a tandoor yourself, a brick base is prepared on the foundation. Three rows of fireclay bricks are laid on the concrete surface: the first is placed along the pit, the second - across, the third - along. The elements of the two lower layers are laid tightly together without the use of mortar. For the top row, a clay mixture is used. The created foundation must be fixed with pieces of reinforcement on all sides. The rods are driven into the ground. Their height above the ground is equal to the mark of the top row of masonry.
How to make a tandoor from brick: step-by-step instructions
After the concrete base has gained the necessary strength, you can begin to build a brick tandoor. Photos that can be found on the Internet clearly display the sequence of actions. The diameter of the bottom part will be 1 m, and the height of the structure will be 130 cm. At the first stage, markings for the future furnace are carried out. The first row of the foundation is laid with an opening for the blower chamber. Clay mortar is used for masonry. The second row covers the chamber, leaving a window in its central part, where a cast-iron grate is mounted.
Starting from the third row, the wall of the structure is erected around the circumference. The bricks are laid in the traditional way. From the inside, the surface is coated with a thick layer of clay, which should be as smooth as possible. Twelve rows are built in this way. Next, you should begin to form the tandoor dome. To do this, each subsequent row is shifted towards the center by a certain distance, which is calculated in advance.

The construction of a brick tandoor is the most common option for a summer cottage
Knowing that the diameter of the oven is 1 m, it is necessary to take into account that the neck should be twice as narrow. This value should be achieved after 10 rows, which will correspond to a structure height of 130 cm. Having performed a simple arithmetic calculation, we come to the conclusion that each subsequent row should be shifted 5 cm to the center.
In order to make a tandoor with a smooth inner surface, the edges of the bricks that will be turned inward should be processed with a grinder. The surface can also be leveled using a clay mixture, constantly moistening it with water. After completion of the masonry process, a jug-shaped structure with a smooth inner surface is obtained.
Next, the exterior of the tandoor is finished using clay mortar. All seams must be well sealed. The steps that were formed during the construction of the dome must be completely hidden. After the stove has dried, which will happen in 2-3 days, you can make the first kindling.
Then they begin to build the outer wall of the tandoor, which comes close to the brick dome-shaped structure. The height of the structure is equal to the height of the inner chamber. The wall is made whole, except for the area opposite the blower hole, where a window is left. For better thermal insulation, the space between the outer wall and the inside of the furnace is filled with fine-grained expanded clay, sand or salt.

The outside of the tandoor can be finished with brick, stone or paving stones
The upper part of the tandoor can be finished with stone or brick bonded with clay, which will provide a complete structure.
Building a brick tandoor with your own hands: a simplified version
The previous option requires some skill to create an arched brick vault. You can build a tandoor at your dacha with your own hands using a simplified method. For this it is recommended to use old brick. As a masonry mortar, you can purchase a ready-made heat-resistant mixture at a hardware store, intended for the construction of fireplaces and stoves. To prepare the solution, you must strictly follow the instructions written on the product packaging.
According to the do-it-yourself tandoor drawing, the brick is laid in a circle, the diameter of which is determined at the planning stage. Usually it is 50-70 cm. Using a wooden frame, the brick is placed on the end, forming a circle. For installation, a sand solution can be used, which consists of fireclay clay, the necessary plasticizers and quartz sand. This composition is very plastic, sets quickly and will not crack when fired.

To build a tandoor, it is better to use refractory bricks that can withstand very high temperatures.
The first row is laid without breaks. A small hole should be left in the second row, which will be used as a blower in the future. This could be a small window with an iron door or a chimney. The third row is laid out completely. If the height of a brick tandoor is 100-120 cm, four rows of bricks are sufficient, the horizontality of each of which is controlled using a level.
When constructing each new row, it should be tied with steel wire. Its ends are twisted and hidden in the gaps between the bricks. When creating the last row, you need to form a tapering neck. For this purpose, the brick should be laid with some inclination inside the tandoor. The video shows the entire construction process in more detail.
Do-it-yourself tandoor made of brick: coating and cladding the structure
Upon completion of construction work, the process of coating and lining the tandoor with bricks is carried out. Fireproof clay is applied to the internal and external surfaces of the structure. The thickness of the layer is at least 1.5-2 cm. There must be at least two such layers. The second is applied 2-3 days after the first has dried. To ensure uniform drying, the structure should be covered with plastic film.

After coating with clay, the structure should be allowed to dry thoroughly and only then the first kindling should be carried out.
It is recommended to moisten the brick before applying the coating layer. This will promote uniform and gradual drying of the clay solution.
The inner surface must be perfectly smooth, so the clay mixture is leveled by constantly wetting it with water. In the upper part of the oven, a metal ring 30-50 mm high is mounted around the hole, thanks to which the area where the lid is installed is separated from the rest of the surface. The space from its outer side to the edge of the wall is filled with clay.
To coat the brickwork, you can use finely ground fireclay mortar.
The final stage of tandoor production is its firing, which can be performed 3-4 hours after completion of the coating and finishing work. The structure is completely filled with firewood, a fire is lit inside the stove, which gradually heats the walls of the structure to 400°C. It is necessary that the fuel burns completely, after which the stove must cool slowly. This process not only helps dry the structure, but also fires and hardens the clay.

Sectional diagram of a tandoor and the process of cooking kebabs in it
After all work is completed, the tandoor should be left for 7 days. During this time, you can make a wooden cover, thanks to which the heat will be retained inside the structure.
Since ancient times, the tandoor has served as an indispensable attribute of national Uzbek cuisine. Today it is widely used in private households. You can cook any dish in such an oven. Thanks to the special operating principle, it is possible to create not only a real masterpiece of culinary art, but also significantly save on fuel._
How to make a brick tandoor with your own hands: video
Tandoor - this word hurts the ear, betraying its foreign origin. Indeed, the tandoor is a stove that came to us from Asian countries. Its main purpose is to bake bread, however, no one bothers to use it for full-fledged cooking, especially since dishes cooked in such an oven have a special, incomparable taste. That is why many are interested in how to make a tandoor oven with their own hands.
Let's take a closer look at the features of this Asian stove, and it has a lot of them:
- fuel, firewood are not needed - all that is required for work is a bunch of saxaul;
- Despite the low fuel consumption, you can cook a lot of food on such a stove, this is due to its design.
also: Brick stove for a summer residence)
In fact, all its features are determined by the geographical factor - as already noted, such stoves were common in Asian countries. The Turkmen, Chinese, Japanese, Armenians used tandoor ovens, as well as the Uzbek tandoor oven - you must agree, a large piece of sushi was familiar with this unique technology, but why there?
The fact is that all of the above states could not boast of a surplus of wood, so they, unlike Russia, had to look for another way; they needed an economical stove.
We understand the device and understand the principle of operation
Let's reveal the secret of such savings: how does a ceramic tandoor oven produce so much while consuming so little?
To do this, you will have to take a closer look at its design.
The body of the furnace is a kind of clay cauldron, which is turned upside down, while the cauldron is equipped with a bottom and a hole at the top. However, in the lower part of the boiler there is a small hole for blowing. The outside of the stove is lined with brick; either sand, clay, or salt is poured between the brick and the walls of the tandoor. An interesting design, but it explains everything.
All materials used are natural heat accumulators, and the shape of the stove is ideal for maximum heat capture. In a word, everything here is configured for maximum efficiency. First, the stove absorbs heat, and then begins to slowly release it, and it releases most of it not to the outside world, but inside itself. (See also: Sitemap)
Tandoor: traditional option
Let's look at how to make a tandoor oven in its traditional version, that is, in the form of a thick ceramic dish, which is also lined with brick for thermal insulation and has holes only for direct use and blowing.
DIY tandoor
The height of such a furnace is no more than 1.5 meters, and the diameter in its central part is approximately 1 meter.

Stages of making a traditional tandoor oven:
- First of all, prepare the clay by kneading it thoroughly, and it is recommended to do this not with your hands, but with your feet.
After which the clay must sit for at least a day, and the process is repeated again;
- The body of the oven is made using tape molding, that is, relatively small rollers 60 cm thick are rolled out of prepared clay, with the help of which the body of the tandoor is gradually formed, tier by tier. To give the required shape and adhesion, the rollers are slightly flattened and pinched.
- The finished vessel is left to dry in the sun, a process that takes at least a month.
We didn’t come up with so many points, but this does not mean that it is easy to make a traditional version - on the contrary, only a true master can cope with this task, and here’s why:
- Properly preparing the clay, that is, taking into account all the nuances such as its fat content, is a very difficult task.
There is no room for error here. If we prepare a mortar for a brick kiln, then if cracks occur, we can simply cover them up. Here the entire oven consists of clay mortar, and if you don’t get it right, the oven will simply fall apart;
- laying out the furnace body using rollers is a task for a professional, because the efficiency of the device depends on how carefully this is done.
Yes, it is unlikely that a beginner will be able to make a traditional version the first time, but this does not mean that they should give up on it.
There is an easier way to fold this Asian stove
Brick tandoor oven, preparation
Yes, you can assemble a tandoor oven yourself, because the whole problem is in the capricious materials of the traditional version, so we will build such a stove from the materials we are familiar with, namely:
- bricks;
- sand;
- clay;
- cement;
- grate.
Agree, Russian people are more accustomed to working with these materials.
And a stove assembled from them has an important quality: in case of an error, we will always have the opportunity to correct it. The clay mortar didn't work out, did it crack? It can be covered up without the risk of the stove falling apart into pieces.
So, let's get started, build a stove according to standard dimensions:
- Height – 1292 mm, and diameter – 1 meter;
- The vertical part of the furnace boasts a height of 544 m, which is exactly 8 rows, followed by another 8 rows of the dome.

Putting on the stove
Now the foundation, no frills required here: dug, filled with cement and done.
But where to start assembling? First of all, marking - draw a circle of the correct shape on the foundation, because first we will lay it out, only then we will take on the inner world of the tandoor.
- 1st row: the main thing is to remember about the channel for blowing, the bricks in this row are laid on spoons, and make sure that their inner sides are in contact with each other.
- 2nd–8th rows: on the 2nd row we block the blower channel, we remind you that in this oven this channel is very small, only 68 X 200 mm, and no more is needed.
A grate will also be installed on the 2nd row, this is where the variety ends, the remaining 8 rows are performed according to the same scheme, the main thing is not to forget about coating and bandaging. We continue this way until the end of the vertical part.
Assembling the dome:
- Rows 9–18: Row 9, beginning of the dome - here we need to calculate the shift correctly, so to continue working we will need a trimming machine.
The challenge facing us is this: we must go from a diameter of 1 meter to a diameter of 500 mm in just 8 rows, which means that on each row we must narrow our circumference by 31.25 mm on both sides. We are finishing the laying of the furnace body.
After the body is completed, it must be generously coated with clay on the outside and left to dry in the sun.
Everything will take a couple of hours. And only after this can we begin the most interesting part - fill the cavity with brushwood to the very top, set it on fire and let it burn out - this will harden the clay and strengthen our tandoor. The inner part is completed, let's move on to the outer lining.
The lining is performed strictly vertically, and the walls of the lining must be in contact with the walls of the furnace.
And the resulting gaps must be carefully filled. This will allow our design to accumulate a large amount of heat, which will be enough for cooking, without having to spend much on fuel.
Now all that remains is to wait until the masonry has dried properly and you can work on the space above the vault, filling it with clay or sand.
Our tandoor is ready for use. Now nothing can stop you from baking flatbreads in a tandoor and enjoying their unique taste, known all over the world.

Earthen tandoor, this is how bread is baked in Armenia
In addition to the options already considered, there is also a third modification of this unique oven, an earthen oven.
That is, the stove is installed directly in the ground, this method was widely used in Armenia, moreover, not only was it used for cooking, it was also widely known in the medical community as the best means for therapeutic warming.
Moreover, before, such a stove had a sacred meaning for people, representing our heavenly body. You can install such a tandoor yourself; it will only take you a little more time than the previous option.
- First of all, we need a foundation pit, both for the foundation and for the entire furnace as a whole; the entire vertical part, that is, the first 8 rows, must be hidden in the ground, take this into account.
- Make a foundation, then lay out the stove, using exactly the same algorithm as the previous version.
We remind you that the dome should be above the ground, and the rest of the weight should be below it.
- Lubricate the dome with clay, twice as much as in the previous modification, this is necessary for the durability of the device.
As you can see, the fundamental difference is only in the pit, but nevertheless, even the taste of food cooked on such a tandoor is different.
HomeSite map
DIY Armenian brick tandoor
Tips for the home handyman

There are many different types of garden stoves for cooking.
How to make a tandoor at your dacha with your own hands: from brick, clay, etc.
Among them there are original Russian variants, but the design that came to our country from Asia is especially interesting. This is a tandoor. Traditionally, such a stove is made by hand. And today anyone can create a tandoor made of brick with their own hands in their personal plot.
Installation diagram

First you need to choose a suitable location. A tandoor can be a structure located above the ground, but sometimes it is built directly in the ground.
The second option is convenient if the site does not have a large area. To implement it, a pit is dug, to which an asbestos-cement pipe is connected (it is necessary to provide air flow to the tandoor, without which it is impossible to maintain a fire).
The bottom of the tandoor must be lined with bricks.
One row of material laid flat is enough. The seams between the bricks are filled with clay. The asbestos-cement pipe is installed in the finished pit so that its lower edge is located 5 cm from the level of the bricks. The angle of inclination of the pipe is 45 degrees.
Then they proceed to laying out bricks to decorate the walls of the furnace.
The brick is laid on the butt. In this case, there is no need to use the solution. The optimal internal diameter of the tandoor should be about 50 cm. The top row of masonry can be made a little wider for ease of use of the stove. The depth of the pit should allow 3 rows of bricks to be laid. There is no point in making the tandoor deeper.
The space between the bricks is also filled with dry clay.
Preparing clay for coating the top row requires special attention. It is diluted with water in a container until it acquires a creamy consistency.
Then you need to strain it (a fine plaster mesh is suitable for this). When the clay has settled, the water is drained and the resulting mass is coated with the internal surfaces of the bricks. Additionally, it is advisable to use mesh for reinforcement.
All that remains is to arrange the dome. Although this matter is not as simple as it might seem at first. Traditionally, a brick tandoor is covered with a clay dome about 1 cm thick with your own hands. It is laid out on some kind of template, the size and shape of which corresponds to the equipped foundation pit.
A large vase or basin will do. When the dome dries, it must be installed on the foundation pit and carefully warm up the finished tandoor for the first time.
Tandoor - DIY manufacturing sequence

Most people love outdoor recreation - in the forest, in the country, especially with family and close friends. Food cooked in the open air evokes a special appetite and is unusually tasty.
The most common device for outdoor recreation and cooking is considered to be a barbecue.
It's easy to cook with it. You can fry shish kebab on skewers, steak on the grill and other variations of meat and fish.
However, the use of the traditional stove of the steppe nomads - the tandoor - is becoming increasingly common. This amazing and simple fireplace produces delicious food!
Tandoor - what is it?
The tandoor (sometimes called tondur or dondur) is an invention of the Turkic people.
They are known for their ingenuity and nomadism from place to place. A tandoor is a small oven for cooking food at home.

Its huge advantage is its ease of manufacture.
Let's look at this process. The tandoor can be installed in any place where there is clay; you will also need sand. According to ancient tradition, sheep wool is added to the clay solution, but it is not the most important component, so you can do without it.
The main advantages of tandoor
the ability to naturally accumulate the energy of burned fuel, and then gradually release it over a long period of time;
2. food using such an oven does not burn and will not turn out raw;
3.
the juiciness and natural properties of the prepared products are preserved as much as possible;
4. You can bake flour dishes, such as “tandoor” flatbreads or juicy samsa.
Let's start making tandoor ourselves
We will need a wooden barrel, sand, clay, and if you can get sheep's wool, then we will add it to the clay, and we will also need vegetable oil.
How to make a tandoor from clay with your own hands
You can consider in detail the sequence of actions step by step:
1. You need to fill a wooden barrel to the brim with water and leave it until it swells completely. Prepare a solution in a 1:2 ratio of clay and sand and mix thoroughly. Sheep wool is also added there, which is cut into pieces of 10 - 15 cm. Sometimes the walls of the tandoor are reinforced with straw, hay or reeds, reeds, flax (this method is found in some descriptions of tandoor making traditions);

2.
We pour water from the already swollen barrel and saturate the inner walls of the barrel with vegetable oil. Next, it needs to dry for about a day;
3. We also apply the previously prepared clay solution to the inner walls of the barrel in a layer 2-3cm thick. Thoroughly compact and smooth out. On one side we narrow the neck of the barrel;

4.
To dry the tandoor, you need to leave it in a dry, ventilated area for two weeks. During the drying process of the manufactured structure, the boards that made up the barrel will move away from the clay;

5. When the tandoor is completely free of the boards, place it on a layer of sand with the neck up.
We light a small fire inside and maintain it for 6 cm. This process is necessary for the purpose of pre-firing the prepared oven. After completing the procedure, cover the tandoor with a lid; there should be a hole in it for the smoke to escape. Then we kindle the fire in it again, only now not a weak, but an intense fire.
6.
The tandoor should cool slowly. After cooling, you can already locate it in a specific place. You can insulate the stove with felt or cotton wool, and then line it with brick or stone, but this is no longer the main stage.

It is necessary to arrange a small blower at the bottom of the stove. It will then need to be covered with a lid made of fireproof material. The lid must match the size. You can also make a device to hang skewers inside the tandoor.

Tips for using a DIY tandoor:
— when the tandoor is hot, you cannot pour water, cracks may appear;
— during the first ignitions, the temperature in it must be raised gradually;
— the same firewood is used as for the barbecue;
— it is necessary to heat it until the soot on the inner walls disappears;
— after complete combustion of the wood, cover the ash pit;
- Now you can cover the oven with a lid and the oven is ready for cooking.

The approximate cooking time for meat in a tandoor is 15-20 minutes, fish will cook in 7-10 minutes, and vegetables cook very quickly in 2-3 minutes.
Make such an ancient device as a tandoor and see from your own experience how tasty and juicy the food cooked in it will be!
If you want to make a tandoor with your own hands, we offer you an overview of making a tandoor from clay, collected from the experience of several craftsmen. In this section you will learn how to make a tandoor (jug) from clay. The resulting product can be used both independently and for the construction of a more massive furnace.
Selection of clay and preparation of solution
Uzbeks and other Asian peoples, for whom the tandoor is their national oven, use local clay.
Kaolin clay is best suited for tandoor. It has a light yellow or light gray color.
Clay preparation
If the clay is not pure, with impurities, then it is soaked in a barrel.
Fill with excess water and place carefully. When the clay is saturated, heavy stones will settle below, and grass and other debris will float to the surface.
Making a tandoor, an egg-shaped clay jug
The garbage and water are drained, and the soaked clay is placed in a flat container.
Clean clay and water are allowed to sit for at least a day, maybe a week. No need to add sand! Knead and leave to ripen in the shade or in a cool room.
As the clay settles, there may be water left on the surface that needs to be removed. The less water remains in the clay before sculpting, the fewer cracks there will be in the product after drying. The clay becomes soft and pleasant to the touch.
Preparation of the solution
Some craftsmen add a little soda. About a tablespoon per 10 liters. Modern experts add liquid glass to this dough.
It provides plasticity, which reduces the chances of cracks forming due to temperature changes. It is non-toxic as it consists of quartz sand, soda and water.
After the clay is soaked with water, wool is added to it. Goat, sheep or camel. If it is not possible to add wool, then it can be replaced with straw. Goat hair is preferable. It is straight, stiff and long. Sheep hair is also suitable, but it is curly and therefore more difficult to work with.
For a tandoor Ø80cm you need 1.5 – 2 kg of wool. And of course, knead everything into a homogeneous mass.
Six will improve the heat capacity and make the structure lighter.
During the tandoor firing process, the wool burns out and small pores form in the walls of the oven. These pores allow you to retain heat for a long time.
All this is thoroughly mixed and kneaded. Traditionally this was done with the feet. And modern craftsmen use a construction mixer. Stir until thick sour cream forms. Then they knead several times until you get a mass from which you can sculpt. Almost like plasticine or dough. After which you can sculpt the hearth.
Wall thickness and heat capacity of tandoor
It wouldn’t hurt to pay a little attention to the massiveness of the tandoor.
Baking in it occurs while the oven is cooling. When the firewood has burned out, flatbreads, meat, samsa and other dishes are loaded into it. Therefore, the amount of cooked food and dishes depends on how much heat the tandoor can give off. And this already depends on the volume of its body, that is, on the thickness of its walls and on the heating temperature.
If the tandoor is being made portable, on wheels, or if additional external decoration is simply not planned, then it is better to make the walls of the tandoor sufficiently thick.
And if the tandoor is planned to be stationary and will be additionally lined, for example with brick, then the walls can be made to a minimum thickness. Since the total mass of the finished oven will be significantly increased, and from a clay vessel we need an egg-shaped tandoor and smooth walls.
Continuation: Methods of sculpting tandoors
The video demonstrates the making of a tandoor. And also cooking flatbreads and samsa in the tandoor.
Do-it-yourself tandoor. Step-by-step instructions with photos
Creating a miracle oven called tandoor, common in Asia, in your yard or on your property is not an easy task. But if you follow the detailed instructions step by step, you will get a reliable and durable unit.
Laying the foundation as a foundation.
The first step is to dig a hole for a shallow foundation. The finished pit is filled with 10 cm of sand, which will retain the heat. A metal mesh is installed on top of the sand, which will need to be filled with concrete. The concrete surface is leveled and must be checked with a building level.
Advice! Carry out the first stage in advance, since it will take about a week for the concrete to completely harden and gain strength.
Construction of tandoor walls
To build walls for you you will need a large sandstone stone, an arch-blower, roofing felt and cement. You can build a tandoor with your own hands from brick or other stone at your discretion.
From roofing felt several rectangular pieces are cut out and attached to cement, forming a circle, as in the photo;

The finished product is attached to cement arch;

Arm yourself with a spatula and start laying on the cement in a circle stones;

Check with construction level uniformity of the top sandstone stones. If necessary, level the level with cement;

how to make a tandoor with your own hands from brick. Photo
When laying between some stones, place pieces wire. They will help in the future to better hold expanded clay with cement.
Lining from the inside:
Dilute in a separate container expanded clay With cement in a one to one ratio;

Take a leaf roofing felt or PVC 5 mm thick and the same height as your future stove. Roll it into a cylinder, secure it with tape and place it inside the oven;

The radius of the cylinder must be significantly smaller than the radius of the furnace so that there is a distance between them;

Fill the cylinder temporarily stones so that they keep its shape;

Begin to fill the empty space between the walls of the cylinder and the prepared oven cement-expanded clay mixture;

After it has dried, first remove the stones, and then the cylinder itself from the structure;

If necessary, level the surface of the walls inside with a spatula or trowel;
Build a small ledge in a circle at the bottom of the tandoor, avoiding the place near the arch. Pay attention to the photo, bricks are used there as a temporary support for the tape holding the mixture;

Install the slab from marble on top of the walls.

Clay coating:
Clay, straw and sand are mixed in equal parts.

Advice! Fireclay clay is excellent for finishing a home tandoor.

The finished mixture, 3-5 cm thick, needs to be evenly covered with the entire inner surface until it becomes smooth;


You need to wait for the clay to dry completely naturally or help it with a lamp or fan.


Closing the holes
Buy a metal door for the arch and a cover for the top opening.


do-it-yourself tandoor in the country. Photo

Checking the oven in operation
Do-it-yourself tandoor is ready. To check the performance of the stove, throw in some firewood. Temperatures will quickly reach 111°C. If you add more firewood, the temperature will increase to 345° C and higher, which will allow you to cook your favorite dishes in the new oven.


Brick tandoor for a summer residence. Master Class
There are many ways to create a tandoor in your country house with your own hands. Basically, all tandoor ovens have the shape of a vase. They are built from various materials and have distinct designs. What they all have in common is the ability to retain heat inside for a long time, which makes it possible to cook delicious food. Those who have at least once tried delicious piping hot dishes are interested in the question of how to make a tandoor out of brick with your own hands.

The task before those who wish will be difficult, but feasible. Tandoor drawings will help you better understand the essence of the design.
You will need:
- Natural stone (you can take untreated);
- Fireclay clay;
- Fire brick;
- Ready-made reinforced concrete slab for the foundation or cement;
- Metal pipe and cap.

DIY tandoor drawings. Photo
Step 1. Foundation
A round hole is first dug, the diameter of which will be equal to the size of the future furnace. It is laid in the hole reinforced concrete slab.


Advice! If you decide to pour the foundation yourself, then place a steel grate at the bottom of the hole. When you pour the cement, it will provide additional reinforcement to the future foundation.
Step 2. Walls
While the foundation hardens, which is from 1 to 2 weeks, you can start creating wooden template for the walls of Tadyr.
Important! The template is a wooden frame that is temporarily attached in the middle of the structure and, when rotated, exactly repeats the shape of the planned stove.
The walls are laid in a circle. The bricks are laid out in a vertical position. After completing the first row, it is necessary to secure a pipe that will regulate air movement.

how to make a tandoor with your own hands. Photo step by step


Advice! To make your own tandoor a tapering shape, place the bricks at an angle when laying each layer. This can be done by adjusting the thickness of the cement layers.
Step 3: Clay coating
When the brick tandoor has reached the height you need, it's time to move on to the next stage. Place a solution of clay and sand in a ratio of 4 to 1 in a container and add a pack of salt to it. The future oven must be thoroughly lubricated with a clay consistency both inside and out.

Advice! It is better to wait not only for the clay to dry completely, but also to burn it. Place the wood inside the stove and simply light it.
Step 4. Facing
To improve the appearance and thermal insulation properties of the tandoor, the outside is lined natural stone. Cover the finished structure with a previously purchased lid. The oven is ready for use.


how to make a tandoor with your own hands. Video step by step
Do-it-yourself large stationary brick tandoor
If a small, budget DIY tandoor is not for you, then pay attention to the example of a massive stove. The main material is brick, which is already very common, but the design is not so common.

Advice! When constructing such a tandoor, be prepared for high costs of materials and fuel during operation.
You will learn how to build a tandoor with your own hands by studying the following steps.
The basis for building the tandoor was chosen concrete platform. Since the stove is quite large, which means it will produce more heat, there is no need to heat the entire foundation with it. To do this, the bottom of the oven is laid out fire brick.

To keep the walls even, use a homemade plywood template on the axis.

The first layer of brick is laid out in such a way as to place a special blower.

The inner wall is laid out in layers of half a brick.

When the structure is completely dry, it must be wrapped basalt wool in 2 layers and begin external laying.

On the neck you can place metal corners, which will serve as nests for skewers and other utensils during cooking.

The stove builder in the photo used an ordinary one as a lid for the tandoor. sewer hatch. You can repeat after him, or you can purchase a lighter lid that will simplify the operation of the oven.

Thanks to the even masonry, such a brick tandoor can look beautiful and dignified even without external decoration. And thanks to its size, it becomes possible to cook even the largest dishes in it.
DIY brick tandoor on a mobile platform
An excellent option for a summer house would be a do-it-yourself tandoor made of brick on a mobile basis. A small amount of materials goes into its construction, but its shape will be similar to any massive tandoor. Its walls are a quarter brick thick. And the entire height will be only 3 bricks. You must first purchase a metal platform with wheels or attach them yourself.
As they are laid, the brick rows must be tied with wire and then covered with a pre-made clay mixture. Fireclay clay- the best material for these purposes.
Do-it-yourself tandoor oven is compact and convenient. But some dishes cannot be cooked in it because of its size.
how to make a tandoor with your own hands. Video
DIY earthen tandoor
You are already familiar with the construction of different types of tandoor, but you have yet to learn how to make a tandoor with your own hands from bricks underground. The advantages of such a stove include the possibility of using scrap materials, as well as saving space.
To build his underground tandoor, the master used:
- Red brick;
- Red clay;
- Neck from a large ceramic container;
- cover
- Convenient place to park your car.
Step 1. The first thing you need to do is dig pit about 1 meter deep. Such a DIY tandoor oven necessarily requires a pipe through which air will flow. For the pipe you need to dig channel inclined.

Step 2. Used to lay the bottom brick. The seams are filled with ordinary clay.

Step 3. Pipe should be of such length that it reaches from the bottom to the surface of the earth. It must be installed at an angle of 45°.

Step 4. The walls are laid out bricks in a vertical position. In the first row, which took 24 bricks, no mortar is needed for fastening. The diameter of the future tandoor is approximately 50 cm. In total, you should get 3 rows of vertically placed bricks.

Step 5. All seams should be carefully sealed. clay.

Step 6. Proceed to cooking clay mixture. To do this, dilute the clay with water to a creamy consistency and hang it through a special plaster mesh. Leave the clay for 1 day so that it infuses and separates from the water.

Step 7. The internal surfaces of the future furnace are covered with a ready-made mixture of clay through a plaster mesh with fiberglass. The thickness of the clay layer was 1 cm.

Step 8. To create throat the master approached creatively. He cut out the bottom of a large flat clay vase and used the container in construction.

Step 9. The vase is installed on the brickwork with the bottom up. To secure it, it must be thoroughly coated with clay.

Step 10. Cast iron or other lid, which you have in your arsenal, will be able to cover a brick tandoor.

Step 11. To secure the entire structure, the free space around the vase is filled up expanded clay. And the protruding part of the furnace is coated with cement.

Step 12. To restore the integrity of the floor, the area around the tandoor is poured concrete, and then put tile.

Do-it-yourself tandoor in a parking space is ready.

DIY tandoor, budget option
If you decide to build a tandoor at your dacha with your own hands and do not want to invest a lot of money in it, then pay attention to the following example.

First of all, an Asian oven needs high-quality foundation. The standard for it is 100*100 cm. The thickness of the slab is 10 cm. It is necessary to dig a hole 15 cm deep. Use sand at the bottom, and attach a reinforcing mesh at a distance of 5 cm from it. For the formwork, 15-centimeter roofing boards were taken (10 cm should remain in the ground, and 5 cm should rise above the ground). Concrete is poured only when everything is level. It will have to dry for at least 72 hours.

For the base and walls was chosen fire brick.
Important! Fireclay brick is ideal for tandoor, as it is not susceptible to temperature changes and does not collapse.
The base of the oven will be round, so you will need blueprints tandoor to cut out a pattern 75 cm in diameter.
Advice! Excess parts of the bricks for the circle can be removed with a cutting wheel.
Brick laid on roofing felt and attached to a fire-resistant stove mixture.

To make the walls smooth and beautiful, you will need a template for their construction.
Important! According to the rules, a tandoor has a height equal to the width of the base, and its neck should occupy 2/3 of the size of the base.
Bricks are laid in a vertical position. All seams are coated with a solution. The first row is being tightened wire.

The second and third rows are laid out similarly. The inside of the edges should fit as tightly as possible, and the outside should be thoroughly coated with the solution.

Do-it-yourself tandoor is a budget option. Photo

The finished barrel is plastered on the outside oven mixture. The layer should be 1 cm.

Advice! While your DIY budget tandoor is drying, protect it from exposure to the sun or bad weather.
When the solution is completely dry, the tandoor is covered with fireproof acrylic paint.

All that remains is to clean the inside of the finished stove from construction dirt and dust and use it for your own pleasure.


The tandoor is a multifunctional oven in which you can cook any dish of oriental cuisine, using a minimum amount of fuel. The structure can be stationary or portable, made of clay or brick. Hardwood is used as fuel for the tandoor. Such a stove can be purchased ready-made or you can make a tandoor with your own hands, following certain stages of the technological process.
What is tandoor? This is a special type of roasting oven in which food is cooked due to heat transfer from the walls of the structure. The food cooks slowly as the heat is introduced gradually. Its uniform distribution helps preserve the juiciness of products and all the beneficial qualities of food.

In appearance, a tandoor looks like a large clay cauldron with holes that is turned upside down. The height of the product is 1-1.5 m, the diameter of the bottom is 1 m. The thicker the walls of the structure, the more heat the stove will give off. At the bottom of the tandoor there is a channel for supplying fresh air, which helps maintain the combustion process. The classic design has a round shape, but there are rectangular and square brick tandoors.
To improve the thermal insulation properties, the outside of the stove is lined with brick. The special shape of the tandoor promotes the accumulation of heat in the walls of the structure, which is slowly released inside. This helps maintain a constant high temperature inside the product for a long time.
Important! To create the optimal amount of heat in a tandoor, you will need half as much firewood as you would need for a classic barbecue.

The main advantages of tandoor are the following characteristics:
- long-term preservation of high temperature inside the structure;
- no need for constant monitoring of the cooking process;
- economical fuel consumption;
- the ability to prepare several dishes during one heating of the structure;
- ease of operation;
- the design does not require special care;
- unpretentiousness of the stove in relation to the type, quality and quantity of fuel;
- simplicity of design.
The disadvantages of the stove include:
- the presence of one common hole for firewood and food;
- lack of chimney;
- formation of soot deposits on the walls of the product after ignition;
- the need to use fire-resistant gloves to prevent burns.

Tandoor structure, operating principle and operating features
The Uzbek tandoor in the form of a clay jug-shaped cauldron turned upside down is installed on a foundation that rises 20 cm above the ground and goes just as deep into it. The structure is mainly located in the open area of the yard. Above the foundation there is a built-in ash pit, closed with a door. A cast iron grate is installed above the opening. Next, a chamber is placed in the form of a dome with a smooth inner surface covered with a layer of clay.
The structure is covered with brick, creating a small air gap, which is filled with salt or sand, due to which the temperature inside the tandoor remains high for six hours.
Firewood or coal is placed through the top hole. After the fuel burns out completely, the soot that covers the inner surface falls off, leaving the coating clean. This means that you can load food into the oven. Before baking, the resulting ash is removed. In the case of meat, this is not necessary. Pieces of dough are glued to the inner surface of the oven.

In a barbecue tandoor, skewers with meat are hung vertically on a special rack, point down. A cauldron with pilaf is placed on the neck of the structure. Next, the tandoor is covered with a lid on top, and the vent is closed. Cooking time depends on the dish and is 15-45 minutes.
Helpful advice! To remove baked goods from the tandoor, use a hook or ladle.
The kindling process depends on the time of year. In winter, the temperature should gradually increase, so wood chips are lit first, and then the main fuel is added. In summer you can do without pre-ignition. After the tandoor has cooled completely, it is recommended to completely clear it of ash. Fat deposited on the inner surface of the structure will burn off during subsequent use of the product.
Types of designs depending on installation option: photos of tandoors
A tandoor in the form of a ceramic hemisphere with a round hole can be above ground, underground or portable. The first design option is installed on a flat surface horizontally or vertically, depending on the orientation of the tandoor. Fuel is loaded through the side or top opening, respectively. The draft occurs through a blower located in the lower part of the furnace. According to reviews from owners, ground-type tandoor is the most popular among other options.

An earthen or pit tandoor is partially or completely submerged underground. Kindling is carried out through the top hole, which also serves to load products. To maintain the necessary traction, a pipe is connected to the bottom of the product, which is buried in the ground at an angle of 450.
Helpful advice! In stationary tandoors you can cook several dishes at the same time.
A portable tandoor can be installed anywhere. The product is made of fireclay clay in the form of a barrel or jug. Depending on the weight of the oven, tandoor comes in four types: small (up to 50 kg), medium (50-79 kg), large (80-100 kg), very large (over 100 kg). This design is additionally equipped with carrying handles and legs on which it is installed. Also included with the product are skewers, racks, hooks and attachments.
Mobile tandoors have thick walls (up to 70 mm), additionally reinforced with steel strips. For such structures it is necessary to ensure proper protection from moisture during storage, so it is recommended to purchase special covers.

What type of fuel can be used for tandoors
Traditional tandoors use hardwood or charcoal as fuel. The product is a thick-walled pot with a lid, made of refractory clay. For air flow and ash removal, there is a special hole at the bottom of the product. Firewood is loaded through the top opening. After they are completely burned, you can start cooking. Such products are characterized by the lowest price. You can buy a tandoor from 5,500 rubles.
Helpful advice! The amount of fuel is determined by the volume of the furnace and is 2/3 of this value. Excessive use of fuel will not increase the temperature inside the tandoor.
There are tandoors that use gas as fuel. Such designs are usually used in cafes, bakeries and restaurants. You can install such a tandoor in your home kitchen, but in this case you should worry about purchasing a good hood to remove exhaust air.

The jug is made from baked white clay and is placed inside a metal body. To preserve heat for a long time, the voids are filled with heat-insulating material in the form of sand, fine expanded clay or salt. Gas furnaces are easy to operate, do not emit harmful substances and are economical. However, the dishes do not have the characteristic smoke smell.
For home cooking, you can purchase an electric tandoor, for which heating elements serve as the heat source. They are located around the perimeter of the lower part of the structure. These are convenient and compact products that do not require firewood and do not emit soot or smoke. The electric tandoor for flatbreads is made of metal. The inside of the product has a ceramic coating. The design of such braziers is varied, which allows you to choose a product for a specific interior style.
Electric tandoors are equipped with mini-computers that control the cooking process by regulating temperature and humidity. You can also buy a tandoor for barbecue and baking, where firewood can be used along with electricity.

How much does a tandoor cost depending on the type and type of fuel
The cost of tandoors is influenced by many factors: material of manufacture, type of firebox, design, dimensions of the product and the presence of additional accessories. The products are presented in a wide price range, so any buyer can choose an option to suit their budget.
A large family tandoor can be chosen from a number of wood-fueled household products, such as: Hunter, Nomad, Big Sarmatian and Middle. The height of the structure is in the range of 63-105 cm. Such clay products surprise with their interesting design. Broken glass, brick, natural and artificial stone are used as cladding, which allows you to create original patterns and ornaments on the surface. The average price of a tandoor is 8,500-20,000 rubles.
Electric tandoors are very popular today. Customer reviews of such products are positive. The advantage of electric models is the ability to install them not only on the street, but also in the apartment. The structures are made of refractory clay and heated by heating elements. You can buy an electric tandoor for an average of 15,000-80,000 rubles.

To produce large quantities of bread and flatbreads, you can choose electrical products from fireclay clay in the Pro category. Such ovens are designed for preparing baked goods in quantities of 60-120 pcs. You can buy a tandoor for flatbreads from 145,000 rubles. Gas stoves are also very popular, the cost of which depends on the type of device and ranges from 75,000-135,000 rubles. You can buy an Uzbek tandoor on wood for industrial needs at a price of 50,000 rubles.
Related article:
Advantages of products, types of models, installation of the structure, recommendations for manufacturing and selection of materials for creating with your own hands.

What can you cook in a tandoor? Almost any dish. This oven is used for cooking flatbreads, samsa, vegetables, fish and various meat dishes. It does not use open fire, but heat coming from the walls of the structure. This is ideal for obtaining the best quality baked goods. Many recipes for dishes cooked in tandoor can be found on the Internet.
Helpful advice! Before starting the first fire, the inner surface of the tandoor is lubricated with cotton-based oil. Then the oven is heated throughout the day, so that the dough cakes will not stick to the clay surface.

Flatbreads should be moistened before baking in the tandoor to ensure better adhesion of the dough to the surface. To collect the fat dripping from meat dishes, a special bowl is used, which is located under the meat.
You can cook barbecue and pizza in the tandoor. However, to do this, you should purchase an additional element in the form of a grate, which is attached to the neck of the structure using special fasteners and lowered to the middle of the stove. In a large tandoor, you can place a pan or kettle on the grill to prepare aromatic pilaf or shurpa.
When preparing shashlik or kebab, skewers are placed in the opening of the tandoor or can be hung on a transverse iron rod. In this case, the neck is covered with a lid. The time spent preparing dishes is much less than when using a barbecue or oven. For pork or lamb it will take 18-25 minutes, for beef - 30-35 minutes, for fish and poultry - 8-15 minutes, for vegetables - 5-7 minutes.

Helpful advice! You can place a pan with tough, sinewy meat in a half-cooled tandoor and leave it until the morning. The next day, this product in any dish will melt in your mouth.
Preparing the composition for making a clay tandoor with your own hands
The traditional Uzbek clay tandoor is not built with your own hands, but is molded from clay. A special composition of the material is used here. You will need kaolin clay, which has good plasticity and high thermal insulation properties. To prevent the body of the tandoor from cracking under the influence of high temperatures, camel or sheep wool with a fiber length of 1-1.5 cm is added to the clay mixture. Before making a tandoor, you should prepare a molding mixture, which consists of clay, salt, sand and wool, in a ratio of 4:1:1:2.
The clay is first cleaned of foreign impurities, rubbed through a sieve, mixed and soaked for 48 hours. The remaining elements are added to the prepared substance. The mixture is thoroughly mixed until a viscous state is formed, reminiscent of the consistency of sour cream. Next, the prepared composition should be left for 7 days so that it dries and acquires the necessary condition. During this period, the mixture should be stirred periodically to ensure even drying. Any water that collects on top must be drained.

The less moisture remains in the molding composition, the lower the risk of cracking of the tandoor during firing. The mixture is suitable for further use when the consistency resembles plasticine.
How to make a tandoor with your own hands: the traditional version
The method of making a tandoor from clay is called the strip method, since the material is used to make long strips about 2-3 cm thick, 20-25 cm wide and 2 m long.
Helpful advice! The manufacture of the oven should be carried out in the shade under a canopy so that the clay does not lose its elasticity when it dries quickly under the influence of sunlight.
The prepared strips must be left to dry in the sun for some time. Next, a bowl without a bottom is formed from them. The product is placed in a ring with smooth walls. It is recommended to use a metal barrel as a frame for forming the lower part of the product, which will need to be removed immediately. To prevent the clay from sticking to the metal, it should be lubricated with sunflower oil.

Then one or two strips need to be attached to the bottom of the product to form a part of the jug that tapers towards the top, which looks like a dome. Next, the process of compacting the walls is carried out. For this, two tools are used: a metal or wooden trowel in the shape of a disk with smooth rounded edges and a wooden spatula with embossed diagonal stripes.
You need to hold the trowel in one hand and press it against the inner surface of the product, and from the outside through the clay wall you should gently tap it with a spatula. This process helps compact the clay and form a pattern on the surface in the form of diagonal stripes.
The final stage is to form the upper part of the tandoor neck with your own hands. The oven narrows at the top. The diameter of the neck should be two times smaller than the bottom of the jug. The clay is compacted and leveled in the same way as for the main part of the tandoor.
The finished product is transferred to the shade for final drying for 30 days. After the product is completely dry, its inner surface should be lubricated with a generous layer of sunflower oil.

Preparing a site for installing a finished clay inlay
There are two options for installing a clay tandoor: on a foundation followed by brick lining and underground. The location for installation of the product is selected in advance.
If the finished clay insert will be located in a recess, it is necessary to prepare a foundation pit, the depth of which is determined by the height of the product. Its upper part should protrude 7-10 cm from the ground. Thus, the earth performs the function of preserving heat. An additional blower should be installed at the bottom of the tandoor.
To create a foundation, you need to dig a pit. It can be round or square in shape. This depends on the configuration of the thermal casing in the form of a brick wall around the tandoor. The second option is more preferable, since a sufficient gap is formed between the inlay and the wall, which is filled with a heat-accumulating or heat-insulating composition. The size of the pit should exceed the dimensions of the bottom part of the insert by 10-15 cm. The depth of the pit is 15-17 cm.

The pit is filled with sand in a layer of 5 cm and compacted well. Next, crushed stone of the middle fraction is added with reinforcement mesh laid, which makes it possible to obtain an additional reinforcing layer. Then formwork is performed with a height of 10-15 cm. The foundation should rise above ground level by 5-7 cm to eliminate the possibility of the masonry being washed away by storm water. A concrete solution consisting of gravel, cement and sand is poured into the formwork. The surface is leveled according to the rule. You can study the installation process in more detail in the video “Do-It-Yourself Tandoor”.
Installation of a clay inlay with the construction of a brick wall
After the concrete base has completely dried, the formwork is removed. The surface is marked according to the dimensions of the clay insert for the construction of a brick wall. First, a brick platform is made with an open area for arranging the ash chamber channel, which is closed with a special door. You can install a metal pipe into a brick insert. It is recommended to install a damper in it, thanks to which the amount of incoming air can be adjusted. The damper can close completely.
A cast iron grate is placed on the ash chamber, where fuel combustion occurs. The ash enters the ash pit, from which it is easily removed through the open door. A clay tab is installed on top of the grate on the platform. For reliability and sealing, the joint between the lower edge of the jug and the brick base is covered with a clay solution. Then a brick wall is erected around the entire perimeter of the tab. The gap between the structure and the tandoor is filled with expanded clay, sand or salt. The brick wall reaches the height of the insert.

Making a tandoor with your own hands from a barrel
The traditional version of making a tandoor from clay requires special knowledge, skills and abilities. The surface is often crooked, and the clay can subsequently crack. To avoid such troubles, a simplified technology was developed. It is based on making your own tandoor from a 200 liter barrel. The essence of the method is to create clay walls around a wooden product.
To build a tandoor with your own hands, you will need kaolin clay, vegetable oil, fine fireclay sand, a wooden barrel with iron hoops and sheep or camel wool. The first step is to fill the barrel to the top with water for 24 hours. This is necessary for impregnation and swelling of the wood. Next, you should prepare a molding mixture of clay, sand and wool in a ratio of 2:4:1, which should dry and become plastic.
All the water is drained from the barrel. It must dry completely, after which its inner surface is soaked in sunflower oil for 24 hours. Then the inside of the barrel is covered with a clay mixture 4-5 cm thick. The composition should be well leveled, wetting your hands with water, so that the result is as smooth a surface as possible. Moving up to the neck, the layer of clay must be increased, due to which the upper part of the oven narrows. At the bottom of the structure there is a small hole for free passage of air.

The structure must dry completely in a dry, dark and ventilated place for 3-4 weeks. After this, the iron hoops are removed and the wooden barrel is dismantled, leaving the clay structure intact. The finished frame is installed on a thick sand cushion, where it is fired. To improve the thermal insulation qualities, you can make a brick wall around the stove.
Do-it-yourself brick tandoor: step-by-step instructions, drawings and photos of the process stages
The traditional version of the tandoor is made from kaolin clay. This is a rather labor-intensive and expensive process that requires the involvement of a specialist or requires a high level of skill. To simplify the task, but still get the desired result, you can make a tandoor with your own hands from brick. The simplest option for making a home stove consists of several processes, each of which will be described in detail in this article.
For construction you will need the following list of building materials:
- kiln brick;
- wooden template;
- masonry sand mixture;
- cement;
- sand;
- kaolin;
- reinforcing mesh.

To finish the stove, a solution consisting of clay, salt, sand and wool in a ratio of 4:1:1:2 is used. Sheep or camel wool acts as a reinforcing element and contributes to good thermal insulation. The mortar for laying brick rows is prepared in the same way (with the exception of wool). The brick for the tandoor should be silicate or red heat-resistant, which can withstand high temperatures for a long time.
Before building a tandoor, it is necessary to prepare the foundation. For this purpose, a round pit is prepared with a diameter several centimeters larger than the size of the future structure. A sand cushion 10 cm thick is created at the bottom, which is covered with a metal mesh made from thick wire or reinforcement rods. Next, the hole is filled with concrete mortar, which is carefully leveled using an iron rule. Be sure to check the levelness of the surface by using a level. Then the lower part of the future dome-shaped chamber is marked, defining the outer boundaries of the walls.
Helpful advice! To ensure reliable waterproofing, the concrete foundation must be covered with a sheet of roofing felt.

Before making a tandoor yourself, a brick base is prepared on the foundation. Three rows of fireclay bricks are laid on the concrete surface: the first is placed along the pit, the second - across, the third - along. The elements of the two lower layers are laid tightly together without the use of mortar. For the top row, a clay mixture is used. The created foundation must be fixed with pieces of reinforcement on all sides. The rods are driven into the ground. Their height above the ground is equal to the mark of the top row of masonry.
How to make a tandoor from brick: step-by-step instructions
After the concrete base has gained the necessary strength, you can begin to build a brick tandoor. Photos that can be found on the Internet clearly display the sequence of actions. The diameter of the bottom part will be 1 m, and the height of the structure will be 130 cm. At the first stage, markings for the future furnace are carried out. The first row of the foundation is laid with an opening for the blower chamber. Clay mortar is used for masonry. The second row covers the chamber, leaving a window in its central part, where a cast-iron grate is mounted.
Starting from the third row, the wall of the structure is erected around the circumference. The bricks are laid in the traditional way. From the inside, the surface is coated with a thick layer of clay, which should be as smooth as possible. Twelve rows are built in this way. Next, you should begin to form the tandoor dome. To do this, each subsequent row is shifted towards the center by a certain distance, which is calculated in advance.

Knowing that the diameter of the oven is 1 m, it is necessary to take into account that the neck should be twice as narrow. This value should be achieved after 10 rows, which will correspond to a structure height of 130 cm. Having performed a simple arithmetic calculation, we come to the conclusion that each subsequent row should be shifted 5 cm to the center.
In order to make a tandoor with a smooth inner surface, the edges of the bricks that will be turned inward should be processed with a grinder. The surface can also be leveled using a clay mixture, constantly moistening it with water. After completion of the masonry process, a jug-shaped structure with a smooth inner surface is obtained.
Next, the exterior of the tandoor is finished using clay mortar. All seams must be well sealed. The steps that were formed during the construction of the dome must be completely hidden. After the stove has dried, which will happen in 2-3 days, you can make the first kindling.
Then they begin to build the outer wall of the tandoor, which comes close to the brick dome-shaped structure. The height of the structure is equal to the height of the inner chamber. The wall is made whole, except for the area opposite the blower hole, where a window is left. For better thermal insulation, the space between the outer wall and the inside of the furnace is filled with fine-grained expanded clay, sand or salt.

Helpful advice! The upper part of the tandoor can be finished with stone or brick bonded with clay, which will provide a complete structure.
Building a brick tandoor with your own hands: a simplified version
The previous option requires some skill to create an arched brick vault. You can build a tandoor at your dacha with your own hands using a simplified method. For this it is recommended to use old brick. As a masonry mortar, you can purchase a ready-made heat-resistant mixture at a hardware store, intended for the construction of fireplaces and stoves. To prepare the solution, you must strictly follow the instructions written on the product packaging.
According to the do-it-yourself tandoor drawing, the brick is laid in a circle, the diameter of which is determined at the planning stage. Usually it is 50-70 cm. Using a wooden frame, the brick is placed on the end, forming a circle. For installation, a sand solution can be used, which consists of fireclay clay, the necessary plasticizers and quartz sand. This composition is very plastic, sets quickly and will not crack when fired.

The first row is laid without breaks. A small hole should be left in the second row, which will be used as a blower in the future. This could be a small window with an iron door or a chimney. The third row is laid out completely. If the height of a brick tandoor is 100-120 cm, four rows of bricks are sufficient, the horizontality of each of which is controlled using a level.
When constructing each new row, it should be tied with steel wire. Its ends are twisted and hidden in the gaps between the bricks. When creating the last row, you need to form a tapering neck. For this purpose, the brick should be laid with some inclination inside the tandoor. The video shows the entire construction process in more detail.
Do-it-yourself tandoor made of brick: coating and cladding the structure
Upon completion of construction work, the process of coating and lining the tandoor with bricks is carried out. Fireproof clay is applied to the internal and external surfaces of the structure. The thickness of the layer is at least 1.5-2 cm. There must be at least two such layers. The second is applied 2-3 days after the first has dried. To ensure uniform drying, the structure should be covered with plastic film.

Helpful advice! It is recommended to moisten the brick before applying the coating layer. This will promote uniform and gradual drying of the clay solution.
The inner surface must be perfectly smooth, so the clay mixture is leveled by constantly wetting it with water. In the upper part of the oven, a metal ring 30-50 mm high is mounted around the hole, thanks to which the area where the lid is installed is separated from the rest of the surface. The space from its outer side to the edge of the wall is filled with clay.
Next, the stove body can be lined with natural stone, this will give the structure an attractive and aesthetic appearance, which is clearly shown in the photo of the tandoor. The price of the finished structure will average 4500-5000 rubles.
Helpful advice! To coat the brickwork, you can use finely ground fireclay mortar.
The final stage of tandoor production is its firing, which can be performed 3-4 hours after completion of the coating and finishing work. The structure is completely filled with firewood, a fire is lit inside the stove, which gradually heats the walls of the structure to 400°C. It is necessary that the fuel burns completely, after which the stove must cool slowly. This process not only helps dry the structure, but also fires and hardens the clay.

After all work is completed, the tandoor should be left for 7 days. During this time, you can make a wooden cover, thanks to which the heat will be retained inside the structure. You can watch the process of constructing the structure in more detail in the video “Do-it-yourself tandoor made of brick.”
Since ancient times, the tandoor has served as an indispensable attribute of national Uzbek cuisine. Today it is widely used in private households. You can cook any dish in such an oven. Thanks to the special operating principle, it is possible to create not only a real masterpiece of culinary art, but also significantly save on fuel.
The structure can be made from clay or brick yourself, having mastered certain requirements, or you can buy a stove. Tandoor in specialized stores is presented in a wide range of varieties. Thanks to the original finishing of the finished product, this traditional Uzbek stove will become a real decoration of the yard.