Shelf for icons made of wood. Do-it-yourself home iconostasis: photo. Where to get carved elements
Read also
In all the homes of believers, icons occupy a special place. Most often, an iconostasis or a special shelf for icons is used to place them, which also contains other religious paraphernalia and symbols. Another option for using such shelves is storing literary books and magazines not only of a religious nature.
Where are the icons located?
Very often you see that the icon is located in some corner of the room. It is rational to use a corner shelf as a stand for these religious objects. This is the most inexpensive and convenient product that will easily fit into any interior. In addition, such a shelf will not take up useful space in the living room.
This piece of furniture can be easily purchased at any furniture store or ordered to be made according to an individual sketch. But you can also make a shelf for icons with your own hands without much difficulty or expense. To do this you will need a minimum of materials and special tools.
Store shelves
A corner shelf for icons, versions of which are on sale, is not particularly practical. Parts and fastening elements may not be of the highest quality. The complete set of this product from the store is sometimes not enough to carry out its high-quality installation. This leads to the need to purchase additional elements.

What to make a shelf for icons from
Having a small piece of chipboard, plywood or boards available, you can make a shelf at home. To do this, you will need a minimum of tools: a hacksaw, self-tapping screws, sandpaper and metal corners. Next, you need to decide on the dimensions and mark the drawing of the future product on the workpiece. After the workpiece is cut to the required dimensions, its edges should be sanded until there are no irregularities or nicks.
In accordance with the chosen design, the shelf can be decorated or painted depending on individual preferences. Its surface can be decorated with a colorful pattern or, if it is made of solid wood, with a carved design.
Shelf installation
Options for attaching a corner shelf can also be different.
For these purposes, you can use metal corners that are attached to the wall and at the same time to the outer surface of the product. To do this, it is best to use self-tapping screws 2/3 of the thickness of the workpiece. For a more durable attachment to the wall surface, it is best to use dowel nails.

During final installation, it is possible to manufacture hidden fasteners. To do this, you need to drill several holes of a certain size in the end part of the workpiece and place previously purchased grips in them. They will hold the shelf on mounts firmly fixed to the wall.
If free space allows, then more than one shelf for icons can be located in one corner. Their number depends on individual preferences, and sizes can also vary widely.
In any case, a home-made icon shelf will easily cope with its main function.
In the Orthodox tradition, it is customary to have at least one icon in your home. And often there are much more of them and a special place is needed to store them. Church traditions recommend hanging icons on the eastern wall of the house or setting up the so-called “red corner” - a corner also oriented to the east. To install such a reduced copy of a church iconostasis, a special shelf is usually required.
Difficulties in making a shelf
There are no strict rules and requirements for arranging a shelf for a red corner, so you can safely try to make a corner wall shelf for icons with your own hands. However, a difficulty may arise in the fact that such shelves are usually decorated with intricate carvings and openwork balusters. But you can completely do without them or purchase ready-made parts from wood carvers. We will talk about how to make a simple shelf for icons with your own hands and the point that shows cutting out an ornament can be completely skipped.
Making a wooden shelf for icons
Of course, to make this, it is better to take planed wooden boards, since solid wood looks much more noble than, for example, chipboard. Moreover, our shelf is single-tiered, which means it is quite light, so there is no point in making it additionally lighter.
Many people have icons at home - centuries-old traditions dictate that they be given to newlyweds, placed near children’s cribs, and so on. However, if such an image is to be placed, it should not be next to a computer, TV or other secular objects. This location should be appropriate. And a special shelf made independently is quite suitable for such purposes.
Materials and tools:
1. The size can be any - depending on the icon. In this case, as an example, the average dimensions of 300x350x40 mm are taken into account. Based on this, you need to stock up on a solid pine board 150 mm wide and 15-20 mm thick.
2. Glued board designed for a bottom with a width of 210 mm and a thickness of 15 mm.
3. Scraps of fiberboard and birch plywood that will be needed for templates.
4. Self-tapping screws.
5. Emery cloth.
6. Jigsaw.
7. Drills and drill.
8. Milling table having a bypass cutter with a bearing.
9. Lathe. If you do not have this tool, you can contact a workshop.
10. Pencil.
11. Metal meter ruler.
Operating procedure:
First of all, it is worth drawing out the details of the bottom, sides and sides of the shelf on the fiberboard. Details must be life-size. Sawing is done with a jigsaw, immediately after it you need to process it with coarse-grained emery cloth. The templates mark holes for self-tapping screws, onto which the product will be assembled in the future. Templates are drawn on birch plywood, the thickness of which should be 8-12 mm. Each stencil is cut out using a jigsaw carefully at low speed. Again, the unevenness is sanded down and smoothness of shape is introduced. If this is not done, all the flaws will be noticeable on the shelf itself in the future. You can also do without fibreboard, but for this you need to be sure of the accuracy of your hand. As a result of the work done, there will be three templates available - sidewall, side and bottom. Now the holes are marked based on the fact that there will be 2 of them in the bottom, 3 in the side and 4 in the side. They are necessary for attaching to the main template blank. Everything is drilled out with a drill with a diameter of 3 mm.

After preparing the templates, they are applied to the board and outlined with a pencil. A jigsaw is used to cut along these lines, but it is necessary to leave some space for milling. You can screw the templates to the workpieces using self-tapping screws using pre-made holes.

The workpiece is milled using a stencil using special equipment.

The sides, sides, bottom - everything is done in the same order. In total you should get 2 bottoms, 2 sides and 2 sides. But to turn decorative parts you will need a lathe. If it is not there, you can contact a specialist. In the event that decorative parts are made independently, it is important to ensure their uniformity, otherwise the evenness of the shelf will be disrupted.

Next, you should grind a round beam, the diameter of which will be 15 mm. It is formed by cutting 6 cylinders of the same size and 15 mm long. Using a three-millimeter drill, holes are formed through each of them. All parts are processed with sandpaper.

Now you can start assembling the shelf. Considering that all the holes are made according to the templates, there should be no overlaps. The bottoms are screwed to the turned elements using self-tapping screws 41 mm long.

When connecting the sidewalls to the bottoms, the screws should hit the middle of the ends of the bottoms - this means that all calculations were carried out correctly.

The sides are screwed on using cylinders. There are 3 cylinders on each side. Self-tapping screws are inserted into the holes from the bottom. Only after this the cylinders are put on and the hardware is screwed into the side.
- Design options
- Materials and components
- Decoration methods
- Wood carving
- Simulation process
- Manufacturing of parts
- Single tier straight shelving
- Corner shelves
- Nuances of fastening
- Location of icons
Following the Orthodox traditions of the Slavs, many decorate their living space with icons. This reflects the desire of believers to show respect for the church and become closer to religion. Since ancient times, icons in the house were located on the iconostasis, which is called the shrine or the red corner. Nowadays icons are hung directly on the wall or mounted on a shelf that plays the role of an iconostasis. The desire to arrange a sacred place in a special way leads to the decision to make a shelf for icons yourself.
Design options
Orthodox canons suggest placing icons on the eastern wall. As an option, the place of the iconostasis is arranged in a corner directed to the east. Depending on the selected area, the shelf can be straight or angular. The small size of the corner shelf requires a multi-tier structure. The shelf can be equipped with a rear wall. Often it is decorated with carvings depicting birds, vegetation or the outlines of the holy apostles. The traditions of Orthodoxy do not provide for the placement of objects that are not related to religion next to church paraphernalia. Having decided on the shape of the shelf, we move on to preparing the material and tools.

Materials and components
Traditionally, shelves for icons are made of wood materials, these can be natural wood or derivatives (chipboard, MDF, LDF). By ensuring that all materials, components and tools are available in advance, you will avoid unplanned downtime. Based on the chosen design of the shelf for icons, you should have at hand:
- Board of any type with a thickness of 1.5-3.0 cm.
- Small pieces of chipboard, MDF or LDF.
- Adhesive suitable for joining wood.
- Sandpaper.
- Varnish and various paints (silver, gold and black)
- Milling cutter and jigsaw.
- Drill and lathe.
- Wood saw.
- Pencil and ruler.
- Hinges, dowels, brackets.
Decoration methods
Depending on the complexity of the elements of decorating shelves for icons, you can make them yourself or purchase them ready-made. Having experience in woodworking allows you to make candlesticks, balusters and carved slats yourself. It is advisable to decorate the crowning shelf for icons with carvings, a crucifix or images of church domes. In the absence of the necessary skills, folk craftsmen or woodworking companies that offer their products in a wide range will help save the situation. You can also find the missing parts for the shelf for icons in a church shop.

Wood carving
If desired, complex patterns and bas-reliefs can be cut out with your own hands. The design of the crucifix is preceded by the selection of a suitable image.
Advice! Soft wood is selected for carving: birch, spruce, pine, aspen or juniper. The thickness of the board is 15 mm.
The tools for making a shelf for icons will require a set of cutters. The carving process consists of the following steps:
- Using a paper sketch and transfer paper, the outlines and contours of the convex elements are transferred to a solid board.
- The crucifix, intended for the shelf with icons, is cut out using a jigsaw.
- Concave elements are formed with cutters. The carving is carried out in layers, carefully processing the internal corners using a thin cutter.
- When the crucifix for the shelf for icons is ready, the product is sanded using a fine abrasive mesh.
When making bas-reliefs for a shelf in segments, they are connected to each other on the back side using an MDF sheet. The procedure includes the following steps:
- Individual elements are applied to the panel, and general outlines are outlined.
- The resulting contour is cut along the edge with a margin of 5 mm.
- The bas-relief segments for the shelf with icons are glued to an MDF sheet.
- The remains of the panel are carefully trimmed with a jigsaw or cutter.
- The ends of the decorative element are sanded with sandpaper.
Making balusters for a shelf with icons involves working on a lathe. Finished parts are also sanded.

Simulation process
If it is not possible to decorate a shelf for icons with wood carvings yourself, and you cannot find ready-made parts, you can resort to imitation of carved elements. The effect can be achieved by the procedure of burning the ornament and then opening with enamel individual fragments of the image on the shelf for icons. To do this you will need:
- Copy the outline of the drawing onto the surface of the upper part of the shelf for icons.
- The outlines of the image are outlined with a burning device.
Attention! The ornament on the shelf for icons must have an identical shade in all treated areas. - After applying the contour, the selected areas are covered with enamel using an art brush with a diameter of 1 mm. It is important not to paint over the outlines of the image.
- The prepared decorative element is varnished.

Manufacturing of parts
Basically, the icon stand includes the following parts:
- side panels;
- shelves;
- racks;
- sides.
Their sizes depend on the chosen shape and location.
Single tier straight shelving
After carefully working out the drawing, they proceed directly to making a shelf for the icons.
Advice! The distance between the shelves is determined based on the size of the icons in the house, and may be slightly larger.
For a wooden structure you need:
- Transfer the dimensions of the sketch onto chipboard or MDF, and then cut out the templates. It is not recommended to use plywood for templates due to the need for further processing after sawing.
- The blanks are applied to the board; it is preferable to choose a material 15 mm thick; each part for the shelf is formed with a jigsaw.
- The edges of the sawn elements are processed with a milling cutter and sanded with abrasive paper.
- The assembly of the shelf for the icons begins after sawing and polishing all the parts.
- Finally, the product is varnished.

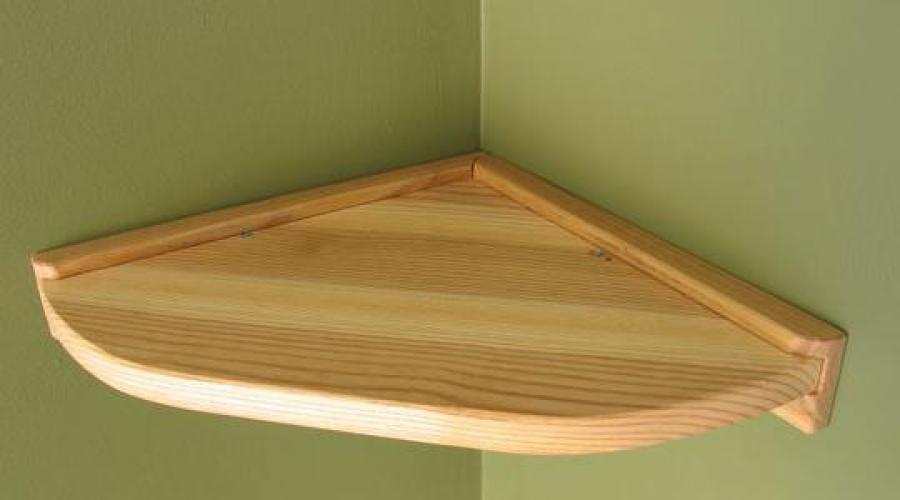
Corner shelves
Let's look at making a corner shelf for icons using the example of using fiberboard as the main material. So:
- Using a pencil and ruler, transfer the dimensions of a right triangle onto a sheet of fiberboard. They can be arbitrary, we recommend choosing the 280/280/380 option.
- The drawn figure is cut out with a jigsaw.
- The edges of the shelf must be sanded; sand the end of the wide side especially carefully.
- For further finishing of the future shelf for icons, you will need a sheet of veneer. It is better to purchase a product treated with glue and covered with film. Lack of recommended protection will require additional purchase of hot melt adhesive.
- A triangle of similar dimensions (280/280/380) is applied to the veneer sheet. The figure is cut out with a sharp knife.
- After removing the protective film from the veneer triangle, glue it to the chipboard part using a hot iron.
- Similarly, treat the end of the wide side of the shelf for icons with veneer thermal tape. Masterly use of a jigsaw allows you to decorate the edge of the shelf not with standard thermal tape, but to decorate it with a patterned veneer frill.
- Two hinges are attached to the sides of the triangular shelf for icons using self-tapping screws.
- Finally, the product is attached to the corner of the room.

Nuances of fastening
The shelf under the icons is secured using dowels. Initially, the hinges are installed on the product, then the entire structure is applied to the wall and the locations of the holes are marked. After that, the recesses are prepared with a drill and the dowels are screwed in. Then brackets or brackets are hung. There are two ways to avoid excessive contamination when drilling holes for a shelf for icons. If you have helpers, it is enough to use a vacuum cleaner, placing the pipe near the work site with a drill, and all the debris will disappear into the bowels of the vacuum cleaner. Working with a shelf for icons alone forces you to use another trick. From four album sheets (according to the number of holes being prepared), cone-shaped figures (simply little bags) are rolled up. Then, using tape, they are attached under the points marked for drilling. This simple device will prevent unnecessary clogging of the floor when attaching the shelf for icons.
Important! The shelf is fixed quite high, approximately 50-80 cm from the ceiling, since according to Orthodox canons, icons should be at or above the level of a person’s eyes and rise above other decorative items.
What else should be taken into account when installing a shelf for icons:
- absence of paintings or other decorative elements in the immediate vicinity;
- the use of candlesticks requires taking care of fire safety measures: there should be no combustible or flammable materials nearby (curtains, paper, etc.).

Location of icons
Adhering to the traditions of the Orthodox Church, it is advisable to equip the structure for the images with three shelves. In such a product there is a main row called Deisis. Compliance with the canons requires the arrangement of holy faces on a shelf in a certain sequence:
- On the top row (Deisis) there is an icon of Jesus in the center, on the left there is an image of the Blessed Virgin Mary, and on the right - John the Baptist. If there is free space, the image of the Archangel Michael is additionally placed on the left side of the shelf, and the image of Gabriel is placed on the right side.
- Holiday icons are placed on the middle shelf. These are images of the most significant Christian holidays; ideally there should be 12 of them.
- The lower shelf of the iconostasis is filled with the favorite holy faces of the residents of the house; it is usually called local.

The corner design of the shelf is preferable to the straight one, as it corresponds to the traditions of Orthodoxy to place images in the “red corner”.
DIY shoe rack
How to make plasterboard shelves
Scaffolding: types, characteristics
How to make scaffolding with your own hands
Today we will tell you how to make simple shelves for icons with your own hands.
I made about ten for the dacha and for good friends. They are easy to make and usually require little decoration.
The base is a triangular piece of chipboard. At the end there is a linden strip with a cut out short prayer to the Mother of God - “Most Holy Theotokos, save us.” The background is tinted with walnut stain, the text is covered with bronze paint.

Another shelf was also made. The lamp hangs in front of the icon on a fishing line passed through a metal arc. The fishing line is long and is fixed at the free end to the wall in a convenient place. Having freed the fishing line, you can lower the lamp and fill it with oil.

A simpler shelf. The end is finished with a colored varnish film. Several shelves decorated with birch bark were also made. One of them required more effort and specialized tools - punches and mints. 
Good punches are made from telescopic antenna tubes.


Birch bark is a fairly soft material and stampings can be made from duraluminium rods.