Complete walkthrough of side missions in Batman: Arkham Origins. Walkthrough of Batman: Arkham Origins Batman arkham origins how to open the enigma door
Read also
Some information: people perceive information differently. Therefore, for greater convenience, I posted a text and video walkthrough of Batman: Arkham Origins in the post.
Objective: Find out the location of the Black Mask
We start the game in front of Blackgate Prison. We go and crouch under the beam to go inside. We advance to the mafioso and the head of the prison, knock out the mafioso with a counterattack, and repel the attack of the head of the prison.
Objective: Find Commissioner Loeb
We head to the prison, go down the stairs, open the bars and bring down Black Mask's people. One of them tells us that he is going with the commissioner to the execution chamber.
Objective: Infiltrate the execution site
We go further along the road and see a drone. We knock out the prisoners who have left their cells, after which we cling to the hook at the top and pull ourselves up to crawl along the bars into the next room. We get to the mafioso who pestered the guard and knock him out. We grab onto the top with the hook, pull ourselves up and move on.
Prisoner registration point
We use detective vision, select a Batarang, throw it at the gate switch, run under the door directly to the enemy, deal with them, open another switch with the Batarang to open the next door. We select an explosive gel, apply it to the floor to make a hole in the floor.
Quest: Follow the Black Mask
After Black Mask talks to the prisoners, we break off the ventilation grate nearby, climb along it and deal with the prisoners. We go into the room to the right of the grate behind which the Mask stands, select the Bat Claw, shoot it at the ventilation grate from above, tear it out and climb into the ventilation again. We bend down and use explosive gel to make a hole in the wall.
We reach the closed door, use a quick batarang, shooting at two switches at the same time. We go through and tear off the grate from the ventilation and climb along it. We observe the execution of the Commissioner, after which we break through the glass and bring down several more opponents. We move along the corridor to a broken drone in which we find a memory card. Using the hook, we climb up and go out onto the roof of the prison.
Objective: Defeat Killer Croc
On the roof we fight the boss Killer Croc. We stun him and inflict a series of attacks, dodging his attack. At one point he will grab us. A button should appear that you need to press, on a PC it should only be a space bar. As soon as he grabs the burning barrel, we use a quick batarang to hit it, then it explodes right in his hands and causes him a lot of damage.
After killing the boss in Batman's cave, we decrypt the found memory card. Which contains information about the 8 most dangerous assassins who were paid by Black Mask to kill Batman.
Task: Find the penguin
GCR tower in Coventry
We need to disable the jammer on the communications tower. We go into the room with criminals who are holding hostages, use smoke grenades, and pull ourselves up with a hook. We move along the top (we use detective vision to see where to jump and cling) and make a grab from the height of the criminal who is holding a hostage. we climb into the ventilation and from there we knock out the criminal when he turns away from us. We grab the third criminal with a hostage through the wall with a decisive blow.
We get to the control tower, scan the evidence in the room, first the corpse, then the wall, as a result we find out that the death occurred as a result of the explosion of the access panel. We scan the panel and take fingerprints, all that remains is to scan the death event by turning the time forward or backward. A red stripe during the collection of uliu will indicate an access card behind bars. We tear off the grate and pick it up. We take out the encryption sequencer and hack the access panel. We go upstairs and once again hack the device blocking the Coventry communications tower.
After this, I immediately recommend going to the Burnley area and visiting the Enigma headquarters to get information about the Enigma people and they were displayed on the map. After we interrogate informants, data blocks are also displayed on the map
Objective: Interrogate an arms dealer working for Penguin
We pass the Gotham Pioneer Bridge, information about the crime being committed will appear, we eliminate it and move further to the Bowery area to the place where the next task is marked. We are waiting for the Penguin people's deal to begin. We attack the group from above, after we deal with everyone, we interrogate Chatterbox. Batman needs to read the SIM card from his phone, but to do this he needs to disable the communications tower in the area.
Bowery Communications Tower
We climb onto the tower and knock out all the criminals. We need to open the door to the tower, which is under electricity, to do this we launch a controlled batarang into the hole so that it passes through the electricity and hits the fuse. We go in and hack the device.
First SIM card
We head to the Amusement Park to find portable stations for Penguin’s people, knock out a group of criminals, then connect to the device and pick up the desired Penguin frequency.
Second SIM card
The second SIM card is located in an industrial area. We jump onto the container that holds the crane, jump from it onto the opponents and neutralize them, there will already be opponents with firearms here, so we carefully kill them one by one, hiding behind cover. Then we connect to the device and catch the signal. From the information received, we find out that Penguin is on the “Final Offer” liner.
Objective: Infiltrate the “Final Offer” liner.
We are heading to the liner which is located in the Amusement Park. From a large building we dive onto the tower on the ship and deal with the sniper. We move from above to the other side and shoot another sniper standing on the container from above. Then, one by one, sneaking up or diving from above, we deal with Penguin’s armed men.
We go inside and fight with two fighters with blades in their hands, dodge attacks and deliver counterattacks, move forward and fight with another group of bandits. Reach the flooded deck 1. If Batman falls into the water, he climbs back up (it’s not clear why? Oh, apparently bats don’t like water!). In general, you can’t fall into the water, so we run along the cables and jump over the break points.
We get to the raft, pull it towards us, after which we jump onto it, cling to the rings in front with a hook and pull ourselves up to them on the raft. We swim to the ring at the top, grab it, and then pull it, after which you can pull yourself up.
We get into the boiler room, jump through the hot steam gushing from the pipes to the top and there we open the large hatch in the wall with a hook and jump into the arena. A stun gun comes out to fight with us. A lot of people had gathered, I prepared for a fight, but as soon as I approached him, Batman simply jumped with his foot and pulled him into the jaw and he was knocked out. After which other opponents jump into the arena with whom you can fight heartily.
After the showdown in the arena, we interrogate one of the fighters about the location of the Penguin. He tells us that he is in his office and can only be reached through Tracy.
Objective: Infiltrate Penguin's office
We go upstairs, where there were spectators, after which we go into the corridor on the deck, jump down and slide along the floor under the obstacles, moving further. We get to the wall made of ice and break it through with explosive gel, then we go into the icy room, jump and cling with our hands to the ledge where the thing is moving up and down, and then we pull ourselves up even higher with a hook, repeat the jump up and knock out two bandits.
We knock out three of them near the grate behind which the electricity is beating. We go through and tear off the ceiling with a hook, after which we do the same with the ventilation grille and climb into it.
In the casino we deal with the criminals, wait for Tracy to say her word and wait for another batch of fighters to come out. When the guys are resting peacefully on the floor, we climb through the ventilation in the floor, crack the password in the room and go back to the casino, knock out three more and go to the room from where they came out. We're taking the elevator
We lock Tracy in the elevator, hack the computer, jump into the casino hall again, open the large door from which more fighters with the punisher are pouring out, deal with them, go to the large hall, where there are many opponents, move along the top. You can make a grab from a height, and after they all gather near their suspended person, attack from above, preventing them from shooting, while using smoke. We interrogate the bodyguard.
Objective: Defeat Deathstroke
Penguin tortures the son of mafioso Alberto Falcone. We break into the office and fight with the bandits. After which Batman begins to interrogate Penguin about Black Mask, but Deathstroke bursts in and interferes with the interrogation, offering Bat a great beating.
Many players get tired of this boss, but in reality everything is simple - the head of the “counterstrike” is everything.
- We definitely and very importantly wait for Deathstroke to start attacking first! We reflect his attack with a counterattack, and immediately after that we hit him 1-2 times with a regular blow or catch him with a bat claw, pull him towards us and hit him.
- When he throws a blind grenade and jumps on us, we press counterattack. Batman will fend off the blows with his elbows and then inflict a large series of combo attacks on Deathstroke, causing him to lose a lot of HP.
- When he shoots at us, we quickly press “counterstrike” to throw a barrel at him. Then we pull him towards us with a hook so that he doesn’t have time to shoot at us, or we move towards him with rolls, but it’s better to hit him with a hook and pull him towards us
- When we break his stick, with an ax, he will respond to our attacks with his own counterattack, and here it is very important to PRESS COUNTERATTACK ONLY AT THE MOMENT WHEN THE ICON APPEARS, WITHOUT PRESSING ANY BUTTONS BEFORE THIS! In general, the most important thing is to press the button only when it appears.
The main thing is not to rush anywhere and press everything on time, then you will definitely cope with Deathstroke. After victory, we get his controlled claw - the device pulls a cable between objects along which you can move and cling to it with a hook.
Murder investigation
Assignment: Investigate the crime at Lacey Towers
We dive from above onto the plane to the large door; it will be closed, Penguin will talk to us through the big screen and report that Black Mask has been killed. We leave the ship using the controlled claw. At the exit, another psycho Anarky will invite us to find three bombs he planted in the city.
We are moving to the Coventry area. On the roof we beat up the police special forces and then catch their frequency. We knock out two more policemen on the balcony and go inside the building. We find the Mask's corpse. We first scan the corpse and his hand. After which we scan the corpse of the girl suspended from the chandelier. and reconstruct how the murder took place. We are once again analyzing the corpses to determine the trajectory of the shots and the height of the criminal.
As a result, we come to the conclusion that the man was attacked from the balcony while he was sitting at the table. We scroll through the scene to recreate the crime scene. We discover a piece of white fabric just as the killer entered the room from the balcony. After we scan the murder in the kitchen, as a result of the investigation we discover digital evidence - a text message in which the girl talked about a man named Joker.
Objective: Gain access to the police department servers
We move to the Batman cave to take the impact detonator, after which we go to the Burnley area to the police station.
We need to sneak into the police station through the roof. We jump onto the roof; you can use detective vision to detect opponents. I recommend eliminating the sniper first, then silently eliminating the guards.
When we get inside, we go down, use explosive gel to break the wall on the right and jump onto the elevator in which the police are talking. We penetrate the ventilation and crawl through the police detention center. With a decisive blow we knock out the grate and the policeman who stands behind it.
In the office we deal with three policemen, after which there is a ventilation grill at the top, we tear it off and climb into it. Below there is a large group of armed people, we use the controlled claw that we took from Deathstroke and pull the cable over them, crawl along it and silently descend into another room.
There is another cop with his back to us, you can silently knock him out so that he does not raise the alarm, or quietly crawl to the door on the right and break the combination lock. We knock out four more in the room. We go into the interrogation room. Behind the glass, a policeman interrogates Chatterbox. We grab him through the glass with a decisive blow and interrogate Chatterbox.
We go into the room where a special forces unit is beating homeless people - we deal with them. We use explosive gel to demolish the boarded up boards in the window. In the shower we sneak up on the policeman talking on the phone and put him to sleep, we climb into the ventilation. We get to the police station. We silently deal with the armed guards one by one. After which we break the lock to the door and go into the corridor in which two cops are talking. We neutralize them. Let's go further and in front of us is a door to the server room, which cannot be hacked with Batman's decoder.
, Boss: Bane , Boss: Joker
Additional missions. Enigma
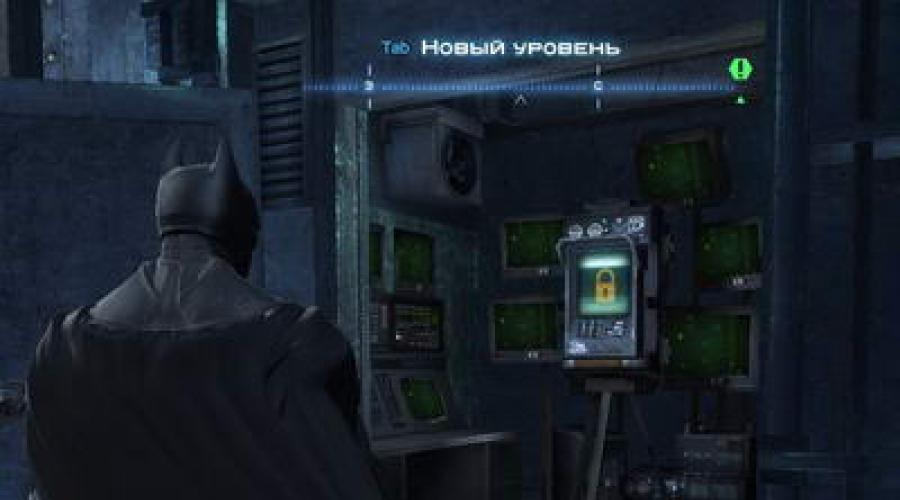
Enigma headquarters
In the Burnley quarter we find a building marked on the map with a special “question mark” mark. We turn on detective vision, break through the thin wall, enter the door with green question marks.
Inside we go down the elevator. We see a control panel with many screens.
After communicating with Enigma through the monitors, we learn that to further penetrate the headquarters we need destroy all repeaters Enigmas in all areas of the city. In order to see the location of repeaters on the map, you first need to hack all communication towers GCR. Capturing towers also opens up access to fast travel points on the map.
Enigma collected incriminating evidence on all famous personalities in the city. In total he has 20 compromising evidence, each of which consists of 10 data blocks. These data blocks are hidden in the most secluded places throughout the city. But at Enigma headquarters we are figuring out the location 20 human informants, knowing the location of the data. After interrogating the next informant, we begin to see blocks of data on the map. This greatly simplifies the search.
Communication towers
Batman: Arkham Origins. Additional missions

Bowery Communications Tower
Communication tower Parkovaya street
(need device: controlled betarang)
At the bottom of the tower we see a closed lattice door, and behind it there is electricity and a steel door. We turn on detective vision, to the left of the door we find a hatch in the floor, we climb there and go through the pipe into the room.
Inside on the left we see a window into the adjacent closed room. We launch the controlled batarang, fly through the window, touch the electricity on the left, then crash into the fuse panel. The electricity is gone, we go through the steel door and hack into the communications tower.
Communication tower Amusement park
(need device: glue grenade, controlled claw)
To get inside the communications tower, we throw a glue grenade into the water, an ice floe forms, standing on the ice floe, we pull ourselves up to the rings on the walls. So let's swim inside. We seal the valves with steam inside, climb up, and defeat several bandits. After winning, we pull the ring on the ceiling, stretch the cable at the top and jump onto it. We deal with another group of bandits, pushing them against the electric walls. At the top we hack the communications tower.
Communication tower Industrial area
(device required: no)
Having reached the tower, we climb onto the platform from the eastern side and defeat the bandits. We see a lattice door under electricity. We destroy the panel in the south of the site. We destroy the panel below on the street on the north side. After this, the electricity will disappear. We enter the communications tower and hack it.
Coventry Communications Tower
Diamond County Communications Tower
(device needed: electric gloves, destructor)
We enter the tower and try to hack it, but our signal is blocked by a jammer located nearby. We jump to the lower platform, sit in the suspended elevator, charge the device with electric gloves, this will cause the elevator to go down. Below we blow up the thin wall with gel, and inside we destroy the jammer with a destructor. We climb up and calmly hack into the communications tower.
Burnley Communications Tower
(need device: controlled claw)
We climb up the tower and finish off all the bandits on the upper platform. To the right of the tower we stretch the cable using a controlled claw. We climb onto the cable, roll along it and at the end break the glass of the communications room.
Inside we hack the control panel, but this causes the window to be covered with bars. To get out, look up and grab the ventilation grill with the batclaw. We climb into the ventilation.
(There is a bug in the game that prevents you from getting into this particular ventilation. We are waiting for a patch to fix this. If you find yourself in a locked room in this place, simply end the game by exiting to the main menu, and then continue again).
You can find 10 repeaters without turning off the jammer on the communication tower. To do this, turn on detective vision and fly around the city. Repeaters will be visible from afar and through buildings as green circular waves.
After destroying relays throughout the city, you can return to Enigma's lair. Inside we break the Enigma server, for this we get access to Batman’s suit - “ New 52 Batman».
We break the password on the door on the left. In the Enigma room we climb to the other side, blow up the thin wall, and inside we find the mystery sign (we get 100,000 experience) - a secret thing from previous games about Batman.
Additional missions. Anarky

Conditions for the task to appear: after passing the Penguin's ship.
Task 1: Find Anarky's supporter and talk to him
In the Amusement Park area, on the Penguin's ship, we climb onto the mast, where a canvas for the projector is hung and Anarky's performance is broadcast. We talk with the anarchist on the mast.
Objective 2: Find and defuse Anarky's first bomb
On the ship we learn about the first bomb. 3 minutes are given for neutralization. During this time you need to: get to the bomb, which is located in the Bowery area on the roof of a commercial bank (the quick access points do not work), defeat a gang of several anarchists on the roof, and tear out the wires from the bomb.
Task 3: Find Anarky's supporter and talk to him
A second painting of Anarky hangs in Diamond County on the northwest corner of the area. Here we find out the location of the second bomb.
Objective 4: Find and defuse the second Anarky bomb
You have 3:30 seconds to neutralize. The bomb is located in the Amusement Park area on the casino building on the second floor balcony.
Task 5: Find Anarky's supporter and talk to him
The third canvas with a projection of Anarky hangs in the Coventry area on a factory chimney. An anarchist stands below on the western parapet of the plant. Here we find out the location of the third bomb.
Objective 6: Find and defuse the third Anarky bomb
You have 3:30 seconds to neutralize. The bomb is located in the Burnley area on the south coast next to the police station.
Objective 7: Fight Anarky at the courthouse
We are moving to the Parkovaya Street area to the courthouse. We defeat the gang outside and go inside the building. In the central room we fight the first wave of anarchists. Then a second wave of anarchists jumps from the top floor, and Anarky begins throwing Molotov cocktails from above. A third wave of enemies emerges, and Anarky descends with them. He has an electric baton in his hands, so we neutralize him from afar, throwing betarangs. After the victory, we learn that behind Anark’s mask was an ordinary teenager.
Additional missions. Penguin

Conditions for the appearance of the task: after completing the story mission to invade the police database.
We receive an additional task from programmer Barbara Gordon. There are six caches of Penguin weapons in the city. The caches are indicated on the map, and finding them will not be difficult. The caches are guarded by corrupt police, we neutralize them. After this, we use the Destructor gadget to burn the red panel on the weapon box.
Task 1. Burnley district on the street under the communications tower.
Task 2. Diamond County on the north coast in a truck.
Task 3. Coventry area on the north coast in a loader.
Task 4. Sheldon Park on the balcony of a factory building.
Task 5. Area Amusement Park on the Penguin's ship. We look at the container raised by the crane, cling to the doors of the container with the batclaw to open them. We shoot at the weapon box inside the container.
Task 6. Bowery area in the western underpass.
For completing these tasks we receive weapons in Kabbplot Boxes, used in multiplayer games.
Additional missions. Deadshot

Conditions for the quest to appear: after defeating Copperhead.
An additional task “Call for Help” appears on the map, go to it.
Helicopter crash
Bowery area tall building to the west. We approach the yellow smoke signal on the top floor. This turns out to be a trap for the police, who appear in a helicopter and order Batman to surrender. But suddenly someone shoots down the helicopter.
We go down to the crash site. 1. We examine the pilot’s body. 2. We examine the remains of the helicopter. 3. On the top floor on the other side of the building we find a fallen tail. 4. We calculate the trajectory of the bullet, climb onto the hotel building opposite, then fly further to the water tower. We find Deadshot's cartridge case and use the radio frequency numbers left on it to contact Deadshot. The crime has been solved.
Objective 1. Fight Deadshot at the Gotham Commercial Bank
We enter the bank through the door on the roof. Inside we see Deadshot, 5 bandits with machine guns and one hostage. Deadshot constantly scans the entire area with his laser. His fatal shot can strike anywhere in the room, so you need to act unnoticed.
We silently eliminate the side bandits, and last of all, we neutralize the central bandit, who is constantly being watched by the boss. After this, we attack Deadshot from behind. One sudden blow cannot kill him, so we stun him and finish him off hand-to-hand.
When Deadshot has very little health left, he will hide from Batman and stand next to the hostage, hiding behind him. At this time, 5 more bandits will come running, but now with night vision devices and a supply of mines. We also silently neutralize them. At the end, we quietly approach the boss from behind and wring his hands. Deadshot has been caught.
Additional missions. Mad Hatter

Conditions for the appearance of the task: after completing the story mission in the sewer.
We receive an invitation to a tea party from the Hatter. He has a girl named Alice hostage. Let's go to the Bowery area. We find a store with a picture of a green hat on the corner of the house on the ground floor and go inside.
We jump into the room where the Mad Hatter trains his zombified bandits in rabbit masks. We defeat the bandits and interrogate the Hatter. But, suddenly, we are hypnotized and find ourselves in Wonderland.
In Wonderland, the side view is turned on. We go to the right, wait until the electrical traps on the floor turn off, at which time we run further. We reach a cliff and a locked gate. When there is no electricity on the floor, we go to the edge and shoot betarangs at the six green lanterns. This lowers the gate, let's move on. We jump over the next abyss, climb up several ledges, and fall into the cave.
Room 1. We find ourselves in a room with many doors, we look at it all from the keyhole. If you enter one door, you will immediately come out of another. To get out of here, we enter the doors above which the rabbit stands in the picture above.
Room 3. Go right all the way. We apply explosive gel to the wall with the image of the Hatter and blow it up. We get out and see a tea river with spoons and forks stuck into it. We stand on a small plate, cling to the first ring with the batclaw, then to the second. We enter the next test.
Room 4. We crawl, clinging to the ledge. We crawl into the next ledge and get to the stairs. We walk along the cable from above, then slide along it to break the map ahead. Immediately after this, we run further along the maps, as the pendulum begins to pursue us.
Room 5. We look up, stretch the cable. We jump to the second floor and break the device. We stretch the cable between the top points and climb up.
Room 6. We simply jump over the gaps, avoiding the pendulum.
Room 7. Using the Batclaw, we climb onto the upper platform. When it lowers, we jump into the opened hatch on the ceiling.
We find ourselves in a room with the Mad Hatter and the hostage Alice. We use a reverse batarang against the Hatter (hold RMB, hold SMB). The Hatter is caught, Alice is freed.
Completing it unlocks several additional upgrades, including the reverse betang.
Additional missions. Bird

Conditions for the appearance of the task: after completing the story task of analyzing a corpse in the police morgue.
Task 1: Investigate a bandit fight
In the Coventry area on the west coast. We neutralize two fighting gangs. We interrogate the latter, find out nothing, but another fight breaks out on the other side of the city.
Task 2: Investigate a bandit fight
In the Amusement Park area on the north coast. We neutralize the gangs, scan the opened container, find an open bird cage and matches from the My Alibi bar.
Task 3: Explore the My Alibi bar
In the Coventry area we enter a bar.
Inside we fight a gang led by a man calling himself Bird. This is Bane's assistant. After the victory, we arrest him.
Reward: Improved Increased smoke duration.
Additional missions. Escaped prisoners

This task is carried out last on the list of especially dangerous criminals. For this task to appear, three conditions must be met:
1) Complete all “Particularly Dangerous” missions (not counting Enigma).
2) Complete all 9 murder investigations.
3) Complete the main story to the end.
When all the conditions are met, we receive a call from Captain Gordon with a request to catch 20 prisoners who escaped from Blackgate. The location of the criminals is indicated on the map. Each criminal is guarded by a gang of his accomplices, who will need to be neutralized.
Additional missions. Shiva

Conditions for the appearance of the task: after completing the story mission in the bank.
Bowery area. From the building of the central bank of Gotham we go north along the lower street, located under glass. In a fenced part of the street we find an abandoned stroller with a crying child. We look into the stroller, but find no one. At this time, the assassin Shiva attacks from behind. Having retreated, she invites us to complete the task.
Task 1: Find and save the "innocent person"
Diamond County. We approach the mark and hear cries for help. From below we enter the shopping center building. Inside, a policeman hangs from a rope over electric water.
First, we climb to the second floor on the right, there we destroy the electrical panel. After defeating the ninja, we look up and stretch the cable to another part of the second floor. There we also break the device and fight off three ninjas.
We get out along the cable to the central part. We release the batarang into the rope. We speak with the released policeman. We learn about the second policeman. We find evidence on the near wall of the pool.
Task 2: Follow the bloody trail to find the cop's partner
Diamond County. On the street we follow the trail of blood. At the end we find a dead body. At this time, Shiva attacks. She gives us one more task.
Task 3: Fight Shiva
Sheldon Park. We enter the Tower of Miracles. Inside we fight with Shiva, surrounded by four ninja girls. When Shiva has half his health left, three more male ninjas will appear, and Shiva herself will begin to use the sword. Having lost all his health, Shiva will praise us and disappear into the smoke.
Reward: Improved Critical Hits.
Additional missions. Black mask

Conditions for the appearance of the task: after completing the story mission at the steel mill.
We learn that Black Mask, even before the Joker arrived, was distributing a dangerous substance throughout the city - venom. From the database we find out the exact location of all tanks with Venom. Having found a white tank, we apply explosive gel to it and detonate it.
Locations of all Black Mask caches:
Sheldon Park. Inside the Gotham City Light & Power plant. At a dead end.
Park street. In the south of the region. In the courtyard behind bars opposite the ACE chemical building.
Park street. In the north of the region. In the courtyard of an abandoned courthouse.
Coventry. In the south behind the Koul Brau Brewery building. On a small area we kill two bandits. Using electric gloves, we charge the device, and inside the opened sewer we find a tank.
Burnley. On the south coast behind the southeast building.
On the Gotham Pioneer Bridge. In the center on the lower tier under the road.
Fight Black Mask in the church
We kill all the mafiosi, hack the panel to the right of the altar, and behind the open grate we explode the last barrel with Venom.
After this, Black Mask himself comes with a new portion of the mafia. We defeat them all, as a result - Black Mask is detained.
Reward: Batclaw Disarm upgrade.
Additional missions. Crime scene

Tower trap in Coventry
(performed according to the plot)
Murders at Lacey Towers
(performed according to the plot)
Fall in Jezebel Plaza
In the Bowery neighborhood in the northeastern part, we see a small broken part of the glass ceiling, and a dead person lies on the ground below. We begin to examine the crime scene. 1. We examine the corpse. 2. We calculate the trajectory of the body’s fall. 3. We climb up, scan the destroyed railings on the top floor. 4. We go down a little lower and scan the suitcase lying on the ventilation pipe. We recognize the suspect by fingerprints.
Finding a suspect in Diamond County. We kill the bandits around, interrogate the suspect. The crime has been solved.
Helicopter crash
(performed in missions with Deadshot)
Shooting at Dixon Dock
On the roof of the house we find a body covered with film. 1. Scan the body. 2. Create a chronology of movement. 3. Calculate the trajectory after the shot. 4. Find the camera around the corner of the glass part of the roof. Find out information about the person in the photographs.
We find the suspect on a roof in Diamond County.
Fire in Coventry
In Coventry, in the north-west of the region, we find a covered corpse on the street. 1. Scan the body. 2. Blood stain nearby. 3. Fire trail. 4. We reproduce the chronology of the murder, climb to the second floor, find a footprint on the wall. 5. We calculate the suspect’s escape route, scan a piece of stairs on the floor. The suspect is Qin Liu. We find him on the Penguin's ship on the upper deck and detain him.
Road accident in Burnley
In the Burnley area, right in front of the entrance to the police station, we find the body of a special forces soldier. 1. Scan the body. 2. Scan the blood stain on the left. 3. We go further along the flight path and scan another spot. 4. We reproduce the chronology of the murder, we see where the car turned. At the turn near the wall we find a sample of the car's paint, using this information we recognize the suspect. We find a special forces soldier on the roof of the nearest right house. The case is solved.
Amusement park beating
In the north of the area on the second floor we find a dead body. 1. Scan the body. 2. Scan the blood stain. 3. Let's fast forward the chronology of the crime. We jump to the first floor, find the murder weapon - an air conditioner, as well as fingerprints. We find the suspect in the center of Parkovaya Street and tie him up.
Shooting in Crime Alley
In the east of Parkovaya Street, in the alley in front of the power plant, we find two bodies. The crime is reminiscent of what happened to little Bruce: both people are dead, but nothing is stolen. 1. Scan one body. 2. Then the second. 3. Based on the blood stains, we reconstruct the chronology of the murder. 4. We look through the chronology, we see how one of the cartridges rolled behind the ventilation grille. Let's remove the grille and scan the cartridge case. Using it we figure out the killer. In the south of the industrial area we find the killer and detain him.
|
Achievement "Honorary Reader Site" Did you like the article? In gratitude, you can like it through any social network. For you this is one click, for us it is another step up in the ranking of gaming sites. |
|
|
Achievement "Honorary Sponsor Site" For those who are especially generous, there is the opportunity to transfer money to the site’s account. In this case, you can influence the choice of a new topic for an article or walkthrough. money.yandex.ru/to/410011922382680 |
I will divide the side quests as follows:
1) Crimes. Batman picks up a police frequency about a crime that has taken place or is about to take place. We arrive at the place following the arrow and fight with the enemies. The difficulty of fights will increase as the storyline progresses.
2) Repeaters, data blocks, informants, towers. Necessary things to catch Enigma. We destroy repeaters, collect data blocks, interrogate informants about finding data blocks, and climb into the towers and hack them to find repeaters and be able to quickly move in a given district.
3) Training planning in AR mode. We arrive at the place and receive markers along which we need to fly. As the complexity increases, the intricacy of the flight and hassle increase.
These tasks are ones that you can complete yourself, but “Danger List” and “Crime Scene” are best completed together with this guide.
Investigations:
Let's start with investigations.
Complete walkthrough of side quests in Batman: Arkham Origins
 Complete walkthrough of side quests in Batman: Arkham Origins
Crime scene. Fall in Jezebel Plaza:
Complete walkthrough of side quests in Batman: Arkham Origins
 Complete walkthrough of side quests in Batman: Arkham Origins
While in the Bowery area, you will hear conversations on the police radio. Someone fell out of the hotel. We need to inspect the crime scene and find out the details of the fall. Having arrived at the crime scene, we identify the victim, and then we reproduce the crime. We climb onto the roof and from the footprints on the roof we understand that someone pushed the poor guy. Now you need to find a case with documents. The case will be lying on the drainpipe. We also learn the killer's name: Robert Haynes. We ask Alfred for the location of the criminal and go to catch him. Robert will not be alone, but with friends. We scatter our friends, and interrogate Robert. This case is closed.
Crime scene. Shooting at Dixon Dock:
Complete walkthrough of side quests in Batman: Arkham Origins
 Complete walkthrough of side quests in Batman: Arkham Origins
As we fly over the Dixon Docks, we will hear police talking about a shooting at the Dixon Dock. We need to go and investigate. First of all, we analyze the corpse. The victim was journalist Owen Grant. We reconstruct the course of events and then analyze the camera. We send the evidence to Alfred and go to catch the criminal. We scatter his friends, and then interrogate the suspect. Case is closed.
Crime scene. Fire in Coventry:
Complete walkthrough of side quests in Batman: Arkham Origins
 Complete walkthrough of side quests in Batman: Arkham Origins
You will receive this task after examining the body of soldier Bane in the morgue. Fly to the Coventry area and listen to the police message. Fly to the place and analyze the body. Having obtained all the evidence, head to the Penguin's ship and beat Qin Li and his friends. The case is now closed.
Crime scene. Road accident in Burnley:
Complete walkthrough of side quests in Batman: Arkham Origins
 Complete walkthrough of side quests in Batman: Arkham Origins
We will receive a tip on this investigation after the completion of the storyline. We arrive at the crime scene and scan the covered body. A special forces soldier was killed. His entire group is now under investigation. We have to find out what he was doing here. Having dealt with the evidence, we understand that the suspect is one of the former squad of the murdered man. He hangs out on the roof with his friends. We beat DeMarco and his friends, then interrogate them and close the case.
Crime scene. Amusement park beating:
Complete walkthrough of side quests in Batman: Arkham Origins
 Complete walkthrough of side quests in Batman: Arkham Origins
We will receive it after completing the case “Road Hit in Burnley”. We arrive at the place. We scan the body and other evidence. Suspect: Andrew Carter. We go to his coordinates, beat him and interrogate him. Case is closed.
Crime scene. Shooting in Crime Alley:
Complete walkthrough of side quests in Batman: Arkham Origins
 Complete walkthrough of side quests in Batman: Arkham Origins
We will receive a tip on this investigation after the completion of the cases: “Road collision in Burnley” and “Beating at the amusement park”. There was a shooting in Crime Alley and now there are two corpses there. Doesn't remind you of anything? We arrive at the crime scene. The crime is reminiscent of what happened to little Bruce. The parents are dead, but nothing was stolen. This was not an attempted robbery. We study the evidence, tear out the bars and scan the cartridge case. Suspect name: Ian Chase. We arrive at the coordinates, beat and interrogate Ian. The matter is over.
"Dangerous list":
After the investigations, we move on to the “Danger List”.
Complete walkthrough of side quests in Batman: Arkham Origins
 Complete walkthrough of side quests in Batman: Arkham Origins
Enigma headquarters (dangerous list):
Complete walkthrough of side quests in Batman: Arkham Origins
 Complete walkthrough of side quests in Batman: Arkham Origins
In this area we are interested in the headquarters of Enigma. We arrive at the mark, feel for a weak spot in the cover, break through it and go through the door. We carry on a dialogue with Enigma and approach the door with the control panel. You can't hack it, you can't destroy your computer. So we are looking for Enigma’s assistants and knocking information out of them.
Right at the exit from the building we see the informant. We beat him and get information about the location of the incriminating evidence. Now we walk around the map and collect them, and also beat up other informants.
Anarky (dangerous list):
Complete walkthrough of side quests in Batman: Arkham Origins
 Complete walkthrough of side quests in Batman: Arkham Origins
The mission starts after Penguin leaves the ship. On the way out, we will hear Anarky, an extremist who is trying to destroy the government and Gotham. Another candidate for Batman's capture. Anarky will send his partner, who will say that there are three bombs planted in Gotham, and we need to defuse them. We go to the location of the first bomb. We have about 3 minutes to get to the bomb, defuse the enemies, and then the bomb itself.
After this, we head to the second anarchist in Coventry and talk to him. We repeat the steps to defuse the first bomb: fly, hit, defuse. We head to the third anarchist and talk to him. After that the same scheme.
Having learned that you have decided to defuse all the bombs and save the corrupt society, Anarky calls you to the courthouse for a battle. Well, we have to go. In the courthouse we deal with Arki and his henchmen. Arki turns out to be an ordinary child, but Batman still ties him up and leaves him to the police. You can also listen to his passionate speech about the situation in Gotham, and then leave the courthouse. This completes the task.
Penguin (dangerous list):
Complete walkthrough of side quests in Batman: Arkham Origins
 Complete walkthrough of side quests in Batman: Arkham Origins
After the mission at the police station and meeting with Barbara Gordon, she will contact you and ask you to destroy the boxes of weapons that the Penguin has. The data will be in your GPS locator. We arrive at the place, neutralize the guards and use the destructor to destroy the weapons. As a reward for this task you will receive containers for multiplayer.
Mad Hatter (dangerous list):
Complete walkthrough of side quests in Batman: Arkham Origins
 Complete walkthrough of side quests in Batman: Arkham Origins
Coming out of the sewers after the Lacey Towers case, you will notice three people wearing strange masks and singing nonsense. After a while they will pass out, and the Mad Hatter will contact us. He has a hostage. We need to save her. We go to the Hatter's lair, there will be a logo in the form of a green hat. Do not miss. Come inside. The door to the Hatter is closed, pull out the grate and jump into the ventilation shaft. Jump out on the other side and knock out the guards, then interrogate the Hatter and... you will find yourself in Wonderland. Run along the path, and then, avoiding electrical traps, move on. Shoot down 6 lanterns and walk along the bridge to the ledge, jump onto it and crawl along the next ledges.
1) This will take you to the first room. The exit is as follows: left door, center door, right door.
2) In the second room, beat the enemies, and when the mirror crumbles, leave this room.
3) In the third room, go all the way and use the gel to explode the image of a clown. Using the raft, move to the other side, to the next room.
4) In the fourth room, grab the ledge, duck down, go up the stairs, go down the cable and run away from the blade into another room.
5) In the fifth room, use Deathstroke's claw to make a cable, climb up it and hit the clock, then make another cable and go out into the next room.
6) In the sixth room, jump from ledge to ledge, dodging the dial and go into the next room.
7) In the seventh room, use the hook to pull yourself onto the bowl and lower it, then jump into the ventilation. The Hatter is already swearing and crying. Go up to his room, stun him with a reverse batarang and knock him out with a right to the jaw. Alice is saved, the Hatter is lying down, the police are on their way. Let's leave here.
Shiva (dangerous list):
Complete walkthrough of side quests in Batman: Arkham Origins
 Complete walkthrough of side quests in Batman: Arkham Origins
As you leave the bank, you will see a stroller with crying coming from it. Approach her and see that the stroller is empty, and Shiva will attack you from behind. A friend of Batman's, by the way. You will not fight with her, she will say that an innocent person may die in Gotham and Batman must save him. We arrive at the mark and hear screams. This is from the shopping center, so let's go there. There is a policeman hanging in the shopping center and an electric swimming pool underneath him. Let's try to save him. We go to the left side and cut out the shield. Three ninjas will attack us, apparently a gift from Shiva. We get rid of them and, with the help of Deathstroke's claw, make a cable and move to the other side. On the other side we cut down the shield and again fight with Shiva’s friends. After this, we release the policeman and talk to him. Thanks to the knowledge gained, we scan the area for evidence and leave the building. On the street we follow the evidence and find the covered corpse of a policeman. Shiva will attack from behind - we counterattack and talk to her.
Now you need to come to Sheldon Park in order to fight Shiva. We arrive at the place and go into the building. Shiva will not be alone, but with his minions. Take out on counterattacks. After you remove your health from her, she will talk to you and disappear, but I have a feeling that we will see her again.
Black Mask (dangerous list):
Complete walkthrough of side quests in Batman: Arkham Origins
 Complete walkthrough of side quests in Batman: Arkham Origins
The task will become available after you destroy the poison container at the steel mill. It is necessary to destroy the containers with drugs that Black Mask hid. After destroying the containers, go to the park street and enter the church for a fight with Black Mask. There will be armed people in the church. We deal with them, then we hack the control console and explode the last container with drugs. Now we fight with Black Mask and his people hand-to-hand. After winning the fight, inform the police about Roman Sionis and leave the church. That's it, the mission is over.
Deadshot (dangerous list):
Complete walkthrough of side quests in Batman: Arkham Origins
 Complete walkthrough of side quests in Batman: Arkham Origins
You will receive this task after the fight with Copperhead. Alfred will contact us and say that someone is asking for help. We go to the mark and are ambushed by special forces. But the helicopter crashes. We need to find evidence and understand who shot down the plane. Start with the pilot's body, then go up to the roof and scan the propeller. After this, return to the roof and analyze the tail section. Now let's find the ballistic trail from the sniper. The sniper was a special forces soldier, but he would not shoot at his own people. It turns out Deadshot is involved. We follow his trail and find a bullet with coordinates. We drive them into the sequencer and receive a message from Deadshot. We need to go to the bank to clash with Deadshot. We arrive at the bank and immediately, using a destructor, turn off the guns of several people. After this, we methodically remove them one after another, without catching Deadshot’s eye. It's Deadshot's turn. Hit him and try to knock him out. He will dodge your final blow. After the third attempt, Deadshot will run away to the hostage. Find an advantageous position, sneak up behind him and neutralize him. That's it, the mission is over.
Bird (dangerous list):
Complete walkthrough of side quests in Batman: Arkham Origins
 Complete walkthrough of side quests in Batman: Arkham Origins
As you leave the morgue after analyzing one of Bane's men, you will pick up a police frequency saying that two gangs with chemical weapons are having a skirmish. Need to check. On the spot we see fighters fighting. We break them up and interrogate the only soldier remaining conscious. We go to the amusement park and repeat the same pattern as at the docks. We interrogate the soldier, and then scan the area around the canister. Now you need to come to the My Alibi nightclub in the Coventry area to fight the Bird. At the club we deal with Bird and his friends. After everyone falls, we interrogate the bird and knock it out. You can go, the police will deal with him.
Escaped Prisoners (Danger List):
Complete walkthrough of side quests in Batman: Arkham Origins
 Complete walkthrough of side quests in Batman: Arkham Origins
How to get this task? In order to receive this task, do the following:
1) We carry out all the tasks on the dangerous list, the last one being the capture of the Bird.
2) Complete all investigations. The final one will be “Shooting on Crime Alley.
3) Complete the storyline.
Having fulfilled all the conditions, you will receive an incoming call from Gordon asking you to catch 20 prisoners who escaped from Blackgate. All criminals will be marked in GPS. Remember, criminals will have friends who will come to their aid. So check out the area first. Having captured 20 escaped criminals from Blackgate, you will receive a thank you call from Gordon. The mission is over.