DIY plasterboard shelves. Step-by-step instructions for assembling a plasterboard shelf on the wall Plasterboard shelves in the corner
Read also
For storing things and various decorative items there are different cabinets, special modules, chests of drawers, shelves and the like. That's what we'll talk about shelves in this article. Even a small family living in a house or apartment needs to place their belongings, dishes, interior items, and the like.
There are different storage modules for this, but there are always not enough of them. This problem can be solved by purchasing furniture for storage, but not everyone has enough space to place, for example, a wardrobe or chest of drawers. Therefore, many people decide to order furniture by custom sizes for their premises, but such a service is expensive.
A sheet of plasterboard can be from 2 to 4.5 meters long, and its width can be from 1.2 to 1.3 meters.
The thickness of the drywall should not exceed the permissible limit, and this limit ranges from 6 to 24 millimeters.
These characteristics allow you to select the required sheet size, which will be designed for different loads.
The design and functionality of the shelf in the future depends on the choice of drywall.
Installation of plasterboard shelves
We begin installation of the frame. For the construction of plasterboard shelves, a UD profile is used, it is not wide.
Due to the fact that the profile is not heavy, the resulting structures are not bulky and light.
First you need to measure the distance where the plasterboard shelf will be.
After you take the measurements, you need to attach the profile to the wall using a level. The profile is nailed using 6×40 metal dowels, and nylon dowels can also be used as fastening.
You need to remember that you need to strengthen the frame of the shelves so that the structure is strong and reliable.
After metal structure ready, then proceed to .
This work is considered not as difficult as installing metal profiles. Attach sheets of drywall to metal or nylon screws. The size of the screws is twenty-five millimeters.
Sheathing a metal frame is not difficult, but you should make sure that its sheets are not skewed, otherwise this can lead to fragility of the shelf. At all stages of the construction of shelves, it is necessary to compare all design parameters with the drawing, and to avoid distortions of the drywall sheets, it is necessary to use a level.
The also illuminated one is still an additional source of lighting. can have any light and any intensity, and it depends on your idea or the designer’s idea.
To install the lamps on the shelf, you will need the following tools:
- Crown round shape, for cutting holes;
The diameter of the crown depends on the size of the lamp. Determine the location for the lamp in advance.
 Installing the lamp is not difficult, but you will have to work hard with the wiring. If you do not have skills, then it is better to use the services of a professional.
You can also install an LED strip to illuminate the shelf, because it can be laid anywhere, even in hard to reach places. This strip illuminates the shelves evenly and can serve as a full-fledged lighting source.
LED strip has a wide range of colors and is energy-saving.
Finishing work
The final work on the construction of a plasterboard shelf is putty and further decoration.
Before  Once you start decorating the shelf, you need to fasten the shelves together with metal and plastic corners.
- The inner corners of the shelf are glued reinforced mesh to avoid cracks in the future.
- Then the shelf is puttied and the putty is applied in a number of layers.
- If the shelf will be painted a different color in the future, its surface must be sanded and then primed.
 You can see the options for finished shelves in the photographs on the Internet.
Home » Wall design
Drywall - modern construction material, which is two sheets of cardboard 120 mm wide, glued together with a special gypsum dough. Intended for finishing walls, erecting arches, slides, niches, etc.
Wall decoration with plasterboard has recently become very popular, because... the material is publicly available, relatively cheap and easy to use. Wall cladding, creating cabinets and many many other uses for drywall can be cited.
Interesting! Drywall was invented in America in the 19th century. In the USSR it has been used since the 50s of the 20th century.

Wall finishing with plasterboard
To finish or level walls for painting, pasting or plastering, plasterboard sheets are used, which easily fit together and make the wall perfectly flat.
Also, using sheets of plasterboard, you can delimit the space of the room using decorative or additional partitions. The advantages of plasterboard partitions also lie in the fact that you can make various cutouts, waves and arches in them.


Drywall arches
Arches - are semicircular cutouts intended for decoration. doorways or entrances to the living room, hall, etc. The arch can be blank or adjacent to the wall. They can be decorated with lighting and additionally painted.


Plasterboard niches
Niches made of plasterboard can easily replace a bedside table for a TV, help build a slide in a room, a wardrobe in a hallway without special costs. The niches are painted the same color as the wall on which it is made.


Plasterboard cabinets
Using drywall, you can create structures to place various things on them. Plasterboard cabinets can be equipped with additional lighting and create original design premises.
Designing plasterboard walls is a fascinating and interesting thing. Use it to create captivating images of a room.


Today, you can make not only from plasterboard beautiful ceiling, but also exclusive inexpensive furniture.
For example, a wardrobe, beautiful shelves for books and souvenirs, flower stands.
Plasterboard furniture
How to make shelves from plasterboard?
Anyone can design plasterboard furniture with their own hands. You don't have to be for this professional craftsman, but it is enough to have minimal skills repair work and handling construction tools.
If you are planning an ordinary decorative shelf for family photos or dried flowers, then it will be enough to assemble a lightweight frame and cover it with plasterboard in one layer.
For more complex furniture: bookshelves, stands for house plants, and even more so for heavy plasma panels or an aquarium, increased structural strength will be required. In this case, the frame needs to be strengthened with additional profiles and sheathed with plasterboard in two layers, and sometimes the standard profile should be completely replaced with special welded brackets, consisting of reinforced reinforcement, a rolled angle, a channel, a single- or I-beam.
To internal and external corners the plasterboard shelves were perfectly level; they should be reinforced with special thin steel profile and then paste on top plaster mesh and smooth it with a thin layer of putty.
If you decide to make corner shelves from plasterboard in the kitchen, be sure to use moisture-resistant sheets.
In the process of designing furniture, you can avoid the “drum effect” - a booming sound that hollow structures will emit under mechanical stress - by filling the internal cavity with sound-insulating insulation or mineral wool.
This is especially necessary when the shelf serves interior partition or mounted on the wall behind which people live noisy neighbors. If more powerful sound insulation is required, we recommend filling the cavities cement mortar- in this case, the plasterboard sheet will turn into permanent formwork.
Various plasterboard shelves are shown in the photo above.
To save money, you can cover only the vertical walls of the rack with plasterboard, and make the shelves from thick waterproof plywood or impact-resistant mirror glass.
Plasterboard cabinet
The most popular type of plasterboard furniture is a built-in wardrobe, which many people want to build in their hallway (see.
on the picture). At the first stage, we do not level the walls and ceiling in the closet area, but immediately make a frame and line it with plasterboard. The depth of the cabinet being built is selected depending on how you want to place the clothes - on hooks, hangers or a rod. The size and number of shelves are limited only by the height and width of the hallway. In cases where the length of the shelves exceeds 1 meter, the frame must be made with a margin of strength and not bend under load.
You can additionally decorate a plasterboard cabinet using original spotlights, placing them along the perimeter of long shelves.
Sofa made of plasterboard
If desired, you can build a very unusual furniture made of plasterboard, for example a small sofa - of course, not huge, but on which you can sleep.
Sometimes, when creating an interior, there is a feeling of a “hole” between furniture elements or a feeling of emptiness - in this case, a decorative sofa will come in handy. And when decorating a studio apartment for owners who often receive guests in large quantities, a miniature plasterboard sofa will look great as a separator for the dance floor and cinema area.
DIY Plasterboard shelves (PHOTO)
If somehow the old-fashioned one falls bookshelf with glass door and twelve identical shelves, you can go alternative way- that the fantastic flight is not specifically limited to drywalls in accordance with their models.
These bookshelves are made from plasterboard (see photo).
photo below), drywall shelves or under the cart under your favorite GCR belt, if the load calculation is correct, since the shelf will be reliable and functional level, which complements the internal elements.
Shelves made of plasterboard (PHOTO)

Photo 1 - Corner plates made of gypsum boards - good way organize a real dead space, making it functional or decorative

Photo 2 - Plasterboard wall panels can be of any size and shape.
For the opportunity to experiment with forms of construction, this material is rated

Photo 3 - Functional design drywall in the living room

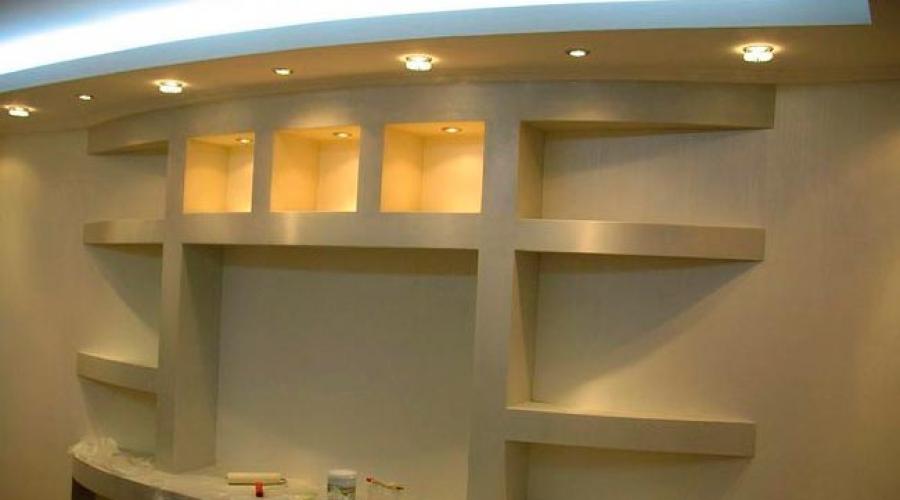
Photo 4 - Semicircular structures of this type of plaster boards will be located inside the kitchen next to the living room

Photo 5 - There is no need to fix the drywall in the bedroom above the couch, as in any other room in the apartment, on the wall.
Walls within a wall made in a row of niches seem much more interesting
How to make plasterboard shelves yourself: step-by-step instructions
The following materials and tools will be needed for construction wall panels from plasterboard.
materials:
- galvanized profile 50×25 mm;
- curved profile profile (if curved structures are made, for example, on arches made of gypsum slabs with shelves or curved shelves);
- guide rails;
- Self-tapping screws and dowel spacer;
- drywall;
- primiranje;
- reinforcing mesh for treating joints (special paper tape or sergeant).
tools:
- screwdriver;
- electric cutters;
- Bulgarian;
- rake level;
- roulette;
- plumb bob;
- pencil;
- hammer;
- pliers;
- saw;
- putty knife;
- brush;
- sandpaper.

Photo 6 - Another shelf of dry walls in the corner
Installation of gypsum boards
Draw a shelf.
First, you need a sketch of how the shelf should be installed.
Shelves for dry floors: 20 photos
Under the sketch, take the necessary measurements and mark the intended location for attaching the shelf to the wall.
Frame made of plasterboard.
There are several mounting options. Firstly, installing a shelf while installing gypsum boards, and secondly, installing a gypsum board shelf on an already made wall.
In the first case, you will get shelves that are built into the body (for example, niches), and the other - projection decorative or functional surfaces.
The shelf base is a frame made of metal profile size 50 x 25 mm.
Mark the wall level.

Photo 7 - Fields and gypsum boards in the nursery
Use a screwdriver and self-tapping screws to secure the metal frame to the wall.
The fixation step must be at least 250 mm.
What profiles are best to use when building drywall structures, which we wrote in one of the previous articles. Most of the information you are interested in on this topic can be gleaned from it.
Assuming there are good shelves for you - no main criterion: are you interested in robust design, which can convey important weight (for example, a home library or television).
If the shelf is designed for high loads, you need:
- Instead of standard drywall 9.5 to 12.5 mm thick, only thick gypsum boards (18 mm thick or more) and other fasteners (such as butterfly screws) should be used, since this type of shelf fastening with conventional screws has not been possible;
- the profile on the wall is fixed in more frequent increments;
- When installing, use a gateway and frames that reinforce the structure several times.
After determining the profile, the installation of conductors begins, which create the volume of the structure frame.
They have transverse and longitudinal rails. To strengthen the structure, the guides must be attached to the ceiling or floor, as well as to the jumper between the profile and the guides.
For clarity, look at the work as an example of how to attach a shelf to the ceiling under hidden lighting. Arranging the same 60 centimeters below for flowers on a window in the hall or on a shoe stand in the hallway will not be a problem.
The only difference is that the second version of the shelf will not have ceiling mounting elements.
Hang the frame:

Scheme 1 - prefabricated profiles on the wall and ceiling, joint connections together
Cover the frame with plasterboard:

Scheme 2 - It is better to start laying by fixing the vertical part

Scheme 3 - Fixing a horizontal sheet

Pattern 4 - Completing the Tile
We install lighting on the shelf:

Diagram 5 - Installation of LED strip and reflector

Chart 6 - Check your calculations
Corner shelves are fixed in the same way as longitudinal ones.
IMPORTANT!
To secure the shelf design to the wall, you need to install two main profiles. In this case, the shelf will become thicker, but stronger.
Lining carcasses with drywall.
Plasterboard sheets are attached to the frame with a higher loading speed; most often it is necessary to attach the sheets to the profile.
If your job is to hang gypsum boards in the bathroom, only use a waterproof dry sieve, that is. GKLV (this type of gypsum board is green).
IMPORTANT! When covering the frame with plasterboard, remember: metal joints must be installed in the middle of the profiles.
The seams of gypsum boards must be covered with serpentine and masked after installation.
IMPORTANT! If a shelf or partition with lighting is planned, electrical installation begins on the frame before the drywall begins.
Before installation on the frame, holes are drilled for fastening the elements to the plaster.
Drywall can be attached as separate part or hang them in solid panels that can be cut off with a knife.
If you can see with dry walls, what kind of shelves should be hung on drywall walls?
How to hang a shelf on drywall?
First, even at the level of the wall coverings, it is necessary to determine the location of the articulated structures and in the places that they intend to be fixed to strengthen the frame:
- place an additional sheet of dry wall between the wall and the sheet of finished leather if the installation is on a metal frame;
- cover the dry film with glue over the entire plane of the sheet, and not to the right if the installation is carried out without a frame on glue.
If this is not the case, the shelves should be attached to special zippers - “butterflies” (the picture below shows a clear attachment).
Butterfly devices can withstand loads of up to 5 kg. Mounting guides can be used to attach heavier structures (up to 15 kg load).

Figure 1 - “Butterfly of fasteners”
Can I exceed the permitted maximum load?
In the event that the load on a shelf attached to drywall exceeds permissible limits, creating more reliable protection floor or ceiling using cables, transfer most of the load from the wall to another surface.
Drywall shelves: price
- in Moscow - from 230 rubles / m²;
- in Kyiv - from 55 UAH / m².
DIY drywall shelves - photo

How to make plasterboard shelves
- You'll need it
- Instructions for making a DIY drywall shelf
- An example of how to build a plasterboard shelf with lighting
- Corner boards made of plasterboard - video
- Tips for making a drywall shelf
We've looked at a lot plasterboard boards but don't understand how to do it?
Famous people told us how to make gypsum boards with their own hands. Study the material and remember to put your knowledge into practice.
You'll need it
- Profile 50x25 mm (if the shelves are semicircular, curved - in a word, with a turn - then a different locus profile is required)
- Guides
- Self-tapping screws and dowels with spacer
- drywall
- example
- Reinforcing mesh or colored tape to cover joints
- Metal corner to strengthen the edges of the shelf
- Screwdriver or drill
- Straight and water lines
- Pencil and tape recorder
- colored knife
- sandpaper
- Scissors for cutting metal profiles
Instructions for making a drywall shelf
- Draw paper on paper.
Choose a place for this. Consider the dimensions of the shelf.
- Mark the place where the regiment will be. To read accurately, use water lines for vertical lines and level for horizontal lines.
- Create frames for frames.
To do this, attach metal profiles to the labels. Drill holes in increments of at least 25 cm, tilt it in Right place and wrap a pencil around the hole to see where you want to drill holes in the wall. Drill drill bits into the wall and insert dowels. Attach the shelves and secure them with screws.
If the TV shelf is made from dry walls, we recommend:
- buy drywall with minimum thickness 18 mm
- use butterfly or other strong fasteners instead of screws
- reduce the distance between holes
- strengthen the structure, use meadows and frames
After securing the profile, attach the transverse and longitudinal guide (guide).
If you want the shelves to be secure, attach them to the ceiling or floor. Insert a jumper between the guides and the profile.
If you are underlining, then fix the wires in place until the frame is indicated.
- The frame is covered with plasterboard. The more elaborate your shelves are, the smaller the pitch between the screws that secure the panels from the dry walls to the shelf.
The sheets should be in the middle of the profiles.
- The measures then depend on the type of final material you will be using.
- If the shelf is under the TV, it is better to paint it. Insert colored tape at the joints and caulk them. After applying the whale to the entire surface, after drying, spray it on smooth surface. After boiling and dyeing.
- If you make shelves in the hall, you can insert them both.
The preparatory work is the same as in the example described above.
- If you're making shelves in the bathroom, paint or tile them. In the second case, do not putty, just pound and lay the tiles.
If you plan to lighten it, then before installing the drywall shelf, keep all wires in correct position. If reflectors are used, holes for them are cut in the drywall before installation on the frame.
An example of how to build a plasterboard shelf with lighting
Corner boards made of plasterboard - video
Gypsum corner plates are made in the same way as described above.
But there were no questions, watch the video.
- If you are making shelves in the bathroom, use stable sheets.
- To make the structure very durable, install two main profiles.
But don't forget - in this case, hell will become thicker.
- If you are sure that household will often be wiped off from the corners of the shelf, then install metal corners before puttingty.
If you read the article “How to make a wardrobe from plasterboard with my own hands”, then you will notice that the drywall shelves are made according to the same principle. This is good. Because if you have already made a drywall cabinet, creating a shelf will not be much for you. That's all.


Built-in plasterboard shelves are one option. Moreover, unlike factory-made furniture, gypsum board samples will have individuality. However, in order to make shelves according to your drawings, you should carefully measure all the parameters for a specific product and, of course, select the appropriate materials.
This material has many positive and negative aspects, but main feature is versatility.  Decorating the interior of a room using built-in plasterboard shelves
With the help of gypsum plasterboard you can not only quickly and inexpensively carry out repairs in a room, it is important that it can be used without problems for the manufacture and interior of built-in walls. What material features are suitable for assembling a plasterboard shelf with your own hands? 

It is these features that give it an advantage over other materials that can be used to assemble design and interior elements.
Materials and tools
To assemble a plasterboard shelf you will need others related materials and equipment for their processing.  Shelves made of plasterboard in the interior of an apartment The plasterboard itself is selected depending on the room where the product will be installed. If this is a kitchen, bathroom or toilet, then you will need. Suitable for living and other rooms wall types material. Most often, those left over from the kitchen are suitable for assembling shelves. interior decoration premises. You will also need a certain quantity marked CD and UD (and a guide). If you plan to create a shelf of a non-standard curved shape, then it is best to buy an arched type of profile or make it yourself from guides.
  Example of shelf design non-standard shape

The shelf configuration is built into general design premises. If the presence of rounded shapes predominates, then the shelves should be rounded. (bugs) and are used as fasteners.
The initial finishing of the shelves is carried out using serpyanka to seal the joints between sheets and universal putty.
The tools for assembling the shelves are the same as for finishing the walls:  Design option for built-in plasterboard shelves
- Drill.
- Hammer.
- Bulgarian.
- Metal scissors.
- with a tape measure.
- Screwdriver.
- The assembled shelves need to be puttied with plaster spatulas.
Read also
Creating a plasterboard podium
For decoration you will need the selected material:
- textured plaster;
- dye;
- tiles or any finishing material.
The list of required materials and tools may vary depending on individual characteristics work.
The process of assembling plasterboard shelves
Bringing the idea of assembling plasterboard shelves to life is not so difficult; it is only important to follow the work technology and adhere to the stages of work.
Drafting
Sketching a future built-in shelf will help solve several important issues.
Firstly, the diagram will make it clear how well the built-in shelf can fit into the overall design, and most importantly, the combination of proportions with the size of the room.  Project of plasterboard shelves
  Drawing of plasterboard shelves
Secondly, the prepared sketch allows you to more accurately calculate required amount materials that need to be purchased.
Thirdly, the drawing can be used as a reminder so as not to forget to make this or that part. 
Today there are computer programs allowing you to model walls and interiors. However, not everyone has this opportunity. Therefore, the simplest version of the project is to sketch out a diagram indicating the dimensions.
Shelves that are small in size can be drawn one to one on paper and the image can be estimated at the site of future installation.
Frame assembly
The frame, assembled from metal profiles, will serve as the base of the entire shelf and will also take on all the loads.  The process of assembling the frame of plasterboard shelves

In this case, you can use two methods of assembling the base: directly on the wall or separately, followed by installation on a load-bearing surface.
In the first option, the sequence of actions is as follows:

When mounting a shelf on plasterboard surface, use special fasteners that need to be selected depending on the weight of the structure and purpose (light ones are fixed with umbrellas or butterflies, heavier ones with a moth dowel).
The rack frame rails are attached to the guides. All connections of metal parts are made using bugs.  An example of assembling a frame for plasterboard shelves
In the case of pre-assembly of the frame, proceed as follows:
- on flat surface set the guides;
- we connect the profiles together with racks;
- at the fastening points we drill holes for fasteners;
- we hang .
Over time, there are more and more things in the apartment, but the space does not increase. Great solution in this situation there will be shelves made of drywall.
Availability in the house niches or plasterboard shelves on the wall will help:
- make practical use of the available space in the house;
- avoid piling up furniture along the walls;
- significantly improve the design of any room - from the living room to the kitchen;
- equip niches or shelves with lighting, which will provide additional illumination inner space in the house;
- create both a functional and decorative element in the living room. On the shelves you can place both souvenirs and dishes or other things necessary for everyday life.
There will be a shelf the best solution than buying bulky furniture, and it will cost much less than ordering custom-made cabinets. Almost anyone can make shelves from plasterboard with their own hands. The main thing is to follow the installation technology - and your apartment will sparkle with new elements.
Drywall is a universal building material that is used for a wide variety of purposes: covering walls and ceilings, constructing partitions, allowing you to create built-in shelves, niches and cabinets, and various ceiling structures.
Such popularity of the material came due to its following qualities:
- ease of installation;
- a wide selection of both sheet options and thicknesses;
- allows you to make an unusual and original design;
- environmental friendliness;
- availability.
Drywall sheets
The advantages of drywall also include the fact that it can be finished in a wide variety of ways: paint, wallpaper, use decorative stucco or use artificial stone.
Thanks to this, plasterboard shelves will be able to have the most varied look and will fit perfectly into the design of the living room or any other room.
Design selection
Plasterboard shelves can have different designs:
- open. They are most often used as decorative elements interior Great option for the living room;
- closed. They carry rather a functional load and are often installed in bedrooms or corridors. Usually they are made very roomy.
According to localization, plasterboard shelves can be:
- centers. They are located in the center of the room. They often contain a whole ensemble of niches and shelves. They look very nice in the living room, since very often the central element of such a design is the TV;
- corner shelves made of plasterboard. They are used if the room is small in size. They can be decorative and functional.
In addition, you can make your own plasterboard shelves like this:
- with backlight. Depending on the size of the niches, built-in lamps can be either single or multiple. Built-in lamps can significantly improve the illumination of the living room or any other room;
Note! Can be used as a backlight not only Spotlights, but also LED strips along its perimeter. At creative approach you can create an indescribable play of light and colors.
- without backlight. They are no less common than illuminated niches. Their design and arrangement, for obvious reasons, are much simpler than those of illuminated shelves.
The design of a plasterboard shelf can also be:
- decorative. In such a situation, it will be light and will not have additional fastenings;
- functional. If you plan to place a significant load on a shelf or niche (installing a TV, dishes, etc.), then it should be strengthened additional elements frame.
When decorating a plasterboard shelf, you can use a wide variety of finishing methods, and also decorate the niche inside with mirrors. With lighting, you can make a unique shelf that will become a real highlight of the living room or bedroom. This will create a romantic and fairy-tale atmosphere in your home!
Creating a shelf project
Constructing a plasterboard shelf with your own hands requires creating a drawing future design. Remember, it is better to measure seven times and cut once. Therefore, everything needs to be taken into account at the stage of creating the diagram, so that when installing a niche, you can avoid unpleasant moments when something does not fit together.
A drawing of a plasterboard niche is created as follows:
- choice of shelf design. Here you should consider whether the shelf will have a partition, the number of elements, etc.;
- decide on the location of future installation in the room;
Note! The shelf should fit into the space of the room, be functional and practical. Therefore, when choosing its design and location, rely on the existing design in the room.
- draw the dimensions of the room to scale;
- indicate the location of the niche, as well as all its dimensions: depth, width and height;
- the diagram must necessarily reflect the partition of the niche;
- if the shelf will contain lighting, put it on the drawing in the places where it is planned.
 Shelf drawing
Note! The drawing should be made taking into account the thickness of the plasterboard sheets and metal frame.
Having created correct drawing, you will be able to evaluate the profitability of the chosen location, calculate the number required material, and also avoid various inconsistencies at the stage of fastening and mounting the frame. All this will allow you to make the perfect shelf, as intended.
In addition, the drawing can be transferred to whatman paper and attached to the place of further attachment to make sure that the design will be appropriate in the chosen location. Thus, plasterboard shelves will be an excellent addition to the design of your living room or bedroom.
Materials and tools
To create a plasterboard shelf you will need the following materials:
- guides and rack profiles;
- arched profile - if a curved niche design will be used;
- cross beams to strengthen the frame - if the shelf will bear a significant load;
- dowels and screws;
- plasterboard sheets. Their type should be selected based on the purpose of the room. Can be used in the living room and bedroom standard sheets, but in the kitchen, bath and toilet it is better to use moisture-resistant ones;
- materials for final finishing: primer, putty, mounting mesh.
Remember that to achieve the highest quality results, experts recommend using materials of the same brand. Today the best manufacturer on construction market counts German company Knauf.
From the list construction tools you will need:
 Materials and tools
- hammer drill, screwdriver and electric planer;
- Bulgarian;
- building level and plumb lines;
- pencil and tape measure;
- hammer, pliers, drywall knife, metal scissors;
- spatula, brush and sandpaper.
This set of tools will help you quickly and efficiently make plasterboard shelves with your own hands.
Preparatory work
Before attaching a metal frame for a plasterboard niche, it is necessary to carry out a series of preparatory work which include the following procedures:
- remove all irregularities from the wall that may interfere with the smooth mounting of the metal guides;
- cover all holes and cracks in the starting wall to increase its strength;
- prime the walls deep penetration to prevent further shedding of the plaster of the starting wall;
- transfer the drawing to the wall at the future location of the niche in the wall.
 Primer of walls
It should be noted that when finishing walls with plasterboard, it is recommended to simultaneously plan plasterboard shelves in order to do all the necessary preparatory work at once.
When all the preparation work work surface have been successfully completed, you can begin installing the frame.
Installation of a metal frame
There are several ways to attach a frame for plasterboard niches:
- simultaneously with the construction of the frame for the walls;
- separate design.
The first method involves the following operations:
- install guides along the drawn lines of the diagram;
- we fix them with self-tapping screws;
- we install rack profiles and further fasten them with self-tapping screws;
- in the place of the proposed shelf we make a niche from guide profiles around the perimeter;
- We create the depth of the shelf using rack profiles.
 Ready frame shelves along with wall structure
Note! If a load is expected on such a shelf, then at this stage the structure should be strengthened. To do this, we attach additional hangers in the corners of the frame. Such a partition will be very strong and will not damage the shelf under high loads. This will make the frame more rigid and stable.
The second option involves mounting the shelf separately from the wall. To do this you will need to do the following:
- preparing the basis for the niche;
- the base is created from a guide profile;
- apply it to the drawn lines and secure with self-tapping screws;
Note! When marking and fastening profiles, be sure to use a level. Thanks to this, you will avoid distortion of the structure.
- Next, we attach the rack profiles with self-tapping screws. This creates the future partition. With its help, in the future it will be possible to divide the shelf into several sections;
- if necessary, special ones should also be used in the corners of the structure fastenings(jumpers) to stabilize it.
 Ready-made separate frame for a shelf
At this stage, with the planned illumination, we carry out electric wires for further connection.
Upon completion of the work you will receive a finished metal carcass either for one shelf or for an entire wall with a niche.
sewing the frame with plasterboard
Upon completion of installation of the frame, it should be sheathed plasterboard sheets. To do this you must do the following:
- if the niche is built into the wall, then first we cover the entire wall with solid sheets, and only then we attach the pieces to form partitions;
- if the niche was mounted separately, then first cut the drywall into required size pieces;
- First we cover the outer walls of the shelf. To do this, we place the pieces in the right place and if they fit perfectly, we fasten them with self-tapping screws. The partition can be sheathed either in one piece or in several;
Note! It is not important to use cut-up whole sheets for sheathing the shelves. The partition can also be sheathed with pieces that remain after finishing the walls or ceiling with plasterboard.
- Next, we fasten the inside of the niche;
- if there is lighting, then we cut out holes in the pieces for it and attach them with already inserted spotlights.
It would also be appropriate to mount it in inner part mirror shelves.
 Ready niche
Drywall has wide application. It is used to decorate walls and ceilings, hide imperfections, and use it to construct various decorative designs. For example, they install shelves around corners, window and door openings.
Let's consider the features and types of shelf designs.


Peculiarities
Drywall is a very plastic material. This is a sheet with a base in the form of plastic gypsum, which is covered on both sides with construction cardboard. It differs in thickness and can be wall, ceiling, or arched. For shelves, they try to use material that is more durable in thickness., although arched ones are often used (if curly shapes are needed). When heated, gypsum board can bend.
It is easy to cut and install, allowing you to build a variety of design structures. This is especially true if the room does not have the usual rectangular shape.
Prominent load-bearing columns, ventilation and heating pipes, walls with steps spoil the appearance and cause difficulties with the arrangement of furniture. All this can be hidden under drywall. And so that effective area I didn’t hesitate to mount niches or shelves.


Advantages of gypsum plasterboard shelves:
- masking communications;
- compatible with built-in lighting;
- the cost is lower compared to other materials for making shelves;
- long service life;
- resistance to deformation;
- fire resistance;
- environmental friendliness.


There are also disadvantages. Plasterboard shelves cannot withstand heavy loads. In this case, lay two slabs at once or use wooden inserts with additional reinforcement. It is necessary to construct a frame made of metal profiles or wooden slats and attach them to the wall. Drywall does not have sound insulation.
Presence of shelves around window openings and along the walls will not reduce the noise level. Designs made from gypsum plasterboard allow you to save on furniture (shelves, open shelves made of other materials, cabinets and TV tables). But there is also a drawback to this. To move the structure, dismantling and subsequent repair work will be required.


Kinds
All plasterboard shelves can be divided into two main groups: decorative and functional. The first ones are often open and have a lightweight frame. They contain various decorative interior elements (vases, souvenirs, photographs).
Functional shelves are more durable and have sufficient capacity. They are designed for heavy loads and can be closed or open. They are often built with specific purpose, for example, as a cabinet or niche for a TV.

Shelves can be divided according to their location. Centers are located in the center of the room. Either the design is bright accent interior, made of an ensemble of various shelves and niches. Products are wall-mounted, corner-mounted and built-in. The latter are the most convenient. Their placement is especially appropriate in closets, cabinets, and bathroom niches.
Corner shelves are more durable than straight ones. If the wall is very curved or has prominent structural elements, you can make a false wall from plasterboard. To avoid wasting useful space, you can arrange niches with shelves. They can also be decorative or functional.
Looks great with backlighting. The configuration of the shelves can be linear or curly, subject to the general style of the interior of a particular room.


Design
Drywall allows you to build structures various forms. The shelves themselves can have any shape (even asymmetrical and tilted). Everything is limited by the space of the room and the designer’s imagination. GCR is often used to create built-in cabinets and walls. This allows you to build a structure that will replace the furniture wall.
This type of furniture has its advantages:
- The size and number of shelves can be determined independently, taking into account the dimensions of existing equipment.
- You can install sockets and lighting.
- There is no need to waste time searching for a suitable furniture wall or slide, which may be more expensive than the construction materials.

On the other hand, drywall shelves cannot be moved or sold like furniture. Unlike cabinets, TV designs using gypsum plasterboard shelves are more functional. You can install additional wall or spotlights, LED bulbs and ribbons.
The backlight looks beautiful and is functional:
- additional lighting is created;
- with the help of light you can zone the space;
- in the absence of main lighting, cozy illuminated islands are formed.


It's not always possible to find the right one corner rack. Plasterboard shelves solve this problem perfectly. At the same time, you can adjust their size and shape. Open shelves do not reduce the space of the room, fitting organically into the interior. Plasterboard shelves for books require special attention. Printed products weighs a lot bookshelves must take into account the increased load. Since gypsum board is not as durable as wood, the shelves themselves should not be large. They are designed for a maximum of 10 books.
If the house is multifunctional, for example, it is an open plan or a combination of rooms (bedroom and living room, kitchen and dining room), zoning partitions with through shelves can be erected from plasterboard. This will allow you to delimit the space. Shelves can be used for storage or decoration decorative vases. This option is also relevant for studio apartments.


You can make shelves from gypsum plasterboard around window and door openings. Near the window you can organize a podium with a niche for storage. When installing, you need to take into account the weight of the person; you must not forget about the located batteries. If you do not install ventilated grilles, the room will cold period It will be poorly heated. Shelves can be located from the opening to the wall or in the form of narrow pencil cases to the ceiling. Above the doors you can organize a mezzanine on which to place bulky but light objects.
Shelves don't have to be wide. They can accommodate a lot useful little things. If there is a desktop near the window, gypsum plasterboard shelves will replace the rack and cabinet. With them you can organize a comfortable workplace.


Communications can be hidden in plasterboard box. If these are heating pipes, you need to install ventilation grates . On the outside you can place several small decorative shelves.
If this a drain pipe in the sanitary room, you can make an interesting pencil case. This is how it will look externally. It should be quite spacious inside: you can hide mops and brushes near the pipe, and mount several narrow shelves for household chemicals.
A similar technique can be applied to the bathroom, making a box with shelves and niches.

Scope of application
Plasterboard shelves can be installed in any room. However, its humidity must be taken into account.
GKL does not like water and condensation, so for rooms with high humidity(bathroom or kitchen) it is better to use moisture-resistant material.
- In the living room most often erected central structures all over the wall. They are convenient for organizing niches for a TV, which is usually placed in the living room.
- Also, decorative structures are often erected in the children's room to separate the playing, sleeping and study areas. This is especially true if the room is shared by two children.
- In the kitchen Usually open shelves made of gypsum plasterboard are placed. They must be strengthened, since the dishes are heavy.


- In the bathroom and toilet Due to limited space, it is quite difficult to select racks and cabinets. It is easier to solve the issue of organizing space using structures made of moisture-resistant gypsum board.
- In the hallway and corridors Most often they have closed multifunctional shelves. Mezzanines can be installed.
- In the bedroom Any solutions are possible. Shelves can be purely decorative or functional. Much depends on the area and dimensions of the furniture.


Installation
The construction of any structure begins with the creation of a sketch, which represents the appearance of the shelf after installation. It is important to consider the appearance of the shelves, functionality, and calculate the size and weight load. For development appearance The future design is influenced by the size and type of drywall. For example, For curved design, flexible arched plasterboard is used.
If a large load is planned on the shelves, then 2 sheets of material will have to be laid. Additional reinforcing elements may be required. If the thickness of the GLK is more than 12 mm, a reinforced frame will be required, since the sheets weigh a lot.
If the shelves are purely decorative, you can take material with a thickness of 6.5 and 9.5 mm. Standard width plasterboard is 1.2 m, the length can vary up to 3-4 m.


If the shelves are planned to be long (more than 1 m), vertical jumpers are recommended. Longer shelves may not be able to support the load. If they are purely decorative and narrow, you can do without jumpers. The front and side parts of the structure can be finished with arched plasterboard. It's cheaper. It will not affect the strength of the structure, but it will save money. The concave shelves that are erected from arched plasterboard look interesting.
To work you will need:
- screwdriver;
- construction knife;
- pencil;
- square, ruler;
- roulette;
- metal scissors;
- hammer drill

Materials:
- drywall;
- metal profile;
- frame hangers;
- dowel-nails;
- self-tapping screws or liquid nails.

For finishing you need:
- starting and finishing putties;
- putty knife;
- fine sandpaper;
- corners or mounting tape for the ends.


Installation begins with the construction of a frame made of a metal profile, which is attached to the wall with dowel nails.
If the design is simple, you can use wooden slats. Where the load is planned, the frame is reinforced.
The next step is to install the backlight, if it is planned. All wires are hidden in a plastic corrugated box. Afterwards, drywall is attached to self-tapping screws or liquid nails. The structure is ready, you can proceed to finishing.


What to finish with?
The finishing work is quite simple; you can do it yourself. The difficulty lies in finishing the end edges. The material may crack in the future and begin to crumble. To avoid this, the joints and ends of the sheets are finished with aluminum and plastic corners . Semicircular models can be finished mounting tape . It’s better not to skimp on it; you need to fix everything carefully.
The joints can be reinforced with reinforcing mesh. It is glued in fragments on top. The heads of the screws should not stick out; they are sealed with starting putty. After processing the joints and ends, finishing putty is applied to the entire structure.
For her completely dry it will take at least a day. Afterwards, the material must be sanded, for example, using fine sandpaper.


Drywall can be decorated with almost anything decorative material. This could be wallpaper, plaster, different kinds paints The structure can be finished with the same material as the walls. Then the shelves will look like part of the wall. You can highlight them with material and color to make a bright accent in the interior, visually divide or adjust the space.
If you plan to paint the structure with colored paint, it is recommended to make the niche lighter. It will be shaded anyway. To do this, you can dilute some of the paint from white of the same brand. Alternatively, you can decorate individual shelves or structural elements. For finishing you should use stone, mirrors, colored glass or plastic, stained glass imitation and much more.
Heavy decorative elements should not be used.


To the choice of material decorative finishing you can come with practical side. A lot depends on the frequency of cleaning. If the shelves are covered with wallpaper, they can quickly become unusable. In this case, the external vertical surfaces can be covered with wallpaper to match the walls, and the horizontal shelves can be painted.
If the shelves are purely decorative and require infrequent cleaning with a vacuum cleaner or a special brush, they can be completely covered.
If you want to make shelves in the kitchen or bathroom, materials for decorative finishing should be chosen that are more practical and resistant to moisture and dirt.
For example, you can paint them with paint. You can choose a practical color.

To learn how to make plasterboard shelves in a bathroom, see the following video.