A step-by-step guide to building a veranda at your dacha with your own hands. Do-it-yourself veranda: step-by-step solutions for a DIY extension to your house Veranda: photos of interesting solutions
Read also
The veranda and gazebo are a stylish and functional decoration of a summer cottage.
But, if a gazebo is a separate structure that can be used in the summer, then a veranda is a room attached to the house that has a roof, walls and is intended for year-round use.
A warm veranda can serve as a corridor, hallway or recreation room, greenhouse, winter garden, you can even place a swimming pool in it
What is the difference between a veranda and a terrace? These concepts are often confused, although they have structural and visual differences. The presence of a roof and walls is what distinguishes a veranda from a terrace and porch.
The veranda is provided during the construction stage of the house, but more often it is completed during operation. Therefore, many are interested in how to attach a veranda to a house with their own hands. Below are step-by-step (step-by-step) instructions for building a veranda for a private house.
1. Veranda project
Any construction begins with the development of a project.
Summarizing the experience of constructing verandas, it can be noted that they differ in the following parameters:
Location (adjacent to the house):
- Corner.
- End
- Facade.


Degree of closure:
- Open.
- Closed (glazed.


By installing sliding doors for the veranda, you can transform a closed veranda into an open one.
Design feature:
- Built-in veranda (built together with the house, has a common foundation with it).
- Attached (added as needed, has its own foundation).


Veranda shape:
- A popular shape is the rectangle.
- Round (semicircular.
- Polygonal (hexagonal, octagonal).


The main purpose of the veranda is to make the house or cottage more spacious and decorate the building. The extension of the veranda also performs a purely utilitarian function - insulating the house. Therefore, the question naturally arises of how to attach a veranda to the house correctly. Despite the fact that the veranda is a summer structure, its construction requires the implementation of a number of rules.
What is included in the veranda construction project:
- location of the veranda. The main options are indicated above. It is important that the extension is a continuation of the house, representing a single architectural ensemble with it.
Note. It is better to place the veranda on the east or west side, then most of the time it will be out of direct sunlight. Also, it is worth taking into account the wind load in the region and on the site in particular.
- entry point to the veranda. The entrance can be from the street, from one of the rooms, or through, across the street into the house;
- door installation location. It is not advisable to place the entrance doors to the veranda and to the house opposite each other, otherwise drafts cannot be avoided;
- size of the veranda in the house. The length of the veranda is usually equal to the length of the wall along which it is built. The width ranges from 2.5 to 7 m. It is important here that the size of the veranda is proportional to the size of the house.
Advice from the master. There is no need to save on the project. Its high-quality execution guarantees that the veranda will be built correctly, and obtaining permits will not cause problems.
An example of a typical veranda design is shown in the diagram


How to attach a veranda to a wooden house
Any extension to a wooden house is carried out after the structure has settled. A house made of timber or logs shrinks over a certain period (the most active is the first 2-3 years). To avoid skewing of the walls, you need to wait this period, or consider a connection to the house that allows the frame to play.
2. Documents for the construction of a veranda (permit)
Adding a veranda refers to the remodeling of a house. Therefore, it requires obtaining permits.
To obtain permission to build a veranda (for an extension, reconstruction), you need to submit to the architecture department:
- a document confirming the ownership of the site;
- house project with a veranda;
- consent of all residents registered in the house;
- application for registration.
Note. You need to start processing documents 2-3 months before the planned construction work. According to user reviews, this procedure takes quite a lot of time.
In principle, it is possible to complete a veranda without documents, but when selling, renting, or inheriting, problems may arise with this property. The veranda is included in the total area of the residential building; the BTI may regard this as an “Unauthorized increase in living space.” Especially if the veranda is heated (warm veranda).
When building a veranda, you should not deviate from the dimensions indicated in the registered project. Any adjustment will entail a change in the project documentation and the payment of a fine. The consequences of unauthorized construction are spelled out in the Law of the Russian Federation “On Architectural Activities in the Russian Federation” and the Civil Code, an excerpt from which is given below.

The consequences for unauthorized construction are listed below

The last thing that will need to be done after the construction of the veranda is to legalize the construction with changes and obtain new documents.
3. Tools and materials for constructing a veranda
The tool depends on what material will be used in the construction of the extension. For wooden you need: a hacksaw, a screwdriver, a hammer and an axe, a sledgehammer, a tape measure, a plumb line, a level (construction and water level), a corner, a cord for marking, a shovel. For a metal frame, you will additionally need a grinder and a welding machine.
Material
The economy (budget) version of the veranda is a metal frame covered with plywood, OSB boards or plastic lining.
A veranda made of brick, natural stone or wood has a more presentable appearance. It is important here that the material of the extension matches the material from which the house or cottage is built or is in harmony (combined) with them.
To build a wooden veranda, you will need: lumber (log or timber, board, batten), fasteners (elements), protective solutions for wood, crushed stone, concrete, bitumen, drying oil or roofing felt, window and door systems, roofing material.
For a veranda with a metal frame: lumber will be replaced by metal corners and a steel profile, solutions for metal processing will be added, but otherwise the materials will be the same.
A polycarbonate veranda has proven itself well in that it allows you to freely admire the surrounding landscape. In addition, polycarbonate retains heat well, transmits light, and can be used for both walls and roofs. Plus, the cost of the material is quite reasonable. Cellular polycarbonate with a wall thickness of 14-18 mm is used.


Note. All materials requiring processing must be processed before work begins. Once the veranda is built, processing will be more difficult.
Preparation for construction
Construction of the veranda begins with preparing the site. The part of the site allocated for the veranda is turning into a construction site. Before starting work you need:
- remove the canopy over the entrance;
- dismantle the porch;
- clear the area of green spaces and debris;
- remove part of the turf;
- think over the place for laying building materials and construction waste.
4. Foundation for the veranda to the house
Before you start pouring the foundation, you need to determine its type. The most widespread is the columnar foundation for the veranda, since it makes it possible to attach a veranda without being tied to the main foundation of the house. However, a heavier veranda requires pouring a strip foundation.
An important point is soil analysis, which makes it possible to reasonably choose the foundation for the veranda of the house. The following are taken into account: the ability of the soil to absorb moisture, the homogeneity and composition of the soil, the level of freezing, the height of groundwater, and the stability of the soil.
In addition, the choice of base for the extension will be influenced by the design of the house’s foundation and the condition of the walls (wall material).
Having decided which foundation for the veranda is best to make, make markings for a strip foundation or mark the location for installing pillars (supports) for a pile foundation.
Note. For a small wooden veranda, it is enough to install pillars at the corners of the structure. For long and wide ones, provide additional posts along the length/width of the base. The recommended installation spacing for supports is 500-600 mm.
How to make a columnar foundation for a veranda
- dig holes for the posts about 1 m deep. It is important to know that the depth of the foundation for the veranda depends on the depth of the foundation of the house (must be the same) and the level of soil freezing;
- At the bottom of the pit, a cushion is made from a mixture of crushed stone and sand. They can also be covered in layers, first with sand, then crushed stone or gravel;
- the concrete base is poured;
- support pillars for the columnar foundation are laid out/inserted:
Made of brick. If you need to add a veranda to a brick house;
From timber. For a wooden veranda;
From asbestos pipes, concrete pillars or metal supports. For a frame veranda.
 The ground part of the pillars is brought to the height of the main foundation of the house. If the base is high, you need to bring the extension to the level of the house.
Example in the photo (the first floor is used as a garage, the veranda is located at the level of the second floor).
 The installation site is covered with sand to eliminate and strengthen the gap between the post and the soil.
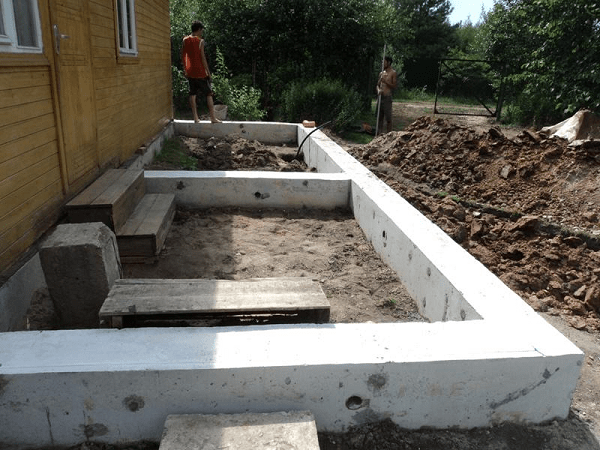
 The design of a veranda with a large mass requires pouring a strip foundation. To do this, you need to dig a trench, place the formwork (slightly higher than the required foundation height), and pour concrete. The process of complete hardening of concrete must be accompanied by periodic wetting with water to ensure uniform hardening of the concrete mixture.
5. Veranda frame
The installation of the frame begins with the completion of the bottom trim. To do this, timber is laid on the supports.


Note. The lower harness can have a double system. It is on this that the racks and floor joists will be attached in the future.
Next, supports are installed that form the frame of the veranda to the house. The frame of a wooden veranda is made of timber 120x80 or 100x100. When using logs, their diameter must exceed 120 mm. It is recommended to install supports at a distance of 500-600 mm, but in practice this is rare. However, supports must be installed in the corners and form door/window openings.
The height of the support is equal to the height of the veranda. In this case, the supports installed closer to the wall must be higher to form a pitched roof. Methods for attaching the racks to the bottom trim are shown in the figure.


Advice. The supports will be given rigidity by the jibs (braces) installed at the top and bottom.


When installing the frame, horizontal beams are installed, which will serve as the basis for installing the window sill board for glazing.
The installation of the veranda frame is completed by completing the top trim. It will serve as the basis for the formation of the rafter system, and will give the frame additional rigidity.
Note. To prevent the top trim from warping, the supports must be secured with temporary spacers.


Many people are interested in how to make a veranda frame from a log frame. Indeed, in this case, both the foundations of the buildings and the log house itself move. Therefore, all connections must be able to move (shift). Shrinkage compensators are installed from below, and from above the roof is firmly attached to the rafters of the log house.
6. Veranda roof
Part of the frame is the rafter system of the veranda. The installation of rafters and sheathing depends on what roofing material the veranda roof will be covered with.
From a design point of view, the following types of veranda roofs are distinguished:

Slope veranda roof.
The simplest and best option. In this case, the rafter system is mounted at an angle from the wall of the house, which allows rainwater or snow to flow down freely without causing damage to the building.
Note. A pitched roof is more convenient from the point of view of organizing drainage and, accordingly, installing a drainage system.

Gable roof veranda.
In this case, the veranda is attached to the house with a narrow part. It becomes like a passageway. This method has not found proper distribution. More often, such a roof is erected over a terrace.
The polygonal roof for the veranda is built in such a way that the angle of inclination is maintained for water drainage.
Installation of veranda rafter system
 A purlin board (beam 100x80 mm) is installed on the wall of the house. The timber is secured with anchor bolts. The upper parts of the rafter legs are mounted on it.
 A Mauerlat is installed around the perimeter of the frame. In small wooden extensions, this function is performed by the top trim boards. The lower parts of the rafter legs are installed on them.
 The lower part of the rafters is mounted so that it is possible to provide an overhang (removal) of the roofing material, which means protecting the veranda from the ingress of flowing water.
Note. The distance between the rafter legs depends on the slope of the roof, the width of the veranda, and the weight of the roofing material.
 When installing a polygonal veranda roofing system, a purlin board is additionally installed.
 Depending on the chosen material, they fill the lathing (for metal tiles, ondulin, slate) or make a continuous sheathing (for flexible roofing materials).
How to attach a veranda to a house - video instructions
7. Floor on the veranda
Construction procedure, materials, methods of fastening and processing.
DIY flooring technology:
Logs are installed on the bottom trim boards. The distance between adjacent logs should be no more than 1 m. The logs are installed perpendicular to how the floorboard will be laid.


Attaching the joist to the frame is an important point; the quality of its execution determines the performance characteristics of the floor. The installation of the log is controlled by the level.

What to make floors from on an open veranda
Concrete flooring on the veranda is cheaper, plus it is durable and requires subsequent finishing. For example, you can lay tiles or lay linoleum. The wooden floor on the veranda, even painted, will deform over time. It is also recommended to use plastic baseboards with wood decor.
How to cover the floors on a closed veranda
The floor of the closed veranda is being laid. In this case, installation begins with the board furthest from the entrance. It is attached to the joists directly through the board.

Subsequent boards are mounted using the tongue-and-groove method, and the hardware is fastened through the groove.


How to fix a floorboard on a veranda
It is recommended to fasten floor boards with self-tapping screws. Their length should be twice the width of the board. The distance from the edge of the floorboard to the wall is 10-15 mm. This gap will compensate for the expansion of wood during the hot season.
How to cover the floor on the veranda (open, closed)
Wooden veranda flooring is one of the most popular and easiest to install. Therefore, the relevant question is how to treat the floor on the veranda in order to extend its service life and preserve its aesthetic properties.
Floorboards will last longer if they are additionally coated with solutions that prevent the appearance of fungus. As a finishing floor covering, a decorative layer of paint or stain is applied, covered with varnish on top.
A new product among paint and varnish materials is Dufa “Liquid Plastic” paint, intended for outdoor use (well suited for an open veranda).
Of the transparent coatings that have earned the respect of users:
- Tikkurila Valtti (wood oil);
- Pinotex Terrace Oil;
- Alpina Oel Terrassen Dunkel;
- Watco Danish Oil.;
- as well as epoxy varnishes (yacht varnishes), which are intended for use in damp environments.
- the product must be intended for wood;
- be resistant to abrasion;
- be resistant to environmental factors (water, temperature, ultraviolet).
It is worth noting that veranda floor coverings are quite expensive, but this is justified by their service life, without refinishing, and high aesthetic properties.
8. Roofing material for the veranda
As a roofing material, it is better to use a material for the veranda roof that is installed on the main building (house or cottage). Bituminous shingles have proven themselves well. They are installed in accordance with the manufacturer's recommendations.
 Note. To prevent water from flowing inside the veranda where the roof of the extension meets the wall of the house, you need to lay a joint strip on top of the roofing material.
 Correct installation of the joint strip involves making a gash in the wall of the house and inserting the narrow edge of the strip into it.
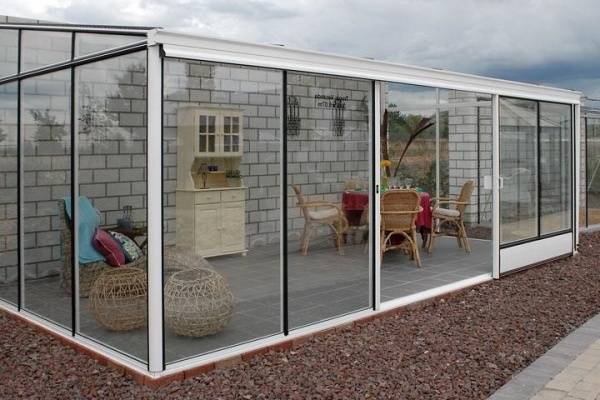
 You can admire the surrounding beauty in the warmth of the veranda by installing transparent roofs for the veranda. In this case, the role of roofing material is played by glass or cellular polycarbonate.
 Telescopic awning roofs or sliding roofs for the veranda are considered new.
). Installation of finishing materials depends on their type.
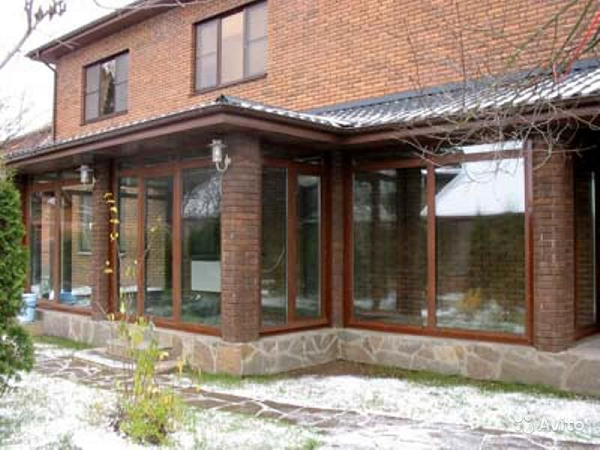
It is important to know that the wall of the veranda adjacent to the house is secured with embedded metal elements (parts). The fastening must be rigid.
Today, it is popular to cover veranda walls with sliding systems, the upper half of which is glass and the lower half is wooden.
Note. Before moving on to the external and internal decoration of the walls of the veranda, you need to give it time to settle. This is especially true for a wooden veranda.
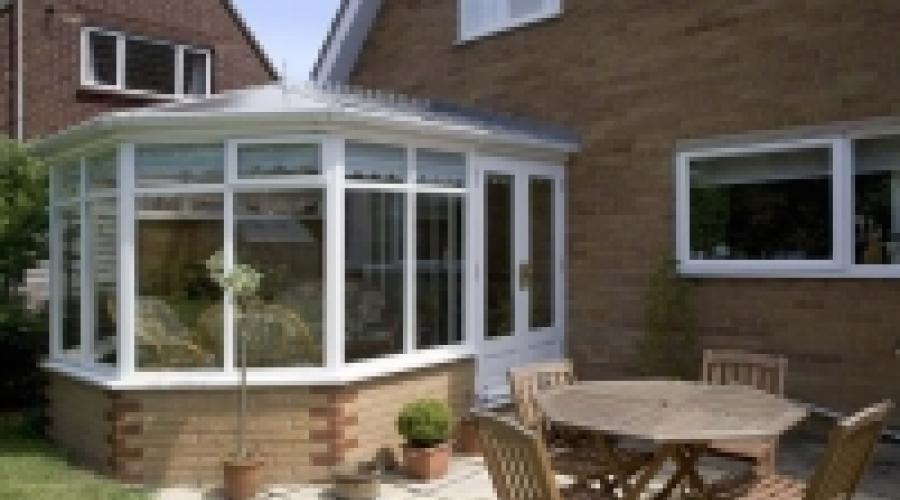
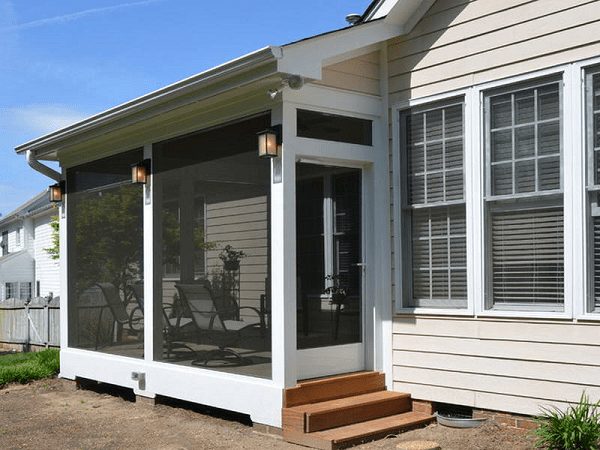
10. Glazing of the veranda
Windows occupy a significant part of the veranda wall area. Due to the fact that the veranda is a summer structure, single wooden windows are usually installed, most often plastic or wooden. Aluminum windows with multi-chamber double-glazed windows are used.
The large veranda is equipped with both opening and fixed windows. The first allow for ventilation of the room, the second - save on glazing. Noteworthy are the sliding windows, which allow you to turn the veranda into an open terrace.
Among the new products, flexible windows for the veranda stand out. They allow you to extend the operational period of the summer veranda. The advantage of windows is their relatively low cost and the ability to quickly install and dismantle them for the winter. They make the high veranda safe for children to play without compromising its attractiveness.


Soft windows for the veranda are roller systems (PVC curtains), which allow you to glaze the veranda of any configuration (round, semicircular, oval).
Installation of soft windows - video
What kind of floor to make on the open veranda in the garden, materials.
Before you start building a terrace with your own hands, you need to determine where it will be located, what its dimensions will be, and what materials will be used in the process. It is worth remembering that the veranda in the garden is a place for maximum comfortable relaxation, so it should offer a beautiful view of your garden. As a rule, the terrace is adjacent to the house and may have a common roof with it.
A summer terrace is often built near the front entrance, although in some cases it can be built at the back so that it extends deeper into the garden and becomes more secluded. Also worthy of consideration is the option of installing a garden object separately, without connection to the main house. In this case, you should choose a secluded place with an excellent view. Also, the terrace can be built on the second floor, with a special frame design. True, this will not allow the extension to be used as a summer kitchen with barbecue...
1 0 0
Terrace or veranda: how to improve a country house?
How can you build a wooden veranda or terrace with your own hands?
Requirements and preparation for construction, features of the construction of terraces and verandas
If there is a need to increase the usable area of the house, you can make a veranda. In the same way, you can build a wooden terrace with your own hands. Knowing the main features and stages of constructing a veranda or terrace, it is not difficult to build them.
The construction of these structures is carried out on the basis of the developed project. They can be erected for a finished home. However, such extensions can only be built on a legal basis. Permission must be obtained before undertaking these construction projects.
A wooden terrace is a great way to increase the usable space of your home.
The materials from which these types of buildings can be made should primarily be similar to those from which the house is built. Can...
2 0 0
How and from what can you inexpensively build a veranda at your dacha?
We would like to build a small summer veranda ourselves at our dacha. How and from what materials will this be easier to do? It is important that this construction is not inexpensive.
A veranda is a very comfortable, practical addition that protects the entrance to the house from rain and snow. An extension to a house is often unheated (in accordance with building standards), lightweight, and does not require a solid, expensive foundation.
The cheapest option would be a frame construction of a veranda made of beams (100x100 mm). You can save on the size of the structure, but take into account the glazing; the area of the veranda will depend on the size of the window frames.
Make a project or at least draw a drawing of the future veranda by hand, mark the construction site using pegs with a cord, dig holes under the support pillars, they are placed under each corner post on a sand cushion. The pillars can be made of brick, concrete, if wooden pillars, be sure...
3 0 0
Most city dwellers aim every summer to try to hide from the noise and bustle somewhere outside the city: in the garden, at the dacha or in their own country house. And it doesn’t matter at all whether you have a small dacha of several hundred square meters or a large suburban plot - its presence is important.
Agree, the main element of your landscape design is the appearance of a country house. The terrace occupies a special place here. Its correct design, the right approach to its arrangement can highlight the terrace as the main place for leisure and relaxation for the whole family and its guests. Today we will talk about how to properly create a terrace design for a private house.
Summer veranda-terrace: a cozy place in the house and at the same time in the garden
The terrace can be described as a kind of link that connects the house and the site. As a rule, this part of the house is not glazed and is often not even heated. Typically, the deck has a large fence that externally connects it to the house. But there are cases...
4 0 0
The veranda at the dacha is the place where summer residents spend most of their time from spring to autumn. On the one hand there is fresh air, an open view of nature, on the other it feels like home. Rain is not scary. There is a floor under your feet. Comfortable furniture. You can get into the interior at any time. If the veranda is glazed, in winter it is a special pleasure to sit on it in a chair, drink hot tea, and admire the snow-covered view.
What is a veranda
The word veranda came into Russian from the English veranda, and there from the Portuguese varanda, which means “balcony”. In order to spend time in nature, but not on the ground, there are three types of country houses:
Veranda; terrace; alcove.
A gazebo is a pavilion, the location of which is in no way connected with the house. It is placed somewhere in a picturesque place. You have to get there from home through open areas. Although a covered passage may also be provided.
Terrace is sometimes considered a synonym for veranda. But that's not true. Terrace,...
5 0 0
What materials are verandas and terraces made from?
In the summer heat, we all enjoy sitting in the shade of the cool summer terrace, being alone or surrounded by loved ones or friends. It seems that the terrace is something self-evident, primordially Russian, but this is not so. The word came into the Russian language in the nineteenth century from the French language and had a completely different meaning than it does now. Around the same time, the English word veranda came to Russia.
As V.I. Dahl’s “Explanatory Dictionary of the Living Great Russian Language” says, a terrace is an embankment, a rut, an earthen embankment or a spacious wide porch.
The “Etymological Dictionary of the Russian Language” says that a veranda is a portico gallery borrowed from English.
Open terrace.
The open terrace is an invention from the times of colonization of South America, Africa, and Southeast Asia. For the hot and humid climate of the tropics, being indoors is not always comfortable, so a wooden platform in front...
6 0 0
Summer corner: building a veranda
House 23 July 2014 11:07 2212Everyone knows what a noble and aristocratic look a veranda gives to a country house: it can perform many functions - an entrance hall, a living room, a summer kitchen, a winter storage room... if you are thinking about building a veranda in a country house or country house, then you will our review is useful.
What types of verandas are there?
The whole variety of verandas can be divided into two types: built-in and attached. Built-ins are usually built along with the construction of a house and always have a common foundation with it; often the house and veranda have a common roof. If the veranda is being built on its own foundation, then it is attached.
Of course, the best option is if a country house or cottage is built immediately along with a veranda, or the possibility of “joining” the veranda to the house is provided for in advance. At the same time, right away...
7 0 0
There is nothing more pleasant than a warm summer evening! You sit on the summer veranda and watch the colors of the passing day! You feel comfortable, calm and it seems that it will always be like this! It’s a pity that such a wonderful vacation is the benefit of only one time of year. But such injustice can be easily corrected! All you need is to glaze the veranda! This way you can admire the autumn and winter landscapes without leaving your own home. After all, you will be in a room that is reliably protected from wind and cold!
Making an unheated room usable at different times of the year is important for many reasons. For example, some people want to set up a winter garden on a glassed-in veranda. Here you can arrange a resting place and even make a study. Everything will depend on the layout and design of your home or country house. There are different options for glazing this useful area. You can glaze only the central part of the veranda, and...
8 0 0
A comfortable summer holiday in nature is the winter dream of all owners of country houses; planning for the summer season begins in February. But what comfort is there without a summer veranda? It’s nice to take a break from gardening and gardening work, drink a cup of morning coffee, sit with friends over a barbecue, and just read your favorite book.
The peculiarity of this small extension is that there are no rules for its arrangement, except one - it is built where the entrance to the house is located. The veranda to the house can be open, closed, glass, wooden. Geometrically, it can be round, it can have 4, 5, 6 corners, and it can also be “L”-shaped. The veranda at the dacha can be made multifunctional - along with a resting place, it can be equipped with a kitchen, a bathroom, a shower room, and a storage room for garden tools.
The main thing is that everyone can build a veranda with their own hands, even if they are not a builder. Ordinary building materials, tools that every owner has...
9 0 0
Attaching a veranda to your house with your own hands is not difficult,
but this must be done with a minimum of errors.
A veranda is an additional glazed, open or semi-open room attached to the house, the main purpose of which is to protect the front door of a private house from external atmospheric influences.
All other advantages of the veranda are concomitant, which only adds to the degree of its importance. In accordance with the purpose and functions assigned to it, the veranda can have different sizes - from a regular vestibule, which serves as a transition from the street to the front door of the house, to a fairly spacious room that has a multi-purpose purpose.
The construction of a veranda is relatively simple, regardless of size, which allows you to make it
Do-it-yourself, not even for a construction specialist. But, knowledge of some of the features of constructing a veranda will allow you to make a better quality extension to the house, with greater savings in material and time.
Having looked at various...
10 0 0
A veranda is an extension to a private house, a very comfortable summer room that allows you to spend most of the warm season in the fresh air, in communion with nature. In addition to the health benefits, physical and spiritual, the veranda also decorates the house, making it more hospitable and welcoming.
Scheme of construction of the veranda: 1 - release of the floor beam of the house; 2 - veranda floor beams; 3 - upper trim of the veranda; 4 - lower trim.
Start of construction
Each person decides independently how to build a veranda in order to feel comfortable at any time of the year. After all, this room is convenient not only in summer, but also in winter. It’s nice on a frosty, sunny day, sitting comfortably in a chair on the veranda, to watch the cheerful fuss of sparrows on a nearby apple tree.
Having decided to build a veranda, regardless of whether it is initially part of a house under construction or is attached to an already finished structure, you need to decide on some basic details:
...11 0 0
The veranda and porch are the “face” of your home. The general idea of the home and its owners depends on how they look. Building a veranda and porch at home with your own hands will not be much of a hassle - here you can apply the skills acquired when arranging a gazebo and a summer kitchen.
Take advantage of the tips on how to create a veranda with a porch in your home and show your individuality by giving the structure a unique look. Below you will read about constructing a porch in the house, making a foundation for the veranda and constructing both extensions.
Construction of a porch and veranda in a house
In fact, the veranda and porch have the same design - these are light extensions to any building for domestic and commercial purposes. The veranda traditionally has glazing, but the porch does not, that is, a glazed porch can be called a veranda, and a veranda without glazing can be called a porch. In addition, a large area porch is usually called a terrace.
Both of these buildings, according to construction methods and types...
12 0 0
The presence of a veranda makes a country house more spacious and in many ways more attractive. The veranda is a summer room and therefore does not require insulation. Structurally, it is quite simple and can be built with your own hands without much difficulty.
When building a frame house, it is better to take into account the presence of a veranda in advance, so that its frame is integral with the frame of the house. But even if the house is built without a veranda, its extension will not become an insoluble problem. The veranda is located along the main or end facades of the house so that there is a door inside through which one can get to it from the main premises. As a rule, the length of the veranda is 3-6 m, and the width is about 2.5 m.
Foundation
The veranda frame rests on a columnar brick foundation. Foundation pillars must be laid under each of the corner posts of the frame, and if the veranda is long, under one or two intermediate ones.
After marking in places of the future...
13 0 0
Every person who has a country house outside the city will definitely think about improving its space, since there is nothing more tempting than starting the day with a cup of freshly brewed coffee and a newspaper, sitting on the veranda among flowers, greenery and perhaps a small pond.
To build a veranda at home, there is no great need to hire a newfangled designer. It is enough just to have a great desire and rich imagination.
However, before you start implementing your own project, decide what you want to see on it. Be sure to think about special furniture and do not forget that it must be of high quality. You can follow fashion trends and look for soft pillows and a hookah. For decoration, it is recommended to use climbing plants, floor lanterns and a personal bar.
Open veranda or closed?
The veranda must match the style of the house in order to blend harmoniously with the architecture and fit into the surrounding...
14 0 0
In the summer, the terrace becomes a favorite place for gatherings for most owners of country houses. Here, enjoying the scenery, you can discuss the latest news over a cup of tea, or just relax in silence, watching nature. Therefore, a summer house with a terrace has become an integral vacation spot for city residents.
Unfortunately, with the arrival of autumn, most people begin to deny themselves such a pleasant pastime. Indeed, traditionally our verandas are intended exclusively for summer recreation. But the situation is not hopeless. If you are wondering how and with what to insulate a terrace, we are ready to tell you in detail everything about the materials and technology.
How can you insulate a terrace?
When understanding the problem of how and with what to insulate a terrace, first of all, you need to decide on the materials. There are a lot of thermal insulation materials on the construction market. There is a wide choice of hydro- and vapor barriers.
Foam plastic and...
15 0 0
A veranda is an extension to a house, inside which the entrance door to the house is most often located. This design, on the one hand, will decorate a country house and add living space to it, on the other hand, it will protect the entrance to the house from weather conditions and save heat.
FOR EVERY TASTE
Summer veranda made of wooden beams
A veranda made of wooden beams is the most popular option for domestic summer residents, primarily because the frame of such a veranda is quite possible to build...
16 0 0
Spring and summer drive out city dwellers who have been stranded in smoky megacities to their dachas. Here you can relax your soul, kneading bones in the beds, and then drink tea and bagels in pleasant company. During the summer season, skillful housewives delight their households with delicious dishes of fresh vegetables and fruits, and prepare preserves for the winter. The only problem is that in hot weather it is difficult to cook in the kitchen, which turns into a real gas chamber due to the high temperature. There's no time for culinary masterpieces here! A summer kitchen with a veranda will help solve this problem.
How pleasant it is to treat your friends to barbecue or grilled dishes in the fresh air, to prepare jams, pickles, marinades, and in the evening, sitting in a rocking chair and admiring the sunset, sipping aromatic herbal tea. You can't imagine better bliss! How to properly arrange a summer kitchen with a veranda to make it comfortable and cozy?
There are several options for placing a summer kitchen with a veranda on the site. Most...
17 0 0
This is one of the most important stages of construction, which must be approached with the utmost seriousness. First of all, decide on the type of roof - for a simple summer veranda, I recommend making a pitched roof with a slope of 20–25 degrees. To do this you need:
1. Install pillars of the required height, and screw a beam onto the wall of the house - for wooden cottages.
2. Support the load-bearing beam on the support pillars, and create a ceiling between the supports.
3. Lay a layer of waterproofing (roofing felt).
4. Lay roofing material (slate, tiles, etc.).
5. If desired, decorate the ceiling from the inside with siding or clapboard.
The place where the roof of the summer veranda is adjacent to the wall of the main building deserves special attention. I recommend treating this seam with heated bitumen or resin to ensure its maximum...
18 0 0
Closed and open, stone and brick, with full-wall windows and semi-shaded ones - verandas have long been transformed from small buildings that acted as utility rooms into spacious and functional rooms. If desired, the additional area becomes a summer dining room, a refuge on a hot day, and, subject to careful insulation, a winter garden. It is difficult to say what exactly the veranda should become: with your own hands, you can create a modest extension or a luxurious hall with equal success.
The veranda is never considered as a separate structure: it is a part of the house that is attached to the main building during the construction process or after some time. Most often it is adjacent to the facade or end side, that is, to the wall into which the door is mounted. Thus, to get into the house, you first need to go to the veranda.
Traditionally, extensions are divided into two types:
Open - the upper half of the walls is missing, and the roof is supported by beams; ...
19 0 0
We are building a summer veranda
A veranda is an extension to a house, inside of which there is most often the entrance door to the house. This design, on the one hand, will decorate a country house and add living space to it, on the other hand, it will protect the entrance to the house from weather conditions and save heat.
The veranda is a convenient place to host friends’ meetings, picnics and family celebrations, as well as admire the sunset during an evening family tea party. And the sun's rays penetrating through the large windows of the veranda will themselves create a cozy and joyful atmosphere.
FOR EVERY TASTE
Verandas are distinguished by location, architecture and glazing method.
First of all, all verandas are divided into glazed and open (non-glazed, also known as terraces).
The material for the veranda is timber, brick or metal profile.
A veranda made of wooden beams is the most popular option among domestic summer residents, primarily because it is quite possible to build the frame of such a veranda yourself,...
20 0 0
Attaching a terrace or veranda to the house
Living in a private house or living in a country house convinces us that a terrace is necessary. It allows you to experience the pleasure of being outdoors without giving up the comfort of home.
The terrace is a transition zone from comfortable scrap to “wild” nature, which not only pleases, but also periodically upsets with rain, scorching sun, wind, cold and dirt. Therefore, a good terrace should be spacious, have a roof that protects from rain, shade from the sun and wind protection, and its covering should be easy to keep clean. Unfortunately, in most regions of Ukraine, an open terrace cannot be used all year round. Its winter version is a glazed veranda, but this is a more complex structure, less close to nature. If we compare a terrace with a patio (a paved area in the garden) or a gazebo (a separate covered structure), then the terrace is more comfortable, and it is more convenient to use the patio and gazebo - elements of the garden. and the terrace is part...
21 0 0
Do-it-yourself veranda at the dacha
A dacha is a break from the hustle and bustle of the city. Some associate this place with the summer harvest, while others associate it as a family vacation spot. It is the association of a dacha with a cozy relaxation corner that leads to thoughts about building a spacious veranda, where you can sit perfectly and enjoy clean air, silence or the amazing singing of small birds.
What it is?
Veranda - relaxation area
In fact, the veranda at the dacha is a kind of continuation of the house, but it is an unheated room. You can hire workers to build it, or you can use a budget option to show your creativity and imagination. The room can be closed (glazed), or it can be built open for better merging with nature.
Quiet summer evening
Where to start? The first thing is your imagination and desire to do it yourself! The second important step to starting any construction will be drawing a sketch of the desired object. In the project you implement...
22 0 0
Everything is changeable in this world, including our ideas about the reality around us. And what seemed yesterday to be sufficient and satisfying all our ideas about housing, for example, today, according to our understanding or due to truly changed circumstances, turns out to be insufficient, cramped, and small in area. What can be done in this case if it is not possible to build a new house? We can advise one thing - to expand the usable area of the home by making an extension.
What will the extension do?
An extension is an extension of the space in your home. What can be placed on these newly appeared square meters? There are a lot of options here. It could be:
Summer cuisine; winter Garden; library; living room and so on.
It all depends on your needs, or desires, or necessity. But when you have already decided what you lack most, the question arises about the material that needs to be prepared in order to turn it into reality...
23 0 0
Often, owners of private houses want to have a summer kitchen or veranda where they can relax, chat with friends or family, or organize a party in the warm season. It is possible to provide for the presence of a veranda at the design stage of the house, but it often happens that it is attached to an existing building. Below we will consider the case of a veranda being completed.
How to build a veranda with your own hands?
First you need to choose the location and size of the veranda. Usually it is located in front of the main facade and is equal in length to it. The width of the veranda is selected within 2 m. It is also advisable to first draw its plan with window and door openings and main dimensions. This will help determine the consumption of building materials, and will also facilitate the construction process itself.
Foundation for the veranda
The start of construction is traditionally associated with laying the foundation. Its type must match the type of foundation of the main house. Otherwise...
24 0 0
A veranda is not an obligatory element of a private home, but the appearance of a bare front door, you see, is not very attractive.
You can, of course, simply make a canopy over the entrance, but it will not be able to protect against wind and dust; it is very difficult to have a tea party or spend a summer evening under it.
The veranda provides such opportunities, which is why it is worth building.
Moreover, it can be a lightweight summer structure that does not require insulation.
Where to start building a veranda for a house
If you decide to start adding a veranda to your house, the first thing you need to do is develop a building plan.
If you decide to do everything yourself, then you will also need tools.
It is very important to think about the style of the building.
The veranda should blend harmoniously with the house and the surrounding landscape.
Verandas made of the same material are usually attached to wooden buildings, but this...
25 0 0
Every little thing, created with love, decorates the house. A self-made veranda is ideal for relaxing in the lap of nature. This place can be used for organizing family celebrations or spending private leisure time.
Design Basics
Sketch of a house with a verandaIt is necessary to consider the veranda as part of the house, and not to single it out as an independent structure. The peculiarity of the veranda is that its construction can be carried out simultaneously with the main building or some time after the completion of the house. As a rule, the extension is carried out from the facade or from the end, that is, in any case, a ready-made doorway is required. Sometimes, the absence of a door does not stop the flight of design ideas, but a decision is made to create another door in the required location.
Verandas are:
- open. In this case, the walls are partially (upper half) missing. The roof is installed on beams;
- closed. In this case, half or most of the walls are glazed.
 The veranda should continue the style of the house
 When developing a veranda project, you should take into account the style of the house; its size and shape should harmoniously serve as a continuation of the main building, while the choice of materials should also be appropriate. The most suitable sizes for it are within the following limits:
- length – 4-7 m;
- width 2.5-3.5 m.
A smaller area can turn the veranda into a cramped room of unknown purpose, and a larger one can disrupt the harmony and comfort that such a structure should create.
Heating of the veranda, including indoor spaces, is most often not provided.
Material selection
When constructing a veranda, you should use the rule: the style of this extension must stylistically match the house. In addition, the compatibility of materials and their combinatorial nature should be taken into account. Let's look at the most popular materials for building verandas.
DIY polycarbonate veranda: a modern solution
Polycarbonate is a modern material that successfully competes with traditional materials.
 Polycarbonate - a modern material
 Polycarbonate is a very durable material and, therefore, its manufacturers rightly claim that it is safe to use. The material has good flexibility, and its deformation does not require special thermal preparation or devices; it can be worked with at any temperature. The cost of the material is relatively low. If we compare it with glass, the price difference between these materials is significant.
Due to a significant increase in the deformation coefficient, temperature changes have a negative impact. For specialists, this factor is nothing more than a certain inconvenience when glazing. The linear expansion of the material can be leveled by increasing the gaps between the frame and the glazing material.
 Sketch of a polycarbonate veranda
 Polycarbonate scratches easily, which can lead to rapid clouding. In addition, with prolonged exposure to ultraviolet radiation, the material may take on a yellowish tint. In order to prevent this phenomenon from occurring, a protective film is used, which, in addition to its main function, additionally strengthens the polycarbonate.
DIY veranda made of wood: environmentally friendly and beautiful
 Veranda made of wood: simple and environmentally friendly
 The most common material is wood. With the presence of new materials on the building materials market and innovative construction technologies, the leading position of this material remains unchanged.
When constructing a veranda, the choice of construction method is quite wide. It can be made of frame-panel, timber or log. The last option is suitable for a house built in the form of a log house. For constructing a building with your own hands, a frame-panel veranda is most suitable due to its simplicity and cost.
A wooden extension is lightweight, safe for the environment and people, and will also have a relatively low cost.
It should be understood that wood is quite a fire hazardous material. In addition, it requires special treatment to protect it from the effects of biological factors.
DIY brick veranda. Popular material
 Brick veranda
 Constructing a brick veranda has a number of advantages. On hot days, this room remains cool. The material does not require special care, has a long service life and is fireproof. The brick structure has exceptional reliability and strength.
If such a room is additionally insulated and double glazed, then, if there is heating in it, you can pleasantly spend time on the veranda at any time of the year.
Due to the fact that the brick structure has a significant mass, it is imperative to organize a reinforced foundation.
How to build a veranda - step-by-step instructions for the craftsman
Foundation
 The foundation of the veranda is an important matter
 If the foundation has not been laid, it should be built in accordance with the selected type. As a rule, a strip or column type foundation is constructed. If the area of the planned construction is swampy, then the use of piles is necessary. In order to select it correctly, the combination of the following factors should be adequately assessed: the material used, the type of foundation of the main structure, the characteristics of the soil and its slope.
The strip foundation is made of concrete, blocks, brick, stone. For its installation, a cushion of sand or gravel is provided. In most cases, it is not connected to the house and is erected as a separate building.
For lightweight structures, a columnar type foundation is constructed. These include structures made of wood or polycarbonate. Brick or reinforced concrete pillars are installed on a sand bed. They are waterproofed, after which the joists and floors are laid.
 Columnar foundation
 Frame
As a frame for the structure, you will need a beam with a cross-section of about 100x100 mm or logs of the appropriate size. The lower belt of the harness must be made of dense wood, preferably oak.
 Veranda frame
 Connections in the corners of the structure are made in half a tree. The bottom trim must be made with a double layer of material. Lags are inserted into it to organize the floor. The racks are fastened using spikes to the lower belt of the strapping with fixation with nails and staples. It is possible to replace beams made of solid material with prefabricated racks made of boards. The strapping of the upper chord is fixed to the racks and later the rafters are mounted on them. Fastening occurs in the same way - using spikes and nails.
A horizontal beam is fixed to the wall of the main building. It, as well as the racks that are adjacent to the wall, are strengthened with anchors.
It is important that the roofs of the veranda and the house meet, with the latter going under the roof of the main building.
Roof
The roof of the veranda is made of a pitched roof with a greater slope compared to the roof of the house. It is desirable that the roofing material of the veranda and the house be the same. This optional requirement is due to aesthetic considerations. The choice of roofing material is not a fundamental issue.
It should be understood that the use of a metal profile sheet will require sound insulation measures.
The construction of the roof begins with the installation of sheathing. For this purpose, unedged boards are used, which are laid in a horizontal plane at certain intervals. Roofing material is placed on the sheathing. The small slope of the veranda roof makes it necessary to lay it with an overlap slightly larger than is usually done. Experts recommend organizing waterproofing using roofing felt.
Floor
The boards that will make up the floor are laid on logs that were previously prepared. The boards must be at least 40 mm thick. Before starting work, the material is treated with antiseptic. Upon completion of installation, the boards are painted.
To circulate air masses, ventilation holes are installed in the underground.
Window installation
The veranda has windows that are larger than those in the main building. This is due to the fact that the room is intended to be used in the warm season, when the sunlight is sufficient to illuminate the room. The location of the window sill board should be at a distance of about 500 mm from the floor.
Most often, windows have single glazing. The frames can be mounted on racks, which will result in a showcase type of glazing. The gaps are eliminated using construction foam, which is then covered with platbands.
Walls
The choice of wall material depends on the preferences of the home owners and the requirements described above for the design of the veranda.
The easiest option for do-it-yourself installation is to use tongue-and-groove boards, which are connected to each other in the same way as lining and attached to the racks.
DIY veranda: construction video
In the proposed videos you can see the process of constructing a veranda.
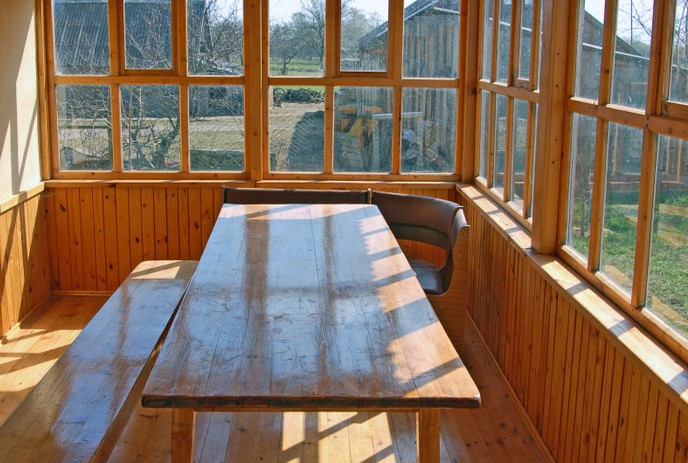
Veranda: photos of interesting solutions
The veranda is the decoration of the site. Look at photos of different porches for inspiration.
 Veranda with sliding wall
  Veranda with stairs
  Veranda with curtains
It’s rare that a private house is complete without a veranda. The easiest way is to build it together with the house on the same foundation, but most often the issue of construction is postponed for financial and organizational reasons for an indefinite period. Therefore, the construction of a veranda for a house in 90 cases out of 100 has to be done in the form of an extension to the stabilized and settled foundation of the main building.
Which design is preferable for construction on a suburban site?
Initially, the construction of a veranda is designed as a room that is maximally suitable for recreation and auxiliary purposes, especially in the warm season. A veranda in a country house is associated with a light, unheated structure on which you can store some household items, and even use it as a hallway. For a residential building, such a room could be a winter garden, part of a storage room, or even a hallway.
All existing veranda schemes can be divided into two large groups:
- Insulated or warm buildings;
- Cold structures, often with a semi-open or completely open room;
- Universal systems in which window openings can be closed with sliding, hinged or removable glazed frames.
Which design is best for your home depends on the characteristics of the building itself and its intended use. The easiest way is to build an open veranda with your own hands. To set up a winter cottage or in a house equipped with a heating system, you will need to build and attach a full-fledged foundation to the house with your own hands.
Choosing a design option for a dacha building always starts with a lightweight open structure, usually on a wood or steel frame. If the location for a summer cottage turns out to be successful, the house is gradually settled in and insulated, turning it into a winter option. The process of stage-by-stage arrangement of a dacha plot leads to the construction of a cellar, a garage, the summer veranda at the dacha turns into an insulated structure, and the place to relax is transferred to the terrace or gazebo.
In addition, the design and arrangement of the veranda must correspond to the design of the house. For a log house or a house made of profiled timber, a frame structure is perfect; a brick building will require the construction of a more capital and massive structure, at least on a stone foundation.

Where and how to place the veranda
Even the simplest construction of a summer veranda cannot begin until a decision has been made on the key issues of construction:
- firstly, choose the size and location of the site;
- secondly, the material and method of constructing the foundation;
- thirdly, think over the structure of the roof of the room.
The construction of a veranda can be done in the form of:
- A narrow and long building stretched along the wall of a house;
- Attach a structure in the shape of a rectangle, square, bay window, round or polygonal to the main building;
- Divide the room into mating parts in the form of the letter L, located along the mating walls of the house.
Important! The future design of the foundation and roof depends on the material and shape of the veranda.
An enclosed space with an elongated, rectangular shape can be attached with a smaller plane to the facade or rear wall of the building. This scheme is most often used in the construction of a warm veranda, for example, as a place of relaxation or a study, with a winter garden or a miniature greenhouse.

The standard roof structure involves the use of a shed system or covering the base of a second-floor balcony.

If the veranda design requires solid protection from rain and wind, you can use the ceiling as a base for an open terrace.
The construction of the above scheme will require a small but fairly rigid base with the structure tied to the load-bearing elements of the building, therefore such verandas are most often built from laminated veneer lumber on a concrete strip.
Building materials for arranging a veranda
To build a veranda frame, steel profiles and sheet metal are rarely used as load-bearing structures; the use of expensive metal profile elements is justified only if the design or characteristics of the building or load-bearing supports require the most durable, rigid and light material.

If lighting in the room is of paramount importance, the veranda box can be assembled from aluminum double-glazed windows or using wooden frames made of larch or walnut.
In the construction of most amateur and professional structures, glued or profiled timber, decking boards, foam blocks and reinforced concrete castings are most often used. For finishing a summer veranda, lining made of coniferous wood and ondulin are suitable.
How easy it is to build a veranda
For your first construction experience, you can choose the design of a frame veranda made entirely of timber and boards. In this case, the building can with equal success be made only for summer, with an open space under the roof, or converted into an insulated winter version, with glazed frames, insulated floors and ceilings.
Construction of a summer version of the veranda
A lightweight structure made of wood does not require a massive, rigid foundation, but in this case, the choice of foundation for constructing a veranda with your own hands must be made based on the quality of the soil. On rocky soil, it is enough to install columnar supports as a foundation or make do with the construction of a shallow belt. Due to the light weight of the structure, it is not threatened by settlement or tilting.

It is much worse if construction is to be carried out on very heaving soils. In this case, there is only one way out - to install the structure on screw steel piles or TISE piles. Any intermediate bored pile installed above the freezing level of the soil can be squeezed out to the surface.

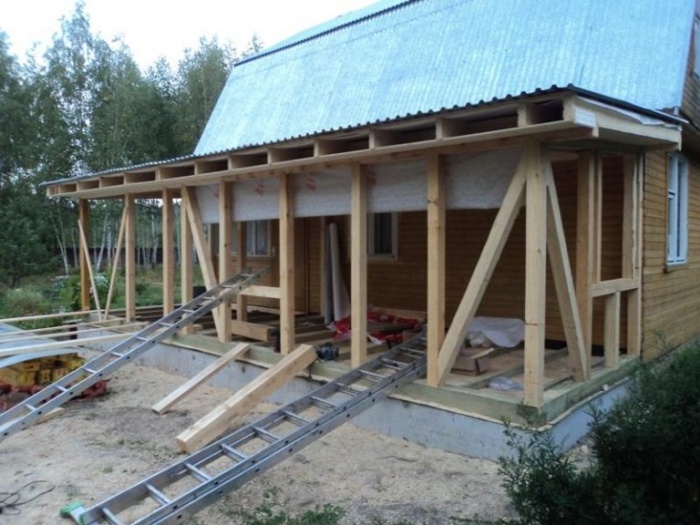
We carry out the construction of a light veranda step by step:

Important! If the construction of a veranda is carried out on a freshly assembled timber house or log house, it will be necessary to provide for the installation of screw compensators, with the help of which you can align the position of the beams sewn onto the walls of the building.

The construction of the foundation of a light veranda made of timber or logs for a fresh wooden house should be carried out according to a swinging pattern. In this case, the horizontal platform of the veranda rests on two lines. The first line is formed by a series of pillars or screw piles embedded in the ground parallel to the front wall of the house at a distance of 1.5-2 m; a beam sewn onto the wall of the house is used as the second supporting surface.
If the soil on which construction is planned is heavily waterlogged and there is a risk of flooding with rainwater, a drainage and drainage system will need to be installed on the supports. This system allows the veranda to maintain the integrity of the structure during any movement of the soil and settlement of the building. A lighter veranda structure can be raised to a greater height than the base of the house, but thanks to the “swinging” effect, the veranda structure remains intact.
How to build a warm veranda
In the construction of permanent buildings on a concrete foundation, it is customary to use a universal rule - the foundation of the extension is carried out according to the same scheme as the foundation system of the main house.
For example, for a dacha on a deep strip foundation, a heavy warm veranda can be installed on a concrete strip of similar depth, or in a cheaper way on pillars or piles with a powerful grillage.
Often, the construction of a veranda on a solid foundation is dictated by technological necessity. For example, a box with a non-standard design and location, which has a huge windage, should be firmly tied to the ground surface, and thereby reduce the effect of swaying under the pressure of the wind. But more often, a concrete foundation is used in the construction of a veranda as a foundation for a future warm extension to the house.
The construction of a closed, warm veranda on a stone foundation can be done in two ways - on a slab foundation and on a concrete strip. A super-rigid slab poured with concrete makes it possible to build a very nice aquarium veranda structure with a maximum degree of glazing.
It would be cheaper and more practical to build a veranda on a regular strip foundation. In this case, the initial stages of constructing a veranda will look exactly the same as during the construction of a conventional building. A clear example of building a strip foundation with your own hands in the video:
On the prepared and marked site for the construction of the foundation, we dig a trench 30 cm wide and at least 50 cm deep, onto the bottom of which gravel, sand, a layer of waterproofing are successively laid, and reinforcement and formwork are installed. After pouring concrete, you will need to insulate the floor and make waterproofing and concrete screed. In this case, you can get rid of dampness, rodents and other troubles that accompany unpaved underground floors.

The reinforcement of the strip foundation of the building must be tied to the reinforcement frame of the base of the house. Both foundations will be separated from each other by an expansion joint, 2-3 cm wide, and will exist separately, which will ensure good stability and the absence of cracks in the walls.

The construction of the foundation box can be done in the shape of the letter U; this option is suitable for a frame structure. For the construction of heavier brick walls or masonry from “soft” wood concrete or aerated concrete, experts recommend making a closed loop or base ring.
For new buildings, no more than 3-4 years old, the owners prefer the construction of a temporary frame structure, since as the foundation of the house shrinks, the foundation of the veranda still “plays” and settles along with the house. For buildings over 5-7 years old, you can safely install brick or aerated concrete.
To assemble a wooden veranda frame, you will need to raise the basement part of the veranda building to a height of 40-50 cm. It is rare that it is possible to make the concrete foundation strip perfectly level across the horizon. Therefore, the most difficult stage of wall construction will be laying out the first row of bricks or cinder blocks; the nuances of starting masonry with your own hands are in the video:
Rolled waterproofing and fine-mesh steel mesh are laid on top of the plinth, used as protection against rats and mice. If the walls are made of wooden beams, the mesh must be raised along the wall 40-50 cm above the base.
Vertical posts are installed on the laid base beam, intercepted by horizontal cross members and reinforced with struts. After laying the thermal insulation and vapor barrier film, the outer walls of the building are sheathed with siding.
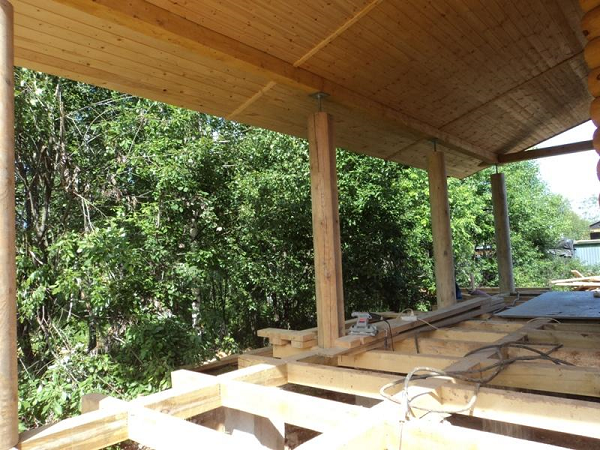
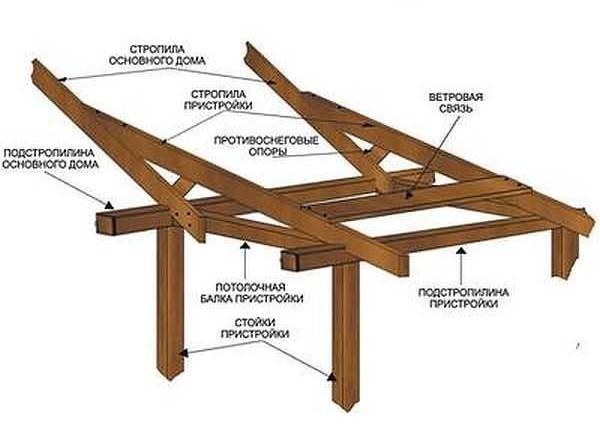
The rafters of the roof of the house and the veranda are assembled according to the diagram below.
Conclusion
Despite the fact that the veranda, in fact, is not a full-fledged separate room, the construction process will require considerable endurance and patience, and most importantly, compliance with all recommendations and instructions for arranging the foundation and connecting the two boxes - the dacha and the veranda. Otherwise, it is possible that the structure may sag and move away from the mother building.
Veranda for the house: projects, do-it-yourself photos at the dacha, videos and useful information - you will find all this in this article. A veranda is an open or closed extension that serves as a living room, a place to relax or a room for clothing. The name comes from the Portuguese word varanda, which translates as glass terrace.
The presented material is divided into four parts:
- In the first part we will tell you what a closed and open veranda attached to a house is, as well as their characteristic features. We will select the optimal materials for the construction of the frame and roof decking. We will also touch on the topic of foundation.
- The second chapter presents a do-it-yourself veranda project for a house made of timber with a polycarbonate roof, in the form of an open-type building.
- The third chapter tells how to make a veranda in a closed country house from expanded clay blocks with a roof made of metal profiles.
- In conclusion, a couple more tips - let's talk about possible construction defects, insulation, flooring and inserting windows into the building.
You can use the navigation bar and move to the overview chapter you are interested in or immediately learn how to build a veranda with your own hands. Let's get started with the review part!
Closed or open veranda attached to the house?
Open and closed types of verandas have their pros and cons, which you need to think about before starting construction.
The difference in a closed and open veranda attached to a house is based on the following principles:
- quantity of materials;
- protection from weather conditions;
- storage space;
- availability of review.
First of all, adding a veranda to a house spends much more resources on its construction than an open one. It requires fully built walls with window openings, the insertion of window frames and a more solid foundation that can support the mass of the walls. 
Weather protection and storage space go hand in hand. On a closed veranda with a door, it is quite possible to take shelter during a storm and calmly drink tea, while your neighbors from the house watch how their terrace board in the open place is flooded with rain. The same goes for storage - you can easily leave your bike on a closed veranda for the winter without worrying about the fact that someone might steal it.
On the other hand, an open veranda to the house gives an excellent view without requiring the installation of large and expensive windows. On a sunny day, it is quite possible to have an afternoon siesta on it, relaxing under the light breeze from the midday heat.
Once the decision has been made on what type of veranda is needed, try to develop a future layout for it on paper. This does not require any special skill, but even the most banal sketches will help you decide on the amount of materials and their type. It would be a good idea to mark the territory on the site so as not to make mistakes in the calculations.

Choosing material for constructing the veranda frame
This chapter discusses the most practical and popular materials for creating a frame. The best options for building a veranda are:
- beam;
- brick;
- profile pipe;
- expanded clay concrete blocks.
Before talking about them, it is worth making a small digression. The frame is a very important thing, and how strong the veranda will be will depend on its strength, so you should not choose only based on the cost of materials.

When building a veranda at the dacha with your own hands, all types of materials for the frame can be combined with each other. Brick will be an excellent support for the facade, and beams and metal profiles will help to continue the walls or supports.
timber
The veranda to the house, the projects, photos of which are presented in this article, are classics. Timber is lumber larger than 100mm. It is made either from solid wood or by gluing individual boards together. The first option for creating timber is much more reliable, although somewhat more expensive.

The shape of the timber is usually square or rectangular - round ones are already logs. It differs from each other in the processed, edging, sides. Bars are produced:
- double-edged;
- three-edged;
- four-edged.
Separately, it is worth highlighting rounded timber - this type of lumber is made from solid wood, the sides of which lead to strict conformity of dimensions relative to the center. Such beams have special strength and structure: their tension is the same on all sides, which allows the beams to retain their shape when drying up to a deviation of half a millimeter.

The main physical quality of a timber veranda is its great elasticity and strength. Unfortunately, the structure of wood can sometimes have negative consequences - over time it dries out and expands due to temperature changes. Therefore, when planning the frame, you should take this into account, giving the tree a few millimeters of margin for expansion. In addition, we can highlight greater resistance to temperature and weather conditions, which are especially evident in dried and treated wood. 
The cost of timber for a veranda in a private house depends on its quality and the type of wood used. Each type of wood has its own appearance and properties. Beams made of spruce and pine are cheaper than their counterparts made of ash, beech or oak, but do not have such an intricate pattern.
A little later, in the second chapter of this article, we will look at how to make an open veranda out of wood with your own hands step by step in 35 steps.
A brick is a product with regular sides, made from mineral substances - clay, sand and other materials. With skillful work, you can create a very strong and beautiful brick veranda attached to your house with your own hands. All bricks nowadays are standardized, which makes it possible to work with them very quickly. 
Brickwork has a number of unique properties:
- resistance to all types of weather conditions;
- fire resistance;
- durability.
In addition, brick does not require any special treatment - it does not fade over time, which allows you not to think about painting. The main disadvantage is the low resistance of the masonry to various impacts - over time it can crumble, and cracks can appear in the masonry.

Brick production is very well developed - you can find goods of any color and shape on the market. In the construction of brick verandas in a village, country house, or private house, red bricks, which are made mainly from clay, and silicate, white bricks, made from sand and lime, are most often used.
Building with brick can cost a lot of money - a closed veranda can take a couple of dozen stacks, which will cost a lot of money, however, this pays off in the durability and strength of the masonry.
Profile pipe
The metal frame veranda has also become widespread among builders. A profile pipe is a solid or welded metal product with any cross-section that differs from the standard round one. It is made from rolled low-alloy steel (although there are also stainless steel specimens), with a thickness from 1mm to 22mm. The cross-section can be very different, from 10mm to 500mm. 
The main properties of a profile pipe for a veranda include:
- ease;
- flexibility;
- no need for post-processing.
Such a pipe is ideal for creating veranda frames and posts, which are subsequently sheathed with various finishing materials. Working with it is quite simple - the pipes are cut with a grinder or iron scissors to the required height, after which they are twisted together with screws. 
The design of a veranda made from a profile pipe is easy to manufacture and will not require you to spend a lot of money, but it definitely requires subsequent processing with finishing materials. It is precisely the “frame” that is obtained from it, when almost completed structures emerge from other materials.
Expanded clay concrete blocks
Expanded clay concrete is one of the most convenient materials. The block is a kind of large-sized “brick” that is light and has heat capacity. Installing a veranda made of blocks does not take long - the blocks are lubricated with the mixture and stacked on top of each other. 
The difference between the blocks lies in their formulation - expanded clay concrete with a high cement content is more durable and stable, but conducts heat better and, as a result, cools faster. Clay, on the contrary, gives softness to the material and better insulates temperature.
The greatest difficulty in their use for these types of verandas is the connection - expanded clay concrete glue, which is necessary for masonry, is quite difficult to use. The cost of such material is low - this allows you to not spend too much on the construction of the frame. 
Choosing roofing material
When deciding what your veranda will look like for your house (projects, do-it-yourself photos at the dacha below), you should turn to the roof, but only after you decide what the frame will be made of. A house with a veranda under one roof will look better, but it is not always possible to plan a veranda at the house design stage.
The article will cover:
- corrugated sheeting;
- metal tiles;
- soft tiles.

All materials are great for a veranda, however, the best solution would be to continue the same type of roofing that is already on the roof of the house. Such a solution will make the veranda part of a single whole, which will create a complete design of the building.
On average, not too much money is spent on the roof of a veranda attached to a country house - 7-8 sq.m. corrugated sheets, for example, will cost a fairly modest amount, which allows you not to think about saving at this stage of work.
Polycarbonate
Polycarbonate sheets are a real “savior” for anyone who is planning to add a veranda to their house with their own hands. Their main advantage is considered to be transparency like glass without the latter's disadvantages - fragility and heaviness.
 Polycarbonate veranda attached to the house - photo at the dacha
 In addition, polycarbonate sheets:
- easily attach to any surface;
- have a large number of colors;
- protected from humidity and temperature changes.
The main vulnerability of polycarbonate is its poor resistance to impacts - large hail can easily pierce the sheet and ruin the roof. This is especially offensive when the sheet is thoroughly screwed - to avoid various patches, it is necessary to completely change the area.

Now it is produced in the format of solid, monolithic sheets and honeycomb panels. To work with it, it is enough to build a wooden frame, onto which sheets will be glued or screwed on top with screws and thermal washers. The screwdriver should be operated at low speed - otherwise you risk leaving a crack on the sheet.
Polycarbonate can help create a beautiful veranda for your home, completely filled with sunlight, from which no lighting will be required during the daytime. 
Corrugated sheeting
Corrugated sheet is a sheet of thin-rolled stainless steel with a wavy relief. The material is the fastest and most versatile when installing a veranda roof. On sale you can find a fairly wide range of profiled sheets - different in color, thickness (which varies from 1mm to 4mm), wave size and other factors. 
Corrugated sheets are credited with:
- ease of operation due to quick coverage of a large area;
- resistance to weather changes;
- flexibility.
The disadvantages of a thin profiled sheet can be considered softness - it can be easily pressed through by carelessly leaning on your elbow or stepping on it. Dents are quite difficult to straighten, so it is better to be careful when working. 
Attaching corrugated sheeting during the construction of a veranda in a private house is quite simple - the sheet is laid on transverse flat joists and screwed with screws with drills and a pressing rubberized washer. At the top of the sheet it is fixed at each interval between the waves, in the middle and end - after 1-2 intervals. The next sheet is laid overlapping the previous one.
It is better to work with a screwdriver in the same way as with polycarbonate - carefully screwing in the fastener at low speed, since excessive tension can deform the sheet, and the screw will leave a hole that is too wide, through which water will then flow.

Metal tiles
It can be given first place in popularity when building a covered veranda. Metal tiles are thin sheets of steel, stainless steel or aluminum, which are shaped like regular tiles. They are covered with a special protective layer on top, which, in addition to protecting against rust, provides a variety of colors and textures.

The material is well protected from corrosion, is lightweight and easy to install. A square meter of tile costs, relative to other materials, average. The price depends on the thickness, composition of the protective coating and the metal used. It is higher for aluminum and stainless steel, however, compared to them, steel provides less durability.
Creating a veranda roof in a country house from metal tiles is a very pleasant job, but its features depend on the characteristics of the sheet. For sheets without special fastenings in the form of a “loop-hook” system, it is necessary to firmly twist the sheets together with screws. The first sheet is scrolled in each wave, the middle - with an interval of several waves. Connections between two sheets are also scrolled into each wave.

With special fastenings, you can do without a large number of screws - the first sheet is most firmly attached with screws, the rest are held on the first sheet and are attached only through a section. The screwdriver should also be used as slowly as possible so as not to bend the texture.
If the roof of your house is made of metal tiles, then the roof of the veranda at the dacha can either be continued with it or covered with corrugated sheeting. From the same manufacturer, they are likely to have the same shade, which will give integrity between both buildings.

Soft tiles
 Do-it-yourself veranda for your house - projects and photos made from timber
 This type of tile is made from bitumen and fiberglass. In appearance, it rather resembles a flexible sheet of plastic material. By using synthetic materials, it can be given any appearance that will fit perfectly into the exterior interior of the veranda.
It is durable and does not require special handling. Flexible tiles are quite resistant to external aggressive environments, but at high temperatures the bitumen heats up and can become deformed over time.
At the moment it is mainly produced in the form of:
- rectangular sheets;
- diamonds;
- hexagons;
- “beaver tails” and other forms.
 Working with it is quite simple - the material is placed from bottom to top so that the top sheet overlaps the previous one. The upper edge of the sheet is nailed or screwed with a screw with a hidden head. To place tiles on the veranda roof, a flat surface over the entire area is required, which can be made using a monolithic sheet of various materials.
When using wood materials, it is advisable to lay a waterproof lining between the tiles and the wood. These are sold in stores, however, thick plastic film will do just fine instead. You shouldn’t pull it tightly in advance - when driving in, the excess areas will go under the nail, and the film will straighten out on its own. This approach is very useful when using MDF or fiberboard panels.

Choosing material for the foundation for the veranda of the house
The foundation for the veranda of the house depends on the materials chosen for the frame. Different frames require different rigidity from the foundation, which imposes certain restrictions on its construction. Next, two foundation options will be considered:
- Columnar foundation for the veranda;
- Tape base.
The cost of a veranda base depends directly on its size. If you decide to design a house with a veranda, then a single foundation would be a good option. This allows for better distribution of air movement underground. Otherwise, already laid communications may interfere with the correct placement of foundation sections.

You should not save on the foundation - in the future it can do you a very disservice. The destruction will lead to the entire structure being mowed down and its destruction. It is very difficult to fix this - to do this you will have to either raise the foundation with a jack, or completely dismantle the veranda and build it anew. This will lead to damage to the materials used and to unnecessary financial costs.
The main essence of the columnar foundation for the veranda is hidden in the name. It consists of concrete columns on which various materials are already placed. The design is easy to create and does not require the purchase of special materials - for the usual version you only need cement and sand. 
Columns can be made:
- made of brick;
- by casting from concrete;
- from foam concrete blocks;
- from parts of concrete pillars and so on.
The simplest method is cast concrete bases, on top of which there are pillars for a brick veranda. Conventional concrete is used - a mixture of cement with sand and gravel, in a ratio of 1: 2: 2.5. A hole with a diameter of about 600 mm is dug in the ground, into which a wooden box with sides of 500 mm and a height of 600-700 mm is immersed. To strengthen the base, you can place a metal mesh inside the casting, making reinforced concrete out of it, or throw in any unnecessary debris made of durable metal. It is advisable to lay a horizontal mesh every 50-100mm, which will provide the necessary pressure strength, and every 100mm vertically, which will prevent the post from falling apart. 
The quality of the brick does not play a special role - you can also use old brick, which has been cleaned of the remains of the dried mixture, but in this case it is advisable to additionally cover it with finishing material. The masonry is made in three rows of bricks, each level changing direction. The posts are placed at a distance of 500-1000mm from each other, be sure to add additional support at each corner.
On such light foundations for a veranda, a framework of boards is usually created. You can choose almost any timber - for a strong foundation, a 100mm by 60mm timber is sufficient. The beams are screwed to the brickwork using metal corners on dowels on both sides of the board. 
The main advantage of a columnar foundation for a veranda to a house with your own hands is the speed of construction - most of the time is spent on hardening the mixture and, in the case of adding brick supports, the speed of collecting the masonry. It depends on the skill of the master, but in general, it also goes quickly.
Despite the fact that the masonry itself is strong, the beams will not be able to support the weight of closed brick or expanded clay concrete masonry, therefore it is only suitable for light frames made of wood or metal profiles. Increased strength can be achieved by using iron joists, but they are expensive and very massive. 
Strip foundation
This type of foundation for a veranda is a completely poured concrete foundation. It is made by pouring a mixture of cement, sand and fine gravel into pre-prepared trenches with a wooden box, formwork. The operating time increases depending on the height of the foundation and the size of the veranda. 
Such a foundation is much stronger than a columnar one, so you can safely place brickwork and expanded clay concrete blocks on it - it will be able to withstand their weight and will not sag over time.
Do-it-yourself work with a strip foundation for a veranda begins with digging a trench. Its depth should be approximately 400-500mm. The formwork is assembled over this trench. In general, the depth of the foundation should correspond to the frost depth in your area. After completing the collection of the box, pouring the mixture begins.
The mixture is made in a ratio of 1:2:2.5 from cement, sand and concrete, respectively. For greater strength, it is worth laying it with a reinforced mesh both horizontally and vertically, with a pitch of each mesh of 100-200mm. 
It must be taken into account that the strongest foundation will be with a one-time pour, since with different hardening times the concrete forms separate pieces, which in the future may sag, causing cracks throughout the building. It is advisable to work as quickly as possible - a concrete mixer or custom-made concrete will be a good help.
The same problem will occur when adding a veranda to an already finished house with a foundation. A good idea would be to place metal rods with reinforced mesh welded to them in the finished foundation. This will save you from problems in the future. 
After hardening, the boxes are removed, and the ground next to the foundation is leveled. To make the area more beautiful, you can fill the area next to such a foundation with pebbles, or place flower beds on it. In the third chapter of the material, we will look in more detail at how to make the correct foundation for a veranda in the form of a strip.
Veranda for the house: projects, do-it-yourself photos at the dacha and how to plan the event correctly
Of course, the best option is when the veranda to the house with your own hands in the country (projects, photos below) is planned before the house is built, so that they have a common foundation and a more complete overall design. This avoids:
- collapse of individual parts of the foundation;
- differences in materials and their shades;
- the presence of unnecessary elements that may interfere with the veranda - windows, doors, etc.

However, sometimes the idea of building a veranda for a house appears already during the operation of a residential building. In this case, you need to immediately decide:
- what kind of foundation is required;
- Will the materials of the veranda and the house match?
A column foundation is much more convenient for adding a veranda to a house, especially when the height of the house allows it. In this case, additional pillars are also placed along the perimeter of the house wall so that the floor of the future veranda does not sag due to constant or dynamic pressure.
If your plans include creating a closed veranda, or using brick or expanded clay concrete masonry, it is better to use a more durable strip foundation. Additional strength can be given to the connection either with special adapters, which are mounted into the foundation of the house and filled with the mixture, or with improvised materials. As practice shows, you can do without them. 
The location of the veranda relative to the doors and windows is also important. An open veranda will not interfere with the windows in any way - the level of light passing through the opening will also be sufficient, but on hot days the roof can save you from the scorching sun.
You should not place the veranda next to the windows of personal rooms - people who will be on the veranda can violate the owner’s privacy and make his life much less comfortable.
A closed veranda and windows in the house are incompatible things. Even with large window openings, this can interfere with the overall design of the room and render the window useless for the home. However, there are exceptions to any rule.
 Incredibly cozy
 The location of the door is also quite important. If your house has two doors - a front door, the entrance from the front side, and a spare one, for example, leading from the living room to the garden, it would be more logical to place a veranda near the second one. Of course, if you want to radically change the layout of the house, you can add an additional exit to the veranda, which will become an additional highlight.
When planning, you should take into account the direction of the door opening - it can become a problem for the future interior and interfere with the arrangement of furniture. Problems with this can be avoided by using sliding entrance doors, or by making the veranda part of the house, insulating it and eliminating the entrance door on the wall of the main building. 
The difference in the time of construction of the veranda and the house can also affect the materials. When looking for similar material, you may come across:
- differences in shades that change from batch to batch;
- lack of the required range of material in stock;
- disappearance of a material from sale due to its discontinuation from production.
Of course, a veranda and a house made of the same materials look much better, but if you could not find a completely matching roof or brick, the ideal solution would be to select contrasts, both in color and texture. The only thing you shouldn’t experiment with is the roof. Different roofs (with the exception of polycarbonate) rarely look good. 
Polycarbonate veranda attached to the house - photo instructions for the project
This master class looks at how to make a veranda for a house (project and photo below) of the classic open type. This combination of materials allows you to quickly build a summer veranda made of wood, open to the sun, with your own hands, on which you can rest on a hot day. The dimensions of the finished building are 3000mm in length and 6000mm in width.
Selection of wood and its properties
When choosing wood for a summer veranda, you need to take into account that it will be under the constant influence of the environment, which negatively affects the tree.
There are two main types of wood on the market.
1. Coniferous trees - spruce, pine, larch, fir;
The most accessible is pine, which is used both in carpentry and for the construction of buildings. It is cheaper than other types of wood, which allows you to save money during construction.
Another good option for an attached polycarbonate veranda to the house (photo below) is spruce. It can withstand loads well and does not bend, and is also not subject to seasonal fluctuations in humidity, which can be important for construction in coastal areas of the seas and in rainy areas. The properties of coniferous wood are presented in the table.
Physical properties of softwood (average value)
| Wood type | Density, kg/m3 | |||||
|---|---|---|---|---|---|---|
| at 12% humidity | completely dry | conditional | volumetric | radial | tangential | |
| spruce | 445 | 420 | 360 | 0,43/0,50 | 0,16/0,17 | 0,28/0,31 |
| larch | 660 | 630 | 520 | 0,52/0,61 | 0,19/0,20 | 0,35/0,39 |
| cedar pine | 435 | 410 | 350 | 0,37/0,42 | 0,12/0,12 | 0,26/0,28 |
| Scots pine | 500 | 470 | 400 | 0,44/0,51 | 0,17/0,18 | 0,28/0,31 |
| Caucasian fir | 435 | 410 | 350 | 0,46/0,54 | 0,17/0,18 | 0,31/0,34 |
| Siberian fir | 373 | 350 | 300 | 0,39/0,44 | 0,11/0,11 | 0,28/0,31 |
A cut of softwood in the photographs below.


2. Deciduous trees - linden, birch, aspen, beech, oak.
Larch and cedar are opposite to each other. Larch is very difficult to process - the density of its core is twice as high as that of other trees, which makes the timber highly susceptible to any impact, while cedar, on the contrary, is quite soft to work with. Both are excellent at resisting moisture accumulation.
Among deciduous trees, you can take a closer look at oak - it is incredibly durable and protected from all types of damage that can overtake a tree. The main disadvantage is its cost. Ash and beech are also good for porches, but they are very susceptible to infestation. The properties of hardwood are presented in the table.
Physical properties of hardwood (average value)
| Wood type | Density, kg/m3 | Coefficients of shrinkage (numerator) and swelling (denominator), % | ||||
|---|---|---|---|---|---|---|
| at 12% humidity | completely dry | conditional | volumetric | radial | tangential | |
| Linden | 495 | 470 | 400 | 0,49/0,58 | 0,22/0,23 | 0,30/0,33 |
| birch | 630 | 600 | 500 | 0,54/0,64 | 0,26/0,28 | 0,31/0,34 |
| beech | 670 | 640 | 530 | 0,47/0,55 | 0,17/0,18 | 0,32/0,35 |
| English oak | 690 | 650 | 550 | 0,43/0,50 | 0,18/0,19 | 0,27/0,29 |
| alder | 520 | 490 | 420 | 0,43/0,49 | 0,16/0,17 | 0,28/0,30 |
| aspen | 495 | 470 | 400 | 0,41/0,47 | 0,14/0,15 | 0,28/0,30 |
See the cut of the presented deciduous trees in the photographs provided.


The choice of polycarbonate and its characteristics
Choosing polycarbonate for a veranda is not difficult, especially when you know what characteristics are needed from it. Polycarbonate sheet nowadays consists of several layers:
- protective layer that filters ultraviolet radiation;
- a coating added to selectively transmit light;
- polycarbonate plate.
Changing these characteristics allows you to achieve any appearance and transmitted light from polycarbonate. The color can be any - everything is limited only by the imagination of the master, however, in this work the choice was made in favor of ordinary, transparent polycarbonate. 
The sizes of the sheets also vary - from small panels 1000x1500mm to huge sheets 5000x10000mm, however, polycarbonate sheets can be easily cut with a construction knife. The thickness of the sheet affects its strength and wind resistance, but as the thickness increases, the price of each sheet also increases.
It is worth remembering that the polycarbonate sheet on the veranda roof can crack very quickly under high pressure. This imposes restrictions on the creation of various roofs - large gaps between the rafters can lead to breakage of the sheet at the first serious snowdrifts.
In this project, we made only one row of beams, which went in increments of 866 mm, since it was done in the Crimea, where very little snow falls in winter. You can see the main properties of monolithic and honeycomb panels in the table below.
Veranda drawing
A drawing of a veranda helps to avoid various design mistakes, and you don’t need to have any special drawing skills; a regular sketch will do. 
The image shows a schematic drawing of a veranda for a house 3 by 6 meters. The total width of the veranda - 6000 mm is achieved due to the width of the roof. For the first beam, an indent of 300 mm is made from the corners. The height of the vertical beams is 2000mm, they are installed with a gap of 1750mm. Front roof crossbar – 6000mm. 
The drawing of the veranda shows the roof. It uses longitudinal logs 3000 mm long, which are located at a distance of 866 mm from each other.
This arrangement of the beams allows for maximum sun transmission from the roofing - a small number of joists guarantees a greater amount of rays.
To strengthen the structure, you can put 816mm long bars between each longitudinal joist with a step of 1000mm from the beginning of the roof. This will firmly strengthen the polycarbonate sheets.
By the way, if you want to do this, look for the relevant material on our website.
Based on the measurements, we will need:
- 1 beam 6000mm long;
- 7 beams 3000mm long;
- 4 beams 2000mm long.
The total roof area is equal to 18 sq.m.
To strengthen the pillars, special metal legs with pins will be made, which are attached to the lower end of the beam and recessed into the concrete pillar during its pouring. You will need 4 of them.
Preparatory activities
This veranda for the house (project, photo below) provides for the preparatory activities described in the table.
 | 1. 7 beams with a section of 50x150mm. All the main elements will be sawn from it, and the corners will be cut from the remains, which will serve for additional fastening of the vertical supports. |
 | 2. 4 metal supports that will be laid with concrete and provide stability to the wooden beams |
 | 3. They can be made from leftover metal corners. They were pre-cut to a length of 100mm, and then welded to each other with an exact fit to 50mm. |
 | 4. A metal pin 500-600 mm long is welded to them from below. The length is not very critical - the reinforcement will be inserted into future holes and filled with concrete. 4 holes are pre-drilled in each wall, into which self-tapping screws will then be screwed in to secure the post in the support. |
 | 5. Cellular polycarbonate with a total area of 18 sq.m. A sheet measuring 2100x9000mm and 8mm thick was purchased. The sheet was cut for the future roof into pieces measuring 3000x2100, a total of 3 such pieces were required. The remaining 300mm can either be reduced by cutting from the last sheet, or left. When cutting, it is better to leave a margin of 10-20mm to avoid shortages - this will insure you in case of an error in the calculations. |
 | 6. You will also need steel blanks 450mm long and 10-15mm wide. |
 | 7. They are marked into three parts of 150mm each. 3-4 holes are drilled in the outer parts, which will serve for screwing in self-tapping screws and subsequently securing the upper frame trim to the crossbars of the house. |
 | 8. We receive the material ready for installation. |
 | 9. Stripes must be painted in any color. The most convenient way to do this is with regular iron enamel. You can also read in a special article on our website (point 5). |
A mixture is also required. Cement “200” is suitable. For 4 concrete columns you will need approximately 1 bag of cement, 2 bags of coarse sand and approximately 2 volumes of gravel, which is necessary for strength.
Tools needed:
- hand circular saw;
- grinder with grinding wheel, grain size – 150;
- electric plane;
- sandpaper for finishing minor polishing imperfections;
- a drill with a long drill for preparing holes in corners and crossbars, as well as a nozzle for mixing the cementitious mixture;
- screwdriver;
- rubber mallet;
- corner;
- level.
The indicated list of tools will give you the opportunity to work calmly without spending a lot of time preparing the material. By the way, a circular saw can be completely replaced with a regular hand saw, and an electric plane can be replaced with a hand plane for wood.
You definitely shouldn’t give up on a screwdriver - it will help you twist the structure and drill all the holes. Nails don't always perform well, especially when it involves nailing wood and metal together through a hole in the latter.
Columnar foundation
The discussed do-it-yourself veranda project for a house involves the use of timber as a support with reinforcing pins screwed to them with a stand for connection (mortgage).
The bottom trim is not used; the role of the floor is played by already laid tiles. This is a good option to save on flooring without losing quality.
Step 10. For the future foundation, some of the tiles are disassembled and holes are dug in them. 
Depth - approximately 300-400mm, diameter - about 200mm. This veranda is quite light, so it is not necessary to assemble a box for the post and fill it with reinforced mesh. If you plan to install the lower trim using more materials, it is necessary to strengthen the posts. Let's move on to the next stage - assembling the frame - which will bring us closer to answering the question of how to make a veranda for your home!
Frame assembly
The frame of the veranda will be assembled from timber. To do this, you must first saw it into blanks and bring it into a pleasant form by grinding. You should start by sawing 6000mm timber.
First, you should mark the required dimensions using a tape measure. On four beams we mark sections of 3000mm, on two more – 2000mm, after which we begin sawing. It is advisable to do this before sanding, since cutting already sanded wood may leave burrs and unsightly edges.
To create this veranda, it is very important to monitor the angle of the supports - they must go exactly 90 degrees, otherwise the 6000mm support beam will lie unevenly and there will be gaps visible to the naked eye.
 | 11. We begin to process the wood. Each board must be leveled with an electric plane. First, a layer is removed from one side. |
 | 12. Next, remove from the other side. The difficulty in working may be with the wider side - without skill it is quite difficult to remove the same size on each side, and it is even more difficult to do this with a regular mechanical plane. The main thing is not to overdo it and not to remove too much - the board for the veranda will be too loose in the prepared corner. |
 | 13. After trimming, we grind the surface using a grinder and a grinding wheel. |
 | 14. We carry out the procedure with each board. After this, it is advisable to put them in a dry, moisture-protected room so that the boards do not absorb water before being coated with a protective composition. |
The remaining pieces of timber will be used to make corners. Good support corner:
- has an angle of 45 degrees;
- designed for the required weight.
To do this, you don’t need to have much experience - just measure the same distance on each side of the board on which it will be attached. Since when connected, this structure will take the form of a triangle, the marked point will be its corners.
After this you need to use the formula: a 3 =b 2
Where a is the measured distance on the board, and b is the required length of the outer side of the support. We cube the distance on the board and put the resulting number in the root and extract it. You can also do this on a calculator - the resulting number will be accurate and will not let you down.
 | 15. To make an even 45-degree angle, simply gently bend one of the corners of an A4 sheet of paper to the opposite side. The resulting angle will be 45 degrees. |
 | 16. You can now draw corners from the outside and saw them. After all the manipulations, we will have corners for the veranda almost ready for installation. |
 | 17. We also grind them, and then make them perpendicular to the beveled plane of the hole using a long drill. |
 | 18. It is better to make several holes in a checkerboard pattern - this way the boards can be pressed evenly over the entire area. With such holes, the frame will come out more even, and the screws will definitely not go beyond the board. It is important that the holes are slightly smaller than the selected screws - otherwise we simply will not turn the wood and the self-tapping screw will lie freely in the boards, without having any effect on the strength of the structure. |
 | 19. After this, metal “legs” must be screwed to the future pillars for the veranda frame. To begin with, they need to be placed at the ends of the beams. If they are adjusted evenly, then this will have to be done with a hammer or mallet. |
 | 20. After the support is level on the beam, it must be screwed in place. We used 35mm screws, but you can use any you have on hand. You need to twist it first from one edge, and then from the other. |
 | 21. This way we ensure uniform placement of the part. The self-tapping screws screwed in the middle are support ones, so they should be screwed in when the part is already in place. As a result, we get a similar design. |
 | 22. Place the structure on the ground. The residue left after cutting can be used for support and more convenient twisting in the future. |
 | 23. In our case, we need 200mm self-tapping screws, which will be screwed on top of the load-bearing logs of the veranda, as well as 152mm self-tapping screws, which will fasten the corner supports to the boards. |
 | 24. We twist everything, measuring the surfaces using a metal corner or a ruler - this way the frame will come out much smoother. |
 | 25. It is better to recess the screw heads inside, or make them flush with the board - otherwise they will stick out, and when painting, excess varnish will collect and cause smudges. |
 | 26. After we have built the frame for the veranda with our own hands, it needs to be raised. You can’t handle this alone, so it’s better to call a neighbor or friends. The raised frame must be strengthened with one longitudinal beam. |
 | 27. In this case, it is temporarily secured with a clamp, which pulls the two together. On the side of the house, the beam is secured using a metal blank. |
 | 28. To level, you can place identical metal corners under each rack. |
 | 29. When the structure is leveled, you need to start pouring the cement mixture into the prepared holes. The mixture is made from cement, sand and gravel in a ratio of 1:2.5:2. Water should be added slowly until the future concrete reaches the desired viscosity. There is no need to make it too liquid or thick - it should flow smoothly from the spatula, as this will dry it out faster. |
 | 30. When the mixture hardens, the frame will look like this. After this you can paint it. For this veranda, a tinted antiseptic in Walnut color was used with an additional coating of yacht varnish. Here you can use any types of paints and antiseptics - everything is absolutely at your discretion. |
Upper harness
 | 30. Work for the top trim of the veranda begins with painting the longitudinal joists. |
 | 31. Acrylic varnish was used for coating. It impregnates the wood from moisture and prevents the process of rotting from developing, since it kills any bacterial infections. |
 | 32. After finishing painting, you need to start securing the veranda joists between the house and the frame. It is better to attach it to the house first, and it is very convenient to do this using prepared and painted plates. They are screwed on with screws on both sides. The free edge can simply lie on the frame - the concrete should already hold it quite firmly. It is better to twist the lag that we used to level the frame last, since it still holds the structure. We screw the end of the frame using 200mm self-tapping screws. |
 | 33. It is necessary to screw the screws into the frame quite accurately - otherwise there is a risk of the screw passing to the side, through the wood, which will spoil the appearance of the structure. After fixing all the logs, the structure will hold firmly and will not be dependent on the wind. |
Roof roof
Step 34. We cover the roof using already prepared polycarbonate sheets. They are attached to the upper plane of the longitudinal ones using self-tapping screws and special thermal washers. By the way, you can do without them - the veranda is open, and this will not particularly affect its insulation. The film must be removed from surfaces in advance.
The polycarbonate sheet has two sides - back and front. On the front side there is a film with marks indicating that the panel does not transmit ultraviolet rays.

You need to twist it as slowly as possible, otherwise there is a risk of cracking the polycarbonate.
Step 35. You may encounter a problem when the connection of two polycarbonate sheets extends beyond the joists. In this case, a special jumper is used, which is either put on the sheet in advance or can be placed in it afterwards. For this you only need a mallet. The jumper is driven between the sheets and does not require special fastening. 
Floor installation
On such a veranda there is no need for additional installation of the floor, but if it is needed in the future, you can simply create a lower frame on small posts along the edges and secure it with screws to the existing joists. After this, the frame can be covered with any finishing material - decking board, MDF board or linoleum.
After finishing the work, you get such a beautiful open veranda made by yourself. 
The polycarbonate used provides excellent transmission for sunlight, protecting the place from ultraviolet radiation. However, if there is too much light for you, then you can sew them that will be lined with the ceiling - this way they will cover up the excess sun.
It would be a good idea to decorate the racks with curtains or even large blinds. You can also hang colorful garlands, which will bring some New Year aesthetics even on the hottest evening, making the space more cozy.
If you wash the floor well, it will be quite possible to walk on it barefoot, taking off your shoes at the threshold. Carpets and other utensils can be placed on the veranda, and a rocking chair or hammock will be an excellent addition to the relaxation area.
Video of the construction of a timber veranda
More details on how to build a veranda for your house with your own hands can be obtained from the video, which shows in detail all the processes described in the article. Special thanks to its creators for a clear and detailed explanation of all the points!
Now let's look at how to build a closed veranda for a country house with your own hands.
Do-it-yourself covered veranda made of expanded clay blocks
A veranda for a house with your own hands in the country (the project and photos are described below) made from blocks is great for creating a warm room. It is quite durable and can serve as a good basis for building a balcony in the future.
Characteristics of building blocks
The veranda will be made using expanded clay blocks. The house itself is built from the same ones, so they will harmonize perfectly. See below for a table of types and characteristics of such blocks.
| Block type | Dimensions, mm | Density, kg/m3 | Emptiness, % | Strength grade | Frost resistance | Thermal conductivity | Weight, kg | |
|---|---|---|---|---|---|---|---|---|
| four-slit | 390x190x188 | 800-1000 | 40 | m35-m50 | f50 | 0,19-0,27 | 11-14 | |
 | 390x190x188 | 800-1000 | 40 | m35-m50 | f50 | 0,19-0,27 | 11-14 | |
 | 390x190x188 | 800-1000 | 40 | m35-m50 | f50 | 0,19-0,27 | 11-14 | |
 | 390x230x188 | 800-1000 | 40 | m35-m50 | f50 | 0,19-0,27 | 13-16 | |
 | 390x190x188 | 1000 | 20 | m50 | f50 | 0,27 | 14 | |
 | 390x190x188 | 1200 | m75 | f50 | 0,36 | 17 | ||
 | 390x90x188 | 900 | 25 | m35 | not standardized | 0,3 | 6 | |
 | 390x90x188 | 1200 | m50 | not standardized | 0,36 | 8 | ||
The blocks, despite their impressive size, are very light and at the same time heat-resistant, so the closed version of the veranda in the future can be easily insulated without constructing thick layers of insulation or sandwich panels.
The size of the blocks used is 390x190x188mm, quite common and available in any store. If necessary, expanded clay is easily cut into pieces using a grinder and a stone disc. 
Drawing and project
In order not to make mistakes during construction, it is better to think in advance about the design of the veranda for construction with your own hands at the dacha. We work with expanded clay blocks, so a more solid strip foundation is required.
You need to start developing a project by calculating the territory. In this case, a veranda is being built to the country house at the main entrance, so you need to calculate the area next to it.
The distance from the house is 2500mm, the width is 3500mm. The foundation is 500mm high. The height of the wall is 2300mm, with the highest point of the roof being 3060mm. In addition, there will be two doorways, the width of which is 750mm, as well as a window combined with the front door.
The roof will be sloped, one part is attached to the house, the other - to the erected walls. The floor is poured with concrete and in the future it can be covered with any finishing material.
In total, the area of the room will be approximately 4.5 square meters, the construction volume will be about 10 cubic meters, excluding the roof drop. You can see the drawing of the veranda below.
 Veranda to the house - project and photo of the actual building
 Tools and materials
To build a veranda at the dacha with our own hands we will need:
- Expanded clay concrete blocks;
- Cement;
- Sand;
- Gravel;
- Wooden beams and boards;
- Metal profile for roofing.
The amount of expanded clay concrete is calculated depending on the height and width of the wall. We needed approximately 150 expanded clay blocks, including cutting.
Cement is taken at the rate of 1 bag per 2 sq.m., 2.5 parts of sand and 2 parts of gravel are added to it. To save on cement, old concrete blocks will be laid inside, which will allow the entire volume to be filled faster.
You don’t have to buy sand - if you have old, unsifted sand, you can clean it using a similar sieve. 
Any metal mesh with small cells, nailed to a box of boards, will help out perfectly and make the old sand “newer.”
For formwork, you can use any more or less even boards that are suitable for creating a flat surface. You will need one board, 50x150mm and 2500mm long, and one beam, 150x150mm. The logs will be 50x150mm in size and approximately 2200mm long.
The metal profile is taken taking into account the surface - in this case it is equal to 14 sq.m.
From the tools we need:
- Concrete mixer;
- Hammer;
- Accurate level;
- Putty knife;
- A circular saw;
- Grinder with a stone saw.
By the way, a circular saw can be replaced with a grinder with wood cutting circles, but a circular saw will give a much more even and accurate cut.
Strip foundation
 | 1. To start construction, you need to dig a ditch. We will dig to the freezing level of 500mm. Taking into account that we will make the height of the foundation 500mm, then such dimensions will be enough for strength. |
 | 2. To speed up the pouring and spend less cement and sand on the work, we will place old concrete pillars inside that are not used anywhere. |
 | 3. After this, you can begin constructing the formwork. It should be approximately 500mm higher than the ditch. Any boards can be used, however, the gaps between them should not allow concrete to pass through, and the surface adjacent to the concrete should be flat. |
 | 4. To prevent the formwork of the future veranda from falling apart, we twist the boards together onto small pegs, and place the resulting panels on supports. They can rest on any solid surface, or be driven into the ground and screwed to the formwork. To get a foundation that is even in width, we will add spacers from small pegs. |
 | 5. As the concrete is poured, the spacers will be removed. After finishing, check everything for evenness using a level. This will create a “trench” into which concrete will be poured. To fix the width of the formwork, the walls can be twisted on top with small planks. This will not allow her to either disperse or collapse. |
 | 6. After this, we begin to pour concrete for the base of the veranda. We remove the pegs as the concrete is poured since they are not needed as part of the future foundation. After complete filling, we level the surface - this is necessary for even laying of expanded clay concrete blocks. In case of rain, it is advisable to cover the wet concrete, otherwise it may absorb excess liquid. After the concrete has hardened, the formwork must be removed. |
Monolithic slab as a floor
During the construction of the veranda, the option of a completely poured concrete floor was chosen, which allows you to put any covering on top.
 | 7. First, you should raise the floor. For this, either old concrete floors or ordinary soil, which should be compacted very tightly, are suitable. With a house foundation height of 700mm, it is necessary to raise the floor approximately 400-450mm from the ground. After this, the surface is covered with cellophane to insulate it from moisture. |
 | 8. For strength, any reinforced mesh is laid out on the floor of the veranda. To save money, you can use old bed frames or mattress springs - they are no worse. The most used places – the entrances – need to be strengthened especially firmly. |
 | 9. After this, the mixture is started and the floor is filled with it approximately 5-7mm. |
 | 10. After finishing the mixture, it must be allowed to dry for one day. You can level it with a wide spatula or any flat and smooth board. |
 | 11. For convenience, the step will be flooded. We separately assemble a reinforced frame for it. |
 | |
 | 13. Fill with more liquid concrete. This step will last for decades! After it dries, we advise you to pave it. |
Laying expanded clay concrete blocks
After the floor is ready, you can begin laying the walls of the veranda. In this case, it was done the other way around, however, it does not make any difference, but it will be more convenient to work with the field already made.
 | 14. Before starting work, it is necessary to apply waterproofing. For this purpose, a special mastic made of bitumen and rubber was used. |
 | 15. A layer of roofing felt is laid on top, which will not allow any moisture rising from the ground to pass through. If you don’t have mastic, you can use regular tar or bitumen - they are no worse in effect. They must be laid in an even layer, since excess pieces do not allow creating an even laying. |
 | 16. Before fixing the blocks with the mixture, they should be placed on the foundation and tried on. You can stretch a thread along the edges of the corner blocks - it will show the border of the masonry. |
 | 17. After fitting and alignment, you can begin laying the blocks. The masonry must be checked according to the level that is placed between adjacent blocks. The mixture for expanded clay concrete blocks is mixed, if possible, in a concrete mixer - quite a lot of it is required in volume, and it is undesirable to be distracted once again by tedious work. If necessary, the amount of mixture under the block is added, or excess is removed. |
 | 18. Once ready, the masonry should be allowed to dry. The top layers and the mixture absorb moisture well, therefore, to speed up the process and protect them from the weather, you need to cover them with cellophane. |
Veranda roof truss system
 | 19. To install the rafters, you will need one rectangular beam and one square one. First, the timber is attached to the side of the house. |
 | 20. Using a hammer drill, holes are made in the beam and wall. When working with a beam, you need to use the drilling mode, and with the wall of the house - a combined mode. After drilling, you need to hammer in the dowels. It is enough to use 200-300mm dowels, which are strengthened with a hammer. |
 | 21. After this, the veranda beam is strengthened with additional corners. |
 | 22. The next step is to lay the timber on the wall pillars. The beam together with the wall is drilled to 300-400mm. |
 | 23. A metal pin is driven in. You can buy it in a store, or make it from scrap materials, for example, a piece of an old lever from a car. |
 | 24. Next, the rafters are laid out on which the roof will be supported. They must be laid out at intervals of 150-250mm, otherwise the roof may collapse under the weight of the snow. |
 | 25. The rafters are secured using self-tapping screws or nails. |
Rafters can be treated with impregnation and antiseptic - this way they will last much longer and will not require replacement.
Sheeting and roof painting
 | 26. For the roof of our small veranda, a metal profile is used - to begin with, it is lined across the entire roof so that it is convenient to measure and, if necessary, cut. |
 | 27. You also need to make sure that there is a margin at the edges that prevents water from getting onto the rafters. The next sheet is screwed on top of the previous one, forming an overlap that will protect the veranda from rain and wind. |
 | 28. To refresh the appearance of the sheets, the roof can be additionally painted with enamel or nitro paint. |
 | 29. When choosing a color, you need to take into account the primary paint on the roof - white colors will require several layers to completely settle on darker ones. After this, the frame of our cozy veranda itself will be ready for cladding, inserting windows and, if necessary, insulation. |
Video of the construction of a closed veranda
More details, as well as a description of the process, can be seen in these videos. Special thanks to the creator of the presented videos for relevant and useful information!
The first part is the foundation:
The second part is the walls and floor:
The third part is the roof:
How to avoid defects during construction
Construction is invariably associated with errors; they must be eliminated or minimized in every possible way.
Approximately half of all defects are associated with uneven areas. Masonry that was not checked for level and came out skewed is short-lived and will quickly crack, and unaligned beams will transfer the curvature to the roof. 
To avoid this, be sure to use a level and a square. The first will allow you to create a flat surface relative to the ground, and the second will allow you to make even 90-degree angles.
Don’t be afraid of preliminary calculations - accuracy will help you save material and get rid of defects in buildings. When working with masonry and wood, we must not forget the usual laws of mathematics - the dependence of the sides on the angles of a triangle and calculations of the area and volume of geometric shapes. Even despite the famous phrase of Albert Einstein. 
The tool also plays a role, but the dependence here can be traced not on its cost, but on the quality and skills of the master. A good metal plane will serve much better than a cheap electric one, and it’s not a fact that an expensive one will be much better than it.
How to insulate a veranda
You can only insulate a closed veranda - for an open one it makes no sense. The degree of insulation required depends on the region. For example, for the Crimea and the Krasnodar Territory, where the temperature rarely drops below zero, ordinary compacted polypropylene placed under the walls, ceiling and floor is sufficient. 
Colder regions require warmer solutions - foam sheets, penoplex, felt and other materials. When insulating, it is not so much the thickness that is important, but rather the absence of “bare” areas and holes in the walls. All surfaces need to be insulated, from ceiling to floor.
Also, with a strip foundation, you need to make sure that there are no holes in it - the cement itself creates a good air cushion that needs to be protected from the cold.
There are a huge number of materials for laying floors - linoleum, decking boards, tiles, rubber coating and others. It all depends on your preferences and design decisions, however, there are some features of the materials. 
Tiles are always much cooler than linoleum or decking, but they are extremely resistant to all types of wear and tear. Linoleum sometimes tears easily, but it is much warmer. Everything is dictated by the characteristics of your home and region, as well as whether the veranda is open or closed.
Also, do not forget about the possibility of painting the floor covering. Paint can look very beautiful - for example, rubber paint for concrete surfaces creates a durable and long-lasting coating. The boards can even be painted every year, updating their appearance and preserving them from wear and tear.
How to insert a window into the veranda?
Glazing of the veranda depends on your requirements. To equip you only need a window opening. If desired, you can also glaze an ordinary veranda - high sliding windows with doors will be an excellent design solution for any home. 
The cost of the issue depends on the glass itself. A cheap option is ordinary glass without the ability to open, but this is completely impractical. The complexity of the work is dictated by the features of the veranda - it is much more difficult to insert windows if they were not planned.