Illumination of wooden beams in the living room. The use of decorative beams on the ceiling in interior design. Modern designs: loft, hi-tech
A beam on the ceiling can be more than just decoration. Its use has a number of advantages that will serve as a bonus to the original interior:
- If you decide to put plasterboard ceiling, the beam will help hide the joints between the sheets. This will have a positive effect on the overall appearance of the coating.
- Hollow beams allow you to hide wiring, pipes and other communications in them.
- If you wish, you can use them to install additional lighting - for example, mount it directly into the yard or turn it into a kind of frame for LED strips.
- The use of ceilings as an element of the interior allows you to emphasize the style of the room;
- To the beams from durable materials(stone, wood, metal) can be attached suspended structures- lamps, decorations and even TVs.

Of course, we should not forget about the main function - load-bearing, especially in private homes. However, in modern design, beams are increasingly used as a stylistic device. We invite you to familiarize yourself with our photo selection to understand what the implementation of such an idea might look like.
Examples of using beams in the interior
There are many design ideas that allow you to transform a beam from a structural element into a beautiful decoration.
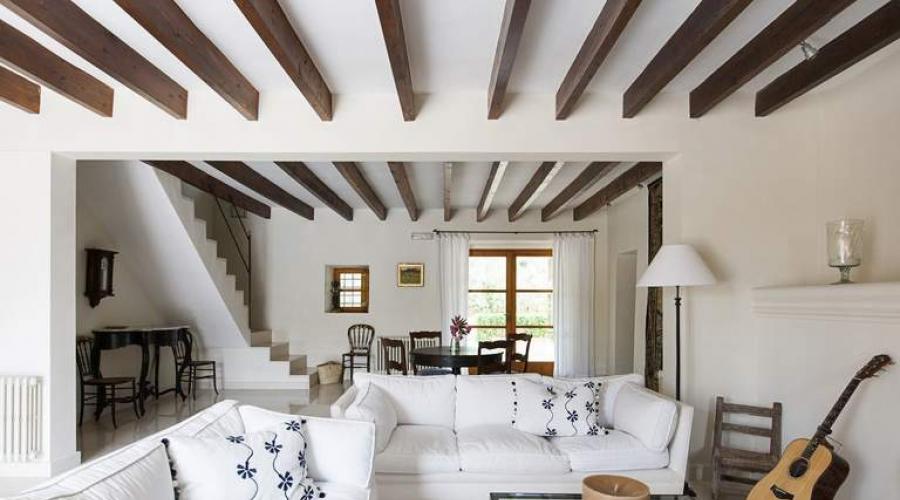
Straight wooden beams that contrast in color with the ceiling look very beautiful in a classic interior. They add monumentality to it, at the same time making the room wider.


The ceiling looks voluminous and textured, and additional sources spot lighting help enhance the effect.
Rough beams made of natural wood can be emphasized with imitation stone on the wall - this will make the room look fresh and unusual.
However, try to avoid dark tones of the flooring - they may seem rough.


The load-bearing beam is favorably emphasized by thinner perpendicular crossbars in contrasting colors. Illuminate it with spotlights for greater effect.
This technique is good for both large and small rooms - it visually adds space and looks good. It is best used between the kitchen and open balcony- this way you can effectively zone the premises.


By the way, you don’t have to stick exclusively to straight lines. If the beam is used as a decorative element, and not as a supporting structure, it may well be figured.
This solution will hide the wires and just look beautiful. The main thing is to carefully consider the pattern so that it is in harmony with the style of the rest of the room.


As an example, we chose multidirectional rays diverging from the horseshoe framing the lamp - a simple but effective technique that allows you to visually expand the room.

Metal beams are suitable for a high-tech interior. They look unusual, and you can choose almost any shape. Such an airy relief beam as in the photo is more suitable for spacious rooms - it hides a lot of the height of the room.


A nice bonus: Metal is one of the strongest materials. Therefore, you can use the structure to hang chandeliers and decorative items.
However, even in a classic interior, metal beams can look beautiful and appropriate - the main thing is to choose laconic straight lines and a discreet shade.

In this case it is better to choose wooden ceiling- the contrast of the two materials looks very impressive and stylish.
It’s better not to try to experiment with color - not every paint will work well on metal, and choosing the right solution is quite difficult.
Open ceiling beams more suitable for living rooms and halls two-story house- that is, rooms where their use allows height.


Volumetric curly elements look stylish and add warmth and comfort to the room. Use them as a frame for small light bulbs - the effect will be simply magical.
If desired, you can lower a column of the same material from the ceiling - a simple but elegant technique.

Openwork beams for concave stretch ceilings will be appropriate both in a private house and in an apartment with high walls. They look very unusual and original, while visually adding space and airiness to the room.
It is better to use contrasting tones of the same range - warm or cold, so as not to create a visual contradiction between them.

Spotlights scattered throughout the space between the beams will enhance this effect. This method is good for large rooms in a classic style. However, by experimenting with colors you can find a solution for more modern types registration
You don’t have to limit yourself to standard wood shades or boring black and white. You can easily paint the beams any color you like - or even several! However, in this case, you must follow a couple of rules:
- Make sure that the selected palette is combined with each other.
- Remember that in a harmonious interior no more than three or four basic tones should be used. Otherwise, the design will turn out to be too colorful and tiring for the eyes.


Otherwise, everything depends on your imagination!
In a private house, you can construct... the entire ceiling from wooden beams. Volumetric relief space, illuminated from the inside - quite unusual design technique. However, remember that the height of the walls must be appropriate.
As you can see, the use of beams in the modern construction world is not only a necessity, but also an elegant design technique that can complement the ambiance of almost any room.
Previously, beams under the ceiling solved a completely functional problem - they supported the ceiling. Now this purely decorative element is most often found in interiors made in a rustic or Old English style, in Provence, country and chalet styles. It’s a good idea to integrate beams into modern interior styles: loft, modern, minimalism, hi-tech.
Decorative ones look most advantageous in rooms with high ceilings, which dictates their placement mainly in houses with a ceiling height of three meters or more. Wooden beams under the ceiling - stylish element home decoration, emphasizing the spaciousness of the room, and in some cases carrying a functional load (for example, it is used to hide communications). Most often, beams are placed in kitchens, hallways, halls and offices.
Types of beams
Certainly, modern houses rarely decorated with real wooden elements under the ceiling. Although there are connoisseurs of natural things who prefer real heavy beams for ceiling decoration, usually in a country house.
Building materials stores offer a huge selection of false beams made of lightweight and easy-to-install polyurethane. Visually, such elements are indistinguishable from natural wood, and in practice they even surpass it in some ways.

The advantages of polyurethane false beams include the fact that they:
- are not afraid of dampness, do not swell from excess moisture;
- do not crack or deform;
- very easy to attach to the ceiling (including suspended ceilings).
However, lovers of naturalness can opt for false beams made of MDF or chipboard, hollow inside. Veneers made of wood are glued onto such beams. valuable species tree. You can find options made from lamellas. Beams come with sharp and rounded edges, U-shaped and L-shaped (for decorating joints).

Table. Comparison of polyurethane and wooden false beams.
To design a high-tech style, some designers use metal beams, however, such elements are more difficult to install and require professionals to install them.

How to make decorative ceiling beams with your own hands
Some craftsmen make beams with their own hands, which takes a minimum of time and is inexpensive. For example, in order to make false beams, you can use ordinary foam plastic, which is left over from insulating a garage or loggia.
Step 1. Cut sheets 4-5 cm thick into strips of the required width.
Step 2. Glue the strips liquid nails into a U-shaped beam.
Step 3. After setting, cut the beams into pieces of the required length.
Step 4. Cover the beams self-adhesive film under the tree (except for the side that will be glued to the wall).

Using the same technology, you can make beams from plywood or even ordinary boards. The boards can then be aged, covered with stain and varnish.
If you want to make beams from natural timber, you can buy edged polished timber, for example, 70x50. When choosing, be sure to check that it is smooth and dry. Then you need to treat it with stain and varnish and cut it to the required length. This is also an inexpensive and accessible option.
Decorating beams
Each interior style will require its own style of beam design.
- For classic and victorian styles you can decorate the beams with gold carvings, decorate them with patterns and vignettes. You can find such ready-made polyurethane beams on sale.
- White, black, brown and also colored beams will be ideal solution for modern interiors.
- For the high-tech style, the design of beams to look like metal is suitable.
- To create a country style, the wood will need to be aged.
- For rural style(country) is characterized by a distinctly rough texture.

Options for placing beams on the ceiling
False beams can be used to decorate any type of ceiling: suspended, plasterboard, regular painted, etc. With their help, you can zone a room or create such a popular decorative element as a false window on the ceiling with imitation of stained glass. Decorative beams can imitate window coverings, between which, during the work process, a canvas with photo printing, mosaics, frescoes and even mirror panels are glued. The modern European trend is very interesting, when beams go onto walls.

The beams can be decorated with LED lighting on top, which will give a special decorative effect. The beams in which they are mounted look amazing ceiling lamps. All wiring in this case is hidden inside the hollow structure.
In general, beams on the ceiling will give a feeling of warmth and comfort to the living space, add zest to modern interior styles and allow you to create the necessary authenticity in public institutions such as clubs or pubs.

How to position the beams
If the room needs visual expansion, then when positioning the beams the following points must be taken into account.
- If you need to make the room wider, then the beams need to be placed on the short side.
- If you need to increase the length, the beams should be placed along the entire length of the ceiling.
- A criss-cross arrangement will give the room visual volume.
- One beam can highlight a separate area: for example, a bar counter.
The frequency of location also plays a big role. For example, if the ceiling height is very high (which happens on the first floors of buildings), placing the beams close to each other helps to reduce it a little. If the ceilings are of medium height, the beams should be mounted at a greater distance from each other. Beams can also be laid in a herringbone pattern. Attic rooms without a ceiling they look especially impressive if the ceiling beams pass through the columns and are attached at the ends to the walls, creating the effect of a hut.

How to attach beams to the ceiling
The specifics of the procedure depend on the material from which the false beams are made. Let's take a closer look at each of the options.
How to glue foam false beams to a regular ceiling
This is the simplest option for placing false beams in modern apartment. If you want to decorate your kitchen or living room quickly, inexpensively and on our own, best option can not found.
Step 1. First, marks are made on the ceiling and walls to indicate the places where the false beams will be glued. The sticker areas need to be primed for better adhesion.
Step 2. Then the beam is coated with liquid nails and glued to required space. Foam products are practically weightless, and liquid nails set literally instantly.

Some instructions advise to apply it to the wall at the same time, but if there is too much glue, the beam may begin to slide down the wall. That's why golden mean needs to be determined experimentally.
Step 3. If the room is narrow, you can stick 2 beams along the long walls of the room, and simply place the cross beams perpendicular to them. Such simple ceiling will help hide the unevenness of the usual concrete ceiling and it will look very advantageous.
How to quickly secure wooden beams to a wooden or concrete ceiling
This is also not very difficult or expensive to do.

Step 1. We draw lines on the ceiling for placement.
Step 2. We drill holes in the timber with a 12 mm drill no more than 0.5 centimeters deep every 30 cm.
Step 3. In the same holes we drill 8 mm holes into which we drive 120 mm self-tapping screws.
Step 4. We apply timber and mark the locations for the holes in the ceiling.
Step 5. Drill 8 mm holes on the ceiling in the marked places using a hammer drill.
Step 6. We drive chopsticks into them.
Step 7 We screw the beam.

Since the head of the screw is hidden, we cover these places with wood putty. After drying, tint with stain, then varnish. You can cover the screw heads with wooden plugs or special decorative overlays that imitate the heads of forged nails. You can attach nails to regular dowels - this is an even faster option.
If cross distribution of beams is planned, unevenness may occur at the joints. The design of these units depends on the style in which the room is decorated. If it is country, for example, then these places can be covered with leather decorative belts or large twine glued in several rows.
Installation of polyurethane decorative beams on beams
This professional way installation

Decorative beam B1 made of polyurethane (wenge, cherry, oak, olive, walnut, light oak)
Step 1. For polyurethane false beams, wedge beams are made of wood, which completely correspond to the internal cavity of the beam.
Step 2. The ceiling is marked: lines are drawn along which the beams will be attached.
Step 3. The wedge bars are installed along a line every 1 meter using screws or dowels.
Step 4. When installing a false beam, polyurethane adhesive is applied to the ceiling. This is not necessary for fixation, but for a tighter fit to the ceiling so that there are no gaps left.
Step 5. The beam is tightly placed on the beams and screwed through the sides with screws.

Step 6. The screws that attach the false beam to the beam and the joints of the beams are covered with decorative leather straps with imitation rivets.
Features of the installation of beams on a suspended ceiling
To make a suspended ceiling and decorate it with decorative tanks, you should install embedded parts, similar to those installed for hanging chandeliers. Embedding for a decorative false beam is easy wooden block required thickness. It is attached to the main ceiling, and the suspended ceiling is stretched in such a way that it passes touching the lower plane of the bar. Then false beams are attached through the ceiling to the beam.

You can use fastening of beams using hangers. Suspensions are attached to the base. and after tensioning the ceiling, slits are made in the canvas. Specific actions depend on the type of material.
If the suspended ceiling has been hanging for a long time, but you want to somehow diversify the interior without dismantling the canvas, you can use external consoles with fasteners to the wall or internal bars screwed to the walls. Beams will be attached to them with self-tapping screws.
Features of the installation of beams on a plasterboard ceiling
Since the plasterboard ceiling is suspended, you cannot simply attach beams to it. You will have to remember/tap the places where the frame profiles go and attach the beams to them. Can be attached to any in a convenient way: with a long anchor through the beam, gypsum board and profile or on a block attached with a self-tapping screw to the gypsum board and profile. A self-tapping screw screwed exclusively onto drywall will not hold the beam for long.

Some nuances
The joints of beams or the exit points of self-tapping screws are covered with various kinds of decorative overlays, among which the following can be distinguished:
- camouflage with decorative rope;
- masking with wax pencil;
- masking with forged copper plates;
- decorative leather belts.
To decorate the space, you can use decorative consoles, which are sold together with beams and create an imitation of supports on the walls. If cables will run inside the polyurethane beam for lighting fixtures, then they must be hidden in corrugated protection.
Video - Installation of wooden decorative beams on the ceiling
This way you can get a very beautiful unusual interior with an emphasis on wooden beams under the ceiling. This interior does not require a large investment of money, and you can fix the beams with your own hands literally within a few hours.
Beams on the ceiling are a stylish, but at the same time cozy element of decor. They will bring the much-missed atmosphere of rustic warmth to the interior. However, the chosen material will support the stylistic idea and can correspond to both modern and classic trends.
Design features of low and high ceilings
- In an interior with low ceilings, ceiling crossbars of a simple design, for example, along or across the room, will look harmonious.
- In a compact room, it is better to replace the timber with a board or plastic. They will save space.
- To prevent the ceiling from appearing low, it is better to use a light palette.
- Would look appropriate in a room with high ceilings complex designs and dark finish.
Types and materials of ceiling beams
Bearers
Concrete floors
Most often used in the construction of urban multi-storey buildings and production premises. Ceiling concrete beam will look harmonious in an interior with a modern style, such as loft, grunge, minimalism.

Rarely used in the construction of urban housing, more often in cottages, dachas or for individual renovations. Solid or laminated timber has square shape. It is most often used as a ceiling.

The log has round shape. The material is more expensive than timber, but it looks better in the interior from an aesthetic point of view.

Metal ceiling
Metal is stronger and has a longer service life. In the interior of the house they can be decorated or hidden; when open they will look harmonious in an urban industrial style.

The photo shows a spacious attic room in a high-tech style, the ceiling beams are made of metal.
Imitation
Beams acting as interior decoration should support the overall style.
Tree
Wooden ceiling beams will add rustic coziness to the interior. Ceiling beams made of timber look luxurious and massive; they are best used in a spacious room, as they are quite voluminous and large structures will take up a lot of space.

For finishing standard city apartments or small rooms It’s better to choose boards, they are more compact. The board can also be part of a structure where a solid beam is used as a base.

Plastic
Polyurethane or plastic false ceiling beams can become an analogue of a tree. The material is not environmentally friendly, but it wins in price and variety. Visually, such ceiling crossbars will differ little from natural wood.

Drywall
By finishing the ceiling with plasterboard panels, you can hide communications, while emphasizing the desired style in the interior. In addition, it is possible to install lamps in plasterboard ceiling beams.

In the photo, the ceiling beams are constructed of plasterboard and decorated with concrete-like plaster.
Ceiling finishing material
Tension fabric
Stretch ceiling is one of the most common finishing options. The popularity is due to ease of installation, great variety and relatively low cost. Tension fabric heats up to 60 degrees and is fixed in each side of the room. The material may have a glossy or matte surface, which allows you to select best option for style in the interior.

Lining
Wooden lining will look harmonious in a room with high ceilings. In a city apartment, the lining can be painted in a light shade, so it will visually hide the minimum amount of space.

Suspension
A plasterboard ceiling can have a flat or multi-level surface. The ceiling will be decorated with beams, stucco moldings or built-in lighting, depending on stylistic preferences. The structure is made of a metal frame and plasterboard sheets attached to it.

Painting
Requires a perfectly flat surface. This finishing method is easy to apply and comes in a wide variety of colors. The ceiling will be decorated with plinths, stucco molding or crossbars.

The photo shows a stylish minimalist bedroom in eco-style.
Wallpaper
To apply wallpaper you will also need a prepared surface. An interesting option There will be photo wallpaper decoration.


Location options
Across
The transverse arrangement of the ceiling crossbars will visually bring the room closer to a square shape, expanding the walls. In a spacious room, you can use a full-fledged beam, complementing the picture with low chandeliers or spotlights. A compact room will have enough boards to support the interior in the desired style.

Along
The longitudinal arrangement of the ceiling beams will make the room longer. By decorating LED flight panels you can get the effect of floating in the air.

Diagonally
The diagonal arrangement of the ceiling crossbars will make the room more voluminous. This method of finishing looks interesting in a modern living room interior. The crossbars can be located along the entire perimeter of the ceiling or occupy only a part.

Half the ceiling
Finishing the ceiling will partially visually divide the room into two zones, while maintaining the area. For example, in the kitchen this way you can separate the cooking area from the dining area.

Cross laying
This arrangement of ceiling beams will make the space voluminous. To emphasize the relief and unusual way location, the color of the beams can be made contrasting with the main color.

Dividing a room into zones
A great way to zoning space. The design on the ceiling will indicate the desired zone or divide the room into two areas. For example, in a studio apartment, beams can be located in the cooking area, thereby separating the rest of the space, or in the bedroom, a complex structure will decorate sleeping area, indicating a sleeping area.

Roofing structures
An interesting interior solution would be to erect a structure on the ceiling based on the principle of a roof structure, for example, a “rack” or “truss”. It is these structures that are located under the roof of the building, holding it. Such structures are suitable for interior design with high sloping ceilings.

The photo shows a bright kitchen-living room, ceiling beams are made according to the principle of roofing construction.
Unusual way of installation
The methods of arrangement can be completely different from beautiful patterns that make up any design to complex geometric shapes. Complex ceiling structures will look harmonious in a room with high ceilings.


Decoration methods
Aging
The aging effect is characteristic of many styles, such as Provence, shabby chic, rustic. In the interior, such items look rustic, cozy and warm.

Painting
You can make the ceiling beams stand out by painting them in a color contrasting with the ceiling, for example, red beams on a light background. In this way you can play up any theme or add some bright details to the interior.

Varnish coating
Varnished wooden ceiling beams will retain the unique grain of the wood. Varnishing will make the material brighter and protect it from harmful effects. A similar finish is suitable for interiors in country, loft, and chalet styles.

Patterns, carvings
Painted patterns or wood carvings will look not just luxurious, but unique. Patterns and openwork carvings will fit perfectly with the Russian style. A more restrained type of carving is suitable for decorating a classic interior.

Color selection
White
White ceiling beams against a light background will look very gentle. The ceilings do not seem low and the design will have its own “zest”. The beams look interesting white against the background of a ceiling in pastel shades.

In the photo, the bleached boards on the ceiling look very gentle; they fit harmoniously into the bedroom interior with a pastel color palette.
Brown
Classic design - brown wooden ceiling beams in the background white ceiling. Due to the contrast of colors, you can adjust the space of the room.

The photo shows a spacious kitchen-dining room. The ceiling is made of wooden slats white and contrasting brown beams.
Grey
Gray ceiling beams on a light background do not have a strong contrast, but still stand out in the overall picture. The combination of rural details and a fashionable color that is relevant today looks interesting.

Beige
Beige ceiling beams look harmonious both on a flat ceiling and on a slatted one. A light shade close to the color of natural wood will decorate the interior of a house or bathhouse in any style.

Black
Contrasting black ceiling beams will successfully complement the room in modern style, echoing other details of decoration or furniture.

Bright
Ceiling crossbars bright shade will decorate a modern interior or a children's room. Bright color can be combined with other details in the interior, such as textiles, decorative elements or small pieces of furniture.

Photo in the interior of the apartment
Kitchen
The location, color and material of the ceiling beams depends on the size and stylistic direction kitchens. In a compact room, minimalist straight crossbars on a glossy surface will look harmonious. Another technique for saving space is ceiling beams light color. IN spacious kitchen The location will depend entirely on the layout of the room or the style of the interior.

The photo shows a kitchen interior with a black set. Partial finishing of the ceiling with crossbars separates the cooking area.

Living room
The ceiling in the hall will be decorated with beams against a background of a flat surface. Depending on the area of the room, the crossbars may have a light palette, identical or similar to the main color of the ceiling trim. Or contrast against the general background, thereby playing the role of the main object in the room.


Bedroom
Wooden beams will make the bedroom more comfortable. The design can be around the entire perimeter of the ceiling or just above the bed, designating the sleeping area. The color of the finish depends on the style of the room.

The photo shows a gentle bedroom in pastel colors. The ceiling has a structure made of plasterboard and decorative crossbars.

Children's
In a children's room, ceiling beams will support a themed design, such as marine or eco style. Crossbars can become part of the image of the room.


Hallway and corridor
If the hallway or corridor is small in size and lacks natural light, then the optimal solution would be a modest ceiling structure in the form of several crossbars along or across the room.


Bathroom
When decorating your bathroom, you should take into account the constantly changing humidity. The optimal solution There will be the use of plastic or polyurethane false ceiling panels, which can also imitate the desired material.


Photos in the interior of the house
With sufficient area of a private house, it appears more possibilities to implement ideas. In log houses with load-bearing log or cobblestone beams, there is no need to camouflage them; it will be enough finishing in the form of sanding or painting.

The photo shows a chalet-style country house. Finishing and filling are made of natural materials.
Cottage interior or country house with a high sloping ceiling will be decorated with a voluminous structure made of wooden beams, repeating the roof structure.

IN country houses and baths, finishing made of natural wood will look most harmonious, emphasizing the proximity of nature.


By decorating the attic with beams, you can create your own secluded corner, from which you can create cozy bedroom or a place to relax.

The bathhouse will also radiate the warmth and comfort of a real Russian bathhouse; the load-bearing or decorative beams just need to be sanded and coated with special paint or varnish.

Matching Styles
Loft
The loft style is characterized by minimal or complete absence decorative finishing. If there are metal, concrete or wooden ceiling beams in the room, then they should definitely be left. In their absence, false beams will help, which can also adjust the space.

Provence
The interior in Provence style is made in light pastel colors and mainly from natural materials. Wooden beams can be painted in one of these shades or have the original color and texture of the wood. This trend is characterized by artificially aged pieces of furniture and decoration.

The photo shows a kitchen in olive color in Provence style. The ceiling is finished in one color with an aged effect.
Country
Country style is difficult to imagine without wooden beams. The spacious room will be decorated with complex structures made of timber, small room simple ones will be enough wooden planks in the right direction.

Scandinavian
The interior in the Scandinavian style has a light, most often white color scheme. Natural materials such as wood or stone are used to decorate and fill the room. Ceiling beams made of bleached wood will look harmonious in the interior.

Modern
The ceiling in a modern style can be decorated with beams made of wood, metal or plasterboard. The arrangement can be simple or complex geometric figure. The design will be supplemented stylish lamps, LED Strip Light or spotlights.

Classical
The interior in a classic style will be decorated with smooth wooden or plaster beams. Cross-on-cross masonry will look harmonious.

Chalet and rustic
Chalet style and rustic are characteristic cozy atmosphere alpine house. Wooden ceiling crossbars do not have to be painted; the original color, texture and pattern of the wood will come in handy. In such a design, it is appropriate to use lamps with warm light, emphasizing the comfort and warmth of the interior.

The photo shows a chalet-style attic. The decoration is entirely made of natural wood.

Lighting and backlighting
Different types of lighting will have completely different result. Spotlights can be mounted in the crossbars or between them in the ceiling.


For complex volumetric structures, mobile lamps can be attached directly to the beams and change their position if necessary.


The chandelier should reflect the overall stylistic idea, for example, in a country style room it could be a low wrought iron chandelier, while in a Provence interior it could be neat with several textile shades.

An unusual effect is created by the LED strip; recessing it into the side parts of the beam creates a feeling of floating in the air.


With your own hands
Before you begin the repair, you need to decide on the size of the beams and the distance between them. The distance between the beams depends on the area and height of the room.
- In a room with high ceilings, it is permissible to place beams close to each other, so the room will seem a little lower.
- Accordingly, in a small room it is better to mount the ceiling beams at a sufficient distance.
- The length of the beams depends on the desire to finish the entire length of the room or highlight only a part.


One of the easiest ways to build ceiling crossbars is to make them from foam plastic.
- Sheets of foam plastic are cut to the required size and glued together into a bar.
- After which they can be covered with a film that imitates wood or plastic and fixed to the ceiling. Installation is quick and effortless.
How to attach beams to the ceiling
Each material has different weight and properties, and accordingly the fastening is also different.
- Before starting work, it is necessary to reproduce the marks on the ceiling where future crossbars will be fixed.
- For foam beams, liquid nails are sufficient.
- To be sure of the result, the ceiling can be primed.


Wooden decorative beams are secured using bars, which are attached to the ceiling at a distance of 1 meter. The wooden false beam is fixed with self-tapping screws on top of the bars.


The photo shows a diagram of the installation of wooden and polyurethane beams.
Photo gallery
Ceiling decoration is an important detail in the interior. Ceiling structures good way Give the design personality and character. In an apartment with a modern style, the ceilings can be made of plastic or metal; in a modern and provincial design, natural wood will look harmonious. Below are photo examples of the use of beams on the ceiling in rooms for various functional purposes.


When finishing rooms, including ceilings, many people have questions related to the use of certain materials. Today we will look at what false ceiling beams are. These elements are becoming increasingly popular, and we could not ignore this issue.
False beams - manufacturing features

False ceiling beams can radically transform a room, bringing a unique flavor and comfort to it. Specialized stores offer a wide range of false beams made from various materials and for every taste.
Advantages of hollow core beams

Note! The advantage of these elements is that they are easy to install, and the internal voids allow you to hide various technological lines, pipes, cables, etc. in them.

As already mentioned, decorative ceiling beams are made from different material, and acquiring them will not be difficult. Installation methods and correct design their premises are described in sufficient detail on our pages, so today we want to touch on a slightly different issue.
Misguided Simplicity

Many people are interested in false beams made of wood, namely, how to make them with their own hands. This is the question we want to consider today.
When looking at this design for the first time, you may get the wrong impression that the element is easy to manufacture. But this is at first glance. The fact is that by simply connecting individual boards in the form of a box, you will end up with a product that has nothing to do with beams.

It's all about the connecting seam. It is clear that if the seam is visible, there can be no talk of any false beam.
Material - special attention
The problem lies not only in the accurate connection, but also in the correct choice of wood:
- If the wood is not dry enough, a seam that is inconspicuous at first glance will become visible after a short period of use.
- Warm air in the room, rising, will only contribute to this process.
- Therefore, when selecting material for manufacturing, it is necessary to pay Special attention to this question.
The junction of elements - the method matters
Further, many are interested in the joining of individual elements. Sometimes it is proposed, as an option, to join individual elements in the manner shown in the picture below - that is, in the transverse direction.

Let's say right away that without special equipment, at home, it is unlikely that it will be possible to carry out a high-quality docking. No, we certainly do not mean specialists high class who perform carpentry work at home. We're talking about the average homeowner who loves to do things with their own hands.
The seam will be clearly visible, and the absence of a circular saw with a variable inclination of the cutting part will lead to a lot of wasted time.
Assembling the structure is a simple and correct way
Therefore, we suggest you make the connection as shown in the figure below.

This connection allows you to perfectly join the individual parts of the false beam, using a minimum of skill and labor costs. Of course, some care will be required, but almost anyone can make this connection at home.
For this you will need:
- boards
- bars
- self-tapping screws
- PVA glue or any other glue that can glue wooden parts well.
Assembling the false beam

When everything is ready, you can start working:
- At the beginning side panels are adjusted as tightly as possible to the base, the lower part of the beam. To do this, use a plane and coarse sandpaper.
- Then you need to screw the bars to the side parts using self-tapping screws. The block should fit snugly, so don’t skimp on the screws, but don’t overdo it either.
It is quite enough if they are located at a distance of 150 - 250 mm from each other. - Next, you need to make holes in the block using a drill and a drill bit for the self-tapping screws for fastening to the base.
- The holes will be located perpendicular to the screws securing the bar to the side. Make the hole spacing the same as in the first case.
Our advice - The basic rule is that intersecting screws should not be located closer than 50 mm to each other.
- Before connecting individual elements, apply pre-prepared glue to the contacting sides.

If you have a question about correct use glue, we have one answer: instructions for its use - best recommendation, and there are no others.
After all operations with glue have been completed, the individual parts are connected and fastened using self-tapping screws. This connection is strong enough to resist the formation of cracks in the joint.
Exterior finishing - methods and options

Of course, we connected, but in most cases the seam still remains visible. What to do? First, you need to decide what you want to use these beams for, or rather, in what interior they will be used.
Do you think this is unimportant? You are wrong - this is very important!
Finishing of beams depending on design option

Let's imagine that you are planning to install ceiling beams, and at the same time you want to use the same plastic to decorate the walls of the room. Agree, it is not entirely appropriate when this interior there are wooden beams, unless of course you are creating some special design.
You'll want to paint the ceiling beams with a paint that matches the rest of your decor. In this case, what’s stopping you from filling the seams with a special wood putty and, after sanding them well, covering them with paint? That's right - nothing prevents you from doing this.
Country style interior
In most cases, making beams from solid wood means using them exactly like natural wooden beams. The rustic or country style has been very popular lately, and a large mass of people want to decorate their homes in this way.
Although, in fairness, it must be said that the concept of using beams in ceiling design, characteristic of various versions of rustic styles, has long moved to some other directions.
See for yourself:
Of course, you can purchase false beams made of plastic that exactly imitates wood. Or real wooden beams industrial production. But today we are deciding precisely the question of the possibility of making this design with our own hands. If we decide to do this, let's complete what we started to the end.
We age the tree

We have resolved the connection issue. The time has come to resolve the issue exterior finishing. False ceiling beams that imitate old wood, smoked over the years, look very nice. Let's make such a design together.
Materials and tools
First, we need boards. Old boards are suitable for this. The only condition is that they should not be rotten and eaten by wood-boring beetles.
If there are no old boards, new ones will do - the main thing is that they must be well dried. An edged board will do. We wanted to age the wood, so that’s what we’ll do.

Secondly, we need tools:
- Well sharpened ax
- Sanding machine with attachments
- Sandpaper
- Tinting paint for wood
- Wood varnish
From the attachments for the grinding machine we need:
- Coarse metal brush
- Soft metal brush
- Sandpaper
Step one - making the box
Everything is ready for work, let's get started. First, we need to assemble the box of the future false beam as we described earlier. We repeat, any boards will do, old or new, the main thing is to make a good tight connection.
With an ax to the “live”
- This is done with the help of an ax. The box is laid on flat surface, and the ax begins to cause chips.
- When making chips, position the ax at approximately 20 degrees to the plane.
- The notches should be positioned like the coloring of the sphinx. In other words, the flat part alternates with notches.
- The depth of the chips should be approximately 5 – 10 mm. But this is at your discretion.
- The main thing is not to reduce the thickness of the board, but simply go over the entire surface in different places.
- It is convenient to make chips with the corner of the ax blade located closer to the ax handle.
- The more nicks and chips you make, the more beautiful the beam will turn out in the future.
- Having walked across the entire surface, look at the structure from the side. If you see gaps that are too large, go over them again, adding additional chips.

The work does not require special skill, chop the entire box in this way, throw out energy on fresh air. Don't skimp on the corners; put chips on them too. After this work, the tight connection becomes completely invisible.
Smoothing
Having received the disfigured false beam box, you need to proceed to the next stage. To do this we need Sander with a coarse, metal brush installed on it.
With its help you need to walk over the entire surface. Or, if you don’t have a brushing machine, you will have to use coarse sandpaper.

- The purpose of this operation is that we need to smooth out all nicks and chips.
- After we went through the box with an ax, the chips and nicks have sharp edges.
- It is necessary to smooth them out so that the edges turn out more flat, as if chipped with time.
Our advice is to use safety glasses when performing this operation. Flying to different sides Small splinters can damage your eyes.
- The work does not require special knowledge or skills. The main thing is to be careful and follow safety precautions when working with a grinding machine.
- While working, you will encounter soft areas of wood, do not be afraid, remove them, this will give an even greater effect.
- In some places, the structure of the wood fibers can be very clearly visible - this will also add a certain color.
We continue to fine-tune

- M 40 is best suited. We must go over the entire plane of the beam with it.
- There is no need to apply strong pressure - just walk over the entire surface, removing a very small part of it.
- The main task is to remove large plane burrs.
We are finishing the formation of the general configuration
After going over the surface with an ax, making chips, smoothing the edges with a rough brush, and removing burrs with sandpaper. With this operation we will remove possible remnants of the soft layer of wood and additionally give the chips and nicks a smooth finish.
This work must be done very carefully. Don’t miss a single unprocessed centimeter of the future false beam.
The main thing to remember is that the better and more carefully you perform this operation, the more good result it will work out at the very end. Let's get started - don't forget about safety glasses.

The work is completed, the entire surface is processed, once again carefully inspect the resulting product and, if necessary, carry out additional modifications.
Protective and external coating - how to do it right
Let's move on to the most interesting issue, finishing. First of all, the tree must be protected from moisture. To do this, the entire surface must be covered with a protective layer of a special product.
Our advice is to do the following: purchase a product that simultaneously performs several functions, protection and decoration.
- Nowadays this will not be difficult; in specialized stores you can always pick up different taste and color, the price of this product is low.
- You can choose a product of any color, there is one for maple, cherry, oak, chestnut, etc.
- Choose what suits you best and cover the resulting beam with it. If necessary, cover the surface in several layers.

Removing the “lint”
- It must be driven in while leaving the original light stripes on the surface.
- Take sandpaper M 40, and go over the entire surface with your hand. Do not use a sander at this stage under any circumstances.
- It is enough to just walk lightly on the surface.
- After this, remove dust and remaining lint from the beam and coat it with varnish. Varnish can also be used either clear or tinted.
After the varnish has dried, you will get a wonderful, completely smooth surface unique look.
Use Cases

Artificial materials or natural logs?
Now the beam can be installed in its place. When the work is completed, it will seem as if the beam has stood there for hundreds of years.
By the way, in this way you can age not only decorative beams, but also real floor products.
You can learn how to correctly position false ceiling beams and create a real country style in your room by watching videos or photos of various design options on our resource. Good luck to you!
Everyone wants to be closer to nature and have the opportunity after everyday work to relax from the hustle and bustle and sit near the family hearth. Therefore, everyone approaches interior design very carefully.
Decorative beams are often used to decorate ceilings. After all, it is such simple decorative elements that create a feeling of comfort in the room.


Peculiarities
Many owners decorate the ceiling with beams with their own hands. They are installed around the entire perimeter of the room. They are secured with special fasteners. To line the ceiling, you can use plasterboard or OSB boards. They are made from wood or polyurethane.
Decorative wooden beams are usually installed in a country house, and their imitation - polyurethane slabs - is suitable for decorating garages and apartments. They are stylish decoration for houses with high ceilings. The beams emphasize how spacious the room is, plus they also support load-bearing walls. They are often used to support a loft or loft. Previously, this design was also often used in the construction of houses and was called one of the most important details the buildings.

A ceiling decorated with beams gives the house a cozy feel, especially if it is made in contrasting colors and looks unusual against the background of a plain ceiling surface.
But even if the tones are the same, the beam ceiling will attract the attention of guests, as it is the central element of any room.
Also with their help you can decorate various communications. These include electrical wires and pipes. Will look great between beams or on them pendant lamps. In addition, they have a low price. They visually reduce or, conversely, increase the size of the room. With their help you can divide the space in the room into several zones.


Kinds
For the manufacture of such structures they use different materials, which can be divided into natural and artificial. If they support the entire roof frame, then it is necessary to take stronger floors, which can be metal, wood, or even concrete. The most commonly used wood is oak or pine.. These structures are installed mainly in private homes, but they have a small drawback - they are heavy.

Beams made from natural wood are environmentally friendly. They are used in houses with a predominance of wood., however, they can often be found in more modern interiors.
Since the fastening of the structure is easy to do with your own hands, finishing with protruding beams can save the family budget.


For city apartments, materials that imitate natural wood are suitable. These can be polyurethane or plastic structures or plasterboard beams, allowing you to hide all imperfections and communications.
Polyurethane is artificial material, which imitates any real surface, including wood texture. It is light in weight and low price compared to other materials.


Very often, to create an interior in a modern, beloved by many loft style uses iron open beams to divide the room into different zones. They can be decorated with burlap or made in the form of a lattice..
If it is not possible to open the structure from decorative beams, but you want to do this, then they use modern false beams. They are quite light and have a wide range of colors.


They can also be used to install lighting. To do this, it is necessary to build lamps into them and at the same time hide the electrical wiring.
Also often use artificial false beams to decorate old floors, which are easier to decorate than to redo. This is the easiest way to make them attractive. You can improve any type of ceiling: stretch ceiling, classic ceiling, or plasterboard ceiling.


Using false beams you can divide any room into zones or make a window with stained glass inserts.
Styles
In the old days, the use of concrete or wooden beams was important only to support the ceiling, but in modern world their purpose is more decorative. They are very often used to create interiors in rustic or “northern” styles. They are also suitable for modern directions, for example, loft or hi-tech.

Chalet
This style combines warmth and real comfort. Chalet-style buildings are located mainly among the mountains, where there is a lot of snow and clean air, although in last years Modern city apartments are decorated in a similar way.
The interior includes only natural materials that give a person a feeling of security and tranquility. On ceilings made of wood there are beams made from coniferous species. Often, ceiling beams are intertwined with structures made of logs or beams on the walls. Over time, they darken a little because the wood releases resins.


Scandinavian
The main attribute Scandinavian style often it is wooden beams on the ceiling. Their shades should be light. Thanks to this, the room looks very spacious and cozy. It seems as if the sun itself fills the room.


Provence
In french style Beams are often used as a decorative element. However, its main color will be white or other light colors.


Country
IN rustic style Natural materials predominate. This includes both wood and stone. Often used for decoration beam structures made of natural wood or imitation wood. Very often they are artificially aged. Colors can be light and dark. All this together creates a homely atmosphere.

Classical
Classic is always strict and simple, but at the same time a certain pomposity. However, nowadays this style does not look as pompous as in the old days, when it first appeared.
To decorate such a room plain beams of the opposite color to the ceiling are suitable that will add sophistication to the interior.
To emphasize luxury, you can decorate them with carvings or paint them with beautiful patterns.


Loft
In this direction, such techniques as defiantly left unfinished communications or finishing are often used. The main material for ceilings is metal. With the help of such beams it is possible to divide the room into several zones and install lighting along them.


Design
When creating any interior, you need to be as attentive as possible to small details. You just have to look at how you can beat the surface with the help of strict or fancy designs.
Using ceiling beams you can divide the room into several zones. If you take the kitchen and living room, it will not be difficult to zone them using a bar counter. And the beams located above it will perfectly complement the composition.
They also add texture to the room. All this is achieved thanks to weaving different colors and the correctness of their location.

Beams running parallel to each other look very nice. It is good if they have a color opposite to the base of the ceiling. Or, conversely, you can use wooden beams of the same tone as the ceiling.


When choosing shades of such materials, you can fantasize as you want. After all, their color palette gives designers great opportunities.
You can combine light ceiling finishes with dark wooden beams or their imitation. Walls covered with colored wallpaper are in harmony with ceiling structures having the same color. Antique-finished beams will look very beautiful against the background of white walls.

How to choose for different rooms?
Ceiling beams are suitable for decorating any room in the house. They diversify the interior and give the room some originality.
Bedroom
If you take a bedroom located in the attic, then a ceiling with wooden beams is best suited for its design. After all, they are not so much decorative elements as load-bearing products to support the building frame.


But they are rarely used to decorate ordinary bedrooms. Such designs are more common in European countries. However, if the height of the walls in the room allows you to decorate it in the form of beams, then you should not neglect this opportunity. They will add comfort and warmth to the bedroom interior.
White beams will look great in any interior style, even if it is a room with a low ceiling. Here they will look original and light, even if you use wide ceilings.


Ceiling beams will look very appropriate in a house made of wooden beam. This decoration will give the room a natural feel, allow you to relax and feel at one with nature.
Kitchen
If the kitchen is small in size and has a white finish, then so that the room does not seem like a hospital ward, it can be diluted with wooden beams dark shades . Cabinets that reach straight to the ceiling will look beautiful. They seem to be a continuation of the beams.
To decorate a kitchen in Russian traditions, wide beams are often used to decorate the ceiling. This option will give it originality. Materials such as stone are often used to decorate kitchens. It can be used to decorate both stoves and columns. You can play with this technique using beams made of wood.


Living room
Most often, it is in the living room that beams are used to finish the ceiling. After all, this is where the whole family gathers for gatherings or a simple tea party. You won’t surprise anyone with this design in dachas or country houses. But their use in apartments is not yet treated very well.
However, many creative owners still decide to take such a step, using beams from both natural materials and their imitation. This gives the apartment a warmth that is so lacking in a noisy city.

In private homes or country houses, wood is often used to decorate beams. It not only gives a feeling of warmth, but also serves as a curtain for ventilation and electrical wires.

For small living rooms, it is better to look for pure white beams, which will prevent the effect of a pressing ceiling and visually increase the space.


Bathroom
Beams in the bathroom are almost impossible to find in city apartments. Especially if these are multi-storey buildings built in the last century. In such houses, bathrooms were not only small sizes, but also low ceilings.
But in country houses built now, where is the bathroom reserved? big square and the ceilings are high, you can use beams. However, it is worth remembering the high humidity of such a room. That's why It’s worth either using polyurethane beams, or treating the wood with special substances that will protect from moisture.


If the owner of a house or apartment wants to finish the ceiling with beams with his own hands, you need to listen to the advice of experts. They will help you place the beams correctly without damaging the room.
If there is a need to make the room wider, then it is better to place the beams on the “short” side. Conversely, to increase space, beams can be placed along the entire perimeter of the ceiling. When laying logs crosswise, the room visually expands.

The most important role is played by the density of their location. If the ceilings are high enough, it is better to place the beams next to each other to reduce them. When placing low ceilings in a room, it is necessary to increase the distance between them.