Hemming the roof eaves with an envelope board. Roof overhang trim. Installation of horizontal roof outlet using a box
Read also
Protecting your home's roof and making it look attractive are issues that require careful consideration. One of the possible solutions is a neat finishing of the overhangs, which will reliably protect the rafter elements from atmospheric influences and ensure the aesthetics of the roof.
The eaves overhang of the roof of a house is usually called its lower part, protruding beyond the boundaries of the walls. It is designed to protect the walls and foundation area from getting wet during rain.
According to the requirements of SNiP, filing roof overhangs is not considered a mandatory operation. Nevertheless, many experts recommend not to neglect the filing of roof eaves. It will allow us to solve a number of important issues, for example,
- when there is a strong wind, rising air currents arise, which, having penetrated under the overhang, tend to tear off the roof, and the roof overhang lining will become an obstacle in their path and will not allow slanting jets of rain to get into the under-roof space;
- lining the roof overhang will hide the rafter elements, the releases of the layers of the roofing cake and the roof covering from the attic side, and more.
Finishing the roof eaves is the final stage in its construction, so hemming the roof overhangs is done after
- her devices;
- insulation and finishing of external walls;
- installation of drains.
Types of overhangs
- Cornice or side. These are horizontal overhangs that are formed by the lower part of the slope. Ventilation of the space under the roof also passes through them. Having passed through the overhang, the air moves towards the ridge, drying the layers of the roofing cake along the way. Hence the conclusion that it is impossible to close them completely. But it is also extremely undesirable not to sheathe the structure. This means that you need to find a reasonable option on how to hem the roof overhangs so as not to block the access of air under the roof, but yes to birds, insects or rodents.
- Pedimental. They are formed by the inclined edges of roof slopes and do not take part in under-roof ventilation. Therefore, the need to finish the roof eaves for gable overhangs is due to other reasons, namely the inclined plane of the structure. It is highly susceptible to the destructive effects of moisture, which is blown by the wind. This is especially dangerous for an attic roof, since the edges of the insulation are unprotected from getting wet. Gable cornices must be completely sheathed. Thus, the lining of the gable roof overhangs will become impenetrable.
How to trim the edges of an overhang

Both gable and eave overhangs have uncovered elements: the ends of the rafter elements and the end part of the sheathing release, respectively, which must be finished before hemming the roof eaves.
The choice of material for finishing the edge of the cornice or its end part depends on the main material of the roof covering. Quite often, manufacturers supply ready-made kits for finishing edges along with the roofing material. The sheathing process itself is performed according to one of the following algorithms.
- All protruding rafter elements or fillies are cut in one straight line strictly parallel to the wall, that is, vertically. Then the ends of the rafter legs are connected with a strapping board. A roof front board is attached to it, the dimensions of which should allow the ends to be covered: completely or partially with minimal shortfall. It is on this that the drainage gutters will be installed in the future.
The frontal board is made of metal or wood. For roofs made of known types of tiles, such a board is included in the roofing material kit. The front board is attached to the ends of the rafter elements using galvanized nails or self-tapping screws.
- Elements of the sheathing that protrude beyond its limits are cut parallel to the wall at the same level. An end board is nailed to them and tied to the end of the roofing beam. If you attach the board in a standard way only to each element of the sheathing, then you will not be able to achieve a sufficient degree of rigidity, so it is recommended to use a T-shaped connection.
To do this, additional elements are hemmed from boards or bars, placing them between the front board and two adjacent battens, starting from the second, in increments of one interval, that is, every second and third are selected.
Binding options
In principle, roof overhangs can be hemmed using any convenient method. But upon closer examination, all of them can be combined into two techniques.

One of the options for filing is directly along the rafter elements. The main requirement in this case is the location of the open ends of the rafter legs in a single plane.
- This method is suitable for roofs with a slope of no more than 30˚, the overhang of which does not exceed 0.4–0.5 m.
- Hemming strips are stuffed onto the base of wooden parts nailed to the rafters.
- You can sheathe the base both lengthwise and crosswise.
- Installation begins with the installation and fastening of the initial and last trim strips.
- Then a construction thread is pulled between them and, keeping the correct level, the rest are set.
- When hemming the corner of two slopes, the planks must be secured to the corner rafter on both sides.

Horizontal roof overhangs are used on steep slopes. Installation of the roof eaves is fairly quick.
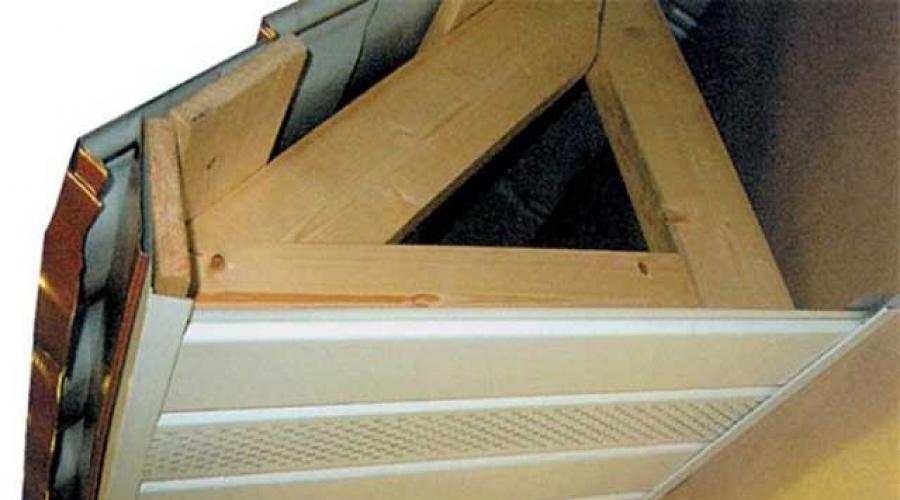
- A box is knocked down from wooden beams, which is attached to the adjacent wall and the base of the roof, and the wall beam must be positioned 1 cm higher than the beam attached to the lower section of the rafter legs. In this way, the slope necessary for the drainage of water that gets inside the eaves due to the wind is maintained.
- To ensure the rigidity of the box structure, fastening the bars with screws is duplicated with additional fasteners on metal plates and corners. Then they begin to file it with some convenient material.
Materials
Various materials made of metal, plastic or lumber are suitable for lining the roof eaves.

- The most common is considered to be lining the roof overhangs with boards 15–20 mm thick. The width of the material depends on the overhang of the cornice and ranges from 5–25 cm. The aesthetic appearance of the cladding depends on the exact observance of the constant width of the boards.
The undoubted advantage of boards for lining roof overhangs is its ability to provide high-quality ventilation of the under-roof space, since air in this case flows there evenly along the entire perimeter of the roof. The gap between the boards is 1–1.5 cm.
- If the boards used for hemming are of sufficient length, they are screwed at several points to prevent deformation.
- The boards are joined in a checkerboard order. In this case, it is necessary to leave sufficient distance between the two joints.
- The only exception is the corners of hip roofs, where the wooden planks are sawn down when joining, dividing the right angle in half.
- All elements are treated twice with antiseptics and fire retardants: before installation and after.

- Another popular material is wooden lining. Considering the susceptibility of wood to all sorts of weather vagaries, special requirements are placed on its quality:
- the planks should not be thin;
- humidity level. The natural humidity of the lining, which has been stored outdoors for at least a month, is considered optimal.
The lining strips are laid tightly, leaving no gaps between them, as in the case of boards. Holes for ventilation are cut out on the finished cladding in 150 cm increments and covered with gratings.

- Lining the roof eaves with corrugated sheeting coated with polymers is carried out according to a simple algorithm.
- When sheathing cornices with corrugated sheets, sheets of the required size are first prepared. They are screwed to the finished frame parallel to the wall. Special screws are used for fastening.
- The joint formed by the wall plane and the corrugated sheet is closed by installing additional elements: a front strip and an internal corner. The corner is attached to the profiled sheet, and the strip, accordingly, to the board. To close the external joints of the corrugated sheet, external corners are used.
- The roof gables (photo above) are hemmed along the walls. The planks are attached to the outer edge of the cornice and hidden under the end strip and corners. The sheathing strips should be approximately 2 cm narrower than the width of the overhang. Thus, air intake will occur due to the height of the profile wave.
- When installing the roof eaves, the finishing with corrugated sheets can be done in color, choosing the appropriate one from a variety of options.

- PVC siding is a fairly affordable and effective option for lining roof eaves. This material often goes on sale in a special package. The plastic panels are supplemented with U-shaped strips necessary for the design of edges, corners, and ventilation grilles. The sheathing is fastened parallel to the edge.
Plastic strips are attached to a wooden frame at two to four points.

- Special plastic panels called soffits are produced for lining roof eaves. These panels are thicker than siding and are usually equipped with special perforations through which ventilation of the under-roof space passes. In addition, UV stabilizers have been added to the plastic for spotlights, which provide the material with high resistance to ultraviolet radiation. The soffits for filing are cut along the length of the cornice and installed at right angles to the wall.
Watch the various options for lining roof eaves in the video
Reliable lining of the roof overhang protects the walls of the house from the vicissitudes of the weather. In addition, high-quality ventilation of the under-roof space can be arranged in the filing to ensure high-quality and durable functioning of the roofing pie. Beautifully designed overhangs are a decoration of the house.
How to hem roof overhangs with your own hands
The roof overhang is the extension of the rafter system to a certain distance beyond the walls of the building. In some cases, to lengthen this element, fillies are used - boards that are a continuation of the rafter legs.
The overhang has a purely practical purpose - protecting walls from external factors - rain, hail and snow.
But, in addition to its functional purpose, an overhang can also perform purely aesthetic purposes, being a decoration of the building.
The overhang is lined from below with various materials, forming a structure that encircles the house on all sides. Various materials are used for this:
- Galvanized metal sheet.
- Metal sheet painted or with a plastic protective coating.
- The board is a tongue-and-groove lining.
- Vinyl siding.
- Soffits are special products for forming an overhang and ensuring the operation of a natural ventilation system.
There are two types of overhangs:
Photo gallery: filing of roof overhangs
Roof overhangs covered with lining well complement the appearance of a house made of timber or rounded logs. Hemming with edged boards is used as a simple and inexpensive way to finish overhangs. Siding lasts longer than wood, so roof overhangs will be reliably protected for decades. Metal soffits not only add the house has a finished look, but also serves for ventilation of the under-roof space
Finishing the edges of overhangs
The fundamental document for the design of safe buildings and structures is the Federal Law of November 30, 2009 “Technical Regulations on the Safety of Buildings and Structures.” On its basis, various documents on the creation of overhangs have been developed, including SNiP II-26–76 “Roofs”. The requirements of the document stipulate the rules for constructing overhangs of various structures and the materials used for this.
This set of rules and requirements is constantly being refined and changed due to the appearance of various roofing materials on the market.
Optimal overhang size
As already mentioned, the purpose of overhangs is to protect walls. Therefore, the wider it is, the better it performs its function. But there are also limiting parameters - a wide overhang is subject to increased wind loads, which can over time weaken it, leading to the formation of leaks in the roof.
Therefore, the width of this element is rarely more than one meter. For buildings with one or two floors, the standards provide for an overhang of 60 centimeters, and for a normal drainage system it must be at least 40 centimeters.
 Roof overhangs can be made in the same style with other architectural elements of the building, for example, with a canopy over the entrance
 Basic methods of filing overhangs
These building design details are arranged in various ways:

A house with unfinished hangings does not look aesthetically pleasing; it sometimes looks like it is unfinished.
How to hem the overhang from below
Various materials are used to form overhangs:
- Boards made of coniferous wood - spruce, pine, larch. Such materials are less susceptible to warping. The board used is planed on four sides with a thickness of 20–23 millimeters. Such material is characterized by drying out, and the width of the product can decrease by 2–8%, which leads to the formation of gaps between them. It is not recommended to use material wider than 12 centimeters; it is often subject to warping. To avoid the formation of cracks, the planed board can be overlapped with an overlap of about 10 millimeters.
- Lining. Using a tongue and groove board for hemming would be a more practical solution. In this case, there is no need to use strips. The board is padded both in length and width, using additional sheathing. In the second case, you can use the scraps remaining after finishing other surfaces.
 When using lining, there is no need to fill the strips
 - PVC siding. This material is usually used for awnings on gables, but it is also used for lining overhangs. The material is valuable because it does not require constant care. Siding plates are installed at right angles to the walls. Fastening is carried out to the wooden planks of the sheathing with self-tapping screws through the holes provided for this purpose. Each successive plank is fixed to the previous part with a locking fastening. The PVC siding kit includes additional elements that can be used to hide the end cuts.
 Overhangs covered with siding last a long time and do not require regular maintenance
 - Profiled sheet. Profiled sheets are often used for hemming overhangs. For this purpose, small-comb varieties with a wave height of about 8–10 millimeters are used. They can be placed lengthwise along the wall or in small cuts perpendicularly. This profile is produced by bending on profile bending mills. A more successful solution from a design point of view is the use of aluminum profiled sheet obtained by rolling. Such a profile can have an anodized coating in a variety of colors, from a range of which you can choose the desired shade. This type of rental is durable and does not require constant maintenance.
 To sew overhangs, you can choose a profiled sheet of any desired shade
 - Smooth steel sheet. It is used with a protective coating of zinc or aluminum-silicon. The benefit of using it is the ability to give the sheet the desired shape flexible. Sheets with a protective coating in the form of paint or plastic are also used.
- Use OSB or plywood. This is a sheet material that is well suited for finishing overhangs. OSB is a product made from specially oriented wood chips. Produced by pressing using polymer binders. The process occurs at high temperature and high pressure. The result is an absolutely non-hygroscopic material of high strength. At the same time, the surface of the slabs has an original pattern, allowing it to be used for design purposes. Plywood made with polymer binders is also used for finishing overhangs. However, the outer layers of veneer are exposed to the weather and require additional protection after installation on eaves.
 OSB has an original texture that can be used to implement interesting design solutions
 - Soffit is a specialized profiled steel sheet for lining overhangs. Soffits with a length of 0.5–8.0 meters can be made to order. In the standard version, their length is 2.4 or 3.0 meters. Please note that the multiplicity is 0.5 or 0.6 meters. In appearance, the soffit imitates timber installation. Double and triple parts are available. One or two soffit projections are equipped with a perforated grille, providing ventilation in the under-roof space. Thanks to the locking connections, the soffits are quickly and easily installed. Fastening to the sheathing is done with self-tapping screws. Color solutions are used within the RAL or RR ranges, which allows you to choose any tones that are in harmony with the color of the roof and walls.
 Soffits are usually matched to the base color of the roofing system.
Soffits for lining overhangs are made from various materials. The mentioned metal perforated products are used only for curtain rods. They are not used for gables.
Metal soffits can be made, in addition to steel, from copper and rolled aluminum.
Soffits made of plastic are also popular. They are noticeably cheaper and very easy to install. The material for their manufacture is polyvinyl chloride or silicone. The main dimensions are 3 meters long, divided into three parts by width, which is 305 millimeters.
Do-it-yourself cornice filing
This structural element of the building can be performed in several ways:
This method is most often used on roofs with a slight slope. The work is performed in the following order:

The specified sequence is used when installing boards parallel to the wall. If the hemming is done perpendicularly, using short pieces, you must first secure the support strips. They are installed on the rafters at the junction with the walls and at the ends of the legs. The hemming strips are fastened with self-tapping screws.
After leveling is completed, roofing work can continue, and the filing can be completed after installing the topcoat.
 Before making hems along the rafters, their ends must be aligned
 Video: how to trim rafters correctly
Framing the overhang on the frame
This method of closing the under-roof space is used for steep roof slopes. To do this, the following operations are performed:

Video: metal filing of overhangs along the frame
Installation of spotlights
With this method of filing overhangs and cornices, additional elements are used, supplied along with the soffits. They are used to form a mount into which the hemming parts are inserted one by one. Different manufacturers have different soffit mounting systems. Before starting work, you should carefully read the instructions.
An obligatory element of the lining of eaves overhangs are ventilation holes in them. They are needed to ventilate the under-roof space. If it is not there, condensation from the finishing coating will damage the roofing pie until it is completely destroyed.
 Diagram of the arrangement of supporting elements for lining with soffits
 For overhangs of any design, there is a single ratio of the ventilation surface. It should not be less than 1:50000, that is, the total area of the ventilation holes in the lining must correspond to the given ratio to the roof area.
It should be noted that we cannot talk about any insulation of overhangs, since a ventilation space is formed along them, and insulation requires tightness.
Video: installation of spotlights
Hemming the roof overhangs is one of the final operations during the construction of a house. This procedure should not be taken lightly, because not only the appearance of the structure, but also its proper functioning largely depends on it. Unreasonable savings on this element can subsequently result in significantly larger unforeseen costs. I wish you success!
The process of creating a roof is not only the manufacture of rafters, laying of roofing material and installation of gutters, but also the filing of eaves. In this article we will try to tell you in detail how roofing is done, and we will also look at how to line the roof of a house and what materials are considered the most popular for these purposes.
When a residential building is erected correctly, the roof extends from the wall to a distance of half a meter to seventy centimeters. This condition is required so that the facade of your house is reliably protected from precipitation - rainwater. Thus, an overhang is obtained in the roof, which is covered with roofing material on top and hemmed underneath. Hemming the roof makes it possible not only to protect against moisture - if properly equipped, it will provide excellent ventilation of the under-roof space, as well as the area between the insulation and the roofing material. The air will continuously circulate, and any moisture that enters will quickly disappear. Accordingly, the roof structure will remain dry, and this will significantly increase its service life.
Roof lining: materials
There is a fairly wide range of materials that can be used for roofing. Sometimes, to carry out such work, and especially in a wooden house, wooden lining is used. This material is quite cheap and easy to install, but it has a huge disadvantage - it has a low service life. Wooden lining will require periodic tinting; over time, it will turn black and actively absorb moisture. Another disadvantage of lining is that it does not have the level of ventilation required for a roof.
A very popular solution for roof lining is PVC lining. This type of material is quite acceptable, both in cost and performance characteristics. However, for ease of installation and to create an aesthetic “appearance” of the roof, special decorative “corners”, also made of plastic, should be used.
Often, a material such as vinyl siding is used to line the roof in a private house. Meanwhile, wanting to save money, homeowners make a mistake: the fact is that siding is initially a material for facade decoration of building walls, and when it is added to roofs, it does not look so attractive. The appearance of the siding is also worsened by ventilation holes, which were not originally provided for in this material.
Among the budget options for the material used to line the roof, we can also mention galvanized metal siding. It is relatively easy to install, but does not last long because it is susceptible to corrosion. Metal siding, when used on a roof, quickly develops rust stains. This is especially noticeable if you line the roof with material in white or various light shades.
Today, in large construction markets you can easily find special materials intended for lining roofing eaves - the so-called “soffits”. They can be of two types - aluminum and vinyl (PVC). The size of such lining elements, as a rule, ranges from 3 to 3.5 meters; such dimensions for lining the roof are optimal. Soffits are:
- solid (used for roofs of verandas, gazebos, porches, etc.);
- perforated (usually used for roofs that are covered with bitumen shingles and other non-profiled materials);
- with perforation in the center (an almost universal option that has the most effective function of ventilation of the space under the roof).
Filing with soffits: stages of work

Preparing the roof, insulation work After installing the rafters, during the installation of the sheathing for the roofing material, the ends of the rafters are carefully sawed off along a line that should be strictly parallel to the wall of the house. In order to sheathe eaves overhangs, either metal profiles (such as for installing drywall) or boards are used as a frame. The ends of the rafters, sawn off vertically, are sewn up in the same way as the frame.
Important: before hemming the roof overhangs, you need to insulate the outside walls of your house. Thus, the lining will fit tightly to the insulating material on the walls, and the heat loss of the building will be significantly reduced.
If the roof slope is small, the soffits can be installed parallel to the walls, directly on the rafters. In this case, the angle of the hem will coincide with the angle of the slope. If the lower plane of your roof rafters is uneven, it is important to pre-level it so that the lining work is completed efficiently. For this purpose, you can screw small pieces (cuts) of boards to the side parts of the rafters. The size of such scraps is at least ten centimeters in length and four centimeters in width. We first screw the first and last boards, and then, so that the rafters become as even as possible, we pull the thread - and fasten the remaining boards along this line. In the place where the slopes meet, the boards are fixed on both sides of the corner rafters.
Much more often, another option is used for laying soffits along the rafters. A horizontal box is installed from the wall to the edge of the rafters. In this case, the frame for hemming the cornices using soffits will be made in the same way as in the previous version - from boards. Fastening is carried out on one side - to the bottom of the roof rafters,
One edge is attached to the bottom of the rafters, and the other to an additional board. This board is lowered and fixed at the place where the rafters meet the wall. In the corners, the board must be laid flat - this is where the joint will be located, on which the two sides of the board will be attached. The joint runs from the corner where the slopes meet to the corner where the walls converge. This allows you to create a rigid structure that will be independent from the wall of your residential building.
When performing this work, try to make the fastenings as reliable as possible: screws are often used for fixation, but in addition we can recommend using metal plates and corners.

Once the frame is ready, the soffits can begin. Carry out the sheathing carefully and securely - so that subsequently no wind gets into the under-roof space, and also so that there is no access to precipitation: snow, rain. Special mounting strips are usually supplied with soffits, which make it possible to make roofing simpler, faster and more convenient. Such planks are quickly installed using ordinary wood screws.
When starting work on lining the roof of a residential building, pay attention to the following important point: the edged boards that you use to arrange the frame, as well as any wooden elements of the roof, are certainly treated with special modern compounds that provide reliable protection against fungi, mold and other negative factors, which have a destructive effect on the tree. Such simple measures will allow you to significantly extend the service life of the entire roof and its individual elements.
This video shows in detail the process of lining with soffits:
By choosing modern high-quality materials in order to correctly install the roof, you will prevent a number of problems in the future, ensure good ventilation, extend the service life and, of course, make your building more attractive and more comfortable to live in.
Hemming of roof overhangs is carried out when all roofing work has come to completion.
This is the final touch that gives your roof a complete look and protects all rafters from external influences.
The roof overhang is the lower part of the roof that extends beyond the level of the walls.
They perform not only a decorative function, but also protect the walls and foundation from the destructive power of rain.
Their width can range from 40 cm to 1 m.
It is not at all necessary to hem the roof overhangs, but hemmed overhangs still look more aesthetically pleasing and bring considerable benefits.
This should be done after all roofing work is completed and the walls of the house are insulated and finished.
Before filing the roof overhang with your own hands, all the ends of the rafters are cut along the same line, parallel to the wall of the house to which the overhang adjoins.
The ends of the rafters must be sawn vertically. After sawing off the rafters, they stuff a sheathing board onto them with their own hands, along which the entire sheathing is then oriented.
Types of overhangs
The eaves are located under the pitched roof, and the pediment is located on the side of the slope.

The eave is located under the bottom of the roof slope. It is through this that the attic is ventilated.
If your house has a mansard roof rather than an attic, then ventilation inside occurs through the roofing pie.
If the overhang is completely covered with boards, then the attic will not be ventilated.
But if they are not knocked down, then birds and rodents will crawl under the roof of the house, and the rafters will deteriorate over time due to humid air.
You can do your own attic ventilation in several ways.
The easiest way is to create a gap between the wall of the house and the roof overhang. If you are hemming with corrugated sheeting, then the gap should be from 0.6 to 1.2 cm, and for hemming with siding or clapboard, 1 to 1.5 cm.

For lining, metal sheets and slabs, special ventilation grilles are usually used.
If the overhang is covered with boards, then a gap of 1 - 1.5 cm is made between them.
The pediment is located under the side part of the slope, which is located at an angle.
Ventilation is not needed in the area of gable overhangs, but it is important to take care of protection from moisture, wind and other bad weather.
If the overhang is not closed, then gusty winds during rain can wet the boards and edges of the insulation, after which heat will not be retained well in these places.
Edge finishing
Both pediment and cornice versions of overhangs have open cuts at the ends - rafters or sheathings. They need to be carefully arranged so that they are protected from the weather.
A drain should be installed along the eaves. Edge processing is carried out with the same material as for the roof.
Before filing the eaves overhangs with your own hands, all protruding elements should be cut to one line, strictly at the same distance from the wall.
The video below shows how to line overhangs with soffit.
After this, the ends of the rafters are joined together with one strapping board, and the frontal board is already nailed onto it.
The frontal board often comes complete with ceramic, metal or bitumen shingles; it is made of wood or metal, and then coated with a special protective compound.
On the gable sections, the edges of the sheathing boards, which protrude beyond the plane of the wall, are cut off. An end board is nailed to the edges of the boards and to the end of the ridge beam.
The end part of the board is covered with roofing material.
Basic methods of sewing cornice sections
Do-it-yourself filing of cornice sections is usually done in any convenient way. But all possible cladding options can be combined into two techniques.
Hemming the roof overhangs directly along the rafters is the easiest way. The main condition is that the open ends of the rafters lie in the same plane.

This method will be most appropriate for roofs with a slope of no more than 30º and an overhang of no more than 40 - 50 cm.
A sheathing of wooden parts is nailed to the rafters and hemming strips are attached to it along or across the base.
Horizontal roof overhang lining is used if the roof has a steep slope. This installation happens quite quickly, and very little material is required.

You need to knock down a box of beams and attach it to the base of the roof and to the wall. The beam that is nailed to the boards should be approximately 1 cm below the wall beam.
This will allow water to flow freely from the eaves. Boards are nailed at the corners from the roof to the house, and the longitudinal beams are reinforced with transverse beams.
Materials for filing overhangs
Today, a variety of materials are used for filing eaves overhangs.
When choosing a material, you should pay attention to its protective properties - it must insulate, protect from precipitation, and also provide ventilation to the roof.
In addition, it is good if the material pleases you with its appearance for many years.
Before metal and vinyl siding appeared on the building materials market, overhangs were treated mainly with boards and wood paneling.
Unlike the treatment of overhangs with siding, the treatment of wooden building materials has many disadvantages.
Wood quickly loses its beauty, is susceptible to rotting, and therefore requires constant care.

If you decide to treat the overhangs with siding, then you will not have to constantly tint them and generally monitor them.
If you decide to use siding, you should know that vinyl siding on eaves does not look very nice.
In addition, condensation will collect under vinyl siding, since this material does not have ventilation holes.
If you want to treat the overhangs with metal siding, then condensation will eventually corrode the screws, and the entire material will become covered with unsightly red spots.
What materials can be used to hem overhangs with your own hands?
Corrugated sheeting is very often used for such purposes. This is a galvanized steel material covered with a polymer coating on top.

This coating not only additionally protects the galvanization from external influences, but also allows you to make corrugated sheeting of any color.
Galvanized steel, in turn, ensures the strength and rigidity of the material, resistance to mechanical and thermal stress.
To ventilate the roof, corrugated sheeting is laid with a gap. Corrugated panels are often made to the required width, so laying the material is quite economical.
Wooden lining is often used for hemming overhangs. You should choose the lining very carefully, buying only the highest quality.
The lining should not be very thin. Make sure the wood is completely dry. It is best to choose material that can be stored in air for at least a month.
The treated board is also suitable for hemming work.
The video below shows how you can hem roof overhangs with your own hands.
A board 1.5 - 2 cm thick should be nailed with a gap of 1 - 1.5 cm. The advantage of such material can be considered uniform ventilation of the attic space.
PVC lining is considered a very cheap material for such purposes. For work, choose a moisture-resistant lining, and also do not forget to purchase plastic corners for ease of installation.
Most often, overhangs are now hemmed with soffit - a plastic panel that is made specifically for these purposes.
This is one of the most common materials for this type of work.
It has a lot in common with siding. However, the soffit, compared to siding, has a denser plastic and special perforation, which provides ventilation.
The material from which the soffit is made is very resistant to sunlight, so it does not fade. The soffit is cut and fixed perpendicular to the wall.