Connecting a chandelier with 4 bulbs. Connecting a chandelier with three wires with your own hands. How to convert a chandelier designed for a single switch into a double switch
Read also
It is traditionally believed that connecting a chandelier is a complex task that must be performed by a professional electrician. But, there is nothing difficult in connecting two or four wires, so any man can easily hang a new chandelier in his home with his own hands.
Connecting a chandelier in a new house
If this is a newly built private house, and if it is being built independently, then it all starts with the wiring. Usually, it is made internal. Although, you can also use external wiring, which is hidden in a decorative casing.
Internal wiring
A special groove is made in a concrete, brick or wooden wall for electrical wires. This groove is called a groove. It can be done either with a special device, a wall chaser, or an ordinary chisel. In the case of a wooden wall - a chisel. The same groove is made in the ceiling.
Creating a channel for wires
The wire is placed in a special casing, which is closed at the top during interior finishing of the room. Don't forget about the distribution box, from which the wires should go to the chandelier, to other lamps, to the socket and to the switch.

Junction box
The presence of a junction box will make it easier to replace a piece of electrical wiring if necessary.
External wiring
The principle of laying external wiring is the same, with the only difference that a groove is not made, and the wire is fixed directly to the wall in an insulating decorative casing.

Wires in an insulating casing are hidden in the wall
If the switch is single-key, then two wires go from it to the chandelier. And if there are two keys, then four. Usually, pairs of wires in the chandelier itself are of different colors, so there are no connection problems.

Single-key switch connection diagram
When wiring, you need to take into account that to connect the chandelier you must leave sufficiently long ends. This will make it easier to connect. The excess can always be hidden either in a hole in the wall or behind a decorative chandelier cover.
Types of chandelier mounting
There are chandeliers that are quite heavy. And the safety of the people under it depends on how well it is secured. How it will be attached must be decided by looking at the mounting provided by the manufacturer. Typically, it comes in two types:
- fastening with a strip;
- fastening with a hook.
How to hang a chandelier with a strip
Almost all modern chandeliers are attached using a strip. It is a strip of metal that is fixed to the ceiling with self-tapping screws. To make the fastening reliable, you need to drill two holes in the ceiling. Plastic choppers are driven into the holes, to which the strip is attached with self-tapping screws. Self-tapping screws, entering the chopsticks, expand them, making this fastening even more reliable.

Photo: attaching a chandelier using a strip
After the strip is fixed to the ceiling, you need to connect the wires to the chandelier. Here it is better to use the services of an assistant who will hold the product. Although, you can temporarily hang the chandelier at some distance from the ceiling using a strong and thin nylon rope. And after connecting the wires, hang it the way it should hang. In this case, all the work can be done by one person.

You should always use a stepladder for this type of work. There is no need to stack stools, tables, etc. This is dangerous for your health.
Wire attachments may vary. On modern products, special couplings are sometimes made at the ends of the wires. The wires that come out of the ceiling are inserted into these couplings and secured with a bolt. If there are no couplings, then the ends of the wiring and the chandelier wires are simply twisted together. They just curl up. You cannot connect wires simply by making hooks at their ends, since the connection must be strong.

Photo: connecting wires using a terminal block
Everything is insulated using high-quality insulating tape. If the wires are copper, consisting of many wires, then before connecting all the wires must be twisted together. Of course, the ends of the wires must first be cleared of insulation.

On modern chandeliers, there are special couplings at the ends of the wires for connection: just press the spring with a button or lever, insert the wire and that’s it!
After the wires are fastened and insulated, you need to lift the chandelier and hang it on the bar. Usually, there are no difficulties with this. Each chandelier has a decorative casing with which you can cover the ends of the wires. This work is made easier when, when cutting, an additional recess is provided in the place where the chandelier will hang.
How to hang a chandelier on a hook
If fastening to a plank is not provided, then a hole is drilled in the ceiling, a plastic tip is driven into it, and a hook is screwed into it. Usually the key is equipped with a special lock, which is driven into the drilled hole and then, by screwing it in, expands the spacer. The concrete ceiling is drilled with a Pobedit drill to a depth of about 7-8 cm.
A chandelier, a popular ceiling lamp, is found in every home, and more than one. Therefore, from time to time everyone needs to install and connect a chandelier. Of course, it is not at all difficult to invite an electrician to do this work for you for a certain amount. But you can learn how to connect a chandelier yourself; it doesn’t require any special abilities. A positive attitude, basic knowledge of electrical engineering and compliance with basic safety rules will allow even an inexperienced person to be able to connect a chandelier on their own.
Required tools and equipment:
- Pliers.
- Screwdriver.
- Voltage indicator.
- Marker.
- A stepladder or other stable device of sufficient height.
- Terminal clamps.

How to connect a chandelier - identifying wires
Before starting work, you must read the chandelier’s passport instructions, which indicate the main technical parameters, as well as a diagram and procedure for connecting the wires.
For convenience, the wires differ in color:
- the “neutral” wire should be blue;
- ground wire – yellow or yellow-green;
- "phase" wire - usually red, brown, black or another color other than blue, yellow and green.
You should also inspect the place where the chandelier is hung. In apartments, the ceiling usually already has a special hook for hanging. You need to pay attention to the number of wires coming out of the ceiling: two or three. The presence of three wires (unless, of course, one of them is a ground wire) allows you to connect the chandelier in sections to use different levels of illumination. The presence of two wires deprives you of this opportunity; it is only possible to turn on all the lamps in the chandelier at the same time.
Modern home wiring is typically done using color-coded wires. The color distribution is similar to the above.

If you have old wiring and all the wires are the same color, then use a voltage indicator to identify the phase wires on the ceiling and mark them with a marker.
Connecting a chandelier to a single switch
The easiest way to connect a chandelier. The wires of the home electrical wiring and the wires of the lamp are connected in pairs to each other.
- Connect the neutral wire of the chandelier with the neutral wire from the junction box.
- The phase wire from the distribution box must first be connected to the switch and routed under its button. Connect it to the phase wire of the chandelier.
When connecting wires, the most reliable and safe option is to use screw terminals. However, in practice, twisted connections are often isolated with special caps. We strongly do not recommend using PVC tape for insulation; after time, due to its drying out, the quality of the insulation can deteriorate significantly, which can cause a short circuit and is fraught with unpleasant consequences.

Connecting a chandelier to a double switch
This connection method is used when connecting a three-arm chandelier or a ceiling lamp with more than three lamps. This type of chandelier allows you to regulate the level of illumination in the room and, moreover, allows you to save on energy bills. If you want to install a chandelier of this particular modification, when purchasing, pay attention to the number of wires coming out of it: there must be at least two phase wires, not counting the ground and neutral wires.
Your home electrical wiring should also be done accordingly: three wires from a double switch are connected to the chandelier mounting point. One of the wires is a neutral wire, the other two are phase wires passing through different keys in the switch.
The connection diagram for a chandelier with a double switch allows you to step by step adjust the level of illumination in the room.

Execution sequence:
- Divide the wires from the chandelier lamps into two sections.
- From each section, connect one twist to the neutral wire.
- Connect the two remaining twists separately to the phase wires.
As a result, with this connection you will get three different lighting modes.
Connection diagram for two or three chandeliers from a single switch
In a large room, several chandeliers or a large number of halogen lamps and LED lamps are often installed, which are all turned on simultaneously with one single switch. Also, sometimes it becomes necessary to install a switch so that it can turn on the lighting in several rooms simultaneously. In this case, parallel connection of chandeliers is used, like several shades in one chandelier.

If the number of wires in the chandelier and on the ceiling do not match
It may turn out that the chandelier you purchased has three wires, but there are only two wires on the ceiling where the chandelier is mounted, and the switch, accordingly, is single. Or vice versa. The algorithm for connecting a three-arm chandelier to a single switch looks like this:
- Connect the neutral wire of the chandelier to the neutral wire on the ceiling.
- In the terminal block of the chandelier, install a jumper between the phase wires or clamp them in one terminal and connect them to the phase wire on the ceiling.
With this connection scheme, it will no longer be possible to regulate the light level.
In the opposite situation, when the home electrical wiring has three wires (two phase and one neutral) and a double switch, and the chandelier has only two wires, the connection is made in the following sequence:
- Using a voltage indicator, you need to determine the neutral wire and connect it to any of the wires on the chandelier.
- Clamp the other two wires (phase) into one terminal, or install a jumper.
ATTENTION: In such a situation, you should definitely check all three wires with an indicator so as not to accidentally short-circuit the network if the third wire is not phase, but neutral. This, unfortunately, also happens.

How to convert a chandelier designed for a single switch into a double switch
If your chandelier is designed for a single switch, that is, only two wires come out of the base of the chandelier, and there are several lamps, and your electrical wiring allows it, you can try to convert the chandelier to a double switch. The process is labor-intensive, but the result is worth it.
In a chandelier of this design, all wiring from the lamps (shades) comes into one combination of phase and neutral wires. You need to find this place and divide the lampshades into two sections, each of which will be turned on by the corresponding switch key.
After we have found the connection point, do the following:
- The neutral wires remain connected to each other and do not need to be touched.
- We divide the phase wires into two groups of wires instead of one. The division scheme is at your discretion, depending on the number of shades and your personal preferences.
- Connect the common (neutral) wire with the neutral wire coming from the junction box.
- To connect the phase wires from the resulting sections of the lampshades of the sections, you need to run another additional wire from the chandelier to the place where the chandelier is connected to the electrical wiring from the double switch.
Thus, it is quite easy to transform an ordinary chandelier into a three-mode one.

The most common mistakes in connecting a chandelier
Errors during installation and connection occur not only among novice electricians; even among experienced specialists, it often happens that the chandelier does not shine at all as it should. These mistakes are typical and banal.
Incorrect connection of double switch
This is the most common mistake, which consists in connecting the incoming phase wire to one of the output contacts of the switch. With such a connection scheme, the chandelier cannot function normally, since one section of the lamps turns on only if voltage is applied to the other section. That is, if the incoming phase is connected to the left contact of the switch, when the left key is pressed, the phase enters the distribution box through the lower input contact and turns on one section of the lamps. The next time you press the right key, another section is turned on. But when you open the left key, all sections are turned off.

When the left key is pressed, it is impossible to turn on the right key.
The reason for the dependence of the right key on the left is that initially the phase entered through the input contact of the left key switch, and the left key, when turned off, breaks the phase in both sections at once.
To eliminate this error, you should swap the connections of the incoming and outgoing phases of the switch.
Instead of a phase wire, a neutral wire passes through the switch
According to the rules of electrical installations, there is a procedure for connecting a switch that closes and opens the circuit by breaking the phase. How does it look on the diagram? The neutral wire, bypassing the switch, is laid from the distribution box directly to the neutral wire of the ceiling lamp. The phase wire from the junction box passes through the switch key, which breaks the circuit.
However, in practice, sometimes an incorrect connection occurs: it is not the phase wire that passes through the switch, but the neutral wire. That is, when the switch key is turned off, the electrical wiring remains energized, despite the fact that the lighting is not on. This is fraught with the possibility of electric shock when replacing a lamp, if you accidentally touch the exposed parts of the chandelier shade, or if the insulation of the wire is broken.
Therefore, if possible, it is advisable to eliminate such a connection error.
This violation of the connection diagram can be detected using a voltage indicator, which, when the switch is in the “off” state, shows the presence of a phase on the ceiling wires.

Incorrect connection diagram for the neutral wire of the chandelier
This error is the reason that only part of the light bulbs in the chandelier turn on normally, the rest either shine weakly or do not turn on at all. As previously discussed, if there are three wires, the phase wires are each connected to a separate section of light bulbs, while the neutral wire is common to all light bulbs, which are all connected to it in parallel. If you mix up the wires and connect the interconnected light bulbs, say, of the first section to zero instead of the phase, and connect all the light bulbs of both sections to the phase (instead of zero), then when you press the first key in the first section, the light bulbs will turn on, since they go there at the same time both zero and phase. When you press the second key in the second section, the light bulbs will not light, since both incoming wires will be phase, and in order for the light bulb to shine, a phase with zero must be supplied to it at the same time.

Compliance with safety rules when connecting a chandelier
Working with live parts always involves a certain amount of risk. Connecting a chandelier to a home is no exception, and the work is done at height. To protect yourself and others during electrical installation work, you must follow the following safety rules:
- Carefully study the instructions for connecting the chandelier.
- The power tools used in the work must be in good working order, especially with regard to the insulating parts of the tools.
- Equipment for climbing to heights - stepladders and other devices - check for reliability and stability of the structure.
- Before starting work, stop the power supply by turning off the circuit breakers in the electrical panel.
A classic version of a device for lighting rooms is a chandelier. It makes it possible to distribute the light flux as evenly as possible. When installing a chandelier with one lamp, no significant difficulties arise, but with a larger number of lamps, certain design features should be taken into account.
Necessary tool
Chandelier - interior decorationBefore you begin connecting the chandelier, you should prepare the tools necessary to complete this work. With such an organization, you won’t have to be distracted by searching for it.
An indicator screwdriver should always be at hand. With its help, the phase wire is determined.
Carrying out electrical work and attaching a chandelier is not possible without a set of screwdrivers with different head shapes.
To check the correct connection of electrical circuit elements, you need a multimeter.
Pliers are used to prepare wires and install them.
Using a terminal block will simplify the process of laying out the wires when connecting them.
In addition to these tools, you will need a knife, a marker for marking and a stepladder. Before connecting the lighting device, you should carefully study the instructions supplied with it.
Dealing with chandelier wires
If you have instructions, connecting the chandelier is greatly simplified. This document contains complete information regarding the purpose of each wire and describes how to connect them, as well as an electrical diagram. Wires are usually marked as follows:
- white or brown – phase;
- blue – zero;
- yellow-green – grounding.
 Chandelier wires
 Checking the presence of a phase with an indicator
In its simplest form, the phase indicator looks like a transparent screwdriver. It contains a current-limiting resistor and an indicator, which is a light bulb. The device is equipped with two contacts. One of them is a probe made like a screwdriver, the other is a contact on the body. The probe is designed to determine the presence of voltage in the circuit, and the contact is touched by hand. A light signal indicates the presence of voltage.
The simplest indicators may have poor quality assembly or a poorly visible indicator light. In most cases, the design of this device does not allow it to be used as a screwdriver, since the body is not strong enough. A weak indicator light may cause electric shock. The main advantages of such devices are ease of operation and affordable cost. In general, the device copes with its function.
 Indicator
 When choosing it, you need to pay attention to the appearance and range of operating voltages. As a rule, the voltage in the network is 220 V, so the range indicated on the case should include this value. If the case does not inspire confidence and there is no information about permissible operating voltages, it is better not to purchase such an indicator.
Professional level indicators are equipped with two poles and, in addition to light, sound signaling. One of the contacts is made in the form of a probe with reliable insulation. The second is a slightly larger probe, the circuit of which includes an alarm.
The voltage is checked by touching one probe to zero and the other to the wire being tested. The reliability and durability of this device are at a good level. However, to check it is necessary to know with certainty where the zero or ground goes. Otherwise, you will have to check all the wires in pairs. This is inconvenient for household use, so the device is most often used in industrial settings by professionals.
Checking the presence of phase with a multimeter
A multimeter is a small-sized measuring instrument that is designed to perform various measurements and tests of electrical circuits.
 Multimeter device
 The device comes with probes. One end is equipped with a plug necessary for connecting to the multimeter socket located on the front panel. The other end is equipped with a special holder that has a bare contact - the probe. It is this that is connected to the circuit under test. When using the device, you should remember the rule that electricians all over the world adhere to: the probe for connecting to the positive pole is marked red, and black for the negative pole.
Before measuring the voltage in the circuit, set the device settings. In our case, this is alternating current and the measurement limit is above 250 V. Next, the probes are connected in parallel to the circuit, and the required value is displayed on the device display. When determining the neutral wire, the multimeter is reconfigured accordingly.
Installation of chandeliers of various designs: step-by-step instructions
Chandelier with one lamp
To install a chandelier in a place where there was no such lighting fixture before, markings are first made. For this purpose, the center of the ceiling is determined and the point is marked with a marker. When installing in a suspended ceiling, a hole is made for wires; in suspended ceilings, restrictive rings are mounted and holes are cut out.
If the ceiling is made using a design approach and is a complex structure, then it is necessary to consider the option of a fastening system. To hang a massive chandelier, you will need to install an additional beam or metal chain.
The wiring goes from the mounting point of the lighting fixture and goes down the wall to the distribution box, to which the power wires from the switch are connected.
Important: The distribution box should be installed with a distance from the ceiling of at least 150 mm. In this case, there must be a reserve length of the wires located in the box of at least 100 mm.
The connection of wires in the junction box is carried out in accordance with the electrical diagram of the lighting device. After connecting them together, careful insulation is required using electrical tape; the wires are laid in such a way that they do not intersect. Finally, the box is closed with a lid, which is securely fixed.
Most often, modern chandeliers are supplied with a mount, which is a bracket. This design greatly simplifies installation. The bracket is placed near the point where the wires exit and this position is marked. If fasteners are supplied with the chandelier, then the diameter of the drill must correspond to its diameter. The holes for the dowel and the wires are not allowed to coincide.
 In progress
 When laying the wiring, it is necessary to create a certain length reserve so that there are no difficulties in accessing the wires in the event of dismantling the chandelier.
Before installation, the wires are stripped and connected using a terminal block in accordance with the electrical diagram. If the terminal block is not supplied with the lighting device, then the wires are connected using a twist. In this case, the length of the stripped surface is 20 mm, and the wires are connected in pairs by twisting. Finally, the structure is covered with insulating tape.
If the chandelier has a metal body, then it is equipped with a special screw, which is intended for grounding. The ground wire coming from the junction box is stripped and twisted into a ring shape. This end is securely fixed with the indicated screw.
Having completed the connection and insulation of the wires, proceed to the installation of the chandelier. Before doing this, you need to make sure that the location of the wires does not coincide with the fasteners.
Two- or three-lamp chandelier
The presence of two or three lamps in a chandelier does not have a significant impact on the installation procedure of the device.
The difference from a chandelier with one lamp is the number of wires supplying power. When connecting the simplest version of a chandelier, two power wires are connected and grounding is connected. When connecting a lighting device equipped with two or three lamps, three wires are used for power and one for grounding. Wire switching is carried out according to the electrical diagram. To do this, bring one wire from each cartridge to one point and connect it to zero.
When connecting a two-lamp chandelier, the unused wires are connected to the phase wires. In a three-lamp, the wire coming from the third cartridge is connected in parallel to the phase of the second or third cartridge. The connection method in this case is the same as when installing a chandelier with one lamp.
For the operation of such a chandelier, it is required, to which a wiring consisting of three wires leads. Turning on one of the keys will close part of the circuit and one lamp will light up, turning on the other will provide two lamps. Pressing both keys simultaneously will turn on all lamps.
Chandelier with four or five lights
Increasing the number of lamps in a chandelier does not have a significant impact on the technology of connecting the device. The process is completely similar to that described in previous cases, except for the need to group the phase wires. Lamps are grouped at personal discretion, but there is a limitation on the number of wires supplying power and the number of keys on the switch.
 Connecting a chandelier with five lamps has its own characteristics
 Connecting the switch
Connecting the simplest version of a chandelier with one lamp to a switch with one key is not particularly difficult. If there are two or more lamps, then the number of switch keys can be two or three.
In the case where there is ready-made wiring, and the number of lamp groups corresponds to the number of switch keys, replace it according to the connection diagram.
 Connection according to the diagram
 When installing this device on new wiring, you should take into account the specifics of its design. Switches with two and three keys have a terminal that is common. It serves for switching with the power wire coming from the junction box. The remaining terminals, depending on the location of the keys and the selected order of grouping the lamps, are connected to the wires of the sockets passing through the box.
Important: The switch must open the circuit by breaking a phase. This is a safety condition when replacing a burnt out lamp.
Measures in case of insufficient wire length
A chandelier is not always connected in a new building, so a situation cannot be ruled out when the available length of wires is insufficient for the connection. In this case, it is necessary to extend the wiring wires or the chandelier itself.
Experts recommend using a terminal block to connect wire sections. This device is a plate made of plastic on which conductive planes are located. On both sides there are screw terminals that are used to connect the wires.
Important: When using this device, you must ensure unobstructed access to it. This requirement is due to the fact that the connection weakens over time and deteriorates the contact of the conductors. As a result, the connection area heats up, which can lead to a fire. If it is possible to replace sections of wire with a solid one, it is recommended to do so.
So, you needed to replace or hang a chandelier on the ceiling in your house from scratch. At first glance, this event causes little concern and seems difficult for a novice electrician. But everything is much simpler than you think, because installation work lasts no more than half an hour and does not require much effort.
In order to hang a chandelier from the ceiling with your own hands, you need to:
- become familiar with safety precautions;
- prepare tools and materials;
- choose the right mounting method;
- install the product;
- check that the connection is correct.
Now let's look at each stage in detail.
Safety precautions
Any electrical installation work is not safe, because a person is dealing with high voltage current. To ensure that you don’t get an electric shock when connecting, and that it doesn’t break down after a while, we recommend that you consider the following rules and tips:
- Before hanging the lamp on the ceiling, turn off the power supply (it is enough to turn it off at the switchboard).
- Make sure there is no electricity in the room by turning the lights on/off.
- Using an indicator screwdriver, check the voltage on the wires coming from the ceiling. If there is no current, proceed to work.
- Perform using terminal blocks. "Old-fashioned" twisting with insulation is not safe.
- Do not buy low quality Chinese products, because... Most often they are the ones that fail.
- Take care of quality.
If you follow these safety precautions, you will be able to attach the chandelier to the ceiling quickly and without any problems.
Tools and materials
In order to carry out installation, you will need the following tools:
- electric drill or hammer drill;
- ladder;
- screwdrivers or screwdriver;
- indicator screwdriver;
- pliers.
Materials you need to prepare:
- connecting blocks either (they are not always included, especially if the product is cheap);
- fastening element (hook or anchor);
- self-tapping screws with dowels.
As for the latter, it should be clarified. If the chandelier will be attached to a concrete ceiling, it is necessary to purchase anchors; they are better installed in the wall. In order to hang the body on a wooden ceiling, you can do without a hook and use wood screws (if the lamp is light in weight). It can only be fixed to drywall if you get onto a frame made of profiles using metal screws.
Installation methods
In order to independently hang a chandelier from the ceiling in a house, you can use one of three methods, each of which is pre-provided by the manufacturer. If the product is not heavy, it can be hung on a hook. When weighing more than 5 kg, anchor bolts must be used. The design of some chandeliers requires the installation of a special strip (bracket). Well, the last way is to attach the back cover of the lamp directly to the ceiling or wall. Now we will look at each of the above methods in detail.
Hook
To install a light chandelier, you can buy an inexpensive hook with a dowel (as shown in the picture) and screw it into the ceiling, then hang a loop on the hook provided by the design of the lamp.

Please note that this method is only suitable if the ceiling is wooden or concrete, because Then you can drill a hole in it and insert a dowel. If the sheathing is plasterboard, this type of installation is prohibited, because the hook will simply tear out after hanging the lamp.
If the chandelier is large and heavy, you can hang it on an anchor hook. Its design is shown in the photo:
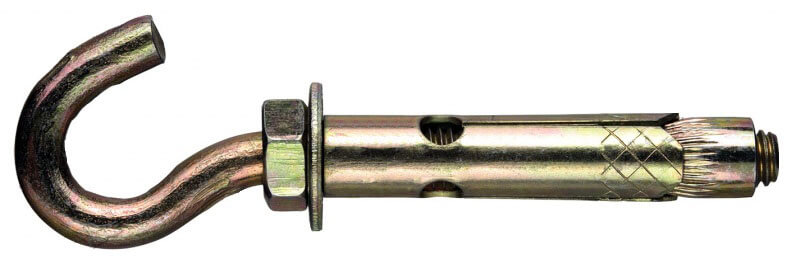
All you need to do is drill a hole of the required diameter in the ceiling, and then screw in the hook. The anchor will “open up”, which will create a reliable fastening for a product of even greater weight.
Such a connection can spoil the interior of the room, so it is recommended to buy lamps that have a decorative bowl, which will hide all the fasteners.
bracket
If the manufacturer provided a strip mount, you will need to spend a little more time on installation.

The kit includes a metal strip and 2 screws with nuts. All you need to do is fix the bar (bracket), and then hang the chandelier yourself tightly to the ceiling.
This option is more labor-intensive, but at the same time it is not complicated. The main thing is to correctly adjust the distance between the screws (it should correspond to the distances between the holes in the lamp body itself).
Back cover
If you want to hang a chandelier on the ceiling without drilling with a hammer drill, you need to choose a special type of lamp, the shade of which can be attached with self-tapping screws. In this case, you just need to screw a few screws through the holes in the back cover. Most often, this mounting method is used if the product is light and installed on the wall (as shown in the picture).


Connection
So, so that you understand each of the connection methods, we will provide the corresponding step-by-step instructions for dummies.
If you use a hook, just drill a hole in the ceiling with a drill, drive a dowel (or anchor) into it, and then screw in the hook itself. Next, you need to connect the wires between the body and the supply wires, carefully insulate them (if required) and only then hang the chandelier on the hook. We need to dwell on this in more detail so that you know how to properly connect a chandelier to the ceiling.
If the design of the lamp does not provide for grounding, two wires must be connected to the housing - phase and neutral. As a rule, metal lamps provide additional grounding, so in this case you will be dealing with three wires - phase, neutral and ground. Each core must be connected in the terminal block according to the color marking of the wires, as well as symbols. If 4 wires come out of the lamp body, then it means the chandelier has two bulbs and it must be connected in the same way as for two bulbs.
Video lesson on connection
If you are installing electrical wiring from scratch, then you also need. You can get acquainted with the technology by simply following the link.
In order to hang the chandelier evenly on the bracket, you must first set the screws at the appropriate distance. Then secure the bracket using dowel nails. Next, you need to thread the body through the studs, and using decorative nuts, securely fix the product to the bar. As in the previous case, the connection of the wires must be done in advance.
We also draw your attention to a very important point. When connecting a chandelier, the conductors must be correctly connected: phase to phase, zero to zero, and ground to ground. If you mix up the contacts, this will happen. To prevent this from happening, we recommend that you read.
Well, the last way is to attach the back cover directly to the ceiling. In this case, the design of the product has several holes on the back cover, which are simply fixed with self-tapping screws. There is nothing complicated, the only advice I would like to give is that you don’t have to use all the holes. If the lamp is light, but there are 4-5 holes, then three self-tapping screws may be enough to hang the body.

Connecting a socket, switch and light bulb in a junction box
Control check
Once you have completed the electrical connections, you need to check all the work. First visually - so that the wires are not visible (hide the wires in the housing). After this, you need to shake the lamp to make sure it is securely fastened. Well, in the end, turn on the machine and if it doesn’t go off and the lamp itself doesn’t sparkle, then everything was done correctly! As you can see, one person or even a woman can easily hang a chandelier from the ceiling! The main thing is to follow all the rules that we told you about!
Non-standard situations
Above, we have provided you with instructions for installing the chandelier under the most standard conditions - when the ceiling is smooth and without defects. At the same time, sometimes you have to carry out fastening in non-standard conditions, which we will talk about briefly.
To hang a chandelier on a suspended ceiling, you can use a strip, as shown in the photo below. In this case, fastening can be carried out even if the ceiling is already stretched and, moreover, the lamp can be replaced without the danger of damaging the film coating. 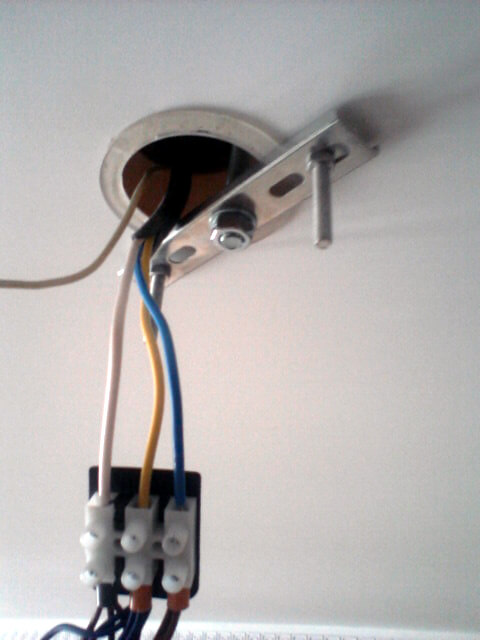
If you decide to hang the product on a sloping ceiling, in this case it is best to use hanging on a chain. When for some reason you have to change the location of a chandelier in an apartment, the main thing is not to get into the wiring when drilling a new hole in the ceiling. To do this, it is recommended to use, which will show where the wires go.
If there is already a hole in the ceiling, be sure to use it so as not to re-drill the hole with a hammer drill. A hole that is too large can be hidden with a special plaster shade, which is sold in most hardware stores.
If three wires of the same color come out of the hole, then in order to find the phase, zero and ground, you will have to use a multimeter. With two-wire wiring, things are easier - you can find the phase and zero with a regular indicator screwdriver (when you touch the phase, the light will light up).
Did you like the article? Add “ ” to your bookmarks and we will delight you with new accessible instructions with visual video examples, as well as electrical diagrams. We hope you now understand how to hang a chandelier on a ceiling made of plasterboard, concrete or wood!
Related materials:
Video lesson on connection
The choice of lighting device should be entrusted to your wife. Ladies love to travel shopping much more, looking for products on sale, they have a better developed sense of beauty, so this will only be a joy for her. How much money should you give to your beloved wife? It all depends on the model, the materials from which it is made, and other features. When choosing, the emphasis is on the unity of design styles of the lamp and other furnishing elements in the room. For example:
- MW-LIGHT Bouquet - pendant design guarantees ease of installation, since this five-arm chandelier can be connected using a regular three-channel terminal box. All contacts are already grouped together and are output in a single winding with three cables. The cost of the model does not exceed 6,000 rubles - another plus for the wallet. The floristry style is ideal for the bedroom, but is also suitable for other rooms.
- Favorite Lanta is a suspended model with advantages similar to the previous design. It looks like crystal, costs much less, and is ideal for decorating a living room or large rooms. The total power of all lamps is 200 watts. The price of the product is 13,000 rubles.
- Chiaro Versace is a very luxurious piece of furniture (46,000 rubles), has a powerful design, and is mounted on a durable ceiling hook. All this allows us to recommend the chandelier to true connoisseurs of beauty who do not spare money for luxury. Plus: all wires are hidden inside the barrel of the product, which allows you to rearrange pairs of lamps.
All listed models can be purchased in our store, they are always in stock. If you have difficulties making a choice, you can contact a consultant.
How to connect a five-arm chandelier without tools?
Not every home has voltmeters, multimeters, indicator screwdrivers and other equipment for electrical work. In order not to spend money on buying them, we decided to give you some useful tips on how to do without serious tools and still connect the ceiling lamp correctly:
- An indicator screwdriver is needed to identify phase and zero. You can find out about the purpose of the wires in other ways: look in the technical documentation, from the markings (“L” - phase, “N” - zero) or by color - brown, black or red colors are typical for the phase, zero is indicated in blue.
- A multimeter is needed to check the correct connection of a 5-light chandelier. An easy way to do the same, but without the device, is to turn on the power supply and press the switch keys.
- Instead of pliers, you can use a regular kitchen knife to clean cable cores. The braid is heated with fire from a lighter, softens and removed. Try not to overheat the wire to avoid losing its functionality.
Everything you need to connect a 5-arm chandelier: a durable chair, a knife, electrical tape. Instead of twisting the wires, you can use a terminal box; it comes complete with the lighting equipment itself.
Basic connection diagrams for a ceiling lamp
We will look at 4 methods for synchronizing cables:
- How to connect a chandelier with 5 arms to a single-key switch.
- A method for synchronizing lamp cables with the terminals of a two-key panel.
- Connecting equipment from which 10 wires extend.
- Installation of a chandelier with three cables.
How to connect a 5-arm chandelier to a single-key switch?
This breaker model has two or three cables of the main power supply network: phase, ground and neutral. In most cases, there is no “earth”; its use is justified only in industrial buildings. A single-key switch will turn on and off all the lamps at the same time, so there is no point in dividing them into groups. If two cables with a phase come out of the chandelier, they should be wound together and placed in the terminal box. You can use the serial connection method: insert the ends of the wires into different slots, secure them with bolts and close them with an additional common cable with a cross-section of 0.25 sq. mm. The final stage in connecting a five-arm chandelier is to insulate the additional wire after the connection.
Zero is always a common cable, therefore, only one core is provided for it from both the common network and the chandelier - there will be no problems with connection.

Wiring diagram for a chandelier with 5 lamps for a two-key switch
From the breaker with two buttons there are two phase wires and one neutral wire. Manufacturers of chandeliers with five lamps also divide the total number of lamps into two groups: two and three lamps. Therefore, three cables also come out of the trunk of the lighting device: two phases and zero.
This connection diagram for a chandelier with 5 light bulbs is the simplest: connect the phases of the chandelier with the phases of the network and both zeros by twisting or inside the terminal box. When using the latter, do not tighten the contacts too tightly - the core may break off and the electrical circuit will be interrupted.
How to hook up a chandelier with 5 bulbs and 10 wires?
This is where difficulties arise most often, but this method has one important advantage - you choose which lamps to combine into groups. The neutral wire is always common, so you should do the following:
- Hang the chandelier on a hook so that it does not fall and is not suspended.
- Locate the neutral wire using colors, markings, or instructions in the technical data sheet.
- Connect the 5 neutral wires of the chandelier using pliers or a screwdriver in the terminal box using the sequential method.
- Place one neutral cable into the box on the other side and secure it with fasteners.
- Divide the phases into two groups if you have a two-button switch, or combine them into one if you have a one-button switch. The number of terminal boxes used depends on the number of groups: it is easier to hide two small ones than one long one.
- Connect the phases in the same way. All twists should be insulated with tape.
Important: do not touch live paths even when they are de-energized. Residual tension will not cause a blow of critical force, but can incapacitate a person for some time.
Connection diagram for a chandelier with 5 arms and three common cables
The method is similar to the first method. However, here the manufacturer has already distributed the groups of lamps and simplified your task: you don’t have to think about how to connect the wires in a 5-arm chandelier. After connecting, you should check the functionality of the lighting device. To do this, activate the electrical switchboard and turn on the switch buttons. If you strictly followed our instructions, everything should start working after the first installation attempt.
Go for it! We are sure that your work will delight your wife, mother-in-law and other ladies around you!