Preparing soil for planting onions. Preparation of onion sets, family for planting, planting onions in spring in open ground on the head and feather: timing, technology description. How to soak onions before planting in spring: a recipe How to prepare the soil for onion sets
Read also
Onions are a vegetable that almost every summer resident grows. In cooking, these sweet or spicy fruits are simply indispensable, because in some recipes the main ingredient is onion. Before planting seeds in a summer cottage and harvesting a good harvest, you need to know what kind of soil the onion likes, what temperature is suitable for planting seedlings in open ground, and how to properly plant an onion crop in order to enjoy a high yield at the end of the season. Let's look at each stage separately, perhaps starting with the soil and its autumn preparation.
Soil preparation for spring planting
Before doing land work, you need to choose a place for planting small bulbs. As many gardeners know, bulbs love warmth and light, in the shade the plant will quickly wither and the fruits will be small, so when choosing a site, give preference to beds in the middle of the garden, next to which trees do not grow and there are no buildings. Did you find such a place? Great, now you need to check if the soil in the garden is suitable for growing onions. For this, it is better to use litmus paper. She will determine the type of soil in no time. It will be very good if your soil is sandy or sandy. It is in it that the onion develops a powerful root system and is able to ripen faster before harvesting.
In autumn, the bed for onions should be fertilized with overripe manure or ash. There are a lot of nutrients in these components, so it is advisable to apply humus per 1 sq m of 6 kg of fertilizer. Dig the entire bed to a depth of 20 cm, not forgetting to remove weeds and other debris that will come across during digging. After fertilizing, level the topsoil with a rake and leave it alone until spring.
Attention! The preparation of the beds is an important point, it is on this operation that the yield of fruits depends.
In the spring, as soon as the snow melts and you can go out into the garden, it is recommended to re-dig the area under the onion so that the beneficial substances are evenly distributed over the top layer of the earth. Now it remains to prepare the onions for planting, wait for the optimum temperature of the soil to warm up, plant the sowing in open ground and take care of the plant to get a juicy, large crop.
Planting material preparation
Do not rush to plant onions in the spring, because in order for the seedling to germinate to be almost 100%, you need to sort out and treat the onions with special solutions that will protect the crop from diseases and pests. So, first sort out low-quality planting material, removing all damaged, dry and diseased specimens. Distribute a good seed in diameter into different piles. This will allow you to produce uniform turnip cultivation.

After sorting, hold each group for about three days at a temperature of 35 degrees, if this is not possible, then simply ignite the onion for about 4 hours at 40 degrees in the oven. Processing onions before planting, thus, activates metabolic processes and improves germination. After drying, transfer the seedlings to the diluted fertilizer for 1/3 of the day, then dip the seedlings in a weak solution of manganese for 5-10 minutes, rinse the onions under running water and you can safely plant the onions on an unprotected surface.
How to plant an onion on a turnip
You have already done the basic procedures, prepared the sowing and dug up the garden bed. Now it's time to plant the onion in open ground. In order for the planting process to be successful and soon juicy green feathers appear on the beds, you need to choose the time when the soil warms up to 12 degrees and will be able to accept the "residents". Usually, spring planting falls in the third decade of April or in the first decade of May. For agriculture, it is better to choose cloudy, dry weather and you need to start from the land. You already know how to prepare a bed for sowing, it remains only to make holes or grooves and plant planting material. In the first and second options, it is important to observe the following rules:
- the distance from sevka to sevka should be at least 15 cm;
- row spacing should not exceed 30 cm;
- seedling planting depth is 7-10 cm.
After planting, be sure to water the beds with settled water at room temperature. If you planted the seedlings too close, then thin out the rows after a while, otherwise the plant will not have enough nutrients during the growing season, the growth of the bulbs will noticeably worsen and it is likely that the root system of the turnips will get confused with each other.
Planting onions in July

If you want to harvest onions twice during the summer, we recommend that you plant a second set in July. However, this option is only suitable for southern cities, where the summer time ends in the middle or end of September. In order for the onion to grow, you need to use only early-ripening varieties that will just finish ripening by the end of August. How to plant onions in July? Just like in May. The soaked sevok is sown in the prepared recesses and after the appearance of the leaves, the usual care of the plant begins.
Sowing seeds
It is known that the onion is a perennial plant, so you can get a turnip only in the second or third year. However, some gardeners buy sets and grow onions in one season. Other summer residents grow onions by planting seeds in the ground, this process delays the harvest, but you can grow high-quality seedlings, which next year will bring large fruits of onion heads. Seeds are also recommended to be processed before planting, and we will now find out how to do this correctly.
First of all, soak the seeds in warm water for a day. Soaking onions in a handy container before planting will help you sort out empty seeds. It is they who will be on the surface of the bowl, and the good ones will settle to the bottom of the dish. After 24 hours, drain the water from the container along with the floating seeds, they will definitely not be useful to us, because there will be no benefit from them. Transfer the rest of the planting material to gauze or cotton fabric, put it in the shade until crumbly. Then treat the seeds with a solution of manganese and dry again. Onion seeds are ready for planting.
Attention! If there was no manganese, and you don’t know what to soak the onion in before planting, use copper sulfate, after dissolving the crystals in water.

To sow seeds, make grooves on the bed, 2-4 cm deep. Leave the distance between rows from 10 to 30 cm. Then pour plenty of hot water over the recesses to carry out antibacterial tillage and sow the seeds at a distance of 1-3 cm from each other. Pour the bed again with water at room temperature, cover it with a film. After the appearance of the first leaves, the need for shelter will disappear.
Onion care in the open field
Mostly experienced gardeners know how to properly care for this plant, but we want to remind you once again what care is. First of all, the beam needs moisture, so water it once a week with plenty of settled water. If the summer turned out to be dry, then increase watering up to two times in 7 days. In general, make sure that the ground is always slightly moistened and then problems with growing onions will not begin. After each "water" procedure, loosen the top layer of soil so as not to disturb the breathability. Do not forget to remove weeds and treat onions with copper sulfate to prevent infection with fungal and viral diseases. For the entire growing season, feed the plant three times with organic or mineral fertilizers.
Attention! In July, watering is gradually reduced so that the onions have time to ripen by harvest.
Chinese way of growing bulbs

Planting onions in the Chinese way has become popular only because of the high yield of fruits, whose sizes can break all records. First of all, prepare the beds, or rather the ridges. Raise each row by 15-20 cm, leave a distance of at least 30 cm between the rows. Now prepare the material for planting, for this, spread the seedlings on a baking sheet in one layer and heat it in the oven for 12 hours at a temperature of 40 degrees. Then remove the husk from the set, cut off the dry neck and soak the material in warm water for a day. How to soak onions before planting for better germination? In water with slurry. Such a solution will saturate the seedlings with nitrogen, and the plant will grow better. Then you can plant onions in the ground.
To know when to plant onions using the Chinese method, you need to distribute the onions into fractions before processing the seedlings. The first group, which has not reached a diameter of 10 mm, is best planted before winter. The second - 15 mm, ideal for planting in the spring, namely in early April. The third - 20 mm, it is desirable to plant in early May, the rest of the sets are only suitable for forcing onions onto a feather.
The sevok has been prepared, now let's see how to plant onions in the Chinese way, and how to properly care for the seedlings so that there are large bulbs. Stick the onions into the moistened grooves 2-3 cm, sprinkle with earth and lightly tamp the top layer with your hands. Water the bed generously with water. Loosen the ground, resuming air circulation. It is advisable to carry out the procedure early in the morning, while the sun does not bake as much as during the day.
During cultivation, turnips will need simple care, which consists of weekly watering, removing weeds, loosening the soil, and fertilizing. It is also worth noting that three weeks before harvesting (usually in July), gradually stop watering, free the turnip from the ground by half, and leave only the root system in the ground a week before harvesting.
Usually, onion sets are planted in the spring, when warm weather has already set in and the soil has warmed up enough - approximately the beginning - the middle of May (depending on the weather and the region). In the meantime, you have time to prepare the garden.
In the second half of April, it is worth going out into the garden and, after looking around, determine the most illuminated area, which will be sunny for most of the day without shade from neighboring trees, fences or buildings. And it is better if this place is on a hill, and not in a lowland, where rain and melt water often stagnate even on sandy soils. Further, on one of the fine days, when the earth is already somewhat dry and stops sticking, you can begin to study the soil. It is enough to dig a few times to roughly determine the type of soil:
- the lump is heavy and sticks strongly to the shovel - the soil is clayey (by adding 2-3 buckets of coarse sand and peat, you can improve the drainage of the soil and make it suitable for onions)
- if the earth is easily chipped from a shovel - most likely sandy soil or loam (both options are quite acceptable for cultivation);
- but when the soil simply crumbles, without forming lumps and lumps, then it is sandstone (compost or humus is necessary, because such organic matter not only provides planting with nutrients, but also helps to retain moisture in the ground).
Soil acidity can also be determined without special tools and preparations. Take a look at what weeds grow on the site, you noticed - horsetail, horse sorrel, plantain - these are acidic soils, and for the successful cultivation of onions, chalk or lime should be added to the selected area (about 1-2 kg per 1 sq.m of land). If nettle, clover, woodlice, wheatgrass are more common, then these are slightly acidic soils, but the common bindweed, shepherd's purse, adonis or euphorbia speak of neutral acidity.
Even novice gardeners are aware of the need for soil fertility. But the organics recommended in specialized articles: fresh manure, rotted mullein, and even the contents of compost heaps - garden beginners are often perplexed: "Where can I get all this and how to work with it?" Therefore, let's do it easier: if you doubt the fertility of the soil - before planting onion sets and digging up the garden bed, prepare the fertilizer yourself.

Chopped (without roots and seeds) weeds are suitable as organic matter - the same nettle, dandelion, tansy or shepherd's purse. You can also buy a ready-made concentrate of natural fertilizer based on peat - Humat, which, according to the instructions, is also scattered before digging. And as a mineral supplement, purchase nitroammophoska - a complex preparation containing both the necessary nitrogen, and potassium, and phosphates.
It is impossible to simultaneously apply means that reduce soil acidity (wood ash, chalk, lime) and organic matter, since their interaction leads to a decrease in nitrogen in the soil, which is so necessary for growing crops. It is better to carry out these activities in two stages - in autumn and spring.
Having dug up the area selected for the onion, you need to form a bed. Its dimensions depend on the method of planting and the number of seeds. Following the advice of experienced gardeners, it makes sense to organize mixed plantings, alternating rows of onions with carrots, beets or berry plantings. And such cultivation is really useful: in addition to saving space on the site, the plants will protect each other from pests and prevent the spread of diseases. And for a novice gardener, this is an opportunity to try his hand and grow several crops at once without unnecessary “labor exploits” and care.

Planting material preparation
Growing onion from sets is undoubtedly the most convenient, efficient and fastest way to get a crop. It is quite simple to purchase planting material - sevok is sold in various varieties, sizes, shapes. At the same time, the expected harvest of turnip bulbs may differ in weight, taste, expected shelf life and their use. And if everyone has their own taste preferences, then it is worth mentioning the size: qualified gardeners prefer to buy smaller sets, because in this case the number of onions in the sold unit of weight or volume will be greater. But on the other hand, under adverse conditions or improper care, it is difficult to grow full-fledged, large bulbs from such a "small fry", especially if there is not enough experience. Therefore, we recommend that beginners plant larger sevok so as not to be disappointed in gardening at the first attempt.

Before planting an onion, it is necessary to carry out a number of measures aimed at activating its vitality and preventing diseases.
- Sevok is heated in hot water (t 35-40 ° C) with the addition of a pink solution of potassium permanganate or any suitable fungicide (antifungal drugs sold in flower or gardening stores). This will not only kill possible infections, but also reduce the likelihood of "shooting" the bow in the future.
- Now it is dipped into a saline solution for 1.5-2 hours (a glass of salt per liter of water) so that the pests cannot “feast on” the future harvest.
- When everything is done, the sevok must be washed. Then, if the onions have underdeveloped or too dry roots, they are kept in a root formation stimulator (you can buy a ready-made preparation in the store or make it yourself: for 1 liter of water + 2 tablespoons of honey + 2 tablespoons of aloe juice).

The sowing material prepared in this way is already sufficiently saturated with moisture, disinfected and ready for the beginning of the growing season. You can start planting according to sowing rates and in pre-marked rows.
Care, watering and fertilizing before harvest
In about a week, the first green sprouts will appear on the bed, and soon the even rows of the onion will need care. You will have to regularly pull out the weeds and, in dry weather, water the garden bed.
As top dressing, if you were unable to “get hold of” the infusion of mullein or bird droppings, you can use the same that you applied to the soil before planting.
Chopped greens (cut grass, tops, cut young twigs, weeds, even with seeds) are poured into any container, filled to the top with water and left to ferment for 5-7 days. After that, the infusion is filtered and added during irrigation at the rate of 1 liter per bucket of water. If there is no time to mess with the grass, then organic Humate powder can be used as a fertilizer according to the instructions. That's the whole simple care.
Two weeks before the expected harvest (when the green part of the onion turned yellow and began to fall), all watering is stopped, and the drying earth is carefully raked with a chopper or hands so that the bulbs ripen in the sun.

In order not to miss the moment of cleaning, you need to check the condition of the turnip - pull out one and look at its roots - they should begin to dry out. But if new white roots have appeared, this means that the plant is entering the next season of vegetation, which cannot be allowed, because the taste of the onion is lost and its keeping quality decreases.
The harvested crop is transferred to the shade under a canopy, where there is good air circulation. There, the bulbs remain until the greens, roots and roots are completely dry and dense yellowish scales are formed. When the onion is dry, it is put away for storage in the basement or pantry.
Dear friends, the May spring sun is warming more and more confidently, which means that it's time to plant onions. We hope that you have already prepared onion sets.
This is the name of a one-year-old onion grown from seeds (nigella) and representing a small onion.
Sevok can be grown independently from seeds or purchased at garden centers and stores.
How to choose sevok
It is important to choose the right quality planting material. Bulbs should not be shriveled, already germinated. In this case, the supply of their nutrients has already gone to the pen, and a good turnip will not work.
Also inspect them for damage and rot, this is important because such a set will not make a good onion head, it will be prone to disease, will not grow well, or even rot.
Here the principle applies: quality is more important than cheapness. It is better to purchase good planting material than discounted, but not meeting these criteria.
A good set of small size, dense, with a shiny smooth, whole and tight-fitting husk.
When to plant onion sets outdoors
The most popular month for planting onions is May. Specific dates depend on your climate zone. In central Russia, onions can be planted throughout May, while the spring moisture of the soil is preserved, which the onion respects very much.

When planting onions, it is not even the date that is more important, but the weather conditions and soil temperature. No need to rush to land if the weather is cold and wet. It is necessary to wait for warm days when the soil warms up to at least 15-20 degrees Celsius.
If you rush and plant the onions in the cold ground, then this will not lead to anything good. Although the onion tolerates frost and cold quite well, its character deteriorates because of this. He will certainly take revenge on you and, instead of a good turnip and greenery, he will grow flower arrows for you.
Therefore, it is better to wait for stable warm weather without rain than to be left without a crop. Pay attention not only to the lunar calendar as the ultimate truth, but also to the weather forecast, it will be more accurate.
What to do so that the bow does not go to the arrow
Even before planting, it is important to know why the sevok goes into the peduncle and how to avoid it.
The reason for the fact that the bow shoots is the incorrect storage temperature of the planting material, the lack of adaptation before planting, and the violation of the rules of care.

Let us explain in more detail: onion sets must be stored at positive temperatures, because it is the cold that provokes the onion to create arrows. This is a signal to launch a self-preservation program and give offspring as soon as possible. Therefore, as soon as you plant such a set, it will begin to produce flower stalks in order to give seeds faster.
The key to a large and strong onion turnip is storage in comfortable conditions, without cold stress.
But what if you bought an onion set in a store, and you have no idea how it was stored? No problem. Purchased onions need to arrange an adaptation period.
To do this, two weeks after the purchase, we keep the onion near the battery or in another warm place. And then we store it before planting only at room temperature and in the dark so that it does not begin to germinate ahead of time.
If there is no time to warm up the battery or the heating has already been turned off, then you can do the following: give the bow a warm bath. In a bowl of warm water (40-45) degrees, spread the onion and leave for 8 hours, periodically adding warm water. Then we take out the heads, dry it thoroughly and store it at room temperature until planting.
For planting on a turnip, choose medium-sized heads, because large ones are more prone to shooting and are best planted on greens. Do not plant in cold soil. For the same reason, watering with cold water should be avoided.
Processing and soaking onions before planting
First of all, when preparing a seed for planting, you need to carefully sort it out. Arm yourself with several containers for sorting.

It is necessary to reject all damaged and small specimens, leaving medium-sized bulbs for planting on the head. Large onions, small and even sprouted ones are suitable for greens. But empty, shriveled, missing - we throw it away.
Next, carefully cut off each dry tail at the crown with scissors. This simple operation will help them germinate faster and better. Well, you need to be afraid that an infection will get into the cut, because the sevok will be treated for diseases before planting.
Should onions be soaked before planting? And what is the best way to do it? Let's figure it out.
To feed the bulb so that it grows large, it is recommended to dilute the complex fertilizer in water (40-45 degrees) and soak the onion there all night. When the sevok is saturated with usefulness, you can proceed to its protective treatment and planting.
Most popular recipes:
- Soaking onions in potassium permanganate. We make a strong dark pink solution of potassium permanganate and soak the onions in it for 2-3 hours. After that, they will need to be washed under running water so that concentrated potassium permanganate does not damage future young roots. Potassium permanganate prevents fungal and bacterial diseases.
- Soaking onions in saline. 1 st. l salt diluted in one liter of water, immerse the bulbs in it for 2-3 hours. Salt also prevents decay and disease.
- Soaking in blue vitriol. 1 tsp of copper sulfate per 10 liters of water, for 10-15 minutes. Copper sulfate disinfects seedlings and protects them from diseases.
Processing onions before planting with salt, potassium permanganate and ash
On a three-liter jar of warm (60 degrees) water we take 2 tbsp. l with a slide of salt + dark pink solution of potassium permanganate + 2 tbsp. l wood ash. Soak for 2 hours.
Processing onions before planting from pests with birch tar
The most nasty onion pest is, of course, the onion fly. Fortunately for us, she cannot stand the smell of birch tar. And if you want to protect your crops, then it would be useful to soak the onion in the solution as well: 1 tbsp. l. tar in a liter of water for 10-15 minutes.
With the same solution, you can additionally shed plantings during the growing season.
Onion planting and care in the open field
As we know, onions cannot be planted in the same place where an onion bed was also located last year. The probability of diseases in this case greatly increases, and such landings should be avoided.
Choose a place where tomatoes, carrots, potatoes, legumes, cucumbers, zucchini, pumpkin, cabbage were previously planted. The earth after them retains its nutritional value, and this is necessary for the onion to grow a good turnip. Onions and carrots have good neighborly relations, they scare away each other's pests, so you can plant them side by side.
He also prefers that the soil is not heavy, loose and nutritious. Places likes light, with good drainage, without stagnant moisture.
It is better to prepare the future onion bed in advance in the fall, loosen the ground well and add humus and compost. In the spring, one to two weeks before planting, we loosen the soil and spill it with organic humic fertilizers. Will do.
Planting an onion on a turnip (per head)
We prepare grooves about 8-10 cm deep. The distance between them is at least 15 cm.

Spill them with a disinfectant solution. You can use both powder (1 tsp per 10 liters of water) and paste (1 tbsp of diluted paste per 10 liters of water).

We plant our seedlings in the spilled grooves at a distance of 10 cm from each other. We sit him down on what is called “on the shoulders”, i.e. not only to cover the roots, but much deeper. This is necessary so that the bulb has good contact with the soil and does not hang out, because. She won't have roots yet.

Sprinkle wood ash on top as fertilizer and disinfection. And we fill the grooves with earth.

Planting onions on greens (on a feather)
When we do not have a goal to grow a turnip, but we only want greenery, then to save space, we suggest that you use a bridge landing.
This is when the bulbs are planted one to one very tightly and not very deep. At the same time, landing in open ground is not necessary, you can use a container with earth. Or select a small place in the garden.

Mixed nib and head fit at the same time
When we don’t have a lot of space, but I want to grow a good onion and eat greens, then this method will come in handy. We make grooves as usual, but we plant sevok in them in a checkerboard pattern and quite often.
With such a goal that some of these seedlings will grow on a turnip, and some can be pulled through as they grow, not greens and consumed fresh.
Otherwise, the actions are the same as in the classic landing on a turnip (see above).

Onion care
When we have organized a good bed, in a lit place, with nutritious loose soil, we only have to weed it in time so that the weeds do not interfere with the growth of the crop. Watering is carried out after planting once a week.
Onions also need frequent loosening of the soil (between rows and between plantings, especially after rain, so that the earth does not turn into a crust) and top dressing.
At the end of May, it is necessary to feed it with nitrogen-containing fertilizers, in mid-June - it already needs potassium fertilizers and ammonium nitrate. For those who prefer to do without chemicals, green fertilizers from weeds and nettles, biohumus and ash are suitable.
Top dressing with ammonia is also effective: 2 tbsp. l of ammonia dissolve in 10 liters of water, it is necessary to water with such a product on wet ground, and not on dry ground. Therefore, we pre-moisten the beds. Ammonia will drive away pests and nourish your plantings with the necessary nitrogen.
We do this top dressing three times with an interval of 10 days. And you will forget about the yellowing of the onion feather, and the onion fly will not stick its nose into your beds.
So dear friends, there is nothing complicated in growing onions, you will definitely succeed.
How to treat onion flies
Onions are a world famous crop that has a very long history of cultivation. For more than 4 millennia, the population of almost all regions of the globe has been successfully breeding it, receiving high yields of a vegetable with many useful properties.
Features of growing onions
Onions are characterized by increased resistance to low temperatures. Seedlings of the plant can easily withstand cold down to -1 C, and in adult specimens, frost resistance is even higher, up to -5 C. Ideal for the full development of the plant and contributes to its intensive growth, the temperature is in the range of 12-26 C.
The duration of the growing season for different varieties of this crop is different, in general, it fits within the framework of 90-180 days.
There are several ways to grow onions:
- in a biennial culture (this method is used most often and has long become traditional);
- from sevka, which is offered for sale in specialized stores;
- from the sample;
- from seeds.
The terms and rules for planting a plant and caring for it are determined by the chosen method. But in relation to the soil, the requirements of this culture are rare constancy. What kind of soil do onions need? How to choose and prepare a place for its landing?

Selecting a landing site
In order for a business to be successful, it should begin with preliminary preparation. Planting onions is no exception to the general rule. First of all, you need to decide on a place for planting plants. Best of all, this crop is well-lit throughout the day by the sun's rays, in extreme cases, very slightly shaded areas of the earth.
For the cultivation of all varieties of plants use planting on high beds. This method of cultivation is quite justified, since the soil located directly under the onion warms up easily and quickly, providing the plant with the most comfortable environment for growth and development.
The most suitable for planting are fertile, nutrient-rich, neutral loamy soils with good air permeability. The plant responds well to moderate soil moisture, but soil with high acidity will not suit it. If the site where it is planned to plant a crop is characterized by acidic soil, it must first be prepared: 2-3 years before the planned planting, the soil is neutralized by adding lime to it.

How to improve productivity?We are constantly getting letters in which amateur gardeners are worried that due to the cold summer this year, a poor harvest of potatoes, tomatoes, cucumbers, and other vegetables. Last year we published TIPS about this. But unfortunately, many did not listen, but some still applied. Here is a report from our reader, we want to advise plant growth biostimulantswhich will help increase the yield by up to 50-70%.
Read...
Principles of crop rotation when planting
When choosing a place where the crop will grow this year, it is important to adhere to the rules of crop rotation. It can be planted on the same piece of land only when at least 3 years have passed since the previous harvest.
Plants develop well, the predecessors of which were vegetable varieties, the soil under which was well refueled: cucumbers, tomatoes, early ripe cabbage, carrots, pumpkin, nightshade or legume representatives of the flora. If the beds with onions are located in close proximity to the beds with carrots, they will not only grow well, but also protect each other from damage by garden pests. You can not plant this crop on those plots of land that were fertilized with fresh manure last year.
The rules for preparing the soil for subsequent planting in the fall come down to three simple steps:
- dig the soil to the depth of a shovel;
- clear it of weeds;
- fertilize the selected area abundantly.
In spring, the soil must be loosened with a rake or dug to a shallow depth in order to prevent its structure from being disturbed and moisture to evaporate quickly from it.

Subtleties of soil fertilization
The guarantee of a good harvest is the correct fertilizer of the plants. Timely and sufficient feeding of the culture with useful substances and microelements contributes to the full development of the onion, its resistance to dangerous diseases and increased resistance to adverse external conditions.
Organic fertilizers as a means of feeding
They begin to prepare the soil for planting this vegetable in the fall. To enrich it with nutrients, it is permissible to use both organic and mineral fertilizers. It is difficult to give an unequivocal answer to the question which of them is more effective. Of the former, manure, bird droppings, or compost, which is more accessible to many summer residents, are most often introduced into the soil in the autumn. A good result can be obtained by mixing these natural substances with peat. Adding a small amount of ash to the soil will also benefit the onion.
Autumn soil enrichment with organic components is carried out according to the following scheme: 5 kg of humus (compost, stale manure) per 1 kg of ash is distributed over the surface of 1 m² of land.
The use of products of natural origin not only significantly increases the content of nutrients in the soil, but also improves its structure. The soil becomes looser, lighter, which means that more oxygen and moisture penetrates through it to the roots of plants. Also, organic components increase the degree of digestibility of mineral compositions by onions.
Manure and bird droppings contain a large amount of nitrogen, which is extremely important for the rapid growth of plants and their healthy development. After applying a nitrogen-containing fertilizer, onion feathers begin to grow right before our eyes. But the lack of this element slows down the development of the vegetable, weakens it and reduces the yield.

Mineral fertilizers and their application
The greatest effect in the cultivation of onions can be achieved by combining natural fertilizers with specially developed mineral products in its nutrition.
Complex preparations (Fertika, Autumn) have gained particular popularity. They are used at the rate of up to 0.1 kg per 1 m² of soil. Fertilizing the future onion planting site with a composition independently prepared from several components will be no less effective. In autumn, 20 g of superphosphate and 10 g of potassium per 1 m² are added to the ground, and with the advent of spring, another 10 g of both substances and 15 g of ammonium nitrate are added to the previous top dressing.
Mineral fertilizers with a high content of potassium and phosphorus have proven themselves well for autumn dressings. One of the advantages of their use is low consumption: manufacturers advise applying no more than 30 g of the drug per 1 m² of soil.
If filling the soil in the fall did not work, this can be done in the spring. There are special formulations for fertilizing onion plantations at this time, for example, Fertika Spring-Summer is a well-deserved love for gardeners. It must be applied at the rate of up to 100 g per 1 m² of soil.
Since the roots of the plant are located in the upper layers of the soil, mineral fertilizers are best planted at a shallow depth. In this case, it will be easier for the onion to receive nutrients.

Organics and chemistry in soil preparation for onions: pros and cons
To enrich the soil in the cultivation of onion crops, for a long time, products of exclusively organic origin were used. However, mineral nutritional preparations, after their appearance, quickly won the palm in this area. Both large agricultural producers and owners of small summer cottages like to use them. Their advantages are obvious: they are easier and more convenient to use, easier to get than natural ones, they are cheaper, and the range of their effects is extremely wide.
When growing onions, the use of organic components for plant nutrition has a very significant drawback: due to their structure, they have the ability to retain a lot of moisture in the soil, which can lead to rotting of the bulbs.
In this regard, mineral formulations are far superior to naturally occurring nutrients: having excellent absorbent properties, they absorb excess moisture. When using them, there is no stagnation of water in the deep layers of the soil. Moisture, in which components useful for plant growth are dissolved, goes directly to the root system, which greatly facilitates the process of nutrition.
But even despite the obvious loss to agrochemicals in terms of moisture loss, organic fertilizers continue to be very popular when feeding onion plantations. And do not rush to call their use irrational.
Processing bulbs before planting
Onions are characterized by such a feature as the active absorption of nutrients from the soil. When cultivating a crop, the amount of humus contained in the surface layers of the soil is greatly reduced, which means that the fertility of the earth is reduced. The only way to revive the fertile soil layer is to add nutritional components of organic nature to it in the fall.
It is quite possible to get a good harvest and grow large, healthy bulbs in your area. It is only necessary not to forget about feeding the plant, which should begin in the fall. One has only to provide the bow with the useful elements necessary for its full development, and the result will not disappoint!
And a little about the secrets of the Author
Have you ever experienced unbearable joint pain? And you know firsthand what it is:
- inability to move easily and comfortably;
- discomfort when going up and down stairs;
- unpleasant crunch, clicking not of their own free will;
- pain during or after exercise;
- inflammation in the joints and swelling;
- causeless and sometimes unbearable aching pain in the joints ...
Now answer the question: does it suit you? Can such pain be endured? And how much money have you already "leaked" for ineffective treatment? That's right - it's time to end this! Do you agree? That is why we decided to publish an exclusive interview with Oleg Gazmanov, in which he revealed the secrets of getting rid of joint pain, arthritis and arthrosis.
Attention, only TODAY!
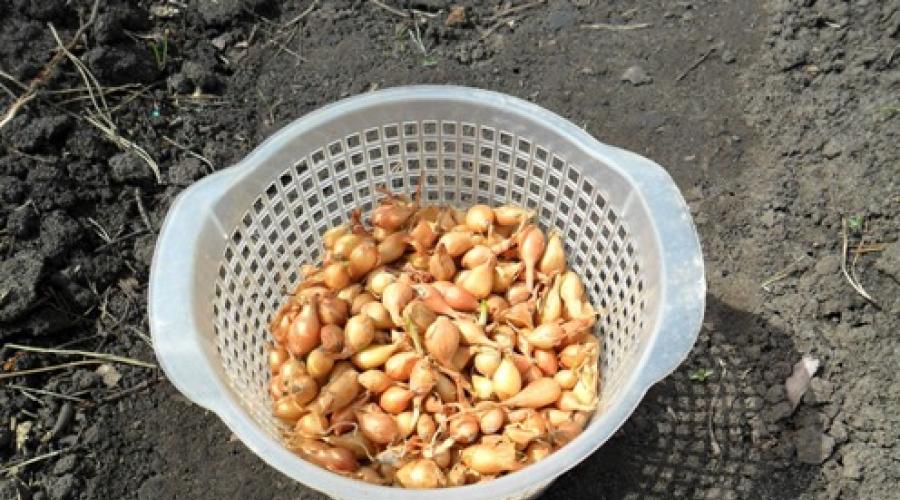
To obtain a large turnip, the best planting material is a set of 1.5-2.5 cm in size.
PREPARATION OF SEVKA FOR LANDING
Before planting, the onion sets are sorted out, all dry, bare, diseased, damaged, cut, sprouted bulbs are removed, the remaining ones are sorted by size so that the seedlings are uniform. First, large, then medium and small bulbs are planted in the garden.
If for planting you take your onion sets, which were stored at a temperature of 18-20 °С, then additional heating is not required. If you buy planting material, then 2-3 days before planting, be sure to warm the bulbs near the heaters at an air temperature of 30-40 "C.
You can carry out another treatment: just before planting, pour the seeds into a bucket, pour hot water (55-60 ° C) for 1-2 minutes, and then lower them into cold water for 1 minute. If you do not do any processing, then the planted onion sets can go to the arrow.
After heating, the bulbs are soaked in a nutrient solution. In 10 liters of water, dilute 1 tablespoon of nitrophoska, or nitroammophoska, or "Growth-1", or any complex fertilizer, stir well and dip the bulbs in a cloth bag into this solution for 8-10 hours. Then, for the prevention of fungal diseases, a bag of onions, without washing, is dipped for 5-10 minutes in a solution of copper sulphate (1 teaspoon per 10 liters of water) or in a solution of cherry-colored potassium permanganate. The processed bulbs are rinsed with clean water and proceed to planting.
BED PREPARATION
A bed for planting onion sets has been prepared since autumn. Its width is 100 cm. All plant waste is removed from the garden, sprayed with a disinfectant solution of copper sulphate (1 tablespoon of copper sulphate, or copper oxychloride, or polycarbocin per 10 liters of water) at the rate of 1-1.5 liters per 1 m 2. Onions grow well in neutral soils. Therefore, dolomite flour or chalk or a ready-made deoxidizing substrate (available at the Seeds store) is added to acidic soil, at the rate of 2 tablespoons per 1 m 2. Then the bed is dug up with a pitchfork.
Before frosts, the bed is additionally shed with water, and in winter it is not bad to throw snow from the bed. All this is done for good freezing of the soil. As a rule, on such a bed, onions are less damaged by diseases and pests.
In the spring, organic and mineral fertilizers are applied to the garden, depending on the composition of the soil:
loamy soil - per 1 m 2 5-6 kg of humus, 4-5 kg of peat, 2 tablespoons of superphosphate, 1 teaspoon of urea or crystallin;
clayey soil - per 1 m 2 5-6 kg of humus, 5-6 kg of peat, 8-10 kg of coarse-grained river sand, 100-150 g of expanded clay drainage, 2 tablespoons of superphosphate, 1 teaspoon of urea;
peat soil - per 1 m 2 5-6 kg of humus or compost, 8-10 kg of coarse-grained river sand, 2 tablespoons of superphosphate, 1 teaspoon of urea;
sandy soil - per 1 m 2 1 bucket of humus or compost, 1 bucket of peat, 1 bucket of loamy or clay soil, 2 tablespoons of dry Fertilizer and 2 tablespoons of nitrophoska.
The bed is dug up to the depth of a bayonet shovel, leveled with a rake, slightly compacted and disinfected with a solution of copper sulfate (1 tablespoon per 10 liters of water) at the rate of 1 liter per 1 m 2.
The prepared bed is covered with a film for 2-3 days to better warm the soil, since the sowing planted in cold soil (below 12 ° C) can go into the arrow.
LANDING ONION SEVKA
In the southern climatic zones, onion sets are planted in the third decade of April, in other areas - in the first decade of May. It is impossible to be late with planting, otherwise, due to lack of moisture and high temperature, the onion will develop slowly.
Before planting the bulbs, the bed is marked: grooves are made to a depth of 4 cm with a distance of 20-25 cm between them. The soil is watered from a watering can with a fine strainer with water at room temperature (20 ° C) at the rate of 2-3 liters per 1 m 2.
The bulbs are planted in grooves with a distance of 8-10 cm from each other so that the soil layer above the shoulders of the bulbs is no more than 2-2.5 cm. If the planting is too deep, the ripening will be delayed, and the bulb itself will change shape. With a shallow planting, the bulbs are exposed and their growth stops, especially in hot, dry weather.
Shoots appear 5-6 days after planting.
CARE OF ONION-TURP
Care consists in watering, weeding, loosening, feeding and processing.
Watering. Onions are quite picky about watering, especially in the first 2.5 months (May, June and half of July).
In May, it is watered every week from 6 to 10 liters per 1 m 2, in June - every 8-10 days at the rate of 10-12 liters per 1 m 2. in the first half of July - every 8-10 days at the rate of 8-10 liters per 1 m 2. If the second half of July is hot, then you can water it 1-2 times in 8-10 days at the rate of 5-6 liters per 1 m 2. Water from a watering can with a small stream so as not to break the leaves. Watering is completely stopped 15-20 days before harvesting.
You can not water the onion with cold (below 18 ° C) water in order to avoid disease with downy mildew.
Weeding. Keep weeds out, they create high humidity and conditions for fungal diseases. Weeds are best removed from moist soil when they reach a height of 3-5 cm. Onions grown in unweeded areas have a thick, juicy neck, which makes them difficult to store.
Loosening. Every two weeks, the bed is loosened, especially after watering and rains, in order to maintain good air access to the root system. Loosening is usually carried out to a depth of 2-3 cm.
Top dressing. During the growing season, 2-3 top dressings can be done.
The second feeding is given 12-15 days after the first. In 10 liters of water, dilute 2 tablespoons of nitrophoska or Fertility organic fertilizer and spend 3 liters per 1 m 2.
The third top dressing is carried out when a bulb with a diameter of a walnut is formed: 1 tablespoon of superphosphate and 1 teaspoon of fertilizer "Breadwinner" per 10 liters of water at the rate of Zl per 1 m 2.
Treatment. When the leaves (feather) reach a length of 12-15 cm, it is necessary to do preventive treatment against fungal diseases (downy mildew). In 10 liters of water, dilute 1 teaspoon of copper sulfate or copper oxychloride and 1 tablespoon of liquid soap, spray on the leaves at the rate of 0.5 liters per 1 m 2.
The most effective method against downy mildew is the treatment with the Allett fungicide, but they prohibit the treatment of onions used on the feather.
CLEANING AND STORING ONIONS
The onion is ready for harvest when the formation of young leaves has stopped, their lodging has begun, the bulbs are fully formed and have acquired the color characteristic of the variety.
Onions are harvested from mid-August to the first decade of September. If you are late with harvesting, then after 8-10 days the growth of onions resumes, and such bulbs are unsuitable for storage.
Cleaning should be done in dry weather. Onions are dug up with a pitchfork and carefully pulled out of the soil by the leaves. The earth remaining on the bulbs is removed by hand, and not shaken off, since the bulbs rot during storage due to mechanical damage. Then the onion is laid out in an open sunny place to dry for 12-15 days.
After that, the leaves are cut off, leaving a neck 3-4 cm long. The cut onion is dried again at a higher temperature (30-35 ° C) for 5-6 days. This drying will reduce the number of bulbs affected by neck rot.
Onions can be braided if the leaves are not diseased. With this method of storage, the leaves do not need to be cut, but they should be dried well before braiding. Onions can also be placed in baskets or boxes of 10-12 kg and stored at room temperature in a dry place at home.