Crafts made from plastic bottles are the simplest. Crafts for decorating a summer cottage from plastic bottles. How to make a bag from plastic bottles
Plastic bottles are a real boon for creative people. Even beginners with no experience can independently make a variety of crafts from this material. Recycling plastic not only makes the raw material practical, but also saves the environment, increasing sustainability. Unusual ideas with step-by-step descriptions will help you make crafts to decorate your garden and decorate your summer cottage.
Original ideas for crafts from plastic bottles for the garden step by step
Plastic bottles are considered an affordable raw material; making funny figures does not require any creative skills. Additional tools you need are scissors, paints, a stationery knife, and other available materials. To get beautiful crafts, it is recommended to stock up on other plastic products - cups, plates, spoons.


Flowers: how to make an open bud
Buds of daisies, roses, bells and lilies of the valley - with all this you can decorate your garden space without much effort. Large flowers made from five-liter plastic bottles look great. To get started, you need to prepare the bottoms of the bottles, scissors, and acrylic paint. The step-by-step process looks like this:
- Bottle bottoms must be cut along lines that are clearly visible. The incision is not made all the way, leaving 2-3 cm in the middle.
- From each petal you need to cut 1-2 thin strips and curl them beautifully towards the center.
- Fire is used to give the flower its shape. You can take matches or a lighter: bring the bottom of the bottle to the fire and turn it in the desired direction. The bottle begins to melt, taking on a different shape.
- At the final stage, the product must be painted with acrylic. You can use a brush or a foam sponge - this will prevent streaks from being visible.
The photo shows that such products are suitable for decorating flat surfaces. You can decorate the fence with plastic flowers, place them in the garden near the house, and also equip the tiled path with them.


Palm tree - an exotic garden decoration
A palm tree made from plastic bottles will help add a touch of the tropics to your dacha. Making such a garden decoration item is not difficult, the main thing is to follow the sequence of steps. First you need to prepare the materials: a large number of brown and green plastic bottles, a stationery knife, tape, a tube for decorating the barrel and a thick rope. The master class looks like this step by step:
- Creating leaves.
- Creating a trunk.
- Assembly of all parts of the structure.
To make a palm tree crown, you need to cut off the bottom of green bottles, and cut the upper part into small strips and bend them in the other direction. There is no need to touch the lid and neck. Depending on the number of bottles, the palm will be thicker or vice versa. After this, you need to take brown bottles, cut off the bottom and make stripes from it towards the neck. There should also be a lot of bottles. To assemble the tree, a rope is tied to each lid, secured inside. The palm tree will serve as an excellent decoration for an inconspicuous corner on the site.


Swan: designing a reservoir area
The white bird is the most common craft in garden plots. It’s easy to do, and the result is an original figure. To get started, you need to prepare one five-liter bottle, as well as a knife, a mesh for decorating the wings, and putty. An interesting swan is created like this:
- The horizontal side of a plastic bottle is cut off.
- A hole is made through the lid, a thick wire is inserted, bending it - this will be the neck.
- To give the product a round shape, it is covered with sand.
- Make a stand: spread the putty in an even layer on polyethylene and wait for it to harden.
- Small rolls of putty are rolled into a rope and form the neck of the bird.
- Using a spatula, the material is applied to the bottle itself, making feathers.
- To make the wings, a metal mesh is used - it is inserted on the sides and also puttied.
A swan will look beautiful if you draw its eyes and draw feathers on its body.


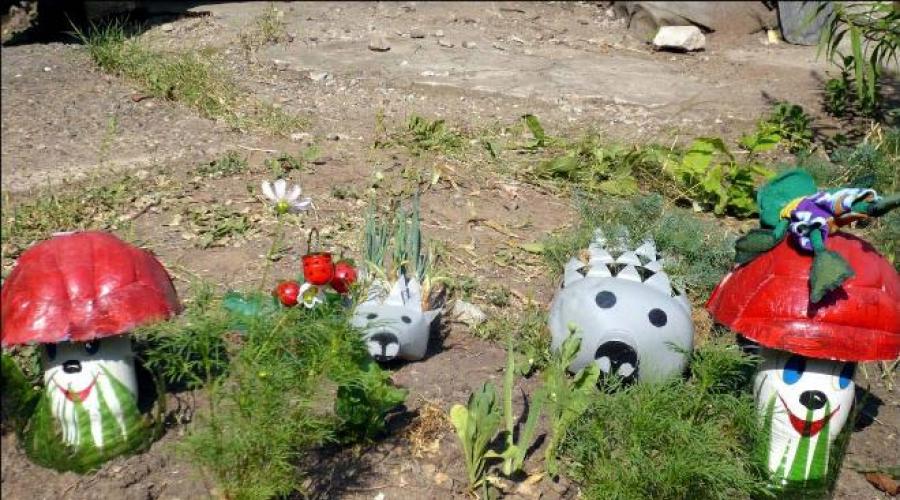
Pig: a simple master class
Another simple master class on decorating your garden using recycled plastic bottles. The pig looks original if you organize a small flower bed inside for summer flowers. To make a pig, you will need one five-liter bottle, as well as a knife, a can of paint, a brush, a pencil, wire, a black marker, cardboard and plastic glue. You need to do the following:
- Cut out piglet ears from cardboard and paint them with pink paint.
- Leg blanks can be made from the cut off upper parts of plastic half-liter bottles.
- In a five-liter bottle, cuts are made with a knife: for the ears, for attaching the legs and for the tail.
- The wire is twisted in a convenient way and inserted into the hole.
- Finally, the pig is spray painted in the chosen color.
You can place soil inside the pig and grow small flowers: to do this, you need to cut a hole below the ears, making an oval.


Minions: bringing the cartoon to reality
Modern DIY crafts from plastic bottles step by step for beginners involve making popular cartoon characters. These master classes are for children, so an adult can complete the task without any problems by involving a child in the process. You can try to make a beautiful and funny minion:
- You will need one or more (according to the number of minions) bottles with a volume of 1.5 liters or more.
- There is no need to trim anything here, because the man himself has an oval shape; it is enough to depict the minion’s face as accurately as possible.
- The top part of the bottle is painted yellow, the bottom part is painted blue.
- Eyes are drawn on a yellow background, like those of minions.
You can remove several wires from the cover - this will be funny human hair. Such figures will decorate the garden and add a touch of humor to the exterior.
Flowerbed: how to make a basis for growing flowers
The simplest option for making a garden flower bed is to use a tire from a wheel. The result is a large flower bed in which you can plant flowering plants. To work, you will need a large number of small bottles of the same type, glue for plastic, and a tire from a wheel. Paint can also be useful if you want to change the color of the bottles.
The prepared wheel is installed in the desired location of the future flower bed or in the garden. The tire can be painted any color, or left black. Bottles are gradually glued to the top of the wheel, row by row. Toward the top, the throat of the flowerbed will be a little narrow, so you will need to properly pour the soil for future plants. If you don’t want to leave the bottles transparent, you can paint them in the chosen shade before work.


Decorative ball - an original figure in the garden
In order to make a dense and openwork ball with your own hands, you will need to prepare several dozen plastic containers from under water. It is advisable to take bottles with a volume of at least 1 liter. The basis for gluing the bottles will be a ball of cement; it is not difficult to make. To do this, you need to mix water and cement with sand in a ratio of 1:3. The process then looks like this:
- The bottoms of all bottles are cut off.
- Each bottom is painted a certain color; you can use several shades and make a rainbow ball.
- When the bottoms are ready, they are attached to the cement base.
- You can secure the products with strong glue or insert them into the cement while it is still wet.
The result is an original and unusual ball that will decorate the space near the house. The sphere can be placed near the gate, and can also be made the center of the composition in the garden.


Sheep: how to do it step by step
To create a sheep, elongated bottles are useful. It is necessary to prepare the container:
- 1.5 liters – 4 pcs;
- 2 liters – 11 pcs;
- 1 liter – 3 pcs;
- 2 liters – 20 pcs. with a figured bottom.
You also need some bendable wire and a can of white or gold paint. The top parts with necks are cut off from liter bottles, and one bottle is inserted into another. Process of creation:
- Ears are cut out of a liter container and secured with wire.
- The body and neck are made from two-liter bottles.
- The head is attached to the neck, the legs of the sheep are made from 1.5 and 2 liter containers.
- For curly wool, the sheep are connected with curly bottoms using wire.
At the final stage, the sheep is collected and coated with paint. The eyes and nose are made from corks of a contrasting color.
Owl: decorating trees
In order for your country house to shine with new colors, it is important to properly decorate the yard space. Another idea for this is to create a figure from PVC bottles in the form of an owl. To do this, you need to prepare 5 brown containers, tin lids, a transparent container, a glue gun, pliers, acrylic paints and threads. Instructions:
- The bottom and throat are cut off, and cuts are made along the edges.
- The cut fringe is pulled together with a thread: the upper part of the bottle will serve as the head, and the lower part will serve as the tail.
- The remaining bottles are useful for making wings: they are cut into rectangles and painted white.
- Using a glue gun, the wings are fixed to the base.
- The eyes are made from tin lids - they can also be tinted and a picture of the pupils can be made.
The night bird will fit perfectly into the design of the site; it can be placed on a tree branch.


Peacock - an unusual solution for the site
Another colorful, but no less easy to make bird is the peacock. Its beautiful and colorful feathers will amaze guests of the country house, because the peacock will become the center of the composition. In order to make it yourself, you need to take pieces of foam plastic - they will be the base and body. The remaining elements are made from plastic bottles:
- Feathers are cut out from containers of different sizes, after which they are painted with acrylic and glued along the perimeter of the tail.
- Feathers in the form of a fringe can be made with thin scissors on a green bottle.
- The beak is made from the top of the container by cutting out a triangle and secured to the head with nails.
- The legs are made from the tops of small bottles with necks and wire.
At the final stage, the bird needs to be assembled: the legs are attached to the body, after which it is covered with feathers. Next, the wings and tail are attached - the peacock is ready!


Donkey: DIY decorative figure
Continuing the animal theme, you can make a donkey out of bottles. It can be installed near a fruit tree, setting up a hive for bees there. If desired, the donkey can be used as a flowerbed by attaching a cart made of wooden branches to its back.
The body is made from a five-liter container, the front and hind legs are made from kefir or milk containers. The animal's face can be made from a keg bottle of beer or kvass. The ears are made of plastic or cardboard. The entire donkey is covered with gray spray paint, a braid is attached to its muzzle, a cut bottle with soil is hung on the side and a flower is grown there. Another simple DIY option is to use polyurethane foam in combination with bottles.


Frog: composition for an artificial pond
A frog figurine would be appropriate where there are ponds or artificially constructed fountains on the site. She can coexist with a swan, turtle, fish, ships. All you need to create is two two-liter bottles, the top of which is cut off. To work, you only need the bottoms. The paws are made from flat parts - cut out according to a pre-designed template.
The crucial moment is painting the frog. First, the background is tinted green; this may require several layers. Then, with a thin brush, draw out the eyes, muzzle, and draw the phalanges on the paws. If desired, you can make a crown for the frog - it is also made from a plastic bottle. The neck is cut off to form arrows, painted golden – the crown is ready.
The imagination of gardeners does not end with the listed ideas - original crafts from plastic bottles for the garden are replenished with the following master classes:
- butterflies;
- snowmen;
- trains;
- candies;
- robots;
- penguins;
- cats;
- dogs;
- cockerels;
- towers.
Plastic containers are distinguished by the fact that they do not rot after precipitation: a gardener can safely go to the city during the rainy season without worrying about the appearance of the products. To prevent the paint from slipping, after painting you need to coat the figure with varnish. Such original and easy-to-make garden figures will delight the residents of the site for many years.


Many summer residents use a variety of available materials to decorate their plots; one of the simplest options is to make various decorations from plastic bottles. The use of this option has a lot of advantages: low cost and availability of the material, ease of operation and the ability to make a wide variety of crafts. You don't need to have any special skills or use a special tool, everything is very, very simple.
What do you need for work?
As you know, plastic bottles are often simply thrown away, however, the material can be given a second life, especially since very little is needed:
| Bottles | Products of a wide variety of colors and sizes are suitable for work - from small to large. In some cases, the color of the products matters, but if desired, you can use any materials |
| Scissors and sharp knife | Almost any work involves a lot of cutting; sometimes it is more convenient to use scissors, but sometimes a knife is better. It all depends primarily on what is more convenient for you to work with. |
| Rigid wire or metal rods | These materials are needed when creating products that are additionally reinforced with a frame to impart reliability and resistance to deformation. It is important to choose the optimal elasticity option so that it can ensure sufficient stability of the frame |
| Paint for plastic | Any composition that fits well on plastic will do. The choice of colors depends on what color scheme you have chosen for future designs. Acrylic-based compositions are most often used; their price is low and their quality is quite high. |
Important!
Remember that all products will be located outdoors and will be subject to many adverse influences: sun, high humidity, temperature changes, and so on.
That is why it is necessary to use weather-resistant compounds that can maintain color and structure for at least several years.

Main Use Cases
As noted above, you can make a wide variety of crafts from plastic bottles for your garden. It is important to choose an option that you like and that will organically fit into the decor of your site.
Palm trees
A very popular option due to the fairly simple workflow and excellent results in the end. The most important thing is that, having learned how to make palm trees, you can easily make any other tree, since the principle of operation is exactly the same.
Let's consider the manufacturing technology step by step:
- To work you need a knife or scissors, wire or metal rod to make the frame and the bottles themselves. It is best to use green products for leaves, and brown for the body. As a last resort, the trunk can be painted, but it is still better to make the branches initially green.
- First, brown bottles are cut in half and teeth are cut along the top edge as shown in the photo. It is worth considering that the work will require a very large number of blanks, so take care of the necessary supply in advance so that the work does not stop halfway.

- Next, take a strong pin with a diameter of 5-8 mm, you can use reinforcement, or you can use any other metal element that is suitable in height. It is worth considering that part of the element will go into the ground, for reliable fixation; for large crafts, it may even be necessary to concrete the base in order to give the necessary stability.
- Next, the blanks are strung onto a pin, after which the corner elements are bent to give the trunk even more naturalness and resemblance to a real tree.. Of course, you don’t have to make folds, but with them, similar crafts from plastic bottles for the garden look much more interesting.

Important!
Be sure to remove labels from bottles in advance, as they can ruin the appearance of the finished product.
Sometimes they come off easily, but if they are difficult to remove, you can place the products in hot water for a few seconds - then the process will be much easier and faster.
- Next, green products are taken, first of all, the bottom is cut off, after which the petals of future branches are cut. They can have a wide variety of configurations - from straight to figuredly carved. Everything again depends on your desires and preferences; your imagination is not limited to anything.

- Next, the finished leaves are strung on pins, after which they can be bent to make them even more naturalistic.. Lastly, all the elements are connected to each other, the easiest way to do this is by welding, but if you don’t have the equipment, you can use special clamping clamps, which are sold in all construction fastener stores.

Flowerbeds
Compact flower bed:
- You can take any container as a base, the main thing is to choose the optimal size; a barrel cut in half, a stack of car tires or anything else will do.
- Next, the base is installed in the right place and a cement-sand mortar is prepared in a ratio of 1 part cement to 2 parts sand. Water is added until the consistency of thick sour cream is obtained.
- Next, take bottles, and you can use both plastic and glass products. The walls of the container are coated with a thick layer of solution, after which the necks of the bottles are stuck into it. The rows are arranged in a checkerboard pattern; you can use variations of different colors to create a pattern or ornament.

- After the solution hardens (after 1-2 days), the container can be filled, the bottom layer is gravel or crushed stone, it will serve as drainage, and the top layer is fertile soil in which flowers will be planted. The solution, which is visible from above, can be decorated with any available material.
Compositions from bottoms
The instructions for making such a composition are quite simple:
- Take half bottles, they can be of a wide variety of colors, this allows you to create the most unusual compositions.
- A hill of soil is poured, and the halves are stuck into it, depending on the shape of the slide and the color of the elements, you can create any flower beds.

Design of flower beds and beds
You don’t have to make full-fledged crafts from bottles for your garden, but use them as a decorative element, which, among other things, also has a practical function, which we will consider below:
- You can take products of the same color, or you can use any options, but later they will have to be painted to improve the appearance of the composition. The most important thing is that the size and shape of the bottles are approximately the same.
- Next, you need to cut off the necks approximately at the point where the narrowing begins, after which the resulting containers are filled with white sand or black soil– this will give them rigidity and simplify installation.
- Filled blanks are dug in around the perimeter of flower beds or beds; this design will help give the summer cottage originality. In addition, such improvised fences prevent soil from spilling onto the paths - they can be sprinkled with gravel to further improve the appearance of the garden.

Flowerpots
Another very attractive option is a flowerpot; such crafts from plastic bottles for the garden are very easy to work with, but the result is excellent.
There are several options:
- The simplest solution is to cut off the top of the bottle(then you will get a straight pot) or its bottom (then you will get a cone-shaped one). Naturally, it is best to use large containers; almost any plant can fit in them. Products can be decorated with paints, pebbles or shells - it all depends on your imagination.
- You can cut off the side of the bottles and make hanging flower pots, this way you can decorate any wall. This option allows you to decorate nondescript surfaces.

- From large containers you can make flowerpots in the shape of various animals or birds, this option is somewhat more difficult to implement, but the result is much more interesting and attractive.

Other options
DIY country crafts made from plastic bottles are not always large in size; they can also be very tiny decorative elements.
There are a huge number of options, and we will look at just a few of them:
- From the bottoms, which often remain during the work process, you can make various figurines of animals or fairy-tale characters. In this case, coloring is also required in order to achieve maximum similarity.

- Using a grid with large cells, you can create a flower arrangement. You can do it even simpler: just create flowers, in which the middle will be the bottom of the bottle, and the petals will be the cut elements. The final result depends on how the plastic is cut.

- If necessary, you can even decorate a fence with bottles– such a fence will last for many years and will perfectly fulfill its intended purpose – protection from the penetration of animals. (See also article.)

- You can do this: simply decorate the products in the form of fairy-tale characters and place them in the garden or vegetable garden. Children really like these figures, and in just a few hours you can create a whole fairy-tale world.

Using traffic jams
During the work process, very often a large number of caps remain, which can also be used to make quite interesting products and compositions:
- Corks are great for creating bright and elegant garden curtains. The process of their manufacture is extremely simple: each cap is punched using an awl or a screwdriver with a thin drill, after which all the elements are strung on a fishing line or cord.

- Another fun option is to create paintings from caps.. You can make any composition; the more elements are used, the more colorful the picture will be.

Conclusion
You shouldn’t throw away plastic containers, because with their help you can make your summer cottage unique almost free of charge. The video in this article will clearly show some of the manufacturing options being considered.


Interest in DIY crafts from plastic bottles, probably will never disappear, because an incredible amount of them accumulates in the house. And besides, if you really want to get creative, keep your children occupied during the holidays or a vacation at the dacha, or make something cheap and practical, it’s hard to imagine a better material than PET containers.
That is why today you will find another, but very interesting selection of the best ones that are suitable for all the tasks mentioned above.
DIY crafts from plastic bottles photo
Of course, there is no ranking of the best, simplest works, because everyone has their own requirements both for the master class and for the finished result. For many, the result is not as important as the creative process itself, but for others, useful and practical DIY crafts from plastic bottles, photo which you can see in our article, will serve for a long time and will become excellent helpers on the farm.
So we can conditionally divide all the options into useful, decorative and mixed works, that is, those that also perform a practical function, but at the same time, say, decorate the interior (carved).
For example, such works include original pendants and lampshades for lamps, photographs of which you can see above. They are created from many top parts of the container, that is, before doing the work, you will only need to cut off the top third and leave the bottom for some other work.
Methods for decorating pendants can be different - it can be applique with fabric, ropes, laces, stones, the surface can be painted both inside and outside with paints, and can be perforated with interesting patterns.

Before you is the process of performing such DIY crafts from plastic bottles step by step, which results in a wonderful lampshade for a small lamp (naturally, it should be an LED lamp that does not heat up or heat up surrounding objects like an incandescent lamp, which can lead to a fire). We cut off the upper part and leave the lower part to create.
Try to process the edges using a hot surface so that they are not sharp, or when gluing the cord, wrap it behind the back of the plastic. In our example, the craft is made using a technique similar to papier-mâché, when tape or polyethylene is glued to a plastic surface specifically so that the lace does not stick to it.
The lace is well impregnated with PVA during the process, so when the glue dries, you can simply remove the bottle from the inside and only the rope frame will remain. But if this technique is too complicated for you, then leave the bottle inside, just decorate it with paint or another layer of rope.

This way you can create magnificent New Year's decorations if you leave transparent plastic inside, and treat the top and bottom with hemp, inserting a small New Year's decoration inside. in the same style can become a nice vase or interior decoration in an oriental style, it all depends on your imagination and on the interior of the room where you are going to hang your new homemade decor.

There is nothing more beautiful than, but only on condition that these flowers are made carefully, using an interesting technique, using several shades of plastic, as in the master class presented to you above. And, on the contrary, there is nothing worse than terrible and clumsy flowers, for example, from a cut bottom, somehow painted with paint. There is no beauty or aesthetics in such decor; even a summer cottage is not recommended for anyone to decorate in this way.
Do-it-yourself dacha crafts from plastic bottles
A real treasure trove of interesting tips always concerns decoration. do-it-yourself dachas. Crafts from plastic bottles always help us make country life a little more beautiful, more convenient, and more practical. And for families with children, these are a great way to both keep the kids busy for a while and entertain them with ready-made garden decor.

For quite a long time, empty containers have been used as containers for seedlings or as small pots (plant pots) for flowers, herbs, and salads. All this can be organized so beautifully that you get both a country house decor and a useful system for storing fresh herbs for the kitchen and cooking.

Just such examples are shown in the photo, and the golden rule applies that if the plants are beautiful in themselves, have lush, elegant greenery and bright flowers, then the bottles can not be decorated at all or the decorations can be minimal. On the other hand, if you grow kitchen herbs, such as parsley or watercress, right in the summer kitchen, then a great idea would be to decorate such pots, make decoupage or other types of applique for them.

Attracting birds to your site with the help of feeders is a great idea, both in winter and in summer. Many people simply don’t think about how many pests an average sparrow or starling can eat in one summer season. Moreover, the more grain and seeds the birds have at their disposal, the less attention they will pay to valuable cherries. You have options DIY garden crafts from plastic bottles- not only cute feeders, but also a drinking bowl, which is also very necessary for a comfortable stay for birds in your garden.

They may be valuable for their decorative value, but useful things created using ordinary plastic in the country are no less needed.
We present to your attention an interesting broom for outdoor cleaning, because, as any summer resident knows, in suburban conditions any broom or broom wears out at cosmic speed, especially if you need to remove fallen leaves or fruits. To get a broom, you need to assemble a structure from a long stick and a cross board, the initial blank will resemble a mop.
Using self-tapping screws, several lids are attached to the horizontal board, as shown in the photo, into which the necks can be screwed. The containers themselves are cut into strips using scissors or a cutter, first cutting off the bottom. Try not to make the strips too thin, otherwise the broom will ultimately work worse; you need all the “twigs” to retain their elasticity.
DIY children's crafts from plastic bottles
Entertaining or creating interesting decor are ideal DIY children's crafts from plastic bottles must combine both of these concepts. It would not be very pleasant if, as a result of painstaking and exciting work, you ended up with something not very beautiful. Therefore, when choosing among a variety of ideas, pay attention not only to the ease of implementation, but also to the end result, which must definitely find its place in the nursery.

For example, such a place can very easily be found by a stand for pencils and pens, made in the shape of a space monster, not at all scary, but very funny.
To work, you will need a suitable container, preferably already painted, so that you do not have to use additional paint from a spray can, as well as paper for applying the applique - face, hands, teeth, and so on. For more delicate natures, pencil cases with images of cats are suitable, which are also quite simple to make; the faces are not glued on, but carefully drawn with markers of different colors.
DIY crafts from plastic bottle caps
If the rest of the material has already gone to beautiful, then we suggest you use absolutely all the spare parts and make DIY crafts from plastic bottle caps, intended for children. It is the lids that accumulate a lot in the household, due to their durability, good shape and variety of colors, they can be very easily used as educational toys, objects for appliqués and even for didactic material that helps children's development.

The photo shows options for games that you can organize with or for children using multi-colored plastic covers. Worthy of attention is the option of turning the caps into chips for playing tic-tac-toe.
And if you insert small magnets from the back inside the lids and secure them with glue, you will be able to play not only on a specially drawn field, but also on any iron plate or refrigerator.
Animal toys created on the basis of lids will help you make a home puppet theater; with their help you can easily tell any fairy tale, from classics to stories of your own composition. As for drawings, this is a great way to teach children to count in older preschool years or learn colors in younger ones.
To do this, the picture shows circles of different colors, and the baby will need to find the right one among all the different colored lids and place it in the right place. The result is a simple and quite exciting game.
DIY crafts from plastic bottles for children
Fulfill DIY crafts from plastic bottles for children It may not be very simple, because plastic is difficult to process; you need sharp scissors or a knife, special paints, hot glue, etc. Therefore, it will be better if you do all the work together, as a friendly team, trusting the children to complete simple steps, and leaving the work with cutting or treating surfaces at high temperatures for yourself.

In the photo you can see how easy it is to make small toys if you combine the bottom, stable part with the top. They can be securely connected with glue, or they can remain autonomous, looking like neat boxes. Be sure to paint it using acrylic or stained glass paints; children will like it much more. The idea of bottle nesting dolls painted in folk style is also interesting. To create them, you just need to find containers of different volumes, but of a similar shape, that could fit into each other.

This tutorial for making a lampshade using a container and lots of plastic spoons is a great option for a more complex collaboration. But the finished product will turn out so interesting and elegant that it can be used to decorate the interior, especially in a modern style.


Handmade is popular in any form, be it a gift to friends or a joint creation with a child. Bottles of water, carbonated drinks, milk and juices are an excellent base for crafts. The material is easy to process, durable, and not afraid of precipitation, which is why folk craftsmen and famous designers love it so much.
It’s easy to see this by looking at the photos of crafts made from plastic bottles. The ideas realized on them are easy to repeat yourself, or they will become the starting point for creating new masterpieces in the interior or garden.

What to prepare for work
An important advantage of handmade objects is that any material available on the farm can be used for crafts. Plastic containers for drinks are a universal “raw material”.


In action are:
- whole bottles of any size, including canisters;
- separately necks or figured bottoms:
- main smooth part;
- covers.

The advantage of the material is its ease of processing. Blanks can be:
- pierce with a knife, awl, clamp needle
- heat until the plastic takes the desired shape and hardens
- cut with scissors or a stationery knife

For decoration, depending on the idea, you will need paints, remnants of thread, scraps of fabric, natural material (cones, twigs), artificial flowers, leaves. There is a use for old children's toys, broken garden tools, ribbons, foam rubber, and wrapping paper.

Schemes for crafts made from plastic bottles are easy to find on the Internet, but if you lay out the existing bottles and various waste materials in front of you, ideas will arise by themselves.


Big possibilities in a small bottle
No complicated tools or special skills are required. But as a result you can get:
- real animals and fictional animals;
- organizers for storing small items, stationery, garden supplies;
- figurines of people, animated characters, fairy-tale heroes;
- flowers and various floral arrangements;
- flower pots and flowerpots for indoor and outdoor plants;
- bird feeders;
- decorative details for interior or landscape design.

Original ideas for bottle crafts do not necessarily involve cutting the container. As a result of simple manipulations with loosened soil and multi-colored paint, you can build:
- a low figured hedge or frame for flower beds,
- flat silhouette of a flower, insect, animal;
- smiley

In this case, the bottles are simply sunk into the ground to the desired depth, and the protruding parts are tinted in the selected color.

A beautiful vegetable garden without much hassle
In the store it will not be difficult to buy a garden figurine of any theme. The same goes for flowerpots, decor for a recreation area or flower garden. But similar things made with your own hands look no less impressive. Crafts from plastic bottles for the garden can be made in the winter, so that at the beginning of the season you can install them in places of honor in the country house.


Artificial pond
1.5 liter bottles are painted blue for 1/3 of the length, starting from the bottom. Then they are pressed into the loose soil close to each other. There is no need to create perfectly even outlines. Let the artificial lake have an irregular shape.

You can line the edges with large stones, and install figures of waterfowl or water lilies “on the water.” Plants, by the way, can also be made from plastic containers.

Engine
The shape of the 5-liter drinking water canisters resembles train carriages. You will need whole bottles with necks and soft plastic lids for homemade preparations. In the lids and sides of the bottles, two protocols are made from the bottom of the canister. The holes are located closer to the beginning and end of the workpiece on both sides. Then, using flexible wire, the “wheels” are attached to the locomotive and carriages. Now the composition can be painted.

The neck of a soda bottle looks like a pipe and can be inserted into the hole on the nose of the locomotive. If you cut rectangular holes around the perimeter of the bottle on top of the cars and pour soil inside, the train turns into pots for climbing and short plants.

Hares, pigs, and elephants
Cut off the top of a large round canister and you will get the body of an animal, on which even an incompetent artist can depict a muzzle and paws. You can cut long and thin ears from another bottle and insert them into the slots closer to the edge of the bottle. You will get a recognizable bunny.


Ears are round in shape and small in size - for a bear cub, huge and wide ears - suitable for an elephant. If you place the canister horizontally, leaving the spout with a lid, then the small sharp ears and pink color will help turn the bottle into a perky pig. The crochet tail is made from a small bottle cut in a circle.

Excellent crafts are created from plastic containers cut to the required height. If you make holes on the sides and insert wire or twine as a handle, you will get a convenient basket for collecting berries.

It can be painted, covered (tied) with colored ribbons or twine, and artificial flowers can be added. You can decorate the necklace with an old lace napkin or create a pattern from coffee beans.

1000 ideas for 1000 things
A detailed description of crafts made from bottles for novice designers can be continued with organizers that are necessary in any home.


Supporters of minimalism will appreciate the prefabricated composition of bottles with cut-off necks, varying in height and volume. They can be fastened together using wire, stretching it at the puncture sites and tightly twisting it into a flagellum inside the containers. Multi-colored caps, beads, appliqués made of fabric or self-adhesive paper will help to cover the fastening points.

Hanging organizers are indispensable in the bathroom, home workshop, garage, or craft corner. You can make a rigid mount by cutting a hook or loop from part of the bottle so that it is one piece. Or choose an option with fastening on a rope or wire, similar to the principle of a bow on a bucket.


Figured baskets. It is easy to arrange soft plastic in the form of a basket. Then you can store, for example, cosmetics in it. It would be appropriate to make a spice box for the kitchen, and if you line the bottom of the box with thick foam rubber, then rings and stud earrings will look original in it. The edges of such baskets can be wavy, smooth, or jagged.

Another filling idea is a floral sponge. You can fix artificial buds in it or create a composition of fresh flowers.

And can apple trees bloom on Mars?
A master class on crafts made from plastic bottles would be incomplete if we ignore the plants created from them. An exotic palm tree can easily grow in your house or garden, even if you live in central Russia.

For flower arrangements you can do:
Inflorescences from figured bottoms. It is enough to paint them with bright colors and install them on a rigid “stem” of wire. The leaves can be made from green bottles.

Exotic buds. From the soft plastic center you need to cut four-pointed holly blanks of different sizes. They can be connected in pairs, combining parts of different shades, but from the same color scheme. Each detail needs to be slightly shifted relative to each other, creating volume by bending the petals towards the center or towards the bottom of the bud.

Prefabricated flowers. Round-shaped petals are prepared in advance and slightly melted over a candle flame. Through the holes made at the bottom of the petals, the bud is collected onto a flexible wire.

Fairy lights. The easiest way to assemble them is from multi-colored bottoms from bottles with a volume of 0.5 to 1.5 liters. You can string the buds horizontally or create vertically flowering vines. They can block the entrance to the gazebo or hang from trees in the garden.

Leaves are cut small and round, tall and thin, like sedge, or with soft curves, like in nature. The latter option is easily obtained from wave-cut strips, lightly scorched over a candle fire.

Bonus ideas
Before you enthusiastically engage in creativity, you can familiarize yourself with a small kaleidoscope of ideas available for implementation:
- mosaic on a garden path or gazebo wall made of plastic covers;
- a corrugated pipe or hose from an old vacuum cleaner as the trunk of an elephant, the neck of birds, a giraffe, the legs of animals (a rigid wire frame is inserted inside to give the desired bends);
- bottoms of multi-colored bottles instead of mini-shades for garlands;
- cans of rinse aid and other detergents to create fancy figures and funny faces;
- a bottle as a sprinkler (pierced with a thin needle and put on a garden hose) or an automatic watering container.

It’s not difficult to see that a plastic bottle is an inexhaustible source of ideas for creating useful little things. For more instructions on how to make a craft with your own hands, watch our video.


Create, please others and enjoy the process of creation yourself. Remember that by giving bottles and canisters a second life, you make the world cleaner and brighter!

Photos of crafts made from plastic bottles


