Crafts from driftwood are a fascinating hobby. Original crafts from tree branches that you can make with your own hands What can be made from stumps of driftwood branches

Today, decorative elements and furniture made from recycled materials are becoming increasingly popular. It’s hard to believe, but even nature has “secondary” material. Why cut down new trees when you can make magnificent things from old snags, stumps and the like.
1. Bench

Furniture made from natural, untreated wood is now at the peak of popularity. An original bench made of unpainted wood will be an unusual addition to the interior.
2. Wall made of saw cuts

One of the walls of the bathroom, decorated with wooden cuts.
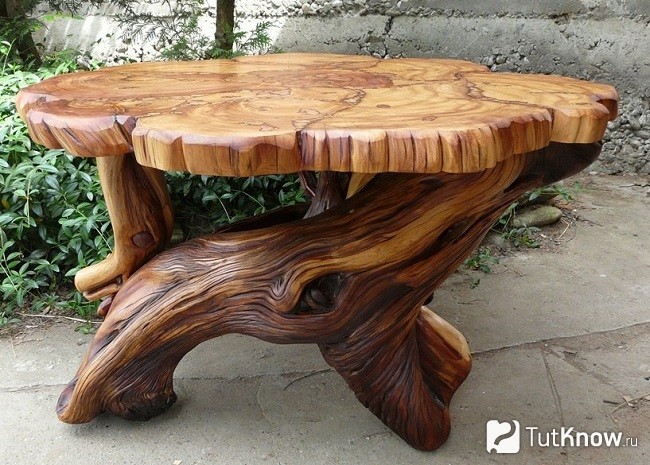
3. Coffee table

A magnificent table made from a large polished stump. Such an original piece of furniture can be obtained in a forest belt or on your own personal plot.
4. Decor item

A large branch will help decorate a child's bedroom. Decorate it with colorful paper birds and the original decoration is ready.
5. Flower pot

A unique flower pot made of wood with a magnificent natural pattern characteristic of wood.
6. Mirror frame

A mirror in a creative driftwood frame will become a unique decoration in any room.
7. Clock

An amazing clock made from cut wood is an original and useful thing that you can make with your own hands.
8. Shelves

Thanks to their round, flat shape, large saw cuts are perfect for creating shelves. To do this, they need to be divided in half and attached to the wall.
9. Shop

A charming wooden bench in a rustic style is what you need for comfort in the hallway.
10. Bookshelf

Why chase expensive designer furniture if you can borrow something from nature. For example, a massive tree trunk can be a wonderful decoration for bookshelves.
11. Table top

Who would have thought that a piece of wood exposed with varnish could be turned into an original countertop under the sink, which would become a real highlight of the bathroom.
12. Headboard

Assorted tree cuts can be used to custom decorate the space at the head of the bed.
13. Woodpile

Cold autumn evenings give a lyrical mood and are perfect for various crafts. At this time of year it’s nice to work with natural materials, especially during trips to the forest to pick mushrooms you won’t experience a shortage of such materials. In this article, we invite our readers to make crafts from branches and driftwood and decorate their interior with stylish and fashionable handmade items.
Before you start making interior items, you need to properly prepare the driftwood branches. How to do it? It’s not easy, but after processing, you can be sure that your products will not turn black and crumble into dust.
How to prepare driftwood for crafts?
You will need:
- Plastic container;
- Soda Ash;
- Sandpaper;
- Fabric bleach.
In total, it will take about a week to prepare tree branches for crafts. Therefore, it is recommended to immediately select the required number of branches for the future product and process them all together.
Step 1. Add about 1-2 cups of soda ash to a large plastic container (basin, bucket, old baby bathtub) and pour into it. Then place the branches there and press them down so that the water completely covers the wood. Fill several containers if the branches do not fit entirely into one basin. You can use a glass jar filled with water as a load. The branches should sit in water for about 48 hours or longer so that the bark softens and can be easily removed with a wire brush.
Step 2. When all the branches are cleared of bark, you will see that the color of the wood is uneven. For the beauty of future crafts, the branches need to be bleached. To do this, pour clean water into the container again and add bleach. For seven liters of water - approximately one cup of product. We again immerse the wood in the container and press it down with containers so that the branches are completely submerged in water. Leave for 48 hours.
Step 3. After the branches have acquired a light, uniform shade, take them out of the water and place them in a sunny place. Let it dry for another two to three days. The sun should dry the wood well, but it is not recommended to dry the wood on heaters or on. Too much heat can cause wood to dry out and crack.
Step 4. The materials are almost ready for making crafts, but they are still rough. It is necessary to clean and sand all sharp and uneven places (knots, bends) with fine sandpaper. And now you can safely start handicrafts.
How to make a candlestick from branches
Making an original candlestick is very simple. Using this principle, you can make a vase, a pot for an indoor flower, or a bread bin.
You will need:
- Transparent glass cup;
- Thin branches;
- Glue;
- Twine;
- Candle;
How to do: if you are making a very small candlestick, then the branch can not be processed according to the above scheme, but simply washed and dried on a radiator. Then cut them into pieces of equal length. Apply glue to the twig and attach it to the wall of the glass. Do this with all the other blanks until the entire glass is hidden behind a row of branches. The outside of the candlestick can be tied with string or colored ribbon. Insert a candle or plastic bowl inside the glass.

Shelves for books and small items made from tree branches

Photo frame made from branches
You will need:
- For the base, wide wooden frame;
- Smooth thin branches;
- Glue;
- Beads, natural materials and any other options for decorating the frame.
How to do it: cut the branches into equal lengths, slightly longer than the sides of the base of the frame. Glue each branch onto a wooden base. Cover all 4 sides of the frame with branches. You can glue artificial flowers or other decorations in the corners, or even paint the entire branches with acrylic paints in any suitable color.

In skillful hands, any driftwood will turn into an unusual shelf or small objects. Many interesting homemade crafts for decorating your home can be made from branches and driftwood, including paintings, figurines, shelves, mirror frames, clothes hangers, screens, and even chandeliers. The main thing is to see the silhouette of the future in a simple branch and make an effort to ensure that the branch becomes it.
Nature presents many surprises. Twisted tree branches, parts of roots, turn into snags. There is a whole movement in art.
Creating such masterpieces requires spatial thinking, rich imagination and a non-standard approach. Not everyone is given the opportunity to see the future creation in individual sticks.
It’s difficult to comment on all this; you need to enjoy the result of your work.
The entrance frame resembles a time portal.


It is very comfortable to sit on such a bench.

Leshy's bench.

The table seems unstable, but this is an illusion.

Framing the railings for the hut.

You should sleep sweetly on such a bed.

This is a work of art. You can look at it for hours.

Framing the stairs leading to the second floor of the tower.

Comfortable sofa with lots of soft pillows.

Chest of drawers made of driftwood and wood.

The tree hanging from the ceiling is a chandelier.

This is how you can decorate a wall.


These are magnificent and unique sculptures.


A garden made of driftwood is called a rutarium.

DIY stump table: 10 stunning photos
A table is an important attribute of any home. The most important action takes place at the table - the meal. Scientists advise using wooden tables - they do not emit toxins like plastic ones. Glass tables are more dangerous and can be fragile. Good wooden tables cost a lot of money, and many people decide to make a table with their own hands. The cheapest and easiest way is to make a table from hemp.
It looks very beautiful and beautiful, but it is an ordinary stump.

They simply nailed the tabletop to the stump, and it turned out to be a good table.

This type of work will require significant time and carpentry experience, but it will be worth it.

A table can be made from small stumps and varnished.

It's not particularly easy to find such a large stump, but the coffee table turned out great.

To create such a small table, we took a small stump and an ordinary round timber from a tree.

You can also put a glass top on top, which will add even more attractiveness to your table.

You can also screw wheels to the stumps and the table will be movable.

A table with lighting can also be made from hemp.

The coffee table in the shape of a month is a beautiful piece of work.

They say that sitting on a stump is even beneficial. Previously, hemp was often used as a chair and people didn’t bother too much, even now many people do this in villages. But you can make a beautiful chair from a stump for your apartment or house with your own hands; all you need is properly growing hands and imagination. In this article you can consider the best works.
Very simple and soft - soft stump.

You can turn an original chair using a chainsaw and a turbine.

And here is a stump chair with legs.

You can also make the back in hemp if you wish.

Beautiful stool made of dark wood.

Screw on the wheels and you have an office chair made from a stump.

Almost any stumps can be used.

From small stumps you can glue together a table and a stool like this.

Hemp chairs for the whole family.

And in these ones they even made a real thing.

The royal stumps look beautiful.

You can cut the stump into pieces and make a stool.

DIY stump crafts for the garden: 10 photos
The garden plot can be decorated with a variety of materials that have already served their time, as well as materials of natural origin. These include cut down trees, or rather what remains of them are real stumps. From stumps you can build a variety of strange things that can please the eye. Let's present 10 photos of handmade garden stump crafts.
A stump with a cute frog perched on it.

An original and extraordinary fly agaric was built from a stump.

Baba Yaga from a stump will delight anyone, make them laugh, and even cheer them up.

Forest brethren from birch stumps.

A tree stump house for a variety of inhabitants.

The house is a fly agaric, a great idea.

A house made of a stump with a roof, windows and flower beds - balconies.

The two stump brothers created an interesting composition.

A house for an Elf made of a stump with a powerful door.

House with a chimney and a porch for gnomes.

Top 13 DIY stump products - only the best ideas
Unnecessary tree stumps are an excellent material for creativity and making money. And imagination, as we know, has no limits or boundaries. With certain treatment, objects made from a stump will last a very long time. We have prepared a selection of the top 13 DIY stump products. Enjoy watching! These will be only the best ideas.
You can make glowing seats from a tree stump. Having painted them with luminescent paint, they are good to use in the garden.

Candlesticks made from a stump are a creative idea for the home.

If you carefully work with your tools, you can turn a stump into a stand and a shelf for books: two in one.

A lamp made from a stump is an ordinary accessory made of an unusual material.

From a stump you can make a bar counter for several bottles of wine.

A coffee table made of stump and glass will fit well into the interior of the living room.

You can make a bird feeder from a small stump.

Mini - waterfall from a stump. But the stump is made from healthy dried wood, carefully treated with impregnations.

Crafts from a stump in garden design are a great idea.

A garden table made from a stump will decorate a terrace or winter garden.

Flower stands and flowerpots are made from stumps of different sizes.

The stump of an old tree will make a beautiful flower garden.

Stump figures can be placed in a garden, park, or playground.

DIY stump stool. 10 amazing ideas + photos
Designer items are made from waste scraps. From an unnecessary stump you can make: benches, tables, stools. The stump does not need to be processed with tools. This type of furniture has a special style and design. Furniture in Russian traditions will look great in a garden, a bathhouse, or a summer kitchen. We invite you to evaluate the stump stools with your own hands. 10 amazing ideas + photos.
Economical furniture: the stool is made from two cuts of one tree stump.

For this stool you will need a high stump so that you can cut down the backrest.

This model is sustainable. But you need to make an effort to cut a curly leg from a stump.


The most common model of a stump stool. But in order for the furniture to last longer, you need to properly fasten the legs.

The stump is upholstered with soft fabric. This stool is comfortable to sit on.

A stool made from a stump is a convenient and simple model: cut out the legs and the seat is ready.

Stable, low-rise stools made from a stump. True, they weigh quite a bit.

To make such stools from a stump, you will need a lot of effort and time, large stumps. And the price will be high.

This tall stump stool is perfect for a bar counter.

Beautiful wooden crafts can decorate any interior of a house or apartment, a summer cottage or a playground. This natural material, which is easy to find even in the city, in the skillful hands of a master turns into real works of art.
What kind of wood are crafts made from?
All tree species can be divided into two groups:
- Soft wood evergreen conifers. Its density is slightly lower than that of broad-leaved trees, and it costs less because coniferous trees grow faster. This wood is used to make paper, plywood, and is used in the furniture industry. The most popular varieties: pine, cedar, fir, larch.
- Hardwood deciduous trees. It is denser and more expensive, and crafts made from it are strong and durable. Deciduous trees are valued in carpentry. Varieties common in mid-latitudes: oak, birch, hazel, linden, maple.
Interesting wood crafts can be made by both adults and children. The process of joint creativity brings the family together, children develop motor skills and creative thinking. To create interesting panels, figures or interior items, you don’t always need to use carpentry tools. For the simplest things, wood itself, office supplies and free time with an interesting idea will be enough. Any parts can be used:
- array;
- roots;
- branches;
- bark;
- saw cuts;
- hemp.

Solid wood crafts
You can work with solid wood if you have special carpentry tools. The minimum set includes:
- work surface with a vice;
- cutting tools, such as a jigsaw;
- grinding devices.
Depending on your imagination, available material and time, you can create:

Crafts made from tree roots
If working with solid wood requires special tools and skills, then roots and driftwood suggest simpler, but no less spectacular wood crafts. They can be used for the creative process with your child:

Crafts from tree branches
You can create beautiful wood crafts from the most common dry branches. First, such material must be cleaned of dirt and disinfected with a solution of potassium permanganate, so as not to infest your home with unnecessary larvae. Crafts made from tree branches often become interior decorations or holiday decor:

Tree bark crafts
Considered a waste product in the wood industry, the bark serves as a valuable material for crafts. It can be collected from dry or freshly cut down trees. The tree periodically sheds parts of its bark, so you can collect the required amount yourself. You should not remove the bark from a growing specimen, as it serves as a protective layer of wood, without which the plant will die. Crafts made from tree bark are very fragile, so it is better to use the material for decorating different surfaces:

In the old days, cool wood crafts were made from birch bark, prepared in a special way. It was called birch bark and was an analogue of modern paper. It was used for writing and making:

Crafts from old wood
Don’t rush to throw away old boards left over after renovation or construction. This material is in great demand for creating stylish art objects in eco style. Simple crafts made from old wood can decorate various rooms in the house:

Crafts made from round wood
In art schools and studios, wood crafts for children, which children make on their own, are made from saw cuts - round flat parts of the trunk and branches of different diameters. By connecting them using special glue, you can create:

Crafts made from tree stumps
Popular wood crafts for the garden made from old stumps are tables and stools for them. Such products can be left practically untreated or given a more aesthetic appearance by sanding, varnishing, painting or decorative carving. However, if you have free time, you can truly improve unsightly stumps:

Rutarium will allow you to make furniture for your dacha out of driftwood and stumps. You can also make flower beds and sculptures with your own hands from these materials.
Rutarium is an interesting direction in landscape design. It will help turn the cottage into an extraordinary corner. Stumps, various snags, and old wood are suitable for this.
DIY crafts from hemp
If you have an area with the root system of a tree and its low above-ground part, do not uproot this element. To make crafts from hemp for your summer cottage, you will need:
- stumps or one;
- colored wood chips;
- antiseptic;
- stones;
- flowers;
- the soil;
- brush.

- To make a stump craft last as long as possible, remove the rot from inside. Dry this inner hole. Remove the bark from the stump.
- Paint this natural wood element inside and out with two coats of antiseptic. When it is completely dry, you can start decorating the flower girl.
- Pour fertile soil inside the stump and plant low-growing flowers. Mulch the surface with regular or colored wood chips. Place stones next to the stump.

Instead of stones, you can use upside down glass or plastic bottles. The necks of the latter are cut off.
If you don’t know how to decorate the northern part of the territory at your dacha, then place the rutarium here and plant shade-tolerant flowers in it.
Not only hemp, but also all kinds of driftwood are suitable for the device.

If you have had an unnecessary log lying around for a long time, saw through the top, remove some of the wood, and remove the bark. Also treat the surfaces with an antiseptic, then add fertile soil and plant unpretentious plants.
Take a closer look, maybe the snag found in the forest resembles someone? In the photo she looks like a fairy-tale dragon, you just need to work out the details so that they become obvious. To do this, use a hatchet, hacksaw, and wood carving tools.
Crafts made from driftwood can be not only in the form of flower girls, check out the following ideas.
How to make garden furniture and wooden sculptures?
Look at the results the craftsmen achieve. Having outlined some details of the silhouette, you can make such a snowman or a good-natured Leshy.

To make this type of chair, take:
- driftwood;
- board;
- rope;
- stain;
- wood varnish for exterior use;
- brush;
- self-tapping screws;
- saw.
- To make the chair reliable and stable, choose only strong, not lightweight driftwood; oak is perfect.
- Saw off the parts that will turn into legs. The two front ones are short, the back ones together with the back are long. Make a base for the seat, place a couple of boards here, and attach them with self-tapping screws.
- Make armrests from durable driftwood, secure them with self-tapping screws and rope. For the backrest, take a reliable crossbar, which is fixed in the same way. Two small driftwood are attached vertically to the center of the back.
- All that remains is to cover the chair with stain; when 2 layers are dry, apply three layers of varnish with intermediate drying.

If you want to emphasize the natural structure of the wood, then do not coat it with varnish, but just go over it with an antiseptic, or transparent. Look what wonderful chairs you can make from stumps. The table is made from the same blank, only the tabletop is attached to the top.

Here's what you can make from a large stump by sawing off its top part. Then the thick, intricate driftwood will turn into table legs.
A bench made of wood will also turn out to be unusually interesting, delicate and even fabulous.
To do this, take:
- two strong boards, preferably floorboards;
- driftwood;
- self-tapping screws;
- wood glue;
- antiseptic;
To securely connect them to the legs, attach driftwood here using self-tapping screws. Additionally, they can be fixed using pins by cutting holes of the same diameter at the two connecting elements into which glue is poured.
In the same way, fix the back, consisting of many driftwood. Sand some elements if your design idea requires it.

You can create a massive sofa using almost the same type. But its legs and base are logs.

You can leave the product as is or paint it with varnish, it also turns out very beautiful and unusual.

Not only individual items, but also a whole set will come out of the old tree. Covered with antiseptic and varnish, it will be able to stand outdoors in the air.

It’s so nice to sit on such country furniture in the shade, eat here, and organize holidays.

If you use golden varnish in a spray can to decorate furniture made from driftwood, you will create, for example, a chic bench that will look like an antique one with a copper tint.

If you only have an old stump, remove the bark from it, take out the rot, prepare it as described above, put tempered glass on top, you will have a wonderful wooden table.

He may come out different. If you have a longitudinal cut of wood, process it, attach the legs from below, and place glass on top. Instead, you can make a tabletop from.

Rutarium made from driftwood: master class
We continue the topic of how a rutary is created. To make the crafts come out beautiful, you first need to prepare the driftwood. For this you will need:
- soda ash;
- laundry bleach;
- iron brush;
- Plastic container;
- sandpaper.
- Pour hot water into the container, if it has a volume of 10 liters, then add two glasses of soda ash and stir. Place driftwood here. To prevent them from floating, place weights on top. These can be plastic cans filled with water.
- After two days, the wood will soften, then clean the surface with an iron brush. Since the wood will be of uneven color at this stage, wash the workpieces. Pour 10 liters of water into the same 10-liter plastic bowl and add one and a half cups of bleach. Place the driftwood here for two days.
- After this time, place them in the sun for 3 days. Then, using sandpaper, you need to sand the uneven areas.

Now you need to fold these blanks so that, if desired, you can use them for crafts, for example, make such a voluminous star.

For it you will need:
- plywood sheet;
- jigsaw;
- driftwood;
- hot glue;
- star template.

After filing pieces of driftwood to the desired length, glue them to the star, starting from its outer edge.

Then, gradually move towards the center, try to cover all the plywood with lumps.

Wait until the glue cools down and cover your work with spray paint of the desired color. The silver star looks great.

The door of a country house is perfect for such a craft made from driftwood. Attach the finished work here so that the star decorates the building. You can make another rutary.
Look what a wonderful wooden shelf you can make.

For it you will need:
- strong driftwood;
- rosewood varnish;
- iron brush;
- construction hooks;
- corners;
- brush.

If you want, you can cover the hooks and corners with gold paint, when it dries, use these elements.
Screw on construction hooks to hang mugs or wine glasses on. Attach the driftwood shelf to the wall using metal corners.

Driftwood makes wonderful things not only for the street, but for the home. Watch the following master class, from which you will learn how to make a flower stand with your own hands. For this creativity you will need:
- small log;
- snag;
- shells;
- leg-split;
- river pebbles;
- hot glue;
- self-tapping screws;
- saw.

First you need to prepare the wooden parts. To do this, remove the bark from a wooden log. This must be done extremely carefully so as not to injure your hands.

Saw circles about 5 cm thick from the log. You also need to remove the bark from the driftwood. If this workpiece is not of the correct type, then bleach it in the same way as described earlier.

While the driftwood dries, you will have time to decorate the flower stand. Glue the rope onto the side surface in a circle at the top and bottom using a hot gun. Using it, attach pebbles and shells. Paint the surface with varnish in 2 layers.
In the same way, decorate other pallets where the plants will stand, including the largest one, which will become the basis for the flower girl. Attach a piece of driftwood to it, and attach circles to the tops on which the flower pots will stand.

Also paint the driftwood with varnish in 2 layers and let it dry. You can decorate the flower stand with artificial greenery.

In some places, glue shells with hot glue, you will get a very beautiful picturesque stand.

DIY rutary in the city
If you don’t have a plot of land, you live in a city, the trees here were cut down, leaving behind interesting snags and stumps, then you can decorate your yard using this idea. To implement this idea you will need:
- stumps and snags;
- dye;
- tassels;
- seedling;
- fertile soil.

If it is difficult to remove the middle of tree cuts, then just paint them; for others, remove this middle part, fill it with earth, and also paint these blanks so that they look more positive. In this case, you can use not only white color, but also any others.
Make a kind of well from the branches of cut trees, placing four in a row. Also add soil here and plant flower seedlings. If there is little sun in the yard, then use shade-tolerant plants, such as hostas, vines, ivy.

If you have a lot of driftwood, you can make interesting sculptural compositions out of them. For example, these horses.

If you know how to carve wood, then try making a rutary with a sculpture of a funny person.

DIY wooden figures
They can also be made to decorate a yard in the city or country house. Such a rutarium looks great, adds individuality to the site, it is clear that a jack of all trades lives here.
If you want to know which wood is best to carve a sculpture from, then check out the following information.
- Linden is one of the best materials. This wood cuts softly and easily. The structure of this tree is light, it almost does not warp or crack.
- Aspen is also easy to process. Products made from it don’t even need to be varnished, then after time they will have a beautiful silver color. But crafts made from such wood are prone to chipping, so it is used to create large sculptures.
- Alder lends itself well to carving and processing, and is resistant to cracks. Therefore it is also an excellent material. Take this into account when you do rutaria on the site.
- If you want to make elements of fine art here, use walnut, it is very decorative, does not warp and is resistant to chips.
- Birch is not processed so well and warps. Therefore, if you want to carve wood, use this to create small parts and souvenirs. But birch is well painted and has a beautiful relief.
- Large carvings can be made from oak and will be durable. But such dense wood is difficult to cut, so you will have to make an effort or use an electric tool.
- Large ones include an axe, a hacksaw and even a chainsaw.
- Using cutters with a blade width of 1.5 cm, you can cut out small elements that are in hard-to-reach places. There are many cutters, each designed to perform a specific function.
- The adze is suitable for initial processing of small parts.
- Knives, jambs and chisels are also used for wood carving. The latter perform any notching and are intended for working out details. The cutting edge can be of various shapes.
- The Bogorodsky knife is perfect for carving sculptures from wood. It is named after the village where such work has long been carried out.
- A drill is suitable for drilling holes.
- To make the surface of the product smoother, use a rasp, a grinding machine and sandpaper.

The photo shows how wood carving is done. You can see the stages of creating a sculpture from this material using the example of carving a bear.

This is preceded by the following work:
- creating a sketch on paper, it needs to be drawn from different angles;
- then this sketch is transferred to a workpiece, for which it is best to use a rectangular block;
- if you want to avoid mistakes when cutting a sculpture from wood, then first mold it from plasticine or clay and make adjustments;
- Now you can move on to rough cutting, which is carried out using a hatchet or saw;
- you will create small details using an adze;
- and a cutter and chisel will allow you to cut off excess corners.
Next, the details of the nose and sternum of the bear are worked out. Then he will acquire ears, front paws and hind paws. At the next stage, they are designated more clearly, and a stand for the wooden sculpture also appears.
For the next step, you need to use chisels, a Bogorodsk knife, shoals that will help make the facial features, bear claws, and fur more realistic.

At the final stages, you will need to sand and polish the wooden sculpture, then cover it with stain and varnish. You can use special wax.
If you want to see how a bear is carved from wood with a chainsaw, then refer to the next master class.
If you want to know what a rutarium at your dacha could be like, then turn on the following video material.
Another one will clearly show how you can decorate your yard using cut down trees.