Metal stair railings are durable and reliable structures. Designs of stair railings Metal railings for wooden stairs
Read also
Railings are an indispensable attribute of a staircase structure. They perform the function of a protective element that ensures the safety of movement along the span. Railings are distinguished by a variety of shapes and materials; they can be simple in appearance, or made in an unusual, original style. This enclosing element can be a striking design addition to the interior and become a chic decoration for any home.
Having studied various photos railings for stairs, you can see the variability of these structural elements and choose the option that is most suitable for your case.


It's easy to make handrails for stairs with your own hands. We’ll try to figure out how to make fencing elements for a staircase structure ourselves, what material is best to use, and where to start the installation process.

Material selection
First you need to understand what materials the railings are made from. flight of stairs. The following fencing elements are the most popular.

Aluminum. If you prefer railings made of aluminum, then making them yourself will be difficult. Basically, such products are sold ready-made, and all you have to do is make them correct calculations, buy required amount fencing elements, assemble them with your own hands and familiarize yourself step-by-step installation railing for stairs.

Chrome plated. They, just like the previous ones, are sold in construction stores in a ready-made form, so to install them yourself you need to perform the steps listed above.

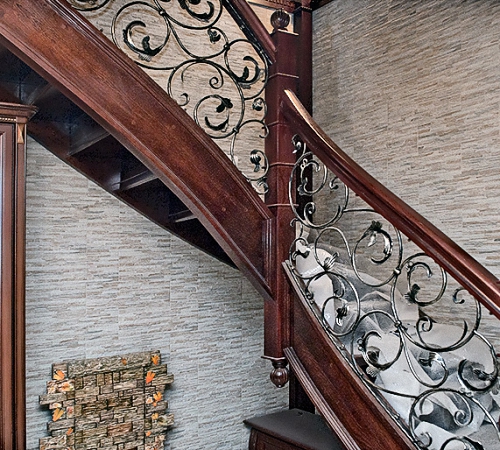
Forged. Such fences look incredibly beautiful and interesting, but making forged railings at home is a rather difficult task.

Hot forging can only be carried out in a specially equipped room, as regards cold forging– you can do it at home, but you need to know the basics of this process and have all the necessary tools in your arsenal.


Made from of stainless steel. Such railings are very wear-resistant, strong and reliable, but in order to install them yourself you will need welding and metal cutting skills.

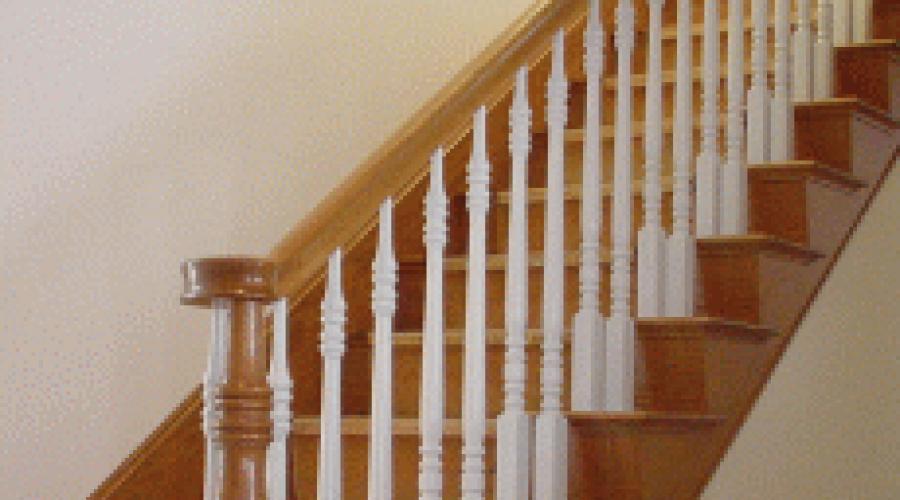
Wooden. This is the most popular material used in the manufacture and installation of handrails on your own. Let us dwell in more detail on wooden fencing elements and provide the reader with brief instructions how to make a wooden railing.

Wooden stair railings
Wood has long been used to create railings; the main advantages of this material: wood allows you to create a fence of any stylistic orientation, shape, with interesting carvings and ornaments. In addition, there are many decoration options wooden fencing, they can be painted, varnished, etc.

For novice craftsmen, it is better to start with just such a railing; if you have no experience in carpentry, you can choose a simple design; due to its texture, wood will in any case look interesting and aesthetically pleasing in the interior.

Let's try to figure out how to properly make a railing for a staircase made of wood. First, decide on the type of tree, whether it will be beech, pine, oak, birch or something else. The costs incurred for manufacturing, the quality of the railings, their resistance to sudden temperature changes, susceptibility to rotting, and ease of processing will depend on the selected species.

Secondly, familiarize yourself with the main parts stair railings. Any railing will contain the following elements: handrails, posts, balusters, cabinets.

Particular attention should be paid to the balusters, because the appearance of the flight of stairs will depend on them. You can make them in the form of neat columns, if you can use metalworking equipment - carve various patterns and ornaments on the surface.


Manual cutting can turn these structural elements into a real work of art, the scope for creativity is incredibly wide, craftsmen carve figures of people, animals and other incredible compositions from bars.

After preparing everyone necessary elements The question arises, how to install railings on the stairs. Wooden shaped posts can be attached directly to the steps, using grooves or metal studs, while flat balusters (presented in the form of thin boards) are best mounted on a special beam located 10 centimeters above the bowstring.

In this case, the handrail, beams and pedestals will form a frame, where it is necessary to place flat balusters. The distance between the crossbars in both cases should be no more than 15 centimeters.

So in general outline looks like the process of adding enclosing elements to a flight of stairs. Having decided to install the railings, evaluate your strengths, choose a suitable project, calculate how many materials you will need for the work, prepare the necessary tools and begin this interesting activity.

Photo of railings for stairs


The railings are designed to ensure safe movement on the stairs. They can be the most different forms- both simple and skillful. For the manufacture of such fences, almost any materials are used: metal, concrete, wood, plastic. To make them yourself, you need to take into account a lot of factors. How to understand all this and avoid mistakes is described in detail below.


Peculiarities
For glass fences, fastening occurs in this order: first, they are attached to the posts, and then handrails are attached on top. Such fences are safe, provided that all fastenings are made correctly.
Handrails must be on all fences; they secure the entire structure. To more securely fasten parts, metal rods are used. The shape of the handrails should ideally match the staircase.


All defects will be visible if the structure is distorted by high humidity, and then all defects can be seen with the naked eye.
It is necessary to take into account the fact that simpler form handrails, the less chance of improper bends in the handrails.


Materials
You can purchase ready-made fencing; these can be chrome-plated fencing. When making such a choice, it is important to calculate and take into account all the elements that may be needed. But you need to remember that this type of railing has some disadvantages. For example, their coating wears off quickly. Railings installed in high traffic areas are most susceptible to such damage.

Aluminum
Making your own railings from aluminum is not so easy. In most cases, all parts can be purchased ready-made. You can assemble fences already from finished parts, you just need to correctly calculate the necessary fasteners and additional elements. Aluminum railings also have a number of disadvantages: they bend when impacted, are prone to corrosion, become dull and scratched.


Forged fences
They can be cold or hot forged. Hot forging is difficult to do at home, so most often such work is ordered at special factories. It is easier to perform cold forging at home. But to create this type of railing you will need highly specialized tools, equipment and skills.
Among the disadvantages we can note high cost such railings, complexity of manufacture and availability special tools. But they also have advantages - a wide variety in the design of railings.


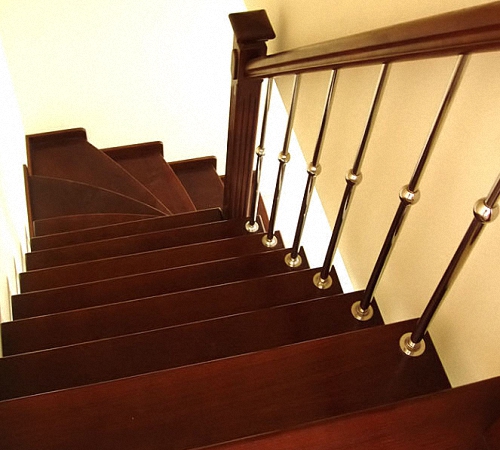
Stainless steel
Stainless steel railings are very common. This metal does not fade over the years and has a beautiful shine. Railings made from it are very strong, durable and safe. But to build them yourself, you need minimal skills as a welder and metal cutter.


Drawings and sketches
Before starting work, you need to determine what type of fences will have. After that, draw what you imagine on paper. You can use various ready-made drawings.
If you decide to create your own drawings and sketches, you should understand that you cannot do without accurate calculations. In this matter it is necessary to pay attention Special attention safety and ease of movement. To make sure the plans fit this important criterion, take into account factors such as the width and height of the stairs, the size of the steps and other parameters.
It is clear that a straight and wide staircase is very convenient. But it is not always possible to make it the way you want. When constructing a drawing, consider such important factors as the angle of the stairs. It should not go beyond 24–36 degrees.


Clearance is the distance between the step and the ceiling. Its minimum permissible value equals 2 m. It is also necessary to take into account the width of the flight, because the convenience of the stairs largely depends on this parameter. In a house or apartment, this figure should not be less than 0.9–1 m.


Requirements
Main function handrails – ensuring safe ascent and descent of stairs. In addition, it is a decorative element and can contribute to the interior. Parapets must be manufactured in accordance with all norms and regulations in accordance with SNiP.
The height of the railings in residential premises should be 90 cm and higher, and for tall structures, the desired height is 100–110 cm. In places where children live, the railings should not be less than 120 cm, for the safety of the child’s movement.


The handrails themselves should not be very wide, ideal width 6–9 cm. With this width it is convenient to grab them with your hand. If the staircase is narrow, you can install one parapet. But when planning a wide model, two parapets are required. If children live in the house, for their convenience you need to make a second, lower handrail.


How to do it yourself?
First of all, you need to decide what height of the fence you want and what the gap between the balusters will be. So-called pedestals are installed on the lower and upper steps. They are necessary to fix the entire structure.
When choosing pedestals, keep in mind that the diameter of the balusters should be less than their girth.
Standard height the railing is 95 cm, but the frame must be raised 10 cm from the staircase itself. You also need to take into account 5 cm on the handrail. Then we subtract 15 cm from the total height and get 80 cm. This is the size in which you need to cut balusters and cabinets.


After all the work and preparation has been completed, you can begin welding. We lay out the frame from the prepared profile and weld it in place quite a bit. There is no need to immediately tightly weld all the elements, because in case of defects or misalignment you will not be able to avoid extra work. After you've finished welding work with a frame, balusters are welded to it. It is also worth highlighting that the cabinets should be twice as large in diameter as the internal metal lintels.
After you've finished everything previous works and you don’t see any defects or distortions, you can start finishing welding. Seams need to be welded on both sides, this maximizes the strength of the structure.


When you have finished all the work on the frame, posts with square or round plates should be welded to the bottom side; the height of the posts should be 10 cm. Make holes in the plates, they are needed to attach them to the steps. To give the railing a finished look, you need to polish the entire structure and remove any welding residue.
You can give your design beautiful view using various forged elements. They can be bought ready-made in specialized stores, where you will be offered many similar accessories, various flowers, ornaments or other decorative elements. You can weld them to the frame and thus give the fence exclusivity. Also, don’t forget about the handrails themselves. Most often they are made of wood. Blanks for handrails are carefully polished and rounded.


Wooden options
For wooden fencing, materials such as pine, oak, birch or beech are suitable.


Another type of wood that is suitable for railings is beech. It is in no way inferior to oak. However, it is very sensitive to dry air. Due to the extremely dry air, the beech tree breaks down the fibers and becomes deformed.

Components of the structure of wooden fences
In wooden, as well as in metal structures, there are: cabinets, balusters and handrails. IN wooden structures, balusters also perform a decorative function, and not just a supporting one. Most often they are made from glued timber and given various shapes.
Hand cutting is a real work of art. Craftsmen carve various patterns, designs and ornaments, and some even carve animal figures. The easiest way to decorate the stairs yourself is with flat balusters. You can cut patterns into them.


Fencing made of flat balusters
It was already written above about how high the railing should be. The final height of the balusters was 80 cm. In order to make the railing, you will need boards, the width of which should be 10–15 cm and the thickness about 30–35 mm.
To create an attractive railing, the boards can be given the desired and interesting shape. To do this, you can use a lathe. If you do not have such equipment, a regular jigsaw can replace it.
- Draw a template on paper that has actual size balusters.
- Using a regular pencil, trace a template on all the boards.
- After this, cut out the shape along the contour.
- After completing this procedure, all the boards need to be cleaned with fine sandpaper and polished.


How to install?
Sculptural balusters, like metal ones, need to be mounted to the steps, which should not be done with flat balusters. If flat balusters are attached to the steps, then the entire structure will turn out to be unreliable and shaky. Balusters need to be inserted into a frame, which is made from a handrail, an upper and lower cabinet, and a lower beam.
The balusters must be fastened at a distance of 15–20 cm from each other. During operation, you can use two types of fasteners - on metal studs and in grooves. If you still decide to install in grooves, then you need to grind grooves about two centimeters in size on the structural parts.
Wood - main construction material humanity from ancient times to the present day. Of course, today there are many good synthetic analogues, but natural wood is preferred both for the base of structures and as a finishing material with great texture. Making wooden railings - The best decision, not only for aesthetic reasons, but also due to the flexibility of the material to all types of processing.
Railings are an important structural element of the stairs
In private house construction, wood is suitable both for the manufacture of the staircase itself, and for independently constructing aesthetic and comfortable railings. In this case, it is not so important what type of design and general configuration near the stairs, railings are needed in any version:
- marching;
- straight;
- curved;
- rotary;
- screw;
- curvilinear;
- combined.
Any handrails are not only important functional element for ascending/descending stairs, wooden railings are also endowed with an aesthetic component of the interior. They limit the space of the stairs when ascending (descending), ensuring overall safety.
The railings are made from different materials, but when choosing the general appearance of the staircase, it is very important how it will look against the background general style in the house. Today, stair steps are often mounted directly into the wall or made of transparent plastic and glass. However, a sense of overall safety and security should come to the fore, and the designer's idea should yield to established safety standards.
Attention: The absence of limiters on stairs is permissible only for small flights of stairs (flights) consisting of no more than 5 steps. Using stairs without handrails (stops) can lead to an accidental fall and irreparable harm to health!
Basic requirements for wooden railings
Wooden handrails provide a complete look and remain the main support when using the steps. Considering the characteristics of wood, it is important to ensure that the railings are sufficiently smooth, eliminating the possibility of injuring your palms. To do this, the wood is well sanded or sanded, varnished in 2-3 layers or painted with enamel, such as a wooden staircase railing: photo.

Except appearance stairs, general convenience is also important - the height of the handrails should be comfortable when moving along the stairs in order to hold the handrails for people of average height. Single standard- make handrails no higher than 95-100 cm, measuring from the level of the step. Sometimes the stairs have an additional parallel bottom row - railings for children. Along the wall (another supporting vertical), railings for wooden stairs are also additionally fixed on brackets.
Stair railings are very simple in design:
- handrails (decorative or simple);
- support posts (turned or simple balusters).
Decorative balusters are placed at sufficient intervals so that a child or an adult cannot inadvertently fall through the holes in an awkward fall. Usually one support post per step is sufficient. But with too gentle a descent and wide steps, and also taking into account some design features designer stairs, railing posts are placed at a distance of 10-15 cm.
In addition, there are support and intermediate balusters, and the bases of the stairs are made on thicker supports than the secondary support on the railing. However, it is also not recommended to make stair railings too light - on any section, the handrails must withstand a sufficient horizontal load, about 100-120 kg/m. The simplest railings are polished bars mounted on metal brackets along the wall. The number of balusters on a standard staircase usually corresponds to the number of steps.

Before you make a wooden staircase railing with your own hands, you should start:
- from studying basic construction standards;
- wood consumption calculations;
- preparation the necessary tool and woodworking machines;
- creating a project, drawings or sketches;
- calculating the step width of the stairs and the location of the balusters on them (at the beginning of the step or in the middle).
It is better to make the main elements of the support from oak, maple or beech, which are the least likely to crack and dry out. Such a staircase will not creak even after many years if it is designed correctly. Trim parts can be carved from ash, yew, rosewood, cherry or walnut. To highlight natural texture wood pattern, it is better not to paint the handrails, but to cover them with stain after polishing and open them with varnish.
Tip: Be sure to check the horizontal and vertical of the bars for timely adjustment, and if the level slips off the board, you can temporarily fix it with tape.

Main types of stairs
The appearance of the staircase cannot be designed separately from the general style solution at home, since the staircase is always an important aesthetic component and even its business card. Stairs are classified:
- external and internal;
- house, service, landscape, architectural;
- entrance, interfloor, passage;
- stationary, portable and transformable;
- single-flight and multi-flight;
- straight and rotary (2 or more spans).
Guests may not notice any paintings on the walls, but they will definitely remember the beautiful spiral or hanging glass staircase they climbed. Therefore, if the construction of a staircase is only in the plans, contact a competent architect to develop a project, who will offer an option that will organically fit into the design of the house. In addition, a specialist will help you choose the type of staircase design:
- on bowstrings;
- on stringers;
- on pain, etc.

1. Staircase on rails or cantilever. This design looks impressive because it has no visible supports, and guests initially experience some anxiety when using the steps. In reality, the steps are very securely attached to vertical plane, withstanding an impressive load. It takes up minimal space, but older people are reluctant to use it. It is important to ensure confidence when climbing and to limit the stairs with a good handrail.
2. The staircase on stringers is supported by support beams secured in a special way. The design has been used for several centuries and has proven its reliability; it is made over a large area.
3. A staircase on bowstrings looks elegant and light; it is often used as an interior decoration, connecting the living room and the hall. It is somewhat reminiscent of a stretched rope ladder, but made of stronger materials.
4. Spiral staircases are used where there is no provision for climbing steps along the walls, but connects the first floor with a hole in the center of the ceiling to the floor above. It occupies a minimum of space, but is not very convenient, since two people walking towards each other cannot pass each other there. But its aesthetics are usually beyond doubt, and handrails are a must. The spiral movement determines the type of this design.
Standard stairs in entrances or private ones multi-storey buildings- single-flight, double-flight or multi-flight rotary type. A march is an inclined fragment of stairs with steps connected by an interlevel platform. Stair landings between marches they provide the opportunity to enter, turn around and move to the steps of other marches. Turning stairs there are:
- bilateral;
- rights;
- left.
Also closed staircases, semi-open, completely open, not limited by handrails. It’s worth understanding the design features not for the sake of memorizing the names, but to choose the appropriate staircase configuration for your home, based on:
- functionality (where it leads);
- location in the house;
- constructive design;
- material of supporting supports (wood, metal, plastic, reinforced concrete).
Each type of staircase requires its own type of handrails or restrictive elements, as well as types of fastening. Therefore, professionals know where it is better to use:
- hidden;
- adhesive;
- groove connection of structural elements.
On a narrow staircase up to 130 cm, the railing is usually placed on one side. On wide staircases, where oncoming movement is expected at the same time, the handrails are made symmetrically with the same angle of inclination. This angle must correspond to the degree of inclination of the flight of stairs, that is, duplicate its geometry. The width of the handrails should not be large, that is, as comfortable as possible for the palm to reach. Curves must be made at the beginning and end of the handrail. All these subtleties should be reflected in preliminary calculations.

How to make a wooden stair railing
Installation of a staircase with railings is painstaking and time-consuming, but at the same time very exciting process. The simplest wooden handrails made of wood with your own hands, for any type of staircase, are easiest to make using balusters. Modern construction supermarkets sell various blanks or ready-made components for stair railings, which will make installation easier. The most beautiful are the turned balusters, reminiscent of skittles.
The design of wooden railings is chosen based on common tasks, the material used and woodworking capabilities.
1. To make simple wooden railings yourself, you need finished timber cut 2 posts, preferably 100 x 75mm. These blanks are fixed on the outside of the bowstring, at the bottom and at the top of the march. Immediately, the level checks the vertical accuracy of the racks.
The easiest way to adjust the vertical mount is with screws. Further, along the line of fastening the supports in the center of the flight of stairs, a 3rd rack of timber is mounted - the rest of the handrails are installed along them.
Using a power tool, 3 pieces of 150 x 40 mm are cut. Using a plane you will need to process (round) the edge, which will later become the basis of the handrail. These treated boards are secured at equal intervals from each other, secured to the back surface of the posts.

It is important to ensure that the supports are slightly higher than the handrail - approximately 50 mm. After that central support cut to the required height of the handrail, now you can thoroughly sand their surface.
2. The most beautiful wooden railings - with decorative balusters, pre-turned by a woodworking machine. In practice, many people have no idea how to make a wooden railing with a complex configuration. To make them you need to have professional carpentry skills and good equipment.
However, you can use ready-made balusters, turned or purchased in advance. For such railings, the support consists of 3 parts. The trapezoidal base of the balusters, which acts as their support, is tightly mounted to the bowstrings using tenons. They must have a groove in the upper base for mounting a support post.
We attach the decorative part to the central support - formed using lathe and a well-polished head, with the help of tenons we fit it tightly into the grooves. We check all elements with careful fit before assembling the entire structure, after which we apply wood glue to the tenon joints. The parts to be glued must undergo curing; they should not be loaded earlier than after 1-2 days.
Medium decorative balusters, turned on a lathe, are assembled sequentially. The baluster supports are attached using dowels to the bowstring using wood glue. The base of the supporting baluster is securely attached to the floor with anchors so that the edge of the staircase does not move under load.

We mount a rail with a groove corresponding to the size of the base of the intermediate baluster to the bowstring and fasten it with countersunk screws. Next, we fix the middle post of the supporting baluster in exactly the same way. We place the intermediate supports with their lower ends into the grooves of the slats, having previously lubricated them with wood glue. The tops of each passing baluster are mounted into the corresponding groove on the prepared handrail.
Attention: All balusters are cut before installation at the same angle, corresponding to the slope of the stairs. When measuring their length, take into account the correspondence of the dowels to the depth of the grooves - both at the base and in the folds of the handrails. On the first baluster, even before final fastening with grooves, be sure to check the verticality of the balusters with a level. Having made all the marks, we make the final bevel at the required angle, then we use the fully finished staircase part as a stencil for the remaining balusters.
Fastening intermediate balusters in order:
- Insert the timber into the groove of the bottom strip lubricated with glue the desired shape and length, check the interval between all intermediate balusters one by one;
- we insert the required support into the groove of the handrail using glue; if there are doubts about the reliability of fastening, you can additionally secure it with nails;
- We insert the first baluster into the grooves prepared in the bottom bar and handrail, and lubricate the edges with glue (you can also duplicate them with nails);
- we install intermediate strips between the balusters and handrails in the grooves of the slats, smearing them with glue, and the step between them should have an equal interval between the balusters;
- we install each subsequent part in the same way;
- fastening the handrail to support post we do on metal corner, tightening with nuts;
- it is important to beautifully process the rounding at the ends of the handrails;
- Once the glue has set, the handrails will be strong enough for everyday use.

Attention: In the lower support under the handrail, make a window for attaching a nut and washer, and after installation, close it with a wooden washer. Polish the joints of the handrail parts well. The handrail can also be ordered in carpentry of any configuration, which will be provided by a cutter.
In the role business card In a private home there is often a beautiful staircase, an integral part of which is the railing. It is worth noting that the main functional purpose of this structure is the ability to conveniently move between floors. But handrails and railings are responsible for the reliability and safety of the stairs. Among other things, the overall attractiveness of the staircase structure largely depends on them. In this article we will tell you how to make a staircase railing with your own hands from wood and metal.
In the process of making railings, you should follow high accuracy, because the components for them are located at different levels.
You will have to make various attractive elements, perhaps make patterns, etc. But don’t be afraid of making railings, because most often “the eyes are afraid, but the hands do it.” Get to work!
How to choose source material
Before you begin assembling the railing, you need to decide what type of material will be most suitable for the interior of the house.
- For many generations they have been used for the production of stairs and railings for them. natural wood. Today, railings are made from different breeds tree. And each type of wood imbues the interior with a special aroma. Wooden railings will fit even into the most ultra-modern design premises.
- Metal railings are also very popular. Bent and forged railings look noble and elegant. They are very versatile and will fit into every interior. You just have to take a responsible approach to choosing a patterned design for the railings.
- Railings made of plastic and glass. Glass panels replace balusters, and handrails in this case are made of plastic. However, in this case, the railings can only be used with a certain interior solution. In combination with retro and classic styles, such railings will look out of place.
Important points to consider when making railings

Here you should pay special attention to the form. If you have children, then there's a good chance that railings can take a lot of abuse. The child will most likely test the strength of the railing repeatedly, for example by swinging on it or simply sliding down it. It is also worth noting that bottom part The railing should be made so that your baby cannot slip between the elements. As for height, this is worth thinking about separately. Minimum height railings - 900 mm. The best height for a person 1.80 m tall is 1200 mm.
As for the surface of the railing, it must be perfectly smooth. If staircase design narrow, then it is allowed to install railings on only one side. However, if its width exceeds 1250 mm, then both sides should be equipped with railings. Please also note that the distance between the balusters in the case of small residents cannot exceed 150 mm.
The tool is an important part of the preparatory process
Before making the railing, prepare all the tools. Everything here, of course, depends on the source material you choose for making the railings. If the railings are metal, then you will need welding machine with the necessary for him additional materials. If you are equipping a staircase with wooden railings, then first prepare the following tool:

- two hammers - light and medium weight,
- chisels,
- wood hacksaw,
- screwdrivers,
- bit,
- electric drill,
- skin,
- jigsaw,
- metal construction square, plumb line or level,
- screwdriver
The master's work is scary! Making stair railings
First of all, collect all the elements necessary to complete the work. The railing assembly kit includes:
- Handrails are that part of the railing that a person holds on to with his hand.
- Balusters - represent vertical racks, on which the handrails are held.
- Rotary and end pedestals are more durable than balusters, racks installed vertically. They are placed at the beginning and at the end, as well as at the turning points of the staircase structure.

When making railing elements with your own hands, keep in mind that some of the finished parts will end up in waste during the assembly process. This may be due to errors during the work process. Experts say that 10% of the elements will be defective. So do large quantity elements than actually required.
The assembly process depends on the source material. If we are talking about assembling metal railings, then the main action is to connect the parts into one whole using a welding machine. If you do not know how to handle it, then it is better to call a specialist to your home. You can connect metal parts with rivets, however, such a connection is not very reliable.

To make wooden handrails, balusters and turning tables you will need wooden blocks different sections. To process them you will need a jigsaw. With its help you will give the details shape. After this, you should carefully sand the surface of all elements for the railing. And at the next stage you can start the installation process.
Installation of wooden railings. Let's learn to do it right!
The installation of railings should begin with the installation of end bollards. These are the points from which you need to start in the process of performing work. They should be installed at the beginning and end of the stairs, as well as at its turns.
Attach a string to one of the pedestals and stretch it between all the pedestals. So, you will determine the location of the handrail, which will allow you to secure it correctly and securely.

Then mark the locations for attaching the balusters. The distance between them is determined individually, however, it is not recommended to place them further than 20 cm from each other. Their complete installation is only welcome. These elements can be attached both to the steps and to the strings on which the steps are attached. If you decide to fasten the balusters to the bowstrings, then you need to first cut them at a given angle. Accordingly, the balusters are mounted horizontally to the steps.
Securing balusters with nails is not very effective. Practice shows that during use, nail fastenings quickly become loose. It is better to use self-tapping screws and glue specially designed for this.

Now the balusters should be attached to the handrail. If you make special grooves in the handrail for the entry of balusters, then the process of installing handrails for stairs will be simplified. In those places where the staircase turns, to install the balusters to the handrail, you need to make a special transition element, which is filed at a certain angle.
Once the balusters are installed, fill any gaps. Clean the surface of the finished railing from dirt and dust. Sand all defects. Now leave the structure so that it can dry completely. Then proceed to finishing, which includes coating the surface of the railing with varnish or paint.

If you want to wooden surface If the railing has retained the beauty of its natural pattern, you can use parquet varnish to process it.
At this point, the installation of wooden railings will be completely completed.
We purchase material for forged railings
Forged stair railings are much more difficult to make than their wooden counterparts. However, the effort is worth it! Initially, you should purchase raw material and assemble the tool:
- Level, grinder with attachments, cleaning wheel.
- Welding machine with electrodes, mask.
- Rolled metal and metal profiles of different sections. It is better to use a profile with a small cross-section, because it is easier to cut and shape it.

Before starting work, it is very important to think through a sketch of the railing. It is important to take into account that the finished railings must correspond to all the interior features of the house.
You are unlikely to be able to implement a very complex project at home. Because this requires a forge and a pneumatic hammer. Choose a more modest, but no less attractive design.
Pre-prepare the assembly area. The site should have a special coating on which you can draw steps on a 1:1 scale. To do this, you need to take measurements. Measure the height and depth of all steps. Now draw the silhouette of the stairs on the prepared area. Then outline the outline of the railing.
The pillars should be located at a distance of 10 cm from the first and last steps. This is necessary for reliable and durable fastening of the railing posts.
We come up with a pattern and implement the idea
After you've drawn the frame, think about the pattern. For example, these could be balusters that resemble grapevine. It can be decorated metal sheets, sold in specialized stores. Use easily erasable chalk for drawing.
When you have made the pattern, take a string and use it to determine the length of each individual curl. To do this, attach the lace and measure the length. Cut the profile according to the measurements. Moreover, the profile should have a slightly longer length. Such a reserve will help you make less mistakes. If it is unnecessary, you can always cut it off.
Let's start forging and welding the frame with a pattern
You need to give each prepared segment a shape that is designed according to the pattern. Using a forge at home is impossible, so you will have to bend the profile cold. To do this, of course, you should be patient.

Use a hammer and vice for this. Insert a section of profile into them and try to bend it with a gas wrench. A few tries and you'll get the hang of it! Then, if necessary, you should trim off all the extra centimeters from the pattern elements. The resulting forged elements must match the pattern with maximum accuracy.
Now you need a welding machine. First, connect the fence frame. Lay out the required shape from the profiles and weld them together. It is better to make the seam temporary, so that in case of an error, it can be corrected without unnecessary labor costs. Now fill the frame with forging elements that create a pattern. Fit piece by piece, locking them in place. Apply spot sutures that can be separated in case of urgent need. If at the end of the work no errors are identified, turn the railing over to the other side and weld all the seams properly. Return the structure to its original position and weld on the opposite side. Now weld forged decorations that will enrich the structure. The finished section should be installed without any deviations.

Clean all seams so that they are aesthetically attractive. This process is carried out with a grinder with a grinding wheel. Pre-protect your eyes from sparks by wearing special glasses. Then attach a metal brush to the unit and thoroughly clean the surface of the railing. This will remove defects, rust and unevenness.
The final stage of production - painting

You can paint the railings with a brush or spray. Don't forget to prime the metal before doing this. Interestingly, only white soil will hide small irregularities, which will allow you to paintwork smoother. When choosing paint and primer, pay attention to the composition, because they must be compatible. Each layer must dry well.
If you want your wrought iron railings to look chic, you should apply a wrought iron patina. So, you can decorate some forging elements. The manufacturing process is now complete. All you need is to install the fence in a permanent place.
Do you already have experience in manufacturing and installing railings? Then write us comments. Your experience will be useful to us!

Metal railings can be quite sophisticated
Every house, even a one-story one, has a staircase, and often more than one. The staircase can be like mandatory element, and the highlight of the interior. A good designer knows how to play with, emphasize and fit this element into the surrounding space. An integral part of the staircase is the railing. Their main function is to ensure security. But besides this, it is stylistic decision railing allows the staircase to become a dominant feature in design solution specific interior. This one seems to be exceptional functional design can be a bright and memorable accent in interior decoration Houses. Metal ones allow you to implement almost any stylistic decision, regardless of whether you plan to decorate the interior in a classic, vintage, hi-tech or Provence style.
First, let's understand the terminology. Railing is a protective system of stairs that ensures the safety of ascent and protects against falls. It consists of several elements. Balusters are supporting vertical posts, with their help the fence is attached to the stairs.


Fencing filling - closes the space between the balusters, that is, it performs the main function of ensuring safety. Also, it is by filling the space between the balusters that you can create a completely different design for the staircase.
Important! If there are children in the house, partitions are necessary. It is safest to use solid partitions.
Filling can be done:
- vertical or inclined elements;
- horizontal crossbars running parallel to the handrails;
- continuous sheets.


Vertical filling of the fence

Horizontal filling of the fence

Continuous filling of the fence
Handrails are that part of the railing that lies on the balusters, and people hold on to it with their hands, leaning on them when ascending or descending.

1. The handrail is installed in the wall. 2. Handrail installed on the railing
Design and selection of materials for railings
Even if the staircase is not a bright decorative element of the interior, it is important to pay attention to how it looks so that it stylistically fits into the surrounding space. And this largely depends on the choice of material. A minimalist or high-tech metal structure can negate all efforts to create classic interior, and vice versa - too elegant, it will look awkward in a simple, unpretentious retro.


Example harmonious combination metal fencing with the general interior of the room
So, let's look at the most popular materials:


…before exclusive options with hand carving


PVC handrails and glass panels are also beneficially combined


Or maybe the embodiment of luxury and wealth


Separately, it is worth noting the artistic casting railings, which are not inferior in luxury to their “brothers” from ancient palaces
Important! If you plan to install metal railings outdoors, the structure must be treated with a special anti-corrosion compound. Otherwise, weather conditions will quickly ruin their appearance.
Advantages of metal railings
- Durability - unlike wooden ones, metal parts will not require updating.
- Price. Lower compared to wood (however, everything depends on the complexity of the design)
- Variety of materials – aluminum profiles, steel, wrought iron, pipes, etc.
- Variety of shapes - metal railings can give the most a large number of design options.


Metal railings can long years withstand hail, rain, snow, heat and other weather conditions without losing its beauty
Methods for making metal railings
According to the manufacturing method, metal railings can be different. And each method has its pros and cons. Prefabricated ones are made of aluminum or steel parts. After assembling the parts, the steel railings will need to be painted, and the aluminum railings will need to be coated with protective covering. Another advantage of this option would be light weight. This is the simplest and economical option, which you can assemble with your own hands and, if necessary, dismantle.
Manufacturing and installation of prefabricated railings- Cast railings. For casting, first a sketch is drawn, then a mold is made in which the necessary parts are cast. It’s a labor-intensive process, but the resulting result has two undeniable advantages:
- durability


almost endless variety of shapes The wear resistance of cast railings makes them a great option


for outdoor installation
Indoors, such railings can also look chic. Combined railings are the most versatile and very interesting option . Combination with glass and wood allows you to realize a wide variety of design ideas

, which will fit into almost any interior.


Most often, metal railings are complemented by wooden handrails
Forged ones are most often used in classical styles such as Baroque or Rococo. Elegant and sophisticated, they look elegant and rich, creating an openwork light pattern. They will add charm and a sense of luxury to any room. Forged railings can be made in a very diverse color palette– bronze, gold, silver, copper, etc. Perhaps the only disadvantage of this option is the high price.


Wrought iron railings are suitable for interior stairs...

Same for decorating the porch


White forged railings look especially elegant
Stainless steel railings (welded) are quite strong, reliable and durable. The principle of their manufacture is simple: pieces of steel or cast iron rods are welded in the form of a lattice, which is coated with paint. Stainless steel railings are usually used in modern high-tech or minimalist styles. In fact, when processed, they can produce very beautiful fences with geometric patterns that will look great in classic versions. Welded iron railings can be susceptible to corrosion and require periodic painting. Steel products do not have these disadvantages. Welding stainless steel railings
Design requirements
When designing and creating metal fences, it is important to remember not only the design, but also the safety of the structure. For the fences to do their job protective function, when designing, several requirements must be met:
- The height of the fences ranges from 90 cm to 1 m.
- The distance between the posts is no more than 60 cm.
- If there are small children in the house, or fences are designed for child care facility (kindergarten, hospital), the distance between the posts is reduced to 10 cm so that the baby cannot stick his head between them.
- The distance from the handrail attached to the wall to the wall is 7-10 cm.
- The fence can withstand a load of 100 kg per m.
- The handrails that a person holds with his hand when descending are made smooth and continuous, with a cross-sectional area of at least 5 cm.
- The handrails protrude 30 cm beyond the line of the steps; their ends are rounded.

An example of calculating handrails for stairs
The staircase in a house usually takes up large space and is used repeatedly every day for many years, so its design, convenience and safety must be taken very carefully at the design stage. In order for you to get beautiful, easy-to-use, high-quality fencing that will serve you for many years, all stages are equally important: selection of material, design, manufacturing and installation. Therefore the most the best choice– entrust this process to experienced professionals who will produce high-quality fencing for you, taking into account all your wishes and the conditions in which the structure will be used.