Transferring a photo to wood with your own hands. We transfer the photo to the tree. We make a wonderful gift with our own hands. Transferring photos to a wooden surface using PVA
All photos from the article
Distinctive feature century high technology is the ease with which beauty is replicated and originality is put on stream. But if not everyone is given the gift of becoming an artist and painting great canvases, then creating unique images with the help simple technologies many can do.
Wood is one of the suitable materials, on which a photograph or favorite drawing will look great. In addition to the fact that the quality of the product will remain unchanged for many years, it will be a kind of masterpiece or a piece of goods, depending on how it is disposed of.

The essence of technology
Don't let people like that scare you Clever words, like sublimation printing technology or graverton, because they are one and the same, therefore, less incomprehensible. The technology is based on the principle of sublimation, when a substance is exposed to high temperature“jumps” from a gaseous state directly to a solid state, bypassing the wet stage.
Graverton technology allows you to transfer a design to wood, metal, glass, fabric, and the process itself takes place in a certain order:
- The image is printed on sublimation paper;
- The front side is applied to the object being processed;
- Placed in a heat press for a certain time.
expose artistic treatment you can have a huge number of things - from shoes, dishes, fabrics to corporate symbols, puzzles and all sorts of other unexpected things.
The main disadvantage of graverton technology is the need special equipment and its high price:
- sublimation printer(starting from 500 thousand rubles and kopecks);
- thermal transfer press(from 9 to 30 thousand rubles).
I translated an image printed on a regular laser printer. In the future I'm thinking of looking for an inkjet printer to print color images. In this case, you must not forget to mirror the image horizontally. Well, I also made a small tone correction in the light direction.
The surface on which the image is transferred must be smooth. I used 120 grit sandpaper.

Main element technological process- gel medium. When I found a craft store in my city and asked the seller to give me a gel medium, he asked me a question that puzzled me: “Which one do you want?” “Well, well, on the Internet it’s written simply - gel medium. Let me translate the pictures.” Then it was the seller’s turn to be surprised. It turned out that translating pictures is just by-effect, which the seller had not heard of before, but in general the gel is used for various effects “under glass” and “with rhinestones”. From all the many gels, I chose a transparent glossy acrylic medium. It turned out I was not mistaken. The gel itself is similar to sour cream. And consistency, and color, and just as opaque.


Glue the sheet with the image and use a roller to push out the bubbles.

The idea of the method is that upper layer paper carrying the image is pasted into the medium ( liquid glass). After complete hardening (we left the workpieces to dry overnight), you only need to remove the layer of paper. To do this, the paper is soaked and rolled with your fingers. I used the hard side of the dish sponge. Here you must not overdo it and damage the image itself. But this does not pose any particular problem; the image is quite stable.

We have conducted many experiments on paper removal. The sponge showed itself with best side. But when the paper was rolled up with your fingers, a small paper pile remained, which rose when the varnish was applied.
After removing the paper, all that remains is the printer ink glued into the liquid glass. Moreover, after drying, the gel became transparent and the structure of the wood was clearly visible.


I must say, the technology is quite effective. The whole process takes two evenings. The image is translated clearly and does not blur. One jar of gel with a volume of 125 ml and costing 480 rubles was enough for 9 A4 sheets. The only inconvenience is that the image may be damaged when the paper is removed.
All that remains is to cut off the excess.


Now that you have the technology, you can think about its application. For example, decoration of boxes or original labeling of products.

You can purchase some things from this blog in our VKontakte group:
The work shown in the example was done for a person who is interested in aviation, so the photo for processing was chosen to correspond to his favorite topic. You should choose a photograph that is suitable in its content and mood for the person for whom this work is being prepared. Above is a before and after image.
Step 1. Materials needed for work
Below is a list of all those necessary materials that were used. It is not necessary that you will need this entire list in your specific job. You can get creative and replace some materials with others.
Here's what it took to create this work:
- Printed photograph;
- Wooden plates, same size as photo;
- Gel Medium (gel based on acrylic paint);
- Brush for applying gel to wooden plank;
- Spatula or knife to evenly distribute the image;
- Wood paint and fabric (optional);
- Pigment;
- Sandpaper;
- Wax for smoothing and compacting the applied photograph;
- Wax brush;
- Hanging bracket;
- Brackets for fastening (since two planks were used).
Step 2. Image search and processing
At the first stage of creating a picture, you have to find, process in a graphics editor and print a photograph. Please note that in the example we used color photography, good quality, and the result is a monochrome painting made in an antique style. To ensure that your photo does not come out too noisy in the printed version, the original image must be high resolution. We create monochrome and the effect of an old photo using a graphic editor, such as Photoshop. At this stage, you completely form your future picture. How you make it now will determine how it will look when finished.
Step 3: Print the Photo and Find the Wood Plate
Having prepared and processed the image, you need to print it. Decide on the size. The example shows a work of 20x30 cm, that is, A4 format, and perhaps this is the most best option both in price and in size, to do more will cost more and take longer, to do less will result in too little work.
Finding the right wooden plaque is a little more difficult than printing a photo. It is quite possible that you will have to go to several hardware stores to do this. There is a more expensive one, but convenient option– you can make a plate of the desired size and format to order. But again, this option may cost you a lot more. You can also take two plates and combine them together, as shown in the example.
Step 4: Apply gel to wood plate

Let's get straight to work. Applying gel to wood is the most crucial moment in creating a painting; the final result depends on how well you do it.
Carefully apply a small layer of gel to the entire surface of the board. If you apply too much thick layer, the picture will look ugly, too thin - it simply won’t stick, and in some places it will lag. Try to make the layer as even as possible over the entire surface. Once the gel is applied to the board, it's time to transfer the image. I must say, this is as complex and meticulous a process as applying protective film on your phone screen, it requires enormous concentration and nerves of steel from you. Air bubbles will appear during application in any case, so try to smooth the picture as much as possible and eliminate bubbles. You can smooth it with a spatula, but very carefully so as not to scratch the photo. Also, for this purpose you can take a ruler or fabric; this option is less “traumatic” for the image.
After you have transferred the image to the plate and got rid of any air bubbles, leave the painting overnight and make sure that no one touches it until the next day.

Step 5: Remove paper from wood

Now you need to get rid of the paper in the painting, so that only the ink from the print remains on the board. To do this, take a cloth and moisten it with ordinary water, then pass the damp cloth over all surfaces of the painting. This is quite a messy process, so just in case, it's best to do it in old clothes. IN different places, paper can be removed in different ways, some easier, some more difficult, so it is very possible that you will be tired by the end of the work. Also, be prepared for the fact that you will not be able to remove all the paper at one time, and the process will have to be repeated several more times, with an interval of 20-30 minutes. And one more small recommendation - keep a vacuum cleaner at hand, because there will be quite a lot of dirt.
Step 6. Finish transferring the image

And now the most creative moment of the whole process begins. It is in your hands to make the picture the way you want it to be, to do this, turn on your imagination and get ready to work. In our example, the goal was to make the picture aged, so that it would look like a rare thing. If you want to get the same effect, look through a number of old photographs, images from the early 20th century, analyze them and start designing them.
First, apply a stain of paint to the wood and blot it with a cloth to remove excess, being careful not to overdo it. When the paint dries, rub it a little with the same rag for a more antique effect.

Now we sand the edges, get rid of excess gel and continue to give the painting an antique effect. Now we apply pigment along the edges. Using the applied pigment, you can create something like a vignetting effect, or you can add pigment only on opposite edges to create a kind of frame. To apply the pigment, you can use a regular sponge or porous cloth. The pigment package is smaller in volume than the paint package, so use it sparingly so that you don’t end up without pigment at the most crucial moment.

When additional effects using paint and pigment have been applied, we proceed to the last stage of work in this part. Apply wax to the finished image to give a glossy effect. Use a medium brush to apply a thin, even layer to the print. Just like paint, the wax must dry thoroughly. When the wax dries, go over it with a cloth to smooth the surface and remove excess. In the example, soft wax was used, so the resulting surface was not too shiny, but the surface looked smooth and beautiful.
Step 7. Hang the picture

When the work is done, the painting is presented, help the owner hang your masterpiece on the most appropriate place. If, as in the example, you used two boards folded together instead of one solid one, then you should first combine them together with two small mounting brackets, which can be purchased at any hardware store.
Tree - excellent material For decorative finishing and for construction, since it is durable, environmentally friendly and adds a certain charm to the external treatment of walls and floors in rooms.
Sometimes wood is also used to place various images on it, which can serve as individual paintings or be placed on the walls as decorative elements. At the same time, make an image on the tree or transfer it from regular photography, with some tools and common substances on hand, is quite simple.
Transfer Methods
But how to translate a photo, picture or pattern into wooden surface so as not to spoil it, but to get beautiful result? There are several common ways to transfer an image onto wood with your own hands.
Most often a certain type of paper, drawing or photograph is used in electronic format, as well as prepared for transfer wooden base- a board on which you need to transfer the picture.
Methods for transferring pictures:
- sublimation paper;
- paper and iron;
- PVA glue;
- gel;
- film for decoupage.
Sublimation paper leaves an image on a wooden surface quickly. Therefore, the method for transferring an image using it does not require detailed description. Simple instructions for using it will suffice.
In all cases, before transferring a photograph to wood, it is processed in a photo editor, and only then applied to paper. Depending on the type of paper, certain substances are used to transfer the image onto wood.
Preparing to transfer the drawing
It is important to properly prepare the wood surface before transferring the design onto wood.
Preparation for transfer is usually the same for each type of transfer and includes the following steps:
- Cleared first working surface. It is better that it is light and purified. The color of the wood can affect the quality of the future design, so you need to take into account what kind of material and type of wood is selected.
- To get the perfect pattern, you need to sand or process sandpaper wooden board so that its fibers do not distort the image quality.
- When translating pictures you need to use mirror reflection drawing. In almost every case, you need to take into account the method of transferring the image, since often the correct drawing from paper requires a mirror image.
- Photos should be in high resolution digital form if possible. This doesn't always guarantee good result, but otherwise may lead to distortion of the picture.
- Before transferring a picture onto a tree, texts and numbers should always be reflected in mirror image. If portraits or landscapes can still be left as is, then the readability of the text directly depends on the location of the text on the transfer paper.
Transfer with a hot iron
This is the most cheap way transfer the image onto a wood board. It is best suited for transferring simple images followed by surface treatment.
For this method, before transferring the drawing, you need to have a printout of the image from a laser printer, as well as a surface for the drawing that has been sanded with fine-grained sandpaper or a sanding machine.
First, the pattern or design is stretched to required sizes, and then print it out. A sheet of paper must be placed on the board in the place where the transfer will be carried out and fixed. After this, iron the paper with an iron.
To better transfer the pigment, the paper can be pre-moistened with a small amount of acetone, but you must follow safety rules so as not to inhale the fumes. A gauze bandage should be used, and the room where the image is transferred to the tree should be well ventilated.
Typically, this method is used to burn out patterns and simple images using a wood soldering iron. The pattern can also be drawn by hand and using carbon paper to apply the design onto paper and then onto wood, or directly through a piece of paper and carbon paper onto the surface.
Transferring the image with PVA glue and gel
When transferring an image with glue or acrylic gel medium, the procedure is practically the same. It is recommended that before applying the design, degrease the surface and sand it smooth.
The difference is in the procedure for applying the glue or gel. In the first case, glue is applied to the photograph, after which it is placed on a wooden base. In the case of gel, the substance is applied directly to the board, after which an image is placed on top of it. In any case, it is important to apply the substance in an even layer, not thick, but do not leave gaps or dry spots.
After this, the surface of the photograph or paper with a pattern can be leveled, air bubbles expelled and fixed in in the right position. In this case, a roller is used to smooth the sheets, like, for example, wallpaper on the walls after gluing.
It may take 12-24 hours for the glue to dry or the gel transfer to completely transfer the photo onto the wood. After a day, the sheet can be removed. In the case of glue, you can slightly moisten the paper with a sponge so that it is better separated from the wooden surface. The glue has to be carefully rubbed off with your fingers. It will be much easier to separate the paper from the gel - just roll it up.
The gel needs to be given a little time to dry, after which it is covered with paraffin. PVA glue also needs to dry somewhat, after which it is varnished.
Transferring with film for decoupage
This is a good way to transfer images onto wood without the help of glue or gel, which already leaves quite rich colors and bright designs.
This method uses a board surface prepared with sandpaper, onto which it is applied. acrylic paint white. The paint is first slightly diluted with water, after which one layer is applied to the surface of the board in the longitudinal direction, and later a second layer in the transverse direction. After this, the paint is allowed to dry.
At the same time, decoupage film is used, on which a photograph or the desired image is printed. First it is soaked in water room temperature for about half a minute. After this, it is placed on the surface of the board, and then the base is removed.
By treating the film with a sponge, excess moisture is removed from it so as not to rub the pattern. After it dries, you can use a marker to correct image defects. The board takes on its final appearance after it is coated with varnish.
From all the available examples, it becomes obvious that transferring an image onto wood with your own hands is not so difficult. It is enough to have careful hands and, perhaps, some skills in working with photo editors, as well as at least a little good taste in color.
After creating a design on wood, it can be placed in any room of the house or used as a decorative element, multiplying it several times.
Some masters have turned this simple activity into a good business. But first of all main task such a transfer is beautiful drawing on the tree, creation beautiful object, gift or decor that will bring pleasure to its owner.
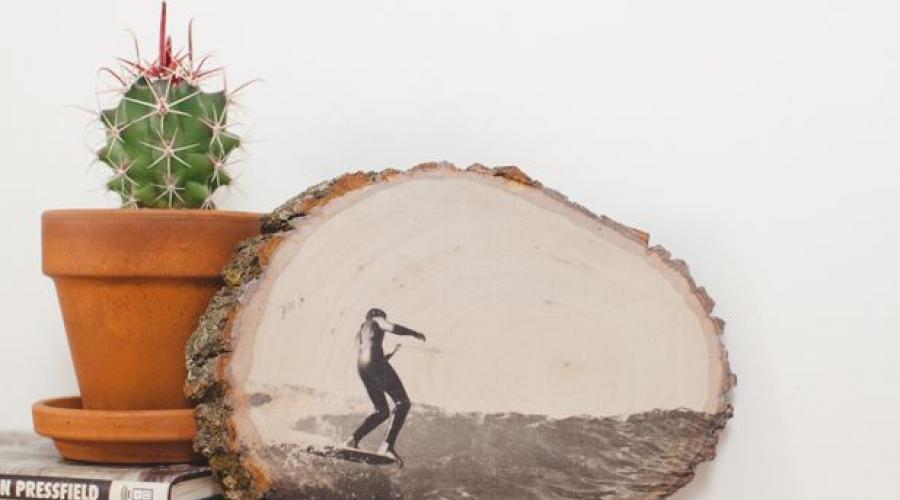
Do you have various pieces of wood lying around at home and need to go somewhere with a gift? Here economical option original gift- photo on a tree.
- actual photography
- a light, flat piece of wood or plywood
- simple photo editor
- Possibility of printing on a laser printer
- scissors
- bone knife for envelopes (a piece will do
hard cardboard) - matte gel polish (can be found in the section
acrylic paints in art stores) - matte adhesive for Mod Podge blend (you can
and glossy - your choice) - 2 different brushes (bristles or foam)
- towel and rag
- newspaper for workplace protection
STEP #1- Make a mirror image
Open the photo you want to use in an editing program (almost any image viewer/browser will do) and apply the horizontal mirror filter. This is necessary so that the final image is the same as the original one.
Make sure the photo resolution is 300 DPI so it will print in good quality. Pay attention to the size of the photo, it should be large enough to fit on the surface of your pile of wood.
STEP #2— Laser printing
Print your mirrored, precisely metered photo at 300 DPI using a laser printer on fairly thin paper (eg 24 lb or 90 gsm paper).
It is better to print the photo on thin paper because it will be easier in step 8 when you erase paper base.
To insure in case your hand trembles while cutting along the contour, you can make two copies of the photo.
STEP #3- Let's work with scissors
It's simple - carefully cut out the image according to the shape of your piece of wood.
STEP #4— Spreading with glue
Cover the table with newspaper to avoid getting it dirty.
Apply matte glue to the entire surface of the cut-out photo using one of the brushes.
Now very carefully place the photo face down on the top of the piece of wood.
After this, use a bone knife or stiff cardboard with a straight edge to smooth the photo and expel any air bubbles from underneath your photo.
Remove any remaining glue that squeezed out from under the edges of the photo when you smoothed it out.
STEP #6- Let it dry
It should now take at least 8 hours for your photos to dry.
Therefore, it is convenient to start making this gift in the evening in order to continue the next morning. Or vice versa, get up early in the morning to finish in the evening.
STEP #7- Wet it properly
After the photo has dried for 8 hours or so, it's time to properly wet it.
First, lay down a towel.
Then take a rag and wet it with water.
Squeeze the excess water out of the rag—you don't want to get wet—and place it on top of the photo.
Press the wet rag onto the photo and make sure it is completely wet. Or just let the wet rag sit on the photo for a few minutes if you prefer.
STEP #8— We remove unnecessary things
Firstly, it will take some time.
Now that the photo is wet, use a rag and/or your fingers to wipe away the paper backing and “free” your beautiful photo.
- To age a photo, use a wet rag to remove any fibers from the paper. The rag's own fibers will also erase some of the photo that appears.
- For better quality, clean look, use your fingers to erase the fibers of the paper.
Take breaks from erasing the paper to dry so you can see any paper fibers that still need to be erased.
From experience, best condition, in which all the fibers can be seen and erased when the photo is almost dry.
FYI: Depending on the size of your photo, this step may take some time. It took about 30 minutes to remove the paper from our small oval board. In any case, take your time with this so as not to ruin all your work.
STEP #9- Dry it a little more