Covering a house measuring 9 11 under the roof. Projects of houses with a gable roof. Conical and dome
Read also
The partitions were made in this way. A galvanized metal “U”-shaped profile (channel) 10 cm wide was fixed along the marking line on the floor and ceiling. and with a shelf height of 5 cm.. Wall racks of partitions made of timber with a section of 10X5 cm were inserted into the profile. with a distance between the racks of 57 cm, OSB sheets were attached to the racks on both sides and two layers of insulation boards were installed between the racks. From the outside, a block with a cross-section of 5x5cm was attached to the bottom trim of the frame. Plastic plinth panels to imitate stone were attached to this block to cover the foundation pipes.
The top of the block was covered with a galvanized metal shimmer.


We made a sand cushion around the house and laid a concrete blind area reinforced with reinforcing mesh on it. We painted the walls of the house with two layers of ivory exterior paint. The joints of the OSB panels were covered with wooden overlays made from boards with a cross-section of 25X150mm. painted with Aquatex in mahogany color.
List of materials for the construction of a one-story frame house measuring 9 by 11 m:
Asbestos cement pipes 100mm.X4m. (125 pillars) - 42 pcs. - 300 rub. pcs. = 12.600 rub.
Cement 4 bags for the foundation and 10 bags for the blind area around the house - 14 bags for 200 rubles. = 2,800 rub.
Edged boards 50mm. x 150mm. x 6 meters – 9m3 (frame)
25mm x 120mm. 6 meters – 3m3 (roof sheathing)
25mm x 150mmX6metro – 1m3 (dec. strips)
-13m3 for 5,000 rubles = 65,000 rubles.
Floor board 100m2 at 500r/m2 = 50,000rub.
OSB sheets measuring 1.25m x 2.5m. 152 pieces for 490 rub. = 74.480 rub.
Insulation board size 5 x 60 x 100 cm 700 m2 = 60,000 rubles.
Ondulin 81 sheet x 380 rubles = 30,780+ 3,000 (ridge) = 33,780 rubles.
Ruberoid 12 rolls of 15m each. 12 x 350 = 4,200 rub.
Glassine 10 rolls 10 x 100 rubles = 1,000 rubles.
Mounting profile 100 x 50mm. galvanized 50m. = 2.500r.
Nails, screws – 3,000 rub.
Total: 309,360 rub.
Prices are for May-June 2009.
We did not include finishing materials, windows, doors, paint in the list of building materials, since everyone’s tastes, desires and capabilities are different.
That's how, during our vacation and weekends, we managed to help our friend build a house.
I'll probably repeat myself, but please forgive me. Using this construction technology, with all these “intricate cuts,” as one cunning builder told me, we, not professional builders (4 people, two of whom had not even held a circular saw in their hands until the moment of construction), managed to erect the frame of a 9X11m house. under the roof in 5 working days.
The house was built as a summer cottage to be visited in the summer during vacation, and in the winter, if it was possible to get to this wilderness. The house was built this year in the summer, I don’t know how the foundation will behave in this place, but seven years ago I built a house for my family using the same technology, with the same foundation, so far everything is fine, but what will happen next you probably know who knows .
If we talk about the broken shape of the roof, then for some reason many people have questions. Meanwhile, it is nothing more than a type of gable roof. Therefore, for those who have decided to expand the space on the attic floor, there is simply no better option. And there are many fans of such original designs.
You can build a broken mansard roof yourself. You just need to know a certain sequence of actions to do this. The main principle of constructing a sloping roof is the principle of supporting the rafters on the floor beams.
Before you start building a roof, it is best to start by properly developing a project on paper, preferably in a checkered pattern. This way, in a fairly simple way, you can determine the height of the structure, the angles of inclination of the slopes, the size and location of window openings. It is even easier for people who have drawing skills or who know how to work with graphics programs on a computer. Once certain proportions are found, all that remains is to simply adhere to them.

After determining the desired proportions, you need to decide on the cross-sections of the elements of the rafter system, and then carry out strength calculations. For these purposes, you can use any suitable calculation program where such a possibility is provided, for example, “Calculation of the rafter system”. Or make detailed preliminary calculations in an Excel spreadsheet.
After all the dimensions of the future sloping attic roof have been completely calculated, you can begin its actual construction. It is worth considering this process in more detail, literally step by step. It is best to do this using a specific example, taking, for example, a house with sides 8 by 8 m as a basis.
Stage-by-stage construction of a sloping mansard roof
Step 1. First of all, you need to start by installing the mauerlat and floor beams. Approximate parameters for calculating the cross-section of beams are 100 by 200 mm. The Mauerlat should be mounted on the inside of the walls, and the outside should be covered with bricks for aesthetic reasons. During installation, it is necessary to ensure that the upper part of the Mauerlat does not protrude beyond the facing brick by 2-3 cm. This is necessary so that the load of the roof falls on the Mauerlat, otherwise it will be transferred to the facing brick, which is fundamentally wrong.

The next step is the installation of beam floors. First you need to install the outer floor beams. Their removal will determine the width of the cornice. The width of the cornice, depending on the wishes of the customer, can be 40-50 cm. The beams are special beams, the cross-section of which must be calculated separately, taking into account various aspects (snow load, wind load and other factors).

First of all, we install the beams indicated by the numbers 1,2,3,4.
For the specified brick box measuring 8x8 meters, the cross-section of the beam is chosen to be 100x200 mm. When the outer beams of the section are installed, it is necessary to tighten the lace along the top and align the other beams.
The pitch of the beams must be taken into account based on the pitch of the rafters that will be laid in the future. For example, if you take floorboards 50x150 mm, then it would be good to choose a pitch of 60-70 cm, even better to stop at 60 cm, taking into account that roofing insulation usually has this width. After installing long beams, you need to install short ones. The step for them is most often 1 meter. To attach beams to the mauerlat, 150-gauge nails are suitable. Sometimes the use of self-tapping screws and metal rafter corners is allowed.
Step 2. The installation of racks begins, which should be positioned strictly vertically. First of all, racks of timber measuring 100 by 150 mm are installed along the edges, and then, when the laces are tightened, smaller intermediate ones with a cross-section of 50 by 150 mm are installed. The distance between any elements should not exceed 3.

To keep the racks firmly in place, temporary spacers are used. The height of the racks should be 10 cm higher than the finished ceilings in the premises.
It is worth mentioning a very important nuance. When building a new roof, when everything seems to be calculated and laid out properly, for some reason the correct rectangle does not work out. The result is a house shape that is actually narrowed in some direction. In principle, this should not be a big concern, but to make subsequent work easier, you should still position the racks so that you end up with a regular rectangle. This way it will be possible to make the rafters of the upper slopes using one template. Otherwise, you will have to use cords and trim the finished elements accordingly. It’s unlikely that anyone will like the extra waste of energy and time.
Step 3. Purlins consisting of boards measuring 50 by 150 mm are laid on top of the racks. The missing racks having the same dimensions are installed; no other spacers are needed. These structures will serve as a frame for the proposed walls of the room.

Step 4. In order to properly secure the purlins, roofing corners and tie rods, that is, crossbars, are placed on them. If we proceed from the parameters according to the example, then in this case the length of the ties will be 5.5 m. The sections can be calculated in a special program. If the section width of the guy wires is 50 mm, then, accordingly, the height will be over 210 mm. Various deflections are eliminated using suspensions. Of course, this will significantly increase the load on the rafters of the upper slopes, so it would be reasonable to increase the cross-sectional dimensions of the rafters of the upper slopes obtained in the calculations from 50 by 150 mm to 50 by 200 mm.

A temporary support is placed under each of the bolts (crossbar). To do this, use the middle of the span. There may be sagging that needs to be reduced. An inch measuring 25 by 150 mm is perfect. All these measures will allow you to safely move along the puffs. Breakages, as well as all kinds of sagging, are practically excluded.
To make the structure more rigid, you need to fasten the ties on top, after they are fully installed, with a board measuring 25 by 150 mm. This very board should not be placed strictly in the middle; you need to deviate from any of the axes by at least 20 cm.
Step 5. Next, you can proceed to installing the side rafters. You will need to make a template first, after which the top cut is made. As for the bottom cut, it is marked in place, and then the rafters are fastened and plugs for the insulation are installed.


Step 6. After this, the process of installing the rafters of the upper slopes begins. To make a template, take a piece of board measuring 25 by 150 cm, which is then fixed to the outer crossbar strictly vertically. Any of the corners of the board must necessarily coincide with the axis of the roof being built. After all, the right edge of the board will coincide with the axis of the roof. Next, take a suitable small board, apply it, and mark the upper and lower cuts on it with a pencil.

Two rafters are made and installed according to the template. It is better not to use ridge beams for this. After installing the first pair of rafters, it must be secured with a brace to prevent a fall.

Next, all other rafters are installed. For a roof 8 m long, 4 struts would be appropriate, a pair in different directions. We temporarily fasten the remaining pairs of rafters with an inch board, because there is no sheathing yet.

Step 7 The sewing of pendants takes place, that is, boards measuring 25 by 150 mm. This is done so that the crossbars do not sag after the temporary supports are removed. This board should also not be placed in the middle of the structure, otherwise it will simply interfere with the process.

Step 8 The final stage of roof construction begins. Namely, the pediment frame is installed and then sheathed. Only after this can you begin making cornices, sheathing, gable overhangs and ebbs.


After the sloping attic roof is completely ready, you can begin roofing work. This is, without a doubt, no less important stage, but, as they say, a completely different story. It is worth noting that all the construction work discussed is best done by three people.
When choosing the design and configuration of the roof, it is necessary to take into account the shape of the building itself and its dimensions. So, the roof of a 10 by 10 house can be flat or pitched. The same can be said about buildings with dimensions of 10 by 12 and 12 by 12. But square houses have one significant advantage - more types of roofs are suitable for them, since domed, hipped and spherical roofs are much more difficult to combine with rectangular buildings in respect of. Moreover, the roof of any house can have an attic. If you do everything yourself, then it is useful for you to know the design features and advantages of each variety.
Before making a roof, you need to select its type and design, taking into account the following factors:
- The roofs of the houses must correspond to the general style of the building.
- It is important to take into account the design features of the building (load-bearing walls, smoke and ventilation ducts, the need to install roof windows in houses with an attic).
- If you make the design yourself, then take into account the complexity of installation.
- The choice is also influenced by the climatic features of the area.
- It is important to consider the loads that the load-bearing roof frame and roofing place on the walls and foundation of the house.
- If you are planning to build a house with an attic, then you need to think about ways to insulate roof structures.
- To build the type of roof you choose, you must be able to purchase the necessary building materials.
Even from the photo you can understand that all roofs, according to their design features, are divided into two types:
- Roofless combined. Here the roof structure acts as the ceiling of the last floor. It can be flat or sloped and is more often used in regions with warm climates.
- Attic. The ceiling of the last floor is located at the end of the walls. With the help of floor coverings, the space under the roof is separated from the living areas of the house. This option is acceptable for cold climate regions, since it is possible to insulate not only the roof, but also the last floor. The attic space can be equipped for additional storage space. The attic can be insulated and converted into living quarters, then you will get a house with an attic. Moreover, it is relatively easy to do this with your own hands; you just need to thoroughly insulate the roof structures.

In a residential building, you can make flat and pitched roofs. Moreover, the last option is much easier to do with your own hands. Pitched structures are suitable for houses with any size plan and can be of the following types:
- single- or double-slope (gable);
- attic or broken;
- half-hip and hip;
- tent;
- multi-pincer;
- dome;
- conical;
- combined;
- free form.
Each type has its own design features, pros and cons.
Flat roof structures

Such a roof for a residential building is done very rarely for the following reasons:
- It is quite difficult to do it correctly with your own hands. This requires knowledge and skills.
- On a 10x10, 10x12 house and other buildings with a square or rectangular plan, it looks inexpressive and boring.
- Such roofs are subject to increased requirements in terms of waterproofing and insulation.
- Even if a flat roof structure is made for a small house, it is important to consider the snow loads and the load-bearing capacity of the frame when arranging the roof in use.
Advantages:
- Possibility of arranging a terrace, area for sports, recreation, etc.
- You can arrange a greenhouse or winter garden.
- There you can install solar panels and a wind generator to increase the energy efficiency of the building.
Important! Another advantage of a flat roof is easier care and maintenance.
Single-pitch

A small one-story house with a rectangular configuration can be covered with a pitched roof. More often, such structures cover outbuildings. The rafter system rests on opposite load-bearing walls of different heights. The difference in heights and the distance between these walls regulates the angle of the slopes.
This option is more suitable for compact buildings, since a large area requires an increase in the angle of inclination for effective drainage, which leads to an increase in windage. The advantages include simplicity of calculations and installation, low consumption of materials and weight of the structure. With a small angle of inclination, this type of roof is easier and safer to maintain.
It’s worth knowing: the disadvantages of a lean-to system include the rather limited attic space, which needs thorough insulation.
Gable

A gable roof for a 10 by 10 house is an ideal option for arranging a structure with an attic. It is also called forceps. It has the simplest design in the form of two slopes, running in different directions from the ridge and resting on opposite load-bearing walls.
Advantages:
- You can calculate and build the supporting frame yourself.
- The attic space can be used for storing things or creating living quarters there.
- Typically, slopes have a slope of 15-60°, which ensures effective removal of precipitation from the roof surface.
- Acceptable price.
- Aesthetic appeal and the ability to combine with different architectural styles.
It is worth remembering that as the area of the house increases, the plane of the slopes also increases, so such roofs are suitable for small structures. Gable roofs can be isosceles or asymmetrical (with different angles of inclination and length of slopes).
Broken (attic)

For a 12 by 12 house with an attic floor, a sloping roof is ideal. In essence, this is the same gable structure, only each slope has a kink and its planes are located at a different angle. Thanks to this, it is possible to expand the attic space.
The costs for such a structure are a third higher, but the attic floor will be more functional and comfortable. This option is much more profitable than building a full second floor, since it allows you to significantly save on wall material.
Tent

This variety is suitable for buildings that are square in plan, for example, measuring 10 by 10 or 12 by 12. Externally, the design resembles four isosceles triangles connected by their vertices at one point. Essentially, it is a pyramid, the base of which rests on a house.
The advantages include:
- good resistance to weather disasters;
- attractiveness;
- large selection of suitable roofing materials.
Disadvantages include the complexity of calculations and installation. To ensure good load-bearing capacity, it is important to make a symmetrical frame.
Hip and half-hip

For a rectangular house 10 by 12, you can choose a hip or half-hip roof. The hip system consists of four slopes. Two of them are trapezoids, the other two are triangles (hips). They all have the same length. Trapezoidal slopes converge at the ridge part.
In half-hip systems two triangular slopes are slightly shorter than the long side slopes, which makes it possible to equip the attic floor with full windows in the end walls under the shortened hips.
Hip design easily withstands wind loads and protects the walls of the house from precipitation due to elongated overhangs. Such buildings look very harmonious, solid and have a spacious attic floor.
Multi-pincer

If you combine two gable structures, you can get a multi-gable system. Typically, smaller slopes are located above the attic windows, and larger ones are located above the gables of the house. Such structures can also be used for buildings with complex plan configurations.
When implementing such systems, special care must be taken in the arrangement of valleys and junction points, of which there are a lot in such systems. The slightest inaccuracies and negligence in installation can lead to leaks in the future.
Conical and dome

Such roofing systems can be made both over houses with a square plan and over structures of complex configuration. The following can be used as roofing material:
- natural and soft tiles;
- rolled materials;
- metal tiles;
- corrugated sheeting
A dome roof is more suitable for round-shaped buildings, but can also be installed over a square house. Their advantages include:
- aesthetic appeal and originality;
- thermal efficiency of structures;
- the possibility of making glazed structures for arranging a winter garden.
Combined
Even a house with a square plan can have elements with different number of storeys, decorative bay windows and towers. Therefore, the roof in such buildings will be combined, that is, several types of roofing systems are harmoniously combined into a single architectural ensemble.
When arranging such a system, special attention should be paid to the junctions and intersections. It is better to choose a flexible roofing covering that will ensure the tightness of all surfaces, edges and kinks.
Erection of the roof is one of the most critical stages of building a house. The simplest designs include gable roofs with straight slopes. If you decide that you will build a gable roof with your own hands, then you need to carefully read the step-by-step instructions and video. The functional parameters of the roof also depend on proper insulation, characteristics and quality of installation of the finishing coating.
Preparatory stage
To determine the configuration and size of the roof, it is necessary to take into account the snow and wind loads in the existing climatic conditions - the smaller the angle of inclination, the better the structure can withstand the loads. But the small angle of inclination (40 degrees or less) does not allow full use of the attic space.
The shape and structure of the roof are developed in accordance with the design plan of the house: the key support points of the roof truss system must coincide with the lines and locations of the load-bearing structures of the underlying floor. Thus, it is necessary to take into account the width of the house and the presence of a longitudinal load-bearing wall in the center. If you do not plan to use the attic as additional usable space for permanent or seasonal living, you can make a reliable roof with layered rafters. In this case, the rafters are attached to the ridge girder, which is supported by racks resting on the internal load-bearing wall.

Hanging rafters are the most practical and economical option for light buildings. In this case, the rafter legs are connected in pairs with crossbars - horizontal jumpers that provide the necessary rigidity of the structure. The hanging rafter system rests on the side walls of the structure.
If the width of the house exceeds 6 meters, in addition to the crossbars, which act as the basis for the ceiling, purlins and racks are installed. The purlin is a horizontal beam that acts as an additional support for the rafters that form the roof slope. Installation of the purlin requires the use of racks. The racks, in turn, rest on the beds - a special beam laid along the slope. The beds and racks serve as the frame of the walls of the attic room. This layered design allows you to create an attic or spacious attic for household needs with your own hands.

If you need to build a simple and reliable roof, a gable structure with an inclination angle of 45-50° is optimal. This rafter system is suitable for installation on residential buildings and buildings for various purposes. When calculating materials, it is necessary to take into account that the rafter system must be light enough to avoid excessive load on the foundation, but at the same time strong. The cross-section of lumber should be selected based on the dimensions of the rafter structure.
Mauerlat installation
Let's look at a step-by-step method of building a roof with layered rafters and an attic space with your own hands. At the first stage, the upper frame - Mauerlat - is installed on the longitudinal walls of the house. The strapping takes on the pressure of the entire roofing system and evenly transfers it to the building structures - walls and foundation.
The Mauerlat is made of timber (section from 50×150 to 150×150 mm), treated with special protective agents to protect it from rotting and fire.
Mauerlat can be made in various ways:
- Rolled wire is embedded into the brickwork, through which the beam is fixed to the wall (the wire is threaded through specially made holes and twisted tightly);
- Long metal pins with a diameter of 12 mm or more are embedded in the masonry;
- At the top of the wall there is a monolithic concrete beam with embedded steel studs.

The studs should be spaced at intervals of no more than 120 mm. The height of the protruding end of the fastening element should be 20-30 mm higher than the total thickness of the waterproofing and the timber in which holes should be made in advance. The beam is put on the studs and tightened tightly with nuts and wide washers.
Construction of the rafter system
The rafter system, which you can make with your own hands, consists of a number of elements combined into a single whole. The A-shaped rafter truss is a rigid structure that works “for expansion”. If the roof is being built on a timber house, the opposite walls should be strengthened with ties made of 100x150 mm timber at the level of the ceiling beams. This is done to prevent the walls from moving apart under load.

Beams are laid on the ceiling - additional elements made of timber 150×150 mm or more, which serve as support for the racks and redistribute the point load on the surface of the ceiling. Laying the beds with your own hands should be done along the lines of the walls of the future attic space. If the attic is not planned to be used, the bed can be laid directly under the ridge to install support posts. If necessary, you can splice the timber, but only in places where the joint will lie on the beam. The tenon joint is strengthened with a bracket or metal plate.
Repeating parts of the rafter system should be made completely identical to each other in order to build an isosceles gable roof, the weight of which will be distributed evenly even under atmospheric loads. For this purpose, templates of identical parts are made with your own hands.

50x150 mm boards are laid out on the floor of the house, a triangle of the required height is made from two rafter legs and a stand board (its length corresponds to the height of the future roof), connected with a nail. Two or three people lift the structure - the stand is installed on the central axis of the ceiling, the rafters are installed on the mauerlat.
In the process of preparing the template, you can lengthen the elements by varying the height of the roof and choosing the most suitable option.
Having decided on the dimensions, it is necessary to make curly cuts on the rafters at the points of their contact with the strapping. The rafter leg should rest firmly on the mauerlat. There are a number of fastening methods; you should choose the most convenient and reliable one; it is advisable to use metal pads. The intricacies of the technology can be found in the video. The resulting rafter structure subsequently acts as a template, and the support board helps control the height of the installed trusses.
Gable
The pediment is a continuation of the wall, limited by the roof slopes. If a gable roof is provided, the gables of the house have the shape of a triangle. When installing a truss structure, the outer trusses are installed first, which later serve as the frame for the gables. It is necessary to strictly check the verticality of the structures and ensure that they have the same height. A ridge girder is attached to the upper part of the gables, to which the remaining rafter structures are subsequently mounted.

Usually the gables are sewn up after the roofing work is completed, but this can be done at an earlier stage. Installation of boards 50×100 or 50×150 mm is carried out in a vertical or horizontal direction. The pediment, which you can build with your own hands, is often equipped with windows.
It is also necessary to provide for insulation of the gables.
Roof insulation and roof installation
A sheathing is placed on the rafter system, the pitch of which is calculated based on the characteristics of the roofing material - its size and rigidity, and installation method. If the use of flexible materials is envisaged (bitumen shingles, PVC film, rolled bitumen roofing), it is necessary to make a continuous, even flooring.

Roof insulation must be treated with the utmost care, since otherwise heat losses will be very significant. Typically, a gable roof is immediately made taking into account the use of certain materials for insulation - when building a rafter system with your own hands, the pitch of the rafters is calculated relative to the width of the sheet insulation. This allows you to build a roof with minimal economic costs, since the material for insulation does not have to be cut. In addition, this approach speeds up and simplifies the installation of insulation and vapor barrier systems.
In this high-quality video you can see in detail how to make a gable roof yourself and make sure that there is nothing complicated about it.
The last stage of building a house is arranging the roof. Traditionally, a gable roof is erected for any residential building, and a single-pitch roof is erected for outbuildings. Technological processes for the installation, fastening and arrangement of a roof with a rafter structure in a gable roof version have been perfected for centuries, and these operations do not change depending on the type of roofing materials (clay tiles, corrugated sheets, metal tiles, asbestos slate, metal or plastic).
Types of gable roof
People say: “a roof like a house,” that is, they mean not only the shape, but also the reliability of the structure, which has a long list of advantages:
- A variety of roofing scheme options and architectural roof shapes;
- Simple calculations and cost-effectiveness of the roof;
- Natural runoff of precipitation;
- Simple geometric shapes of the roof ensure a low probability of water accumulation and roof leakage;
- Large usable attic area, it is possible to make an attic;
- Good maintainability, high strength, durability and wear resistance of a roof made of two slopes.

The three most common options for a gable roof:
- Symmetrical gable roof: This is the most popular solution due to its absolute reliability and ease of execution. Symmetrical slopes evenly distribute all loads on the mauerlat and walls of the house. The choice of roofing material does not depend on the type and thickness of the thermal insulation layer. The load-bearing load can be easily increased by making the rafter system from thicker timber; the jibs and spacers can be attached anywhere. Negative factor - a full-fledged attic will not work in such an attic - either there will be low sloping walls with many “dead” zones, or a small but rectangular room;
- Asymmetrical roof of two slopes: Different slope angles reduce the usable area of the attic, but on one side you can make a full-fledged living space. Due to different roof slope angles, the load on the load-bearing walls and foundation of the house is distributed unevenly, which requires recalculating the load-bearing capacity of the base and load-bearing walls of the house, recalculating the types of materials and their quantities, as well as changing the methods of insulation, waterproofing and finishing;
- Asymmetrical gable roof with internal or external bend: Allows you to design living spaces without regard to the roof structure. The disadvantages are the same as in the paragraph above.

Preparing to build a house roof
The shape of the roof and its design can be chosen based on the size of the building, the material of the load-bearing walls, and the geographic location of the site. These and other parameters specified in the project determine what loads a gable roof can withstand during operation.

The slope angle of the slopes has a certain optimal range, in which weather conditions have the least influence on the formation of maximum loads on the roof. If the slope angle is ≤ 400, then this limits the possibilities of equipping an attic or a full-fledged room in the attic, and a slope angle ≤ 100 increases the load on the roof from rain, wind or snow. If you definitely want to have an attic or a room in the attic space, it is better to use the option of a sloping asymmetrical roof, and if the walls of the house are more than 6 meters long, then the rafter system must be strengthened with additional purlins. 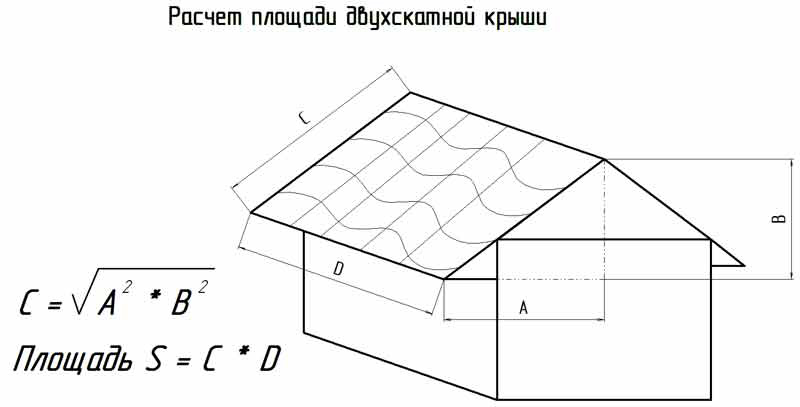
When calculating building materials for a gable roof, it is necessary to proceed from the axiom that the weight of roofing materials should be as small as possible so as not to load the walls and foundation of the house. Wooden elements will be stronger not only by increasing their cross-section, but also by using suitable types of wood. The main parameter when calculating materials is the total area of the roof, and a symmetrical structure in this regard is easier to calculate than others - it is enough to know the perimeter of one slope, double its area, and get an accurate result.

The main load from the weight of the roof is borne by the long walls of the house, so the rafter system is built on the principle of distributing the load along the system. For a small house (≤ 6 m), it is more practical to use a system of hanging rafters (without supports); when building a larger house, a system of layered rafters with a more complex configuration is used. 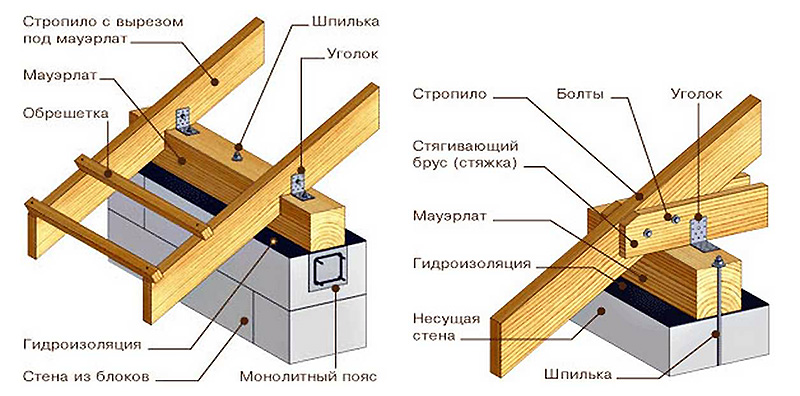
A finished gable roof for a private house consists of the following elements and components:
- Mauerlat is a wooden (sometimes metal, if the roof will be covered with rolled metal) beam or log that is attached to the surface of the external walls to support the rafters on it;
- A rafter system, the design of which is selected based on the design of the house;
- Struts (diagonal fastening of rafters to each other) and ridges (beams along the roof ridge for fastening the slopes);
- Lathing – used for installation of roofing and hydro-noise insulation elements;
- Insulation and moisture protection;
- Roofing covering.
How to mount the Mauerlat
The Mauerlat along the walls of the house holds the weight of the roof, evenly distributing it over the walls and base of the house. The width of the timber for the mauerlat should be equal to the width of the wall. The timber is impregnated with an antiseptic and substances that increase the fire resistance of the wood. The outer border of the Mauerlat should not protrude beyond the outer edges of the walls. 
The Mauerlat is attached in different ways. Steel wire Ø 8-12 mm is laid in the brick wall, holes for the wire are drilled in the wood, and through them the timber is tied to the wall. The timber can also be secured with staples, threaded rods of one or two teeth, metal plates, wooden pegs or anchors through the same holes in the Mauerlat. The gables and lower edges of the sheathing are attached either directly to the mauerlat, or to a beam of smaller cross-section, which is nailed (screwed) to the top frame.
Floor beams
When arranging beam floors for the roof of a private house, it is necessary to use a wooden beam with a cross-section of 200 x 100 mm. The larger the area of the house, the larger the section of the supporting beam should be. Begin the installation of beams by attaching the outermost elements along the long wall of the house. Then the points where the remaining floor beams will be attached are marked. 
The lathing is mounted on longitudinal beams, which are located at a distance of 50-60 cm, and attached to the mauerlat with nails 200 mm long or by any of the above methods. The beams are carried beyond the edges of the walls to a distance that determines the width of the cornice - from 30 to 50 cm. The cornice will be nailed (screwed) from below to these beams. Since a pediment will be installed at the ends of the roof, to attach the cornice and pediment, an insert is made into a groove on the transverse beam of the mauerlat. When constructing a sloping roof for an attic, the pediment will have a fairly large area, so it is necessary to ensure the design of the ebb and gable overhang. 
The rafters of a gable roof are several identical wooden beams of the same length and cross-section. After installing the floor beams, a ridge beam is attached, for which beams with a cross section of 100 x 50 mm are secured along the central longitudinal axis of the house with spacers. The height of the racks in a typical gable roof scheme is equal to the distance from the floor to the upper surface of the Mauerlat. Instead of timber for the ridge, you can use boards 50 mm thick.
Before installing the rafter system, it is recommended to make a scale template. To do this, you need to attach the board from the rafter structure with one end to the beam, the other to the ridge, and mark its length. This will be the standard length of the rafters. 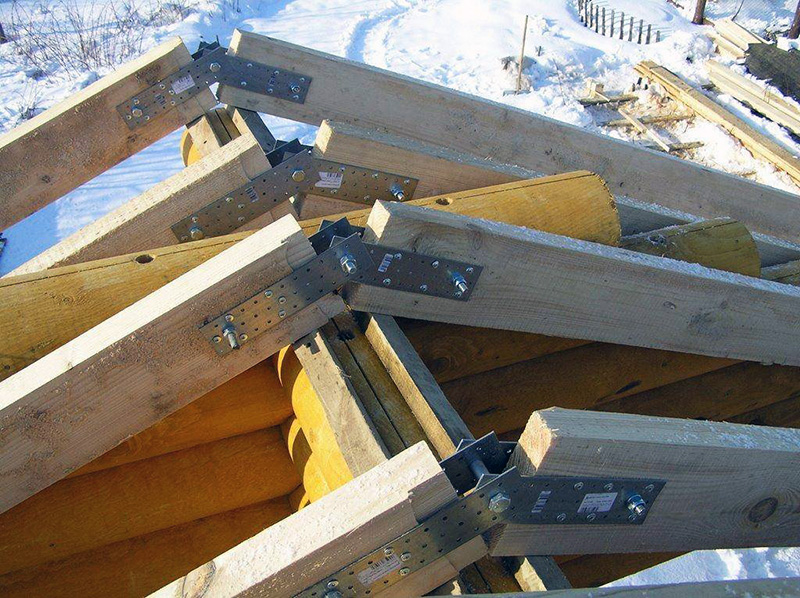
The rafter system is also installed according to the template, observing the sequence of processes. After installation and fastening from the lower end of one rafter beam, you must immediately fasten the opposite rafter and connect the beams with their upper ends to each other through the ridge. The rafters are nailed to the ridge beam, and to the floor beam - with steel brackets or angles, self-tapping screws or anchors. For a roof of any shape with two symmetrical or asymmetrical slopes, boards are fastened lengthwise and crosswise under the rafters to give rigidity to the system.
Pediment and cornice
The pediment is sewn up after the construction of the rafter structure is completed. Modern materials are increasingly replacing traditional wood when sheathing gables, and now they use lining, siding, corrugated board, and other durable decorative finishing materials. Any cladding material is attached to a frame, which is mounted in advance. Regardless of whether or not there is a room or attic in the attic, it is necessary to leave a window opening in the gable - for ventilation and minimal natural lighting of the space. 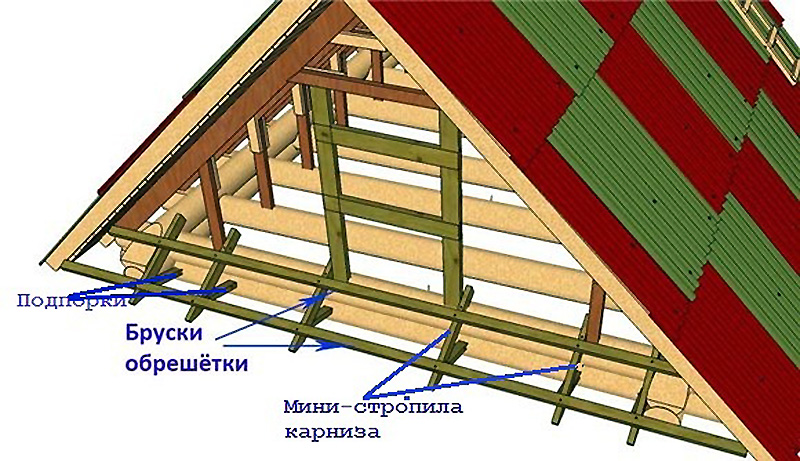
The cornice must be installed around the entire perimeter of the house - it is necessary for moisture and wind protection of the rafter structure, the walls of the house and the foundation. Since every self-respecting owner must install drainage systems around the perimeter of the house, they are also attached to the eaves, and drain pipes to the walls. The plastic drainage system is mounted on plastic clamps. The bottom of the cornice boards or cornice frame is painted, sheathed with siding, clapboard or corrugated sheeting - in unison with the finishing of the pediment. 
The roof is mounted on the sheathing, and, based on the type of roofing materials, the sheathing is first done with vapor barrier, hydro- and heat-insulating materials. For roofing you can use ondulin, metal tiles, ceramic materials, soft tiles, etc.
- Self-tapping screws for roof construction must have the manufacturer's mark and EPDM gaskets ≥ 2 mm thick, otherwise roof leakage cannot be avoided;
- Poor-quality protective coating of fittings will quickly deteriorate under the influence of weather conditions, which will lead to leakage at fastening points and an unsightly appearance in the form of rusty or dirty spots;
- The absence of a snow retention system means the possibility of unexpected snow falling off the slopes, which can lead to failure of the roofing and drainage systems;
- Poor ventilation leads to the formation of condensation in the under-roof space.