The pencil drawings are very complex and beautiful. How to paint a picture for your home with your own hands using available materials
Read also
That's all today more people They are wondering how to transform their own home, making it more comfortable and at the same time elegant. You can buy some particularly impressive interior detail. But why spend your hard-earned money if almost each of us can create a masterpiece on our own?
Source: http://www.adme.ru
To decorate your home beautiful picture, you don’t even have to take painting lessons. will tell you how easy and fast learn to draw! And for this, in addition to paints, you will need...
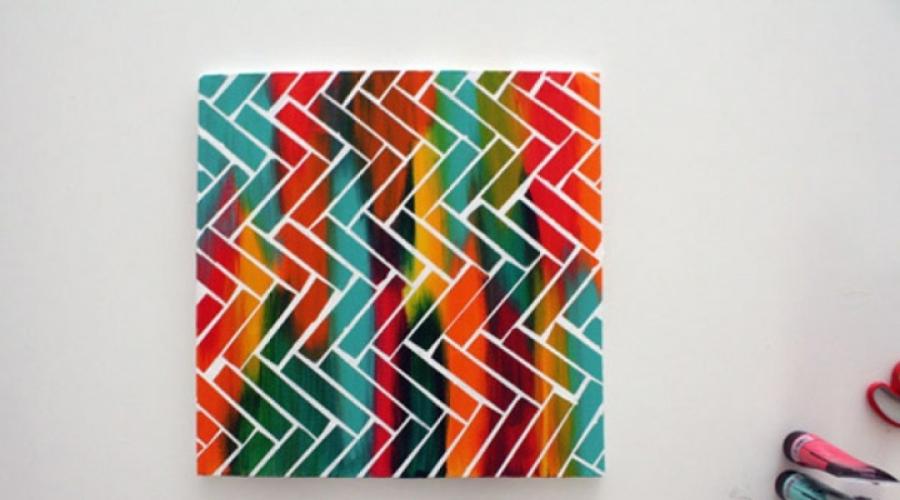
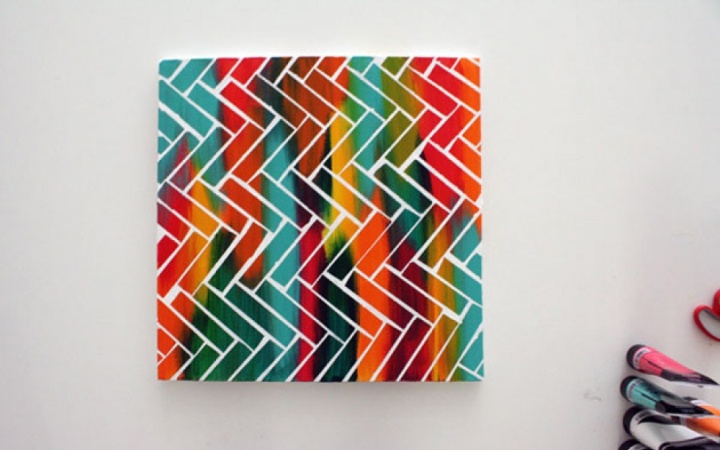
Masking tape
Using a wide brush, paint the canvas as you please. When the acrylic paint dries, place equal pieces of masking tape on the picture - checkerboard diagonally. Apply two layers of white paint to the canvas alternately. After the second layer has dried, remove the tape. The picture is ready!
Source: http://www.adme.ru
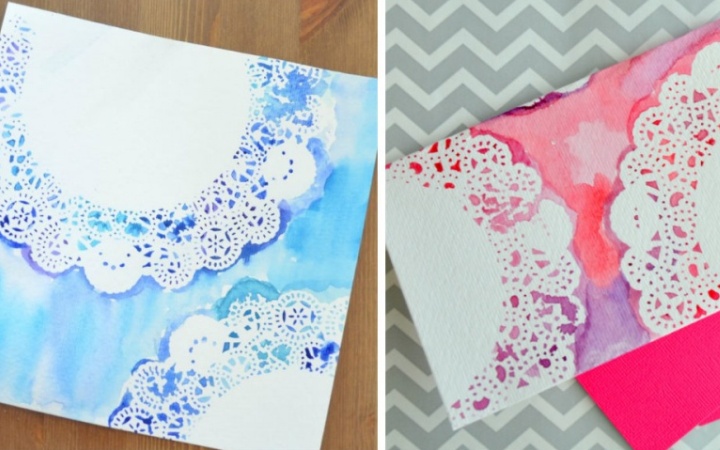
Openwork napkin
No we won't draw a picture on a napkin - we just use it as a stencil. Place the napkin on a white cardboard sheet. Mix watercolor paint with a small amount of water and paint over the design on a napkin. Remove the cardboard from the dried stencil. It turned out to be a wonderful picture, didn’t it?!
Source: http://www.adme.ru
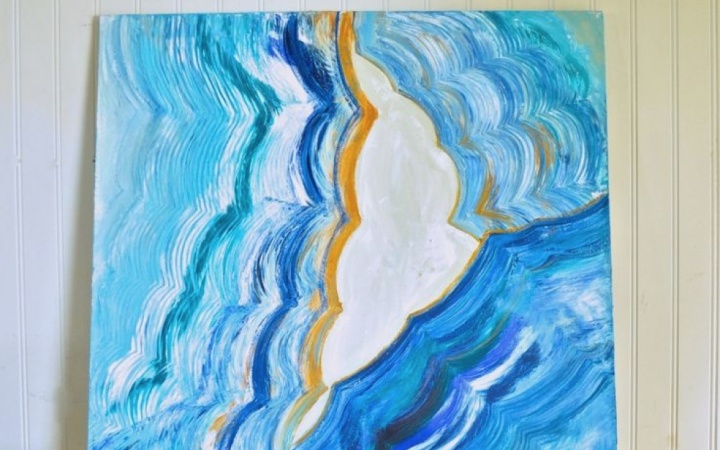
Sheet of cardboard
And this one drawing lesson quite simple. Let's take it acrylic paint, we create “waves” on the canvas, to which we apply cardboard and draw along the colorful lines several times. Voila! A simple but very effective “marina” is ready to decorate your home!
Source: http://www.adme.ru
Artistic spatula
The spatula is an artistic one, to help beginners in fine arts. “Scatter” balls of acrylic paint on the canvas, blend them with a spatula, creating blots and washes. A little imagination and sleight of hand - and who said that creating masterpieces of abstraction yourself is impossible?
This is interesting: If desired, in some places you can add foil, along the edges of which the paint should also be shaded.
Source: http://www.adme.ru
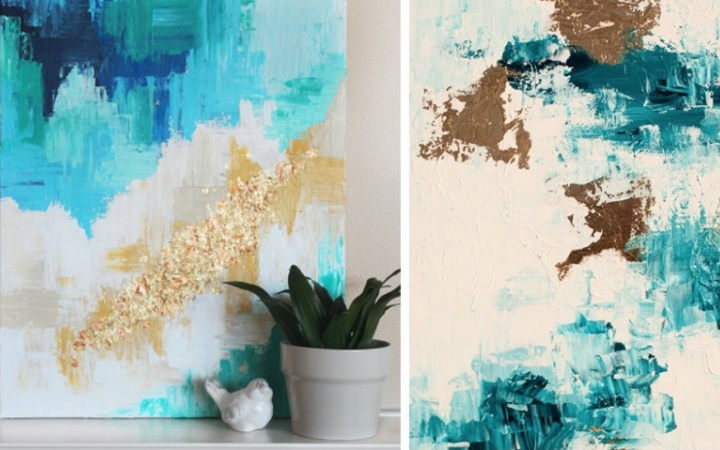
Foil and cardboard
These two things will help add shine and color to your work. Simply coat the canvas with glue and sprinkle crumbs of foil on it. Then apply a second layer of glue. To paint a picture, take a piece of cardboard, apply acrylic paint to it and blend it onto the canvas. Crack-pack-fax - and a truly brilliant picture is ready!
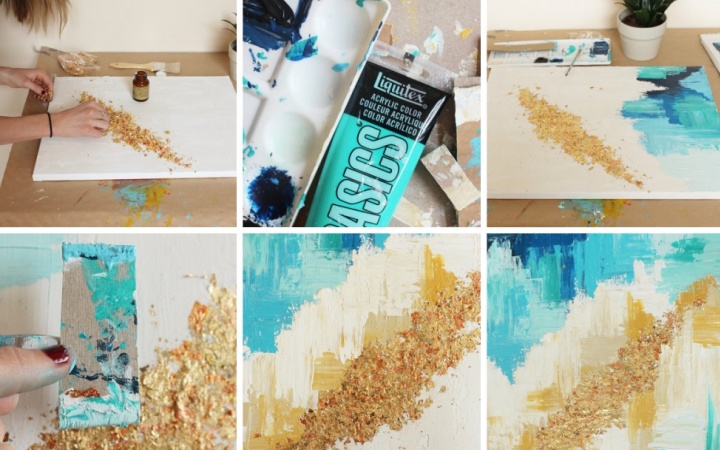
Source: http://www.adme.ru
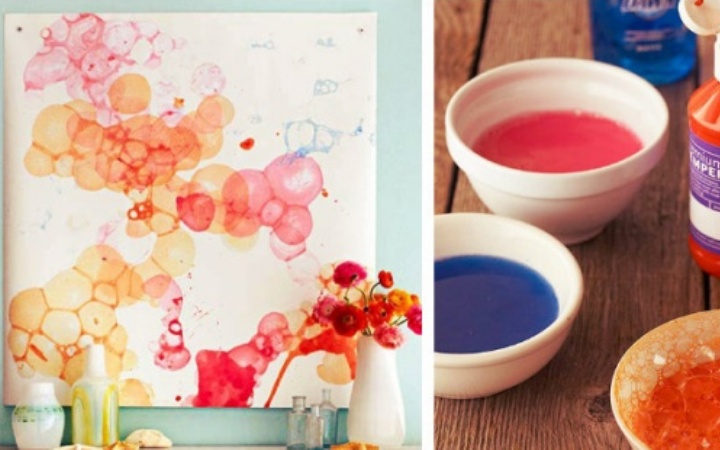
Bubble
How to draw a picture soap bubbles? - you ask. Very simple: 2 tablespoons of gouache + 2 tablespoons of soap + half a cup of water. Mix in a shallow bowl, insert a straw and blow into it to create bubbles. If you lean white paper against them, fancy and, most importantly, unique patterns will appear on the sheet, which will definitely become worthy decoration your interior!
You don't have to be a real artist to learn how to draw well. And you don’t even need to have special talents. It is important to simply be able to hold pencils/brushes/pens in your hands and master several basic techniques for transferring an image onto a plane of paper or any other surface. Basically, you just need to learn how to copy others' drawings while respecting the proportions and lines of the original.
A lifesaver carbon copy
You can draw pictures different ways. For example, simply through a carbon copy. Of course, in this case, the image format will have to match completely; you will not be able to reduce or enlarge it. Options are only possible, for example, in coloring, coloring. But this allows you to draw pictures in such a way that even the smallest, difficult-to-transfer elements are preserved. The technology is quite simple. Take a blank sheet of paper, place a carbon copy on it, sticky side down, on top, face down, the same image that needs to be copied. Carefully trace the pictures along all the lines with a simple pencil with a finely sharpened lead. Just do everything slowly. Trace especially carefully small areas drawing.
Cons and pros
 As you understand, it’s not difficult to draw pictures this way. The disadvantage of this method is that your drawing will be stained with paint. If we discuss the color of the carbon paper, it is better to take black or gray. And, of course, when you start adding color to the image, you won’t be able to remove the contours with anything - unless you work with oil and gouache paints, and this is more difficult than just copying drawings with a pencil, for beginners. And the watercolor will have to be applied in thick, thick layers so that the base does not show through. Its transparency and lightness will not be conveyed in this case. What is another advantage of this method of sketching? You can apply it not only on whatman paper, landscape paper, cardboard or notebook paper, but also on smooth, for example, white chintz fabric, well-treated plywood.
Quick mesh cage
 You can also transfer a painting from the original to your drawing using the “cellular” method. What does it mean? First, apply the marking grid to the sample. Use rulers to mark centimeters and millimeters. Then draw the surface on which your drawing will be in the same way. And transfer the image, as they say, from cell to cell. What can you draw this way? Quite complex paintings with many objects different shapes, located at different levels: landscapes, still lifes, even portraits. The convenience of this method compared to carbon paper is that your drawing comes out clean, the pencil lines are then removed with an eraser, only the paint remains, and so on. And in your drawing you can convey the necessary airiness, subtlety and richness of shades and all those color nuances that are inherent in the original.
Professional mesh
 In approximately the same way, you can draw a picture step by step, only using slightly different methods. They are more painstaking, but the result is more accurate. Take available materials such as a piece transparent film or a sheet of tracing paper. Next, you will need a ruler and a finely sharpened pencil, as well as the actual drawing paper and a sample from which to make a copy. I would like to note that professional artists often do the same if they are ordered copies of famous paintings.
Work order
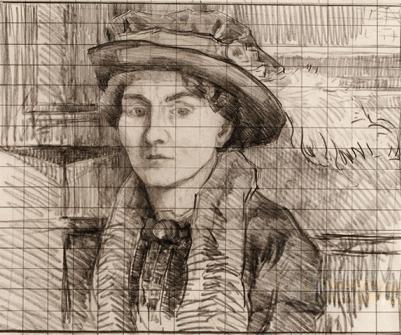
 Where to start using all these tools? Lay out the film or tracing paper to create a grid. It is better to use a millimeter scale rather than a centimeter scale, especially if the original contains many complex and small elements. If the pattern is quite simple, then cells measuring 2 cm by 2 cm are suitable. When the film is prepared, it needs to be applied to the sample and the pattern translated. For greater convenience, so that the mesh does not move, secure it with buttons. Apply the image to the film with a thin marker - this is quite problematic to do with a pencil. And an alcohol marker dries faster without smearing under your hand. Now draw a blank sheet using the same template. If the new drawing should be larger format, increase it proportionally. And number the cells, as in crossword puzzles, diagonally and horizontally. And only then copy the lines from the cells into your drawing.
Working with a grid (tracing paper), start redrawing the main contour lines, initially longer. Go from the edges to the center. Then take up small touches and start working on more fine details. When copying is finished, specially sand those lines that turned out to be too straight or angular. Give them the necessary roundness, smoothness, and volume. If your work should be in black and white, now start shading. Start with light, pale shades, gradually deepening and complementing the shadows. Emphasize the shapes and curves, this will make your drawing more realistic. 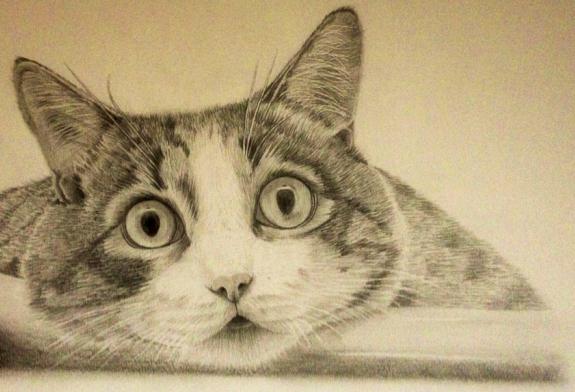
Making sketches
If you are faced with the task of “how to copy from a photograph,” you should go a different way. For example, you need to depict your favorite pet. Choose a photo so that the pet is in a simple pose that is easy to sketch. Draw a coordinate axis on the sheet. The point of intersection of the X and Y is the center of the muzzle. Make the same axis in the photo, only lightly, without spoiling it. Next, first draw the silhouette of the animal, focusing on the axis. Then the details. On the face there are eyes and a nose. Ears. Paws, the way your four-legged friend holds them. Make all the strokes without putting too much pressure on the paper with the stylus, because a lot will have to be corrected. Be sure to follow the proportions. Make sure that the body or head is not too small or elongated. The coordinate axis will also help you with this.
From blank to painting
Now deal with shadow and light. Gently start shading the shadows. This is fur, for example, spots, stripes. Or unlit places. Gradually delve into subtleties and details. Those elements of the drawing that are key, the most important, should look brighter, and make the secondary ones a little dimmer. Details that the viewer should pay attention to are emphasized. In particular, the animal’s muzzle, and on it there are eyes and a nose. It is worth adding that the same rules are used if the appearance of an animal is not drawn, but a portrait of a person is copied from a photograph. Contrast should be concentrated on the eyes and nose.
Finishing touch
What now remains for the aspiring artist to do? Clean up the dirt. Selected places soften the drawing, shade something, highlight somewhere. Combine with shadows, write out necessary details, hint at the presence of a plane, so as not to create the impression that the animal is floating in weightlessness. You can draw a shadow from the figure. And that’s it, your art is ready!
No less interesting and in demand today is such a hobby as drawing pictures by numbers. It differs from coloring books in the scale of work. As a rule, these are large paintings, real canvases that can be hung on the wall or given as a gift. Who will be interested in this activity? Everyone - from children to adults, housewives and businesswomen who want to somehow express themselves, reveal their talents, and so that they like it! Color by number pictures will not let you get bored and will help diversify your day. You will be happy to watch how a magnificent picture is born under your brush.
Coloring pictures by numbers is very interesting. This The best way be alone with your thoughts. What else is good about color by number paintings? With what you get quick results. You can decorate your home with a painted picture and proudly tell and show it to guests. Every time you look at your masterpiece, you will experience joy and delight. You don’t need to give half a kingdom for such a hobby; color by number paintings are affordable. Check out our selection of paintings that we have planned to draw.
1. Cherry blossoms.
You can look at this picture endlessly. Will decorate a bedroom or living room.
2. Lush bouquet.
Flowers and fruits look like real ones; it is best to decorate the dining area.
3. Lioness with baby.
Animal lovers will be happy to take on this work.
4. Marine theme.
You can draw it and give it to a friend who is an avid traveler.
5. Golden autumn.
While working on this picture, it seems to us that we can forget about all the problems. Works better than medicine.
How to draw a beautiful picture?

Almost anyone can learn to draw; to do this, you need to try to master artistic skills. Next, you need to choose the technique that is most suitable and begin to learn from your own experience how to draw a picture beautifully in order to achieve positive feedback about your creativity.
How to draw a beautiful picture using different techniques
The very first technique that is easiest to master is to make drawings with a simple pencil: you can beautifully draw portraits, landscapes and other types of paintings with it. This is possible even if the person has never drawn before.
Pencil sketches are also the basis for depicting color paintings: they are made before applying oil, watercolor and gouache paints. It is easier to draw from pencil sketches with wax and oil crayons or regular colored pencils. In this case, the strokes with a simple pencil should be made very light so that they are not noticeable later on the finished painting.
How to draw different objects with a pencil
Pencil drawing is First stage in drawing almost any picture. Therefore, in order to create artistic masterpieces, you must first learn how to draw pictures beautifully with a pencil.
For example, how to draw a rose beautifully with a pencil? This needs to be done in stages:
- First, the contours of the bud and the “leg” of the flower are depicted;
- Then the unopened part of the bud is drawn in the central part;
- After this, rose petals are depicted along the periphery; they should, as it were, surround, “hug” the central part of the bud;
- After the sketches are made, you can more carefully draw all parts of the flower. Then they start drawing the stem with leaves: they are drawn with clearer lines.
Using this scheme, you can beautifully draw a rose or any other flower with a pencil. By depicting a bouquet and decorating, for example, a vase and background, you can get a picture that you only need to color. Even more practical advice You can find drawing techniques in our section: .
It is easier to draw letters beautifully, either with a pencil or with any other technique, than portraits or landscapes, since in this case you can give free rein to your imagination. For a drawing, it is enough to simply depict “standard” letters and, based on them, make any “fantasy” letters. They can be geometric, round, with monograms, etc.
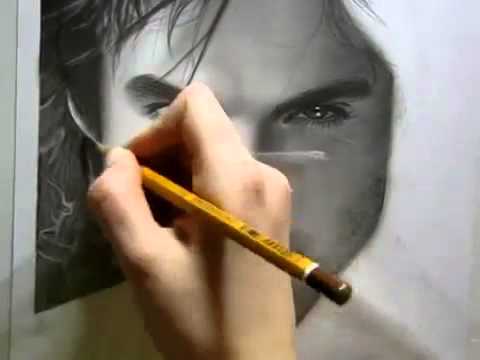
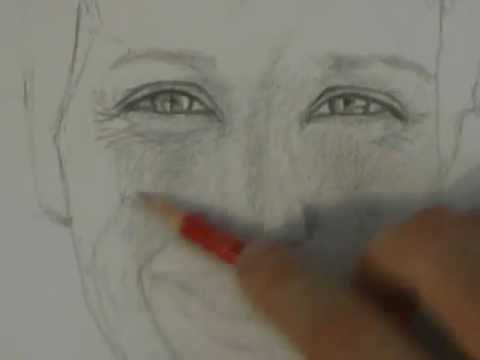
Portraits in pencil
Portraits can also be made using a simple pencil. Most often portraits 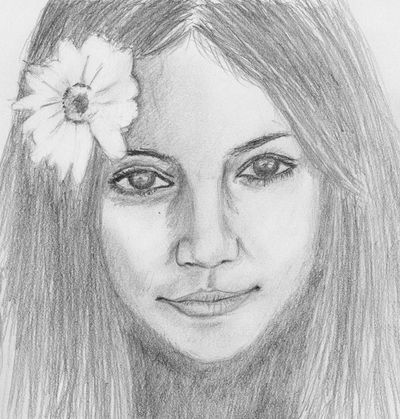 copied from photographs or from nature. Thus, for example, you can draw a beautiful picture of your mother with a pencil.
The drawing is also performed in stages
- First, the outlines of the head and hairstyle are drawn with light strokes;
- Then the drawing is marked: where and what details should be present (eyes, nose, mouth, etc.);
- When the sketch is ready, the drawing is made clearer, shadows, facial wrinkles and folds of skin are added, which give the face the desired expression.
You can find tips on using other drawing techniques in our article.