Do-it-yourself greenhouses and greenhouses for summer cottages. We make greenhouses with our own hands: the best projects and accessible master classes. Video: cheap DIY greenhouse
Read also
We invite you to familiarize yourself with the 3 most popular and simplest ways to make a greenhouse with your own hands: option of making from pipes, from polycarbonate and a budget method of making from improvised means. Each method has photo instructions and a detailed description of the manufacturing process.
To diversify your diet, provide your family with real natural vitamins before a new crop appears on the market, and with the right approach, even to deliver fresh vegetables and berries to the table all year round, you need to build
However, before starting work, you need to carefully think through all the nuances of the future process and thoroughly understand the issue:
- To begin with, you should immediately decide how much area can be allocated for it.
- The second thing that needs to be decided is the functionality of the structure - whether the greenhouse will work all year or will only begin to be used in the spring. The year-round option will require much more effort and materials, since it will require the installation of heating, lighting, water supply and good ventilation systems.
- The next step is to select the type of greenhouse construction and the material from which it will be built.
And in order to decide which of their structures to build, you need to consider some of them in more detail.
Types of greenhouses
There are many types of greenhouses, and besides, based on the general principle of their design, many craftsmen come up with own options for greenhouses or individual elements of this agricultural structure. Greenhouses can be divided into different criteria, such as the shape of the structure, material of manufacture, stationary or temporary construction.
Greenhouse structures
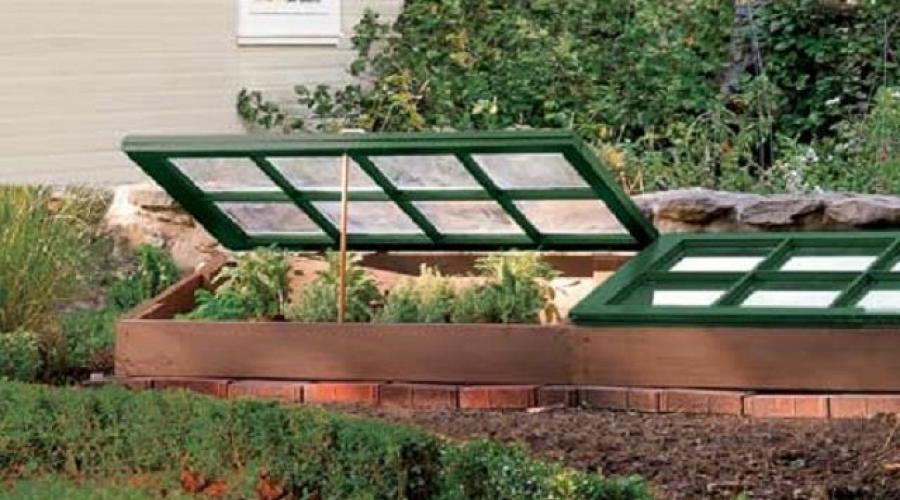
- The frame of the greenhouse can be made of boards, and the useful volume can be protected by a shaped lid that can be opened. This type of greenhouse is suitable for growing seedlings or herbs, for getting them to the table early.

- Other temporary type of greenhouse that installed only for the spring-summer period, made of a wooden frame, fiberglass reinforcement and polyethylene film.
 The simplest ones are temporary tented greenhouses
 Such a greenhouse can last for many years, if winter period disassemble it into parts and put it indoors. Replacing the film with a new one will not require much effort or much expense.
Video: the simplest greenhouse on a fiberglass frame
- Some craftsmen set up a greenhouse in a large old barrel- it is also usually used only in the spring, but you can not remove it from the site for the winter, but use it as an open bed or flower bed.

- More difficult type of greenhouse that It can be heated by forced heating and can be used immediately after the snow melts. This structure is made of boards, metal-plastic reinforcement and thick polyethylene film or. The advantage of this greenhouse is that you can go inside the building to monitor and care for the plants.

- A capital greenhouse, which is equipped with all the necessary equipment to provide the desired microclimate, allowing it to be used throughout the year. For it you need to make a shallow foundation, a brick base and good insulation.

This version of the greenhouse can be attached to the wall of a residential building - then it will be easier to install all communications into it. It will also be more convenient to care for plants at any time of the year - the entrance to such a greenhouse can be made directly from home.

- To save money in the winter, they often set up a so-called thermos greenhouse. A pit 1700-2000 mm deep is dug for it, which is then covered with a transparent roof. In this version of the greenhouse, the correct installation of the ventilation system is very important.

Although the work of arranging such a greenhouse is quite labor-intensive, this design will help you save a lot on energy costs.
Roof shape
When choosing the shape of a greenhouse, you need to be able to understand the question of which roof structure will be most effective for growing plants.
- Gable roofs
Greenhouses with a gable roof are quite popular, as they are spacious and comfortable not only for plants, but also for gardeners. At correct design, installation and selection of material, the room will be illuminated by sunlight all day.

Such greenhouses are often used as winter garden, planting them not only and not even so much vegetable crops, and exotic plants. However, it will be possible to implement such an option if all the necessary conditions– there are reliable heating, irrigation and lighting systems.
- Arched roof
This version of an arched greenhouse is easier to install than a greenhouse with a gable roof. In addition, this form, covered with polycarbonate or polyethylene film, perfectly diffuses the sun's rays throughout the room, which allows plants to receive maximum natural light.

Very important point Another advantage is that, thanks to the arched shape, precipitation in the form of snow does not accumulate on the roof, which means that the risk of deformation and damage from high loads in winter is eliminated.
A pitched roof is well suited for greenhouses that are adjacent with one wall to a more massive building - a house or a high stone fence, always on the south side.
You can save money on the construction of this greenhouse, since one of its sides will already serve finished wall, to which it will adjoin. In addition, it will be easier to carry out all communications into the greenhouse.

When designing a greenhouse with a pitched roof, you need to choose the right slope so that snow does not linger on the roof surface, since an excessively high load can damage the coating.
Greenhouse covering material

Different greenhouse designs will require different materials, but there is always one thing in common - the material for covering the walls and roof must be transparent, allowing daylight to pass through.

This table contains information about the characteristic physical, technological and operational qualities of the three most commonly used materials, such as polycarbonate, polyethylene film and ordinary silicate glass.

| Technical and operational parameters | Cellular polycarbonate | Glass | Film |
|---|---|---|---|
| Difficulty of installation and weight | Light weight, self-supporting material. It makes it possible to reduce the number of frame parts and even completely abandon the foundation. | Glass - heavy material, therefore, if it is chosen for the covering, the building must have a strong frame and a reliable foundation (foundation).. | Very lightweight material, which needs reliable strengthening on the frame. |
| Durability | The practice-tested operational period of the coating is about 20-25 years, the manufacturer provides a guarantee for 10 years of its service. Polycarbonate, due to its rigidity, is itself an element of the load-bearing structure. Once secured, it does not cause deformation or distortion. | The material is durable if protected from mechanical stress and heavy loads (snow and hail). | The service life of the film is very short, at best two to three years, since it is destroyed under the influence of ultraviolet rays. |
| Noise insulation | The material, thanks to its cellular structure, dampens wind noise well. | If the installation is poor, the wind can penetrate into the greenhouse, and the glass can make ringing or rattling noises. | It creates almost no sound insulation, and in strong winds it rustles in the wind. |
| Appearance | Aesthetic and modern appearance material will make a greenhouse even to a certain extent decorative element suburban area. | The glass has a fairly neat appearance if installed according to all the rules. | The material looks neat only in the first year after it is fixed, then the film becomes cloudy and collapses, especially if it is left on the frame for the winter. |
| Safety | Polycarbonate is safe and does not break when dropped. It is 200 times stronger and at the same time 15 times lighter than fragile and quite heavy glass. | Glass shards are very dangerous if they fall into the soil, as they can cause serious injury. Therefore, for safety reasons, glass installation must be carried out in strict compliance with all safety rules. | From the point of view of causing injuries, it is completely safe. |
| Care | Dust is practically invisible on the surface of the material, and if it is heavily soiled, it is enough to wash it with water from a hose. | Raindrops can linger on the surface of the glass, and then, when they dry, they leave cloudy marks. To wash off these stains from the surface, you will have to make a lot of effort. | It is not recommended to wash the film, as cloudy stains will remain on it, which will prevent the penetration of light. |
| Created microclimate | Polycarbonate perfectly insulates the room. Drops formed as a result of condensation of rising evaporation flow down the walls of the greenhouse and do not fall on the plants or on the gardener’s head. The material transmits and diffuses sunlight very well. The heat generated by plants and soil does not escape through the greenhouse coverings, and therefore the necessary greenhouse effect is formed. | Glass does not provide the same high thermal insulation as polycarbonate, so the greenhouse effect is significantly reduced. The material transmits light well, but does not scatter it, and low-quality glass often begins to act like a lens, which is undesirable for plant leaves. | The new dense film creates good thermal insulation, but after working for one season, it becomes thinner and cloudy, so it loses its ability to completely retain heat and transmit light. |
Taking into account all these parameters, you can choose the material suitable for a particular greenhouse, which will best suit the design of a particular greenhouse.
Prices for various types of greenhouses and arcs for them
Greenhouses and arcs
Preparing to build a greenhouse
Location on the site
 It is very important to choose the right place for the greenhouse
 Expert opinion:
Demidova O.V.
Florist. Landscape designer.
In order for the plantings in the greenhouse to receive the light necessary for their development for as long as possible during the day, it is necessary to correctly position and orient the structure on the site. The productivity of plants largely depends on how long the beds are illuminated with natural light. Therefore, most often greenhouses are installed completely open space or a transparent surface to the south.

By selecting the right option greenhouse, having found a suitable place for it on the site, having correctly calculated your strengths and capabilities, you can proceed to drawing up a sketch and a small drawing.
Greenhouse project

It is not necessary to draw all the elements along a ruler, adhering to the strict rules of drawing art. If the owner plans to build everything on his own, and is making a project for himself and his assistants, then it will be enough to draw a greenhouse by hand in such a projection in which one could see all sides of the building and put on them the dimensions of all the main elements.
Territory marking
After drawing up the project, you can begin marking the territory. This is especially important if a thermos greenhouse or winter greenhouse is built on a foundation, since both options involve a considerable amount of excavation work.
Marking is done using rope and pegs, which are driven in around the perimeter of the future pit.
Pit and foundation
- If you choose the option of a thermos greenhouse, which can work all year round, then before you start digging a pit, you must carefully remove the top fertile layer of soil from the marked area. This soil is put in a separate pile, as it will then be needed for laying in the greenhouse.

When deepening a pit, if layers of clay are encountered, then it is also piled separately from the mixed soil located under fertile soil. Clay can be useful for making adobe bricks that can be used to insulate a greenhouse.
The depth of the pit must be at least 1700 mm, but usually it is deepened by 2000 mm. Exactly at this depth Natural geothermal heat rising from the ground is preserved, since the ground here never freezes. (Of course, provided that the greenhouse is not located in northern regions countries where permafrost prevails relatively shallow from the surface).
The recommended pit width is from 2000 to 5000 mm, and the length can be selected as desired. You should not make the greenhouse wider, as it will quickly cool down, and its heating and lighting will require much more electrical or other energy.
In addition to the pit itself, a smooth descent is being dug, where the installation will subsequently be installed. Entrance door to the greenhouse.
- If a place is marked for an all-season version of the greenhouse, then a trench is marked on it and dug strip foundation width and depth of 300 mm.

This depth is quite sufficient, since the structure is not heavy and does not place a large load on the foundation. In height, above the ground, the foundation can be raised by 200 ÷ 500 mm, although sometimes it is poured only 100 mm, and the rest of the wall is subsequently raised from brick.
Next, sand is poured into the trench and compacted in a layer of 50 ÷ 70 mm, then crushed stone in the same layer. After this, formwork is installed along the trench, with a slight recess into it, which is subsequently filled with mortar. Need to follow up so that the concrete is poured tightly, without leaving air cavities - to avoid this, you can carry out “bayoneting” by piercing the freshly poured mortar with a bayonet shovel.

In some cases, support posts made of metal pipes are immediately embedded into the foundation, onto which the remaining elements of the greenhouse will then be attached.
- The third option for the base for a greenhouse is a wooden frame made of timber, which is impregnated with antiseptic compounds and installed on a sand bed.
 The simplest base of a greenhouse is a wooden frame on a sand cushion.
 Installation of greenhouses
Having dealt with the base for the greenhouses, you can proceed to the installation of the selected option.
Rating of greenhouses for making with your own hands
| Photo | Name | Rating | Price | |
|---|---|---|---|---|
| #1 |
|
Greenhouse on a wooden frame |
⭐ 70 / 100 |
|
| #2 |
|
Greenhouse thermos |
⭐ 84 / 100 |
|
| #3 |
|
Greenhouse on foundation |
⭐ 96 / 100 |
|


3. Greenhouse on wood frame
- no concrete foundation required;
- easy to do with your own hands.
- strong winds can destroy the structure.
A greenhouse, which does not require a concrete foundation, and a strong wooden frame is the basis, is the easiest to install.
- The base box, made of timber with a cross-section of approximately 200 × 150 mm, is laid on a flat prepared area covered with sand. The base should fit tightly to the surface of the earth over its entire area. Therefore, if, when laying the frame, a gap is found between it and the soil surface, it will need to be sealed using stone pads. It is necessary to level the frame, otherwise the greenhouse will stand unevenly and unstable.
- After the box is leveled, pieces of reinforcement 700 mm long are driven into the ground at its inner corners. This measure is necessary to fix the base in place.

- The next step is to drive pieces of reinforcement into the ground along the long side of the box, which should go 700 ÷ 800 mm into the ground, and 600 ÷ 700 mm should remain above the surface.

The fittings are driven in at a distance of 500 ÷ 700 mm from each other and exactly opposite the same rods driven in on the other side of the box, as they will become the basis for securing the pipes.
- Next, pre-prepared metal-plastic pipes of the required length are put on the reinforcement sticking out of the ground. The result is a kind of arcade, which will become the basis for a transparent coating.

- To ensure that the pipes stay tightly in one place, it is recommended to secure them metal loops, which are screwed with self-tapping screws to the box.
 ... and their fixation to the box
 - If the structure turns out to be three-dimensional, then it must be strengthened at the end sides, since they must stand rigidly. This frame will not only add rigidity, but also form a doorway.

To do this, bars with a cross section of 50×50 mm are installed vertically, and then they are fastened in several places with horizontal crossbars.
Sometimes, knowing that transverse fastenings are indispensable, pipes for arches are fastened with cross adapters into which pipe sections are installed horizontally.
Greenhouse prices

Another option for adding rigidity to the structure is to fasten the entire arcade at the top of the vault with one common pipe.
 Sometimes one central “ridge” pipe is enough
 Fastening is carried out with wire, plastic clamps - “ties” or construction tape.
 Fastening pipes together with a plastic clamp - “tie”
 - Next, the frame obtained from the pipes is covered with a very dense polyethylene film. It is laid with an overlap of 200 ÷ 250 mm. At the bottom, the film is fixed to the wooden box using a construction stapler and staples.

First, the film is stretched onto the arcade and then attached to the end sides. At the doorway, the film is folded inside the greenhouse.
- The door to the greenhouse should be lightweight, but at the same time have a rigid structure. It is mounted from a 50 × 30 mm bar, and to prevent its deformation, one or two slats are fixed diagonally. Then the resulting “door leaf” is covered with plastic film.

The door is hung on appropriate, prepared for her opening using hinges. Exactly the same as the door, the window openings are also installed, which are located closer to the ceiling on the end side of the greenhouse opposite the doorway. This should create natural flowing air circulation.
Video: an easy-to-use version of a compact seasonal greenhouse
2. Greenhouse thermos
- the ability to grow crops and harvest before deep winter;
- long service life.
- high cost of materials;
- long and labor-intensive construction process.
Foundation for walls
- After the pit for the greenhouse is ready, it is necessary to create along its perimeter. To do this, a trench is dug, and then all actions similar to those described above are carried out, where the issue of foundation for a winter greenhouse was considered.

- When the foundation is completely ready, you can proceed to laying the walls, not forgetting to install one or two ventilation pipes. They are mounted in the lower part of the end side of the building, opposite the entrance door, at a height of 500 mm from the floor.
- The pipes, after installing the roof, are raised to a height above the ground, approximately 1000 mm.

Wall masonry
The masonry can be made from adobe bricks, or from permanent formwork made from polystyrene foam blocks, the cavities of which are filled with ordinary cement mortar.
- If selected last option, then you can immediately get insulated walls, but in this case the resulting structure will need to be separated from the ground with plastic film.
After construction stone walls, the gap between the soil and the masonry must be filled with clay, which should be compacted well. The diagram of a thermos greenhouse is clearly shown in the figure.

- The walls rise from the foundation above the ground by 500 ÷ 600 mm. If permanent formwork was not used for the walls, then they must be insulated to the depth of soil freezing (taking into account the climatic characteristics of the region where the greenhouse is being built).
- The insulation can be laid on the outside of the wall, that is, between it and the ground. Therefore, the gap between them will have to be widened and the insulation will have to be separated from the ground with a waterproof film.
If polystyrene foam is chosen for insulation, and it will rise above the ground surface on the outside of the building, then it must be covered with waterproofing, and then with an external decorative coating. It is best if it is a material that is not subject to rotting when exposed to moisture. For example, a plastic lining will do.
- Closing the insulation can be done in another way - it is covered with expanded clay from the outside, and covered with roofing material on top. Corrugated sheeting, which is fixed below polycarbonate or glazing, is well suited for this. In this case, polyethylene film will not be suitable for covering the roof.
Frame installation
The next step is to install the frame to cover the walls and ceiling with polycarbonate, since installing it is much easier and safer.

The frame is erected from wooden blocks or a rigid metal profile.

- First, bars with a cross-sectional size of approximately 100 × 150 mm are laid on the walls raised from the pit and secured with anchors. The rafters and ridge beams must have the same cross-sectional size as the beams installed on the walls.
- A thin sheathing is attached to the rafters, approximately two to three bars per slope. In this case, it is necessary to ensure the rigidity of the structure.
- Next, polycarbonate sheets are attached to the sheathing. They are screwed with special self-tapping screws with a large head (press washer) and a rubber gasket.

- Having completed the installation of the roof covering, the end sides of the greenhouse are sheathed with polycarbonate, and then the finished door is installed. It is desirable that it also have a glazed part.
- In addition, the upper part of the ventilation is mounted almost under the roof itself - a hole is made and a pipe is installed.
Insulation of the building
- It must be said that it is very important to leave open for sunlight that roof slope that faces the south side, since the sun is there the longest during the day.
- The second slope of the roof from the inside of the greenhouse is covered, which will reflect the light falling on it through the transparent part of the roof. Foamed polyethylene 5 mm thick with a foil surface is well suited for this purpose.
 Approximate scheme for insulating a thermos greenhouse - 2
 Attach it to the roof rafters using screws with a wide head. At the junction, the insulation is folded onto the wall.
- Next, all the walls of the greenhouse are insulated in the same way. The insulation on vertical stone surfaces is fixed with “liquid nails”, or a sheathing of thin slats is installed on the wall and polyethylene foam is attached to them with self-tapping screws.
 Insulated thermos greenhouse - view from the inside
 The task that the foil covering must perform is not only in the reflection of lightinsidepremises, but also preservation carbon dioxide, moisture and heat, which are vital for the processes of photosynthesis occurring in plants.
Providing heating
In order to retain heat inside the greenhouse for a long time, doors must be installed on the ventilation openings.
A room can be heated in different ways - electrical system“warm floor”, convectors, and if the greenhouse is located near the house, then you can install water heating and from a gas boiler.
- If a “warm floor” system is installed, then before placing it, the bottom of the greenhouse must be prepared so that energy does not go into the ground in vain. The system is usually installed only under the beds, although, if necessary, it is sometimes placed under the paths between them.

The preparation proceeds as follows:
— a thermal insulation coating is laid on the ground. It is better if it is foil;
— a reinforcing mesh with cells of 30 × 30 mm is placed on top of the sand;
- the heating cable is attached to it;
— it is covered with a 50 mm sand cushion;
— the reinforcing mesh is laid on top of it again;
- 300 ÷ 400 mm of soil is poured onto it.
All these layers are laid in formed beds, the sides of which are boards or bricks.
Most often they are installed along the walls, but if the greenhouse is very wide, then another, additional one can be installed in the middle. It is advisable to make the beds at a slight angle so that the soil surface is slightly turned towards the transparent southern slope of the roof.
Polycarbonate prices
polycarbonate
- Recently, convectors are increasingly being installed in greenhouses to heat them.
 Convectors - effectively maintaining the desired air temperature in the greenhouse
 They have a number of significant advantages that are ideal for greenhouses and greenhouses:
- they dry the air much less than any other heaters, since they are designed in such a way that they create artificial circulation of warm air;
— ease of installation — convectors are hung on brackets installed in the wall, plugged into an outlet, and the desired temperature is set on the thermostat;
- a big plus is the automatic switching on and off of the heater according to the selected temperature regime - and this is a considerable saving of electricity;
— the convector is compact and has an aesthetically modern appearance.
Before buying a large room, you need to look at the characteristics of the device and its power - only after that will you know how many heaters are required for a specific area.
- Another heating option could be a long-burning cast iron boiler with a water circuit.
 Heating a greenhouse with a water circuit - approximate diagram
 To install such a system, you will have to work hard:
— It is necessary to install the boiler itself. Its installation is carried out in the greenhouse itself or in an adjacent room.
— A chimney pipe should be installed, which must be raised to a height of about 5000 mm.
— To pass the pipe through the hole arranged for it, it is necessary to well isolate the combustible materials of the greenhouse from high temperature when firing the boiler.
— Fill the system with water, install a temperature sensor in the greenhouse room.
Installation of this system can probably be called the most difficult of all other options, including compared to a converter heating system.
When heating a greenhouse, you need to know that for normal development and growth of plants, you need to maintain the air temperature within 25 ÷ 30, and the soil temperature - about 20 ÷ 25 degrees. In addition, an optimal level of humidity must be created in the greenhouse.
1. Greenhouse on a foundation
A greenhouse installed on can easily function year-round if all the necessary conditions for this are created in it.

In this case, the assembly of the structure must be carried out with special care, since the structure must be essentially airtight, except, of course, installed system ventilation.
- longest service life;
- resistance to strong winds and hurricanes.
- high cost of materials;
For the frame of such a greenhouse, it is best to choose wood, since it conducts cold to a lesser extent than a metal profile, which is guaranteed to create “cold bridges.”

The frame for this type of greenhouse is mounted as follows:
— Waterproofing material is laid on stone or adobe, plastered walls, erected 500 ÷ 700 mm above the ground surface. As a rule, this is ordinary roofing material.
— Thick wooden blocks are secured to it with anchors. Their width depends on the width of the walls, and their height can vary from 50 to 150 mm.
— The gaps between the wall and the bars (or metal profiles) must be sealed with polyurethane foam.
“Further, the work depends on what material is chosen for the greenhouse - this could be the installation of ready-made metal-plastic frames or the construction of a wooden or metal frame.
- Then, double or even triple glazed windows are installed in metal-plastic frames, and in a wooden frame - frames made of wood, with glass already installed in them, or also double-glazed windows, and polycarbonate is most often fixed to the metal frame.

The foundation, floor and lower part of the wall of the greenhouse must be very well insulated. Therefore, in this case, you can use the “warm floor” system, the design of which is described above, but in addition to it, it is recommended to install convector heating. It will well maintain the desired temperature in the room.

If the greenhouse is located in regions with very snowy winters, then when clearing the yard of snowdrifts, it is recommended to pile the snow to the bottom of the greenhouse walls. Snow is very good insulation and will help save on heating the building in winter.
For walls, you can choose thick glass 5 ÷ 7 mm or cellular polycarbonate 10 ÷ 15 mm thick. The honeycomb material has an air gap between the two main planes, which will act as insulation.
Greenhouse lighting
Any greenhouse used in the cold season must be additionally illuminated in order to create a “spring” state in the room, since both the length of daylight hours and the intensity of winter solar radiation will clearly not be enough for this.

In order to save energy, light emitting diodes (LED) are used as lighting devices. They can have different shapes, but it is recommended to place them at the highest point of the greenhouse ceiling. Of course, if desired, you can equip the room with lamps, which are most often mounted at the junction of the roof and walls or high on the walls themselves.
You can, by the clock, install a control unit with a timer and program on it the time when the lights in the greenhouse should turn on and off. Such a system will help save energy and create the most comfortable conditions for plants.
If the greenhouse is used only in the spring-summer period, then building it is not at all difficult, since it does not require the creation of any special conditions insulation and lighting. The winter version of the greenhouse is quite complicated in calculations and in construction, as well as in everyday maintenance, and usually such complexes are arranged by those owners of plots who are professionally engaged in floriculture, vegetable growing or growing exotic plants. In this case, without
Greenhouse thermos
0 % ( 0 )
Greenhouse on foundation
0 % ( 0 )
To see the results you need to vote
A greenhouse is a predecessor and simplified seasonal analogue of a greenhouse. The design of greenhouses varies greatly, from those that do not require anything other than a covering film, to structures about which you can’t really tell by looking whether they are still a greenhouse or a greenhouse. Having made a greenhouse with your own hands, you can first supply your family with early/late vegetables and herbs and at the same time master the intricacies of greenhouse farming, without risking losing a lot of initial investments due to mistakes due to inexperience. And if things work out, then build a real all-season greenhouse and get vegetable delicacies to the table all year round; It is possible to establish a profitable business.
PC greenhouse
Currently, light-transmitting greenhouse coverings are made almost exclusively from polycarbonate (PC). This material was developed for this purpose and only later did its advantages become apparent in the construction of gazebos, canopies, porch covers, swimming pools, etc. However, To build a homemade polycarbonate greenhouse you need to take into account the following circumstances:
- PC is sold only in solid sheets from 2x6 to 2x12 m; it is not cut into pieces.
- Cost per 1 sq. m of the cheapest PC structure 2R with a thickness of 4 mm is less than that of glass, and is comparable to the cost of agrofilm, see below for more information.
- Without quite expensive complete accessories (standard fasteners with thermal compensators, edging profiles, aluminum tape, filter tape for the ends), a PC will last no more than 3-4 years outdoors.
- PC installation is most often carried out with pre-stressing due to bending of the sheets. This gives the structure greater strength, but requires a reinforced (and, accordingly, more expensive) frame of a special design; see e.g. .
Based on this, it is recommended to make a greenhouse under polycarbonate either with scraps remaining, for example, from, or using a solid flat sheet in a fairly rigid frame, see below. It’s better to design your first greenhouse with film, especially since there are options for which you won’t need anything other than it.
What happens in the greenhouse?
A greenhouse with the plants in it and the soil in which they are planted is a fairly delicate biosystem. Its main difference from natural ones is the forced change of biorhythms for the sake of faster development/ripening and greater productivity of greenhouse crops. From a biological point of view, a greenhouse is not a greenhouse at all; in that biorhythms are close to natural, only intensified. Therefore, this section outlines the basic information necessary to properly make a greenhouse.
Plants
The biorhythm of plants in a greenhouse generally corresponds to the natural one, see Fig. on the right, but with some differences that speed up their “maturing”, see below.

In the light:
- Vegetative parts - leaves, green stems - absorb carbon dioxide and water from the soil with minerals dissolved in it;
- Metabolic oxygen is released. Respiratory oxygen is absorbed as always, but much more metabolic oxygen is released;
- As a result of photosynthesis, dissolved organic, so-called, are formed. plastic, substances necessary for the growth and development of a plant;
- Plastic substances partially enter storage (tubers, bulbs, rhizomes, non-chlorophyll parts of stems) and generative (flowers, ripening fruits) organs, and are partially deposited in the so-called. depot - special cells or cellular structures of the vegetative parts.
At night or in the dark:
- Vegetative parts and roots absorb oxygen for respiration and release carbon dioxide;
- Green leaves, in addition, release excess water in the form of water vapor through stomata or, less commonly, in the form of droplets through water stomata - hydathodes;
- The depots of plastic substances are emptied, using up the daily supply;
- Plastic substances also reach the roots, ensuring their growth. The roots grow mainly at night.
Conclusion #1: during the day, when it is warm enough outside to ensure at least minimal plant life, the greenhouse needs to be ventilated. Plants consume little oxygen for respiration, but there should still be enough oxygen for the night, otherwise rot and disease will occur. It is advisable to ventilate before noon, when the sun is warm, so that the nighttime excess CO2 and H2O will immediately disappear.
Greenhouse effect
The covering of greenhouses is made of materials that transmit visible light well, but reflect, directly or diffusely (scatteredly), thermal (infrared, IR) rays as best as possible. So the greenhouse effect in greenhouses is different from what everyone hears in the earth’s atmosphere, see Fig.

During the day:
- Part visible light used by plants for photosynthesis;
- The other share is absorbed by molecules of greenhouse gases - carbon dioxide and water vapor - transferring them to a higher energy level;
- Another part of the light is absorbed by the soil, which immediately re-radiates it into IR, warming the air and the structure of the greenhouse;
- Part of the IR from the soil is reflected from the coating (on the left in the figure, for simplicity, only 1 branch is shown) and ultimately also heats the soil, the air and the structure. IR practically does not interact with greenhouse gas molecules;
- The soil temperature is sufficient for root activity, but may be lower than that outside, directly heated by the Sun.
Note: CO2 molecules, which are heavier than air, are concentrated mainly in the lower part of the greenhouse, and H2O, which are lighter, are concentrated under the roof.
At night:
- The temperature of the soil in the greenhouse turns out to be higher than it is not only outside, but also the air temperature in the greenhouse, which stimulates root growth and sap flow in plants;
- The soil gives off stored heat both directly to the air by convection and by being illuminated by infrared;
- Greenhouse gas molecules are also illuminated by infrared, warming the air and promoting sap flow in the above-ground parts of plants;
- There is heat loss through the coating;
Conclusion #2: Thus, greenhouse vegetation “works in 3 shifts,” which ensures rapid growth/ripening.
The soil

Fertile soil (we are not talking about hydroponics) is a complex biocenosis, inhabited by an innumerable number of tiny living creatures that cannot live anywhere else. Therefore, there is a whole school of biologists who classify soil, along with anthills, termite mounds, and coral structures, as “superorganisms.” In this case, the soil cover is the largest living formation on Earth.
In a greenhouse, the soil is also forced to work in 3 shifts. Moreover, in spring and autumn they are in antiphase with the natural rhythm of heating/cooling, and the soil in the greenhouse is quickly depleted. Hence the first consequence of the main difference between a greenhouse and a greenhouse: it cannot work on the same soil for more than 1 season, even if it is reclaimed. That's why According to the nature of soil use, greenhouses are divided into:
- Ground ones are the simplest of film only. They are used when a strong greenhouse effect is not necessary, for example. for seedlings in regions that are warm enough.
- Mobile - the upper structure of the greenhouse is moved to a new location as the soil becomes depleted.
- Bulk - can remain in one place for a long time, but natural soil is not used: special soil mixtures are poured into the greenhouse formwork, which are changed at least once a year. These are most often built on waste, skinny land.
Note: The most effective way to squeeze everything out of greenhouse soil and at the same time leave it (from under a ground or mobile greenhouse) suitable for restoration is by heating the soil, see below.
After the first 2 types, it is necessary to restore soil fertility. Most quickly, but not completely, this is done by sowing nitrogen-fixing crops for the next year; primarily legumes - peas, beans. Next year, you can grow flowers, cabbage, herbs, and plant berry bushes in this area.
For complete natural reclamation, before sowing nitrogen fixers, the soil is allowed to rest for a year under fallow and only then legumes are sown. In this case, the restored soil is suitable for any crops, incl. strawberries and root vegetables. If you constantly use a greenhouse, then you need 4 identical plots of land:
- Under the greenhouse;
- Resting under steam;
- Inoculated with nitrogen fixers;
- Under open ground crops.
Conclusion #3: building a greenhouse is still half, or even a third of the work. The main thing is to find and allocate for him suitable site, taking into account the circulation of crops on their land and the availability of free space.
How to warm the earth?
Since ancient times, the soil in greenhouses has been heated with manure. If the harvest went to the table, it was exclusively from horses. Others heat worse and oversaturate the soil with nitrates; the effect of their excess on health was noticed long before scientific agricultural chemistry developed and the very concept arose.
Even then, horse manure was valued as a biofuel, and if you think about its availability today, you’ll remember an American joke: “Joe, did you hear? Tomorrow a completely naked Uma Thurman (Marilyn Monroe, Liz Taylor, Angelina Jolie, etc. – whatever) will ride down Main Street on horseback! – Wow, I’ll definitely go see it! I’ve never seen a live horse in my life!”

- A steam comb is simple, but least effective. It is mainly used in more or less warm places on cow dung for seedlings.
- Steam furrow – uses the heat of the fuel more economically. It can also be built on cow manure, and crops that accumulate little nitrates can be grown on the sides.
- Steam ridge - nitrates almost do not disperse to the sides, warms the furrows better. Used in combination with both film and hard cover. Disadvantage - a lot of space is wasted, because You cannot plant anything on the ridge itself. The steam ridge is predominantly framed by warm pits, see below.
- Warm furrow - warms for a long time, but weakly. Most often it is made with onions and herbs.
- Seedling steam ridge - seedling seeds are sown in the spaces between the ridges. You can plant onions and dill on top. If the seedlings are ready and the biofuel has not yet decayed, you can plant ordinary garden cucumbers in the gaps and let the vines run along the supports on the ridges.
Technoteplo
There is a lot written in RuNet about electric soil heating. But, firstly, no rules of electrical safety and electrical installations for household appliances provide for anything like this, and this is not a purely formal ban, but caused by the many lives lost. An electrical cable in the ground is not a warm floor in a house with thermal insulation. Secondly, electric heating is rarely used even in large commercial greenhouses and is uneconomical. And in small greenhouses, the ratio of the area through which heat is lost to the volume in which it is released is tens and hundreds of times higher. Here, to raise the soil temperature by 1 degree at an outside temperature of -5, it will take approx. 800 W/sq. m. Calculate how much you will have to pay yourself using your own tariffs. If circuit breaker, the meter and wiring will withstand such current at 220V.
Meanwhile, at the same -5, “overboard” the simplest, most primitive area of 1 sq. m in mid-latitudes will provide heating of the soil to a temperature at least sufficient to protect plants over an area of approx. 3 sq. m, if you use the diagram shown in Fig. In this case, you can use old heating radiators: thin-walled steel collectors are used as a heat sink, and cast iron “accordions” are best suited for heaters.

The heaters are installed before filling the pit (depth of about 1 m) with sand on supports so that their warm edges are 15-25 cm higher than the cold ones. The supports must be strong, otherwise the heaters may sag and the coolant circulation will be disrupted. The presence of a filling pipe is mandatory; without it, the system will become airy when warming up due to the release of gases dissolved in the water. Please also note that the return is also insulated, although not with such a thick layer as the supply. The water temperature in it is higher than the soil, and this heat must be preserved.
Note: In case of long cloudy weather with the possibility of frost, it is better to fill the system with antifreeze. The collector will also work from diffuse light.
Land for backfilling
To finish with the soil, we give 3 more well-known recipes for soil mixtures for bulk greenhouses. They are also in other sources, but their qualities do not change.
No. 1, general purpose:
- Peat soil (rotted peat) – 6 parts.
- Garden, leaf or turf land- 1 part.
- Humus (can be from a compost heap) – 2 parts.
- Calcined or washed river sand (can be used as construction sand) – 1 part.
- Slaked lime – 3 kg/cu.m. m.
No. 2, for bulbous, root vegetables, greens:
- Sawdust (not resinous) – 5 parts.
- Wood ash – 1 part.
- Straw chaff – 1 part.
- Peat soil - 3 parts.
- Immediately before planting, add 1 sq. m 20 g of potassium sulfate and 30 g of superphosphate or 10 g of wood ash.
No. 3, self-heating for flowers and seedlings:
- Almost matured peat – 2 parts.
- Horse manure – 1 part.
- Straw chaff – 1 part.
- Add 1 cubic meter before planting. m of a mixture of 300 g of urea, 2 kg of potassium chloride and 3 kg of superphosphate.
Conclusion #4: depending on availability or absence additional heating soil greenhouses are divided into warm and cold. Greenhouses filled with self-heating soil are among the latter. Warm greenhouses can ensure vegetation and fruiting at a consistently sub-zero outside temperature, while cold greenhouses can be built when the tubercles wither after the snow melts.
How to build a greenhouse?
Coatings
The light-transmitting coating is the main element of the greenhouse design, which mainly determines its effectiveness. It is said above about hard coatings: glass is more durable than PC, but retains heat worse. In addition, PCs deteriorate from ultraviolet (UV) radiation, so they are produced covered with a protective film on one side. During installation, it must be protected from damage and the sheets must be mounted with the protected side facing out. Greenhouses are lower than porches, gazebos, etc., so the likelihood of damage to the PC protection here is higher, at least from grains of sand carried by the wind. The material under the damaged film becomes cloudy and cracks.
Films
For covering greenhouses, films with a thickness of 120 microns (in extreme cases, from 60 microns) made of polyethylene (PE), ethylene vinyl acetate (EVA), polyvinyl chloride (PVC) or polyisopropylene (PP) are usually used. The latter for greenhouses are available in the form nonwoven fabric under the names of agrofibre, agrofilm, strapbond, SKF-(numbers indicating the brand). Comparative characteristics of films for greenhouses are as follows:
- PE- cheap and bad. It transmits little light and does not reflect much infrared. It barely retains heat and does not protect from frost. Serves 1 season; most often - in spring to summer.
- PVC– a little more expensive than PE, but in terms of optics and thermal engineering it is satisfactory. Provides a plus in a cold greenhouse at -(3-5) outside. From UV exposure it becomes cloudy and brittle. Serves 1-3 seasons depending on the insolation of the place.
- EVA– still a little more expensive, but quite resistant to UV. Optics and thermal engineering similar to PVC.
- PP– comes in milky white, but the light transmission is high and diffuse, which prevents plants from being burned by direct light. Excellent IR reflection, also diffuse; this gives the maximum greenhouse effect. It allows moisture to pass through, so soil greenhouses and holes (see below) under agrofibre can be watered through the film. It also selectively allows gases to pass through, so there is no need to lift the covering for ventilation. Resistant to UV and mechanical damage, lasts more than 5 years, up to 10-15 years. Allows sewing on Velcro, buttons, zippers, installation of eyelets and other accessories. Quite expensive, almost like PC, but agrofibre is an ideal covering for a greenhouse.
Note: For installation and repair of agro-film, special agro-adhesive tape is produced that lasts for a long time in the open air. Besides this he finds wide application in the construction of greenhouses.
Varieties
The main designs of greenhouses are shown in Fig. Pos. 1 – ground film. This is the simplest greenhouse made from just film. It is built mainly for seedlings or, when using biofuel without excess nitrates, for low-growing crops - radishes, lettuce, onions. The width of the ridges at the bottom is 20-30 cm. The height is either 35-40 cm if the film is laid directly on them, or 25-30 cm if the covering is supported by trellises on flyers, as on the right in Fig. with heating circuits. Advantages: simplicity and low cost; Disadvantages - poor use of light, difficulty in care, and barely 1/4 of the total area under the greenhouse goes directly under the plants.

Note: A soil film greenhouse can be eliminated from the first 2 disadvantages by covering it with agro-film.
Pos. 2 – warm pit. It is surrounded by a steam ridge and can be covered with either film or glass/PC in a frame. Suitable for any low-growing crops. The disadvantage is poor use and high consumption of biofuel, because more than half of its heat goes to the sides. It is advisable to use it as an aid in commercial meat and dairy farming using cattle or goat manure. Sheep is not suitable for health reasons and heats very poorly.
About Russian pits
In this case, it’s not about potholes on domestic routes, which are the talk of the town from Trediakovsky to Pelevin, but about the Russian deep greenhouse. At one time, the Russian greenhouse was a revelation for European farmers. It was from the “Russian pits” that the nobility of that time received green onions, lettuce, dill, parsley, radishes, and strawberries for the table in winter.
The structure and drawings of a Russian greenhouse are shown in Fig. There were usually 3-4 greenhouse pits, which ensured year-round use: while 1 pit was warming up after refilling, the rest were producing products. An indispensable condition for the successful operation of a Russian greenhouse is the lining of the entire complex of pits with a clay castle with a drainage ditch, otherwise the biofuel will sour.

Note: Instead of log sheds, it is now possible to install concrete lintels for windows and doors, trellis posts for grapes, etc. Instead of glass, insert PC into the frames; this will allow you to raise the northern edge 35-40 cm above the ground and grow tomatoes. And instead of silver-plated mirrors, use any flat panels covered with aluminum foil for baking. The soil above the biofuel is poured No. 1.
Pos. 3 – film tunnel on a collapsible frame. For beginning farmers, this is certainly the best greenhouse:
- Simple and cheap, requires virtually no construction/carpentry work; see below about "Snowdrop".
- Retains enough fresh air overnight for plants to breathe.
- A large volume of air in the shelter gives a strong greenhouse effect, which makes it possible to build cold greenhouse tunnels, ready for action immediately after the snow melts.
- Allows you to grow fairly tall crops, up to long-fruited cucumbers.
- It is easily transferred to another place, and the possibilities of land turnover are limited only by the available sown area.
About "Snowdrop"
Film-tunnel type greenhouse industrial production“Snowdrop” is probably the most popular in the Russian Federation and the CIS, and for good reason: purchasing components at retail for a homemade analogue can cost more expensive than purchase finished kit. Just in case, in Fig. A diagram of its design and installation is shown.

Greenhouse “Snowdrop”
Please note that:
- The advantages of “Snowdrop” appear only when covered with agro-film;
- Ate to bend arcs from water pipes the standard length is 6 m, the span will be 1.9 m, and the height under the ridge will be 0.8 m;
- The arches can be connected to the ridge beam by tying them crosswise with flexible wire or wrapping them with agro-scotch tape.

Pos. 4 – cassette greenhouse or box greenhouse. It is done exclusively for seedlings in soil or in bulk, because completely depletes the soil in 1-3 months. Another drawback - poor use of light - can be eliminated with an agrofibre coating. But in 1 sq. m cassette, you can grow seedlings for 12 or even 20 acres.
Pos. 5 – greenhouse-house or butterfly. These are made either removable with established land turnover (see above), or for intensively breathing crops: tomatoes, eggplants, vegetable (sweet) peppers, because film without a frame quickly deteriorates from frequent lifting and refilling.
Note: Vegetable peppers from the nightshade family are not related to real peppers from the capsicum family. So named because of some similarity in the shape of the fruit.

Bulk greenhouses, pos. 6 and 7, are most often built stationary on a durable frame. The coating is appropriately durable, agrofibre or PC. Soil drainage is required; visible in pos. 6. In addition to the butterfly, other design options are possible, see below.
About greenhouses for cucumbers

Recently, in private farms, ordinary garden cucumbers with recumbent vines are increasingly being replaced by long-fruited greenhouse cucumbers: they require less land, they are high-yielding and never taste bitter right down to the bottom. However, the cultivation of long-fruited cucumbers in open ground in most of the territory of the Russian Federation without shelter is impossible; they are heat-loving and do not tolerate frost, so they are cultivated in greenhouses.
The greenhouse for cucumbers must, firstly, be high enough: the “long-fruited” vines grow more than 1.5 m in height before they can be planted horizontally, see fig. Secondly, greenhouse cucumbers do not like to “steam”; this causes powdery mildew and other cucumber ailments to develop on them. Therefore, the roof of the cucumber greenhouse must be flat so that the cool night-time steam cushion from under it evaporates through the cracks. In addition, horizontal rods are attached under the flat roof; cords hang down from them, to which the cucumbers cling with their mustaches.

As a result, the greenhouse for cucumbers turns out to be approximately the same as in Fig. top right. However, less labor-intensive options of the tunnel type on pointed arches are also possible, see below.
About the orientation of the greenhouse
Ridges of soil greenhouses run along a north-south line. Tunnels, cassettes and butterflies are oriented in the same way. As for the pits and single-pitch structures(see below), then they are oriented with a slope to the south or south-southeast, because Plants work most actively in the morning, using the night's excess CO2.
Frames and structures
Materials
Wood rots quite quickly in a greenhouse, so the wood for building a greenhouse must be treated with environmentally friendly, i.e. purchased with a certificate, water-repellent compounds - water repellents. Popular for sheds, outbuildings, gazebos, garden benches And for country furniture, gratuitous processing is not suitable: additives introduced into motor oil should not get into food.
Note: When making a greenhouse frame from scrap materials, wooden structures need to be disassembled and the parts impregnated separately. At the same time, you’ll go through the process of replacing unusable fasteners to make it stronger.
It is better to make stationary greenhouses on a frame made of plastic pipes, they will ensure strength, durability and environmental friendliness. We'll come back to them later, but for now let's see what we can get by with. a quick fix.
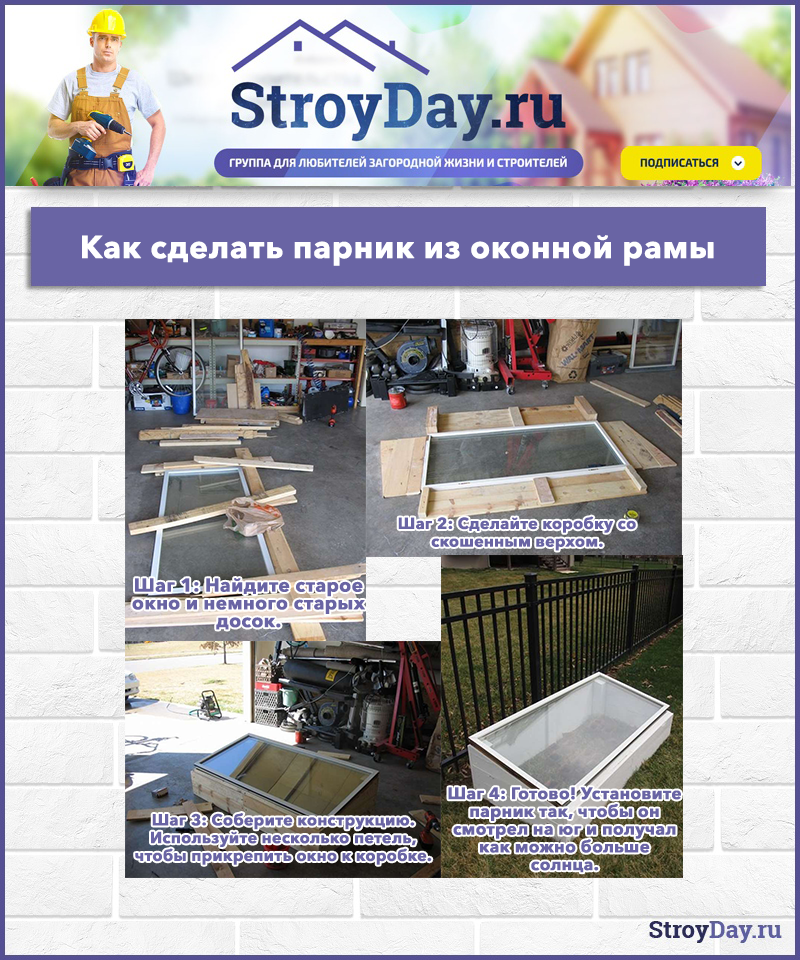
Anything from
A ready-made, and quite good, translucent coating is provided by window frames. The greenhouse is small, so you can get by with 1-2-3 windows. However, unlike a greenhouse, it does not have high transparent walls, so it is better to make a greenhouse from old window frames with a single slope oriented to the south, on the left and in the center in Fig. The second circumstance is that no matter what frames you have at your disposal, the transparent roof must be made folding (lifting upward), and not hinged or folding, as on the right in Fig. Through any vertical crack the entire warm air will instantly evaporate and the plants will be hit with cold, and the horizontal one can be adjusted with supports according to the weather and local conditions.

Note: optimal inclination slope of the roof of a lean-to greenhouse from the vertical (90 degrees) – φ, where φ is the geographical latitude of the place; and (90 degrees)–φ is the angular altitude of the Sun at noon of the spring/autumn equinox. See below about a greenhouse with a heat accumulator.

A successful simple greenhouse; more precisely, its frame made from industrial wood waste is shown in Fig. Its highlight is visible in Fig. the slope of the ridge beam to the south is approximately 10 degrees. This gives, firstly, best use Sveta. Secondly, the entrance must be done with north side in the form of a vertical slot in the canopy with fasteners or Velcro. Then, by slightly opening the slit, we get effective ventilation, and there is no need to raise/lower the film on the sides. The struts are also installed correctly, from the west, and the eastern slope is flatter.
A very good greenhouse covering material is polyethylene terephthalate, PET. As you know, bottles and other containers are made from it. You will need relatively few bottles for a greenhouse, so it is better to use them whole, stringing them into “kebabs” on “skewers” made of a steel rod. How to do this (the technology is simple) is described.

As for the design, the best greenhouse from plastic bottles– a folding bed, or a greenhouse-book, see fig. left. Shields made from PET bottles are excellent light concentrators and reflect IR well; You only need to cover the openings with film at night and in anticipation of frost. And during the day the plants will be warm enough, plus free gas exchange is ensured.
For a long time on the frame
A long-term greenhouse is usually built on a frame made of plastic pipes. This frame is strong and lightweight; 1-2 people carry it without covering, assembled, if the greenhouse is mobile. The frame is placed on the ground by placing the ends of the pipes on pins driven into the ground; driving depth - from 40 cm. The formwork under the bulk soil is attached to the pipes with clamps.
Pipes for the frame are PVC or propylene water pipes. The former are cheaper and last in the frame for up to 10 years. However, arcs from PVC pipes can only be bent semi-circular or, to increase the height by reducing the span, parabolic, pos. 1 in Fig.

PVC is quite plastic and not particularly durable, and the ridge of the roof is most loaded. If the PVC pipes are connected at a kink here, the fastening will not last long.
The strongest, most durable, and gives the most choice of construction options, is a frame made of polypropylene pipes. From them you can assemble pointed arches, pos. 2 in Fig. And their use, in turn, provides the following advantages:
- Using a simple plumbing right angle and self-tapping screws (item 1 in the figure below), the arches can be made collapsible into corners and long parts that require little space for winter storage.

- From sections of 3 m (halves of a standard 6-m pipe) an arch is obtained with a span of more than 1.7 m and a height of under 2 m, pos. 2. That is, you can enter the greenhouse like you would into a greenhouse.
- The pointed arch ensures high use of light because... there is no flat strip of roof covering giving a large tangential (lateral) reflection. But there are always arches on the slopes wide band, giving optimal refraction at any position of the Sun.
- The high elasticity of PP makes pointed arches pre-stressed, i.e. increased strength. This makes it possible to use prestressed PC for the coating, as for greenhouses.
- A ridge beam made from the same pipe is secured from the inside with clamps, tying with wire or agro-adhesive tape, also pos. 2.
- In general, the frame is very durable and resistant to loads from precipitation: there is nowhere for snow piles and rain flows to linger.
- The high altitude not only makes it easier to care for plants, but also allows you to grow long-fruited cucumbers simply on stamens in combination with other crops, pos. 3, or low-growing valuable varieties of the same cucumbers, for example. gherkins, pos. 4.
About PC coatings
In some regions, depending on local prices, polycarbonate coating may be cheaper than agrofiber for a greenhouse of the same area. In such a case, in Fig. – installation of a sub-fence/wall-mounted greenhouse under a PC for tomatoes:

There is 1 whole sheet for the roof; no special fasteners are required. The height and width are given taking into account PC waste for processing and fastening. Where higher, tall varieties are planted, for example. pink, regular in the middle, and small but very tasty (and expensive on the market) cherry tomatoes at the bottom. The height and width are given approximately for the latitude of St. Petersburg based on summer. To the south, the height can be taken equal to the width, and vice versa.
However, PC is more suitable for covering “long-lasting” greenhouses on a steel frame with flaps. In this class, the usual butterflies, pose. 1 on next Fig., are gradually being replaced by greenhouse-bread bins, pos. 2. A greenhouse-breadbox is better than a butterfly not only and not so much in its greater ease of care. In it, in any position of the valves under the arch, a cushion of warm greenhouse gases is retained for quite a long time, which greatly reduces the likelihood of plants getting cold when ventilated.

When planning to purchase or independently make a greenhouse-bread bin, you need to know about its weak points. The first is a hinge with fixation of the sashes. This is a technologically quite complex unit that requires precise manufacturing of parts while maintaining the resistance of the entire hinge to contamination. The second is the joint of the sashes. A gap of 2-3 mm is enough for the warm pillow not to stick, so there should be a gap in the joint minimum width and compacted.

Bread bins, as you know, come not only with flaps. At pos. Figure 3 shows a greenhouse-breadbox in the form of a chest. He holds the pillow under the arch in the same way, but for home craftsmen and craftsmen his design is preferable, because does not require special manufacturing care. Therefore, on to the next. rice. Drawings of a simple greenhouse-breadbox-chest are given.
Breadbox for the North
According to the scheme of another type of household bread bin, a greenhouse with a heat accumulator for a particularly harsh climate can be built. It is suitable only for potted and container culture, but in places with soddy-podzolic or tundra-gley soils, anything else is impossible. Unlike a heat-accumulating greenhouse with lighting in the dark, here the air circulation is semi-closed, for which the heat accumulator itself (ruble stone, broken brick) is placed in a cage made of steel rods, raised above the floor of the greenhouse, see fig. During the day, the lid is opened slightly, the flow of fresh air provides ventilation. The plants do not get cold, because... cold air immediately mixes with the warm, heated Sun through the lid. The battery gains heat and releases it at night when the lid is closed.

The inclination of the cover from the vertical is equal to the angular height of the Sun at noon of the equinox, pos. A, where φ is the geographic latitude of the place. There is no need to make a heat storage device from seemingly quite suitable solid hollow red brick. As can be seen in pos. B, there will be no horizontal air circulation in such a storage tank, it will warm up unevenly and at night the cold part will take the heat for itself, but the plants will not get it.
The traditional design of a mini-greenhouse replicates that of a mini-greenhouse. But a modern mini-greenhouse is already different: it is either a light spatial frame, covered with PET or EVA, for flowers or a small number of seedlings, or an individual umbrella greenhouse for elite garden specimens, see fig.

Both designs can be easily reproduced at home: a three-dimensional frame can be made from scraps metal-plastic pipe, fastened with agro-or ordinary tape, and an umbrella - from any rigid rod and fiberglass rod ends or pieces of elastic steel wire, for example. bicycle spokes In any case, it is better to dissolve PET bottles into sheets for coating.

Easier than steamed turnips...
...which can also be grown in a greenhouse. Finally, we will give options for greenhouses, as they say, out of nothing and for nothing. In Fig. on the right is a mini-greenhouse made from a barrel. How to make it, see the video.
A greenhouse is an indispensable element in any summer cottage. Thanks to this relatively small but very necessary structure, you will be able to provide favorable conditions for rapid growth of seedlings, protect tomatoes and cucumbers, as well as others from frost horticultural crops, get an early harvest - the greenhouse will always take care of your plantings. It can be of any shape, among which you can easily choose the one that suits you and your site best. At the same time, it is not at all necessary to buy this house for plants - you can make a greenhouse with your own hands quickly and easily, if you know how.


Before you go to the barn to assess the availability of materials and tools or to the store to purchase them, you need to inspect the garden plot and choose the place where the greenhouse will be built. Of course, the structure can be portable, but most often it is made stationary. In addition, the choice of location and availability free space the size of the structure will depend, and this factor greatly influences the amount of materials required for construction.

The location for the greenhouse should be selected according to the following principles.
- This should be a flat piece of land. Installation of the structure on steep slopes is unacceptable. If there are snags and stumps in the area allocated for the greenhouse, then they must be uprooted and all holes filled with soil.
- Growing and fruiting plants need good lighting. That is why a greenhouse is not installed where shadows from trees, shrubs, greenhouses, houses and other buildings fall on the ground. Lack of light will negatively affect both seedlings and adult crops.
- It should be convenient for the gardener to carry out all the work in the greenhouse. Therefore, you need to try to calculate the location in such a way that there is sufficient passage around the structure and the greenhouse can be easily opened.


On a note! If the greenhouse is planned to be used for permanent cultivation of plants, for example, then care should be taken to build a second greenhouse, if space allows. The fact is that it is undesirable to grow the same crops, especially tomatoes and cucumbers, in the same place year after year. Usually the plantings are swapped. In this case, a second greenhouse would be very useful.
![]()
The optimal time to build a greenhouse is mid-spring. The snow has already melted, but the plants are not growing much yet. Although if there is nowhere to rush, then you can build a greenhouse at any time of the year, except winter. In winter, it is very difficult to carry out any construction, not only because of the cold, but also because of the hard ground.

Greenhouse dimensions
In general, the size of any greenhouse depends entirely on the desires and capabilities of the gardener, as well as on the types of crops that will be grown in it. If a greenhouse is needed only to acclimate seedlings to the street, but not for their permanent place of residence, then it can be completely small or hastily assembled without any special material costs. But if this design is meant to be capital, then it is best to make some calculations so as not to get upset later and not throw up your hands in case of a lack or excess of space.
You should start making calculations by developing a structural diagram (we will consider types of greenhouses below). Thanks to it, it will be easier to calculate the necessary parameters and the amount of materials.

On a note! Typically, greenhouses are made about 1 m wide and no more than 2-3 m long. The height is approximately 50-60 cm. Such dimensions will be as comfortable as possible both for carrying out work inside the structure and for growing seedlings, as well as low-growing crops.
You can also take the number of plants that will live in the greenhouse as a basis for calculations. For example, no more than 3 cucumber or tomato bushes can peacefully coexist on 1 m2. Based on this, you can calculate the dimensions of the structure you need.
It is also important to consider the dimensions of the material that will be used to build the structure. Sometimes it is easier to make a couple of small greenhouses than one long one, which can only be achieved by joining the material.

Types of greenhouses
Greenhouses for summer cottages come in a wide variety of shapes. To decide what type of greenhouse yours will be, you should get acquainted with the main ones.
Table. Types of greenhouses.
| Type of greenhouse | Description |
|---|---|
| A greenhouse that opens like a regular bread box. It can be factory-made or home-made. It is convenient because the lid does not tend to fall down and does not need supports, unlike, for example, a “butterfly”. |
| One of the simplest greenhouse options. Several plastic or wire arcs are stuck into the ground along the bed and covered with spunbond or polyethylene. It is quickly disassembled and assembled, and this process can be carried out by almost any gardener. |
| The lower part of this structure - the base - is recessed into the ground; only the greenhouse lid is on the surface. This method of arranging a house for plants allows you to retain heat inside the structure longer. |
|
| The greenhouse is arched or like a house, has two doors that open outward. Can be produced in a factory or made by hand. Provides uniform access to plantings on both sides. |
| One of the simplest types of greenhouse is two battens connected at the ridge and covered with polyethylene or other material. It is installed quickly and easily, but is unstable and is used more often as a temporary portable structure. |


Each of the above types has certain variations, supplemented by one or another element. For example, an ordinary greenhouse-breadbox can be installed not on the ground, but on the base, thereby making it taller. There are also a lot of greenhouses - for this, ordinary sports hoops, window frames, headboards and much more are used. Sometimes it’s enough to rummage around in the shed at the dacha, where unnecessary things are stored, and find several items that can easily get a new life in the form of a greenhouse frame. All you need is a little skill and imagination.


Greenhouse materials
It's time to discuss the main types of materials from which it is easy to create a greenhouse with your own hands. The frame itself can be of three types.
- Metal. This material is the longest-living and durable compared to others. He is not afraid of either wind or snow. Metal arches can support more weight than plastic or wooden ones. Metal has two main drawbacks: difficulty in processing (certain devices are needed to work with it) and a tendency to corrosion (this drawback can be corrected if the frame is painted). Also, if the greenhouse falls, the metal base will simply crush the plants.


After constructing the frame, it must be covered with a covering material that will retain heat and protect the plants from wind and cold. Let's consider the possible options.
- Glass. Heavy, but high-quality and durable material with increased fragility. It is easily damaged by impacts, breaks when dropped, but does not bend, and therefore can only be used for greenhouses with smooth walls. Does not retain ultraviolet radiation and retains heat worse, difficult to process.
- Polycarbonate. Recognized as one of the best covering materials. It has a certain strength, it is not afraid of moderate wind/snow loads, it bends well, and therefore can be used for the construction of curved structures. The material has protective layer, preventing ultraviolet rays from penetrating into the structure, and due to its honeycomb structure, it retains heat well. The service life is shorter than that of glass, but in some ways the material is even stronger, since it is not so fragile and will not break if dropped from a small height. Polycarbonate is also very easy to process.


Cucumbers are demanding when it comes to growing conditions and produce a good harvest only when the air and soil temperatures are stable. Providing cucumbers with the necessary microclimate is quite simple: you need to install a permanent or seasonal greenhouse in the garden. We will tell you how to make a greenhouse for cucumbers with your own hands in.

Also for connection individual elements you may need angles, screws, washers, corner profiles, clamps. To make it easier to open greenhouses with doors, handles and awnings are used.

Prices for cellular polycarbonate
cellular polycarbonate
Greenhouse "house"
Gable portable greenhouse- one of the simplest options that you can build with your own hands. It is a “roof” with two slopes, placed on the ground and covered with film. It can be made easily and quickly from a wooden beam approximately 5*5 cm, metal corners and screws or nails.
Step 1. We create two frames by connecting bars of their own length equal to length greenhouse, and shorter ones.


Step 3. We connect the two frames together at the top using a ridge strip. The approximate connection angle is 90 degrees.

Step 4. At the bottom of the frame we connect the elements with longitudinal slats. We have a frame.

Step 5. Now the frame needs to be covered with film so that it can rise to ventilate the plantings. To do this, we cut off the piece of covering material we need, slightly larger in length than the sum of the two side parts of the greenhouse.

Step 6. We cut out two triangular-shaped pieces of polyethylene the same size as the sides of the frame. We nail them with small nails on the sides.

Step 7 We nail a large piece of polyethylene onto the ridge strip.
A greenhouse for summer residents is the simplest and most unpretentious design for growing seedlings, as well as early vegetables and greenery. Currently, garden stores sell inexpensive snowdrop greenhouses, which are easily and quickly installed on a personal plot. Making such a greenhouse with your own hands is not at all difficult. There are the simplest designs that do not require large financial investments and labor costs.
Description of the snowdrop greenhouse design: design, advantages and disadvantages
The snowdrop greenhouse is the simplest design, which consists of a certain number of plastic (or metal) arcs and covering material (polyethylene film or agrofibre). Since greenhouses are much smaller in size than greenhouses, the requirements for them are not so stringent.
The small snowdrop greenhouse is easy to assemble and also easy to dismantle. It will only take a few hours to install it. It does not take up much space on the site and therefore can be placed anywhere in the garden. For such a greenhouse you can make a wooden base, or you can do without it. In this case, plastic or metal arcs are simply buried in the ground. The spunbond is attached to the arches with special latches, clips or other convenient methods.
Basically, the snowdrop greenhouse is made of spunbond (agrofibre), as it has a large number of advantages compared to polyethylene. Arcs made of plastic pipes are much lighter than metal ones, bend easily and do not rust.
Advantages and disadvantages of a snowdrop greenhouse made of plastic pipes and agrofibre
| pros | Minuses |
| Easy to install and dismantle | Not stable in strong gusty winds |
| Low cost of materials | During heavy rainfall and hail, the structure may bend |
| Agrofibre resistance to wind and hail | Not suitable for use in severe frosts |
| Protects plants from ultraviolet rays, transmits soft diffused light and prevents them from drying out | Small area and height of the structure for growing plants |
| Does not allow water to pass through and preserves plants in slight frost (-5°C) | If used carelessly, agrofibre can be damaged by sharp objects. |
| Durability of the design | |
| Easy to care for (easily machine washable) | |
| Agrofibre is a durable and hygroscopic covering material | |
| Suitable for use in middle lane Russia, the Urals and Siberia |
Examples of designs in the photo
 Small greenhouse “snowdrop” made of agrofibre
  Greenhouse made of plastic pipes
  Greenhouse on a wooden base made of spunbond
  Small polycarbonate greenhouse
  Small square greenhouse made of polycarbonate
  Triangular wooden greenhouse
  Greenhouse "snowdrop" made of plastic pipes under plastic film
  Polycarbonate greenhouse
Preparation for construction: drawings and design diagrams
To build a snowdrop greenhouse, you do not need special complex drawings or diagrams. It will be enough to draw by hand simple diagram greenhouse indicating the number of arcs and the size of agrofibre.
The greenhouse is 4 meters long, 1 or 1.2 meters wide.
Construction of a snowdrop greenhouse will not cause much difficulty, since you will need to buy the required number of plastic pipes and a roll of spunbond.
When purchasing covering material, it is necessary to accurately calculate the width of the material, since agrofibre can be made in widths from 1.6 to 3.5 meters. A narrow canvas can be used in a ground-based greenhouse as mulch.
To build a small greenhouse from 4 to 6 meters long, you can simply sew two strips of spunbond on a sewing machine.
If you plan to plant seedlings early in the ground, then it is best to use dense spunbond with a density of 60 units. Standard snowdrop greenhouses are covered with agrofibre with a density of 42 units.
Calculation of the required amount of material and tools for building a greenhouse
We will build a small greenhouse 4 meters long. To create it we will need:
- PVC plastic pipes - 5 pieces (diameter 20 mm). Pipes are sold in lengths of 3 meters. HDPE pipes can be used.
- Agricultural material - a piece 6–7 meters long (if the width is 1.6, then the footage is multiplied by 2).
- If we make a greenhouse with a base, then we will need wooden boards - 2 pieces 4 meters long and 2 pieces 1 or 1.2 meters long. The width of the greenhouse will depend on its height; the higher the structure, the smaller its width will be. If there are strong winds in the region, then it is best not to build a high greenhouse.
- If we put arcs on the reinforcement, we will need 10 rods about 40–50 cm long.
Tools:
- Hammer, nails;
- Screwdriver, self-tapping screws;
- Construction level, corner;
- Bayonet shovel.
Step-by-step instructions with photos for building and installing an arched greenhouse “snowdrop”
- First we need to knock down the base for the greenhouse. To do this, we take wooden boards and knock them into a rectangle. We check the evenness of the structure with a corner or building level.
- We install the base on the ground in the place where the greenhouse will be built. On the sides, from the outside or inside, at a distance of 1 meter from each other, we drive in reinforcement to a depth of approximately 20–30 cm. The rods should be located opposite each other.
- We bend plastic pipes and insert them into metal rods. For greater strength, plastic pipes can be secured with self-tapping screws metal plates to the base.
- Also, for greater strength, you can nail wooden blocks at the corners of the base and in the places where the arches are attached.
- If we need to make the greenhouse more stable and reliable, then we simply nail vertical wooden boards to the base of the boards (at the short ends). We attach a vertical board to them on the edge, in which we pre-drill holes with a diameter slightly larger than the plastic pipe.
- During the assembly of the greenhouses, we thread each pipe into these holes. The greenhouse structure will be more durable.
- If you make special folds in the agricultural material every meter and stitch them, then the arcs can be simply inserted into them and then there will be no need to secure them to the structure with special latches or clips.
- For further use of the greenhouse, you may need ordinary clips for plastic pipes, which will secure the agricultural material raised to the required height.
How to make a snowdrop greenhouse for cucumbers, peppers and eggplants
A triangular-shaped greenhouse is perfect for growing cucumbers.
- First, we make a wooden base the same as for an arched greenhouse. In the middle we nail the posts every meter.
- Then we nail two inclined boards to them on each side of the base. We get a triangular-shaped structure.
- We nail a long beam or attach a pipe to the top of the greenhouse.
- We attach agrofibre to the sides of the greenhouse. We also attach spunbond to the sides, but only in a different way. We cut off the required number of strips, measuring the length by the width of the material with a margin. We nail small wooden slats to the agrofibre on both sides, which will serve as a certain “anchor” for the material. We cover the greenhouse with it and nail it on top so that it sticks better to the structure.
- Thanks to the wooden slats, the agrofibre will not rise in strong winds, it will not need to be fixed at the base, and it will also be convenient to use the greenhouse on both sides.
- If desired, agrofibre can be replaced with cheaper polyethylene film.
- After the cucumbers begin to curl, the agrofibre can be removed and high posts can be nailed to the side parts. Between them we will just need to pull a rope along which the cucumbers will curl upward.
How to use a greenhouse
- The snowdrop greenhouse made of plastic pipes is easy to assemble, so at the end of the season you can simply assemble it like an accordion and put it in the pantry.
- If the greenhouse has a wooden base, it will need to be treated regularly antiseptics, to avoid the appearance of fungus and mold.
- Agrofibre is a lightweight but durable material that can be easily washed in an automatic machine.
- If you want to use biological fuel as additional heating for a greenhouse, its base will have to be buried about 15–20 centimeters into the ground. We insulate the side walls with foam plastic, and inner space we fill the greenhouse organic fertilizer: manure, as well as dry leaves, hay or straw.
- Place the prepared soil mixture on top of the layers.
Biofuel types:
- Horse manure is considered the best organic fuel, since within 7 days after installing a greenhouse, the temperature inside it will rise to +25–30°C and will remain for about two and a half months. Thanks to this, seedlings for early vegetables can be grown in such a greenhouse.
- Cow and pig manure are slightly worse than horse manure, as they produce less heat. The temperature in the greenhouse does not rise above +20°C and lasts only 1 month.
- Goat, sheep and rabbit manure have similar characteristics to horse manure and produce the same amount of heat.
Since biofuel settles over time, when laying it it is necessary to make a sufficiently high layer.
Video: how to make a snowdrop greenhouse with your own hands
The light and simple design of the snowdrop greenhouse is perfect for growing seedlings, early vegetables and herbs. It does not take up much space and can be built in just a few hours if you have all the materials and tools. After the season ends, such a greenhouse can be removed to make room for growing other late crops. Thus, with a minimum of effort and a little imagination, you can build an excellent collapsible greenhouse on your site.
In this article we will talk about what it is greenhouse, what types of it are there and, most importantly, how to build it with your own hands. What materials can it be made from, how to do it correctly, where to mount it and how to heat it? This is exactly what follows.
Greenhouse at the dacha: how to choose a location?
 When choosing a location for a greenhouse, many factors should be taken into account. The main one is the light mode. Thus, greenhouses intended for summer cottages should be placed in areas well lit by the sun. Light is necessary for fruit crops, especially in winter. If you neglect lighting, then growing photophilous crops in winter it will become impossible. If you do not have a well-lit area at your dacha, then greenhouses can be equipped with additional sources of artificial lighting, although this will entail additional energy costs. That is, the cost of the fruits of cultivated crops will increase.
It should be mentioned that in spring and summer periods other concerns may arise, since the sun will constantly illuminate the greenhouse, and because of this, the temperature in it will only increase, which will lead to withering of the plants. And again there are extra costs for ventilating the greenhouse in order to maintain the optimal temperature. Therefore, once you have decided to make a greenhouse with your own hands, you must first decide on the installation location. In particular, you also need to take into account the direction of the prevailing winds, because this factor is especially important when installing a permanent winter greenhouse.
Did you know? The first prototypes of modern greenhouses appeared during the times of Ancient Rome. Gardeners planted plants in small carts, which were rolled out into the sunlight during the day and put away in a warm room at night.
Types of greenhouses in the country
When you decide to get your own greenhouse, don’t forget to answer the following questions:
- Why do you need a greenhouse and what are you going to grow in it?
- Will it be used in winter or only during the warm season?
- Will you mount heating devices in a greenhouse you made with your own hands?
- What is your goal - to grow plants for sale or for yourself? Do you expect the costs to quickly pay off?
- What size greenhouse do you need?
Did you answer? Now let's look at the types of greenhouses that are offered modern market, so that you can choose a design that best suits all requirements.
What types of greenhouses are there by design?
 The simplest and most economical in terms of design is a recessed greenhouse. Perhaps the only drawback of such a structure is that when installed on clay and loamy soils, it will be necessary to equip drainage and drainage systems. To create such a greenhouse in the garden with your own hands, you first need to dig a trench of arbitrary dimensions. It should run in the direction from east to west. The walls of the trench should be strengthened with spacers made of slabs or boards cut on both sides (the side where direct sun rays make it a little higher). It is necessary to sow seeds or plant seedlings on the sides of the depression, and lay fresh manure in the strip in the middle. When it begins to decompose, additional substances for plant nutrition and heat will be released. Upon completion of all work, the walls from the outer sides must be covered with earth to the top level and covered with polyethylene film or covered with glass.
The simple design of a recessed greenhouse forces you to choose a dry place that is well lit and protected from the winds. Take into account the shadows cast by buildings and trees nearby. A ground greenhouse looks like an ordinary film covering the soil in which seeds are sown or seedlings are planted. To ensure optimal temperature regime, you need to pull the film as close as possible to the seedlings, but at the same time so as not to interfere with their free growth. There are several types of ground-based greenhouses, which differ only in the method of installation, height and operational characteristics.
Let's consider the main ones:

Did you know? In Iceland, greenhouses are built on geysers.
Types of materials for a greenhouse
Both glass and various polymer materials can be used as a translucent material for covering greenhouses. Glass is enough durable material, therefore, glazed greenhouses last for years, but the main drawback due to which it is not often used when creating greenhouses is that it does not transmit the entire spectrum of sunlight, which is so necessary for growing vegetables. As a result, their taste deteriorates, since the content of vitamin C is reduced. In addition, glass is heavy and quite fragile.  From materials of the lamellar polymer group greatest distribution received polyethylene film, mostly due to its low cost. In addition, it is easy to install and allows the required amount of light to pass through. Also, such material can be easily removed from any part of the frame if you need to ventilate the greenhouse or harden off seedlings. The main disadvantage is its fragility, which is explained by the weak strength of the material.
Other advantages of polyethylene film include:
- elasticity;
- frost resistance;
- high moisture resistance;
- good possibility of penetration of oxygen and carbon dioxide;
- transmission of the entire spectrum of sunlight;
- good light scattering ability.
Polyvinyl chloride film is endowed with all the advantages of polyethylene film, moreover, it has a longer service life, and the only disadvantages include low permeability of ultraviolet rays (about 20%). But, alas, this film did not gain popularity. Polyethylene and polyvinyl chloride materials reinforced with fiberglass last up to 8 years and have a light transmittance of 75%.  The most common rigid polymer material is cellular polycarbonate. It can perhaps be called the golden mean, because it has all the advantages of glass and plastic film and is almost completely devoid of their disadvantages. In terms of price, cellular polycarbonate is more expensive than film, but cheaper and lighter than glass. At the same time, it is much stronger, therefore more durable.
Advantages of cellular polycarbonate:
- high sunlight transmittance up to 86%, which over time can drop to a maximum of 82%;
- excellent light scattering ability, which prevents sunburn on plants;
- operational life is 20 years;
- high impact resistance of the material;
- excellent thermal insulation qualities;
- good resistance to bad climatic conditions, maintaining all properties at extreme temperatures from -40°C to +120°C;
- simplified installation process due to low weight;
- good flexibility (it can be used to make different roof structures).
 There are three types of polycarbonate covering material: budget, standard and premium. Budget class sheets have a lower density, they are thinner and contain large quantity second-class raw materials. They are cheaper, but have a shorter service life. Standard sheets have a thickness of 25 mm. On one side, they are covered with a protective material that protects polycarbonate from the harmful effects of the environment. It is this polycarbonate that has all the advantages that were described above. It is manufactured in accordance with international standards quality. Premium class polycarbonate has a thickness from 4 to 30 mm and, unlike the standard class, the protective material lies on both sides.
But installing premium polycarbonate will require you to have certain knowledge and skills:
- stiffeners must be mounted vertically to avoid condensation accumulation;
- you cannot bend polycarbonate to a radius smaller than that specified by the manufacturer;
- the ends of the panels must be sealed before installation;
- This material can only be cut with a saw with small teeth or a construction knife;
- fasten the polycarbonate with self-tapping screws with thermal washers;
- the design of a do-it-yourself greenhouse does not involve the installation of polycarbonate material at temperatures below +10°C;
- Installation of polycarbonate should only be carried out with an overlap. It is strictly forbidden to mount it end-to-end.
Did you know? The Crystal Palace was built in London inXIVcentury. For a long period of time, many festivals and various events were held in this large greenhouse, including the Queen’s receptions.
How to make a greenhouse with your own hands: step-by-step instructions and necessary tools
In order for the results of the harvest to meet your expectations, you need to think about where to put the greenhouse, what material to use during installation and what plan to follow when constructing the structure. All these issues must be resolved before construction work begins.
How to make a greenhouse from arcs?
After the arcs and covering material have been selected, you can begin making a greenhouse with your own hands.
Frame assembly:
- Attach the arcs with staples to a base of slats or bars, or bury them in the ground.
- The distance between the arcs should not exceed one meter (optimally 80 cm). Otherwise, the stability of the frame will be at risk.
- The top of the greenhouse must be “tied” with reinforcement to give the structure strength. Can also be used PVC pipes the right size.
Important! Cover the arc greenhouse with film over its entire length, so that from the end it reaches the ground. This is necessary so that the wind does not get inside and completely destroy the greenhouse.
If you cover the frame with inexpensive plastic film, then on the sides it can be pressed to the ground with improvised materials. More expensive types of covering material will need to be attached with special staples to the ground or to the base of the arches.
How to make a greenhouse out of wood?
Greenhouses made of wood, which are made by amateur gardeners with their own hands, are the most convenient in mastering the first steps of growing plants. They are made collapsible for ease of reuse next year. Making a wooden greenhouse with minimal financial costs is much easier than it might seem at first glance.
 Even an inexperienced gardener can make a small arched portable greenhouse with his own hands. The small size limits the full care of vegetable crops if you are inside it, so you have to remove half the cover for watering, weeding and other work. Greenhouse film becomes unusable very quickly, so it is better to work a little more and construct a greenhouse in the form of a box. Such a greenhouse can also have transparent walls, not just the roof. To do this, you need to collect several wooden frames and fasten them together. For ease of access, it is better to make the roof hinged and equipped with a latch so that it does not open due to strong wind gusts.
Important! In order for such a greenhouse to last longer, install it on an improvised brick foundation. If you use bars, they will need to be soaked special composition which will prevent rotting.
Stationary greenhouses for summer cottages, which are built with your own hands, require the laying of a capital foundation. It can be built from old bricks with cement mortar, which is a more budget-friendly option. You can also use ready-made concrete blocks or fill with mortar and place the formwork. The next stage is tying the structure. Along the perimeter of the foundation, lay a wooden beam with a section of 10x15 cm on top. The beams can be fastened in any way: “dovetail”, “half-wood”, with an anchor, or by mechanical linings.
Important! Any greenhouse must have the ability to ventilate. The hinged fastening of the frames or the easy ability to remove the covering material are excellent for this.
 Attached to tied beams wooden sheathing, which consists of vertical posts and horizontal bars in increments of one meter maximum. If you organize a film covering, you can stretch it over the frame, securing it to the outer planks, or create modules from old window frames with film instead of glass, which are connected into one continuous structure. The roof can be of any kind, but it must have a slope, even a minimal one, which will ensure the drainage of precipitation. Inside the greenhouse, you can dig a shallow trench the length of the entire structure, which is filled with fertilizers and then covered with a thick layer of soil. A thick layer of soil will protect the deep roots of the plant from burns (a height of 30 cm will be optimal).
Did you know? In northern countries, greenhouses are often attached to houses. Thus, it is convenient to care for plants and heat the house at the same time.
How to make a greenhouse from old windows?
In order to do small greenhouse from old window frames with your own hands, you will need the following materials:
- window frames in the quantity you need;
- several long boards, not thick logs or bars;
- old brick or concrete for the foundation;
- fastening elements for connecting frames to each other.
When the material for creating a greenhouse is selected, you should more accurately determine its size. There is no such thing as the optimal length of a greenhouse, since it will depend on the size of those same window frames and their number.
Important! You should not design a greenhouse that is too large, because it will not be as convenient in terms of operation.
 Before you start assembling the structure, make sure that all frames are the same size. Adjust the boards and beams to necessary requirements and coat with bitumen mastic or waste machine oil. Lay bricks along the entire perimeter of the future building and place bars on them. From the inside, attach the boards vertically to the beam with self-tapping screws. The distance between them must be made slightly smaller than the width of the frames. On top, along the outside, attach new boards so that the top edge of the first completely coincides with the vertical ends. Afterwards, you need to attach the rafters to the ends with a “house”. This form is necessary, as we have already discussed, for normal precipitation drainage. On finished frame Attach the window frames using the same screws.
Important! At least one of the greenhouse frames must open, so it must be hinged on one side and secured with a latch on the other.
We construct a metal greenhouse
 A greenhouse frame made from a profile pipe is the most durable and reliable structure of all. known species shelters for growing early vegetable, berry and flower crops. To construct a mini or large summer cottage greenhouse from a metal profile, you need to take a fairly powerful pipe. A profile of 40x20 mm is ideal. To connect the frame horizontally, a pipe with a cross section of 20x20 mm will be sufficient. Before purchasing covering materials, to create a future frame, it is necessary to plan a drawing of the future greenhouse. This will help you make more accurate calculations of the amount of materials needed. This will also significantly reduce the time and loss of metal during cutting. Next, we will take a closer look at how to make a metal mini greenhouse with your own hands with the simplest gable roof.
First of all, decide what the foundation of your future greenhouse will look like structurally. Here you can choose from several options, starting with wooden railway sleepers and ending with screw piles. In this example, we will consider a small monolithic foundation, 30-40 cm deep. Before filling the dug trench, lay anchors along the entire perimeter for future pipe fastening. As soon as these parts have set, weld a 40x20 mm profile pipe to them, which will serve as a reliable basis for attaching all future frame frames of your metal greenhouse.  To avoid any distortions during frame assembly, assembly must be carried out on a flat and hard surface. If there is one, then you should mark the outline of the future frame on it and cut a profile pipe along it. To simplify the assembly process, it is not necessary to cut the profile into separate parts; it is better to make small precise cuts with a grinder, and then gradually bend the pipe. Thus, you should get a frame of the desired shape. Accurately calculate the angles of the cuts so that the pipe cuts fit tightly and accurately when bending. After this, carefully weld all joints. The structures that should be approached with the utmost responsibility are end frames. An entrance door will be installed in one of them, and a window in the other.
If you are planning to make a mini greenhouse, then the door can be excluded. Hinge these elements directly onto the frame while it is still lying on the assembly area, as the additional weight will make installation difficult. The 40x20 mm profile has sufficiently high rigidity, so frames can be installed every meter.  They need to be connected to each other by sections of a 20x20 mm square profile. Install frame elements with end frame. So that she doesn't deviate from vertical position, it must be fixed with two angle braces, welding them to the horizontal foundation pipe. Weld the horizontal connecting elements of the profile 10 cm below the inflection point of the frame. This is necessary so that you can attach the polycarbonate in width and length as conveniently as possible.
Thank you for your opinion!
Write in the comments what questions you have not received an answer to, we will definitely respond!
2
times already
helped