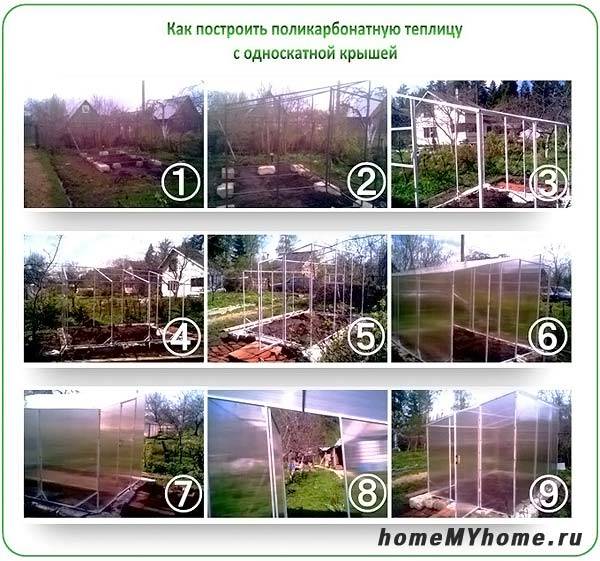
Polycarbonate greenhouse: sizes and types of shapes. How to make a polycarbonate greenhouse Choosing a location for a greenhouse
Read also
Greenhouses are becoming increasingly popular among owners of suburban areas. This has especially developed with the advent of a unique material - polycarbonate. And, of course, home craftsmen try to do everything themselves.
DIY polycarbonate greenhouses
This plastic is a new generation building material. The main properties that determine its popularity are:
- High impact strength.
- Increased strength characteristics.
- Non-flammability.
- High light transmittance.
Examples of using polycarbonate
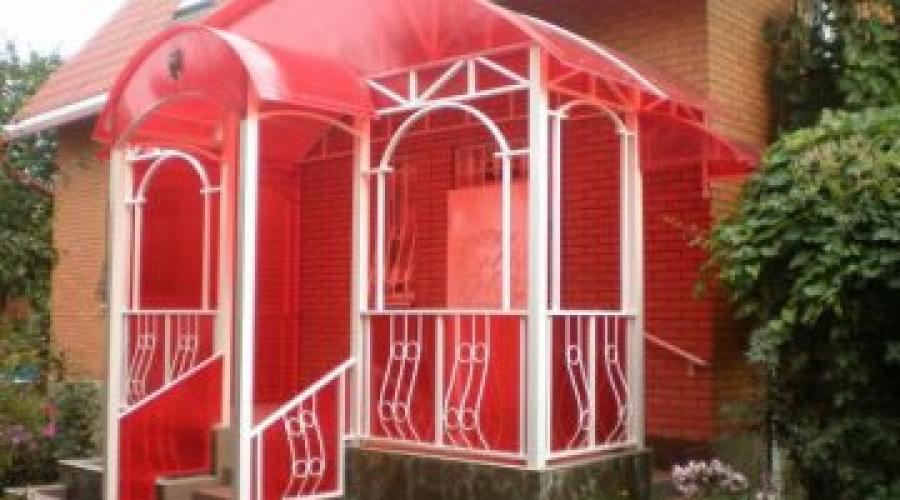
Use of material for air passages  Polycarbonate porch
  Canopy over the pool
  Cellular polycarbonate for greenhouse
This allows it to be used for the construction of transparent structures for various purposes in construction, industry, mechanical engineering and many other areas of the national economy.
What is
Polycarbonate is a complex linear polyester of carbonic acid and phenols. Among plastics, it has no equal in strength, transparency and low thermal conductivity. In addition, it can be easily bent, which allows you to create structures of complex configurations from polycarbonate.
Thanks to these properties, this material is widely used in the construction of greenhouses, greenhouses, winter gardens and greenhouses.
Release forms
There are two types of products made from this material on the building materials market: honeycomb and monolithic sheet.
In addition, a wide range of components and special fasteners are offered for the installation of buildings made of this plastic.
Standard sheet sizes:
- Products made from cellular polycarbonate are produced in lengths of 6 and 12 meters with a width of 2.1. Sheet thicknesses are: 4, 6, 8, 10 and 16 millimeters.
- Monolithic polycarbonate is produced in dimensions of 2.05 x 3.05 meters with thicknesses: 2, 3. 4, 5, 6, 8, 10 and 12 millimeters.
Advantages and disadvantages of polycarbonate greenhouses
Until recently, the main materials for the manufacture of greenhouses were window glass or plastic film. Nowadays polycarbonate is increasingly used despite its higher cost. Its decisive advantage is durability - with a successful choice of design and proper manufacturing, a polycarbonate greenhouse will last at least 20 years.
About the main advantages of polycarbonate structures:
- The transparent design allows almost all sunlight to pass through.
- Due to the high strength of the covering material, greenhouses are resistant to impacts from hail or large branches and twigs in strong winds.
- The low thermal conductivity of the material can significantly reduce heating costs when using the greenhouse year-round.
- The ability of polycarbonate to block up to 95% of hard ultraviolet radiation, harmful to both people and plants.
A carefully made greenhouse of an original shape can become a real decoration of the exterior of the site.
The disadvantages include the following features:
- High cost compared to traditional materials. This is an important circumstance, but if you take into account the long service life of the material, it is completely leveled out.
- High degree of thermal linear expansion, which leads to the need to use special fasteners during installation.
- The need to use a solid foundation when installing the frame - the construction of a foundation seems necessary.
Construction of greenhouses and greenhouses
To increase reliability, their design is as follows:
- The supporting base is the foundation. The best option is strip concrete. The laying depth is at least 60 centimeters. When pouring, reinforcement is made with steel rods. Particular attention is paid to the horizontality of the load-bearing surface.

Types of frames for greenhouses - photo gallery
 Dimensions of main components
  classic wooden greenhouse frame
  Option for making a frame from profile pipes
  Double arc support structure
As you gain experience, this simple device can become a starting opportunity for developing your own business.
Preparing for construction
As with any construction project, there is a certain procedure for implementation:
- Determine the purpose of construction - whether it will be a simple greenhouse, a winter garden or a greenhouse.
- Find out what sizes of polycarbonate are available on the local market and take this into account when designing.
- Complete a preliminary design with drawings of parts. Calculate the need for materials.
- Prepare what you need.
The main task when performing preparation is the accurate calculation of materials. The excess is a direct overspend. A shortage will result in additional hassle and shipping costs.
Frame materials
The main requirement for a frame when using polycarbonate is a long life cycle. It must correspond to the durability of the base material.
For the manufacture of the supporting structure of the greenhouse, the following are used:
- Wood in the form of timber measuring 150x50 mm. When making arched structures, a number of short parts are joined into an arched structure. The connection is made end-to-end using galvanized steel plates with self-tapping screws with a diameter of 5 or 6 millimeters. The plates are placed taking into account the subsequent refinement of the arc shape. Before starting assembly, you need to draw the profile of the frame arch on a flat plane. Each arch must be aligned along the contour, achieving complete compliance. To ensure the accuracy of angular cuts in the manufacture of parts, a miter box is used. When performing rounding with a jigsaw, keep in mind that the minimum permissible bending radius is 150 times the thickness of the polycarbonate sheet used. For example: for a sheet with a thickness of 6 mm it is 90 mm.
- Bent profiles made of galvanized steel. Usually this is a channel. With bend radii such as those used for polycarbonate, it is easy to bend it manually. For this purpose, a slipway is made from supporting metal pegs. The distance between them is no more than 50 centimeters. The supporting arch must consist of two arches. The second part is also bent along the pegs with a bending radius 150 mm smaller than for the first. After the bend is completed, ribs are welded between these two parts. In this form, the arch acquires sufficient load-bearing capacity to withstand snow and wind loads. Attention! Galvanized welds must be thoroughly cleaned and coated with a protective layer of special paint, consisting of 95% zinc powder, the rest being binder additives.
- Bent aluminum profiles. Such structures are made using the same technology as galvanized steel arches. The only difference is that welding is not used. The stiffeners are installed using connecting plates with screws. Aluminum structures do not require additional corrosion protection or additional maintenance during operation.
- Profile steel pipes. Depending on the size of the structure, they are used in sizes from 20x20 to 60x60 millimeters. Arches are made according to the same principle as from other materials with mandatory adjustment on the slipway. All supporting structures made of ferrous metal must be treated with a primer, followed by the application of at least two layers of impact-resistant paint. Maintenance during operation consists of regular annual inspections of structures and touch-up of damaged areas.
Choice of base coating
For small greenhouses and greenhouses, cellular polycarbonate with a thickness of 4 mm is usually used. It has sufficient heat-insulating characteristics.
The second criterion is the size of the structure in width - the larger the area of the roof and walls, the more loads fall on them. Therefore, for large structures it is advisable to use thicker cellular polycarbonate. When constructing a greenhouse or winter garden, double covering is preferable.
If desired, make the structure transparent. In this version, it organically blends into the exterior of the site. The option looks good when only the wall on the side of the site allows light to pass through and the covering material in this case becomes a monolithic polycarbonate sheet. The honeycomb coating allows blurred images to pass through.
The color scheme of the structure depends only on the preferences of the owner.
Calculation of the required amount of material
Polycarbonate sheets are installed lengthwise on the arched structure. Their number depends on the length of the structure. It should be taken into account that the butt profiles from the set of additional elements also affect the length of the coating. However, the number of sheets at the time of installation has already been determined during the development of the preliminary design. If the calculation is correct, purchase polycarbonate in quantities strictly according to it.
When calculating the need for materials for the supporting frame, the following points are taken into account:
- The standard length of lumber is 6 meters.
- Metal profiles are produced in sizes of 4, 6, 9.5 meters. When designing the frame, additional details are taken into account: wind stops in the amount of at least two pieces, as well as longitudinal connections between the arches of the frame.
- Fasteners for polycarbonate are produced purposefully, and you only need to purchase them.
- Important! The tool for drilling holes must be 1.5 millimeters larger than the diameter of the fastener. This is due to the greater thermal expansion of polycarbonate, which determines the need for expansion gaps.
- The fastener installation step is no more than 40 centimeters between installation points.
Tools
When making the frame and installing it you will need:
- Jigsaw for cutting polycarbonate sheets and performing rounding on wooden arches. Polycarbonate can also be cut with a hacksaw for wood, a knife when fitting parts, or reinforced scissors (four-millimeter).
- Welding machine - for assembling structures made of ferrous metals.
- Angle grinder (grinder) with a set of tools for cutting metal.
- Cordless electric drill - drilling holes during installation.
- Screwdriver - installation of fasteners during installation.
- Miter box - cutting timber from wood in the manufacture of load-bearing structures.
- Marker - marking.
- Measuring tools: tape measure, metal mechanic's meter.
- Cement, sand, steel reinforcement with a diameter of 10 mm for the foundation.
- Concrete mixer or “boat” for preparing concrete.
- Construction level - to control the foundation surface.
Basic tools for assembling a greenhouse - photo gallery
 Grinder for cutting materials
  Best tool for cutting polycarbonate
  Cordless screwdriver
  Inverter welding machine
In addition to the above, you will also need other tools of general use, which, as a rule, are available on the farm.
Step-by-step construction of a greenhouse or greenhouse with your own hands
Given the long service life of polycarbonate greenhouses, they require a foundation. To do this you need:

A foundation made of screw piles is possible and popular. They are screwed into the ground, the outer ends are aligned horizontally along the cord. The Mauerlat is attached to them, which is the supporting base of the greenhouse. With this installation method, no excavation is required.
Before installing the Mauerlat, cover the concrete surface with a moisture-proof layer of roofing felt. Further:
- Install the Mauerlat. It uses a wooden beam measuring 150x100 mm. It needs to be treated with antiseptics and waterproofed.
- Install the frame arcs and secure.
- The protective coating is laid from the front end to the rear; the joints can be made in different ways: using special elements from a set of additional parts or by laying the sheets overlapping with an overlap of at least 50 mm. In this case, fixation is made with a wire tie with a diameter of 5 mm to the Mauerlat. The sheets are fastened to the frame using self-tapping screws with a diameter of at least 5 mm. Attention! Screws should not be installed at a distance of less than 40 mm from the edge of the sheet.
- Installation of end walls.
- Installation of vents and doors.
- Installation of an internal irrigation and heating system.
Additional finishing
If you have built a winter garden or greenhouse, the winning element will be the fireplace. Near it there will be an area for receiving guests with comfortable armchairs, a sofa and a coffee table.
Building a greenhouse with your own hands - video
The initial idea of building a simple greenhouse often finds its development in its further improvement and transformation into a winter garden. It is now possible not only to grow vegetables and flowers all year round, but also to contain unique subtropical plants. In the end, the created object becomes not only a place of effort, but also a favorite place to relax.
All summer residents are familiar with this picture: May, it’s warm, the sun is shining brightly, there are the first shoots of early planting, the next morning you look out the window, and snow has fallen. Of course, this is not a completely favorable phenomenon, which will negatively affect yields, especially on crops that are sensitive to sudden temperature changes. If you are waiting for an early harvest to sell, then losses cannot be avoided. But it is quite possible to get out of this situation. It will not be possible to stop the snow, but everyone can protect the seedlings from it. This is precisely why a greenhouse is being built.
You can find many original ideas on how and what to build it from. We suggest you figure out how to build a greenhouse using polycarbonate. The article will present options for its arrangement, tell you what kind of foundation can be built, what to make the frame from and how to mount polycarbonate. We are sure that after reading the material you will be convinced that it is possible to make a polycarbonate greenhouse yourself.
Varieties of types and forms of greenhouses
Today you can find different forms of greenhouses. Most Popular:
- arched;
- tent
They differ from each other in the shape of the roof. There are also other differences, they are listed in the table:
| Comparison of greenhouses | |
|
|
|
| The name of this greenhouse speaks for itself. The shape of the roof is semicircular. It's a kind of tunnel with walls. For this shape, the ideal covering option is polycarbonate. It bends easily, forming a smooth arc. | Its production is carried out from separate blocks. On average, the height of the building reaches 2500 mm, sometimes higher. Length and width are determined individually. The roof shape is predominantly gable. |

Some greenhouses are not built for growing certain crops directly in the ground. In this case, the construction of special racks and shelves will be required.

There are options for greenhouses with removable insulation panels. For example, they can be removed during the warm season. When it gets cold, removable shields are put in place, and they protect the plants from cold and precipitation.

In any case, regardless of the chosen form of construction, the following must be taken into account:
- The greenhouse must be durable and functional.
- All plants must be freely accessible.
Polygonal dome-shaped greenhouses attract with their originality and shape. The process of making them is labor-intensive. Moreover, it is extremely difficult to cover them with polycarbonate.

Important nuances of choosing an installation location
There are several important nuances that should be taken into account when choosing a location for installation:
- soil composition;
- landscape drawing;
- side of the world.
As for landscape design, it is important to take into account the nature of the terrain or the dynamics of soil conditions. For example, if the greenhouse is installed on a slope, will it not be flooded when the snow or rain melts? Also pay attention to the level of soil freezing and groundwater levels. The values should be no higher than 1.2 m, otherwise the rising water will wet the roots, which will eventually rot.

Note! If the groundwater in your area is higher than 1.2 meters, then it is necessary to construct a drainage system to remove moisture.
As for the choice of cardinal directions and suitable soil, it is worth talking about this in more detail. If you do not pay enough attention to this issue, the yield in the greenhouse may be poor. This will be discussed further.
Determining soil for growing greenhouse plants
The soil should be relatively dry and level. If you dig a shallow hole where you plan to put a greenhouse and find clay in it, then this place is not suitable for a greenhouse. Clay retains moisture, so after each watering the water will remain on the surface for a long time.
Sandy soil is considered the ideal soil. If you don’t have sand on your site, then it is important to perform a number of additional works: dig a pit, pour sandy gravel and fill in a sand cushion. A layer of fertile soil should be poured on top.
Selecting cardinal directions

To begin with, it is worth noting that the correct location of the greenhouse relative to the cardinal directions contributes to serious savings on your money. If the greenhouse receives enough sunlight, there will be no need for lighting. In addition, sunlight will provide the plants with the necessary warmth. Agree that organizing the heating and lighting of a greenhouse will require a lot of money, but finance is still needed to maintain the systems and keep them in working order.
So, there are 2 good ways to install a greenhouse relative to the cardinal directions:
- from east to west;
- from North to South.
The first option is the most effective. Thanks to this arrangement, the plants will receive sunlight throughout the day.
Note! If your greenhouse is square, then these requirements do not apply to it. Determining the cardinal directions is necessary for greenhouses with dimensions of 3×6, 3×8 m or more. You can install a square greenhouse in a way that is more convenient for you.
Determining the location relative to buildings and trees

The location of the greenhouse in relation to existing outbuildings and trees also plays an important role. So, no shadow from the house or trees should fall on the greenhouse. If you place the greenhouse close to a tree, then foliage will accumulate on the roof of the greenhouse, preventing the penetration of sunlight into the greenhouse. You will have to constantly ensure that the roof is clean.
Having examined the main nuances of the location of the greenhouse, we suggest returning to our main topic. Let's talk about the advantages of using polycarbonate, as well as the features of its choice.
Features of polycarbonate greenhouses
Traditionally, the greenhouse is covered with glass or polyethylene. These materials are affordable. However, if we compare them with polycarbonate construction, the latter has a clear advantage in durability. There is a very high risk that the polyethylene will break. Moreover, you don’t need to make any special efforts for this. Glass is fragile and may break. Of course, polycarbonate can be broken, it just has more advantages in terms of strength and practicality. If glass breaks, shards can get into your eyes and exposed skin. Moreover, fragments that fall into the ground are very dangerous, because a large amount of work in the ground is done manually.
The advantage of such a greenhouse is that you can make it yourself. We invite you to familiarize yourself with the pros and cons of polycarbonate greenhouses:
| Advantages | Flaws |
| High transmittance of sunlight. | The material is flammable, which is a danger in case of fire. |
| The polycarbonate fixed to the greenhouse frame is resistant to mechanical stress. | Compared to other materials, the final cost may be higher. |
| The plasticity of the material allows you to give the greenhouse an arched shape. | |
| The service life is about 20 years. | |
| Polycarbonate is resistant to the negative effects of precipitation. | |
| Attractive appearance. | |
| The light weight of the material does not require the manufacture of a powerful foundation. | |
| Possibility to choose any color palette. |
Which polycarbonate to choose for a greenhouse

The market offers polycarbonate in different designs. Our goal is to select the most suitable material for the greenhouse. This is an important stage, because polycarbonate plays an important role in obtaining a good harvest. So, when starting to make a choice, it is worth remembering the following:
- It is not uncommon to find low-quality polycarbonate. The worst thing is that it is sold under the guise of branded materials.
- There is lightweight polycarbonate on sale - it has thin walls. Its use is cost-effective in warm climates. With sudden changes in temperature, such polycarbonate will become brittle. Moreover, it will not provide sufficient strength to the greenhouse.
- Often the parameters indicated on the packaging do not correspond to reality. For example, if the sheet thickness is stated to be 4 mm, it may turn out to be only 3.5 mm. But it is not recommended to buy such polycarbonate.
- If you want to purchase wear-resistant polycarbonate, then weight plays an important role in its choice. A normal and high-quality sheet of standard sizes will weigh about 10 kg. Lightweight version - 8.5 kg, or even less. The latter are not highly durable - they are fragile.
- High-quality polycarbonate always has a mark on the method and method of its installation. The presence of a special protective film against ultraviolet rays also indicates quality.
- High-quality polycarbonate is elastic and easy to work with. It shouldn't be too fragile.
If you are planning a large purchase of material, you can ask for documentation and a quality certificate. Usually the weight, size, manufacturer and other necessary data are indicated there.

New polycarbonate must be packaged in polyethylene. There must be appropriate markings on the side that is protected from ultraviolet rays and on the edge of the elements. If you don't have it, it's better not to buy plastic.
Cellular polycarbonate is most often used to construct a greenhouse. And this is logical, because it is relatively transparent, transmits up to 88% of light, and these indicators do not decrease during operation. If we talk about impact strength, it is 100 or more times greater than that of glass. Let us also highlight other features of this type of polycarbonate:
- The thermal conductivity of a material with a thickness of 4 mm is 2 times greater than that of glass. Which saves energy up to 30%. High thermal insulation is achieved due to the presence of an air gap.
- The material is self-extinguishing, so it is considered fireproof.
- Easy to install. The greenhouse can be given any shape.
- The material is resistant to various atmospheric conditions. Recommended for use at temperatures ranging from –40°C to +120°C. During operation, it does not lose its qualities.
Now let's pay attention to the appropriate thickness of the material for the greenhouse. The optimal thickness is 8 mm. The thicker the polycarbonate, the larger the pitch allowed in the sheathing. Thin material has a lower price, but the lathing must be done in small increments, plus its impact resistance is lower.
So, when choosing polycarbonate, consider the following recommendations:
- for greenhouses – up to 4 mm;
- for a small greenhouse - 6 mm;
- for the average greenhouse area - 8 mm;
- if the greenhouse has a large vertical part, then the recommended thickness is 10 mm;
- in case of large spans, a material with a thickness of 16 mm is recommended.
An important factor is the choice of material density. For a greenhouse it should be 800 g/m2. You can even determine the density visually. If, in a lying position, the sheets do not look skewed, do not have bends or other deformations, then the polycarbonate is of sufficient density. But it is best to ask for documentation with technical specifications.
Which is better – ready-made or homemade?

If you don’t like to do things yourself or don’t have time at all, then the ideal option would be to buy a ready-made greenhouse. You will purchase a complete kit, which includes a frame, fasteners, cover, etc. However, such greenhouses have a number of disadvantages that cannot be ignored. Factory-produced greenhouses often do not comply with stated GOST standards. As a rule, such frames are less stable. Therefore, before installing them, you should make a good foundation and further strengthen the structure.
The metal frame often corrodes, and very quickly the need for repairs arises. It's a completely different matter when everything is made independently. By doing everything from scratch, you will never skimp on consumables.
Below we suggest watching a video where a version of a ready-made greenhouse is provided.
Video: the process of assembling a finished greenhouse from a metal profile
Options for polycarbonate greenhouse frames
The frame can be made from different building materials. Each of them differs in quality, which affects the duration of operation. For example, a greenhouse can be made based on:
- profile pipe;
- wood;
- galvanized profile;
- polypropylene pipe, etc.
It is impossible to say for sure which one is the best, because each has undeniable advantages:
| Polycarbonate greenhouse frame options | |
|
|
The material is durable. Does not corrode when exposed to moisture. The advantages include ease of installation. The structures are lightweight, so there is no need to make a heavy foundation. However, there are also disadvantages. If there is a lot of snow in your area, the galvanized profile may bend and cannot withstand the load. |
|
|
This material is budget-friendly, unlike its analogues. This frame will last for many years. Polypropylene does not corrode. However, due to the light weight of the structure, the frame must be attached to the ground. And very reliable. Otherwise, the greenhouse may overturn under the influence of wind. |
|
|
Also quite accessible material. Using this material, you can completely independently make a frame for a polycarbonate greenhouse. But there are some disadvantages here. Wood itself absorbs moisture. For this reason, it is susceptible to corrosion and rots. Accordingly, a reliable foundation, high-quality antiseptic treatment of the frame and high-quality wood are required. |
|
|
This material is light in weight. However, in terms of price it is the most expensive. Considering that a thick aluminum profile is required for the frame of the greenhouse, in the end everything will be very expensive. Although the quality of such a frame will fully justify itself. |
|
|
This material is undeniably the best in its strength. However, to assemble such a greenhouse you will need a welding machine. A bolted connection is not the best option, although it is possible. To prevent the formation of corrosion, it is necessary to treat the profile pipe with a special compound. The installation process is quite labor-intensive and requires a lot of labor. |


What you should pay attention to when determining the frame design:
- Plan the correct location of the windows. For normal ventilation, 2 small windows are enough.
- If the greenhouse is large, then ventilation vents should be located every 2 meters.
- It is often necessary to think about organizing lighting, especially if you are growing vegetables for seedlings.
- Correctly calculate the number of sections and arcs in the future frame. Remember, the strength of the frame depends on the profile section. The step between each section should not exceed 700 mm. Although today you can find ready-made greenhouses with a pitch between arcs of up to 2000 mm. This is not the most durable option.
- Select the correct thickness of polycarbonate. We discussed the subtleties of this process above.
So, these are the main nuances that should be taken into account when forming the frame design.
Foundation manufacturing options
Like any other structure, the greenhouse must also be located on a foundation. It just may differ in the material used. It is worth noting that the base for the greenhouse must perform several important functions, including:
- providing a reliable basis for the frame;
- preventing direct contact of the frame wall with the ground, which provokes heat loss of up to 10%;
- preventing moisture from penetrating into the greenhouse;
- preventing moles, shrews and other “uninvited guests” from entering the greenhouse.
We invite you to familiarize yourself with several types of foundations that are successfully used when constructing a polycarbonate greenhouse:
- tape;
- wood;
- columnar.
We offer step-by-step construction instructions for each type of foundation. Of course, you may know other methods, but we will describe the most accessible and common ones.
Tape

This type of base has a high degree of strength. You can mount a frame for a greenhouse on it from any building material. In addition, it provides excellent protection against the penetration of cold and excess moisture. The production of such a foundation is carried out in several successive stages, which are reflected in the table:
| Stages of work | Instructions |
| Stage No. 1 | First, the strip foundation is marked. To do this, pegs are installed around the perimeter. To obtain the correct size, you should measure the diagonals and the angles themselves. The diagram shows how to perform these processes:
For a polycarbonate greenhouse, a foundation with a width of 250 mm to 400 mm will be sufficient. |
| Stage No. 2 | Now after marking it is necessary to carry out excavation work. A trench along the entire perimeter of the foundation is dug to a depth of 600 mm. |
| Stage No. 3 | The bottom of the trench is leveled, and a sand cushion with a thickness of about 100–150 mm is filled in. The layer of sand and crushed stone must be compacted. This layer is necessary in order to create a good base for the concrete and prevent it from mixing with the soil. |
| Stage No. 4 | Now you need to set up the formwork. In the photo you can see a small section of the formwork, namely the method of its installation:
The formwork must be securely fastened. Supports in the form of stakes or struts must be installed outside. It is necessary to tighten the formwork together with a tie made of wooden beams. The strip foundation should rise 300 mm above the ground level. |
| Stage No. 5 | Reinforcement in the form of a wire-bound frame must be laid at the bottom of the trench. This will give strength to the base. |
| Stage No. 6 | Now mix the concrete solution. It is best to pour the foundation at one time. Having laid a layer of liquid concrete, be sure to compact it and vibrate it. This will prevent the formation of voids in the concrete body. |


That's all, the strip foundation is ready. Depending on the type of frame, you can immediately insert metal embedded rods into the concrete, which will stick up. But this depends on the type of frame chosen. After pouring the concrete, it is recommended to cover it with polyethylene. This is especially necessary if the weather is sunny and hot outside. The concrete will gradually dry out.
Wood

If we talk about the simplest and most inexpensive foundation, then it is wood. Such a foundation will allow you to move the greenhouse to another location if necessary. However, remember the important disadvantage of such a base - the wood is subject to corrosion. The wooden foundation is based on timber. Manufacturing work consists of the following:
| Technology for manufacturing a wooden foundation for a greenhouse | |
|
|
First of all, it is necessary to make markings. This stage of work is performed regardless of the type of base. In this case, wooden beams 100×100 mm are used. Depending on the weight of the frame, the thickness of the timber may be greater or less. |
|
|
The bars are measured strictly according to the specified size. Using a marker, they are marked and prepared for cutting. |
|
|
It is convenient to use a chainsaw to cut timber. It is important to maintain a 90˚ angle. |
|
|
When you lay the beams, use a level. Thanks to this, the frame for the greenhouse will be level. |
|
|
There is a method of connecting beams groove to groove. In this case, a metal corner will be used. The edges of the beam are placed on supports. First, a base of bricks, blocks, or concrete is laid in the ground. |
|
|
Again, pre-measure everything by level. At this stage, the supports under the beam have already been laid and clearly installed. |
|
|
At the next stage, the diagonals are measured. |
|
|
Their sizes must match. If this condition is not met, problems may arise. |
|
|
If the dimensions all match, then soil is poured under the beam. It is also worth making control measurements using a level. |
|
|
At the last stage, the metal corner is fixed using self-tapping screws and a screwdriver. |
|
|
At the same time, control the diagonals so that your previous measurements are not violated. |
|
|
The end result is this kind of foundation for a future greenhouse. |


It is important to highlight some nuances here. In the method of laying a wooden foundation described above, the timber has direct contact with the ground. For this reason, the timber must be treated with a special anti-corrosion mastic. But this is short-lived, so after some time the base will have to be repaired. To eliminate this problem, some build a wooden base on a metal column foundation. How to do this, see the prepared video materials.
Video: marking and preparing the base for a wooden foundation
Video: what will happen if you don’t measure the diagonal when marking the foundation
Video: instructions for making a wooden foundation
Columnar
This type of greenhouse base is combined with a strip base. We will give instructions for making a columnar foundation on metal pipes. Wooden beams will be laid on top. All instructions are presented in the table:
| Sequence of work | The process of making a strip base |
|
|
After the marking has been completed, we determine the places for laying the support pillars. The support pillars must be located at the corners of the greenhouse. On the long side, the step between the pillars can be up to 3 m. Everything will depend on the weight of the future greenhouse structure. Wells Ø300 mm are manufactured. |
|
|
Roofing material is placed in the finished well, which will protect the concrete from direct contact with the ground. The roofing material should precisely form the required hole diameter of 300 mm. A pipe is inserted in the middle of the well, the walls of which must be at least 3 mm thick. As for the diameter of the pipe, it can be different: 50, 75, 100 mm, etc. The pipe is installed strictly vertically. |
|
|
Concrete work is now being carried out. The inside of the roofing felt is completely filled with concrete. To prevent the concrete mixture from pushing through the roofing material, it is necessary to simultaneously add and compact the soil. The level of poured concrete should be level with the soil or slightly protruding. |
|
|
According to this scheme, each support is installed under the foundation of the greenhouse. |
|
|
When the concrete has completely hardened, it is necessary to make preparations so that the columnar supports are cut to the same level. For this purpose, such a device in the form of a clamp is useful. Once you have marked the cut level, you can use the template to make an even cut. |
|
|
The next step will require a laser level. At one point you need to install it and “shoot” a laser beam at it at all installed pipes. Cutting marks are placed on the pipes. |
|
|
After this, using a special clamp, a cut is made along the marks using a grinder and a metal circle. Thanks to this technology, you can ensure a flat surface on the top of the columnar support. |
|
|
At the next stage, the concrete mixture is prepared. A kind of watering can is made that will direct the entire concrete mixture into the middle of the pipe. The entire inside of the pipe must be filled with concrete. As you know, when concrete comes into contact with metal, the latter does not rust. As the pipe fills, take a piece of metal reinforcement or other rod and pierce the concrete to completely eliminate any air from inside the concrete. |
|
|
When the concrete has gained 50–60% strength, you can proceed to the next stage. A sheet of metal 8 mm thick is taken. For the corner pillars of the support, these corner plates are cut. Holes are made in them through which wooden beams will be attached. |
|
|
The intermediate beams will have metal plates like this, which will allow you to either connect two beams together or fasten the beam along its entire length. |
|
|
As waterproofing for each columnar support, these “beddings” are cut out of roofing felt. Already on top you can lay the beams and fasten them for the subsequent formation of the greenhouse frame. |


Today, there are other technologies for making a polycarbonate foundation for a greenhouse. You should choose the most suitable option. At the same time, always take into account the fact that polycarbonate itself does not have much weight. Therefore, the strength of the foundation is determined based on the weight of the frame. It is clear that if it is a metal frame, then a stronger foundation is needed. Next, we suggest looking at several options for making a frame for a greenhouse.
Greenhouse frame
As for the frame of the greenhouse, it can be made of several materials. For example, the simplest one is a wooden beam. More expensive technologies are also used, including aluminum profiles, metal pipes and metal profiles. We invite you to familiarize yourself with the technology of making frames using different building materials.

First of all, it is worth considering the features of this material. Is it so good for making a greenhouse? A metal profile pipe is a pipe with a rectangular cross-section. This material is widely used due to the following technical characteristics:
- the load is distributed evenly along the edges, this ensures greater strength of the frame;
- a linear meter has a very affordable cost;
- the presence of smooth sides simplifies the installation of polycarbonate;
- The greenhouse made from the profile ends up being quite strong and durable.
Most often, a profile pipe with a cross section of 40×20 or 20×20 mm is used.
Drawing of a greenhouse made from a profile pipe. What is important to consider

When making a drawing of a frame from a profile pipe, it is important to take into account that the length of rolled profile pipe is limited: 3, 6, 4, 12 m, etc. Knowing the parameters of the future greenhouse, as well as the length of the profile, you can save a lot. How? For example, you can design a drawing to minimize waste. Moreover, the dimensions of the greenhouse can be adjusted to the existing dimensions of the profile pipe.
Note! If you are buying a profile for racks, then it is better to give preference to pipes with a cross-section of 20×40 mm; if we are talking about cross-sections, then pipes of 20×20 mm would be a suitable option.
When making a drawing, be sure to prepare the following elements:
- roof;
- upper/lower trim;
- vertical racks;
- openings for windows and doors;
- additional elements.
The installation step of each rack can reach 1 m.

As for the manufacture of the roof, it is necessary to prepare unique trusses. They can have two slopes or be in the shape of an arch. It all depends on your preferences. But not only that. To create an arched roof, you need to bend the profile pipe using a special pipe bender. As for the gable roof, only welding is necessary.
Note! Among other things, be sure to consider the dimensions of the polycarbonate. For example, find out the width of the sheet and determine exactly where the joint will be.
If you have an arched roof, then take into account the fact that to build a greenhouse about 2 m high, you will need a 12 m profile. You can use this option: buy two 6 m profiles and connect them together.

To form the roof of a greenhouse, a simple option is used. This will also require minimal welding work. So, you need to make cuts with a grinder in suitable places on the pipe and simply bend it. This is the form that appears:

It is extremely important to take accurate measurements and cuts to avoid mistakes. Each segment must be welded together:

A calculation is also made regarding the location of the ventilation window and the door at the end of the frame. Look at the diagram:

There is also a diagram for assembling a greenhouse from a profile pipe, on which all connections are indicated:

Instructions for assembling a greenhouse frame with a gable roof
Now we offer small instructions for making a frame for a greenhouse from a metal profile in the table:
| Sequence of work | Processes |
| Foundation preparation | To construct a frame made of a metal profile, a strong foundation is required; it is advisable to fill it with a strip foundation. You can also place embedded elements in the form of anchors into the foundation, through which the future frame will be secured by welding or bolting. |
| Profile preparation | Now you need to cut the purchased profile into the appropriate sizes. First of all, the frame racks are formed. |
| Installation of support posts | After this, support columns along the perimeter are welded to the mortgages in the foundation. Be sure to do it in the corners, as well as in increments of around 1 meter. It is important to use a level to install the racks strictly vertically. |
| Installation of the top trim | At this stage, it is necessary to weld the trim around the perimeter of the upper part of the pipe. Thus, all installed racks will be connected into one structure. |
| Spacers between posts | To make the greenhouse structure stable, cross members and spacers are welded. They can go perpendicular or oblique. Their main task is to impart the greatest rigidity. |
| Roofing production | To make a gable roof, two sections of profile pipe are measured. Afterwards the ridge is formed and the pipes are welded at the top point. You can use the method described above by making cuts with a grinder. By bending the pipe, you immediately get 2 slopes, which remain to be welded to the frame structure. |
| Door installation | Doors must be installed on one end side. Loops are used for this. The door frame is also made of pipe, after which it is sheathed with polycarbonate. |
There is a technology by which all the main elements are assembled on a flat horizontal surface. After which the assembled trusses are connected to each other and attached to the foundation.

If you want to give the roof an arc shape, then cut off part of the pipe and, using a pipe bender, bend it to the desired radius. Of course, work needs to be done here. If there is no pipe bender, some home craftsmen make cuts on the pipe and bend it along them. But this method is ineffective; it is better to use a pipe bending device.
We offer several videos on making a greenhouse from a metal profile. At the same time, consider options with a gable roof and in the shape of an arch.
Video: making an arched greenhouse from a profile pipe
Video: making a gable roof from a profile pipe
Wooden frame for a greenhouse: gable and arched

A wooden greenhouse frame has its own characteristics and advantages. Among the positive aspects are the following:
| Advantages of a wooden greenhouse | |
| Low cost | Unlike metal, the raw material for a wooden greenhouse is much cheaper. |
| Easy to use | There is no need to use welding units during construction. For work you need a screwdriver/screwdriver, a hacksaw and a hammer. These are basic carpentry tools. |
| Maintainability | If one of the structural elements breaks, it is very easy to replace. |
| Easy to mount polycarbonate | It is easiest to attach polycarbonate to wooden blocks. There is no need to drill holes. |
| Environmental friendliness | The material is absolutely environmentally friendly and does not pose any threat to the environment. |
| Light weight | The overall structure of a greenhouse frame made of wooden beams will have much less weight, in contrast to a metal profile pipe. |
| Easy to care for | There is no need for special care during operation. |
Indeed, wooden greenhouses are an excellent solution. They will fit perfectly into the landscape of your suburban area. Now we propose to consider 2 instructions for making an arched greenhouse and a gable one.
Arched greenhouse made of wooden blocks

The main problem with an arched greenhouse is making the arch out of wood. The manufactured arcs must have high strength. But anyone can make such a greenhouse. You will see this for yourself now.
To begin, prepare the following building material:
- boards 50 mm thick;
- timber 50×50 mm;
- self-tapping screws;
- metal furniture corners.
As for the tools, this is a standard carpentry set, including a hacksaw, hammer, screwdriver, drill, level, tape measure, etc.
We offer you to follow step by step how to make such a greenhouse. It is immediately worth noting that this type of greenhouse is ideally combined with a wooden foundation:

Below are some dimensions. Based on your circumstances, you can replace them with your own, increasing or decreasing the greenhouse design. So, first of all, the most key element is made - the arch or arc. It will consist of many similar elements:

For ease of work, it is first recommended to make a pattern; thick cardboard is suitable for this. After this, take a board 50 mm thick and place your pattern on top of it. Use a marker to transfer its outline onto the board. To reduce waste, place the pattern on the board in the most efficient way.

Having cut the required number of similar elements, you can begin assembling the first layer of the arc. In the provided diagram, 17 such elements were used. In your case there may be more/less.
The elements to form an arc are laid out on a flat surface as shown in the diagram:

Each element must be laid next to each other as tightly as possible and without gaps. The result will be an arc like this:

The second layer of the arc should act as a fastener. Fastening is carried out according to this principle:

Both ends of the board should be in the center of the already fixed element, that is, with a slight offset. All elements are connected to each other with self-tapping screws. To prevent the elements from splitting, it is recommended to drill holes for the screws. But the diameter of the hole must be smaller than the diameter of the mounting screw. This way you will assemble a whole arc. The number of such farms will depend on the footage of the entire greenhouse. The step between them should be no more than one meter.
Note! Once you have made all the finished elements of the greenhouse, you need to treat them with a special antiseptic against rotting. This will prevent them from being destroyed by moisture.
At the next stage, it is necessary to attach the arcs to the foundation. This is done according to this scheme:

Fastening can be done using furniture metal corners. Step by step you will get this frame:

Afterwards, the stiffening ribs must be fixed. For this, a beam with a cross section of 50×50 mm is used. The length of the beam depends on the length of the greenhouse. In the end you should get something like this:

Every summer resident can make a similar frame for a polycarbonate greenhouse on his own. You will end up with a design like this:

Video: an original idea for making an arched greenhouse
Manufacturing technology of a gable wooden greenhouse
Making a greenhouse with a gable roof is much easier. Detailed drawings and diagrams will help here. Thanks to them, it will be easier to collect the necessary building material. The frame design can be based on 50×50 mm bars as supports for a 100×100 mm frame.
It is worth noting that the principle of manufacturing such a greenhouse is similar to the sequence of manufacturing a greenhouse from a profile pipe. Only in this case everything is much simpler. Support columns are installed along the perimeter: in the corners of the greenhouse and in increments of up to 1000 mm. For greater strength, a lower frame and an upper one are made; timber is used for this purpose. To ensure the rigidity of the walls of the structure, cross members must be fixed.
The formation of two roof slopes is performed on a flat horizontal surface. Using prepared drawings and diagrams, you can cope with this work quite easily and quickly.


To connect the bars, self-tapping screws, metal corners, and in some cases, nails are used. Below we suggest looking at the principle of manufacturing such a greenhouse.
Video: how to make a wooden frame with a gable roof
Greenhouse made of galvanized profile

This material is also used to make a greenhouse. It has many positive aspects, among which the following stand out:
- simple installation;
- a small set of tools for installation;
- galvanization does not corrode;
- the frame does not need to be painted or coated with protective compounds;
- the total weight of the greenhouse will be small, which allows you to save money and build a small foundation;
- unlike a profile pipe, a galvanized profile is cheaper;
- speed of assembly.
The manufacturing process is relatively simple, the description is presented in the table:
| Stages of work | Process description |
| Stage 1 | To make a frame, a flat horizontal surface is required. Otherwise, there is a risk that the frame will have unevenness, which will negatively affect the installation of polycarbonate. So, first of all, the frame of the rear and front walls is made. Lay out a rectangular shape or square on the ground (depending on the chosen shape of your greenhouse). Its upper and lower parts are the width of the greenhouse, and the two side ones (left and right) are the support posts. |
| Stage 2 | Measure the diagonals of the structure. They must match. The difference is allowed up to 5 mm. That is, you should get an even figure, but in no case a rhombus. |
| Stage 3 | After inserting the profile into each other, fasten it with metal screws. The galvanized profile is relatively soft, so there is no need to drill holes. For each fastening unit, 2 self-tapping screws must be screwed. This will give the frame structure greater rigidity. |
| Stage 4 | Afterwards, find the middle of the upper part of the assembled square/rectangle and draw a perpendicular line from it upward to form the roof ridge. |
| Stage 5 | From the marked point, use a tape measure to measure the distance to the edge of the upper corner of the greenhouse. As a result, you should have 2 skates of the same size. Then a profile of the appropriate size is taken and cut in half. At the cut, the profile is bent, and this is how a gable roof is formed. |
| Stage 6 | The roofing element is attached to the frame. The finished structure is also additionally secured with stiffeners. The cross members can be located diagonally or crosswise. There is no strict rule here. The main goal is to create the necessary rigidity. According to this scheme, the second part of the end side of the greenhouse is assembled. |
| Stage 7 | An opening for the door must be formed in the end part. |
| Stage 8 | Taking into account the size of the polycarbonate sheets, it is calculated how many additional trusses need to be installed and in what places. Standard polycarbonate has a width of 210 cm, so the normal span will reach 105 cm. |
| Stage 9 | When all the frame elements are prepared, all that remains is to install the greenhouse. Be sure to attach spacers, ties and cross members for greater stability of the greenhouse. |
To eliminate the unpleasant phenomenon of a broken greenhouse, additionally install a profile diagonally between each rack. Even a strong wind load in this case will not damage the integrity of the greenhouse frame made of galvanized profile.
Note! To make such a frame, a plasterboard profile is often used. Therefore, you can calculate which will cost less.
Video: making a greenhouse from a galvanized profile
Homemade frame made of polypropylene pipes

Polypropylene pipes are successfully used not only for laying water supply systems. They can be used to make homemade greenhouses covered with polycarbonate. This material for this purpose has the following advantages:
- the pipes and components themselves are inexpensive;
- it is possible to move the greenhouse to another place due to the low weight of the structure;
- simple installation, and for work you need a special welding soldering iron and scissors;
- polypropylene does not corrode, the greenhouse will last 20 years or more.
As for the disadvantages, it is light weight. Such a greenhouse will have a strong windage. For this reason, it will be necessary to provide correct and reinforced fastening to the foundation or ground.
So, making such a greenhouse will not take much effort. All work consists of several successive stages:
- First, let's do the markings.
- At the corners of the future greenhouse, reinforcement is driven into the ground, and it should protrude from the ground level to a height of up to 500 mm.
- Afterwards, a pipe is taken and one end is inserted into the fittings sticking out of the ground. It is carefully bent, and the other end is inserted into the opposite section of the reinforcement.

The entire frame of the greenhouse is assembled using this principle. When all the trusses are installed, the cross members must be fixed. This will require special fittings: tees and crosses.
To attach the crossbars, perform the following steps:
- A pipe is cut at the top of the arch; later a cross or tee will be soldered at the cut site.
- A plastic cross should be welded onto the cut parts of the pipe (for this work you will need help: one holds the pipe, bending it, and the second solders).
- It will be necessary to solder crossbars into those with 2 exits from the cross, thus the entire structure will be connected to each other.
- The end parts of the greenhouse are also cut, and the tees are soldered.
Doors and windows can also be formed from polypropylene pipe. Watch interesting videos. One shows how to assemble such a greenhouse using self-tapping screws, and in the second everything is done using soldering. The polycarbonate is attached to such a greenhouse with self-tapping screws, which is very convenient and quick.
Video: features of making a greenhouse from polypropylene pipes
Fastening polycarbonate to a greenhouse - technology

So, the features of manufacturing the foundation and frame of the greenhouse were considered. As you can see, there are many technologies that differ in complexity of execution, cost of raw materials and more. Now we have come to the next stage of greenhouse manufacturing - installation/fastening of polycarbonate. First, let's discuss the options for fastening materials.
Ordinary screws will not work here. There are special thermal washers on sale that do not damage polycarbonate, but on the contrary, securely hold the material. Special sealing thermal washers are used. They have the following positive aspects:
- The ability to easily attach polycarbonate to any type of sheathing.
- Moisture and cold air will not penetrate inside through the bolts, since their design involves the use of a special rubber gasket.
- The thermal washer allows the polycarbonate to expand in extreme heat without destroying it.

Neoprene material is used as a seal. It's quite soft. If the temperature regime changes, then the maximum that happens to neoprene is compression, but it does not lose its tightness. That is, the polycarbonate sheet will move, but in no case warp. As for the self-tapping screw, it is a type of “beetle”, that is, the tip of the self-tapping screw resembles a drill. After tightening the screw, the cap is closed with a plastic plug, which gives an aesthetic appearance. Plus, the self-tapping screw will be protected from direct moisture, which eliminates its corrosion.
There are also special profiles for attaching polycarbonate on sale. They can be of different types, for example, H-shaped, ridge - RP, one-piece connecting - HP and detachable - NSR, end - UP, detachable connecting - SP, wall - FP.
An aluminum fastening system is also known. Of course, this technology is supported by the high strength and durability of the entire greenhouse structure. The fastening aluminum profile is available in lengths of 6 m and thicknesses from 6 to 25 mm.
Video: types of fasteners for polycarbonate
Features of polycarbonate installation

In fact, it does not matter at all what position the polycarbonate sheet will be placed in: vertically, at an angle, horizontally, etc. Special attention should be paid to sealing the joints. If an aluminum profile is used for fastening, it has a special rubber seal. Polycarbonate sheets are joined together to form a hermetically sealed joint.
When screwing a self-tapping screw through polycarbonate, do not overtighten it. The sealing rubber should lightly press the sheet to the frame. Special attention should be paid to the edges and ends of the polycarbonate. They should be framed with a special protective plastic profile.

If, after cutting the sheet, you find burrs, uneven and very rough edges, then all this must be removed. Otherwise, it will not be possible to ensure sufficient sealing. Additionally, we suggest watching videos that clearly show the process of attaching polycarbonate to the greenhouse.
Video: technology for attaching polycarbonate to a greenhouse
Communications in a polycarbonate greenhouse

Building a greenhouse is one thing, providing it with the necessary communications is quite another. Among the main ones are the following:
- Lighting.
- Ventilation.
- Heating.
- Watering.
This is especially important if you plan to grow vegetables year-round. If your work involves this, then you should think about automating most of the processes. This will significantly save your time, although you will first have to raise a lot of money. We recommend that you watch the videos in these subsections. We are confident that this information will help you make the right decision.
Artificial lighting as a complement to natural

We already said at the beginning of this article that the correct location of the greenhouse will save you money. If the chosen place is well lit by sunlight, then this is a huge plus. However, some crops are sensitive to even a slight lack of light, and this can cause negative consequences affecting their development.
To organize lighting, lamps are used:
- conventional incandescent;
- high pressure mercury;
- high pressure sodium;
- luminescent;
- halogen;
- LED.
Let's consider the features of these types of lamps in terms of their use for lighting in a polycarbonate greenhouse:
| Types of lamps | Specifications |
| Incandescent lamps | This type of lighting produces an excess of rays. This has a bad effect on the development of plants, so their installation will not achieve the original goal. |
| Mercury | In addition to illumination, this type of lamp also provides heat. However, their main disadvantage is ultraviolet radiation. Their use is allowed in combination with other types of lighting. |
| Sodium | High level of light output. The light emanating from them has a yellow-orange hue. This is excellent for the development and fruiting of all plants in the greenhouse. |
| Luminescent | This type of lamp is considered the most efficient. The light they emit has a beneficial effect on the development of plants. The low temperature that they emit allows them to be placed in close proximity to plants. Additionally, you can use ultraviolet lamps, which will prevent the development of bacteria and other harmful microorganisms. |
| Halogen | High cost and short service life are a serious disadvantage. However, the light emitted most closely matches the spectrum of sunlight. |
| LEDs | The radiation acquires shades of blue and red spectrum. They are very popular due to their cost-effectiveness. It is recommended to use white LEDs in the greenhouse. |
Subtleties of organizing wiring in a greenhouse
When running electrical cables in a greenhouse, it is important to consider one characteristic feature. There is always high humidity in the greenhouse. Therefore, the wires should be reliably protected from moisture. This also applies to the watering process. Therefore, the wires should be placed in special boxes. It should be mounted higher from the ground, on the ceiling and walls.
To ensure the most beneficial development of plants, the lighting process inside the greenhouse can be automated. This will cost you at first, but you will experience significant savings later on.
Video: features of lighting in a greenhouse
Heating is inextricably linked with lighting

Heating a greenhouse is directly related to lighting. Therefore, if you decide to carry out the necessary communications, then heating should be in the foreground. Today, several heating methods are known. For example, stove heating. To implement it, you need to build a special vestibule in the greenhouse. The main disadvantage is the low efficiency and labor intensity of the heating process. As for modern technology, this includes water heating and electric heating. It is distinguished by its high efficiency. Plus, it’s quite possible to automate the process using special automation.
There is an interesting technology for heating the ground, this is a kind of “warm floors”. Soil is an excellent conductor of heat, so this technology is in great demand, but requires considerable financial investment. We have prepared several videos on the effectiveness of one or another heating method in a greenhouse.
Video: features of organizing heating in a greenhouse
Ventilation – automatic and manual

Ventilation also affects plant productivity. Today there are several ways to organize ventilation in a polycarbonate greenhouse. The simplest is mechanical, that is, manual. For this purpose, the frame is provided with vents (small windows). If necessary, the vents are opened to allow a change of air. Windows for ventilation can be located at the end of the greenhouse. If the greenhouse is large, there may be several such windows. In principle, this method is suitable for summer residents who live in the country during the period of growing a particular crop.
If your financial capabilities allow, then it is quite possible to build an automatic ventilation system. It comes in several types:
- Electric.
- Biometric.
- Hydraulic.
| Automatic ventilation type | Features and differences |
| Electric | This method of ventilating a greenhouse is considered the cheapest. To implement it, an electric fan and a thermal relay are required. The key link in the entire circuit will be the thermal relay. It will send a signal to the fan when the fan turns on/off. One advantage is that multiple fans and thermostats can be installed along the entire length of the greenhouse. To increase the efficiency of such a system, it is recommended to install windows at different ends of the greenhouse that will open when the fan is turned on. A significant disadvantage is energy dependence. If the power supply is turned off, the ventilation will not work. |
| Hydraulic | This ventilation option is considered the most effective, reliable and durable. This system consists of levers that are connected to each other by a transom. The principle of operation is as follows: water is poured into the container. When water heats up, it expands; when it cools, it contracts. When the liquid expands, the vents open, and in the reverse order, when the water contracts, the vents close. A vessel installed inside the greenhouse can be used as a thermometer. A container fixed outside is a compensator. Hydraulic hoses are used to communicate the containers with each other. Everything is relatively simple. You can watch the video at the end of this section. |
| Biometric | In this system, the design and operation of automatic ventilation is possible due to the increase in material as the temperature rises. To implement such a project, two metals with different expansion coefficients are used. As a result, such a system has a low cost, is easy to install, but has a long service life. |
Video: organizing ventilation in a greenhouse
Irrigation - water, the source of life

Another important communication is watering. The irrigation method depends on the crop being grown. For example, tomatoes should not be watered from above; water should immediately flow into the root system. Plants especially need watering in the summer. With all this, when organizing watering, you should avoid excess water and its lack, adhering to the golden mean.
This can be achieved through the manufacture of an irrigation system, which can be of the following design:
- sprinkler system;
- subsurface irrigation;
- drip irrigation.
Let's look at the features of each of them.
Sprinkler system. The simplest method is considered to be this method of irrigation, where water comes from above. It is implemented using a shower spray. There is also a fountain sprayer. In this case, water is sprayed using a rotating spray head. Among the positive aspects of such watering are:
- increasing air humidity in the greenhouse;
- imitation of rain irrigation;
- high productivity;
- uniform watering of plants.
Subsoil irrigation. With this type of watering, the roots are immediately fed with moisture. Channels are created in the ground through which water flows. It is evenly distributed throughout the root system of certain plants. Plastic pipes can also be laid to a depth of up to 350 mm. A plastic film is spread at the bottom, then a perforated pipe is placed and the whole thing is covered with soil on top.
Among the positive aspects of this type of watering are:
- significant reduction in weed growth;
- slight moistening of the top layer of soil;
- regular replenishment of the plant’s root system with moisture.

Drip irrigation. Well, the last method of watering is drip. Based on its name, it becomes clear that water is supplied in drops. At the same time, it goes directly to the roots. This solution has a number of positive aspects, for example, water is used rationally, the formation of fungal diseases is excluded, etc.
Each of the described irrigation systems has its own characteristics, and all of them can be automated. It will be necessary to purchase sensors and all kinds of automation.
Video: watering a greenhouse, how best to do it
So, the question of how to make a polycarbonate greenhouse yourself was examined in detail. If you want to add anything, you can leave reviews and comments on this article. In addition to everything, we offer a series of photographs of ready-made greenhouses. Perhaps they will come in handy when building your own polycarbonate greenhouse.
Photo: options for ready-made polycarbonate greenhouses
 Greenhouse made of polycarbonate and metal frame Greenhouse made of polycarbonate with plastic windows and doors In a polycarbonate greenhouse you can carry out the necessary communications
We will send the material to you by e-mail
ABOUT Relaxing in nature is a wonderful option, especially if you spend time at your dacha or in a country house. Most people have a small vegetable garden on their plot of land, where a nice greenhouse will fit well. Ordering such a product in a store is very expensive, but a do-it-yourself greenhouse made from polycarbonate, the drawings of which are easy to obtain, is the most suitable option. Let's find out what we need for this and how to install it.
Polycarbonate greenhouse
Among the advantages of greenhouses made of this material it is worth noting:
- Durability;
- Reliability;
- Retains heat better and longer than a greenhouse covered with film or glass, provided the material is of high quality;
- Retains up to 92-95% of natural light;
- Year-round operation;

- Ease of installation when choosing a simple greenhouse frame;
- Fire safety, when exposed to high temperatures, polycarbonate melts without releasing harmful substances;
- Aesthetic appearance.
Video: how to choose high-quality polycarbonate
How to make a polycarbonate greenhouse with your own hands (drawings)
If you decide to assemble a polycarbonate greenhouse yourself, you will need a design plan and certain materials, a list of which you can find below.
conclusions
- Durable and has a number of advantages over film and glass greenhouses.
- Easy to install, if you choose a simple design; You can manufacture and assemble it yourself.
We all know the pride of the owner of a cellar or pantry filled with cans of preserves. But in order for this to become possible, you must first successfully grow the entire list of vegetables and fruits: cucumbers, tomatoes, zucchini, peppers - and other crops that require heat and sun to ripen. Heat is problematic in our climate. Therefore, we definitely need greenhouses or greenhouses on the site. You can create such a useful building with your own hands, and choose, for example, polycarbonate as the material.
The difference between a greenhouse and a greenhouse
They are constantly confused. Both here and there - a frame base and a coating that transmits ultraviolet radiation and prevents cold. Only the quality and sizes are different. But it is easy to distinguish between a greenhouse and a greenhouse, despite the similarity in design.
Characteristics of greenhouses
The simplest small greenhouse is protection mainly for beds, often a very, very long structure, and always low. Made from metal and plastic pipes or wooden slats. Sometimes it consists of sections on a wooden base. But often equal sections of plastic pipes or metal fittings are simply stuck into the ground, so the majority of small greenhouses are semicircular in cross-section. Such a greenhouse is usually covered with a lightweight polyethylene film, which is simply folded back in warm weather or to care for plants.
Long greenhouses made of metal arcs can be installed in endless rows
Photo gallery: simplest designs
 This is how the film is peeled off from a greenhouse made of plastic pipes on fittings
  This is also a greenhouse, not a greenhouse, although it is made of wood and glass
  A greenhouse made of PVC pipes assembled into fittings, like a constructor
  A greenhouse with a film thrown over it with a reserve: you can simply tie it at the end
  Factory greenhouse-greenhouse-cabinet for home flowers to protect them from the cold
  Long greenhouses made of pipes and films for long beds
  Small greenhouses for small beds on a wooden frame made of plastic pipes and film
  Covering a greenhouse with plastic film is best done by two people
  A greenhouse made of plastic bottles in the form of an arch over a garden bed
  Greenhouse made of plastic bottles in the form of a house
Larger greenhouses represent a structure of a completely different level of complexity (by the way, simple greenhouses are also often called greenhouses). The materials for their frame are more expensive and stronger: wood, metal pipes, metal corners, plastic pipes of various compositions and qualities. You can enter such a greenhouse without bending. There is a door or two or more doors, and often windows and vents. Inside they are often equipped with beds and shelves for pallets with seedlings and flower pots, their entire interior is paved or paths are made.
In such designs, more durable coatings are used: reinforced polyethylene film, bubble film (which protects better from the cold, but transmits light less well), non-woven materials (Spandbond, Lutrasil, Agril, Agrotex, Agrospan, which also insulate well, but are not transparent), plastic sheets (cellular polycarbonate) and even glass. But still, the last position, like aluminum double-glazed windows, is used for heavy capital greenhouses of the “greenhouse” type, operating all year round.
Photo gallery: varieties and forms of greenhouses and greenhouses
 Greenhouse made of brown double-glazed windows - greenhouse and yard decoration
  A huge double-glazed greenhouse is more of a winter garden than just a greenhouse
  Wall-mounted greenhouse made of metal corner and glass on a foundation
  Greenhouse made of polypropylene pipes with reinforced polyethylene film and a zippered door
  You can make a designer greenhouse from wooden triangles and film yourself
  A designer greenhouse made of metal triangles and film will decorate any area
  A greenhouse made of polypropylene pipes with fittings, covered with film, has a pipe base
Polycarbonate greenhouse
The most practical solution for covering a greenhouse is two-layer single- or double-chamber plastic sheets called “cellular polycarbonate”, which have parallel oriented stiffening ribs. This is a modern material with good characteristics. Actually, polycarbonate sheets are not “honeycomb”. But the honeycomb structure is much more suitable for greenhouses because:
- stiffening ribs in the “honeycomb” greatly strengthen the material;
- The honeycombs inside are filled with air, and as you know, air is the best heat insulator.
Cellular polycarbonate can be of different colors, but, of course, for greenhouses it is better to use transparent.
Transparent cellular polycarbonate is a suitable material for arranging a greenhouse
Material advantages
- Strength - compared not only to all types of films, but also compared to glass; polycarbonate will withstand large hail and an accidental hit from a ball or stone.
- High sunlight transmittance (92%).
- Less ultraviolet transmittance than glass due to light scattering in the honeycomb - there is no need to protect delicate plant varieties during the hottest part of the day.
- High thermal insulation properties due to the honeycomb structure - more than glass or any films.
- It is resistant to temperature changes from -35 0 C to +50 0 C, and does not become brittle from this, like films.
- Has dust-repellent properties.
- Lightweight, 15 times lighter than glass.
- It is flexible, so it can easily be placed on a frame of any shape.
- It is plastic when heated, so it easily fits onto a frame of a very bizarrely curved shape.
- When in contact with an open flame, it does not burn, but melts - without releasing harmful gases.
- Easy to cut and drill.
- Typically supplied in sheets of convenient sizes of 6 x 2.1 m, 3-4 sheets are required per greenhouse.
- Very beautiful.
- The main advantage is low cost with such impressive characteristics.
Flaws

It is necessary to carefully follow the rules for installing polycarbonate - you need to cover the ends of the sheets, otherwise moisture will get into the honeycombs and microorganisms will breed, which will worsen the transparency of the sheets and the appearance of the greenhouse.
DIY device
A polycarbonate-coated greenhouse always has the same components:
- The foundation of any structure or base frame is made of timber.
- Frame - made of metal corners, pipes, profiles; from wooden beams; from plastic pipes of any chemical composition and production method.
- Cellular polycarbonate covering.
Photo gallery: different greenhouses with polycarbonate coating
 Portable greenhouse for covering flower beds
  Wooden greenhouse with polycarbonate in the form of a house
  Corner greenhouse with polycarbonate on a wooden frame
  Unusual configuration of a greenhouse made of plastic pipes with polycarbonate - shelves are pre-made here
  Greenhouse made of plastic pipes with polycarbonate on a wooden base
  The lightweight polycarbonate greenhouse is quite spacious
  Greenhouse made of corner and plastic, equipped with flower boxes
  Greenhouse on a monolithic foundation
  Greenhouse on a concrete foundation with flower boxes
  Polycarbonate greenhouse on a stone foundation
  Polycarbonate greenhouse on a concrete foundation with decorations
  Foundation trimmed with stone for a polycarbonate greenhouse
  Polycarbonate greenhouse on a strip foundation with wood
Preparing for construction
To understand exactly what we want to get, we will need drawings, diagrams, and dimensions.
Idea and drawing
But first we need to decide on the desired shape and material for the frame of our future greenhouse. Although the “house” shape is considered the most resistant to snow loads, it is quite difficult to implement, and traditionally the best and simplest is the arched shape.
The choice of greenhouse shape is dictated by your skills and capabilities
It would be possible to do without a foundation at all or make a piled concrete foundation. But it will not solve the main thing - the tightness of the greenhouse from below. Insects, caterpillars and slugs, and even mice can penetrate there.
A greenhouse made of pipes on concrete rods is a rather complex and impractical solution
Therefore, we chose for our greenhouse a wooden frame made of timber or boards, thoroughly impregnated with an antiseptic, laid directly on the ground, on a sand bed and roofing felt waterproofing.
Frame for our greenhouse made of timber, laid on a sand bed and waterproofing
We will mount a frame made of polypropylene pipes onto the wooden frame, onto which we will attach the cellular polycarbonate. Polypropylene (PP) is a thermoplastic polymer designed for harsh operating conditions. Depending on the type, they can withstand low (up to -10 0 C) and high (up to +110 0 C) temperatures, are resistant to aggressive substances, are easily connected to each other, and are extremely durable.
Polypropylene pipes are an excellent, simple and reliable solution for such a greenhouse
Having searched on the Internet, we find many drawings, and from them we select the most suitable one, medium in complexity, and adapt it to the size we need.
An example of a drawing of a greenhouse on pins does not quite correspond to our goals, but shows the principle of its design
But this drawing does not show the principle of attaching pipes to each other and to the base using fittings. We are looking for the right scheme.
System of fastening pipes to each other and to the base using self-tapping screws using fittings
It is not very clear how exactly to make the doors. We are looking for diagrams for connecting pipes in planar parts and hanging them on an arched structure.
Principles of connecting pipes in planar parts - doors and vents
Specification and selection of material
- The length of the selected greenhouse is almost 7 meters. Considering the considerable size of the greenhouse and the considerable weight of the plastic covering, we choose strong pipes: a glass fiber-reinforced PP pipe with a diameter of 25 millimeters and a wall thickness of 4 millimeters.
Polypropylene pipe reinforced with glass fiber VALTEC PP-FIBER PN 25
- Fastening fittings must be of the appropriate diameter. We will need quite a lot of them. For a cross-shaped connection of pipes you will need cross fittings.
Cross fitting for polypropylene pipes
- To triple connect the pipes at the ends of the greenhouse, you will need tees.
Tee fitting for polypropylene pipes
- For closing the ends and strengthening pipes on a wooden frame - plugs. Since the glasses shown in the diagram are not easy to find, we use ordinary plugs for this purpose, securing the pipes in them with self-tapping screws.
Plug fitting for polypropylene pipes
- Choosing timber for the frame. The frame must be strong enough, so the cross-section of the beam should not be less than 150x150 millimeters.
Pine timber of natural humidity 150x150x6000 mm
- We will also need strong, massive metal corners to strengthen the frame joints.
The fastening angle will help to permanently fasten the base boards
- Polycarbonate is sold in standard sheets. But its thickness can be selected to suit our conditions. Since our greenhouse is quite light, we can purchase polycarbonate with a thickness of 6 millimeters. It will take 4 sheets in total.
Types of polycarbonate: classification by thickness and location of stiffeners
It is very important to choose high-quality polycarbonate if we want to have a durable structure.
Comparison of polycarbonate of different qualities after several years of operation
- We will need a profile to connect the polycarbonate sheets to ensure maximum tightness of the greenhouse. It consists of two parts - the base and the upper part that snaps onto it - the lid; quickly and reliably attach polycarbonate sheets to the frame, while simultaneously connecting them to each other.
The connecting profile "Polyskrep" is used for the installation of massive structures made of cellular polycarbonate
- To cover the end edges of polycarbonate sheets, we will purchase an end profile.
End profile for polycarbonate (6mm*2100mm non-white)
Video: how to choose high-quality polycarbonate
Video: how to properly connect cellular polycarbonate
Calculation of all materials
Now we can tabulate all the components that we have chosen and calculate how many of them we need and how much our greenhouse will cost us, taking into account the average current price for materials.
Don't forget to include a reserve in the list of components - an extra 10-15% - for defects and possible problems during assembly!
Table: list of materials and approximate total cost of the greenhouse
| Position | Name | Specification | Quantity | Unit price | Price, rub) | Notes |
| 1 | Plastic pipe VALTEC PN25 | Ø 25x4 mm | 70 meters | 50 rub/m | 3500 | It is necessary to find a supplier whose pipes are sold by the meter, and not cut into pieces of several meters. Otherwise, pipe consumption will increase significantly |
| 2 | Cross fitting SPK 18110 single-plane | Ø 25 mm | 56 pieces | 20 rub | 1120 | |
| 3 | Tee fitting Enkor PPRC single-plane | Ø 25 mm | 14 pieces | 10 rub | 140 | |
| 4 | PVC plug | Ø 25 mm | 10 pieces | 10 rubles | 100 | |
| 5 | Set of clamps for attaching the film to the greenhouse frame GRINDA 422317–25 (12 pieces) | Ø 25 mm | 5 sets | 70 RUR/set | 300 | |
| 6 | Pine timber of natural humidity | 150x150x6000 mm | 3 pieces | 1500 rub/piece | 4500 | |
| 7 | Cellular polycarbonate, thickness - 4 mm | 2.1x6 m | 4 sheets | 1,800 rub/sheet | 1 200 | |
| 8 | Demountable connection profile HCP 6–16 (cover) | 6 m | 3 pieces | 540 | 1620 | |
| 9 | Demountable connecting profile HCP 6–16 (base) | 6 m | 3 pieces | 540 | 1620 | |
| 10 | 2.1 m | 20 pieces | 50 | 1000 | ||
| 11 | Reinforced mounting angle | 90x90x65x2.0 | 8 pieces | 20 rub/piece | 160 rubles | |
| 12 | Self-tapping screws with thermal washers | About 4 kg | As needed | |||
| 13 | Antiseptic and hydrophobic impregnation | Minor amount | ||||
| 14 | Sealant | As needed | ||||
| 15 | Hinges for doors and windows | As needed | ||||
| Total | 21,260 rubles (excluding the cost of screws, thermal washers, sealant, hinges and impregnation) | |||||
Required Tools
- Hammers of different sizes.
- Nail puller, mount.
- Tape measure, carpenter's meter.
- Bayonet shovel.
- Shovel
- Rake.
- Hydro level or laser level.
- Electric saw (or circular saw, or simple hacksaw).
- Drill.
- Screwdriver.
Step-by-step process for making a greenhouse
- We choose a place for the beds that need to be protected with a greenhouse. The place should be comfortable, sunny, close to water or running water.
Rules for placing a greenhouse depending on the location of the site
It is very important to place the greenhouse so that it is not exposed to strong gusts of wind or does not end up in a wind tunnel between two buildings (otherwise, with a large windage, the greenhouse may simply be blown away). In addition, it should not be located under the slope of the roof of the house, so as not to be covered with additional snow; on a slope so that it does not flood; in the shade so that the snow does not remain on its roof for a long time; near large trees so that the polycarbonate is not pierced by branches and covered with leaves in the fall.
Where should you not place a greenhouse so that it is not exposed to adverse weather conditions?
You also need to remember about the aesthetics of your site - the greenhouse must fit into the overall landscape.
The greenhouse looks great in the landscape of the site
- Using a shovel and rake, we level the allotted area using a hydraulic level or laser level. It is important to do this very carefully, since distortions in the structure can deform or break the polycarbonate sheets.
- Add sand and once again check the evenness of the site. We lay strips of roofing felt for waterproofing.
- If we don’t plan to install pots and trays with soil inside the greenhouse, then you can add fertile soil and peat, or you can do this later.

What is the difference between greenhouses and greenhouses?
Many consumers who are just getting started in the greenhouse business confuse greenhouses and greenhouses. To avoid confusion and clarify the key differences between a country greenhouse and a greenhouse:
- appointment. The greenhouse is designed for growing seedlings, herbs, and low-growing plants. A greenhouse makes it possible to grow tall plants throughout the entire period;
- mobility. The greenhouse is more mobile, thanks to its small size, it is easier to carry and store;
- size. The small size of the greenhouse allows it to be installed not only in the country, but also in the city, on a personal plot;
- maximum height. The height of the greenhouse does not exceed 1.75 m;
- no doors. With rare exceptions, the function of doors is performed by the roof;
- heating and lighting due to sunlight;
- season. Greenhouses are not intended for growing crops in the winter season. Only greenhouses equipped with heating and lighting are suitable for these purposes;
- price. Buying a greenhouse for a summer residence will cost less than buying a greenhouse.
Types of greenhouses
When planning to buy a polycarbonate greenhouse, you first need to decide which design will be most suitable for a particular area and plants. There are several types of country greenhouses:
- in terms of location relative to the ground: above ground and buried;
- from the point of view of mobility: stationary and portable;
- by design: arched, single and gable, free-standing and wall-mounted.
Frame type
The design of the frame is the most significant parameter that affects the convenience of working in a greenhouse. The company "Center Teplitz" sells a greenhouse made of arched cellular polycarbonate. The use of an arched structure is advisable because This type of frame is the most stable, allows rational use of available space, and protects the greenhouse from wind and snow load.
The greenhouse frame is made from a profile or profiled pipe. The frame material is protected from corrosion by zinc coating or powder coating. The structure is fixed by inserting special stakes into the arcs of the arch.
Available sizes of country greenhouses
Greenhouses for summer cottages made of polycarbonate from the company "Center Teplitz" have the following dimensions:
- width: 500–2500 mm;
- height: 320–1750 mm;
- length: 2000–4880 mm.
Thanks to this variety, each customer can choose a ready-made greenhouse or order one to suit their own needs.
Large range of designs
The catalog of the company "Teplitz Center" presents greenhouses of different variations of arched design. Among them:
- The snail greenhouse (breadbox) has a hinged lid, the second flap is fixed. The sides are deaf;
- butterfly – opens on both sides, which makes work more convenient and ensures maximum access of light to the plants;
- innovator-maxi is an analogue of a snail, only its walls are higher. Convenient for growing tall plants until they are planted in open ground;
- the tunnel is similar in design to a greenhouse. Equipped with a door, rounded shapes allow you to grow different plants. This is the longest option - 4.8 meters.
Which material to choose for coating - polycarbonate or film?
To make greenhouses, different covering materials are used:
- The film is durable, lightweight, and reliably protects the crop from bad weather. Such a greenhouse is considered an economical option;
- Covering material “Agrotex 42” has a porous structure, does not interfere with air exchange, allows water to pass through, and protects against temperature fluctuations. It is fixed on the frame with clamps, which simplifies the opening of the greenhouse;
- Cellular polycarbonate - has a honeycomb structure, which gives it high thermal insulation properties, significant strength, chemical and biological inertness, and fire safety.
Based on the properties listed above, you can choose the optimal covering for your country greenhouse.
How to install a greenhouse correctly
Working with different designs, the company supplies convenient and compact greenhouses for the garden. But in order for them to successfully ensure the cultivation of plants, you need to adhere to a number of rules before installing them:
- Choose the right place - The ends of the greenhouse are oriented to the north and are installed in the most illuminated place on the site;
- Choose the optimal shape - it is necessary to take into account the directions of the sun's rays and snow load (for a stationary country greenhouse);
- Give preference only to high-quality materials and components;
- Installation is carried out only in the warm season, at a temperature not lower than 10ºС;
- Use partitions when growing different crops to avoid cross-pollination of plants.
Delivery and installation
Sale, delivery and installation of ready-made greenhouses are the services that the Teplitz Center company provides to its customers. By ordering everything as a single package, the client receives a guarantee for delivery, assembly and a long period of operation of the greenhouse assembled by professionals.
When performing installation work, company employees bear full responsibility for the functioning of the greenhouse. Delivery conditions are negotiated individually for each order.
Advantages of our greenhouses
Teplitz Center products are distinguished by the following advantages:
- quick assembly. Possibility to assemble the structure in 1 hour (with an awning) and 2 hours (with polycarbonate);
- compactness. Provides ease of transportation and storage;
- installation anywhere. There are no requirements for a foundation;
- increased productivity due to optimal microclimate;
- long service life.