Do-it-yourself blind area: step-by-step instructions with recommendations. How to make a blind area around a house: do it correctly according to the instructions with your own hands Technology for constructing a concrete blind area for a building
Read also
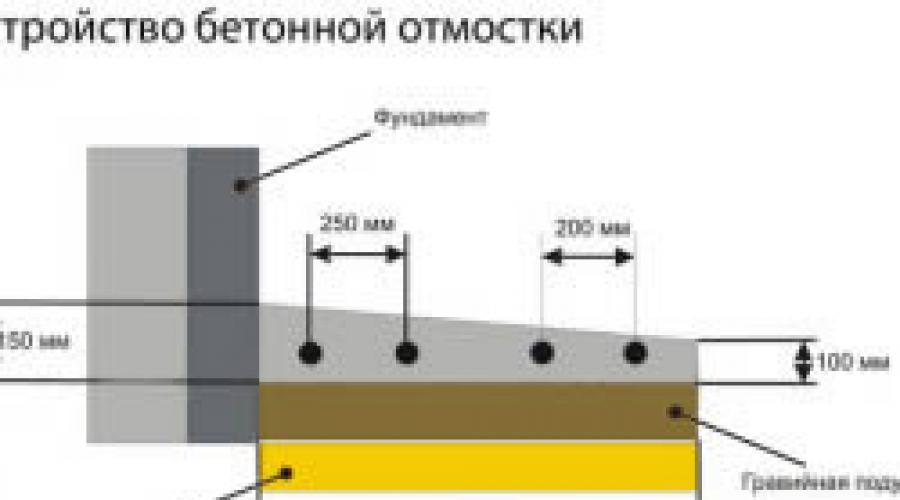
The device is a mandatory final stage in the construction of any building. At its core, this is nothing more than a small stylish sidewalk that encircles the perimeter of the house. Many people make the mistake of believing that it has only a decorative function; in fact, the structure bears the responsibility to protect the foundation from surface waters. Due to the fact that the blind area is inclined from the walls, it retains and drains water into the storm sewer system.
The width of the blind area directly depends on the overhang of the roof, and it must also adhere closely to the foundation continuously along the entire perimeter of the building.
In most cases, it has a width ranging from 60 to 80 cm and a slope of 3-10°. As experts note, the wider the blind area, the more efficient the sediment drainage will be. The width of the blind area is determined by the type of soil, but despite this, it should always be 20 cm larger than the eaves of the roof. The condition for increasing the blind area is construction on easily compressible soils.
It must be closely adjacent to the base of the structure and be continuous around the perimeter, otherwise water will seep into the cracks between the wall and the blind area. If the house is equipped with a warm basement or basement, it is provided to reduce the depth of freezing. The thermal insulation layer is able to protect basement rooms from sudden temperature fluctuations.
Construction of a blind area: sequence of work
Required tools and materials:

- level;
- bayonet shovel;
- edged board;
- capacity;
- road network;
- sand, cement, crushed stone.
The blind area around the house begins to be built by removing the top layer of soil about 15 cm thick. The depth of the trench is determined by the type of soil and the eaves of the roof. If the house is located on a site with heaving soils, it should be at least 30 cm.
When excavating a layer of soil, you should follow general layout surface and maintain a slope that ensures water drainage in the direction of the natural depression of the landscape. Most effective solution there will be a shallow arrangement drainage system along the outer perimeter, which can eliminate the slightest contact of the foundation with groundwater.
The blind area itself, without additional hydro- and thermal insulation, includes an underlying layer and a covering. The best material used for the underlying layer is clay. When poured into a trench, well-compacted clay is capable of absolutely preventing water from passing through. Clay also functions as a waterproofing agent. However, working with this material is very labor-intensive and painstaking, so in most cases a layer of sand at least 10-15 cm thick is poured onto the bottom of the trench and compacted well. To better compact the sand layer, water it with a small amount of water.
After filling and compacting the sand, a curb is installed along the outer edge. At the next stage, the layer of sand between the wall of the house and the curb is covered with crushed stone, firmly compacting the layer. The process is completed by laying a top covering of concrete, paving slabs or asphalt.
Return to contents
Construction of a blind area of a simplified design

The method described below is no less effective, but requires significantly less costs. start with a recess at least 6-10 cm deep. The bottom is compacted manually, and two layers of waterproofing material are laid on top with an overlap of 20-30 cm. The role of waterproofing can be performed with polyethylene film, roofing felt and other non-rotting materials. Placed on waterproofing Sand and gravel, and on top - a covering of gravel or crushed stone, filled with cement-sand mortar.
The waterproofing function is carried out thanks to profiled PVP membranes, which are made of dense polyethylene. They are laid on the ground under a layer of crushed stone and sand. Such a blind area can be made in the form of a lawn; to do this, pour fertile soil 30 cm thick onto a layer of crushed stone and sow grass.
Return to contents
Finishing coating for blind area
The covering of the blind area can be made of various materials; in most cases, preference is given to asphalt, concrete and paving slabs.

The surface lined with turf, cobblestones, gravel, clinker bricks. Each of the above materials has its own nuances of preparation, installation and operation.
The blind area around the house made of monolithic concrete is laid on a sand base, compacted to a coefficient above 0.98. The concrete that will be used for the blind area must match the level of frost resistance of road concrete. Before the pouring procedure, reinforcement is laid on the underlying layer, otherwise the monolithic blind area may collapse under the influence of precipitation and natural conditions.
When choosing this type of coating, remember expansion joints blind areas. To form them, you can use a board tarred or treated with an antiseptic with a thickness of at least 15-20 mm, laid on an edge. An alternative this method is the use of wooden blocks impregnated with waste oil, as well as vinyl tapes 15 cm thick; such solutions can save the blind area even in the case of heavy load.
The disadvantage of a continuous fill is that it will crack during the first winter. Dividing slats act as a damper and protect the coating from destructive destruction. Expansion joints are installed in increments of 2-2.5 m.
Often, reinforced concrete slabs measuring 30x30 or 50x50 cm are used for the blind area. The seams are filled with soil and sown with grass. The main condition for laying such slabs is the presence of air space, which reduces the swelling of the soil.
Asphalt concrete blind areas also cope well with moisture. Before laying, the base is compacted with gravel or crushed stone with a fraction of 40-60 mm. Work is carried out only in dry conditions warm weather at a temperature not lower than 5 °C. performed using a factory-prepared hot mixture with a laying temperature of more than 120°C.
You can approach the house using cobblestones; for this, sand and clay are used. Work begins with laying a clay layer 15 cm thick, then a sand layer 10 cm thick is placed, into which cobblestones are laid.

If we're talking about about laying paving slabs, you will need sifted coarse sand and medium-fraction crushed stone from wild stone without any admixture of coarse cobblestones. Sand is poured over the crushed stone layer and paving slabs or granite paving stones are laid on it. Please note that the tiles should not be laid on the mortar as this will cause them to crack.
On this moment Sandy blind area has gained particular popularity, which performs not only a protective, but also an unusual decorative function. The construction of a blind area is different in that the sand poured into the trench is not covered with crushed stone, but is filled with liquid glass and a special hardener solution. As a result, a monolithic sandstone surface is formed that is not subject to erosion. The modern construction market offers wide choose special ready-made compositions and semi-finished products that require cooking for 7-8 hours.
A more labor-intensive, but incredibly beautiful and organic “old-fashioned” option is a turf blind area. Construction of the blind area begins with excavation of a layer of earth 5 cm thick, and drainage from coarse sand is laid on the compacted soil of the base. The next layer of installation is crumpled clay, which forms a slope for water drainage. Complete the process with a layer fertile soil and meadow turf. The blind area requires watering and regular trimming at first. After several weeks, a lawn strip of elastic turf is formed, which is difficult to wash out or trample.
Due to geological features, the house is exposed to external factors not only from the atmosphere, but also from the soil. Installing a blind area around the house is one of the stages of comprehensive protection that allows you to protect the building from the manifestations of nature (rain, melt, groundwater). Roof and drainage system protects the walls and the house itself from water, but precipitation flows to the ground near the building and destroys the foundation. What is a blind area? Why do you need a foundation blind area, what is its purpose and how to do it yourself?
What is a blind area at home
A blind area is a covering around the perimeter of a house, designed to protect the foundation, basement and basement from water. It is made of waterproof material at a slope from the foundation.
Why do you need a blind area around the house (functions):
- hydrobarrier - protecting the foundation of a building from moisture. First of all, rain and melt water are diverted away from the foundation using a blind area. In addition, the presence of a blind area indicates thermal insulation properties foundation;
- comfort - the blind area can be used as a path around the house. A wide blind area can become the basis for arranging a recreation area or terrace near the house. With the correct calculation of the load, it is possible to organize the movement of a car or its parking along the blind area;
- aesthetics - design of the site and local area, giving the structure completeness.
- the blind area stabilizes the air-gas regime in the soil surrounding the foundation. The soil invariably contains oxygen, which is necessary for plant growth and the vital activity of soil microorganisms. Large pests also create passages for air to enter the soil;
- eliminates the possibility of damage to the foundation due to frost heaving of soil. It occurs due to the fact that water, solidifying in the soil during the cold season, increases its volume. Soil heaving in itself does not pose any threat, but it creates a significant lateral load on the foundation of the house, which can result in a distortion of the foundation of the house, which will ultimately lead to the destruction of the building standing on it. Thus, the blind area allows you to distribute the load more evenly.
Types of blind areas around the house
Taking into account the fact that the period of operation of the blind area should be equal to the period of operation of the structure itself, special attention should be paid to the choice of material for its construction.
In practice, several approaches to making a blind area are used, but in general it is classified as either hard or soft.
Hard blind area
1. Concrete blind area
The blind area is made of concrete in the vast majority of cases. Concrete is a reliable material, time-tested and proven by more than one generation of users. Almost every man has an idea of how to make a concrete blind area. And knowing the nuances of pouring it, he can do the work with his own hands.


It is mostly used to protect the foundations of multi-story buildings. This is caused by two factors. Firstly, it is difficult to compact the material (considerable effort is required). Secondly, to keep the asphalt in a condition suitable for pouring, its temperature should be about 120 degrees. Agree, it’s difficult to make a blind area from asphalt without special equipment. Thirdly, when heated, asphalt releases harmful impurities, and therefore few users are ready to replace the clean air of a country house with a typical urban aroma.


3. Blind area made of ceramic tiles
It is classified as hard because the tiles are laid on a concrete mortar. Clinker tiles are used as a facing material, as they are more resistant to external influences. This blind area copes well with its functions, but the cost of clinker tiles is high. Therefore, its analogue, concrete paving slabs, has become more widespread.


Soft blind area
4. Blind area made of paving slabs (paving stones)
A relatively new direction in protecting foundations from water. Despite the novelty of the material (or rather, the old one, since it is a prototype of paving stones - a cheaper analogue), laying paving slabs with your own hands does not cause any particular difficulties.


5. Blind area made of gravel (crushed stone) or natural stone
The gravel blind area (made of cobblestones, rubble stone) has not become popular for several reasons: the difficulty of compaction, the inconvenience of movement, the need to constantly correct the coating (it can be washed away unorganized drainage), the possibility of weed germination. A blind area made of stone is a good option, but more complex installation and high cost compared to tiles.


6. Hidden blind area around the house
IN in this case The facing material is soil on which you can plant lawn grass, flowers, and arrange flower beds. A blind area of a hidden type is made according to the general principle: the top layer of soil is removed, a layer of waterproofing, a layer of sand and crushed stone are covered. The difference is that the top of the pie is covered with geotextile or PVP membrane, on top of which soil is poured. It is not advisable to walk on a hidden blind area; there is a risk of damaging the profiled membrane and trampling the grass. But, if done correctly, it will serve faithfully for a long time.


Which blind area is better - made of paving slabs or concrete?
Each of the above types of blind area has its own advantages, disadvantages and construction features. According to statistics and reviews, today the most popular (most often used) blind areas are poured from concrete and laid out from tiles. Therefore, it would be correct within the article to consider what is better, concrete or paving slabs for the blind area?
This question is asked by many craftsmen and users. Practical operating experience indicates the effectiveness of the tiles. The advantages are as follows:
- the ability to create a continuous, strong and stable blind area. At the same time, ensure the integrity concrete blind area much more difficult than tiled;
- maintainability. The tiles can be dismantled completely or partially. Thus, the process of repairing a blind area or laying communications is significantly simplified. In the case of concrete, it is necessary to destroy part of the blind area, dispose of the concrete fractions, and restore it again after laying. Eliminating tile subsidence or replacing a defective element in a tile blind area is not difficult and will not take much time. And most importantly, the tiles can be reused;
- reliability. The tiled blind area drains water well thanks to a large number seams. This allows us to assert that it does not deform as a result of soil heaving or water freezing. Water that has frozen on the surface of a concrete blind area can lead to local cracking of the material. At first, these cracks will not pose a threat, but each subsequent flooding will cause the crack to expand and the blind area to collapse.
Another nuance is the location where the blind area adjoins the house. As you know, the blind area should not form a single structure from the foundations (should not be connected to it). Soil movement and freeze/thaw cycles will inevitably cause this bond to break. When laying tiles it is easier to ensure the required technological gap. In addition, the destruction of concrete most often occurs precisely at the place where it adjoins the foundation or plinth (the blind area comes off);
- foundation insulation. The technology for laying paving slabs involves the arrangement of several layers, incl. the use of clay and the possibility of laying insulation. An insulated foundation blind area is an additional protection for the basement, ground floor, which reduces heat loss and ultimately leads to savings on home heating;
- reduction in plinth height. With a rigid blind area (made of concrete), the minimum height of the plinth should be at least 500 mm. When soft (tiles, paving stones, gravel, a natural stone) a height of 300 mm will be sufficient. This reduces the cost of installing a plinth;
- ease of work, no need for a reinforcing frame, minimum waste, minor dustiness of the work;
- additional waterproofing of the foundation blind area. While a concrete blind area protects the foundation only from the influence of surface water (rain or melt), a clay hydraulic lock, which is made by forming a cushion for laying paving slabs, allows you to protect the base of the building from groundwater;
- more aesthetically pleasing appearance compared to a concrete blind area. A variety of installation options, designs, sizes and colors allows you to create a unique blind area.
The main advantage that led to the use of concrete as a material for the blind area is its low cost. Buying paving slabs and materials for laying them will cost more, even if you do the installation yourself.
Cost of blind area of a private house
In order not to be unfounded, we will give a brief comparative description, i.e. We will indicate in the table the prices for blind areas made of concrete and paving slabs. All prices for 2015, approximate, are presented for information purposes as a guideline for drawing up estimates.
The cost of a concrete blind area (width 1 m, thickness 10 cm)
| Material | Material consumption per 1 sq.m. | Price | The cost of a concrete blind area per 1 sq.m. rub. | |
| Concrete M22, class B-15 | 1 | RUB 3,500 | 350 | |
| For self-preparing concrete | ||||
| per 1 cubic meter | For 1 sq.m. | |||
| Cement M 500 | 320 kg | 32 kg | 200 rub/50 kg | 128 |
| Screenings or crushed stone (fraction 5-10 mm) | 0.8 cubic meters | 0.08 cubic meters | 160 | |
| Sand | 0.5 cubic meters | 0.05 cubic meters | 400-600 rub/m3 (the price is also affected by the loading location: quarry or delivery) | 30 |
| Water | 190 l | 19 l | At local rate | |
| Concrete additives* | ||||
| For pillow | ||||
| Geotextile, PVC film) | 1 sq.m. | 110-2500 rub/roll (50 sq.m.) | 100 | |
| Sand | 0.05-0.1 cubic meters Depending on the thickness of the layer and the composition of the finishing base for the tile | 400-600 rub./m3. | 25-50 | |
| 0.1 cubic meters | 1800-2000 cubic meters (the price is also affected by the loading location: quarry or delivery) | 190 | ||
| Reinforcement | ||||
| Fittings, diameter 6 mm. | 12 m.p. | 10 r/m.p. | 120 | |
| Reinforcing mesh 50x50, diameter 3 mm. | 1 sq.m. | 60 rub./piece (1000x2000) | 60 | |
| Reinforcing mesh 150x150, diameter 3 mm. | 1 sq.m. | 33 RUR/piece (500x2000) | 66 | |
| Formwork installation | ||||
| Boards for formwork** | ||||
| Beam 30x30 for spacers** | ||||
| Total: | ~ 800 rub/sq.m. | |||
* we are talking about additives (plasticizers) that give concrete additional properties(strength, frost resistance). Adding plasticizers to the composition concrete mortar is at the discretion of the master. In the “classic” recipe given, their cost is not taken into account.
** to form the formwork when pouring a blind area, in practice, old boards or used plywood are used. Therefore, their cost is also taken into account.
The cost of a blind area made of paving slabs 1 meter wide
| Material | Material consumption per 1 sq.m. | Price | The cost of a blind area made of paving slabs per 1 sq.m. rub. |
| For pillow | |||
| Clay | Depends on the soil and the desired thickness of the hydraulic lock 0.05-0.1 cubic meters. | 250-400 rub/m3. (depending on the location of the quarry and the fat content of the clay) | 15-30 |
| Geotextiles, PVC film | 1 sq.m. | 110-2500 rub/roll (50 sq.m.) | 100 |
| Sand | 0.15-0.2 cubic meters Depending on the thickness of the layer and the composition of the finishing base for the tile | 400-600 rub/m3 | 75-100 |
| Screenings or crushed stone (fraction 3-10 mm) | 0.1 cubic meters | 1800-2000 cubic meters (the price is also affected by the loading location: quarry or delivery) | 190 |
| For the finishing layer | |||
| Cement M 500 | 10 kg. Depends on the purpose of the formwork | 500 rub/50 kg | 100 |
| Sifted sand | 2.5 - 10 kg. Depends on the purpose of the formwork | 100 rub/50 kg | 10 |
| For the front layer | |||
| Tile | Depends on the size of the tile. 50 pcs. for the “brick” shape | 300-1,500 rub/piece. on average 400 rubles. for the “brick” shape | 2000 |
| Border | 2 pcs. | 75-300 rub/piece. depending on thickness | 360 |
| Water for irrigation sands and blind areas | Before puddles form | At local rate | |
| Total: | ~ 3000 rub/sq.m | ||
How long does it take to install a blind area?
An important point, based on the experience of constructing blind areas of various types, we can give the approximate time for the construction of each of them. The calculation was made based on the total time spent by one person on making a blind area of 50 square meters.
- Completion of all work on preparing the base, forming the formwork and pouring the concrete blind area takes approximately 40-50 minutes. per 1 sq.m. (20-25 minutes when using ready-made concrete).
- Filling the pillow and laying tiles 1 sq.m. takes 60-70 minutes. Moreover, a significant amount of time is spent on the process of compacting the base.
It should be noted that with an increase square meters(area) the speed of work increases.
How to make a blind area around the house with your own hands - video
Construction of a blind area for a house - SNiP and GOST
The second aspect that needs to be taken into account before you start building a blind area with your own hands is the provisions and recommendations of regulatory documents. These include:
GOST 9128-97. Mixtures of asphalt concrete road, airfield and asphalt concrete. Contains recommendations on determining the angle of inclination of the blind area.
GOST 7473-94. Concrete mixtures. They contain requirements for the quality of concrete used for arranging the blind area. Required when arranging a blind area that serves as a driveway for a car.
SNiP 2.04.02-84. Water supply. External networks and structures. SNiP regulates the construction of a blind area around a well, contains recommendations for choosing the angle of inclination, as well as for arranging a castle made of clay or rich loam.
SNiP 2.02.01-83 Foundations of buildings and structures. Regulates the main parameters of the blind area device (dimensions):
1. Width of the blind area around the house (foundation)
Determined from the position of soil type. As you know, soil with different compositions subsides differently. For example, clay soil is divided into two types:
- Type 1 soil does not sag under its own weight or its subsidence is no more than 50 mm and can be caused by external factors.
- Type 2 soil can sag under its own weight.
Thus, based on soil data, the composition and thickness of the base layers for laying paving slabs is selected. Based on the provisions of SNiP, craftsmen determine how wide the blind area around the house should be.
It has been verified by practice that for type 1 soil the minimum width of the blind area should be at least 700 mm, for type 2 - at least 1,000 mm.
 If there is normal soil on the site, the optimal width of the blind area can be 800-1,000 mm. In this case, the width can be considered sufficient if it is greater than the overhang roofing material above load-bearing walls by 200 mm (for normal soil) and 600 mm for clay soil Type 2.
The final decision on how wide the foundation blind area should be depends on the users and the purpose of the blind area. Which may consist of the following: only foundation protection, protection + occasional human movement, protection + heavy pedestrian traffic (for example, a terrace or gazebo) or protection + car traffic.
Such parameters as the length and height (thickness) of the blind area are not regulated by SNiP. Users advise taking them as:
2. Length of the blind area around the house
3. Thickness (height) of the blind area around the house
Minimum thickness of the blind area: no less than 70 mm, optimally 100-150 mm.
Note. The height of the blind area is not determined to zero. It should rise above the soil by at least 50 mm.
For the blind area that serves as a pedestrian zone, the requirements are becoming more stringent. They mainly concern the design of the pillow. For the automobile zone, it is advisable to make the most durable base possible and, when choosing paving slabs, give preference not to vibratory-cast slabs, but to vibro-pressed ones.
SNiP III-10-75 Landscaping. The standard regulates the location of the blind area. It should fit tightly to the base at an angle. At the same time, the slope of the blind area should be within 1-10% in the direction opposite to the load-bearing wall.
4. Slope of the blind area of the house
The angle of inclination of the blind area is measured in percentages and degrees. For 1 m of blind area width, the slope should be 10-100 mm, i.e. 1-10%. In practice, the slope does not exceed 15-20 mm per 1 linear meter. This slope is invisible visually, but does an excellent job of draining water from the foundation and base of the house.
Note. A large slope can lead to the fact that the flow of water will increase speed when moving along the blind area and, gaining strength, quickly destroy its outer edge.
Another document worth considering is the “Schemes for operational quality control of construction, repair and construction and installation work" Based on it you can study permissible deviations from the given standards.

5. Expansion joint in the blind area (deformation, temperature)
To compensate for the movement of the blind area and reduce the pressure on the foundation, an expansion joint is provided - a gap between the wall (basement) and the blind area. A thermal seam is formed by installing a sheet of insulation or several layers of roofing felt to a vertical surface. Sometimes a wooden board is installed at the junction, which is then removed, and the place where it is installed is sealed (covered) with sand. This is a labor-intensive method, because removing a board from hardened concrete is quite difficult.
Conclusion
The information provided from the theoretical part will become a useful basis for constructing a blind area around the house with your own hands. Knowing how to properly make a blind area, you can be sure that the created structure will last a long time and effectively.
The blind area around the house, despite its external unsightliness, performs important structural functions, on which the maintenance-free service life of many load-bearing elements of the building depends.
Timely installation significantly affects the safety of the base and basement cladding, helps to extend the service life of plaster walls, avoids flooding of the foundation and basement space.
Functions and tasks performed
Usage additional elements in the form of perimeter drainage, allows you to increase the efficiency of drainage
IN general view, blind area is wide band, made of building materials and encircling the perimeter of the building. The angle of location is adjusted according to technological norms and rules, depending on a number of conditions and requirements.
Construction of the structure is allowed both at the stage of cladding and installation of the basement part, and immediately after the construction of the load-bearing parts of the building. There is no fundamental difference from a technical point of view, but many qualified personnel agree that the arrangement should be completed before the first cold weather and frosts.
This is due to the direct purpose of the structure, since the blind area performs the following tasks:
- foundation protection - the construction of a blind area allows you to create a reliable barrier that protects the foundation and protects the supporting base from the harmful effects of moisture, thawed and groundwater. Combination various materials and high-quality compaction of the underlying layers, helps to redirect and remove moisture from the foundation;
- thermal insulation - the use of an additional layer of thermal insulation materials in the overall structure allows to reduce swelling and freezing of the soil. For heaving types of soil, insulation is mandatory, since frost heaving can cause distortion of the load-bearing elements of the structure;
- pedestrian path - compliance with regulatory rules and width during construction allows for finishing and cladding of the external surface. The arrangement of the pedestrian zone can be done using modern facing materials - paving slabs, paving stones, natural stone, etc.;
- decorative element - from the point of view of decoration, the blind area around any building is one of the elements of the overall ensemble. The finishing of the structure is carried out taking into account general design, finishing materials and coatings, external elements and landscape design.
It is mandatory, since low-level foundations and strip foundations are located directly in the soil. Every spring and autumn season, when snow melts, groundwater flow increases and precipitation falls, the soil begins to move.
As the soil moves, it exerts enormous pressure on the concrete blocks, causing the supporting base to shift relative to its original location. The blind area allows you to reduce the load and partially levels negative impact processes.
Construction requirements and standards

The device can be performed both during the installation of load-bearing elements and at later stages
The installation of a blind area around the building requires compliance with a number of general requirements, which ensure that the structure will fulfill its direct tasks - removing moisture and protecting the supporting base.
When organizing around private and suburban buildings, the following requirements must be met:
- the construction of the structure is carried out along the perimeter of the building with a tight connection to the base and basement of the building. An expansion joint 1-2 cm thick is supposed to be installed between the wall and the adjacent layers;
- according to SNiP, the width of the blind area around the house depends on the type of soil and should be at least 80-120 cm. For suburban buildings, the overhang of the roof eaves and drainage elements should be taken into account;
- The slope angle of the outer surface is selected based on the coating used. For small stone, crushed stone or gravel - this is 5-7 degrees, for concrete and monolithic materials - 3-5 degrees;
- When using liquid concrete or a cement-sand mixture, it is necessary to install expansion joints, which are installed every 2-2.5 m perpendicular to the plane of the base.
The width and angle of the slope should be calculated and adjusted based on the individual parameters of the structure and soil type. That is, the width directly depends on the overhang of the roof relative to the load-bearing wall of the building and the ability of the soil to absorb moisture.

Fine-grained sand and crushed stone are the main components for mortar and laying the underlying layer
For example, if the building is located on rocky ground with a roof overhang of the standard 50-60 cm, then standard width a blind area of 80-90 cm is optimal solution. For buildings on subsidence soils with a cornice overhang of 80-90 cm including drainage, this width will not be enough, which will require increasing it to 130-150 cm.
The slope angle greatly depends on the type of material used as the top covering. Relatively fine materials such as gravel or expanded clay can absorb moisture and interfere with normal drainage. Therefore, a slope of 5-7% is normal for these coatings.
Asphalt or concrete absorb moisture noticeably less, their structure does not prevent it from flowing evenly over the surface - a slope of 3-5 degrees will be enough. Increasing the angle of inclination to 10-12 degrees recommended by some builders is a fiction and a distortion of the facts.
According to SNiP, the angle of inclination is calculated using a certain formula depending on the width. When building a blind area around a private house with your own hands, we recommend taking a slope of no more than 3-7 degrees.
Types of designs for a hand-held device

Three types of structures for self-construction around the building
Organizing a blind area yourself is not particularly difficult, but it is a labor-intensive and troublesome task. The general device of any type provides for a sufficient recess large quantity soil, the use of a large volume of materials, compliance with technological standards, etc.
In order to avoid unnecessary financial and labor costs, first of all, it is worth deciding on the type of structure to be erected, the choice of which depends on the depth of soil freezing, requirements and actual costs of the device.
Yes, for independent organization You can use types such as:
- soft based on clay and crushed stone;
- semi-rigid with external facing coating;
- self-leveling cement;
- monolithic reinforced concrete.
A soft blind area around the house is the simplest solution, since it does not involve the use of liquid binders and installation external cladding. The average service life of the structure is no more than 5-7 years at a fairly low cost, which allows you to remove old layers at any time and install a more durable option.

Metal mesh and steel reinforcement are the most affordable and simple materials for reinforcement
The semi-rigid and self-leveling cement type is generally similar to a soft blind area with some differences in the number of underlying layers and their placement. They are a more durable structure with high decorative and performance qualities, with the ability to equip pedestrian path. Average service life is more than 10 years.
Monolithic using reinforced concrete is the most durable and reliable type of blind area. The technology of the device involves the use of ready-made reinforced concrete slabs or pouring concrete directly at the robot site. The second option is more preferable, since an already cast reinforced slab will not provide the required quality of work.
In fact, when laying a slab, the device is not much different from finishing the external surface with paving slabs or other facing materials. When pouring concrete with your own hands, finished design will have higher protective qualities, since liquid concrete will be directly connected to the underlying layer.
How to make a reliable and durable option
If you are still thinking about how to make a blind area around the house, we recommend that you familiarize yourself with the technology of its construction and decide whether you can carry out this work yourself or whether it is better to order it from professionals.
The technology described below will be valid for monolithic type based on concrete. Structurally, such a blind area will consist of underlying layers and reinforced concrete.
Polyethylene film or roofing felt can be used as waterproofing. For the underlying layers you will need clay, fine-grained or river sand, crushed stone with a fraction size of 20-40 mm.
The preparation of concrete mortar will be made from the following components - M500 cement, granite crushed stone with a fraction of 20-40 mm, sand with a fraction of 0.20-0.3 mm and water without impurities. The proportions of the components are 1:5.6:3.5, where 1 part cement to 5.6 parts gravel and 3.5 parts sand.
The proportions of the components are taken taking into account weight, not volume. That is, for 100 kg of cement, 560 kg of crushed stone and 350 kg of sand are taken. Water is added according to consistency so that the concrete can maintain the required slope and not creep - this is 20-25% of the total mass of the mixture.

Blind area around the house - marking and excavation
The blind area around the house with your own hands will be done in the following sequence:
- Marking is carried out around the perimeter of the building. To do this, you can use a tape measure, wooden pegs and a nylon cord. From the plane of the base, every 5-7 m, an equal distance equal to the width of the blind area is set aside, a wooden peg is driven in and the cord is pulled;
- According to the completed markings, soil is excavated to a depth of 20-50 cm, depending on the number of underlying layers and their thickness. If the soil is no longer needed and will not be used for personal needs, it is recommended to remove it or completely remove the soil from the site;
- The internal space of the trench is treated with a herbicide composition to eliminate the roots and their further growth. The surface of the base or upper part of the foundation is cleaned from adhering dirt, sand and dust;
- The surface of the base is processed bitumen mastic, to which two layers of roofing felt are glued, extending 50-60 cm into the trench. The thickness of the mastic layer should be at least 2 mm. It is not necessary to wait for the mastic to dry completely, but it is recommended to wait at least 24 hours from the moment of gluing;
- Formwork is installed along the outer edge of the trench. The simplest option is a 20 mm thick board knocked together into panels, so that the upper edge protrudes 15-20 cm from the trench;
- A clay layer with a thickness of at least 10 cm is placed at the bottom of the trench and thoroughly compacted. Slightly damp sand 10 cm thick is poured on top of the clay, spilled with a small amount of water and compacted. A layer of mixed-grade crushed stone 8-10 cm thick is poured over the sand, evenly distributed and compacted;
- Expansion joints or expansion joints are installed every 2-2.5 m. These are wooden boards 20-25 mm thick impregnated with bitumen mastic or boiled in bitumen. The seam is placed on the edge perpendicular to the base so that the top edge is at the level of the concrete being poured. During installation, the required slope is observed;
- In the space between the seams, reinforcement with a cross-section of 5-8 mm or a metal mesh with cells of 10×10 cm and a cross-section of 4-6 mm is placed. The step between the rods laid at the base is 25 cm, the rods located closer to the formwork is 20 cm. The reinforcing material is laid on any building material so that the reinforcing sheet rises above the crushed stone layer and is in space;
- The concrete solution is prepared according to the proportions to obtain concrete mixture grades not lower than M200. Mixing takes place in a concrete mixer of the required volume;
- The first step is to lay required amount cement and rotates 20-25 revolutions. Next, sand is added in portions. Number of servings – 3-4, turns for each – 5-7. Crushed stone is laid in the same way. Water is added evenly until a uniform consistency is obtained;
- The concrete mixture is carefully poured to the level of the exposed joints. Next, the mixture is distributed and leveled along the expansion joints while maintaining the slope angle. If available, a vibrating rod can be passed over the surface. If it is absent, the concrete layer can be gently crushed using the rule;
- After the mixture has set, it is recommended to iron the concrete. To do this, the surface is covered with a 2-3 mm layer of dry cement, which is lightly rubbed in using a trowel. Afterwards the surface is covered and left to dry.

Construction of an expansion joint, backfilling with sand and compacting crushed stone

Installation of expansion joints and laying of reinforcing mesh/reinforcement

Preparation of concrete solution and pouring onto the surface

Ironing concrete surface dry method
The construction technology may have a slightly different option. For example, you can refuse to use clay and lay a sand cushion on pre-laid geotextiles. The thickness of sand or gravel may vary depending on the overall depth of the deposit.
When constructing a structure for soil with low humus capacity or low groundwater depth, it is recommended to install a drainage system.
Before performing any actions, we recommend that you watch the video on how to properly make a blind area. It wouldn’t hurt if you look at the photos before carrying out the work. various types blind areas or consult with a specialist, taking into account the nuances of your structure.
Cost of installation and components used
The cost of installing a blind area depends on total area and the depth of its placement, the number of underlying layers used, the thickness of the poured concrete and current prices for consumable components.
Carrying out approximate calculations can be done according to simple formulas. To calculate the total volume of laid materials, you should know standard sizes structure, depth and width of the structure.
Volume calculations are carried out using the following formula - Wall length * Structure width * Laying depth = Volume of materials.
For example, for a building 5×10 m, a structure width of 0.8 m and a laying depth of 0.3 m, it turns out that the total volume will be – (5*0.8*0.3)*2 + (10*0, 8*0.3*2)*2 = 7.2 m3. That is, we can say that the total volume of materials will be approximately 8 m3.
It is advisable to calculate materials separately, which will allow you to calculate the required volume of components more accurately and avoid shortages or overruns. That is, when carrying out the calculation, instead of the total thickness, we substitute the thickness of the layer of sand or gravel.
In conclusion, we have compiled a table with the average cost of basic materials that may be required during the work process.
This article examines the construction of a blind area around the house. We will tell you how to properly make a blind area around the house and give existing species blind areas. Let us pay attention to the important points of the blind area device technology and its operation. In addition, we will pay special attention to the repair of the blind area around the house.
After reading the article, you will understand what the correct blind area should be. You can choose the type, composition and design of the blind area that suits you.
The role of the blind area for the construction of the house
The blind area of the house plays an important role in ensuring the long and comfortable use of the house itself. It protects the structure and the soil around it from moisture. The accumulation of water near the house during precipitation or when snow melts and runs off the roof can erode the top layer of soil and reach the foundation. The blind area of the house serves to protect the foundation from rain and flood waters along the perimeter of the house, prevents subsidence of the foundation, serves as a decorative element of external landscaping, and acts as a kind of sidewalk around the house.
The period during the construction of a house when the blind area is performed
The construction of the blind area should be started correctly immediately after facing the walls or base. Unfortunately, many owners do not give it desired value, and postpone the moment of arranging the blind area for 1-2 years.
Consequences for the house if the blind area is not done
If the blind area is not made, then groundwater freely penetrates to the foundation and adjacent soil and can lead to uneven erosion of the house. Because of this, the foundation and even walls can crack. The lack of a blind area for a house standing on heaving soil can lead to even more serious consequences. It is especially dangerous to leave such a house without a blind area for the winter. Heaving soil becomes saturated with water, freezes and swells unevenly and also unevenly puts pressure on the house structures, destroying them. Therefore, for such soils, the blind area must also be insulated. You can read more about the installation of an insulated blind area on heaving soils in the answer to the question.
Composition of the blind area
Any blind area should consist of two main components: the underlying layer and the covering.
Structural layers of the blind area
Substrate serves to create a compacted and level base for further laying of the covering of the blind area. And only one type of underlying layer also performs the main function of the blind area, waterproofing - this is clay. As the underlying layer, the following is used: sand, clay, small crushed stone, gartzovka.
The choice of material depends on the top covering of the blind area. The thickness of the underlying layer is on average 20 cm.
Coating The blind area must first of all be waterproof and difficult to succumb to erosion by water. For these purposes, small cobblestones, concrete, asphalt, paving slabs, and clay are used. Sometimes the role of both the underlying layer and the covering is performed by a mixture of clay and crushed stone or clay and sand. The thickness of this layer is on average 5-10 cm.

Blind area made of a mixture of crushed clay and crushed stone
Parameters for performing the blind area and basic principles
Since the blind area must drain water away from the house, it must be laid with a slope away from the house. The slope of the blind area depends on the covering: for crushed stone and cobblestones - 5-10% (5-10 cm per 1 m of blind area width); for asphalt and concrete - 3-5%.

Slope of the blind area
The width of the blind area is taken depending on the type of soil and the width of the eaves of the roof. On normal soils it should be 20 cm wider than the cornice, but not less than 60 cm, on subsidence soils - at least 1 meter.

Blind area width
It is advisable to make a concrete tray around the perimeter of the blind area to drain water; you can also use a sawn pipe laid on a concrete base for these purposes.

Drainage of water from the blind area
At the junction of the blind area with the wall, an expansion joint 1-2 cm wide is made. Sometimes it is recommended to seal it with sand or EPS, but 2 layers of roofing felt, or bitumen or sealant are better suited for these purposes. If the house has a foundation waterproofed, it is simply removed to the level of the blind area.

Expansion seam of the blind area
It is impossible to tightly connect the blind area to a wall or plinth, since if it settles slightly, it may suffer facing material, for example, tiles on the plinth crumble.
The main stages of constructing a blind area
Construction of the blind area begins with excavation of soil to a depth equal to the width of the underlying layer and coating (25-30 cm). It is advisable to treat the trench with a herbicide to kill weed roots, as they can destroy the coating. Installed along the outer edge of the blind area curbstone or removable formwork.

Removable formwork for blind area
Then the underlying layer is laid and carefully compacted. The blind area covering is laid on the underlying layer. Each coating has its own installation features, so we will consider each coating option separately.
Cobblestone blind area
A small cobblestone or stone, 4-10 cm high, is laid on an underlying layer of sand (10-20 cm) or small crushed stone (3-5 cm) or on a prancing stone (3-5 cm). The gaps between the cobblestones are filled with sand.

Blind area covered with cobblestones
Blind area made of paving slabs
Paving slabs (4-8 cm) are laid on the same underlying layer as cobblestones, the gaps are filled with sand. For ease of installation, the width of the blind area is determined based on the size of the slabs so that 1 or 2 rows of slabs fit and they do not need to be trimmed. Paving slabs have several advantages. They have a long service life and can be partially replaced if necessary. In order to extend the service life of such a coating, the slabs can be re-laid with a 90° rotation at the drainage points of the drainage system.

Blind area covered with tiles
Clay blind area
Clay (10-15 cm) is laid on an underlying layer of compacted sand (10 cm). In addition, to strengthen the base, cobblestones are additionally sunk into the sand.

Clay blind area
Concrete blind area
Concrete coating is the most popular. The underlying layer on non-heaving soils is made of clay (10-15 cm), and on heaving soils, in addition to clay, sand (6-8 cm) is also laid. It serves as a kind of shock absorber between the heaving base and the covering of the blind area. If a concrete coating is planned, then after laying the underlying layer, expansion joints must be made. They protect the concrete surface from tearing on frosty days. A continuous blind area made of concrete is destroyed, as a rule, in the first winter. As expansion joints across the blind area in increments of 2.5-3 m, they are placed on the edge wooden slats coated with bitumen. The upper surface of the slats is located at the level of the concrete surface, taking into account the slight slope of the blind area from the house. After this, concrete is laid, and the slats serve as so-called beacons along which the concrete surface is leveled. To increase the surface moisture resistance of concrete, the laid concrete blind area must be carefully reinforced. To do this, you need to sprinkle the wet surface with cement several times and smooth it with an iron trowel. Then the surface is covered with a wet cloth and left for a week. The concrete is watered from time to time with water from a watering can so that the fabric is wet all the time.

Concrete blind area
To increase the service life of a concrete blind area, especially on heaving soils, it is recommended to reinforce it. This is necessary so that the blind area works in both compression and tension. Concrete works in compression, and reinforcement works in tension. Reinforcement is carried out with a metal mesh with cells of 100x100 mm in parts, leaving expansion joints every 2-2.5 m.
Blind area made of asphalt concrete
Crushed stone (15 cm) is laid in a compacted trench, and an asphalt covering (3 cm) is laid on top. The construction of a blind area made of asphalt concrete is not quite simple, and it is also not the most environmentally friendly option, since asphalt emits when heated harmful substances for a person.

Asphalt concrete blind area
Water-permeable blind area
If there is drainage around the perimeter of the house, then the blind area can be made water-permeable. This blind area is the easiest to implement. A special geotextile material is placed in a trench with a pre-compacted base, and 10 cm of crushed stone, gravel, pebbles or expanded clay is placed on it. It is recommended to use a fraction of 8-32 mm. Geotextile material prevents crushed stone from being pressed into the base, and thus protects the blind area from subsidence. When constructing such a blind area from a material of a homogeneous fraction, it is worth considering that it will be difficult to compact it tightly, so walking on such a blind area will not be very convenient. And also in case of unorganized drainage from the roof (that is, when water flows not through the gutters, but directly from the entire slope), such covering must be regularly corrected.

Blind area covered with crushed stone
Thermal insulation of the blind area
As we already said at the beginning of this article, on heaving soils you need to perform. Heaving soil becomes saturated with water, freezes and swells unevenly and also unevenly puts pressure on the house structures, destroying them. The insulation does not allow the soil to freeze, thereby preventing it from heaving. For these purposes it is recommended to use thermal insulation material, which does not absorb moisture - extruded polystyrene foam. It is laid between the underlying layer and the covering. There should not be large point loads on the insulation, so it is better to use a coating made of concrete, as well as tiles or cobblestones according to sand preparation. But crushed stone, gravel, pebbles, expanded clay are not recommended for covering such a blind area.

Insulation of the blind area
Repair of the blind area
If you find damage to the blind area, it must be repaired as soon as possible to prevent its spread. The repair of the blind area begins with determining the boundaries of the damaged areas. In this case, several small potholes can be combined into one common plane.
Damaged asphalt concrete pavement must be cut out to its full depth with wedges and thoroughly cleaned of dust and other contaminants. Lubricate the bottom, walls and edges with viscous liquefied bitumen, lay asphalt concrete and compact it with a hand roller. Asphalt concrete should be rolled from the edges to the middle. This creates a smooth surface. The asphalt concrete mixture must be laid slightly higher than the old coating, which ensures best connection new site with the existing one.
When repairing cracks, potholes and peelings that have appeared in a blind area with a cement concrete coating, rubber-bitumen mastics, sealing pastes, cement-sand mortars and fine-grained concrete. The prepared work must be performed in the same way as when repairing an asphalt concrete blind area. Fill the cleaned cracks and seams with mastic, which contains bitumen BND-90/130 or BND-60/90 (60-80%), crushed slag (10-15%) and asbestos (10-20%). Sprinkle sealed cracks with sand. Small cracks can be filled with liquid cement mortar with a composition of 1:1 or 1:2.

Repair of small cracks on the blind area
In case of major damage, the cement concrete coating must be restored with concrete. Pre-clean and prime the surface to be repaired with cement mortar. Cover freshly laid concrete with a damp tarp or plastic film to keep it from drying out during the curing period.

Repair of the entire surface of the blind area
Repair the blind area better in spring and in autumn in cool weather, and in summer - in morning hours when seams and cracks open up more.
Note: Active regulations about the construction of the blind area
"General requirements. Manual for SNiP 2.02.01-83.”
3.182. Waterproof blind areas must be constructed around each building. For buildings and structures erected on sites with type II soil conditions in terms of subsidence, the width of the blind area must be at least 2 m and cover the sinuses.
On sites with soil conditions of type I in terms of subsidence, as well as when the subsidence properties of soils are completely eliminated or they are cut through on sites with soil conditions of type II, the width of the blind area is assumed to be 1.5 m.
Blind areas around the perimeter of buildings must be prepared from local compacted soil with a thickness of at least 0.15 m. Blind areas should be arranged with a slope in the transverse direction of at least 0.03. The edge mark of the blind area must exceed the planning mark by at least 0.05 m. Water falling on the blind area must flow freely into the storm drainage network or trays.
If the blind area of the building is a pedestrian zone, then the requirements for the blind areas are the same as the requirements for road surfaces, pedestrian areas with the expected entry of a car with a maximum axle load of 8 tons.
If this hydraulic structures, then the requirements for the blind area are in accordance with SNiP 2.04.02-84.
“Norms and rules for designing complex landscaping on the territory of Moscow MGSN 1.02-02 TSN 30-307-2002.”
4.11.4 To ensure surface drainage from buildings and structures along their perimeter, it is necessary to provide a blind area with reliable waterproofing in accordance with SNiP III-10. The slope of the blind area should be at least 10 ‰ from the building. The width of the blind area for buildings and structures is recommended to be 0.8-1.2 m, in difficult geological conditions (soils with karst) - 1.5-3 m. In the case of a building adjacent to pedestrian communications, the role of the blind area is played by a sidewalk with a hard surface. .
In addition to the installation of a blind area, the installation of a drainage system is mandatory for water drainage.
In addition, it is used as a convenient pedestrian passage and decorative design when improving the area adjacent to the house. Use of dense or bulk insulation allows you to protect the foundation from the effects of low temperatures and reduce heat loss through the enclosing structures.
A fairly simple device like this protective coating solves several simultaneously important tasks related to protection and improvement, without requiring large financial investments. At the same time, you can do it yourself, without inviting specialist builders for this.
The installation of a blind area around the house is done immediately after finishing the exterior walls of the building, but before finishing the basement begins. This is due to the need to block the expansion joint between the wall and the path covering from rainwater due to the protruding surface of the base hanging over it.
For pile, deep columnar and screw foundations, the presence of a blind area is not mandatory, but it is often made as an element of landscaping and as a convenient walking path.
Design of the blind area
Protective coating must be done around the entire perimeter of the house, since it is necessary to protect the entire foundation mass. The basic requirements on how to properly make a blind area around a house with your own hands are set out in SNiP 2.02.01-83, which states that on normal soils its width should be at least 600 mm, and on subsidence soils - at least a meter. In general, the width of the covering should extend at least 200 mm beyond the protruding roof section. Maximum width not regulated.
General drawing of the blind area.
The hard covering must be laid on a dense base with a thickness of at least 15 cm. The slope of the blind area from the building is not less than 0.03%, with the lower edge exceeding the planning mark by more than 5 cm. Retraction storm water must be carried out into storm drains or gutters.
A high-quality insulated blind area should consist of three main layers:
- surface waterproof;
- underlying gravel or a mixture of crushed stone and sand;
- insulating polystyrene foam.
As an additional layer, it can be used, which will be a fairly reliable waterproofing against groundwater rising in the spring, and will also prevent the possible germination of weeds.
Top layer coating materials
The materials used for the top layer when constructing a blind area are quite diverse and have their own distinctive features. The simplest and most inexpensive is ordinary clay. With its help you can create a fairly reliable hydraulic lock. This type of defense is often found in rural areas. However, modern developers have long abandoned such primitive materials and use more efficient technologies.
 Options.
 The most common option for making a blind area is to install a concrete covering. You can easily and quickly install it yourself without investing large amounts. financial resources. At the same time, concrete is characterized by high strength and durability, and also allows it to be subsequently covered with paving slabs to improve its appearance.
The blind area is finished with paving slabs using a cement-sand mixture or mortar. Most often it is used to create a single color ensemble with the decoration of a building or its decorative elements. It is also quite durable.
The paving stones can be laid on a compacted sand bed. It has a beautiful appearance, but is more expensive than tiles and is somewhat more expensive. When using paving stones, it is necessary to ensure that the top layer is completely sealed.
 Sectional diagram of a concrete blind area.
 The blind area made of natural stone looks very beautiful and will last without repair long years. However high price material reduces the possibility of its widespread use.
Asphalt due unpleasant odor V hot weather rarely used. In addition, this one is not very durable, and buying a factory one is much more expensive. more expensive device concrete screed.
DIY concrete blind area
To install a concrete protective coating, you will need the following materials:
- cement grade PC400 or PC500;
- river or washed sand;
- gravel or crushed stone fraction up to 40 mm;
- expanded polystyrene insulation boards;
- board and bitumen for treating it from rotting;
- reinforcing mesh with a cell of 100x100 mm;
- clay or geotextile.
From tools and construction equipment you need to prepare:
- or manual tamper;
- bayonet and shovel shovels;
- wide bucket for concrete;
- building level;
- plaster rule;
- mason's trowel;
- hacksaw and hammer.
The work begins with marking the future coating. Its dimensions were mentioned above. After the final marking for the width of the path, the top layer of soil should be removed to a depth of 25-30 cm, and the bottom compacted.
![]()
Next, you need to spread a geotextile fabric along the bottom of the trench or arrange a hydraulic lock 5-7 cm thick from compacted clay. Pour a 4-5 cm layer of sand onto the geotextile or clay and compact it too. Sand is needed so that the sharp edges of the crushed stone do not damage the integrity of the waterproofing layer.
Now from boards or other sheet material needs to be assembled and installed removable formwork along the edge of the trench. Its height should be 5 cm higher than the planning level of the adjacent territory. After this, you should fill and compact a layer of crushed stone with gravel 7-8 cm thick and sprinkle it with a little sand. This layer of sand is needed so that when pouring the concrete mixture, the cement mortar does not go into the voids left between the stones.

When installing a concrete covering, it is necessary to provide expansion joints 1-2 cm wide. They will compensate for the thermal expansion of the concrete layer in hot weather and prevent it possible rupture with strong cooling. To do this, along the wall of the house along the entire perimeter of the base, using bitumen, you need to glue a layer of roofing felt or waterproofing 1-2 cm thick. Instead of rolled materials, you can use a porous rope made of foamed polyethylene.
 Formwork drawing.
 In addition, every 2-3 meters, as well as at all corners of the building across the blind area, pieces of boards 2-3 cm thick should be installed on the edge, which, after pouring the concrete, will provide compensation for possible expansions.
Before installation, the wood must be treated with a bitumen compound to protect it from moisture and rot. Transverse compensation slats must be installed in such a way that their upper edge corresponds to the future concrete surface.
Brand of concrete and its pouring into formwork
To increase the strength of the concrete layer, it is recommended to reinforce it with a metal mesh with a cell size of 10x10 cm. If you have an old rod or wire with a diameter of 5-8 mm, then you can use this material, but all individual elements must be connected with each other.

After the formwork has been installed, the reinforcing mesh has been laid, and the bulk layers have been compacted, you can begin preparing the concrete mixture and pouring it. A strong and durable coating can be obtained using concrete grades M200-250.
You can buy it ready-made with delivery to the site or make it yourself, 1 part cement, 2.5 parts sand and 4 parts gravel. Water is poured into the mixer last and added gradually until a homogeneous mass of medium thickness is obtained.

The finished concrete mixture is placed inside the formwork on top of the reinforcing mesh so that its edge rises slightly above ground level, and the slope of the blind area is at least 3% towards the building, i.e. For every 1 meter of width there should be a 3 cm increase in level.
Leveling the surface should be done using a plaster rule and a trowel. It is necessary to always check for slope using a building level.
 Concrete mix proportions.
 A more durable surface can be obtained by using iron plating. To do this, the surface of the not yet set wet concrete you need to sprinkle it with dry cement and, using a wide spatula, rub it into the solution. If such finishing of the blind area near the house occurs by sifting cement through a sieve, then you will not have to rub it in; it will be distributed evenly without this.
In hot and dry weather, it is recommended to cover the poured concrete layer with a wet cloth and periodically water it with water to ensure that the material sets and does not dry out. The initial setting time of the concrete mixture is 72-96 hours. After this, you can stand on it without damaging the surface.
Blind area made of paving slabs
Since the paving slab coating is not as durable as a concrete monolith, the base for its installation is made more dense, having quite a thick layer compacted clay, and on top a cement-sand mixture, on which the tiles are laid.
 Scheme with paving slabs.
 The depth of the trenches for making the blind area in this case is dug deeper than for a concrete blind area. In order for the buried layers of pain to be more stable, a trench 40-45 cm deep is required.
A layer of clay 20-30 cm thick is laid and compacted at its bottom, which will protect the base from the penetration of groundwater rising in the spring. A border is placed on the clay layer along the edge of the trench, the upper edge of which will not exceed the level of laying the tiles along the edge of the blind area.
After this, a layer of crushed stone or gravel 10-15 cm thick is poured and compacted well. The top layer of gravel should be approximately at ground level. A layer of geotextile is spread on the stone as protection against the germination of weeds, and paving slabs are laid over it, on a layer of cement-sand mixture.
Blind area made of paving stones
Differing from paving slabs in their greater thickness and better stability, paving stones can simply be laid on a dense bed of sand. To do this, it is enough to dig a trench 15 cm deep, spread geotextiles on the bottom, and fill in a layer of sand that does not reach the top of the trench. After this, you need to lay the paving stones, adding sand if necessary.
To ensure the tightness of the top layer, all seams between the stones must be carefully sealed cement-sand mixture or cement mortar. The border should not extend beyond the top level of the covering.
Soft blind area
 Option with crushed stone.
 TO soft species coverings include a blind area made of crushed stone and other multi-layer coverings that have cobblestones, gravel, pebbles and other bulk materials as the top layer, under which there is a layer of clay or sand covered with plastic film. This is the most inexpensive type of covering and it is very simple to make, but such a blind area made of crushed stone lasts no more than 5 years. After this, it is necessary to resolve the issue of protecting the foundation again.
Very important point when installing soft design— the presence of a slope of the waterproofing layer made of polyethylene or clay. This is necessary because in this system, water is removed not by the surface coating, which allows it to pass through, but by the waterproofing layer.
Installation of an insulated system
The insulated blind area protects building construction foundation from the effects of low temperatures and significantly reduces heat loss from the building. A material of sufficient density, strength, hydrophobic and not subject to rotting should be used as insulation. Polystyrene foam and polystyrene foam best meet these conditions.
 Photo of a properly insulated blind area of a house.
 The insulation process consists of three stages, which are included in the overall scope of work on constructing a blind area around the building. First, a layer of waterproofing in the form of roofing felt or waterproofing material is laid on a thin sand cushion or compacted clay, with some of the material placed on the side walls.
Then the vertical one is insulated basement wall by attaching sheets of thermal insulation to it. When installing sheets vertically, it is necessary to ensure a connection between them in a protruding groove. In cases where this is not possible, the seams should be sealed with polyurethane foam.
A horizontal layer of insulation is laid on the bottom layer of clay or sand base. To reduce the cost of purchasing materials, you can use the first layer of polystyrene foam as insulation, and lay more durable polystyrene foam on it. In this case, it is necessary to ensure that the seams between the individual sheets do not coincide vertically.

The further procedure for how to properly make a blind area is no different from what was described above.
There is an opinion that the insulation of such a structure can be ensured by filling it with a layer of expanded clay instead of crushed stone. This opinion is not entirely correct. There are air gaps in the layer of bulk expanded clay, in which moisture will accumulate over time, and the thermal insulation properties of such a layer will be greatly reduced. If you use expanded clay concrete, then the required layer thickness will be very large and all savings will be lost.
Operation and repair of the blind area
Over time, the surface of the concrete pavement may develop cracks or other damage. This most often occurs as a result of soil subsidence, incorrectly selected width of expansion joints, or the use of low-quality materials and for other reasons. Repairs to such damage can be done using a mixture of bitumen primer, asbestos and sand.
 Market cost of blind area installation services.
 Initially, the crack expands somewhat and is cleaned of debris and dirt using a water jet. Then you need to let it dry and fill it with the prepared mixture.
Damages that are too large must be extended to the right size, wetted with water and restored by pouring new concrete. If necessary, the damage volume is reinforced with steel wire or rod. After the concrete mixture has hardened, the restored areas must be treated with a primer.