Disabling password entry in windows 10. Through editing registry entries
A Windows 10 sign-in password is sometimes not required for a computer with only one user. Entering a cipher into your account every time is too annoying if the security rules do not require it. You can disable the password using the account manager and the registry editor. You must have administrator rights to remove authentication at power on.
You can delete any rule using standard Windows tools. If some necessary options turned out to be disabled by accident, then you should know that.
Accounts
To remove the password request in one of the ways, you need to edit the account, which is done through a series of actions:
- Launch the Run window. To do this, we alternately hold down the Windows and R keys. In the window that appears, enter the control userpasswords2 or netplwiz command.
- The next step is to set up accounts. Here you need to uncheck the area highlighted in the figure. In this case, it is important to click on the account for which you need to configure the request.

It happens that it is not possible to disable identification when turned on in this way. This may be because the account has already been included in some domain. Then you should turn to a special registry editor, from which you can remove any item.
Registry Editor
You need to understand that such a computer setup will lead to the open storage of the user's password. Any person viewing computer files can recognize the characters of the cipher in this case. First, you need to repeat the steps described above: open the Run window.
- We alternately hold the Windows and R keys, which are located on the keyboard.
- Enter the regedit code in the window that appears.
- Next, you need to go in the window to the address: HKEY_LOCAL_MACHINE\ Software\ Microsoft\ Windows NT\ CurrentVersion\ Winlogon.

- Once the specified realm is found, double-click the AutoAdminLogon option.
- Set the value to 1 in this parameter.
- Open the DefaultDomainName line and change it to the domain name or computer name that is viewed in the properties of My Computer. If there is no such parameter, you can easily create it yourself using the right mouse button.
- Open the DefaultUserName line and change it to another one.
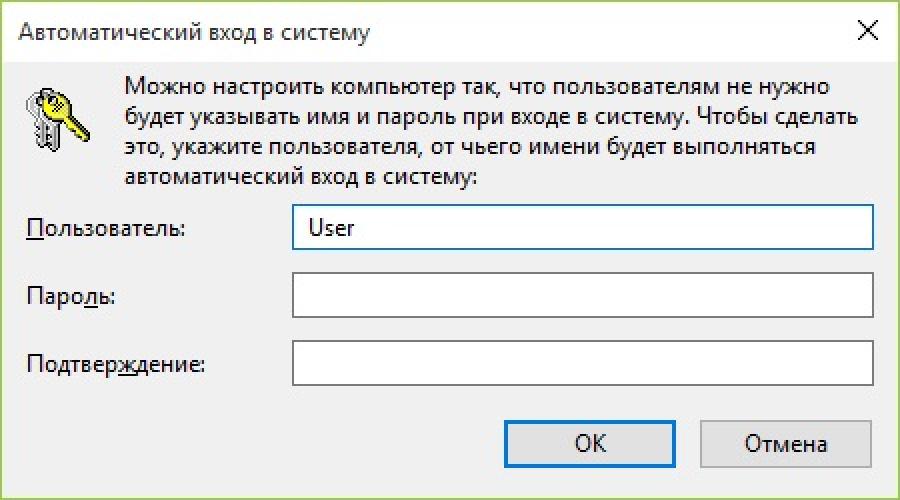
- Create a DefaultPassword string and set the value in it by copying the password of the current user.
Once all the steps are completed, you can safely close the editor and restart your computer.
Sleeping mode
There is a way to remove the account when you turn on the computer from sleep mode. The setting for this mode is located if you open it in the notification area:
- All Settings tab.
- Select Accounts.
- Click Login Options.
A special window will open in which you need to set the Never option, as shown in the figure below.

It is also possible to remove the password request from the Power menu. For this you need:
- Go to Control Panel.
- Select an existing power plan.
- Click on Power plan settings.
- A window will appear in which you need to click Change advanced power settings.
- Select the value as shown in the figure and apply the changes to the computer.

As you can see from the above, there is nothing difficult about deactivating an account. All you need to do is uncheck the checkboxes. Do not be afraid of the registry editor. You can easily create the desired parameter, or you can also simply delete it.
(Visited 4 836 times, 1 visits today)
How to remove a password from a Windows 10 computer? Knowing this, you can simplify the task of your login.
By default, desktop PCs and laptops that have Windows 10 installed require a password to be entered for their accounts or local accounts when enabled.
As a rule, this combination of password characters is selected during system installation to increase the security of confidential information stored on a computer that is shared with several users at once.
Therefore, if protection interferes, and you want to disable the Password prompt, you should use one of the options for setting up automatic Windows 10 boot to go directly to the desktop.
Fig.1. Password at login.
Pros and cons of passwordless login
The main advantage of passwordless entry is quick access to the system.
No need to remember passwords and spend time entering them; every time you turn on your computer, this saves valuable time, and most importantly, you will never lose your password and access to your data.

Fig.2. Incorrect password message.
Among the minuses, it is worth noting the simplification of access to a computer by other people - at home, for example, it can be children.
Removing a password
The principles of setting up Windows 10 login are not too different from the actions that are performed in previous versions - Windows 7 and 8.
At the same time, it is recommended to remove the protection of the entire system and individual accounts only in cases where only one person uses the computer.
If there are several users, it is worth leaving passwords on other accounts.
There are two main ways to remove the password in Windows 10:
- through the registry
- through accounts.
In addition, the password can be removed not only for the account, but also for the local record. And also - remove a similar function when exiting sleep mode.
The account method
Using Windows 10 accounts is the easiest option to reset your password. The main steps will be as follows:
- open the Run window by pressing the Win + R combination;
- enter one of the commands in the dialog box - netplwiz or control userpasswords2;
- press "Enter";

Fig.3. Entering a command in the Run window.
- select the required user in the account window that opens and uncheck the box requiring a username and password;
- click the "Apply" button;

Fig.4. Change the way you enter your name and password.
- in the automatic login window, enter the previously set password twice to confirm your rights to remove it;
- click OK.

Fig.5. The last step is to remove the password using accounts.
Advice! After completing all the steps, you should make sure that the checkbox for requiring a password has disappeared. Rebooting the system will allow you to finally check this.
Removing a password through the registry
In cases where automatic passwordless login cannot be configured for some reason, you should use the second option - the registry editor.
For this you need:
- open the editor using the "Run" window, called by the Win + R key combination;
- enter the regedit command;
- press the enter key;
- when a window appears asking you to make changes to the system, select the “Yes” option.

Fig.6. Calling the registry editor.
- in the registry, go to the "HKEY_LOCAL_MACHINE" section;
- open the subsections SOFTWARE, Microsoft, Windows NT, CurrentVersion and Winlogon in turn;

Fig.7. Select the desired subsection to remove the password.
- find the DefaultUserName parameter in the right column of the editor, double-click on it and check if the name of the account for which the password is being changed is in the value field;
- select the parameter called “DefaultPassword” there or create it if it has not been created yet. To do this, click the "Create" button and select the "String parameter" value. Enter the password in the "Value" field;
- enable the ability to automatically log into the operating system by finding another parameter - "AutoAdminLogon". This value is zero by default and must be changed to one for passwordless entry.
After restarting your computer, Windows 10 should start without you having to enter passwords.
However, due to the complexity of this method and the possibility of modifying the registry, it is better to use the first technique first.
Disabling the password for local writing
Using a local account, which limits the user's capabilities, but is often necessary for a work computer, you can also remove the password when logging into Windows.
After that, even a system locked with the Win + L keys does not require a password. All that is required for this:
- launch a command line (requires login with an administrator account);
- enter the net users command and pay attention to how the username is displayed;
- repeat the input again using another command - “net user user_name”;
- press Enter.

Fig.8. Disable password entry for an account.
After the command prompt is closed, the Windows 10 user is able to log in without using a password.
Removing the password to wake up from sleep mode
In addition to entering a password when logging in, the security requirements of Windows 10 lead to the need to request a fifteen-digit code when exiting "sleep mode".
However, on a home computer, such protection is practically meaningless.
And in order to get rid of it, you should use a special setting in the accounts menu.

Fig.9. Sleep password management.
To change the logon options, you must set the value to "never" in the section for choosing the time after which Windows asks for a password.
Now the exit from sleep mode will become passwordless and fast.
You can remove the password request when you turn on the temporarily blank screen in another way - using the "Power Options" item located in the control panel.
To do this, when setting up the power scheme, select the item for changing inaccessible parameters, change the value "Yes" to "No" and click "Apply".

Fig.10. Disabling the password through the power menu.
findings
By applying the methods of disabling the password, you will have at your disposal a system that does not require the introduction of a code.
Although, if it is possible for outsiders to access the computer, passwordless entry is not secure.
And the password is best left, as saving a few seconds of time is not worth the privacy breach.
Do you want to load your Windows 10 desktop quickly by skipping the login screen? Do you want to skip entering a password from your account every time you boot your operating system (OS) when you turn on your laptop or system unit? It can be arranged! You can turn off the password prompt at login and configure Windows 10 to automatically boot into the desktop or start screen without entering a code.
What is the benefit of this? When you enter the software environment without a password, your account does not require you to enter it. Also, now you do not need to remember the code and type it on the keyboard, spending a few seconds when loading. Thus, Windows 10 will load the desktop faster, albeit only by a couple of seconds. What is the downside of this approach? It will now be easier to access information on your computer without asking for a password.
The process of setting up a Windows 10 login on the machine is similar to the same steps in previous versions - Windows 7 and 8. Since both of the approaches below apply to both the local user and the Microsoft account user, you can follow the same instructions.
We have already written about the disadvantage of disabling the password, and therefore we advise you to do this only if you are the only user of the computer. If your relatives use the PC, then you should not remove the password.
So, to enable automatic login to Windows 10 without a password, use one of the methods below. So, here's how to remove the password prompt when logging in to Windows 10.
Method #1 for automatic login without password
This is the easiest way to remove the prompt in Windows 10 from the login screen.
On the Start icon, right-click and select Run. The same window can be called by simultaneously pressing the key with the Windows start icon and the R key. In the dialog box that appears, you need to enter Netplwiz. Then press the key to enter the "Enter" command.

(picture 1)
Now a window with "Accounts" will appear on the screen. Uncheck the box next to the entry "Require username and password". To fix the action, click the "Apply" button. This will open the Automatic Login window.

(picture 2)
In this dialog, you need to enter the current password and below it again and click on the "OK" button.

(picture 3)
Make sure the bird in the window is gone. To see the changes in action, right-click (RMB) on the "Start" icon and select "Shutdown or Exit" - "Exit" or "Restart" with the left mouse button (LMB).

(picture 4)
Method number 2 to disable the password in the windows 10 registry at login
The Windows registry does not change much from version to version, unlike the external graphical shell. So this method achieves the same result.
In order to use it, open the editor for the registry. To do this, you need to get to the "Run" window, as described above. Press "Win" + "R" and type Regedit, press the "OK" key.

(picture 5)
In the editor that opens, go to the following subsection:
HKEY_LOCAL_MACHINE\SOFTWARE\Microsoft\Windows NT\CurrentVersion\Winlogon

(picture 6)
On the right side of the editor, in alphabetical order, there is the DefaultUserName parameter. To the right of it is the name of your account. By double-clicking (LMB) on it, you can see it in the "Value" field.

(picture 7)
Click "cancel" and returning to the main window of the registry editor, in the right part of the window, look for the DefaultPassword parameter. This entry may not exist. If so, then create it by clicking (RMB) on an empty space. Next, click the "Create" button, selecting "String Value" (String Value). Rename it to DefaultPassword. By double-clicking (LMB) on the created entry, enter the password in the "Value" field. Click on the OK button.

(picture 8)
Now you need to change the login to automatic value. To do this, modify the AutoAdminLogon entry. In the "Value" field, enter "1" instead of "0".

(picture 9)
That's all! Restart your PC and make sure your Windows 10 desktop now opens without asking for a password. In order not to disable anything superfluous in windows 10, it is better to use the first method.
Alexander, www.site
Video "Sign in to windows 10 without a password automatically"
Many users of computers running Windows 10 (or Windows 8.1) use the linking of the operating system to a Microsoft account. Thanks to this, absolutely all the features and functions of the system are available to them. However, this has its drawbacks, and one of them is that every time the PC is turned on, the user has to enter his account password, otherwise he will not be able to log into the system.
If you use the computer only at home, and no one else except you has access to it, then password protection of the system is completely useless to you, which means that you can remove the password without fear of anything.
Enable automatic login to Windows 10 without entering a password
Not everyone is aware of this, but the password on the Windows 10 login screen can be easily disabled. More precisely, it is enough to once add the Microsoft account password to the credential manager, and once and for all you will forget what a password prompt is before starting to work with the operating system. Here's how to do it.
Right-click on the Start button and select Run, or simply press + R on your keyboard. Enter command netplwiz and press the OK button or the Enter key on your keyboard.

The User Accounts window opens. It can be opened in other ways, for example, through, but the netplwiz command is the easiest option.
In this window, if you have multiple accounts, you need to select the profile for which you want to enable automatic login without entering a password. Uncheck the "Require username and password" option and click the "Apply" button.

Now enter your current password twice and click OK to confirm the changes.

After restarting the computer, you will see that you no longer need to enter a password. This, of course, has its drawbacks, since by disabling the password, you remove a layer from the security of the operating system, but in this case for the sake of your convenience.
Finally, to remove the password when the computer wakes up, open the Settings app, go to Accounts -> Sign-in Options, and select the Never option from the Sign-in Required drop-down menu.
 Removing password when logging in to Windows 10
 Have a great day!
Have you set a login password and now the operating system requires you to enter it every time you turn on your computer or wake it up from sleep/hibernation? No problem. This is easy to fix, and without removing the password from the account.
There are several ways to remove the password when logging in to Windows 10:
- a control panel applet called "User Accounts", as it was in XP and the "seven";
- a system registry editor that allows you to configure virtually any Windows settings;
- The last of the Control Panel applets, called "Power Options", will get rid of prompts for a password when waking up the computer.
Note that to execute the algorithms below, the account must be an administrator account or have administrator privileges in the system, otherwise you will not get access to the corresponding registry entries. It is in it that the necessary parameters are stored.
Through account management
Let's look at how to log in without an account password. This method is considered first for several reasons:
- It is a simple and fast method to achieve the goal;
- The steps required to eliminate the password box are virtually identical to those required in Windows 7 and XP.
Everything is done very simply, and even a beginner can easily cope with the task without any questions.
1. We call the command interpreter using the key combination Win + R.
The Win or Windows key is mostly placed between Ctrl and Shift. Its difference is the presence of the Windows icon - made in the form of a flag, a window divided into four.
2. Enter the command " netplwiz».
To simplify the task, the above command can be executed in the search line - the result will be identical - a window will appear with the name "User Accounts".
3. Remove the check mark opposite the only option "Require password and username" in the first tab of the dialog box that appears.

If there are several accounts in the system, select the required account from the list below, then uncheck the box related to the selected user.
4. Click "Apply" to save the changes and close the window by clicking "OK". After that, you will have to enter the current password and confirm it.

When entering and confirming a password, you can select another user on whose behalf Windows will start.
In cases where the PC is connected to a domain, the option to require a password will be inactive. Although the way out of this situation is to directly edit the system registry entries through its editor.
The method described below is less safe for beginners, so you should be extremely careful. It is also recommended to make a backup copy of the modified branch or create a Windows 10 rollback point.
Through editing registry entries
The second method to implement all of the above is to exploit the capabilities of the registry editor ( only works on older versions). In this case, the password is stored in one of the registry keys in unencrypted form, so any experienced user can easily find it out.
1. Download the registry editor.
This is done with the "regedit" command. It is performed in the search line or the line of the Win + R command interpreter.

2. Expand the contents of the HKLM branch.
3. Go to the address:
HKLM\Software\Microsoft\Windows NT\CurrentVersion
4. Go to the Winlogon branch.
To activate automatic login in the system, do the following.
5. We double-click on the parameter " AutoAdminLogon"And set its value to 1.

6. As the value of the key " DefaultDomainName"Specify the name of the computer (we look at it in the system properties).
If there is no key, we create a string parameter with the above name and value.
7. Change the value " DefaultUserName"To the username from which automatic login will be performed, if necessary.
8. Add a string parameter called " DefaultPassword", The value of which will be the password from the above account.
9. Now close the registry editor and restart the operating system. If everything is done correctly, Windows 10 will automatically log you in.
We remove the automatic lock of the computer
Each time you turn on a computer or laptop that has been put into hibernation or sleep mode, you also need to enter a password for authorization. This is easy to avoid, because the developers have provided a separate option in the Options menu ( this method works up to version 1903).
- We call the system settings window "Parameters".
- Go to the "Accounts" tab.
- Go to the Login Options section.
- In the "Login required" section, select "Never".

After the next wake-up of the laptop / computer, it will not ask for a password, and the login to the specified account will be performed automatically.
Disable via command line
When working under a local account, the best solution is to remove the account password.
Using the Win + X menu, launch the system console with administrator privileges.

We execute the command "net users".
Net users account_name ""

Press "Enter".
The password for the specified Windows 10 account has been removed.