The sole of the nn 75 ski boots has come off. What to do if there is a problem with your ski boots. Salomon ski boots
I switched to NNN system bindings and boots not long ago; I’ve only been riding in them for the second season. I switched because of weak Salomon SNS bindings, which, if broken, can sooner or later lead to the breakdown of expensive cross-country skis. I also switched due to the limited selection of shoes for SNS and my own laziness because many modern top cross-country skis have integrated NIS platforms for NNN mounts with the possibility manual adjustment and without the need to drill unnecessary and extremely undesirable holes in the ski. However, NNN seems to have another ambush lurking. Not in the bindings, but in the boots - extremely weak soles. Which can unexpectedly burst even for a top couple after just a few trips with the Dmitriev Group. :-(
Client #1 - Rossignol X3. I bought it at Trial-Sport for almost 8 thousand rubles. Died after only six one-day hikes with the Group. Fortunately, there was no leaving the route, and the boot, thanks to an improvised bandage with an adhesive plaster, withstood another 45 km.


Client #2 - Fisher XC Control. I bought it at Juventa to replace the aforementioned Rossignols for 6 thousand rubles. I couldn’t find anything cheaper than acceptable quality and convenience. Served for less than one season or 12 trips with the main engine (including last year’s Hundred). Timely revision allowed me to avoid breakdowns and derailments during the hundredth mileage that took place on Monday.


Client No. 3 - cheap Chinese Nordway Tromse from Sportmaster - for a new one? :-)
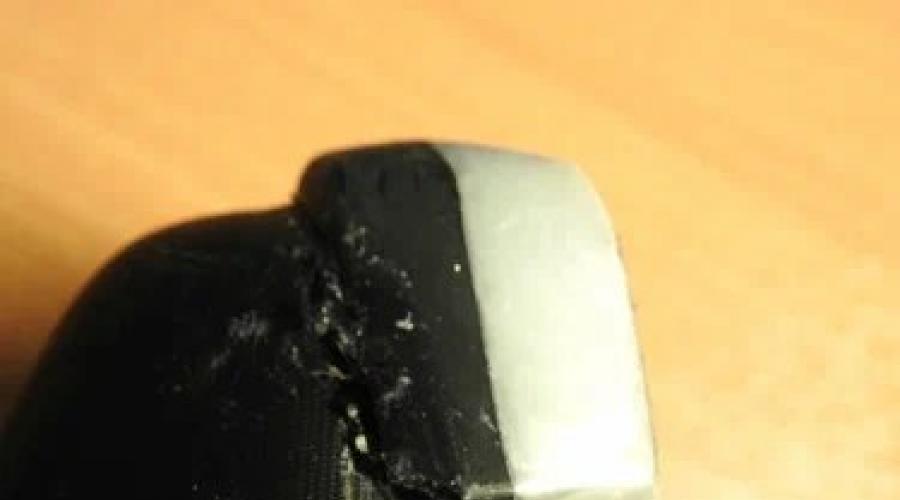
It can be seen that the crack forms in the same dangerous section - at the junction of the toe with the main sole. Not a single shoe repair shop even tries to repair “Fisher”: shoemakers only “heal” broken rubber soles, but here they are hard plastic. It would be a shame to throw it away (the crack is just beginning). Maybe it’s still possible to somehow save it in some advanced workshop?
For comparison, the old “Salomons” of 2011, which went through fire and water, two hundred and many trips to the State Duma along gullies, as well as numerous walks on the city asphalt from home to train stations and back.


They did whatever they could with them - they put a patch on the bend of the foot, cut off the plastic retainer, stitched all the seams. The sole and axles were heavily ground down on the asphalt, but the sole itself is simply indestructible. :-) It is completely monolithic, without a toe joint with an increased stress concentration, like NNN, and without sudden changes in thickness.
Or even more ancient Spine Advance boots from 2008, which have served continuously for 4 seasons and still serve at the opening/closing of the season. Also with an indestructible sole.


So think about what is better - to go back to the immortal SNS boots, but with weak fastenings, or to buy NNN-Chinese ones every year in Sportmaster, as in the famous advertisement “if you don’t see the difference, why pay more”?
Maybe experienced skiers know how to get around this disease NNN? :-) That is, choose inexpensive boots, but with more reliable soles. I would be glad if anyone could share whose NNNs have worked well for several seasons of intense skiing.
Shoes are one of the most important components of your equipment. From her the right choice and the quality of execution depend on the comfort and health of the user. Sometimes you have to change several pairs of boots before you can find the perfect one, not to mention the fact that the purchase new shoes almost always financial event for the outdoor enthusiast. That's why it's so important to extend the life of your shoes. proper care and timely repairs.
The tips outlined below will be valid both for classic trekking shoes made from full-cut leather with a minimum of seams, and for lighter models made using wear-resistant textiles. Our material is based on the experience of experts from the American magazine Backpacker and advice from specialists from McNett, a manufacturer of products for repairing clothing and equipment intended for outdoor activities.
Backpacker- one of the world's most authoritative publications dedicated to active recreation. The magazine has been published since the spring of 1973. In each issue you can find travel reports, equipment reviews and useful tips. Since the early 1990s, twice a year, the magazine has published its “Gear Guide,” in which the most interesting and best examples of clothing and equipment are awarded the Backpacker Editor's Choice award. In addition to the magazine, the publishing house produces small brochures on tourism topics, - descriptions of interesting walking routes or useful tips. ![]()
When repairing shoes, you should not use universal superglues, since their connections do not have the necessary elasticity. The basis of your set will be polyurethane glue. This is due to a number of its positive properties:
- this composition is characterized by high fastening strength;
it swells significantly when hardening, which allows it to penetrate porous substances (leather, EVA foam) and reliably hold them together;
high adhesion allows the use of this composition when gluing leather, rubber and textiles with polyurethane treatment, which are actively used in the production of trekking shoes; water resistance; high elasticity of the resulting adhesive connection, including at sub-zero temperatures;
high wear resistance.
In the American and European markets, the most popular and reputable products of this kind are McNett Freesole and Shoe Goo. They are actively used and recommended by both experts from leading tourism publications and independent observers. Sometimes polyurethane sealant can be used during repairs - as a rule, this concerns gluing textile materials. In this case, the most universal remedy McNett Seam Grip is also used to seal the seams of awnings and backpacks, as well as to repair inflatable camping mats and sleeping bags. Freesole and Seam Grip can be replaced by any other polyurethane-based adhesive - Anaes, Desmokoll, Secunda. But, as practice has shown, such analogues do not have the same versatility of use and are only suitable for gluing soles and upper elements of shoes.
Second important element your shoe repair kit will be durable adhesive tape, which is useful for fastening bonded surfaces in field conditions repair.
To achieve maximum strength of the adhesive joint, thorough cleaning and degreasing of the bonded surfaces is necessary. This is where alcohol-based cleaning wipes come in handy. As a rule, they are packaged in individual packages and weigh almost nothing. They can be found both in ready-made repair kits (for example, Therm-a-Rest Instant Field Repair Kit) and in pharmacies.


How to seal holes in boots?
Sometimes, as a result of intensive use, small holes may form on the bend of the boot in its toe section. This is a fairly common phenomenon for shoe models with textile uppers.
Thoroughly clean the surface around the damage from dirt and dust. The smallest particles from the fold line can be easily removed with a toothbrush. For achievement best result When cleaning, it is advisable to use an alcohol-based cloth - it will degrease the surface. Then squeeze Seam Grip and spread it over large area over and around the hole. The polymer is quite flexible and forms a sealed seam over the damaged area. It will take 10-12 hours to dry.

A layer of Seam Grip adhesive bridges a tear in the flex of a Salomon Wings Sky GTX boot (photo via Backpackers Complete Guide to Outdoor Gear Maintenance and Repair)
Boot sole repair
If you notice peeling of the top of the boot along the edge of the sole, then it is most advisable to stop this at an early stage, without waiting until the boot or sneaker “asks for porridge”.
Using a flat-head screwdriver or other tool with a similar profile, you need to carefully and thoroughly remove the dirt and debris that has accumulated between the sole and the top of the shoe. Additional help at this stage can be Toothbrush. The more thoroughly you clean, the stronger the adhesive joint will be.
Next, fill the syringe with Freesole glue or polyurethane sealant Seam Grip. Then squeeze it directly into the gap between the sole and the top of the boot along the entire length of the peeling area. A syringe is needed for more deep penetration and accurate distribution of glue, so in the absence of it, you can use a clean screwdriver or stick.


Use strong duct tape to secure the sole and top of the boot tightly. In some problem areas such as the toe, additional pressure will be required for effective bonding. To create it, you can use a pencil or a stick taped with adhesive tape. It will take 10-12 hours for the polymer to dry.
If the sole has peeled off, it is necessary to clean and degrease the bonded surfaces as much as possible. Therefore, in addition to removing mechanical impurities, it is important to use an alcohol wipe. Next, you just need to fill the entire cavity of the sole with shoe glue and press it tightly with the top of the shoe. For completely dry in this case, significantly more time is required - from 12 to 48 hours. The glue will inevitably squeeze out beyond the sole - if the aesthetic side of this moment confuses you, then its largest fragments can be carefully cut off after hardening.


An example illustrates the repair of the Asolo Stinger GTX boots, which was carried out by Melanie Robinson, one of Backpacker magazine's expert testers. The photo clearly shows the consequences of untimely repair of a peeling outsole - part of the EVA foam midsole, on which the shock-absorbing functions lie, crumbled when walking
If your shoes have worn out heels
Many tourists, due to the nature of their gait, experience increased heel wear on the soles of their shoes. This is especially offensive in situations where the rest of the boots are still in good condition, and their replacement is hardly justified. In this case, the following method will help extend the service life.
Place a strip of thin tape around the heel. The resulting edge will not allow the Freesole glue to spread, which needs to fill the cavity that appears as a result of wear on the sole.
In order for the outsole in this area to be as smooth as possible, it is important to carefully distribute the polymer and position the shoes as far as possible. flat surface. Repaired shoes can only be used after 48 hours, after the glue has completely cured.
Of course, such an outsole does not have the same durability as a factory one, however this method allows you to extend the life of the sole by at least one season. To ensure that the glue does not contrast in color with the black sole, you can use the McNett set with Freesole glue and color scheme Color Sync Black.


Applying toe protection
A significant part of modern trekking boots have rubber toe protection. If your pair of shoes does not have such an element, and the skin in this place suffers from external influences, then you can apply it yourself. Here's the method recommended by the experts at McNett.
To begin, clean the toe of the boot and apply a strip of thin tape that will serve as a border for the area where the polymer is applied. Next, treat the smooth leather surface with sandpaper small grain size. The surface will become matte. Treat it with an alcohol wipe and remove any debris caused by the sandpaper. Next, using a sponge, apply and spread Freesole glue over the entire surface you have treated. After 30 minutes, remove the strip of tape. The adhesive forms a smooth, water-resistant glossy surface. It will take about 12 hours for final drying.
An alternative to this method is to apply a layer of shoe wax, such as Holmenkol Natural Wax, to the toe. This method is not durable, but at the same time does not violate the aesthetic component, which is so important for many users.


Caring for trekking boots
Timely cleaning of shoes significantly increases their service life. Dust particles and dirt are an abrasive that gradually destroys both textiles and leather. You should clean your boots after every hike.
First, take out the laces - you can throw them in the washing machine or dishwasher. Next, simply wet the boots with a sponge. Water will dissolve contaminants. When cleaning, use a non-aggressive detergent, such as dishwashing detergent. Significantly simplify this process specialized means, which are sold as a spray or cleaning gel, such as Grangers Fabsil Footwear Cleaner or Nikwax Footwear Cleaner Gel. When cleaning, follow the manufacturer's instructions. In any case, the work should be supplemented detergent using a brush with soft bristles - a shoe brush or dishwashing brush will do. For cleaning hard to reach places A toothbrush will do. Remains of the cleaning solution should be washed off with water using a sponge. Remember that leather trekking shoes require natural drying - contact with heating radiators should be avoided. household heaters, fire and so on.
At the height of the ski season, my ski boots failed - the rivets in the protruding toe fell out due to heavy load, and the sole began to peel off. There was no point in gluing the sole with superglue without additional fastening, and the workshop did not have the opportunity to install new rivets. Then the idea came up to use bolts with washers and a nut instead of rivets.
The article will be useful to those who find themselves in a similar situation. Make such repairs ski boots It’s not at all difficult to do it yourself.
For repairs you will need:
3x40mm flat head bolt, nut and two washers
A piece of PVC linen cord 200-250 mm long
Pliers
Metal hacksaw blade or wire cutters
Adhesive for gluing leather and rubber
Repair sequence
Step 1. Let's prepare necessary tools and materials.
Step 2. We remove the remaining parts of the rivets and clean the surfaces to be glued.
Step 3. We pull a piece of linen cord through the rivet holes and remove its end from the shoe.
Step 4. Insert a bolt with a washer on it into the hole in the cord.
Step 5. Pull the cord with the bolt through the hole. In the same way, insert the second bolt into the hole.
Step 6. We put washers on the protruding parts of the bolts, screw on the nuts, apply glue to the cleaned surfaces and tighten the nuts.
Step 7. Stepping back from the nut by 3-4 mm, cut off the protruding parts of the bolts. To prevent the nuts from unscrewing, the bolts must be riveted.
I hope that after repair the ski boots will last for more than one season.
Post Views:
1 977
For safe skiing on the ski slopes, it is important to have reliable, high-quality equipment. Boots are an important part of the equipment, which affects not only the comfort, but also the health of the athlete. During active skating, especially short track speed skating, virtuoso turns, sports shoes quickly break.
Repairing ski boots is an expensive business, and you need to find good master. However, some problems can be solved on your own.
This is a common problem among ski enthusiasts. It often occurs at the height of the season due to heavy workload. The sole may come off completely or just the toe.
You can repair it yourself using small screws, glue and nuts. First we connect the back part. If you have fastenings without holes, then make several holes at the junction with the shoes. Insert the nuts with the cap down. Roll them inside the shoe. The nose is repaired in the same way.
You can strengthen the connection using shoe glue. Pre-clean and degrease the sole part. Gluing is an additional procedure to fastening with nuts.
The clasp has come off: how to fix it yourself
If used carelessly or with a sharp jerk, the clasp can be damaged. Often, it is produced in the form of Velcro. In this case, to repair skis with your own hands, you will need sewing supplies - strong thread, thick needle and thick fabric.
If it is completely torn into 2 parts, you need to connect them using a piece of prepared fabric. If the clasp has come off the ring, then attach it too, using fabric. If the special ring has been lost, you can use wire. However, this temporary option, since such a fastener will quickly break.
In professional stores you can find spare parts that will help you restore.
Repairing the rear foot brace
This plastic element extremely important, it is present in all expensive shoe models. This allows you to securely fix the leg in the heel area, preventing injuries.
But his problem is that he often leans away from the boot itself. To repair, buy 2 bolts with a small diameter. Drill holes in the clamp. Using bolts, connect the bar to the boot and tighten them from the inside.
Help with pins
When a pin breaks, skiers face three problems:
- The plastic that holds the pin weakens or wears away, and it begins to wobble.
- It completely falls away from the attachment point.
- The pin was bent or dented while riding.
The first 2 difficulties can be solved with epoxy glue, tape and a file. First, using sandpaper (preferably fine sandpaper), carefully clean the area that will be glued. Insert the pin in place, secure it with tape, and fill it with glue. Let it dry overnight excess glue remove with a file. You will have to try hard to remove the tape.
It is possible to repair a bent pin if the strength of the fastening is not significantly damaged. To do this, you need to make a mandrel by tapping on both sides with a hammer.
Snowboard boots are repaired in the same way as ski boots. However, snowboarders may encounter the following problems: rust on the fittings, worn seams, loose lacing. If there are problems with the part, the part needs to be replaced. Attempting to repair it yourself will not return it to its original functionality, and riding may become dangerous.
Careful operation, timely cleaning and proper storage in the off-season it will avoid many problems with ski equipment.