Do-it-yourself finishing of slopes of plastic windows. How to install sandwich panels for windows - the secrets of warm and beautiful slopes How to make a slope from sandwich panels
Read also
Sandwich panels are increasingly being used because the material is light in weight, easy to maintain and resistant to stress.
Sandwich panels for slopes of plastic windows are a finishing material that includes three layers.
Characteristics and features of the material
A couple of layers consist of plastic, the third, inner layer is insulation. Such panels are used in construction almost everywhere; any job can be done, but there are some differences, which lie in the insulation used.
Panel insulation is most often mineral wool. The sandwich construction is ideal for installing on a window slope; the material does not allow extraneous noise or cold to pass through, due to which the window will retain heat in the house. The characteristics of the panels do not end there, because mold and mildew do not appear on them, and they are not subject to temperature changes. The sandwich panel can be made of different materials, which is located on the outside, see the table for more details:
| Material: | Description: |
|---|---|
| Cink Steel: | Installation of the panels is easy, operation is simple. Not used for windows. |
| Aluzinc: | It is extremely rarely used for windows, due to the fact that the appearance of the window will be spoiled. |
| Drywall: | Suitable for creating panels on slopes. Easy to use, the slopes will look beautiful. |
| Plastisol: | Durable material, since the panels contain special additives that make the panel stronger. Not subject to destruction due to weather conditions, resistant to mechanical damage. The composition is free of toxins, which means that sandwich panels of this type can be installed for window slopes, both inside and outside. |
| Polyvinyl chloride or polypropylene: | Most often used to create a sandwich panel, ideal for window slopes. |
Important! It is convenient to cover a window with such material, because PVC panels are produced in different colors, white material or wood-like material is used.
Advantages of plastic sandwich panels for window slopes
The main advantage of the panels is 100% resistance to moisture, which means there will be no mold or mildew on the slopes, and condensation will not appear on the window. Comparing drywall and sandwich panels, plastic sheets are easier to install, the installation process is easy, and in addition, there is almost no debris during operation.
The cladding does not require special care; it will be enough to wash the surface when needed and that’s all. The installation work does not require any special tools; a standard set and a knife or jigsaw that can be used to cut and saw the material will suffice. The cost of the slope is minimal, the cost of the panels is acceptable, considering the advantages of the material.
How to properly make slopes from sandwich panels (video)
Preparatory work
After dismantling wooden windows and installing metal-plastic ones, it is necessary to prepare the surface for installing a slope made of sandwich panels. You need to do the work step by step, the preparation instructions are as follows:
- The wall is coated with an antifungal agent.
- The mounting foam that gets in the way is cut off; if necessary, the cracks can be foamed and then the remaining foam can be cut off.
- The frame is measured, points need to be placed along the perimeter, retreating from the edge by 5 mm. 2-3 dots are drawn on each side. After that, a level is placed on them and everything is connected. The lines must be in a plane.
- The dimensions of the opening are taken at the top and bottom. By the way, during preparation you can also insulate the window sill. Insulation will make the house warm and cozy.
The preparation of slopes from sandwich panels with your own hands is completed, now you need to install the system on the window.
Installation of slopes made of sandwich panels

The installation of window slopes from sandwich panels is carried out correctly as follows:
- The material that needs to be used to cover the window is being prepared. During the work, the application will require: starting profile, finishing profile, platband, foam, silicone or sealant.
- Next, everything is carefully measured again, the data is transferred to the mount (profile). The profile should be cut to size and then installed around the perimeter of the window with self-tapping screws. The step width is 15-20 cm.
- Now the depth of the slope and other parameters of the elements are taken to transfer the data to the panel. The sheathing is cut using cutting tools.

- All the cracks on the slope must be filled with foam, only after this the installation of slopes from sandwich panels begins.
- The panel is placed in the starting profile; it will guide the rest of the cutting. The material is leveled.
- The finish should be secured with tape or a support strip.
- Similarly, you should fasten the panels around the entire window and stick tape on them.
- If the gap between the panel and the wall is large and the thickness allows, then the technology involves inserting mineral wool.
- The external casing is cut to the height of the window and made slightly longer than the opening, by the width of the casing.
- The plastic trim is placed on the panel in accordance with the dimensions.

- Making the correct angles, for them you will need to cut the upper part of the platband at 45 degrees, and then fasten it at the top. The plastic corner should match at the edges. The vertical side is done in the same way.
- At the end, the seams are sealed, which will keep street noise and cold out, preventing them from entering the house. Silicone is used for this. The platbands themselves should be coated around the perimeter and glued to the slope.
This completes the finishing of the slopes with sandwich panels. The technical process is presented in detail in the video at the end of the article. An example of how to finish a window can be found on the Internet in the photo. Installing PVC sandwich panels for slopes is a simple process, most convenient and good for people without plastering experience. Knowing the characteristics of the material and the rules for how to install a slope, you can veneer everything yourself.
Photo gallery of finished works


Apartment renovations usually begin with the installation of windows, after which it is necessary to install slopes for new plastic windows. They can be made using various building materials: plaster, sandwich panels, drywall. Slopes made of sandwich panels are extremely popular. In addition, you can install them yourself. It does not take a lot of time.
Before installation, you need to do it correctly: remove the old plaster from it, insulate it with basalt wool, penofol or expanded polystyrene.
This material has many advantages:
- low thermal conductivity;
- hygiene;
- efficiency;
- ease of installation.
Required Tools

Installation diagram outside the window.
In order to do the installation yourself, you need the following tools:
- starting "P" profile;
- “F” profile (cover);
- roulette;
- sharp knife;
- liquid plastic;
- self-tapping screws 2.5x7 mm;
- screwdriver;
- sealant;
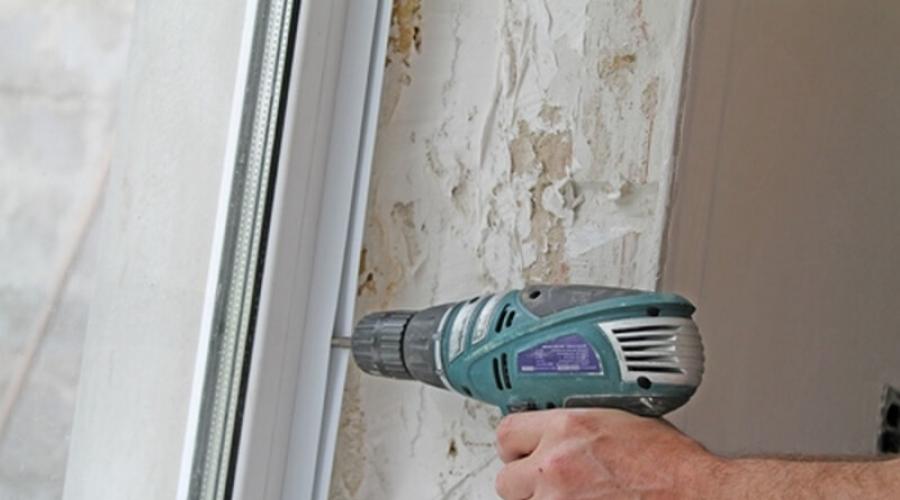
- screwdriver or drill.
Main stages of work

Installation of deep slopes from sandwich panels to a wooden and plastic frame.
First you need to use a tape measure to measure the width and length of the slopes. You need to cut three strips from the panels: the top, two side. The top strip should be parallel to the window sill. Using a sharp knife, you need to carefully cut off the excess foam around the entire perimeter of the window block. It is very important that the foam dries completely. At least 24 hours should pass from the moment the window is replaced.
So, after the excess foam has been cut off, you need to start installing the “P” profile with your own hands. It received this name because of its shape, which in cross-section resembles the letter P. We cut the material according to measurements and install it along the edge of the window opening using self-tapping screws. It is very important to ensure that the distance between the screws is at least 10-15 cm. First of all, the top profile is attached, and then the side elements are brought to the top so that there are no gaps.
There is one caveat: installing the panels yourself can be done without fastening the starting profile.

Sectional finishing of window slopes indoors.
Windows and doors in the house can withstand the heaviest loads. The outside is affected by precipitation, wind, temperature changes, and inside the house there is a different temperature and evaporation. All these factors lead to rapid destruction of structures. The walls of a house can last for centuries, but windows and doors have to be replaced. When replacing window frames, we suggest immediately installing slopes from sandwich panels to get a completely new, beautiful and modern window opening. You don't need a lot of time or any special skills.

In addition to aesthetic qualities, modern materials have many technical positive characteristics. Window openings with slopes made of sandwich panels are not afraid of sudden temperature changes and become reliable protection for the house from external atmospheric influences. The depth of the slopes can be a minimum of 5 cm and a maximum of 150 cm. Sandwich panels with a thickness of only 1 cm are used for work.
Why sandwich panels?
The material we offer for installing window and door slopes differs:
- environmental cleanliness;
- long service life while maintaining the original appearance;
- excellent resistance to fungi, mold and moisture;
- efficiency;
- low thermal conductivity;
- high hygienic characteristics;
- ease of installation.


To work you will need to prepare a set of tools:
- Profiles - “F” and starting “P”.
- Liquid plastic, sealant.
- Self-tapping screws.
- Screwdriver, sharp knife.
- Screwdriver and tape measure.
Step-by-step instruction

Step #1. When the installation of new window frames is completed, measure the side slopes and the top. At least 24 hours after completion of window installation, remove excess polyurethane foam with a sharp knife.
Thoroughly clean old slopes of dust and treat with an antifungal agent. To ensure that the finished slopes look beautiful and are not skewed around the perimeter of the window, drill grooves for the dowels. Screw in four screws at the top, right and left. Check the screws for horizontal and vertical alignment. Screwing in the screws is done closer to the edge of the slopes. If you do everything correctly, your window will have a perfectly even shape.

Step #2. According to the measurements taken, cut three plates from the starting profile. Start fastening with the top profile, and then proceed with installing the side parts. To fasten the “P” profile along the edge of the window profile, use self-tapping screws, cutting them in every 15 cm.
Attach the profiles so that there are no gaps between them.
You don't have to install the start profile. With this installation, move the cut strips of sandwich panels to the window profile by a centimeter. Using foam, seal the niche to secure the panel. The foaming procedure must be done in several stages. In this case, the result is much better.

Step #3. Insert the top sandwich panel into the starting profile. From the main profile, cut four parts with a length equal to the width of the slopes. At the top and bottom along the perimeter of the window opening, insert the cut parts into the side profile. Use self-tapping screws for fastening. The result will be a peculiar design of starting profiles, reminiscent of a lying letter “P”.
When the structure is secured on all sides, proceed with the installation of the slope. Repeat the process on the other side of the window. Installation of side sandwich panels can be carried out without fastening the starting profiles at the bottom and top. The side slope is simply inserted into the starting profile, and the small gaps between the panel and the window sill are covered with liquid plastic.
To avoid troubles during subsequent operation of the windows, do not use sealant to fill the gap.
Step #4. To make your window look aesthetically pleasing, use the “F” profile. Using a sharp knife, cut strips 5 cm longer than the height and width of the window opening. Snap the “F” profile covers onto the cut edges of the sandwich panels. Place the strips overlapping at the corners. Draw a cutting line for the edging with a pencil and trim. You'll have to tinker a little, but the final result will please you.
Treat the joints with liquid plastic. A new window opening with self-installed slopes will decorate any room and complete the interior.

Take your time with the last step of installing the slopes. Before attaching the “F” profile, seal any possible voids between the wall and the sandwich panels as thoroughly as possible with mounting foam. After a day, remove the excess and proceed to the last installation step.
This is very important because the foam helps keep the house warm and protects against street noise entering the room.
Video
We bring to your attention a video about finishing slopes using sandwich panels.
Freezing of the structure and the formation of condensation can ruin the appearance of even the highest quality and most expensive window system. There are many methods for finishing window slopes. Most of them can only be performed by professionals, but there is a simple variation to solve this problem. This is the use of sandwich panels for slopes, the installation of which can be done by yourself.

Peculiarities
Unlike old wooden frames, modern plastic windows are equipped with special ventilation equipment. For this purpose, the upper part of the window frame is tilted, forming a narrow opening for the flow of fresh air. As a result, air turbulence occurs with sharp changes in temperature conditions.
In order for the entire window system to serve for a long time, it is necessary to take care of the design of the window slope.
Drywall is often used for this purpose, but such building material can freeze in winter, and caring for it requires a lot of effort.


If the room is built of brick or reinforced concrete blocks, only sandwich panels can be used for maximum insulation of the slopes.
The advantages of using sandwich panels are as follows:
- additional noise and thermal insulation is performed. Additional insulation is carried out using polyurethane foam to better connect the material to the slope;
- does not require constant care and maintenance. Any type of contaminant can be easily washed off with a cleaning solution without damaging the structure;
- high vapor permeability. Unlike plasterboard material, sandwich panels do not get wet or crack when exposed to moisture;
- low weight of the structure (the weight of 1 m² with a product thickness of 24 mm is 3.9 kg);
- highly resistant to mechanical damage;


- resistance to ultraviolet radiation;
- stylish design appearance;
- resistance to mold and mildew;
- reasonable cost of the product;
- do not require additional registration. The surface of the panels has a structure similar to the surface of plastic windows;
- environmentally friendly material. It does not emit harmful substances, thereby causing no harm to living organisms during operation.


Despite the fact that multilayer panels have many advantages, some consumers have negative reviews about this building material, such as:
- under the influence of high temperatures the product turns yellow and becomes deformed;
- improper installation of the material can lead to the formation of gaps and cracks;
- Finishing slopes using sandwich panels cannot be done if the distance between the loop and the wall is small. Otherwise, the structure will walk around the perimeter;
- Only low quality materials have such disadvantages.

Specifications
The technical characteristics of sandwich panels for creating window slopes are as follows:
- the noise and sound insulation indicator is at least 21 dB;
- density – 30–35 kg/m³;
- compressive strength – 0.25 MPa;
- thermal conductivity of the product – 0.029 W/ (m K);
- product flammability class – G1;
- service life of the material is about 50 years;
- temperature range for operation – from -50 to +60 degrees;
- heat conductivity in a dry room is not less than 0.041 W/ (m² K).


Device
Sandwich panels are sheets made from extruded polystyrene foam. Their thickness is 9 mm. Such canvases can be finished on one or both sides with polyvinyl chloride sheets (PVC), the thickness of which can be 1 or 1.5 mm. The dimensions of sandwich panels for window slopes are 300x150 centimeters.
The material consists of such elements as:
- C- and J-shaped profiles. The C-shaped profile is mounted on the side of the room. The special element is designed to fix the internal boundary of the slope;
- a wooden beam, which is suggestive;
- polystyrene insulating material, which fills all cavities. Thanks to this product, the entry of cold from the street is blocked;
- the top panel, which is the decorative finish of the structure.

The following materials can be used as insulation:
- polyurethane foam;
- extruded polystyrene;
- free foam plastic.


The outer layer of a multilayer product can be made from several building materials.
- Rigid PVC sheet. For the manufacture of multilayer panels, white sheet material is used. Thickness can vary from 0.8 to 2 mm. The special coating of the sheet can be matte or glossy. The density of the product is 1.4 g/m³.
- Foamed PVC sheet. The internal part of the structure has a porous structure. Foamed PVC sheets have a low density (0.6 g/m3) and good thermal insulation;
- Laminate. This material is made by impregnating a multilayer material consisting of decorative and kraft paper with resins, followed by pressing.


The upper panels of the structure can be of a wide variety of colors, which allows you to choose a panel for any window.
Sandwich panels can be produced as ready-made systems; in this case, there is no need to carry out preparatory work on assembling the building material. The finished systems are fixed to the facing building material using an adhesive solution. The second variation of the system - such products are assembled using self-tapping screws before installation.
Multilayer panels are available in single-sided and double-sided production.
- Single-sided production is when one side is rough and the other is front. The front side is thicker than the rough side.
- Double-sided material is when all sides of the product are front. Many people believe that sandwich panels are only intended for plastic windows, but they can also be used for wooden ones.
There are metal panels that are mainly intended for the construction of hangars and change houses. Installing such panels for PVC windows has a number of difficulties. The opening must be sheathed with a profile or board, after which metal panels can be installed.


Installation of slopes made of sandwich panels is important for reasons such as:
- protection of seams from destruction, so cladding of plastic windows should be done both indoors and outdoors;
- as an obstacle to the penetration of moisture from the street and the appearance of condensation;
- improving thermal insulation indoors. Cold air will not penetrate inside the room, and thermal energy will not escape outside.

Design solutions
The construction market offers a wide range of artistic designs for slope panels. You can choose a design of any shade. The most popular color is white, but connoisseurs of an elegant look in the room can choose non-standard color variations.
Nowadays the yellow shade is very popular. You can install the panel to match the color of the glass unit or choose a harmonizing shade. The design of slopes in a natural style is in demand. Slopes finished with material imitating wood look harmonious. Panels for window slopes can be used to suit any stylistic decision.

Dimensions
The parameters of sandwich panels depend on the equipment used by the manufacturer. However, there are standardized sizes. The maximum length of panels can be from 12 to 16 meters. The large size of the product can lead to fracture of the product under the load of its own weight during installation, and it will also be difficult to transport the material. The width is 100, 115 and 119–120 centimeters, and the thickness can vary from 5 cm to 35 centimeters.
In some cases, panels are made according to customer preferences. There are sandwich panels, the technical characteristics of which allow them to be used for finishing the slopes of windows and doors. The parameters of such panels are 3000 mm in length, 1150, 1300 or 1500 mm in width, and 10 mm in thickness. In rare cases, the thickness of products can be 24, 32, 40 mm.

Installation
The process of installing slopes with sandwich panels consists of several stages. To finish slopes you will need tools and equipment such as:
- tape measure, building level, pencil, bolt or mounting knife;
- U-shaped plastic profile, edging profile, liquid nails and construction gun;
- screwdriver and screws;
- white sealant, primer mixture for concrete bases, brush and special antifungal agent;
- plaster, spatula, medium-grit sandpaper, drill.

Preparatory stage
Sandwich panels are practical building materials that are easy to install. The panels come in two-layer and three-layer types. The latest variation of the material is covered with PVC on both sides. These panels are suitable for installation on a wooden frame, because they have increased rigidity; attaching them to a wall surface or with liquid nails is pointless, because PVC material has a low adhesion rate with such building materials.
Installation of slopes of this type is carried out using three methods: using liquid nails, polyurethane foam, or using a frame made of wooden blocks.


Let's consider the first installation variation, that is, the initial profile and liquid nails, which takes up minimal space. In this case, the thickness of the two-layer sandwich is 10 mm. At the preparatory stage, the slopes are cleaned, everything that could lead to peeling of the product from the base is removed. Irregularities and bumps are eliminated.
If there is excess foam left after installing the windows, it must be removed. And also all areas not involved in installation must be covered with plastic film, which will prevent the destruction of the window sill and window.

Afterwards, the plaster mixture is prepared for rough work. All cracks and cracks are sealed with this mixture; the surface should be perfectly flat. This can be checked using a building level. If the surface of the slopes was initially in ideal condition, then the plaster process can be omitted.
After the plaster mixture has completely dried, the slopes are treated with a primer mixture intended for porous surfaces. This is necessary so that the glue securely fastens the sandwich panel. After the primer mixture has dried, the base is treated with a special antifungal agent; after the product has dried, you can begin lining the window slopes.
Installation of sandwich panels
First you need to take measurements of each window slope, and also cut the sandwich panels to fit the parameters of the slopes. A cutting object is used to cut the skin. It is more efficient to cut panels with a mounting knife. To do this, lay the panel on the floor and mark it using a pencil and tape measure. Now a line is drawn with a knife blade, after which this procedure is repeated several times, trying to hit the first cut. When the material is cut, the edges of the cuts need to be smoothed with sandpaper.

The next procedure is the installation of side slopes. Self-tapping screws are used to fasten the starting profile. The distance between the screws should be 15 centimeters. The panel can be installed without installing the original profile. In this case, the panels are mounted close to the window, going 1 cm deep behind it. The slope is fixed by foaming. This is a more complex installation option, but the final result of the design looks more aesthetically pleasing.
Then a zigzag strip of liquid nails is applied to the panel in the middle and straight strips around the perimeter of the material. The panel is inserted with one edge into the starting profile and pressed against the slope. The top and second side panels are installed in a similar way. To decorate the window opening, a edging profile is glued around the perimeter. In order for the window to have a neat appearance, the joint areas in the corners must be cut at 45 degrees.


When installing sandwich panels, you must try to place the component elements in such a way that a minimum gap is formed between them.
To mask the joints, you can use white sealant or liquid plastic. At this stage, the finishing of the slopes with multilayer panels is completed, but you must wait 1-2 days for the structure to dry completely. Properly installed slopes are functional and do not require special care, and are designed for a long service life. The building material of the cladding does not change under the influence of ultraviolet rays.


Installation on foam
For this finishing option, you need to purchase a multilayer panel with two stiffeners. This process includes the following steps:
- measurements are taken. It is necessary to obtain accurate indicators so that errors do not occur in the future when cutting the material;
- installation of the starting profile;
- the prepared measurements are transferred to the facing building material;
- the panel is trimmed with a sharp object;
- mounting the top bar. It needs to be inserted into the groove of the starting profile;

- the gap between the panel and the wall is sealed with polyurethane foam. You need to apply the foam carefully, because during the drying period the foam will double in size. It is recommended to choose a professional version of polyurethane foam, which is applied in a thin layer;
- immediately install a plastic special element, which is done using masking tape;
- then the vertical sections are covered with sandwich panels;
- Allow time for the foam to dry completely, and cut off excess material.


Mounting on wooden slats
This installation option includes the following steps:
- Measurements are taken and transferred to the panel. The parts are cut to the required sizes;
- Wooden slats are mounted along the edge of the window frame from the outside. As a result, a complete contour should be formed. Correct installation is determined using a building level;
- a profile is attached to the plastic frame;
- a small gap is formed, which can be filled with mineral wool or polyurethane foam;
- multilayer panels are inserted into the grooves of the profile, but they are not glued, but nailed with a construction stapler. A staple is used to pierce the outer side of the PVC panel, so this variation is suitable for a three-layer product;
- If you do not use a starting profile, then all elements need to be glued. In this case, the inner corner is treated with sealant to hide the resulting defects.

The design of window slopes with sandwich panels has the following technical features that must be taken into account, such as:
- if you live in hot climates, you should use panels with a special renolit coating, this film can withstand higher degrees;
- when installing the structure, you should pay attention to the coefficient of linear expansion;
- to cut the material, instead of a mounting knife, you can use a circular saw with a small pitch of teeth, which will prevent cracking or delamination of the product;
- It is not recommended to cut the panel at low temperatures (less than +5 degrees). Low temperatures lead to brittleness of the material;


- When installing panels, you should use the starting profile recommended by the manufacturer;
Replacing windows in your home is always a big event in your home. Especially in cases where old non-functional structures are replaced with modern ones that meet the latest technology. But at the same time, the inside of the opening in which the window system is located is also damaged. It must not only be decorated, but also insulated. Warm sandwich panels will help with this. Let's look at how to install them with our own hands, and what we need for this.
How it was before
In the old days, slopes were simply plastered with cement mortar, which was then puttied and painted. The distance between the window frame and the wall was filled with tow, which served as insulation. At a later time, glass wool could be used instead of this material, but this was in very rare cases.
The finishing of slopes became much more diverse at the end of the last century, when various plastic materials began to appear. Many people tried to transform the interior of their own apartment with their own hands, and at the same time get more durable and attractive openings.
At first, sheet plastic was used, which had to be secured only by creating an impressive wooden frame. But this design did not require any more maintenance, unlike the slopes, which had to be sealed with cement mortar. And this was only the beginning of the offensive of completely new materials on window openings.
A fresh look at the opening
Window openings began to look completely different when plastic windows began to be installed in them. These technologically advanced designs made it possible to obtain comfort and coziness for every room, wherever they appear. But the old finishing materials were no longer suitable, since the interior and design solutions required the same new approach.

Home craftsmen, constantly experimenting in their work, began to use first plastic lining, and then panels, which quickly “took root” on the slopes. The enormous convenience of this material was ensured by PVC profiles, which were used as guides. They were easily attached to the windows and all that remained was to fill the opening with panels.
An additional advantage was that the work required a minimal set of tools. It was necessary to prepare:
- perforator;
- building level;
- screwdriver;
- tape measure and pencil;
- hacksaw

With him, the work went quickly and the craftsmen received high-quality finishing of the slopes when using panels. It is worth noting that almost anyone could now decorate window openings with their own hands.
It became even easier to seal slopes with the advent of insulated panels. These stiffer materials offered a huge advantage over other finishes. A frame was no longer required for installation. It was completely replaced by just one wooden slat, thanks to which it was possible to level the crooked wall. Otherwise, sandwiches, as the insulated plastic was called, came off the windows.

Independent work
Finishing slopes with your own hands is now simple and not difficult. The main thing is to follow certain rules that are not difficult to remember. The work begins when the windows are already in place, and the space between them and the wall is completely filled with polyurethane foam.
When the foam has completely dried, which will take no more than three hours, it must be cut off along the entire perimeter of the window so that nothing interferes with the installation work. This is easy to do with a simple knife. Next, it is necessary to align the edges of the opening, especially in cases where they do not have a visually even appearance. A wooden strip will help to do this, on which it will be convenient to attach PVC panels later.
To install the leveling parts, you should drill holes in the edge of the opening and insert nylon dowels into them. Next, the slats are attached with self-tapping screws, which must be checked with a building level. These operations are easy to do yourself. When this stage is completed, you can move on to windows.
PVC profiles must be attached to them. This must be done around the perimeter of the windows so that there are no gaps. The PVC strips are secured with small self-tapping screws, which will later be hidden by plastic panels.
It is worth remembering that you should twist the profiles quite carefully, since any awkward movement can damage the thin plastic.
To make it easier to install PVC starting strips on windows, you can draw a straight line in advance using a building level. Then do-it-yourself work will come down to leveling the material along the existing line.
Mounting part
When the preparation is completed, all that remains is to make the slopes themselves. This is quite easy to do with your own hands, since all the work comes down to installing plastic panels with insulation. For convenience, you should use a thin knife to guide the material exactly into the groove without crushing the edges.
But first you should cut the PVC panels to the length and width of each slope. This will only allow you to later secure the material to the frame, since the sandwiches at the windows will be held in place by the profiles. Self-tapping screws that screw into the end of the plastic panels will also help to do this.
To top it all off, you need to install PVC corners on the window slopes. They will play the role of cashing out. A plastic F-shaped profile is also used, which is inserted into the sandwich. This element is attached with glue. But the edging of the window opening can be done differently. To do this, you will need a plastic corner with a width of at least 30 mm. It is cut to length and joined at the places where it intersects with each other “at the mouth”. That is, they cut at 45 degrees.
This work can be easily done with your own hands using ordinary scissors. But these actions must be performed very carefully, since the plastic is quite fragile and can chip or crack if not handled carefully. If this happens, the part will need to be replaced, although some craftsmen try to repair the damaged area using a special sealant that completely replicates the material of the element.