Finishing the kitchen with plastic panels: photos of kitchen design ideas. Covering a kitchen with plastic panels from A to Z Do-it-yourself kitchen renovation with plastic panels
Read also
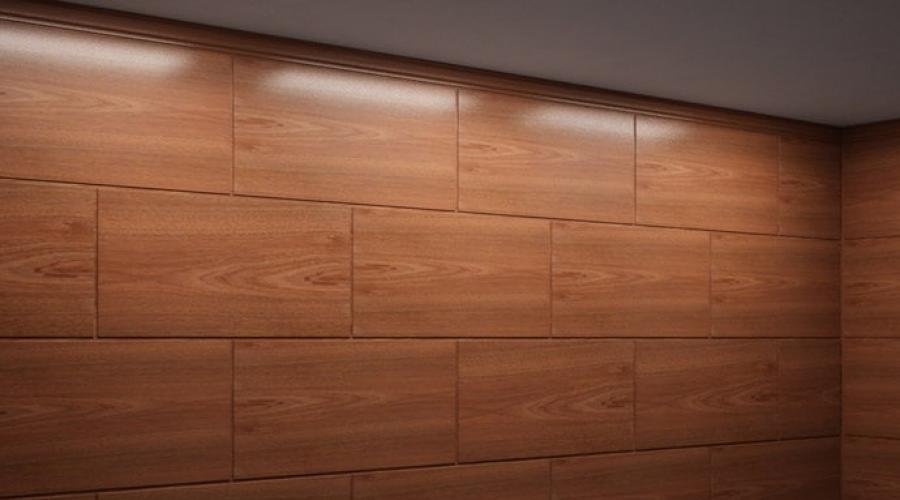
Wall panels have become very popular relatively recently. These materials can radically change the design of an apartment without requiring large sums of money. Wall panels are very easy to care for, they practically do not get dirty and have good durability, so they are ideal for the kitchen. You can turn classic walls into unique style compositions, come up with a unique interior and fill it with beautiful decorations. Today we will look at how to decorate a kitchen with wall panels.
Preparing to install panels
First you need to prepare all the materials that you may need. Therefore, buy in advance: wall panels, corners, wooden slats, dowels, level, staples, tape measure, profiles, pencil, screws, protective impregnation, etc. After this, evaluate the degree of flatness of the surface on which the panels should be attached. If the walls in the kitchen are perfectly level (which is unlikely), you can attach the panels directly to the wall using glue. This option only applies to kitchens with normal humidity levels.
If there is high humidity in the room, you will have to install a wooden frame. It can also be installed if the room has uneven walls. In this case, some space remains between the wall and the kitchen wall panel, which can be filled with insulating material. In addition to sound insulation, it retains heat, so heating costs are reduced. In addition, in this way you can hide electrical wiring, for which you do not need to ditch the walls.
If the walls are not very smooth and you are not going to use a frame, you need to prepare them for finishing. To do this, you should thoroughly clean the walls from dust, dirt and let it sit. Be sure to remove any remaining old decorative coating, paint or wallpaper. All irregularities should be eliminated using high-quality putty that is suitable for the type of surface. After this, you should walk along the walls with sandpaper.
Calculation of material for installation
Before attaching wall panels in the kitchen, you should calculate their number. To do this, you must know the dimensions of the wall panels for the kitchen. Please note that there should be no errors. It is necessary to measure the width of the kitchen walls and divide it by the width of the panel. This way you will get the number of products needed for finishing. It may not turn out whole. If this happens, you will have to carefully cut one panel and adjust it to size.
If there is a window, doorway or arch in the wall, you need to measure this area. After this, you should subtract the resulting number from the length of the wall. To finish the walls you will need profiles and corners with which you can secure the wall panels in the corners. It is recommended to leave gaps as panels (especially sheet panels) can expand over time. The height of each piece should be one centimeter less than the distance between the floor and ceiling.
After this, you can cut the workpieces to the desired size. If you use a hacksaw, it is advisable to make cuts from the front side of the coating. If you plan to work with a circular saw, you need to cut the pieces from the base side. First, you should carefully cut the coating, then cut the panel itself with greater force. While cutting, try to keep the carpet knife strictly perpendicular to the panel.
For perfectly cut straight lines, it is better to use a straight edge or ruler. For sockets and switches, you need to cut appropriate holes in the material. Before attaching wall panels to kitchens, they must lie in a room at room temperature for more than twelve hours so that the humidity levels of the building materials and the surrounding air can get closer to each other. Therefore, unpack the box and leave the material for a while.
Procedure for gluing wall panels
Sheets can be glued using acrylic, silicone or universal construction adhesive. It is advisable to study the adhesive composition on the packaging and perform all actions, taking into account the manufacturer’s advice. First, the wall panels are glued to the inner corner of the room, and then along the perimeter. The adhesive composition should be applied to the entire surface of the material.
- Tiles are square or rectangular wide panels with a side of 290-950 mm, mainly used for wall cladding or kitchen apron cladding.


Square fragments also look good on the ceiling
- A slab (sheet) is the largest material in area, which is cut according to the parameters required by the customer. Dimensions are selected in the range from 1040 to 2800 mm for the most seamless wall covering.

In addition, MDF wall panels for the kitchen differ in thickness.
- The thinnest (5-9 mm) are convenient due to their low weight and ease of installation, but cannot boast of sufficient strength, so they are most often used in the manufacture of furniture facades, but can also be used to cover ceilings in the kitchen.
- Medium thickness (10-18 mm) - the main material for wall cladding (as well as the manufacture of doors or furniture frames). They are quite strong, but their thickness will have a slight impact on the usable space of the premises.
- Thick (19-38 mm) are the most durable, mainly used in furniture production, but can also be used for covering large areas that require additional insulation.
And finally, MDF wall panels for the kitchen can be divided according to texture into smooth and textured. A smooth surface (especially with a glossy finish) visually enlarges the room, which is especially important for small kitchens. But on a textured cladding with a pronounced relief, various defects are much less visible, and it looks more unusual and impressive.

Relief finishing materials based on MDF

Interesting! Anyone who wants to practice the art of design can try themselves in selecting combinations of different colors or textures, as well as in non-standard (for example, diagonal) installation of MDF boards. If you are not confident in your skills, use ready-made proposals with original design, for example, materials with a 3D effect.

Optical illusions using 3D technologies
Options for facing the kitchen with MDF panels
If you decide to use MDF panels when decorating your kitchen, it is important to determine the area of their coverage. Actually, there are two options - complete cladding of all surfaces (which is quite rare) or fragmentary cladding of walls, ceilings or sections thereof. We propose to consider several areas in which this material will serve as both functional protection and an effective interior decoration.
Full cladding - pros and cons
At first glance, it seems that the best option for finishing a kitchen with MDF panels is to completely replace all facing materials with decorative wooden plates. But the result obtained rarely lives up to expectations. To implement this idea, you will need a really spacious room with a high ceiling, otherwise a small kitchen with such decor can turn into something like a wooden box.
Of course, you can use your imagination and try to create original color combinations, play with the texture of embossed and smooth materials, or perform installation with non-standard installation. For example, choose square slabs for the floor, multi-colored lining for the walls, and line the ceiling with seamless panels. But it’s still better to leave this option for the kitchen at the dacha or in a country house.

Full kitchen refurbishment in spacious home

MDF cladding of walls, floors and ceilings
For apartment kitchens, partial finishing with MDF panels is often used. This can be the cladding of the lower part of the walls, used mainly in large rooms, since in small kitchens this space is almost completely covered with furniture. You can also cover the ceiling with MDF lining or sheeting. Moreover, if finishing with wood slabs is more recommended for the walls, the ceiling covering should be chosen in light neutral shades - white, soft blue, creamy. In addition to plain panels for the ceiling, imitation stone, such as light marble, and original reliefs are suitable.

![]()
Highlighting the dining area with wood finishes

A cozy duet - a massive tabletop and a wall with wooden trim
If the kitchen is spacious enough, has a long rectangular shape, or is combined with another room in the house, you can install a small partition, separating the dining room and work area not only visually. And this is where seamless wall sheets made of MDF that imitate wood will come in very handy. Moreover, veneer made from expensive species, a simple varnish coating, or material with realistic photo printing can be used for this. Air partitions made of MDF made by laser cutting look no less impressive.
Openwork partitions for zoning kitchen space:


On a note! In kitchens with a small area (for example, in Khrushchev-era apartments), this material is used to decorate the wall opposite the working one. Moreover, for this it is not even necessary to completely sheathe the entire area; it is enough to cover the surfaces free of furniture with MDF panels. Particularly good for partial cladding is a seamless sheet cut to fit the open space.
Application of MDF for kitchen apron
The section of the wall between the upper and lower cabinets of the kitchen unit belongs to the work area, that is, it is here that the exposure to moisture and temperature is the highest. Therefore, MDF panels for finishing should be selected only with good protection (and ideally, moisture resistant) or additionally covered with a glass screen.
The most reliable option for wall panels for interior kitchen decoration are considered to be the so-called MDF skins with a heat-resistant plastic coating. By the way, another advantage of these sheet slabs is their rich decorative assortment, including photo printing. For inspiration, we offer a selection of photos of wall panels on a kitchen apron.
With plastic coating and photo printing:


On a note! It is better to mount the wall panels for the apron on the sheathing in order to run wiring underneath them to illuminate the work area and communications for connecting various household appliances.
DIY installation methods for MDF cladding
For finishing walls and ceilings with any MDF panels, there are only two installation options - adhesive and frame methods. The latter is considered more environmentally friendly, since it does not require chemicals that can release harmful substances when exposed to high temperatures. In a properly equipped kitchen, the negative impact of possible glue fumes is neutralized by exhaust ventilation, so both options are equally popular and are successfully used for covering various surfaces.
Fastening panels with glue
This method can be used to mount any types of panels, but it is most reliable for fixing thin and medium MDF boards. Glue mounting is chosen only in cases where the surface does not have defects extending beyond the plane by more than 2-3 mm.
For long or voluminous fragments, it is better to treat the wall with glue
- Installation begins from the corner - the first panel is pressed against the working surface, leveled vertically and horizontally and tapped with a rubber mallet (or just a fist) for a tight fit. Then the following elements are attached.
- In the case of gluing lining or tiles, the correctness of the connection is checked with a level every 3-5 fragments. Excess adhesive that comes out is immediately removed with a cloth soaked in water or alcohol.
- After fixing all the cladding, install the necessary fittings - internal, external and finishing corners, plinths.
Important! It is most convenient for novice craftsmen to use so-called “liquid nails” for installation; more experienced ones can choose any universal reinforced adhesive compositions or even polyurethane foam.
Installation on frame or sheathing
If the kitchen does not have perfectly flat surfaces, you will have to equip it with a frame made of metal profiles or wooden slats to decorate it with wall panels. This option is also chosen when installing hidden wiring and ceiling cladding.
Fastening MDF panels to the frame
Sequence of work:
- The preparatory stage consists of applying a primer with fungicidal properties to the walls or ceiling. All wooden parts of the future frame are treated with the same impregnation.
- The sheathing is being marked. When working with walls, the upper and lower slats are placed at a distance of 3-5 cm from the floor and ceiling, the rest are spaced 40-50 cm apart. For the ceiling frame, mark out a grid with a square side of 1 m.
- The frame elements are fixed to the working surface with metal or wood screws in increments of about 50 cm, checking for correct installation with a level.
- Installation of panels starts from the corner. The first lamella is leveled vertically and fixed to each batten of the sheathing with small nails at such a distance that they can then be covered with fittings. On the other side of the lamella, the comb is also attached to the frame. It is most convenient to use special clamps for this (in construction jargon - clamps).
Clamp fastening system
- The next lamella is installed in the lock of the previous one and is also fixed with a clamp by the comb. This rapport is repeated around the entire perimeter.
- If necessary, the last plank is cut to width with a hacksaw (if the gap is too narrow, you can reduce the width of the first and last fragments so that the difference is not noticeable).
- After installing all the main elements, the turn of the fittings comes - the necessary corners and baseboards are applied.
Video: how to attach MDF panels to a kitchen working wall
Now you know how to cover a ceiling or walls with MDF panels. This work is really simple and is accessible even to an unprofessional craftsman, but if you don’t have enough time for independent experiments, or you simply don’t have confidence in your own construction skills, you can always call on the help of specialists who will install MDF panels with high quality and in the shortest possible time.
The kitchen is one of the most difficult areas to design in a modern interior. This is especially felt when, in addition to good aesthetic properties, the surface must also effectively withstand frequent contamination and be easy to clean.
Tile tiles are most often used to decorate work areas, but not everyone will like the mosaic structure, appearance and price of ceramic products.
The closest alternative to tiles are wall panels, which are not only not inferior, but also in many ways superior to ceramic products in technical characteristics and visual impression. Due to their artificial origin, the panels are quite easy to form, which in turn allows you to significantly diversify the surface texture and color range.
Kitchen finishing panels are made of PVC or MDF - which modification you prefer depends solely on your wishes.
Panels made of polyvinyl chloride are lower cost and moisture resistant, but they can be installed exclusively on a pre-assembled frame. MDF sheets have heat and sound insulation properties and can be fixed to the wall using either adhesive or frame methods.
The disadvantages of MDF products include high cost and relatively weak moisture resistance.
Also, this product is distinguished by ease of installation - even without professional skills, you can install the panels yourself without any difficulties. This article will tell you how to decorate a kitchen with wall panels.
Panel installation
Finishing the kitchen with panels is carried out in two ways - glue or on a pre-assembled frame. The first method is used exclusively in combination with MDF sheets - both MDF and PVC analogues can be mounted using the frame method. Below we will look at both technologies.
Panel stickers
The advantage of adhesive installation of MDF sheets is simplicity and cost-effectiveness - for fixation there is no need to assemble a supporting frame, which allows you to save money on the purchase of material. The disadvantage of this method is the lack of thermal insulation and the obligatory presence of the most even surface possible in order to avoid voids and excessive consumption of adhesive.
Most often, walls in the kitchen are finished using 122x244 wall panels using the adhesive method, since smaller analogues are easier to “plant” on the frame.
Surface preparation
- Peeling layers of whitewash, paint, plaster, etc. must be removed from the walls. – the surface must be continuous and reliable. Cracks, cavities and other irregularities are filled with a repair mass, the composition of which is selected based on the structure of the original finish. As a result, you should have a smooth surface with a uniform texture;
- If the surface is porous, it is necessary to fill small voids and make the wall structure uniform.
Note! In this case, this means pre-installation of sheets that complies with all building codes. In any other case, it may be necessary to level the walls with plaster or putty.
Gluing
Before gluing, the panels should be left for 24 hours in the room where they will be installed so that the material can adapt to the temperature conditions.
The sheets must be unpacked in such a way as to ensure air access to each element.
- The back of the panel is cleaned of dirt and degreased, after which an adhesive composition is applied to it, according to one of the schemes presented in the figure;
- The panel must be pressed tightly against the wall and the entire surface of the sheet must be tapped to evenly distribute the glue. To guarantee fixation, it is recommended to use spacers and other temporary fixations;
- Between the panels and the floor/ceiling/internal corner, it is necessary to provide a temperature gap of at least 3 mm necessary for thermal expansion of the material.
- All joints, external and internal corners are masked with moldings and profiles, or filled with sealant - the first option is preferable, as it ensures complete tightness of the coating;
Note! If you use moldings or other connectors, sealant should also be applied to the joints to prevent moisture from getting into the interior of the panel.
Frame installation is carried out using a tongue-and-groove lock, which is located at the ends of the panel. The elements are fixed to a pre-assembled frame, which allows you to smooth out small unevenness in the wall.
Assembling the sheathing
- As a material for assembling the supporting frame, you can use either a wooden beam or a metal profile. The thickness of the elements in this case does not play a big role, since finishing the walls with panels in the kitchen does not imply the presence of thermal insulation;
- First of all, the lowest rail/profile is installed, subsequent frame elements are located in increments of 40 cm from each other. If wooden slats are used, they are fixed using polyamide screws. The metal profile is mounted using metal fasteners;
- During installation, it is important to monitor the horizontal and vertical alignment of the profiles/beams using a building level. Ultimately, all frame elements should form a single plane and be on the same level;
- The covering begins from the inner corner - using a stapler or screws, a corner is mounted into which the first panel is inserted. Then the free side of the panel is fixed and the next one is inserted - for a tighter fit, you can tamp the panel by placing a piece of foam plastic between it and the hammer so as not to damage the edge;
- When the sheathing reaches the next corner, a corner is put on the end panel, after which the panel can be fixed. External corners are also formed using appropriate corners;
- To seal the sheathing, the joints are coated with sealant. It is most convenient to make longitudinal cuts with a construction knife, and transverse cuts with a hacksaw.
Bottom line
Finishing panels for the kitchen make it possible to diversify the interior with bright colors and new ideas, while maintaining the functionality of the coating. Along with a unique appearance, you will receive a surface that is resistant to stains and is easy to care for.
You can learn more about this topic by watching the video in this article.


One of the most budget-friendly finishing materials is PVC panels. But they are in demand not only due to their low cost. Plastic panels for the kitchen are also one of the most practical, quick ways to cover walls: they are not afraid of humidity, high-quality plastic can withstand temperature changes, and does not deform even when heated.

The price for this finishing material starts from 50 rubles per sq. m. m.

PVC panel Domino. Prices – 291 rubles per sq. m. (in Leroy Merlin)
Features of using plastic panels in finishing
The use of PVC in the kitchen has its own characteristics that need to be taken into account if you decide to give them preference.
For interior walls and splashbacks
Hard and high-quality plastic is practical. Thanks to its technical properties, it is an excellent budget option for finishing a kitchen apron. It is important to consider here that the cheaper the plastic, the less it will last. You need to take into account the fact that cheap plastic can become deformed when heated, smell unpleasant, and release toxic substances. Quality rigid PVC can withstand temperatures up to 450 degrees Celsius.

The best material for an apron is ABS plastic. It is stronger and holds color longer. Buy materials only from trusted manufacturers or ask the seller for a certificate confirming environmental safety.

Design
It is often believed that plastic panels make the kitchen interior look cheap. But today the choice of colors and textures is so great that you can create an original and beautiful design.

The finish with textured and relief imitation of wood, stone or concrete looks beautiful.

Beautiful and textured PVC will cost a little more, but their price is justified by their appearance.

PVC panel "Ripso". Prices – 378 rub. per sq. m (in Leroy Merlin)
PVC lining is often used in country or Scandinavian styles.


Care
The plastic surface cannot be washed with chemicals containing abrasive substances. Also, do not use hard brushes or rough sponges. Grease and dirt can be easily washed off using a soft sponge, rag and regular dishwashing detergent or soap solution.
Fastening
Depending on the correctly chosen method of fastening - on lathing or profiles, with the help of panels you can hide even significant unevenness in the walls, as well as hide electrical wiring without grooves. Plastic can be glued to the wall, provided that it is perfectly flat.

It is advisable to lay electrical cables in a special protective corrugation for fire safety.
Fragility
Please note that plastic does not withstand strong impacts. But even if the surface is damaged, the damaged part can be replaced locally.
Watch a video from Leroy Merlin about the choice of wall panels and their characteristics:
Kinds
By design and method of fastening:
- sectional rigid panels with an internal structure in the form of a honeycomb. They have an average width, for example, 250 or 380 mm;
- lining or lath up to 100-120 mm wide;
- decorative PVC sheets. They are often produced in the form of imitations of brickwork or mosaic with the only method of fastening - with glue. They are very thin and fragile, so they are harder to install. They also require a perfectly level base. It is best to use them on a kitchen apron.


By invoice:
- matte;
- glossy;
- embossed.
According to the method of drawing:
- plain. Color is added to the material at the production stage;
- with thermal printing. One of the most budget-friendly options is when a design or pattern is transferred using heated film. The low price corresponds to not very high quality, cheap appearance;
- with offset printing. Another budget option, slightly superior in image durability to the previous type;
- with digital printing. This option allows you to make the design more interesting, but it increases the cost of production, and the color fastness is slightly lower than that of a product with offset printing;
- laminated. By applying a layer of a special film (laminate), it is possible to obtain imitations as close as possible to natural materials.
Design ideas
Cheap plastic is an excellent option for decorating walls in a country house. But there are also options in the middle and high price categories that look no worse than ceramic tiles or the same wallpaper, and will last much longer.
We have collected for you some interesting ideas for decorating walls in the kitchen with budget and expensive plastic panels, which you can take note of.
- Matte and glossy.


- With an image.


- With imitation of natural materials.


- Plain and monochrome.


- With horizontal and vertical mounting.


How to make wall cladding with PVC panels with your own hands (video)
Mounting to the wall can be done in several ways.
- On glue. Here it is necessary to carefully prepare the base - level it, remove any bumps.
- On a frame made of profile or lathing. This method benefits in that it will hide even large flaws in the walls, but at the same time it conceals space.
To make cladding, it is not necessary to have extensive experience in construction or repair work. You can do the finishing yourself by watching a training video on this topic:
How to glue it correctly:
Fastening to the sheathing:
Takes ~3 minutes to read
A kitchen is a room with a special operating regime. During cooking, moisture and various contaminants settle on the walls of the room. The finishing material for kitchen walls should repel moisture and be easy to clean with standard means. Many property owners decorate their walls with ceramic tiles, but this is not the only material available. These products can be successfully replaced with PVC panels for the kitchen.

Save
Advantages and disadvantages of PVC panels
Products made from polyvinyl chloride are characterized by their low cost due to low production costs and low cost of raw materials. Other advantages of plastic are:
- Small mass of parts, which simplifies kitchen renovation with PVC panels.
- The material resists moisture well. The plastic surface can be washed and stains can be wiped off with a sponge. Moisture that gets onto the plane will not be absorbed into its structure; it will soon evaporate.
- Long period of operation of the material. Such products can last up to 10 years while maintaining basic qualities.
- Mold and rot do not appear on the surface of the products in question, and the material does not conduct current.
- Plastic panels for the kitchen are easy to install. These elements can be installed with your own hands with minimal time and physical effort.
- The products have an attractive appearance, which allows the user to choose the option that suits them.
- Plastic is resistant to sudden temperature changes.
PVC panels really have a lot of advantages, but this material has several significant disadvantages. This is flammability; products ignite upon contact with open flame. In addition, the material in question is not strong enough with respect to mechanical loads.
Types of panels
Finishing a kitchen with panels begins with choosing the appropriate product option. The material can be designed in different ways, but it must fit into the existing design of the room.
Lining
The material in question resembles wood paneling. It is used not only for decorating walls. In addition, the product is used to make an apron. Let's get acquainted with the features of the lining:
- The width of the products is 10-12 centimeters, the length of individual elements reaches 6 meters.
- The surface of the kitchen lining often imitates wood, but there are models with a monochrome color.
- The material is quite durable.
Plastic kitchen panels are often installed vertically, which will visually increase the height of the room. To expand the room, the lining is laid horizontally; there is also a combined installation option.

Save
Panels, slats
One of the wall design options is plastic panels for the kitchen. The photo shows how beautiful and harmonious they can look indoors.
Main features of the products:
- The width is within 25-50 centimeters, the length of the material is 2.6-3 meters.
- According to the method of fastening and appearance, the slats resemble lining.
- The material in question is fixed to a pre-installed sheathing, and the joints are covered with moldings.
Slatted typesetting elements are used to finish all surfaces in the kitchen.

Save
Tile
PVC tiles are somewhat reminiscent of ceramics. Such products can have different sizes and surface colors.
Tile characteristics:
- The most popular product sizes are 30*30 centimeters.
- The thickness of the tiles is 8-25 centimeters.
- The material is mainly used for mounting on an apron.
- The design of the tile can be very diverse; its surface imitates wood, natural stone, etc.
For installation of plastic products, lathing is used. The tiles are connected into a single structure using locks that work on the tongue-and-groove principle.

Save
Sheet plastic
This material resembles tile in appearance, but it is much longer and wider than its counterpart. The thickness of the plastic sheet is in the range of 3-6 millimeters. After installing such parts, all joints are filled with sealant.

Save
When purchasing plastic panels, you must follow these recommendations:
- The overall dimensions of the products should slightly overlap the apron area in order to hide the unfinished walls behind the stove, cabinet or table.
- When installing decorative elements near the hob, buy products that are resistant to high temperatures.
- The design of the products, as well as their color scheme, is selected in accordance with the dimensions and interior of the room. So dark colors are better suited for spacious rooms, while at the same time light shades can visually expand the space of a small kitchen.
To diversify the design of the room, purchase various metal inserts or products that imitate the surface of wood.
Color and pattern
Decorating the kitchen with wall panels looks very original and unusual. To decorate wall surfaces, various types of products in different colors are used. Let's look at the most popular options:
- Single-color products with red, white, orange, white, blue, dark blue, green or brown surface.
- Materials that imitate the texture of wood, natural stone or water surface.
In addition to these types, there are models of wall panels on which images of various vegetables, plants and other patterns are applied.

Save
Decorating a kitchen apron
The kitchen apron is located in the work area, but it gives a special style to the entire room. This element must fit into the existing interior and fit perfectly with all furniture elements.
When using PVC panels for a kitchen backsplash instead of tiles, you must consider the following:
- The material must protect the wall from water, splashes of oil or grease, dust and dirt accumulation.
- Housewives prepare food in the work area, so it is necessary to choose plastic products with high strength ratings.
A unique apron with images of vegetables and fruits will help you decorate your kitchen. When choosing this option, make sure that the appearance of the work area fits into the design of the room.

Save
Finishing the kitchen surface with plastic panels
Before laying plastic panels in the kitchen instead of tiles, it is necessary to consider all stages of the work.
Required Tools
First you need to take measurements of the room and buy the required amount of material. Another 5% is added to the calculated value for possible trimming. After this, we prepare the working tool:
- electric drill and set of drills;
- perforator;
- construction tape for measurements;
- pencil;
- building level;
- stationery knife.
When all the inventory is prepared, you can begin the main process.

Save
Preparatory work
Preparing the walls involves removing the old coating. If there is old wallpaper left on the base, it is soaked with water and then cleaned off using a metal spatula. Previously painted walls are cleaned using an electric drill with an attachment. In addition, the paint can be removed with a hair dryer; when the coating is blown, it is carefully removed with a spatula. All irregularities and cracks on the base are puttied. After the surface has dried, it must be sanded.

Save
Frame method
To install the panels using this method, it is necessary to prepare smooth wooden slats or a special metal profile for constructing the frame. Wood products are impregnated with antiseptics and fire retardants. Such solutions will protect the material from overheating and prevent the appearance of mold and rot.
The panels are installed in the following order:
- The guides are attached to the base using dowels. Self-tapping screws can be used for the same purpose. The planks are oriented at an angle of 90 degrees with respect to the decorative elements.
- The frame elements must bypass all utility lines.
- When installing the guides, use a building level; all slats must be strictly vertical and form one plane.
- The distance between the guides is within 40 centimeters.
After the frame is installed, fittings, external and internal corners, as well as finishing components are installed. If panels are installed on the entire surface of the wall, a ceiling plinth is fixed in the upper part of the room. The installation of the panels begins from the corner, while the groove is cut off at the side element, which will create a high-quality joining. The position of the decorative elements is checked using a level; they are secured to the frame with staples or self-tapping screws.
Frameless method
In this case, the installation of PVC products is similar to the installation of tiles. First you need to level and prime the base surface. When the solution dries, the master mixes the glue according to the instructions on the package.
The solution is applied to the wall with a notched trowel, then the panel is laid on the mixture. The remaining products are pressed against the wall and then joined with locks. The outer panels are secured to the surface using staples. Self-tapping screws can be used for the same purpose. During the work, the position of the panels is checked by the building level.

Save
Conclusion
Decorating the kitchen with plastic products is considered one of the most practical finishing options. For this work, it is necessary to choose durable, wear-resistant and fire-resistant materials. The created surface must be in harmony with all elements of the furniture, so before carrying out work it is necessary to view photos with various decoration options for the existing interior.
Wall panels made of polyvinyl chloride are the simplest, fastest and cheapest way to decorate premises. Since this material is easy to clean, tolerates high humidity well, and has a very affordable price, its use is especially justified when arranging a kitchen to cover the walls and backsplash.
However, some features of this material should be taken into account:
Knowing these features, it becomes clear how important it is to carry out the work correctly, using plastic wall panels only where permissible.
- Actually, the wall plastic panels themselves. Their length can be 270, 300 or 600 cm, and their working width can be 10, 12.5, 20, 25, 30 or 33.3 cm.
- Profiles for joints, corners, plinths, start, finish.
- Frame material and fasteners.
Often, wooden slats are used to create a frame, but in the kitchen, due to high humidity, the wood can swell and deform, which will lead to a violation of the integrity of the finish.
 When decorating a kitchen, metal profiles are preferred as a frame. Among other things, such a frame is easier to level, and the price of an aluminum profile is comparable to the cost of wood. If you plan to use plastic wall panels not only for the kitchen walls, but also to cover the apron, then you should ask the seller for a certificate when purchasing.
This document contains information about where it is permissible to use this PFC; it allows you to understand whether it is suitable for such a hot spot.
For fastening to wooden planks, staples and a stapler are used, but in the case of a metal frame, you will have to use small self-tapping screws - “fleas”.
When calculating the amount of materials, you should take into account the size of the openings, the length of the corners, take into account the apron and other points. The price, including all additional materials, may differ significantly from the cost of plastic alone.
Tool
Everyone who likes to make something at home with their own hands probably has the required tools.

To cover the kitchen walls with plastic panels, you will need:
- chop cord;
- roulette;
- hydraulic level, bubble level;
- drill or hammer drill;
- screwdriver;
- tool for cutting plastic.
Sheathing process
Work begins with marking and assembling the frame. If you plan to install wall panels vertically, then the frame strips must be mounted horizontally and vice versa.

A paneled backsplash is usually easier than a plain wall because you can remove cabinets and countertops, giving you some wiggle room. The walls are limited by the floor and ceiling.
You just need to make sure that the apron does not go beyond the dimensions, otherwise there will be difficulties with reinstalling the furniture.
You can combine wall panels of different colors, decorate one wall with plastic panels in both vertical and horizontal orientation. You just need to install an H-shaped molding at the joint.
If you don't do it yourself
The work is not difficult, but to get an impeccable result, it makes sense to hire professionals. This will not cost much at all; together with the work of assembling the frame, finishing with plastic panels can cost from 500 rubles per square meter.
 Naturally, the price will increase if the work becomes more complex - a large number of corners, openings, etc.
If you need to install wall panels on an apron, then you need to remember to take into account its area, and also agree on who will clean and install the kitchen furniture.
Since people use the kitchen almost every day, it is advisable to complete all the work as quickly as possible. An experienced builder can solve the problem in one day. However, if the kitchen is large in size or the design involves many complex elements, then the time frame may increase several times.
To increase the speed of work, you can involve not just one worker, but a whole team, but in any case, you will have to come to terms with the fact that the price of the service will increase significantly.
But even the most complex option will be cheaper than finishing with tiles or other materials. Including due to the fact that the price of plastic finishing materials is very low.
What material is most often chosen for kitchen finishing? Are you thinking ceramic tiles? It turns out that for several years in a row plastic panels have held the palm. But it is losing its popularity.
This is due to the fact that PVC is a more affordable, practical and easy to install material. It will be a pleasure to do repairs with him. Let's look at the most important questions - what are the advantages of plastic panels and how to cover the walls with your own hands.
Why you should love plastic: 3 advantages
Let's start with the main thing - the advantages of PVC. And the first thing we note is the affordable price. When starting a renovation, you will choose a material that combines two main qualities - low price and practicality. Actually, plastic panels will delight you with their characteristics. In addition to cost, the material has the following advantages:
- Not afraid of water, cleaning and high humidity. These factors are very important, since the kitchen is a place where work is constantly in full swing, and there’s no point in talking about humidity. It is very easy to care for PVC panels - wipe them, wash them, and they will retain their beauty.
- Does not conduct current. In the kitchen you will have all kinds of electrical appliances and there is a risk of short circuits. Plastic does not conduct electricity.
- You can install the panels yourself. There is no need to attract specialists or spend additional funds. You can renovate the kitchen and cover the walls yourself.
Of course, something needs to be said about the appearance of the panels. Today you can choose models with a pattern, photo printing, glossy or matte finish. And for the apron area you can choose panels with ornaments and abstract images. In the photo below, look at where PVC panels were used in both classic monochrome and color versions.

 In the photo - the ceiling in the kitchen is made of PVC panels.
 Let's say a few words about the shortcomings. The only thing the material is afraid of is high temperatures. If you choose skins for decorating a zone, pay attention to those models that can withstand temperatures of 170 degrees. While tiles can survive high temperatures, PVC, alas, is not such a resistant material. Also, do not use hard or metal brushes to clean the walls, so as not to damage the top layer.
Installing panels in 3 steps
Let's proceed to the main process - installing the panels on the walls. Repairs should begin with surface preparation. Regardless of whether you plan to cover all the walls or just the working part using skinals, you need to dismantle the old material. By the way, another feature of PVC panels is that if ceramic tiles require ideal evenness of the walls, then plastic can be installed on old wallpaper or plaster. Thanks to this “ability”, panels are most often chosen instead of tiles.

Step No. 1 - preparing the walls
So, the first thing you will do with your own hands is dismantling.
- Remove all protruding elements from the walls - paintings and nails on which they hung, roof rails, lamps, etc.
- If you had tiles or decorative kitchen panels installed on the wall, remove the old material.
- Level the surface of the walls. There is no need to achieve perfect smoothness. Repair may be limited to “sealing” recesses, protrusions, and cracks. They need to be puttied and the surface allowed to dry.
You have completed the first stage - the walls are ready. For those who are making renovations for the first time, and finishing the kitchen seems complicated, a video from more experienced craftsmen will come to the rescue (at the end of the article). Below, watch the video instructions that will help you understand the process of puttying and removing old tiles.
Step No. 2 - install the frame
This stage will be the main one, since a correctly installed frame is the key to the strength of the wall cladding. The frame can be made of wooden slats - a more economical option, or metal - a more reliable and durable method. Both wooden and metal slats are attached according to the same principle, so it won’t be difficult to do it yourself. In addition to the slats, you will need:
- roulette;
- building level;
- screwdriver;
- drill;
- knife for cutting plastic;
- metal staples;
- screws and dowels;
- pencil.

Now let's move on to marking the walls. There is an important point here. The frame can be installed in two ways: horizontal and vertical. The first is used if the paneling will be done vertically, and the second - if horizontal. Both the installation of the skin and the covering of all walls can be carried out using the vertical method of fastening the frame. That's what we'll look at.

This is how the preparatory finishing of the walls is carried out. Although this stage is important, you can construct the frame with your own hands. If you are afraid of making a mistake and want the repair to be carried out to the highest quality, watch the videos of more experienced craftsmen. Photos of the frame installation process will also help explain all the points and details.
Step No. 3 – attach the panels
Now let's proceed to the final stage - we will attach the panels to the walls. Here, in addition to PVC panels, you will need additional components - profiles that will help install the sheets. There are several types of profiles:
- L-shaped– will be needed at the start and finish of the cladding;
- Profile F– will help cover corner joints. Also used for finishing and starting;
- H-shaped– a universal profile, needed for panel joints.
You will also need a plinth, corner and outer profile. Do-it-yourself finishing will begin with the profile.
- The first one you take is the L-shaped one. Attach it to the slats along the perimeter.
- Next, you will need a corner profile (F-shaped) - install it at the “turns” of the wall.
- Now take measurements between the guides (their outer side). Subtract 5 mm from the result.
- Finishing begins from the corner of the kitchen. This way you will reduce material consumption. The panels are installed on wooden slats using a stapler. If you don't have a stapler at hand, you can use small nails or construction glue. PVC is mounted on metal slats using screws.
- Insert each next panel into the groove of the previous one and thus move along the entire wall.
- The very last sheet of plastic will have to be cut to width. To do this you will need a plastic cutting knife. The last panel is inserted first into the corner profile, and then into the groove of the previous sheet of plastic.
Here, in fact, the renovation is complete and the wall decoration is ready. Next, you can install the baseboards along the bottom line of the panels with your own hands. If you will only install them, it is best to fasten them with a stapler so that the nails do not spoil the appearance. Skinals can also be glued to the frame. True, such a solution is not durable. Over time, skins near the work area may become deformed. So that you don’t have any questions, watch the video where walls are decorated with sheets of plastic.
And one more piece of advice. If you chose wooden slats for the frame, treat them with a special antiseptic, and only then attach them to the wall. Now you know all the intricacies of installing panels and can safely abandon expensive tiles in favor of practical and versatile PVC.