Decorating with a “Block House” inside the house: design ideas and installation methods. Block house: optimal finishing material for the facade Cladding the building with a block house preparation
Read also
Eco-friendly houses made from natural materials have become very popular in recent decades. Traditional wooden buildings remain one of the most common. Such buildings are suitable both as a summer country house or permanent cottage for year-round use, and for small office buildings.
And enthusiasts argue that it is worth using a practical block house.
Why wooden houses often need cladding
Houses made of any wooden building material have long been a priority for citizens. The sales leaders in this segment remain profiled or laminated timber and rounded logs. Such materials are already dried, equipped with cuts, connecting elements, and are maximally prepared for the construction of reliable walls.
Supporters of naturalism prefer to use traditional logs, which require a long period of shrinkage of the structure - with this method, the flaws in the workpieces will always be visible. In this case, covering the house with a block house is recommended no earlier than a year or two after completion of construction.
The walls of self-built houses often have visible defects or require additional insulation, since the climate of most regions of the country is very unstable. A completely reasonable step would be to cladding the exterior of a wooden building, which does not reduce the usable space of the premises and gives the building a special charm. External wall decoration is required for frame houses - this method will create a cozy atmosphere inside the building and improve its appearance from the outside.
A separate category are capital old buildings that lose their visual appeal and become less comfortable. Additional presentable wall protection will extend the life of the house: it will protect against precipitation and mechanical damage. The insulation is laid outside and combined with a hydrobarrier, and the surface of the old wood is cleaned of paint, varnishes, and coated with antiseptic compounds. Careful owners can carry out all the work with their own hands.
Block house: advantages, species diversity and selection rules
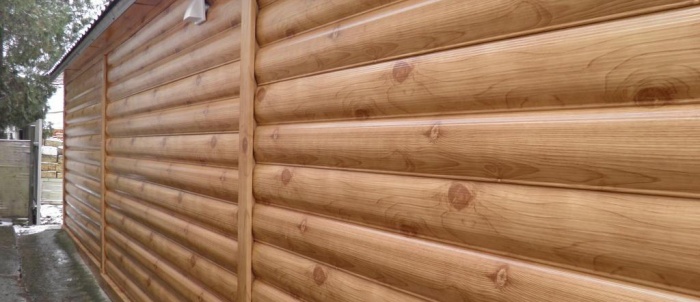
Block house is considered the most successful and presentable type of lining. Its environmental friendliness is undeniable. Most often, the starting material for panels is coniferous wood. Many consumers are attracted by the ability of the lamellas to release phytoncides for many years, suppressing the development of bacteria.

Strength, excellent insulating properties combined with maintaining natural air exchange are arguments that can be decisive when choosing a facing material. Also important is the ease of installation of the structure - any craftsman can do it with his own hands - and the absence of “wet” work.
Professionals note that a pine house block is indispensable for the external cladding of the walls of a residential building, but for saunas and baths, dense panels made of hardwood would be a rational choice. In order to choose the optimal grade and not be disappointed in the material, you need to decide on the price category before starting purchases:
- Class A - an elite block house of excellent quality without the slightest error. It remains the most expensive and very presentable.
- Class B - implies the presence of minor knots - up to 3 cm - on the front side, which, if properly positioned, can even decorate the facade. Small chips are acceptable on the back side.
- Class B - the number of knots and their configuration are not regulated.

The type of wall material is selected depending on the purpose of the building and the aesthetic preferences of each person. If you plan to build a house with your own hands, then when choosing lamellas yourself, you should carefully examine each segment and put aside specimens with cracks or mold deposits.
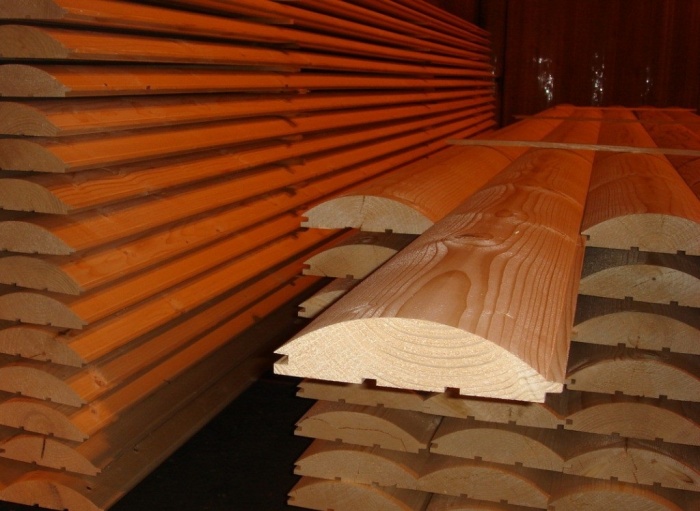
Craftsmen draw the attention of beginners to special nuances: the closer the lines of annual rings are to each other, the stronger and denser the wood. Exterior paneling of a building with a blockhouse involves a wider modification of the board - about 150 mm.
Sheathing a house with a block house is done on a prepared frame, which is easy to build with your own hands from slats or ordinary boards. A similar lathing is located along the walls in increments of 500-700 mm. And the resulting gap is perfect for laying insulating materials. The layer thickness is calculated depending on the region. For example: in winter the thermometer shows from -8 to -12 o, which means a five-centimeter thickness of the material is enough.

If you plan to use mineral wool, then the pitch is selected in proportion to the existing slabs. And in front of the panels of the block house there is a layer of wind protection. Any type of waterproofing will extend the life of the base material.
To do the work yourself, you will need a screwdriver, which can be replaced with a regular drill. A square, saw or grinder with a set of discs will also come in handy.
When constructing the frame, plumb lines and levels are used - the slats must be installed strictly vertically. Only in this case will the cladding have the correct geometric shapes. If class B or C samples are available, then before work you need to carefully inspect them and plan the location of the panels. Defects should be masked with special putty. Any house block is treated with impregnations.
It is important to correctly cut the material, carefully measuring all the parameters of the walls with your own hands, taking into account the presence of door and window openings.
To cover the external walls of a wooden building, the block house is laid horizontally. The spikes should be located on top: this way they will protect the grooves from rainwater. The sealed tongue-and-groove connection ensures the tightness of the structure.

Experienced craftsmen prefer to construct corners by perfectly cutting the lamellas at an angle of 45 degrees. And for those who do such work with their own hands for the first time, it is worth using a decorative outer corner. To improve the joints near a window or door, you need to purchase casings.
To attach a wide block to the frame, clamps and screws are used: holes are carefully drilled in the panels, which are then masked using selected putty or closed with special plugs.
The final stage is the application of varnish or paint to the block house. Renewal of the coating must be done every 5-7 years.
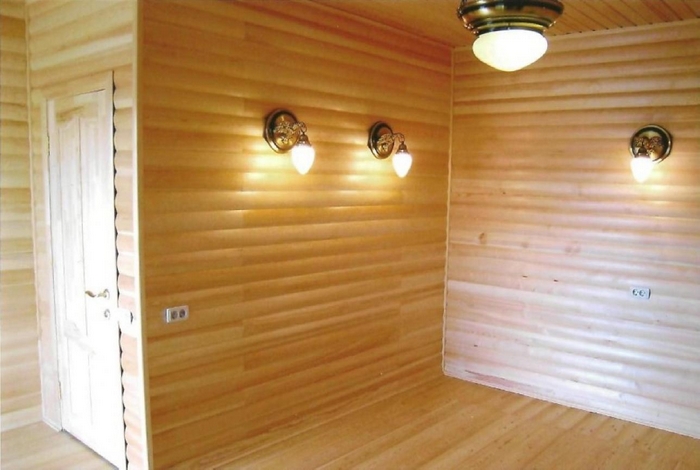
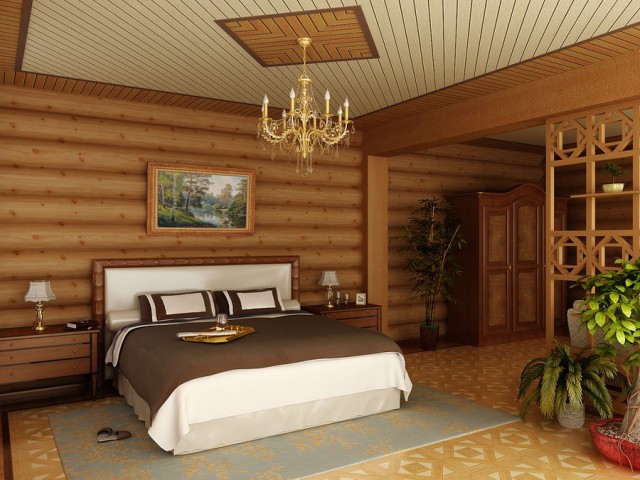
Internal block house decoration is becoming more and more common when arranging a room. This finishing option will set you apart from many.
But before starting work, you should familiarize yourself with this material more closely and understand how suitable it is for you. After this, you need to choose the right type of wood and only then make a purchase.
This article will tell you which block house to choose for interior decoration and how to carry out the work correctly. Before purchasing, you should watch how the interior decoration of a block house is done (video) and decide on a design solution.
The interior decoration of a block house has a number of its advantages, but there are also disadvantages that are also worth familiarizing yourself with before making a final decision on finishing.
So:
- The interior finishing of a block house is completely safe for human health, the material is made entirely from a natural product that will not harm your health;
- During installation, you will also provide high-quality heat and sound insulation. And this is important. Moreover, the materials for this will only complement the design;
- The installation is not that complicated, and you can easily do it yourself. To do this, you don’t need a special tool, but only a set that is available in almost any household;
- Not a large amount of debris during work, it is much less than with other types of cladding;
- Finishing the interior block with a house is done quite quickly and does not take much time;
- This finishing option helps create a microclimate in the room. There is ventilation under the panels, which ensures this process as correctly as possible;
- The price of the material is not that high, almost anyone can afford it;
- Cladding can be done on any surface, and you will not be particularly interested in the curvature of the walls and the previous coating.
This material also has its disadvantages, which you should know before purchasing:
- You will have to constantly monitor the finishing of the house, and this takes time;
- There are gaps between the panels that will allow dust to accumulate;
- Perhaps the most significant drawback is the usable area, which is reduced. And this cannot be avoided.
Attention: When purchasing material, you should also consider the method of use of the room.
Coniferous wood can also be used for residential premises. But you shouldn’t use them for finishing a sauna.
Paneling
After viewing photos on this topic and choosing the type of wood, you can make a purchase and start doing the work, which is done according to certain rules and requires compliance with technology. The appearance and durability of the structure will depend on this.
Surface preparation
For proper fastening, we need to properly prepare the surface:
- First you need to remove everything from the walls. After this, take a metal brush and remove all the previous coating;
- Now we look at what has peeled off from the old plaster.
If there are deep cracks, they should also be gouged to a width of one cm. To do this, use a chisel and a hammer; - Now we need to treat the surface with antiseptics, which are commercially available. Give preference to deep penetration liquid. To do this, use a brush or spray gun;
Attention: Be sure to apply antiseptic. Even if there is no fungus on the walls, this must be done.
If it appears after installation, problems may arise. Access to the surface will be limited.
Therefore, do this even for the sake of prevention.
- After processing, it is necessary to apply a layer of primer to the surface, which will strengthen the surface. To do this, use a brush or spray.
Installation of sheathing
This is a rather important stage of work. The entire structure is attached to the frame and the slightest deviation will immediately be reflected on the surface.
The geometric shape may also be disrupted. Therefore, take this work seriously.

Attention: Two frame materials are used for installation. This is wood and a metal corner.
If you choose the first option, then you should treat the timber with antiseptics, which are commercially available. This will significantly extend the service life of the entire structure.
So:
- First you need to make the markings correctly. After all, if the fastening is not done well, then the correctness of the geometric shape of the structure will be disrupted.
First you need to make a strap around the perimeter of the plane and correctly outline the installation. The best way to do this is to use a hydraulic level.
We mark the beginning of fastening the panels and then use a hydraulic level to transfer the size to another part of the wall; - After this, we connect the marks using nylon thread. We just beat off the installation line;
Attention: When choosing the mounting height of the planks, you should also take into account the height of the insulation, which should not be deformed by the cladding.
Otherwise, it loses its properties. So provide a gap of a couple of cm. And that will be enough.
- Now we cut the slats to the required size. To do this we use a saw.
Just remember that the fastening cannot be done tightly to the wall. It is necessary to provide a gap of one cm.
This will help avoid troubles during the expansion of the material; - We cut the beam and fasten it. For a wooden surface, it is enough to use self-tapping screws. For a wall made of concrete or brick, you should first make a hole using a hammer drill and make the connection using dowels;
Attention: Do not use dowels from kits. We need a strong and reliable connection, which they will not provide.
Buy plastic and self-tapping screws separately, which take a couple of mm more from the cross-section of the pacifier hole. This will ensure the required quality of fasteners.
- We tie the entire plane around the perimeter of the room in exactly the same way;
- Now we need to secure the cross profile or beam. To do this, you should apply a step from the calculation of the panels, but not less than 50 cm.
It should also be noted that the connection of panels cannot be done by weight. It should be performed on a frame.
Using this, we determine the fastening distance and draw the installation lines for the slats; - While working, use a plumb line. With its help, the work can be done efficiently and the perpendicular to the floor can be correctly determined. We draw lines;
- To ensure correct height installation, you should use a fishing line that is stretched along the diagonals of the plane. Height adjustment is made using wooden spacers;
- We make the fastening as described above;
- After installing the sheathing, a layer of waterproofing should be applied. Various films are used for this.
They can be fixed before applying the sheathing, but this is suitable for a plane made of wood.
On a concrete surface, after attaching the frame, cut the film to size so that it overlaps the slats and then secure the material using a construction stapler; - After installing the frame, you can install the insulation. The sheets should be laid tightly, but not deformed.
Installation of wiring
The finishing inside the block house is carried out after installing the wiring for sockets and lamps:
- First, find the connection point. Here you will need to secure the junction box.
It must be freely accessible. This will be required during repair work; - We secure the box and then mark the installation of sockets. We make a cable connection there;

Attention: To make connections in the wiring, use only terminal blocks. They will provide a reliable and high-quality connection.
Do not use twists. This is not only poor quality, but also unsafe.
- We fasten the wire to the place where the socket is installed and cut it off. At the same time, do not forget to release the cable so that it is enough for a free connection;
- During fastening, proceed as follows. First, we attach the panel and then mark the location of the socket.
Remove the panel and place it on a flat surface. After this, we make a hole using a drill and a crown.
Just don’t forget to match the crown to the diameter of the socket mounting.
Installation of block house panels
The material should be brought to the installation site a couple of days in advance, it should get used to the room temperature and gain the required humidity.
So:
- We begin finishing with wood by installing the first panel, which is attached only with the tenon facing up. You can start fastening from the top or bottom.
It depends on your desire, you just need to leave five mm gaps at the top and bottom, this will ensure sufficient ventilation.
There are several options for fastening:
- Nails are the most economical, but also the least durable fastening. Over time it simply becomes loose;
- The most common option is galvanized self-tapping screws;
- There is also a special fastening for block houses, which is made in the form of brackets;
- Claimers are also used.

Attention: When fastening with nails and screws, never hammer or screw them into the surface. First, make a hole using a drill, only the diameter should be slightly smaller than the diameter of the fastening element.
After this, make a lowering in the surface. This will be needed to hide the cap. And only after that should you make a connection.
- You should also not make a very tight connection between the panels themselves. You need to leave a couple of mm. This is also due to the expansion of the material due to temperature changes;

You will have to join the corners.
This work is done in two ways:
- In the first option, you should make a cut at an angle of 45 * and then you can do the joining without additional materials. Just keep the angle correctly;
- In the second option, you simply attach the corners to the joint and, after completely installing the panels, install the facing corner and hide this joint;
- After the panels are completely installed, the corners are lined. For this purpose, a decorative corner is used, which will hide the joint and possible fastening defects.
This is how the installation of a block house is done. You can look at the photo and get to work.
There are instructions, now all that remains is to make the final decision.
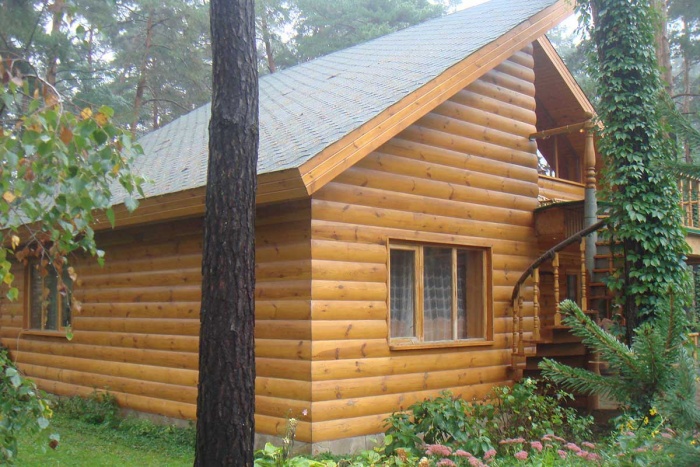
The desire to live in a house made of natural materials is natural. Only in it can you relax in the best possible way and gain strength. It is not possible everywhere and not always to build a dwelling from a log house, but you can make it as similar as possible to a log house.
To do this, you will need to decorate the house with a block house. This is a very interesting material that is often used for baths. What types of block houses are there and what to choose for interior decoration? This will be discussed in the article.
What kind of material
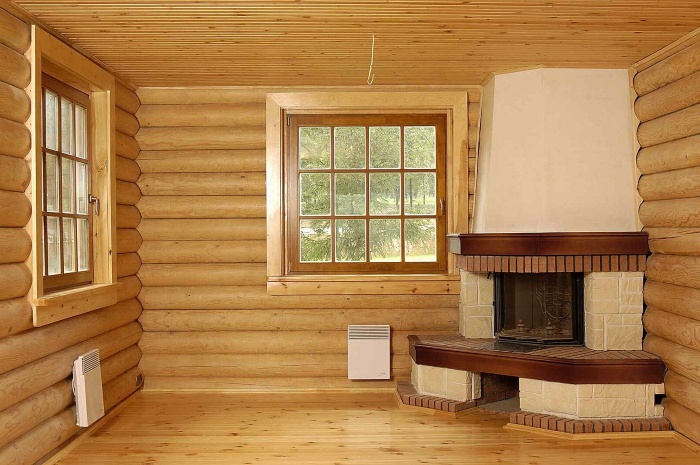
Block house is a material that is very similar to wooden lining. It is made from natural wood without using harmful additives. In appearance, the block house resembles a piece of rounded log. The block house is used for both external and internal decoration of buildings. When used inside, an atmosphere of calm and tranquility is created.

The block house can have different widths. Everything will depend on what effect you need to achieve. Its installation is simple, so even an inexperienced person can cope with the task. This is explained by a clear system for fixing individual planks of the block house. Caring for a natural block house will require the same care as for wood. If desired, it can be given any desired shade.

Features of the material
The block house has enough advantages to choose it as the undisputed leader for finishing work. Among them are:
- long service life;
- high strength of the material;
- additional thermal insulation;
- some sound insulation;
- pleasant tactile data;
- relatively light weight.
With proper care, a block house can last for many years. To do this, you will need to timely treat the block house with antiseptic materials and paints and varnishes. Thanks to its natural origin, we can talk about the high environmental friendliness of the block house. It does not emit harmful substances even when heated, such as in a steam room.
If there is an opportunity to purchase material that is made from coniferous trees, then this will be one of the best options. The resins that are in the wood will repel pests. The block house, which is used for exterior decoration, perfectly withstands strong wind and other loads. At the same time, the block house does not deform and does not lose its aesthetic properties.

Wood is an excellent insulator, so finishing a block house inside the house will somewhat reduce heating costs. At the same time, you can achieve good sound insulation if you install mineral wool insulation under the planks of the block house. Thanks to the tongue-and-groove technology, there are no questions about how the planks should be positioned on the wall or how to secure them together.

If necessary, assembly can be carried out independently without outside help. A block house is a non-rounded log, so its weight is much lower. This means that it will not be able to put a large load on the walls and foundation. There are also negative aspects that should be taken into account:
- susceptibility to fire;
- possibility of loss of shape;
- need for ventilation.
.jpg)
The block house is wood, and it burns well. This factor must be taken into account before choosing this particular material. To increase fire resistance, the block house is treated with fire retardants. If you do not properly treat the cladding strips, then they will easily lose their shape and become deformed from exposure to moisture. In this case, it will be necessary to replace the damaged areas, since it will be impossible to do anything. That is why you will have to take care of good ventilation, which will remove excess moisture from the room.
What to choose from a block house
A block house for external and internal decoration can differ significantly. And this difference lies not only in the external dimensions, but also in the material from which it is made. It is important to understand it well in order to choose a product that will last as long as possible.
For interior decoration

Only the wooden version of the block house is suitable for interior decoration. It has its own subcategories, which are a classification of the quality and type of wood that was used for its manufacture. The cheapest is class C. It is not the worst option. This rather speaks to the quality of its processing. To put it simply, you will have to bring it to mind yourself. The surface of such a house is not perfectly smooth. In the structure you can find dark knots that fall out of the overall picture. Producing this grade of material allows companies to tolerate some errors or defects, which include cracks or dents from impacts. There may also be a small amount of bark.

The next class of block house, which is designated by the letter B, is very similar to the previous one. The boards of this type of house may have certain defects, but not as serious as for the previous class. Most often, this material is used for exterior decoration, but not for the front side of the house. An excellent option for interior and exterior work would be a class A block house. It has an excellent structure and is well processed at the manufacturer’s factory.
There are no cracks or damage allowed in the block house. There may be some small dark spots which are not a problem. The most expensive are top-class products. There should be no damage or inclusions in them. The house is ready for installation without additional processing using wood putty or a plane.
For exterior decoration

One of the excellent solutions for exterior finishing is a vinyl-based block house. If it is made by a conscientious manufacturer, then it is difficult to distinguish it from natural material without close examination. It costs much less than wood cladding. You can immediately select the desired color. There is no need for constant painting or varnishing. The advantages of this solution are:
- ease of care;
- light weight;
- long service life;
- simple installation system;
- UV resistance.
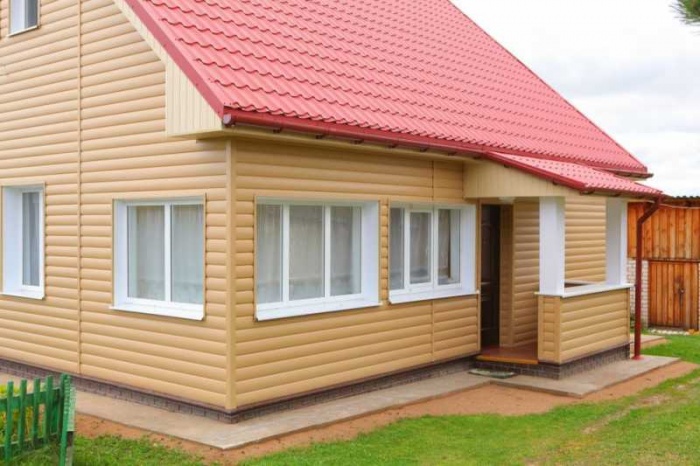
A vinyl house is very easy to care for; you can easily wash it with a hose without fear that any harm will be caused to it. PVC has excellent resistance to moisture. In this case, the material does not deform and does not corrode. It has a long service life, so you don't have to worry about needing replacement after a few years. The weight of a vinyl house is much less than a wooden one, so its installation is even easier. A unique groove assembly system is followed. PVC perfectly resists exposure to sunlight. It does not lose color and is not deformed.
Some opt for a block house, which is made of metal. Its base can be galvanized sheet or aluminum. This block house is perfect for finishing facades after they have been insulated with penoplex. The advantages of metal are obvious. These include resistance to temperature influences and a low coefficient of expansion. In addition, such panels are very good for finishing the basement floor, because they can withstand mechanical stress and shock. Installation is also simple. The cost of the metal version of the block house is lower than that of the wooden one. With regard to aluminum sheets, we can talk about excellent anti-corrosion resistance. The material is not afraid of open fire, so in the event of a fire, it can only partially melt.

Note! When choosing a metal lining, you must take care of the presence of insulation underneath it. It will prevent the walls from heating up from the metal, which is an unpleasant thing in the summer.
What to evaluate when choosing
When purchasing a block house, you need to pay attention to some nuances that will allow you to evaluate its quality. The first step is to evaluate the method and place of storage of the block house. If it has been in a wet warehouse all this time, then there is a high probability that when dried, it will lose its shape. The next step is to check the actual size with what is indicated on the packaging. Next, the uniformity of the boards and their identity are assessed. There should be no discrepancies so that the installation of the block house goes smoothly. The external surface is assessed for compliance with the class of manufacture. Such an assessment will allow you to save money on delivery if defects are immediately identified.
Design options
The block house combines perfectly with other materials if the junction points are properly designed. Based on this, the decoration of the walls inside can be fragments or whole, as can be seen in the photo. In the second case, it is assumed that the plane of the wall will be completely covered only with a block house. This creates the effect of a wooden house. In the second case, the block house can be adjacent to tiles, clapboard or simply a painted wall.
The calculation of the amount of material required will depend on the choice of finishing method. When fully finishing a block house, you need to calculate the area of all the walls, multiplying the length by the width, and adding the results together. For fragmented finishing, you will have to separately measure each area where the block house is supposed to be installed.

Note! Be sure to make a small supply of material when purchasing. It can be useful for replacing damaged strips or for other problems. This will make it possible to purchase all the material from one batch, which will guarantee its identity.
What you will need
To carry out installation work, in addition to the block house, you will need some tools and additional consumables. The main ones will be:
- miter saw or hand-held circular saw;
- hammer;
- nails;
- roulette;
- laser level;
- marking tool;
- hacksaw;
- plane;
- hammer drill
Material acclimatization
After delivery, you cannot immediately begin installation work. Especially if this happens in winter. In the room where the house will be installed, the temperature should be above zero. The finishing material must undergo acclimatization. To do this, you just need to leave it there for a few days. The next step is to take another close look at each individual plank for damage, pests, or other defects. Next, each plank is treated with an antiseptic composition. Fire retardant additives will also be required. You should be careful that the impregnation does not come out through the knots, as it will cause yellow spots. When the material absorbs the substance and dries to the required levels, it can be installed.
Carrying out installation work
The first step is to assess the surface on which installation will be carried out. It is important to identify all the irregularities that will be taken into account later. To carry out this operation, you will need a long rule, which must be placed at various points on the wall. The sheathing is being installed. To do this you will need a hammer drill, screws and dowels. All unevenness of the wall can be easily compensated by cutting the boards with a plane or placing supports. The most difficult part is attaching the first two sheathing boards. They are fixed at the edges of the wall and must be at the same level. You can use a laser level for this.

Several threads are stretched between the two exposed slats and the remaining slats are installed along them. It is necessary to place vertical planks every 50 cm. They must be vertical, since the house itself will be mounted horizontally. If additional sound insulation or insulation is required, then the required material is placed under the block house between the sheathing posts. It is easier to install a house from the bottom up. The first plank is leveled with the groove up and secured with a self-tapping screw at an angle. In this way, the set is made to the very top. If during measurements it becomes clear that the last plank of the block house needs to be cut by more than half, then it is better to reduce the width of the first and last plank equally.

It happens that the length of one house plank is not enough for the wall, then they are connected with a special element that covers the joint. A rather difficult step is processing the corners of the block house. If this is an external corner that is sewn up with a block house, then all the strips of material can be cut at 45° and they are joined with the inside of the block house strip. For these purposes, you can use a special corner element, which simplifies the task. Internal corners can also be covered with additional trim or pattern fitting for a seamless fit. Ventilation gaps of 1 cm are made from the floor and ceiling. They can be covered with baseboards. A video about the installation of the block house can be seen below.
Conclusion
Block house is an excellent material that is suitable for interior decoration and adding comfort to the room. The installation of a block house can be done carefully the first time, if you do not rush. It is better to take measurements several times and only then cut or secure the block house strip. After installation, you can carry out final cleaning using a sanding machine before applying varnish.
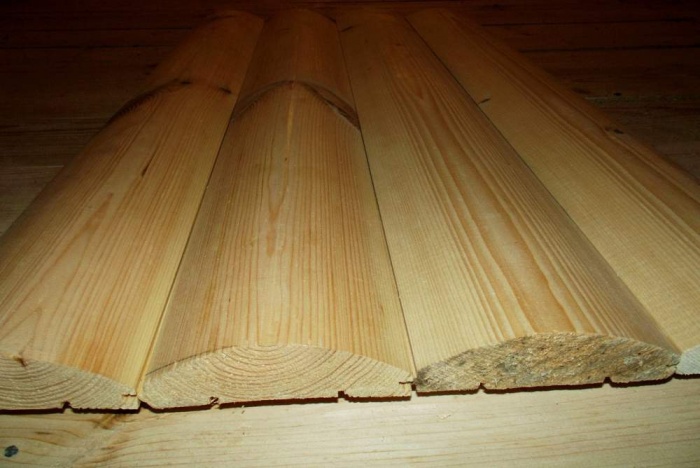
Block house is one of the types of lining. It is also used for finishing interiors and creating a ventilated facade. A traditional block house consists of planks with a convex outer side. The parts are connected to each other using a tongue-and-groove fastening. The finished wall looks as if it was made of timber.

Types of material
Elements of a block house can be not only wooden. Metal and vinyl parts are also available. Each type of finish has its own characteristics.
The main material for slats is coniferous trees, as they are less susceptible to rotting. One log produces four pieces, which are kept in a drying chamber for two weeks.
The main advantage of wooden facade finishing is its appearance. Imitation wood can only deceive the eye from a distance. Up close the impression will be completely different. In addition, wood retains heat for a long time. This property can be used to improve the microclimate in the house.


Details of a metal block house are curved steel plates that follow the shape of one or two logs. A pattern imitating a wooden surface is applied to the outer side. The interior is coated with a layer of primer and paint.
The facade made of metal elements does not deteriorate from moisture and temperature fluctuations, and is resistant to fire, is able to withstand strong impacts and mechanical damage, and it is also not exposed to insects. Thanks to this, the coating will not have to be renewed every 5-7 years.
It is worth considering that metal parts have high thermal conductivity. They get very hot in hot weather and quickly give off heat in cold weather.


A vinyl block house is the cheapest substitute for a wooden one. Like metal, it is not susceptible to sunlight and biological factors. During a fire, it does not burn, but melts slowly, and at the same time it is non-toxic. Vinyl parts will last at least 20 years without losing their original appearance.
However, this material is sensitive to temperature changes, which can provoke the appearance of mold and mildew. The surface of a vinyl block house is heterogeneous and does not always look like wood.


Peculiarities
There are two types of cladding: with and without insulation.


Let's look at the first, more popular option.
All design elements are equally important. If you neglect the vapor barrier or wind barrier, it will have to be repaired much more often. Layers are listed in direction from the wall.
The block house is installed in the same order:
- A vapor barrier layer is needed to protect the insulation from moisture vapor from the wall.
- Lathing – the frame of the facade, creates space between the wall and the block house. It is made from timber with a cross section of 100*40 mm.
- Thermal insulation. Roll insulation, such as mineral wool, is best suited. The optimal layer thickness is 10 cm.
- The windbreak is attached to the sheathing beam. It protects the facade from the wind, and the insulation from the moisture contained in the air.
- Counter-lattice - wooden slats to which the boards of the block house are attached. They have a cross section of 20*40 mm. They create an empty space between the windproof film and the outer skin, which protects the inner surface of the boards from moisture.
- The outer layer is the block house itself.

The design is quite light and does not create a load on the foundation. You can equip such a façade not only during the construction of a new house, but also when renovating old buildings.
How to choose?
The quality of wooden elements can be determined by markings.
- E – extra class. The parts have a perfectly smooth surface. A coating made from such lamellas will not be cheap, but it will also have to be updated less frequently.

- A – products with a well-planed base, without mechanical damage. The parts are suitable for both interior and exterior decoration.

- B – boards made from low quality raw materials. There are knots, small holes, and cracks on the surface.
- C – the base of the lamellas is poorly planed, pieces of bark, cracks, falling knots and holes may remain. On the outside, material of this quality will quickly deteriorate, and professionals recommend using it only for interior decoration.
The requirements and standards of different industries may differ significantly, so it is advisable to buy material from the same manufacturer. It is important to pay attention not only to the markings, but also to the appearance of the slats.


Here are some more tips to help you find a quality block house.
- Larch is best suited for exterior decoration. It retains its original appearance for a long time and practically does not rot. Pine is a cheaper raw material, inferior to larch in quality and durability. A block house made of spruce is good only for interiors.


- For finishing facades, professionals recommend using lamellas with a thickness of 35 mm or more. The length of the parts can be 2-6 m, width - from 15 cm. All elements must be the same size, and the number of joints must be minimal.
- Boards made from trees grown in the northern regions have greater density. This improves other characteristics of the material.
- High-quality lamellas will not have mold, rot, cracks or falling knots.


- Please note the storage conditions: the goods must be stored under cover on pallets or racks. Check the integrity of the packaging.
- Try connecting the parts. The tenon should fit into the groove tightly, but without much effort.


- Find out the moisture level of the lamellas and the size of the pitch. The permissible value of the first indicator is up to 20%, the second - up to 3 mm in depth and up to 8 mm in width.
- It is good if the parts have undergone protective treatment with biopyrenes and fire retardants. It makes them more resistant to external factors.
- The finish will be more beautiful if the boards match the scale of the house. On the facades of large houses, wide lamellas look better, while narrow ones are suitable for small ones.


How to sheathe?
A block house can be used not only to decorate a private house, but also a gazebo or bathhouse. The basis for such a facade can be a wall made of any material: wood, brick, aerated concrete. It can be made the external part of a frame building.


A short list of required materials:
- beams for sheathing and counter-lattice;
- glass wool;
- vapor barrier and wind barrier films;
- nails with anti-corrosion coating for fastening panels;
- antiseptic (if the wooden parts have not been treated).


The work of installing the structure includes a number of stages.
- Preparation. It is necessary to stock up on all materials. If the block house slats have not undergone industrial treatment, you will have to do it manually using antiseptics.
- Installation of vapor barrier. Fix the film from bottom to top so that the strips overlap each other by 10 cm. You can fasten it with a stapler. Then seal the seams with tape.


- Installation of sheathing. The distance between the beams should not exceed 60 cm. Make additional slats near the door and window openings - they will be useful when installing the counter-lattice. It is easier to attach frame elements to metal corners. The slots on them allow the elements to be installed strictly vertically.
- Working with insulation. The glass wool is laid tightly so that there are no gaps between it and the sheathing. Condensation accumulates in them, and the presence of moisture does not have the best effect on wooden structures. And if moisture gets on the glass wool, its effectiveness will decrease. The front surface of the insulation is covered with wind protection.


There is an algorithm for installing lining:
- Attach counter batten slats to the sheathing.
- Beat off the bottom row line. A laser or water level will definitely help you do this.


- Trim the ends of the sheathing that protrude beyond the line.
- Secure the first board along the line. Place it with the tenon facing up - then moisture will not collect in the grooves. Nails are driven in from above and below, into the tenon and into the groove. This must be done carefully to avoid chipping.
- Continue laying the second and subsequent rows in the same way.


If the length of the wall is greater than the length of the block house.
- Place the joints on the same vertical line. Then nail a board 10-15 mm wide and 20 mm thick on top. The same boards can be used to trim corners, slopes and trims. This method is easier, but the finish looks unprofessional.
- The joints are placed in a checkerboard pattern. In this case, the cuts must be perfectly adjusted to each other, and the length of each board is selected separately. The facade will look much more attractive.

In the next video you will see how to cover the facade of a house with a block house with insulation.
What to paint with?
Wood is an aesthetically attractive material, but susceptible to various influences. It can be damaged by moisture, temperature changes in winter, ultraviolet rays and insects. Block house elements made from natural raw materials are no exception. Impregnations and protective paint coatings will help extend the service life of a wooden facade. A more expensive version of the block house undergoes industrial processing in autoclaves. The coating elements are impregnated with compounds that protect the wood from fire, rotting and the destructive effects of other factors.
Those who bought untreated parts should improve their properties themselves. This must be done before installation. It is advisable to process both the planks, the sheathing, and the base. Impregnations and stains are suitable for this.

Impregnations do not change the appearance of wood. All compositions can be divided into three groups:
- Acrylic water soluble ones are used for untreated wood. Good for interior decoration, as they do not have an unpleasant odor.
- Alkyd ones are made on the basis of white spirit and alkyd resins. They create a durable coating, but have a serious drawback - a pungent odor. Used only for facade work.
- Oilseeds are made from natural oils, most often linseed. The coating takes a long time to absorb and dry, but is durable. But it is incompatible with some paints.


The English word “blockhouse” means a house built from individual elements, a building of block construction. Such buildings belong to the category of quick assembly objects. However, in Russian this concept has been transformed and is applied only to the finishing material that is used for covering surfaces.
In fact, it is ordinary wood (usually coniferous), processed accordingly. It is called and spelled differently (block house, block house, block house), but this is not for everyone. We are talking about the same material. Moreover, for some reason this name is applied only to those blanks in which one side is somewhat convex, imitating a log. There are also products “under timber” that have only flat surfaces. All differences in production technology are indicated at the stage when the log is “trimmed.”
The interior decoration of the house with a block house is very convenient. When compared with lining, the difference seems to be small. On the sides there are the same “tenon” and “groove” for joining the workpieces, one surface is perfectly flat. The other side has already been said - either flat or convex (half-cylinder). And yet, many craftsmen prefer this particular “board”. Why?
- About the material
- Video instruction
- High quality drying. What does this mean? Firstly, the weight of the workpieces is significantly reduced, which makes working with them easier. Secondly, the likelihood of such “troubles” as temperature deformation, rotting, and the development of fungal diseases is greatly reduced. Thirdly, it is not subject to “shrinkage”, therefore, cracks will not appear and additional sealing of surfaces will not be required.
- The processing on all sides is of better quality than that of the same lining.
- Peculiar appearance. All properties of natural wood (environmentally friendly, the ability to regulate indoor humidity and some others) are completely preserved.
- Experts note that in terms of the quality of the joints between boards, a block house is more preferable than lining.

At the same time, a relatively low vapor permeability is noted as a disadvantage. Therefore, if a blockhouse is used for interior decoration, then the issues of waterproofing surfaces and creating a reliable ventilation system should be considered. Otherwise (under certain conditions) the formation of condensation and an increase in the humidity level cannot be avoided.
It is used to decorate any buildings: residential buildings (including country houses), bathhouses, gazebos and the like. There are some nuances in its installation that you need to be aware of.

Features of application
It is necessary to take into account the specifics of the house. If it is built from natural wood, then you need to wait until the logs (beams) shrink. And this, as a rule, is about a year. There is no point in carrying out finishing work immediately after construction is completed.
1. Correct selection of wood type.
It is necessary to take into account its properties when decorating a particular room. As already indicated, most products are made from softwood. This “wood” has some peculiarities - at high temperatures, the wood begins to secrete resin and “resin.” In addition, having a dense structure, it heats up very much. Therefore, there is a possibility of thermal burns. Therefore, for some rooms of a sauna or bath (steam room, shower), the use of larch species (alder, linden, aspen) is recommended.
However, a block house made of larch can be considered a good option for the interior decoration of such premises if the choice fell on coniferous wood. Firstly, when wet it becomes stronger over time. Secondly, it practically does not “resin”.
When choosing larch trees, you need to take into account that, for example, ash does not like high humidity and temperature changes. It is not suitable for a steam room, bathroom, or kitchen. When choosing a particular type of wood, check out its characteristics. Experienced craftsmen warn against finishing all rooms with the same type of wood. Although this is more convenient, first of all you should take into account the specific use of each room;
2. Selection of sizes.
 It will be mounted on the sheathing. Based on this, the material should be quite light. It is preferable to have a small thickness and a width of no more than 15 cm. This is quite enough to beautifully and economically cover the inside of a house with a block house;
3. Installation of a waterproofing layer.
Attached to the surface to be treated. And only after that the slats are installed under the block house.
4. Installation of sheathing.
Its dimensions (configuration) are selected based on what material the insulation will be used. It fits between the slats, and therefore determines the distance between them, as well as their thickness. Depending on the conditions, it is recommended to leave a small “gap” between the insulation and the wall. This ensures good ventilation.
5. Installation of insulation and vapor barrier layer.
The latter is applied to the thermal insulation. After completing the “assembly”, it is recommended to install another waterproofing layer on top. This is the final stage of work on preparing the surface for blockhouse cladding.
6. “Finishing” surface finishing.
The boards are fastened either with nails or special clips. If the latter are used, it is better to choose metal ones, since plastic is less reliable. Place the workpieces horizontally or vertically. It all depends on the overall interior and the taste of the owners. In rooms with high humidity, condensation often appears on the walls, and water droplets begin to roll down. In such rooms, boards should be placed vertically to prevent moisture accumulation at the joints of the workpieces.
These are brief instructions for decorating rooms with a blockhouse. But before you start such work, make a detailed list with everything you need and make a cost calculation (make an estimate).
It is largely determined by the design of the building (area, configuration of premises) and the material from which it is constructed. After all, in accordance with this, both the sizes of the boards and the type of wood are determined.
For example, 1 m3 of a pine blockhouse costs about 9,000 rubles. The standard length is 3.4 or 6 m, the most purchased variety is AB. The remaining “parameters” are 26 (36) x 136 (141).
Larch will cost 930 rubles/m2 with dimensions 27 x 140 (thickness 24 mm). Thinner blanks (22 mm) are sold for 850 rubles/m2. For 1 m3 you will have to pay about 16,000 rubles.
Other wood “goes” at a price from 390 to 560 rubles/m2.
If you choose the right finishing material (thickness), type of wood and do the installation yourself, you can save a lot. You just need to take into account that you still need to take with a small margin. During work, something is always missing. And if you buy more, it will be a blockhouse from a different batch, which is undesirable.
You can invite specialists to carry out finishing work, but you will have to pay for their services from about 450 rubles/m2 (including cost).
Recently, products have appeared on the market that can be called a hybrid of the above described and the siding we are already familiar with. It's called metal siding. There is also a plastic one. But they are more often used for the exterior design of buildings, so we will not consider these types of material in more detail.
 Natural and environmentally friendly finishing materials, despite high costs and special functions, never lose their relevance.
Decorating a block with a house in a house is a chic, exclusive and quite nice option that will change every apartment that will no longer be recognized.
House block is a type of spacer that can be made from a variety of materials.
Classic cladding is made of natural wood, most often from conifers (spruce, cedar, pine), as well as deciduous trees (lime, rash, alder).
For exterior finishes, climate change-resistant vinyl or metal counterparts are characterized by increased wear resistance and durability.
A special feature of the Haus block is its front part in the form of a rounded rod.

The interior finishing material has distinctive features:
- It is made from environmentally friendly raw materials;
- It has high strength, reliability, wear resistance;
- It offers repairs, painting and polishing;
- It is lightweight and therefore does not cause unnecessary stress on different surfaces;
- It provides high heat and sound insulation of rooms;
- Allows you to maintain optimal humidity inside the house;
- Simple and easy to install and then worry about.
Main dimensions and material classes
When choosing a house block, it is important to consider its size and ratings.
Manufacturers offer two plate sizes. Narrow (8-9 cm) and medium (12 cm) width (20-25 cm), thickness from 2 to 4 cm long. This product can vary from 1.5 to 5.5-6 m.

As you already know, you can use narrow boards for small rooms with low ceilings, medium boards for larger rooms.
But wide elements are suitable for cladding facades.
In addition, you need to define a class. Modern block blocks come in three classes:
- Economy Class (C) - minor imperfections and surface damage, small worms, pockets and uneven colors;
- Standard (A, B) - includes a small number of nodes and small cracks, no significant errors in the database.
The plates are clean and textured;
- The extra class is completely flat and clean, without bugs or bugs. Presence of resin pockets.
Based on all of the above, we can conclude that the slab is of a higher class, more expensive material.
The most common products are coniferous products, which are characterized by high density, strength and durability.

Particular attention should be paid to the thickness of the panels, as this will determine the strength of the coating.
Experts advise choosing products with a thickness of at least 3 - 3.5 cm.
Mounting functions
Completing a home project begins with preparing the necessary materials and tools.
To work you need the following:
- screwdriver;
- Self-tapping screws or nails;
- Fretna žaga;
- drill;
- Hammer;
- Construction class;
- Antiseptic for wood;
- Brush (5, 10 cm), roller;
- Grinding machine.
- Block house (correct size and quantity);
- Chopsticks (25-30 mm thick);
- Corners for interior and exterior decoration;
- Pedestal.

After purchasing the covering material, he must spend some time in the house for the so-called.
acclimatization. How does this happen? The plates should be placed on the floor of the room, which is ready for final processing within a few days. This prevents the wood from shrinking and cracks and cracks forming.
Installation of a home unit begins with the installation of a frame, which will be made of wooden beams.
House block for interior decoration: dimensions and quality, basic principles of installation, warnings
It is necessary to carefully observe the distance between the individual elements, which should be 45-50 cm. The year is mounted on the surface in a vertical position using nails or self-tapping screws.
To ensure that the padding of the indoor unit does not appear uneven, it should be aligned with the construction stage when securing the container.
Where it is necessary to cut out the rods somewhere, make an additional substrate.
If the house needs insulation, a heater or steamer must be installed after the stud is installed.
The finished material can be attached in one of two ways: with knives or dowels in the prepared holes.
 After installing the slats, small holes are made into the rods using a drill for installing dowels or self-tapping screws.
The process of laying the blockade always starts from the top, since the first plate must be twisted upward.
Among the elements at the intersection with the floor and ceiling, small slots should be left at a distance of 4-5 mm for ventilation.
Each plate should be secured at a 45 degree angle in a suitable groove in the screws of the prepared holes, which are screwed in with a screwdriver.
The corner trim is simply machined, so the end surfaces of the plate must be inserted into the inner or outer corner insert.
Once all the panels are installed, you must install the ceiling and base.
Once the installation process is complete, you can start sanding the surface with the mill.
Then the surface is covered with an antiseptic or stain in several layers. You can use brushes for the corner and for the main surface - the cylinder.
The covering and block of the house can be painted and at the same time you can choose different color schemes for the house.

If you notice any slight roughness or roughness on the surface, you can remove it with a sprint. After this, apply the stains with a stain and leave until completely dry.
Well, in the end, you open the wood base with a varnish intended for wood.
It effectively protects against damage and provides high resistance to high humidity and sunlight. To do this, it is better to use deep penetration formulations with a long drying time.
Video about the correct installation of this material:
Properly selected materials and careful consideration of all installation rules ensure a high-quality finish.
- Why do they prefer a block house?
- Installation of a block house: recommendations
- Summarizing
When it comes to updating the interior, people first of all start from their aesthetic preferences. The attribute of comfort is what occupies a leading place in our time.
Finishing the facade with a block house is an opportunity that will turn the house into a beautiful building, effectively improving its appearance.
This design of a dacha or country house will give a certain status to the owners of the property. Moreover, such cladding in itself is useful for the house and has a number of advantages.

Why do they prefer a block house?
Cladding the facade with a block house will strengthen the house: such finishing of the building provides mechanical strength, which protects against adverse atmospheric and external influences (sand, stones, impacts, etc.).
Also, finishing the facade with a block house allows you to maintain the integrity of the cladding.
If, after all, the finish has been damaged, it can be easily restored without spending a lot of effort: you need to sand the damaged area and then paint it.
After finishing the facade in this style, the building will be perceived completely differently.
Finishing with natural wood is a very favorable campaign that brings aesthetic satisfaction.
It must be admitted: cladding the facade with a block house is not a cheap pleasure, so it will create the necessary impression among neighbors and passers-by about the owners of the house.

One of the big advantages is that decorating a house does not take much time and is a simple job.
How to decorate the inside of a house with a block house
The load on the foundation will be negligible. The house will be able to “breathe”. When performing external finishing with a block house, additional insulation is created, which is never superfluous.
We can go on describing the advantages of a block house, since the above are not all the advantages. But the point is clear: finishing a block house allows the house to look not only impressive, but also effectively protects it.
There are quite a few disadvantages compared to all the advantages.
And yet: in order for the operation of a block house to last for a long time, it must be periodically painted, coated with protective materials, or possibly varnish.
This means that additional financial resources will be required, as well as certain concerns. If the house is large enough, the procedure will require a lot of time and effort.

As for the tool, you may need:
- roulette;
- hacksaw;
- stapler;
- screwdriver;
- marker;
- level.

How to choose wood for cladding a house
No matter how simple the choice for exterior decoration may seem, it is not an easy task.
The tricky part is choosing boards that differ in their properties and appearance.
The boards must be at least 150 mm wide if this is the exterior of a block house. It is this parameter - size - that you need to pay special attention to. It would be great if all the boards were identical to each other.
Since the block house is external, the wood must be of high quality so that it can serve for many years. Taking this fact into account, it is best to use coniferous species for decoration: spruce, pine or larch.
These trees have good resistance to rot.
Before you make your choice, you need to find out where this board came from. It is much more profitable to purchase a tree that grows in the North. It has greater density, and this has a positive effect on other properties.
To purchase a quality product, it is best to split a potential log for purchase and look at its inside: a tree from the North has a smaller interval between the rings.
Basically, wood from any region is suitable for finishing, but, according to authoritative experts, it is northern wood that lasts longer.

A little about caring for a block house
Once the house is lined, there is no need to relax if there is a need for long-term use.
If you have one, then you should stock up on: mastics, paints, stains and varnishes, as well as other protective coatings - to your own taste.
In fact, caring for a block house is not something complicated. Moreover, working outdoors is always beneficial. To prevent wood from wearing out it is necessary:
- Prime the surface and then treat it with clear varnish or paint.
- Wait until the coating dries and sand the surface well.
- Apply the required amount of final coating - paint or varnish.
- It is recommended to perform this procedure once every 5-7 years.
You need to use only high-quality materials that have a long service life.
It is the quality of materials that will determine the service life of the block house. It is recommended to use the same materials that were applied the first time, otherwise you will have to remove the old coating and apply a new one.
If there is a need to give the wood a different shade or highlight the texture, then there are special stains that allow you to do this.

Before you begin installing the facade of the house, it is necessary to carry out preparatory work.
First you need to acclimatize the boards by letting them sit indoors without packaging. Since there are several installation methods, you need to decide exactly how the work will happen.
The procedure for finishing a house with a block house will be as follows:
- A vapor barrier is attached to the wall.
- A sheathing is installed over the vapor barrier.
- Insulation.
- Windproof film.
- Second layer of sheathing.
After this, you can begin attaching the block house.
As mentioned above, there are several ways to secure a block house.
For this, self-tapping screws or nails are most often used. A big plus is the anti-corrosion coating on screws or nails.
Regardless of the method of fastening the board, you need to pay attention to its location during installation. It should be positioned with the spike facing up, which will prevent dust and moisture from accumulating.
With this installation, the boards will remain intact longer, therefore, their service life will increase.

Summarizing
It is necessary to take into account that finishing a house with a block house allows you to create a structure whose purpose is to insulate the house and make the room comfortable.
In other words, the block house has, first of all, a practical meaning, and then an aesthetic one.
Despite the fact that the cladding requires maintenance - albeit rarely - and the installation procedure itself requires a considerable amount of money, a block house will breathe life into the house and make its appearance pleasing to the eye.
It has many more pros than cons.
Having resolved all the hassles and done the work once, you won’t have to worry about it all year round.
If you want to build a house with a wooden frame and surround the house, this is an opportunity to get a reliable and warm apartment relatively cheaply.
Comparing the design, assembly technology and thermal characteristics of frames and wooden houses, I found that both options have similar performance indicators. But a frame house is cheaper and can be built faster, since there is no need to move the plank to shrink.
House frame
We left separate skeletons for each floor.
The corners from the solid beam have moved from the façade to the top of the second floor. Attached messages are top sticks. Their upper ends are cut at an angle, which forms an inclined base.
The top floor of the first floor is assembled on these peaks. The second floor beams are installed at the rear. In the main building of the house, the media are posterized, as they are visible on the ceiling of the first floor.
The lower, intermediate and upper belts are made of wood 100 * 150 mm. The cabinet compartment is 100 x 100 mm (intermediate wall corner) and the bridge bridges are connected by connecting screws and liquid nails adhesive force.
The minimum distance between the posts must be at least 0.8 m. Floor beams with a rod 100 * 150 mm are laid in increments of 0.8 m.
Diagonal stem skeletons are provided around the corners of the frame to increase the strength of the frame. On the second floor, as well as on the first, there are additional rods attached to the corner contacts, on which the top strip is loaded with rafters.

The upper frame of the house frame is made of hardwood with a profile of 100 * 150 mm.
The structure of the side wing of the structure is below 0.2 m basically. We introduced Gable to 0.4m substrings. They need to break down and draw on the ground so they don't have to do it over 6m.
roof
Since the house has several roofs, the frame was assembled in two stages. First, to avoid mistakes, the plan was drawn on the ground according to the drawing, using the foundation base as a template. The skeleton of the roof was then stripped down with all the parts and their locations laid out to keep the height simple and easy to install.
House frame assembly
The middle pillars joined the corner pillars, which supported the other panels.
Small stands on the ground floor and diagonal slopes were installed by marking. On the second floor floor, they assembled a temporary process bottom and began laying down the top strip. To install the reefs and roof frames, temporary scaffolding was built half a meter below the top chord level.
Flow around a block
To save money, we chose class C blocks (number of holes from falling nodes allowed) with a thickness of 40 mm and a width of 145 mm.
Errors in them can be easily eliminated using wooden pins adjusted to the size of the nodes and PVA glue.

Cutting slabs with defects for shells and finishing gables. By carefully choosing the material, the waste takes up a maximum of 5%, and in the future the remains will also be useful - for a gazebo or cavity.
Cladding the house began with adjusting the bottom slab.
It was installed at a 25 degree angle to the wall, checking the horizontal level of the top edge. Glassine was used to waterproof the walls. The plate placed above the tile can also be used with a serious gap as it must be cut at the same 25 degree angle.
joints
The standard locking length is 3 m.
The cut sorted plates form a decorated wall with a uniform profile.
Block house for interior decoration: ideas for space design
But on the long sides of the house panels it must be fixed. To make the leather look durable and not bleed on the joints, we used special interface technology. A bar (of the same thickness as the block) was attached to the smoothly visible edges of the leather ends. The following plates were laid and secured on the other side of this board. This technology also interfered with the interior corners of the house with blocking. If there was more than one such joint on a wall, it was not always possible to match the joints exactly - and minor defects had to be hidden using vertical fabric tape.

Thus, in case of rain, the block is not wet, we immediately destroy each wall with a special color.
The walls were painted oak, and all other details were painted in a dark matrix.
Old types of slates
The material for the roof of the house, we chose the simplest and cheapest - ordinary gray slate. Add it up - it's pretty simple, but there was a lot of time involved in setting up and outfitting the classes, and laying down the slate at the skater crossroads.
After fixing all the sheets, galvanized iron ridge elements were installed.
The slate is covered with a special color, the so-called rubber roof. The color chosen was dark brown, the tone of the windows and corner corner.
The painting work was quick, as before, sheets of ink were treated with a special powder, after which it was enough to paint the roof only once.
Less than 7 hours later our roof was not recognized.
We have finished the second floor
On the roof they began to tear apart the walls of the second floor. The work was slower: first the scaffold had to be built on one of the walls and then moved to the other. Much time was spent filling in the gables. For the overall harmony of all elements and the structure as a whole, we decided to end them with a blockade.
The problem was installing the front panels in the corners and lengthwise. This is where we were helpful - the suggestions from the two rulers included at the end of the course. He identified this little thing as the side of a slope and took it to the boards.

Windows and doors
After the house was finished, windows were installed.
The widths and widths were determined during the installation of the frame, so we installed all 8 windows in one day. The outer window unit was heated at a distance of 1.5 cm from the outer part of the blockade. Later, when the clypeus was nailed down, this shelf was covered with a specially tight fitting and along the wall of sticks.
External corners of the house
Firstly, the armor was tied to the ends of the blockade, and the corners were covered with boards 25 mm thick and 150 mm wide.
And we cut one of the plates to 125 mm so that the coating is symmetrical.
The height of our house is almost 5 m, so we decided to make corner panels for each floor. The joints between the floors were covered with decorative spots. The already painted corner panels were secured with screws.

porch
Its roof was on the side that matched the roof of the house.
It was difficult to secure it to a porch roof with a wall covered in blockage. To do this, use a circular saw to cut a depth of 25mm along the roof contour, from the gutter to the height above the shaft (120mm), using a circular saw. Above the slate lying on the ruber and against the wall of the house, the apron was made of galvanized iron, which swung under the profile of the internal corner. The outside corner was placed over it in a container and tied tightly to the wall of the house, covering the apron.
Before painting, the roofs were additionally mixed with propylene sealant in the block.
Perhaps we built the house too early: two seasons were a long time. Naturally, renting a team of professional builders was possible and quick: within two weeks a team of 4 people could build a house.
But we wanted to do it ourselves.
What type of finishing material is called  block house?
In European countries, this concept refers to a set of parts for assembling a frame structure.
In Russia, when this term is used, they mean the panels with which the finishing of a building is carried out.
There is no doubt that covering a house with a block house is more convenient and economical compared to finishing with plaster, for which expensive construction crews have to be involved.
Types of finishing materials
There are several types of such finishing coatings:
Sheathing, which includes natural wood.
Mainly coniferous wood is used. One side of the product has a flat surface, and the other has a convex surface. 
Artificial coverings. Vinyl is used to make them. They consist of plasticizers and protective strengthening substances.
The metal casing is resistant to corrosion. It has a long service life.
Wood paneling
Panels made of wood have the appearance of planed and processed boards.
When finishing with such a coating, a complete imitation of a house is created, which includes natural timber.
Coniferous and deciduous wood varieties are used for the production of products:
Pine and larch contain natural water-repellent substances.
When finishing walls with coniferous wood, the structure is additionally protected from rot and mold. Coniferous trees contain natural antiseptics. 
Such coatings are quite strong and durable.
The material has a reasonable price.
Spruce is not usually used in block house making. It is not a strong enough type of wood that can be used for external cladding.
Deciduous species include oak, birch and alder.
They are rarely used in the manufacture of block houses. At the customer's request, such coatings are produced in single versions.
Finishing with oak can last almost forever. This type of wood is the most durable. It is little affected by weather conditions.
You can sheathe the outside of a wooden house with your own hands.
To do this, you must follow the installation rules. 
When purchasing a coating consisting of natural wood, you should definitely check its quality. From many unscrupulous manufacturers you can find damp and poor-quality products.
The panels must have a flat surface. Humidity should not exceed 20%.
Use of vinyl coverings
Cladding a house with a block house, which includes vinyl, is a fairly reliable coating.
The panels are not afraid of moisture, do not rot, and mold does not grow in them.
In addition, they are easy to care for. Vinyl siding can be installed in a short period of time.
House covered with block house - Photo
The material has convenient grooves for joining and fastening the necessary fittings.
For installation, you do not need to carry out carpentry work, which is present when installing a natural covering.