Features of pouring a foundation in winter: methods of heating concrete. Heating concrete with a welding machine is a proven method. Winter concrete How to warm up concrete with a welding machine diagram
Read also
Warming up the concrete with a PNSV wire, the laying scheme of which will be described below, is used when carrying out work outside premises in the winter. Such manipulations are necessary for the reason that upon exposure, the solution begins to gain strength more slowly, and the water in it simply begins to turn into ice. A longer hardening of concrete causes the work to be delayed for weeks and months; in addition, there is a possibility that the structure will not gain the required strength and will crumble during operation.
How the wire works
The technology with PNSV wire is that before the start of pouring, a cable of the required cross-section and voltage is taken, laid, and then poured. Then the cable is connected to the network. You should not be afraid that the qualities of concrete will change under the influence of high temperatures; bubbles will not appear, as well as cracks after hardening, but the hardening process will not be stopped by low temperatures, which will allow you to obtain a strong and reliable structure.
Technical features of wire for concrete

The wire for heating concrete PNSV, as a rule, has some features. This is usually a conductor that has an insulating coating. The protection can be made of polyester or polyvinyl chloride. In this case, the diameter is 1.2 mm, but the average resistance is equivalent to 0.15 Ohm/m. It can be used in the temperature range -60-+50 °C. During operation, the current can be equal to 14-16 Amperes.
Laying can be done at -25-+50 °C. Before purchasing, you need to determine how much wire will need to be used, so for 1 m 3 of solution you will need about 55 m.
PNSV winter wire is completely safe, since during production the product receives high-quality insulation, which prevents fire. There is almost no danger that the core will be broken, since it is quite strong. Do not operate the wire until it is immersed in the solution. Otherwise, burnout will occur due to increased current. However, the leads are not afraid of such phenomena, since they contain wires with a larger cross-section, representing the so-called cold ends. They are made from APV-4, the maximum length of which is 1 m.
Area of use

The method of heating concrete with PNSV wire suggests the possibility of using it not only on a domestic, but also on an industrial scale. Sometimes installation is carried out in
foundations and fences.
Carrying out cable installation

Working with a cable involves responsible manipulations. Before starting the installation process, it is necessary to clear the surface of debris and foreign objects, including those elements that can damage the wire. During this process, it is important to ensure that the cable does not become kinked. To do this, it is recommended to lay it in a semicircle, but there should be no unfilled areas. The simplest installation method is a snake.
After switching on, you need to be careful. So, there should be no voltage drops; to achieve this goal, you need to use a stabilizer, otherwise the wire will simply burn out, and it will not be possible to remove it.
The diagram for heating concrete with PNSV wire is in the article. After you have implemented it in practice, you can fill and connect, which involves connecting the cable to the power source. It is recommended to use a transformer when connecting. As a rule, experts recommend using heating stations of the SPB-40 and SPB-80 brands.
The connection can be made according to two electrical circuits, the first of which is called “star”, while the second is called “triangle”. In the latter case, the wires in the wire are divided into 3 equal parts and the wires of each are mated in parallel. The resulting sets must be connected into 3 nodes and connected to the 3 terminals of the station.
Features of warming up

Before you start, you need to know the time it takes for the concrete to warm up with the PNSV wire.
During the first period, the solution will warm up, and it is unacceptable to increase the temperature by more than 10 0 C in two hours. The second period should be accompanied by an increase in temperature by no more than 80 0 C. At the final stage, cooling occurs. At the same time, you should not rush, and the decrease should not be more than 5 0 C within an hour.
Heating concrete with PNSV wire, the installation scheme of which is described here, does not differ much from the installation technology of a “warm floor” system. In addition, this cable can be used to achieve such goals. However, the system will have to be slightly modified by constructing a heating element from wire strands, while the system must be protected with insulation on top.
Heating cable cost

Before purchasing, you need to familiarize yourself with the prices of the cable. In different areas it may cost differently, but the average price remains unchanged, it is equal to 2 rubles/m. You should not buy a product without checking whether it complies with the established GOST standards; thus, the cable is manufactured according to the standards 12.1.013-78.
Carrying out treatment of concrete after heating
Many builders wonder whether it is possible to manipulate cutting or drilling concrete after it has gained strength. This question is due to the fact that at the time the heating stops, the structure has not yet acquired brand strength. The answer to this question can be positive, but with some reservations. Although cutting is possible, it is unacceptable to produce impact loads. The most suitable solution for this is the use of diamond tools. So, if you use diamond drilling at this stage, the holes in the concrete will have smooth edges and cracks will not appear. Moreover, if you drill through the concrete body, you will not have to change the tool at the moment of overcoming the reinforcement, which is true for reinforced concrete.

Heating of concrete with PNSV wire, the laying diagram of which is in the article, can be done by first winding it onto a steel frame, and it is necessary to ensure that there is no tension. You can simply lay it between the elements of the metal frame. It should be remembered that the wire should not touch the surface of the formwork, nor should it protrude from the concrete body after pouring.
The heating wire can be installed only after the reinforcing frame has been laid; this work should not begin until the embedded elements are in the space. Welding work must also be completed by this moment. Heating of concrete with PNSV wire, the laying diagram of which is shown in the figure, should not continue after the solution has gained strength within 50%.
The heat that comes from the core should be able to heat the solution to 40-800 0 C. The period until the mixture completely gains strength will depend on the characteristics of the object and, as a rule, takes up to three days. The warming station must operate on an intermittent or long-term basis. The pitch between the wires should not be more than 15 mm.
Calculation of concrete heating with PNSV wire is presented in the article, but compliance with it does not yet give complete success. After all, it is also important to take into account the installation technology, which involves eliminating the contact of the wire or its intersection. In order to be able to control the temperature regime in structures filled with mortar, it is necessary to make special wells. The heating process should not begin until the solution has been completely laid, as this is contrary to safety considerations and may damage the wire. It is preferable to entrust this type of work to specialists, since cable installation is accompanied by certain difficulties and requires the master to have skills in conducting such manipulations.
Calculation of wire for heating concrete
Based on the above, we can draw the following conclusion: for 1 m 3 of concrete it will be necessary to spend approximately 55 m of cable. In order to calculate the wire, you must first find out how much mortar will be poured into the formwork. So, for 20 m3 of mixture you need to purchase 1100 m3.
In general, it is preferable to carry out construction work in the warm season, which is especially true for private developers. As a rule, pouring concrete during the cold period is associated with the need to complete the object by a certain time. Such work within the framework of home construction involves additional costs for the purchase of heating cables and other things. And labor costs when pouring concrete in winter turn out to be much greater, because mixing is more difficult, as is the subsequent distribution of the mixture over the formwork.
Sub-zero temperatures negatively affect the hydration of the concrete mixture. The main task of winter concreting is to preserve moisture and maintain the required temperature conditions for optimal setting of concrete. Today we will look at simple techniques that allow you to carry out concrete work in winter.
The geographical location of our country dictates its own rules and technologies for all types of construction work carried out during the cold season. With an increase in negative temperatures, concrete work is possible only on those sites where the technical possibility of electrical heating or another type of heating of the concrete mixture has been laid down in advance. As you may have guessed, we are talking about large construction sites, where, regardless of weather conditions, concrete must be poured within strictly defined periods.
Sub-zero temperatures negatively affect the hydration (strength development period) of the concrete mixture. Let's remember what it consists of: cement, sand, water and crushed stone. Water is the catalyst for the chemical reaction in the concrete setting process. At negative temperatures, moisture freezes out, which is extremely necessary for the process of gaining strength; the loss of concrete strength jeopardizes all further types of work. The main task of winter concreting is to preserve moisture and maintain the required temperature conditions for optimal setting of concrete. If the moisture in the concrete mixture has crystallized, then this concrete cannot be saved, and you should not wait for a thaw - this process is irreversible.

- The optimal temperature for setting concrete is +10…+20 °C.
- At temperatures of -20...+10 °C, measures must be taken to ensure normal hydration of concrete.
- When the temperature drops below -20 °C, all types of concrete work are prohibited.
Methods for heating concrete at home
At a temperature of 0...+10 °C, it is allowed to work with concrete provided that plasticizer additives are added, which prevent the mixture from losing the required strength gain. Depending on the ambient temperature, the additive is diluted strictly in the proportion specified in the attached instructions. You can buy an anti-freeze additive at any hardware store.
The disadvantage of plasticizers is the slow development of strength; if at +17 °C concrete gains its grade strength in 7 days, then at +7 °C with the use of plasticizers the process can take up to 30 days. In order to speed up the setting of concrete, after pouring it must be insulated with improvised means that you can easily find in your household. If a concrete slab is being poured, it is advisable to fill it with sawdust, which will reduce the hydration process by almost half.

Foam plastic and penoflex are excellent as insulation, but buying it for one fill is not very cost-effective. It is much cheaper to buy foam chips and fill the slab with it; in order to prevent the light crumbs from being blown away by the wind, it must be covered with oilcloth or tarpaulin, pressing it along the perimeter of the slab being poured.
The columns and walls are protected by formwork, but it still wouldn’t hurt to cover the exposed areas of concrete with the same oilcloth or tarpaulin. As concrete gains strength, a chemical reaction occurs, due to which the concrete mixture itself releases a certain amount of heat, which must be preserved with additional insulation.
If the thermometer drops below zero, then the heat generated is no longer enough. On industrial construction sites, special transformers are used to heat concrete at sub-zero temperatures, through which the concrete is heated with heating wires.

Buying a special transformer in order to pour a couple of cubes of concrete in the cold is not a very good idea. It is quite possible to use a regular 150-200 A welding transformer as such a transformer. Below is a list of materials needed to heat a small plate with a welding machine:
- Welding machine 150-200 ampere.
- PNSV wire 1.5mm.
- Single aluminum wire AVVG 1x2.5mm.
- HB electrical tape (black).
- Current clamps.
Preparing to warm up
The heating wire PNSV must be cut into pieces 17-18 meters long. The resulting sections (loops) are laid evenly and tied along the entire reinforcement frame of the structure being poured. We lay the loops so that after pouring they are slightly above the middle of the slab; if a column or wall is being poured, the layer of concrete above the loops should be at least 4 cm. It is best to tie the heating wire with an insulated aluminum wire. It should not be a stretch; ideally, it should be arranged in a wave-like pattern. The distance between the loops, depending on the air temperature, ranges from 10 to 40 cm. The lower the sub-zero temperature, the smaller the distance between the loops. The number of heating loops depends on the power of the welding machine. One loop consumes 17-25 amperes, which means 6-8 warm-up loops is the maximum that the welding machine will pull at 250 amperes.

When laying loops, it is important to mark the ends; alternatively, we wrap a strip of electrical tape around one end of each loop and leave the other end free.
After the loops are laid and tied, you need to attach aluminum ends to them, which are then connected to the device. The length of the cold ends is determined by the location of the welding machine itself, but not more than 8 meters. We splice the loop and the cold end using a twist 4-5 cm long. We carefully insulate the twist with cotton tape and lay it in such a way that after pouring it remains in the concrete, since the twist will burn in the air. The marking with electrical tape must be transferred to the attached cold end of the loop.
Connection and warming up
After pouring, all cold ends need to be connected to the welding machine; the ends with and without markings are placed on different poles of the machine. After everything is connected, we check the entire heating circuit and turn on the device at the minimum load of the power regulator. Using current clamps we measure each loop separately, the norm is 12-14 amperes. After an hour, add half the power reserve of the device, after two hours, unscrew the regulator completely. It is very important to add amps evenly to the warm-up loops; each loop should show no more than 25 amps. At -10°C, 20 amps on the loop provide the normal temperature required for concrete to set. As the concrete sets, the amperage of the loop drops, which makes it possible to gradually increase it on the welding machine. Before increasing, we look to see whether the value on the loops themselves has dropped or not. If the amperage has not changed since the last check, then we wait until it drops by at least 10%, and only after that we increase the current.

The warm-up time depends on the volume of fill and the ambient temperature. Just like in concreting with additives, we additionally insulate the structure being poured. In frosts of up to 10 degrees, 48 hours are enough for normal hydration of concrete. After the heating loops are turned off, additional insulation remains for at least another 7 days. You should not heat the concrete too much, as this can lead to excessive evaporation of moisture, which will subsequently lead to the formation of cracks and loss of concrete strength. The slab under the insulation should be slightly warm and nothing more. Warming up concrete with a welding machine at home requires increased electrical safety measures and should be carried out only if you have the necessary knowledge of electrical engineering and professional skills in working with a welding machine.

If you don’t have a welding machine, you can use the old heating method - the “heat tent”. When pouring small structures, a tent made of tarpaulin or plywood is erected over them, the air in which is heated using heat guns or gas heaters. “Miracle stoves” running on diesel fuel have proven themselves well with this heating method. With economical fuel consumption (2 liters for 12 hours), one furnace heats 10-15 cubic meters of air in a heating tent to the required concrete hydration temperature.
Video on the topic
Pouring concrete in winter has its own difficulties. The main problem is considered to be the normal hardening of the solution, the water in which can freeze and it will not gain technological strength. Even if this does not happen, the low drying rate of the composition will make the work unprofitable. Warming up the concrete with a PNSV wire will help resolve this issue.
Electric heating of concrete in winter is the most convenient and cheapest way to achieve the desired hardness of the material. It is permitted by the standards SP 70.13330.2012, and can be used when performing any construction work. After the concrete hardens, the wire remains inside the structure, so the use of cheap PNSV provides an additional economic effect.
Application
Warming up concrete in winter with a cable makes it possible to solve two main problems. At temperatures below zero, the water in the solution turns into ice crystals, and as a result, the cement hydration reaction not only slows down, it stops completely. It is known that when water freezes, it expands, destroying the bonds formed in the solution, so after increasing the temperature it will no longer gain the required strength.
The solution hardens at optimal speed and maintains characteristics at a temperature of about 20°C. As temperatures drop, especially below freezing, these processes slow down, even though hydration produces additional heat. In order to meet technical conditions, in winter it is impossible to do without heating the concrete with a PNSV wire or another cable intended for this purpose in situations where:
- sufficient thermal insulation of the monolith and formwork is not provided;
- the monolith is too massive, which makes it difficult to heat it evenly;
- low ambient temperature at which water in solution freezes.

Wire characteristics
The cable for heating concrete PNSV consists of a steel core with a cross-section from 0.6 to 4 mm², and a diameter from 1.2 mm to 3 mm. Some types are galvanized to reduce the impact of aggressive components in mortars. Additionally, it is covered with heat-resistant polyvinyl chloride (PVC) or polyester insulation; it is not afraid of kinks, abrasion, aggressive environments, is durable and has high resistivity.
The PNSV cable has the following technical characteristics:
- The resistivity is 0.15 Ohm/m;
- Stable operation in the temperature range from -60°C to +50°C;
- Up to 60 m of wire is consumed per 1 cubic meter of concrete;
- Can be used at temperatures down to -25°C;
- Installation at temperatures down to -15°C.
The cable is connected to the cold ends through an aluminum autorecloser wire. Power can be supplied via a three-phase 380 V network by connecting to a transformer. With proper calculation, the PNSV can also be connected to a 220-volt household network, the length should not be less than 120 m. An operating current of 14-16 A should flow through the system located in the concrete mass.
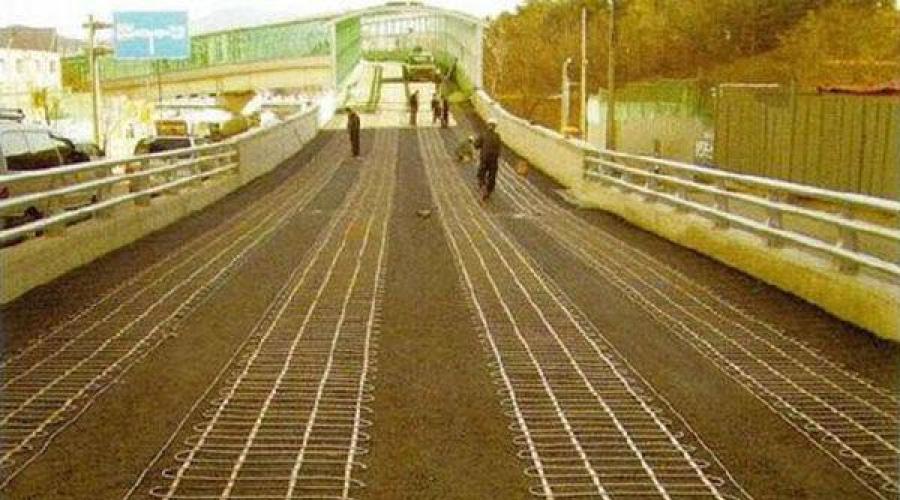
Heating technology and laying scheme
Before installing the concrete heating system in winter, formwork and reinforcement are installed. After this, the PNSV is laid out with an interval between the wires of 8 to 20 cm, depending on the outside temperature, wind and humidity. The wire is not stretched and is attached to the fittings with special clamps. Bends with a radius of less than 25 cm and overlaps of current-carrying conductors should not be allowed. The minimum distance between them should be 1.5 cm, this will help prevent a short circuit.
The most popular installation scheme for PNSV is a “snake”, reminiscent of a “warm floor” system. It provides heating of the maximum volume of concrete mass while saving heating cable. Before pouring the solution into the formwork, you must make sure that there is no ice in it, the temperature of the mixture is not lower than +5°C, and the installation of the connection diagram is carried out correctly, and the cold ends are brought out to a sufficient length.

The PNSV wire comes with instructions, which you need to read before heating the concrete. The connection is made through sections of busbars in two ways through a “triangle” or “star” circuit. In the first case, the system is divided into three parallel sections connected to the terminals of a three-phase step-down transformer. In the second, three identical wires are connected into one node, then three free contacts are similarly connected to the transformer. The power supply is installed no further than 25 m from the connection point, the heated area is surrounded by a fence.
The system is connected after the entire volume of mortar has been completely filled. The technology for heating concrete with a PNSV heating cable includes several stages:
- Heating is carried out at a rate of no more than 10°C per hour, which ensures uniform heating of the entire volume.
- Heating at a constant temperature continues until the concrete reaches half its technological strength. The temperature should not exceed 80°C, the optimum is 60°C.
- Cooling of the concrete should occur at a rate of 5°C per hour, this will help avoid cracking of the mass and ensure its solidity.
If the technological requirements are met, the material will gain a grade of strength corresponding to its composition. At the end of the work, the PNSV remains in the thickness of the concrete and serves as an additional reinforcing element.

It should be noted that using a KDBS or VET cable is much easier, since they can be connected directly to a 220 V network through a panel or socket. They are divided into sections, which helps to avoid overload. But these cables are more expensive than PNSV, so they are less often used in the construction of large facilities.
Another popular technology is the use of formwork with heating elements and electrodes, when the reinforcement is inserted into the solution and connected to the network using a welding machine or another type of step-down transformer. This heating method does not require a special heating cable, but is more energy-consuming, since water in concrete acts as a conductor, and its resistance increases significantly during hardening.
Length calculation
To calculate the length of the PNSV wire for heating concrete, several main factors must be taken into account. The main criterion is the amount of heat supplied to the monolith for its normal hardening. It depends on the ambient temperature, humidity, the presence of thermal insulation, volume and shape of the structure.
Depending on the temperature, the cable laying pitch is determined with an average loop length of 28 to 36 m. At temperatures down to -5°C, the distance between the cores or pitch is 20 cm, with a decrease in temperature for every 5 degrees, it decreases by 4 cm, at - At 15°C it is 12 cm.
When calculating the length, it is important to know the power consumption of the PNSV heating wire. For the most popular diameter of 1.2 mm, it is equal to 0.15 Ohm/m; for wires with a large cross-section, the resistance below a diameter of 2 mm has a resistance of 0.044 Ohm/m, and 3 mm – 0.02 Ohm/m. The operating current in the core should be no more than 16 A, therefore the power consumption of one meter of PNSV with a diameter of 1.2 mm is equal to the square of the current and the resistivity and is 38.4 W. To calculate the total power, you need to multiply this figure by the length of the laid wire.
The voltage of the step-down transformer is calculated in a similar way. If 100 m of PNSV with a diameter of 1.2 mm are laid, then its total resistance will be 15 Ohms. Considering that the current is no more than 16 A, we find the operating voltage equal to the product of the current and the resistance; in this case it will be equal to 240 V.

You can buy warm-up wire PNSV-1.2 at a competitive price here
The use of PNSV wire is one of the cheapest ways to heat concrete. But it is more suitable for use by professional builders, since its connection requires special knowledge and equipment. This cable can also be used at home if you correctly calculate the power consumption. The use of thermal insulation materials will help reduce costs when heating the solution; in this case, heating will occur faster, and the temperature decrease will occur more evenly, which will improve the quality of concrete.
Climatic conditions in most of the Russian Federation dictate their conditions for all types of construction and installation work that are carried out during the cold season.
In this regard, pouring concrete structures in conditions of negative ambient temperature is possible only if the construction site has the technical ability to warm up the poured structure, including using electricity.
On an industrial scale, concrete is heated using special transformers and heating cables. At home, with small volumes of concrete work, it is allowed heating concrete with a welding machine power from 150 to 200 Amperes.
What is needed to heat concrete with a welding machine?
- Household welding machine with a power of 150-200 A. Important! Not a welding inverter, but a welding (transformer) machine;
- Heating wire PNSV with a diameter of 1.5 mm;
- Single aluminum wire AVVG 1x2.5 mm;
- Cotton tape;
- Clamps for non-contact determination of current strength.
Preparatory work
The PNSV wire is cut into segments (heating loops) of 17-18 m. The resulting segments are evenly tied to the reinforcement frame for pouring the concrete structure. At the same time, make sure that the loops are located above the middle of the slab being poured; if a column is being poured, the layer of concrete above the heating loops must be at least 4 cm.
The garter is carried out with an insulated aluminum wire. The ideal option is if the loops are arranged “snake-like”. The distance between the loops is taken depending on the air temperature - from 10 to 40 cm. The rule here is “the lower the temperature, the shorter the distance.”
The number of heating loops depends on the power of the specific welding machine. Since one loop consumes 17-25A, in our case (power 250 A) no more than 7-8 heating loops with a length of 17-18 m can be used.
Important! When laying loops, the ends are marked - one end is marked with electrical tape, the second is left free.
The loops are laid and tied. Now it is necessary to extend aluminum wires onto them, which will be connected to the welding machine. The length of the aluminum wire is determined by the location of the welding machine, but not more than 8 meters.
I insulate the twists of the heating loop and the extension wire with CB electrical tape, and place it in such a way that it remains in the thickness of the structure being poured. Otherwise, the twist will overheat and burn. The markings are applied with electrical tape to the ends of the aluminum wires.
Connection to the welding machine and heating features
After pouring the concrete, all aluminum ends (extended) of the loops are connected to the welding machine. In this case, the ends marked with electrical tape and without it are connected to different poles of the welding transformer. Turn on the welding machine at the minimum load of the power regulator.
They check each of the loops with pliers - the current consumption should be no more than 12-14 Amperes. After 1 hour, you can add half the power of the device, and after 2 hours you can turn on the device at full power.
Again we check the current strength in each loop. The current strength should be no more than 25 A. As practical experience says, a loop power of 20 A is enough to efficiently heat concrete at an ambient temperature of minus 10 °C.
Features of heating concrete with a welding transformer
- Warm-up time depends on the power of the structure and the ambient temperature. At air temperatures down to minus 10 °C, two days are enough for concrete to hydrate;
- The surface of the concrete structure must be insulated with drinkers or mats;
- You should not overheat the concrete - the structure under the insulation layer should be slightly warm and nothing more.
Concrete is a building material, without which it is impossible to construct buildings, renovate apartments and houses. Warming up concrete is a serious process, so it is important to know all the manufacturing technology in order to ultimately obtain a high-quality, durable, and most importantly durable material.
- Heating concrete with wire.
- Heating concrete with cable.
- Warming up concrete with a welding machine.
Warming up concrete with wire
Heating concrete with wire
To heat the concrete, a simple and relatively inexpensive PNSV heating wire is used.
The wire consists of two elements:
- Single-wire steel core, round in shape.
- Insulation - PVC plastic or polyethylene.
The method of heating concrete with wire is based on the transfer of heat to concrete from highly heated wires. Heating of the wires is carried out using step-down transformer substations, which have a regulation system. This system is very convenient; it allows you to adjust the thermal power based on external temperature changes.
Technology for heating concrete with wire:
- The wire is laid evenly in the structure, but it should not touch each other, not touch the formwork and not go beyond the concrete levels.
- The ends are taken outside the heating limits after connecting the heating wire and the cold ends by soldering them. It is recommended to wrap the soldering area with metal foil to preserve the thermal field.
- The quantity and length of the heating element is calculated based on prepared technological documents and maps.
- A test check of the wire is carried out with a megger to ensure a uniform current load across the phases.
- Current is supplied through a step-down transformer substation.
The number and length of the heating element is calculated based on: the type of structure, the heating area, the volume of concrete and the electrical power required for this.
When working with concrete heating by wire, a separate and individual flow chart must be developed for each structure. Regular laboratory observations are carried out, and the heating time and hardening time of the concrete are recorded.
Heating concrete with cable
The method of heating concrete with a cable does not require large energy consumption and does not require auxiliary equipment.
Technology for heating concrete with cable:
- The cable is installed on the concrete base before pouring the mortar.
- Fixation with fasteners.
- The cable must not be damaged during installation and operation and must not cross each other.
- Connecting the cable to a low-voltage electrical cabinet.
When using a cable to heat concrete, a cable installation diagram is drawn up and temperature tests are carried out.
Warming up concrete with a welding machine
The method of heating concrete with a welding machine includes the use of: pieces of reinforcement, an incandescent lamp and a regular thermometer. Pieces of reinforcement are installed in a parallel circuit, with adjacent return and forward wires, an incandescent lamp is installed between them to measure voltage, and a thermometer is used to measure temperature. The hardening time of concrete is very long and amounts to more than a month. When heated in this way, the structure should not be exposed to cold or flooding.
This method is used for small quantities of concrete and good weather conditions.

Warming up concrete in winter
In winter, the hardening of concrete stops, since the water freezes and does not participate in chemical reactions. The quality and strength of concrete is also destroyed. Therefore, warming up concrete in winter is very important and necessary.
Ways and methods of heating concrete:
- Adding antifreeze additives.
- Warming up using the thermos method.
- Other methods of heating concrete.
- Technological heating of concrete.
Adding antifreeze additives

Antifreeze additives withstand extreme cold, even at a temperature of -30 C they fulfill their chemical indications. The composition of the additives is different, but the main component is antifreeze - a liquid that prevents water from freezing. For reinforced concrete structures and reinforced floors, mixtures with the addition of Sodium nitrite and Sodium format are suitable. Their main feature is the preservation of physico-chemical and anti-corrosion properties at low temperatures.
For ready-mixed concrete, hollow reinforced concrete blocks, in the manufacture of curbs and paving slabs, mixtures with the addition of Calcium chloride are suitable. The properties of this substance are widely known throughout the world. Thanks to the speed of hardening, resistance to low temperatures and low price, construction in winter has become accessible to everyone.
The chemical is potash, an ideal antifreeze additive. Dissolves quickly even with a minimal amount of water and does not cause corrosion. The use of potash when heating concrete is a significant saving on building materials.
When using antifreeze additives, it is imperative to comply with all safety standards. For example: concrete with these additives cannot be used when the structure is under tension, monolithic chimneys are being erected, etc.
Warming up using the “thermos” method
The “thermos” method involves placing concrete into insulated formwork at a temperature of 20-25 degrees. Due to the emanating heat, the structure gains strength. Another common method is to additionally heat the concrete and then place it in insulated formwork.
Other methods of heating concrete
The transformer heating method is similar to the “thermos” heating method, only instead of conventional heating of the formwork, heating with a transformer or wire is used.
Electrode heating occurs using strip, plate or string electrodes that are immersed in concrete. The current is distributed across the electrodes through a step-down transformer.
Infrared heating of concrete does not occur immediately for the entire structure, but for individual zones. Infrared devices are placed in these zones, which consist of reflectors and directly emitters. Infrared rays transfer thermal energy to the entire selected section of the structure. Thanks to lateral radiation, all cold places warm up.
Technological heating of concrete
Technological heating of concrete is based on the transmission of current through a cable or wire, which is installed on the structure before pouring concrete. The ends of the wire or cable are connected to the transformer, then heat is supplied. The voltage level is regulated according to the established and developed project, and must be taken into account; construction area, weather conditions, concrete grades, wire lengths.

Warming up concrete in winter conditions is a necessary component for any construction work. There are many different schemes for heating concrete and the choice is made individually for each structure.