Basics of photography. Main photographic terms and concepts. How to photograph a group of people
Read also
Modern cameras from phones to DSLRs high class designed to make decisions for us. And for the most part, they do the job quite well. Put your camera in Auto mode, and more often than not, you'll get pretty good results. clear photos with decent exposure. If you just want to document the world around you, then do just that, switch. The disadvantage of such images is that they look alike - with uniform depth of field and exposure. If you want to go beyond automatic settings, then you need to have a good understanding of your camera, how to use it, and most importantly, what effect the changed settings will have on the final image. Here are the five most important camera settings and how they affect photography.
ISO
First of all, the ISO acronym is terrible, it basically makes no sense from a photography perspective. It stands for International Standards Organization, a European non-governmental organization that ensures that industries use the same standards. When it comes to photography, they guarantee that ISO 800 on Canon is the same as on Nikon, Sony or Fuji. If this standard did not exist, the settings would not be applicable to all brands. So, if I made the image mine Canon camera with settings 1/100 sec. at f/2.8 and ISO 400, and you set the same settings on your Nikon, then we would not get the same exposure. Fortunately, all major manufacturers adhere to ISO standards.

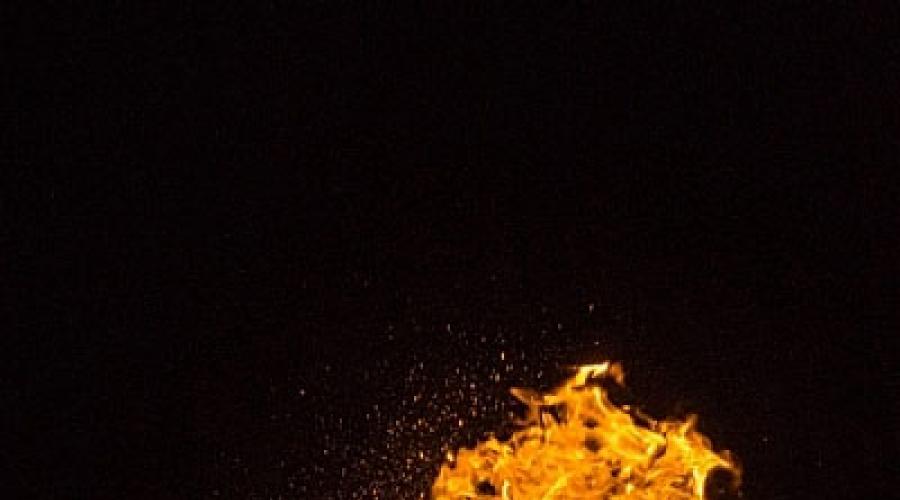
This night image required using a fast shutter speed to preserve the details in the fire, so I had to use a highISO(3200). In the following detailed shot you can see the noise in the original fileRAW. (By the way, this photo shows what happens when you release methane from a bubble in the ice of a frozen pond in the boreal forest and then set it on fire.)
Yes, yes, but what is ISO? This is a measure of the sensitivity of the sensor digital camera to the light. The lower the number, the less sensitivity. The higher the number, the greater the sensitivity. If you're photographing in low light conditions, say in a dimly lit room or at dusk, ISO 100 will require that large quantity light penetrated the sensor as if using a value of 400, 800 or 1600.

Pay attention to noise in the details of the person's clothing and in shadowed areas.
Flaws high valuesISO
So why not shoot at high ISO all the time? There are two reasons: 1. High ISO often creates digital noise in the image (although camera sensors are getting better and better) and 2. Sometimes you need to use a slow shutter speed, in which case you will need less sensitivity to light. This could be the case when you want to capture blurry motion, e.g. flowing water, wind movements or create a nice blur in sports photography.
- High ISOs often create digital noise in the image (although camera sensors are getting better and better).
- Sometimes you need to use a slow shutter speed, in which case you will need less sensitivity to light. This might be the case when you want to capture blurry motion such as flowing water, wind movement, or create a nice blur in sports photography.
In short, ISO is one of three tools at your disposal that give you control over your exposure.
Excerpt
The length of time a camera's sensor is exposed to light is called shutter speed. Many cameras have a mechanical shutter that opens and closes to allow light to enter the sensor, others use a digital shutter that simply rotates the sensor for a set period of time. Shutter speed has a huge impact on the final image. A slow shutter speed will create blur in moving objects. As a landscape photographer, I often use long shutter speeds to blur the movement of water, expose starlight, or capture the movement of wind.

For this image I used a shutter speed of 0.5 sec to blur the waves a bit but still retain the detail.

30 second exposure to blur the Yukon River to make the surface look like a mirror.
A fast shutter speed has the effect of freezing movement. Use a shutter speed of 1/2000 second to clearly capture the movement of a runner or cyclist.

This image of a bicycle was taken with a shutter speed of 1/500 second. It was just enough to maintain sharpness at the same time as a sense of movement in the wheel area.
The use of shutter speed must be conscious in order to create good picture. Think about what kind of photo you want to get. Does it have fuzzy components or should it be clear? Do you want to capture or convey a sense of movement? Think, experiment, and then decide on exposure.
Diaphragm
Aperture, or f-number, can be the most confusing aspect of photography for many photographers because it affects images in unexpected ways. Essentially, aperture refers to the size of the hole in the lens. The smaller the hole, the less light will get inside; how bigger hole, the more light will pass through it. People are often confused by the numbering system: the lower the number, the larger the hole. So, at f/2.8 the opening is larger than at f/4, f/5.6, f/8, f/11, etc. Lenses with the widest possible aperture (a small number like f/2) are considered “fast,” meaning they can let in more light.

Diaphragmsf/11at 17 mm was enough, to do All image from himself the edges before rocks in the distance harsh.
But it's not just about the light and how wide the lens can be opened. Aperture also affects image sharpness. Most lenses (dare I say all?) are a few stops sharper (this is called a "sweet spot"). A lens with a maximum aperture of f/2.8 will produce a sharper image at f/8 than at f/2.8. How better quality lens, the less it matters, but it is noticeable with most lenses.

Very small depth sharpness V this image does bird, hiding V bushes, V focus, A Environment Wednesday from branches blurred V haze.
Depth sharpness And application
Next, the aperture also controls the depth of field. This is the amount of the image that is in focus. When the lens is wide open, such as f/2.8, the image will have less depth of field than at f/11.
As with shutter speed, your use of aperture must be deliberate. Want to get a landscape image where everything from foreground to background is in focus? Then you're better off choosing a high f-number (like f/11). How about a portrait where you want a clean, soft background but a very clear look? Then use very small f-number(like f/2.8 or f/4) and keep an eye on the focus point.
Aperture has a direct effect on shutter speed. A large f-number will require the use of more long exposure to ensure appropriate exposure. A smaller f-number will allow the use short shutter speed. These two are completely interrelated, there is no way to avoid it, so you NEED to understand both.
Balance White
White balance, like ISO, is sensor specific, but in this case, it interacts more with the color of the light rather than its intensity.
Different light sources have different shades. Our eyes often can't tell the difference, but you can bet the camera does. Have you ever seen the photo home interior, lit by soft white lamps and also a window? Usually, the interior of a room looks natural when the light from the window is artificially blue. This is white balance. The camera (or photographer) uses room light (warm-hued lamps) as a neutral color, and then the natural light from the window appears blue.
When White Balance is not set correctly, colors become distorted. They look too yellow, blue or orange. When White Balance is correct, everything looks natural or as our eyes see.

This automatic installation Camera white balance. Northern lights colors seem too purple and yellow

In this version, using the same exposure settings in post-processing, I set the White Balance in the bluer range, thereby making the colors more natural and pleasing.
How about automatic white balance?
I have a confession to make. I almost always use Auto White Balance mode. Cameras are quite good at distinguishing shades and choosing the appropriate White Balance. When it is not detected correctly, I check the image on the screen and make changes for the next shot. Secondly, I only shoot in RAW format, which means I can make adjustments on the computer. I trust the image on a computer monitor more than the small screen of a camera.
However, there are times when White Balance needs to be adjusted. Firstly, if you shoot in JPEG. This format will not give you the opportunity to adjust the White Balance later, so it must be correct initially. Secondly, in the case of combining images for high-contrast scenes or panoramas. Subtle changes in hue when combining HDR or panorama shots will make this more difficult or impossible. You can use White Balance if you deliberately want to take a photo in cold or warm shades, or when using artificial lighting. (Now THIS topic warrants its own article...)
Be aware of white balance, learn what it means and how it affects your images, and then decide how to use it.
Compensation exposition

Here I used Exposure Compensation to make sure the image was bright enough to show the details in the foreground without blowing out the bright sunset in the background.
These two images show how useful Exposure Compensation can be. The image below was taken in bright sunlight, but deliberately underexposed by three stops, turning the mountains black but preserving detail in the sky, thereby creating a surreal image.

Know your camera well
Exposure compensation is a tool that you should be able to adjust without even looking at the camera. Exposure compensation allows you to very quickly add or reduce the amount of light in an image. Too dark? Use Exposure Compensation to add light. Too light? Exposure compensation will quickly reduce exposure. Its setting depends on your camera.
I often use Aperture Priority mode. This means that I choose the aperture and the camera determines the shutter speed. If I set Exposure Compensation, the camera will maintain the selected aperture and simply recalculate the shutter speed. If I were to use Shutter Priority mode, as I sometimes do, the camera will set the aperture. In Auto mode, the camera makes these decisions for me.
I use Exposure Compensation all the time. This is my usual way of fine-tuning exposure while shooting. On my Canon DSLR I can do this by simply turning the wheel. In other cameras, exposure compensation is adjusted on the front panel, a wheel next to the shutter button, or the same system of buttons on the rear panel. Learn how your camera works and learn how to set it up quickly and efficiently. Understanding these important tools means you won't miss the chance to do nice shot, working outdoors or in the studio.
Conclusion
These five settings are the most important to understanding the camera. Experiment with them so you know how they affect the final image and how to change them quickly and without too much fuss. Once you do this, you'll be on your way to creating thoughtful images.

A group portrait is one of the most difficult genres of portraiture, since the photographer is faced with the task of advantageously conveying the emotions and appearance of not just one person, but several people at once. Most average photographers approach group portraits in a banal way - line everyone up, smile, and that’s it. However, if you want to top up good photos, a professional approach will be required.
Technical points
Tripod
For shooting in poor lighting conditions, such as indoors, a tripod is a must. However, even on the street it will help attract extra attention your models, and most importantly - to get photographs with the same frame boundaries, which will be useful to the photographer during post-processing, in case some frames have to be combined.
Optics
For group portraits, lenses with a standard focal length, namely from 35 to 50 mm, are best suited. Wide Angle Lenses It is better not to use them, as they distort the figures of people closer to the camera. However, using the standard one, you need to calculate the distance to the group and carefully select the shooting location, as you may need more space.
Focus
Avoid shallow depth of field (aperture values smaller than f4). When shooting group portraits, this usually results in someone in the group coming out out of focus. To ensure that all models come out equally sharp, DO NOT shoot at the lowest setting. acceptable values apertures such as f1.4 and f2.

Continuous shooting
If your camera supports continuous shooting, this is The best decision for group portraits. When shooting large groups of people or complex group portraits involving children or animals, the adjacent frame may be better, and in post-production you will be able to copy the successful expression of the subject's blinking or looking away.
Light
Light is one of the most important components of any portrait. If you're shooting outdoors, try to avoid harsh midday shadows by shooting in the shade, or shoot in the morning or evening when the sun is low and the light is softer. Pay attention to the direction of the light. Models' faces should not have unsightly deep shadows under the eyes or under the nose. If shooting a group portrait indoors, use a tripod or. It is better to remove the flash from the camera or bounce it off the walls or ceiling.

Organizational aspects
Preparation
The patience of models (especially children) runs out most quickly if you spend a long time preparing for the shoot. Therefore, before demanding the attention of those being portrayed, prepare for shooting, namely:
1. Find good place shooting. If we're talking about about a pre-agreed shooting on the street, it is better to inspect everything before the start of the photo shoot, to find interesting angles and backgrounds even before the clients appear.
2. Think about the pose and composition.
3. Check the readiness of the camera: battery charge, etc., prepare flashes.
4. Warn people that posing for one shot can take several minutes.
Large groups
When there are a lot of people, some of them may turn away or get distracted. To avoid this:
1. Smile and be friendly - people will want to work with you (this applies not only to large groups).
2. When staging, try to keep an eye out for those who are excessively distracted.
3. Ask all models to do some common action: shout “Hurray!”, sing a song, wave your hand - this will attract attention to you.
Composition and poses
This is the most important part of shooting. It is the composition and posing that will determine whether you managed to convey the unity of the group. First of all, you need to decide how strict the client’s requirements are. Does he want a group portrait where everyone is clearly visible and everyone is looking into the frame, or is he okay with creative photos and you will have more freedom?
Poses
The most difficult groups are those in which there are people with large differences in height. For example, children and adults or men and women of different heights. For this case, you can try several different schemes.
1. The tallest models can be seated on benches/chairs/armchairs, and children can be placed in the arms of tall models. This way the issue will be resolved big difference in growth. Those who can no longer fit on their knees can be placed behind the backs of those sitting. So, we will get three rows: in the back are models of medium height, in the middle are tall models sitting on chairs/bench; in the foreground are short models in the arms of those seated. Short models can also not be sat on their knees, but can be filmed while standing. Here is an example of such a setup:

The photograph itself is not very good, but it clearly illustrates the pose.
2. Tall adults – in the background, standing; short adults - in the foreground, along the edges; children are in the foreground, in the middle.
3. Adults - sitting, children - standing.
If the subjects being photographed are approximately the same height, arranging them in one strict line is the worst option. Someone must sit, someone must stand, or, when shooting outdoors, in places where there are steps or other elevations that can create different levels, you must definitely use these elevations:

If we are talking about shooting at home, it is best to create an atmosphere for a relaxed photo, make the most of the furniture available in the house so that the photo looks natural. For example, the same arms of chairs and sofas, on which it is usually not customary to sit, can be perfectly used for models:

Finally, don't be a boring photographer. A creative approach to photography will only please clients:


Typical examples of settings for family photo sessions can be seen in this video:
Subtleties
- When shooting a group portrait, be sure to ensure that none of the models obscure those standing behind you - all faces should be clearly visible.
- Ask models not to tilt their heads - this will help you avoid double chins.
- It is better to take a group portrait without hats. If clients insist on wearing hats or caps, position the camera just below their eye level and use it to highlight shadows - usually hats and other headwear with sides create shadows on their faces.
It is better to select the background in such a way that it does not dominate the models. The background should not have many small distracting details; it should be more or less uniform, but not boring. Beautiful staircase against the sky - great option. Forest landscapes, city exterior designs, and so on are also suitable.
Composition
1. The basic, simplest principle of constructing a composition in group portraits is that when people are arranged in a group, the combination of their faces forms a triangle or other geometric figure.
Examples from painting:


Example photo:

2. Another principle is the arrangement of faces along diagonals. When posing models in a portrait one below the other or next to each other, the faces are lined up vertically or horizontally, and the composition turns out to be more boring. It looks more advantageous if the faces can be placed diagonally. Combinations of horizontals and diagonals look good. The diagonal may even be weakly expressed, but it will look better than the horizontal.

3. In addition to faces, it is imperative to watch your hands. Pay attention to the group portraits above - the hands everywhere emphasize the pose or are busy with something, and do not just hang idle along the body. Hands can also emphasize the commonality of a group. Pay attention to this picture - the hands here tie the composition together.

4. Use different angles. You can not only arrange the group at different levels (for example, on the steps of a staircase), but you can also climb the stairs yourself to get an upper angle. This is especially true for large groups.
Top angle:
Bottom angle:

5. Use different plans. Some of the models can be placed further away, others can be placed closer to the camera.


If you have any questions or additions on the topic of group portraits, write to me in the comments, do not hesitate, I am attentive to criticism and requests from readers.
Photo by rentoholic 17
One of the most common subjects is a group photo. This is true everywhere from weddings to holiday camps, parties, sports teams, schools and more.
Every day thousands of group portraits are taken around the world, but, unfortunately, many of them disappoint the photographer.
Among the main problems are:
One or more people being photographed will definitely be looking in a different direction or even different directions(i.e., for different photographers)
Someone blinks (at least one, but it will definitely happen)
Someone is missing from the photo
People in the group have different moods (some are smiling, some are serious, some are grimacing in front of the camera, etc.)
The group is located too far away or, conversely, does not fit into the frame entirely
Someone's head is hiding behind the wide back of the person in front
While you'll be faced with similar challenges when taking group portraits, there are a few things you can do to increase your chances of getting a good shot:
1. Preparation
Nothing turns those posing against you more than your lack of preparation. People don't like to be kept waiting, so consider the following aspects of your shot in advance:
Conduct a reconnaissance of the shooting location in advance
Think about how and in what poses you will position people and where the boundaries of the frame will be.
Make sure everyone you want to photograph knows to arrive a few minutes early
Make sure your camera is turned on and the batteries are charged
 Photo by Erin
2nd place
The location of the group portrait itself is important for several reasons. For starters, it can add context to a shot - for example, a photo of, say, a sports team on their playing field means more than against a brick wall. Another reason to choose your location carefully is the presence of distracting objects.
Choose a location that will accommodate everyone, has adequate lighting, and does not have distracting objects in the background. Also avoid shooting a group of people in front of a window - the light from your flash can bounce off the glass and ruin your shot.
3. Take multiple backup shots
The best way to get away from the problem of not everyone looking the way they should is to take a series of photos. I often switch my camera to continuous shooting mode when taking group portraits and taking a few short bursts. I often find that the first shot is not good, but the next few are successful, because after the first shot people pose less and are more relaxed.
Likewise - take a few shots before everyone gets ready - sometimes the process of organizing a group shot can be fun, with everyone telling everyone else where to stand and everyone squabbling for the best spot.
I also recommend taking pictures with different cropping if you have a zoom lens. A few wider angle shots and a few tighter cropped options definitely wouldn't hurt.

Photo by Mark MacClean
4. Get close
Try to get as close to the group you're filming as possible (without pushing anyone out of frame, of course). The closer you get, the more detailed the faces will be, which will only benefit the frame.
If the group is small, then come close and take a few shoulder-high shots. One of effective techniques is to ask people to tilt their heads towards each other, this will allow you to get even closer. Another way is to line everyone up in one line, and then place some of them behind and in front of the line.
5. Poses
In most cases, people will behave quite naturally (each of us has already participated in this at some point). The tall ones go back, the short ones go forward. But there are other points that can improve the composition:
If the event is centered around one or two people (a wedding or a birthday), put them in the center of the group (there are several options here: everyone looks into the lens, everyone looks at the culprit (or culprits)).
For formal group portraits, place taller people not just at the back of the group, but also in the center, with shorter people at the edges.
Try not to allow your group to be too "deep", that is, the distance between those in front and those behind is minimal. This will help keep everyone focused. If the group is still “deep”, cover the diaphragm.
Ask everyone to raise their chins a little - they will thank you when there are no double chins in the photo!

Photo by andrew.smith
6. Timing
Choose your moment to shoot carefully. Try to choose a moment that is harmonious with what is happening at the event. I find that it is best to take group portraits when everyone is already together and there is a lull in the ceremony part.
Also good is the moment immediately before the start of the event, this is how people look best, gather in groups, and if heavy libations are expected, then no one is walking around on eyebrows.
7. Think about lighting
To get good detail, you need sufficient lighting. Solutions vary from case to case, but it's worth considering a flash if you're shooting a small group and can get close enough to get enough light, especially if the main light source is behind the group.
If the day turns out to be sunny and the celestial body is low above the horizon, try to stand so that it is not directly behind your back, otherwise you risk getting a selection of wrinkled and squinted faces in the photo.
8. Monitor
I have repeatedly been present in situations where the photographer almost lost control over people, not only by not being efficient enough, but also by not communicating with the subjects. It is very important to keep the conversation going with the group; explain what you want from them; “smile” them; say they look great, and also tell them how long you'll need them for the shoot.
The reason to pose for a photograph is also important. For example, at a wedding, you can motivate people to take the time to photograph you by saying something like: “*Insert name married couple* asked me to take several group portraits”; or, at a sporting event: “Let's take a group portrait to celebrate our victory!” When you give people a reason, they are much more willing to give you a few minutes.
Another option for working with a group is “If you can see the camera, it can see you.” This is the key to success if you want to see every person's face in the photo.
If there are other photographers besides you, wait until they finish and then attract the attention of the whole group, otherwise everyone will be looking in different directions.
Of course, you shouldn't be a dictator, otherwise you'll end up with a portrait of a group of very angry people. Best photographers They know how to capture people's attention, convey to them what is required of them, and at the same time manage to create a light atmosphere so that people feel relaxed and enjoy the process of shooting.
 Photo by EssPea
9. Large groups
It may turn out that it will be very difficult to photograph a large group of people, even if you compact them as much as possible and move the taller ones back - some will still not fit.
One solution to this problem is to physically lift yourself higher. If I'm photographing a wedding and the couple asks for a large group portrait, I arrange for a ladder to be available (I've even had to climb onto the roofs of churches) to get the shot from above. This way you can fit a lot more people and still stay close enough to the group (there will be many faces in focus and fewer bodies in the photo). It also gives an interesting perspective, especially if you have a good wide-angle lens.
10. Use a tripod
I recommend using a tripod for the following reasons: firstly, having a tripod gives confidence that you are serious about what you do and will help draw attention to you (it's amazing how professional-looking equipment can make you more considerate and attentive). to you). Secondly, it gives you more freedom as a photographer to participate in the composition. Set up your camera on a tripod so it's ready to shoot (framing, settings, focusing) and organize your group as you need it.
 Photo by Austin Henry
11. Use the services of an assistant
If you're filming a very large group of people, having an assistant to help organize it will come in very handy.
The assistant is also indispensable if you take several group portraits (for example, at a wedding, when shooting various options family portrait). In such cases, I always ask the newlyweds to provide me with a family member or friend with a list of all necessary options. I also ask this person to make sure that everyone who is supposed to be there is present in the frame. In this capacity, a family member is best managed, since everyone knows him and, as a rule, reacts adequately to his attempts to build everyone up.
12. Smile
Yes Yes! YOU should smile! There's nothing worse than a sullen, tortured photographer. Have fun and enjoy the process of filming and you will see that people react the same way. From the weddings that I photograph, I usually return with cramped facial muscles, because The best way make the young people, together with their families and those invited, relax and smile—smile yourself. It works, honestly!
P.S. Another little advice– bring an element of creativity and non-standard solutions!

Photo by weaving major & tractor dan
We all have moments when we need to take a group photo. Not a single big holiday is complete without them. And, unfortunately, this is exactly the type of photography that is not easy and requires a significant amount of time. Use a few tips below and become a group photo master!
Always start with a plan
Good impromptu group shots can only be taken by professionals. Or the lucky amateurs. If you do not consider yourself to be a professional, then it would be better to prepare for a group photo.
1. Plan your shoot
It is necessary to think through everything down to the smallest detail. What day will this be? Who will be present? Where will it be? Pick up appropriate place for a photo and other little things.
2. Choose the right environment
What is considered the right environment? It all depends on the context. For example, if you are going to take a group photo with employees, then it is logical to choose a place that will represent the business. If we are talking about seasonal photographs, for example Christmas ones, then it would be nice to include some snow or a fireplace in the frame.
3. Visualize the photo
You can spend a lot of time thinking about the shooting location, staging, etc. But for the photo to come out really good, you also need to imagine it. You must understand exactly what you want to get from the photo. Imagine how it should turn out. Otherwise, you can spend a lot of time taking more and more pictures in the hope of getting the perfect one. So ask yourself what you want to see as a result.
Remember, you are the boss here
1. Take control
Think of yourself as a director. Everyone must do what you tell him, and exactly as needed. Don't hesitate to give orders. After all, you are responsible for the result.
2. Create a comfortable environment
On the one hand, you must be persistent in guiding the filming process. But the main thing is not to overdo it. It is unlikely that the photographs will turn out warm and positive if the participants are scared and anxious. Chat and joke with them, cheer them up. After all, photography conveys all emotions.
3. Use a tripod
Of course it takes up some space. And it is not always convenient to carry it with you. But it's very useful thing. First of all, it will save you from unnecessary shaking and, as a result,... Also, a tripod gives you the opportunity to manage the process, communicate with people, and at the same time not carry a camera with you everywhere.
4. Lighting is our everything
Creation proper lighting- This is the most important trick for getting high-quality photos. It has great importance whether you photograph indoors or outdoors, winter or summer. This topic is very broad and difficult to fit into a small paragraph. In addition, light always depends on the context. Avoid using flash if possible. It is so strong that it often washes out colors and creates harsh shadows. Daylight always better. In cases where using a flash is unavoidable, use a diffuser to soften the light.
The composition is perhaps the most difficult moment in a group shot. But there are several simple tips, which will make this task easier.
1. Find the triangles
In a group photo, objects should not be the same height. This creates a feeling of unnaturalness. Distribute the filming participants so that there are shorter people between tall people. This will give the photo dynamism and naturalness. The essence of such a triangle is to connect the heads of the participants in the photograph with each other with imaginary lines so as to form a triangle. It doesn't have to be perfect. It's just a little trick that will help you arrange people in the front and back rows in a way that is visually appealing.
2. Compact the frame
A group, by definition, is a single whole made up of individual parts. So, when shooting in a group, it is very important to keep your subjects grouped. Try to fill large gaps. After you are done with the arrangement, take the camera and capture the participants in the shooting. As you approach or move away from them, find optimal distance, from which you can take a good photo. "Good" means there won't be too much on it. free space, which will create the effect of emptiness and imbalance.
3. Choose an appropriate background
Most often it should be something simple. Something that doesn't distract you from the main focus - people. For example, if you are photographing indoors, it could be a wall. Objects that can distract (for example, a picture or photo frame on the wall, a table or chair that falls into the frame) are better to be put aside.
4. Experiment with angles
If you think all your group shots look boring and monotonous, try taking photos under different angles. For example, from the floor (from bottom to top). Or, conversely, from above, for example, going up the stairs. In general, use your imagination.
Photography is a complex and broad topic. We have given you only superficial recommendations. But this is quite enough to understand in which direction you need to move to achieve. And remember: there is nothing wrong with mistakes, because they are what help you improve.
Any photographer who has ever tried to capture an image of a group of people can attest that it is a much more challenging endeavor than taking individual portraits. First you need to group the people. Then get the desired facial expression from everyone and, of course, decide on the composition of the frame so that it does not look mediocre and boring.
There may be a themed shoot timed to coincide with a family celebration, or an award ceremony and a prize, and so on. But sometimes you want to take a casual approach, to capture the subject in a relaxed atmosphere. Or maybe you've been asked to get creative with a group shoot, for example to work on a music album cover.
Then you expand the shooting format, experiment with viewing angles, lens choice and camera settings. And, despite the fact that all this will have a significant impact on your photo, you can not be limited and go further. Use doorways in the frame, include steps, railings and other elements of the surrounding space into the composition.
The main thing is that all this is harmoniously combined with the object and theme. And also use group dynamics when working within a large team.
Professional models are well aware of how to pose, but most people will feel awkward. So explain to them what you are trying to do and what result you are trying to achieve. It's best to involve everyone involved and get more expression.
For formal images, you'll find it helpful to mount your camera on a tripod and release the shutter using a remote control. This is necessary not only to minimize the risk of camera shake. This way, while you take a series of photos, you will maintain a constant angle. And your hands will remain free so that you can guide the participants in the photo shoot and move props.
Set the camera to aperture priority mode (A), then select the lens aperture to f/11.
It's good to shoot with an 18-200mm lens so that you can control the background and produce a better perspective for portraits.

(module Yandex direct (7))
When you photograph people standing exactly along the line, position yourself tall man in the center, and those who are lower - on the sides.
This is useful even when objects are almost the same height.
Take a few minutes to line everyone up in the right order and at the correct distance so that the line is straight.

For less formal shots, you'll want to shoot handheld, so adjust your settings to avoid the effects of camera shake.
Use the Auto ISO function to set the maximum sensitivity you are willing to use and the minimum shutter speed. 1/125 sec will come in handy here.

You don't have to take all the shots while standing directly in front of those taking pictures.
In the example below you can see how the photographer climbed up the wall. This positioning gives an unusual angle of view. You can use a 10-24mm super wide-angle lens to achieve an exaggerated perspective effect and a more striking composition.

With wide-angle shots, you need to be especially vigilant about the background. Simply because there will be much more of him in the frame.
You will have to spend some time deciding on the frame and preventing unwanted elements from being included in it.

Flash can make a big difference, especially when you're shooting in low-light conditions.
It brightens the object and helps to highlight it against the general background.
Perhaps the built-in flash in the camera will be enough. But external flash will give you more flexibility in use and you will be able to control the direction of the light.

At some point in time, you begin to realize that asking models to say “cheese” in front of the camera is not enough. With your input, the subjects can behave relaxed and at ease, and fool around a little.
The "Synchronized Mid-Air Jump" is a classic trick that works brilliantly in nature, as you can see in this photo.
This technique will help “melt the ice” and add confidence to your subjects. And you can explain exactly what images you are trying to get. If you manage to properly involve the participants in the photo shoot in the process, they will be able to come up with own ideas for new pictures.

This old doorway turned out to be a great backdrop for standard group photography. The experiment determined that in this case, the door being opened slightly inward held the potential to add interest in a frame with a natural door frame.

This one is old Brick wall turned out to be an ideal support for the models to rest their elbows on. They were asked to interact with each other to give the photo an informal, candid feel.
There is also experimentation with different shooting angles here. Try photographing from below or from the side.

The low angle of the super wide angle lens helped exaggerate the perspective. A remote flash made the lighting more dramatic, and a graduated filter effect darkened the sky.
It's simple and effective method turn an ordinary background into a gothic scene.

(module Yandex direct (9))
Here you see footage of members of the Electric Jesters. The photos could be suitable for a poster or album cover.
The composition of the image creates a good impression, but here I wanted to add a changeable mood to the photo in the digital darkroom.
Useful for this Adobe application Camera Raw in Photoshop CS6. These methods are quite simple and can be used in almost any image editing program.
To achieve high contrast and a desaturated look, I had to increase the contrast, then adjust the color and saturation, and finally add a vignetting effect to darken the corners.

Increase contrast
Adobe Camera Raw has a Clarity slider that, when moved to the right, makes objects and outlines clearer. To increase midtone contrast, move it as far as possible. Then use a significant increase in contrast using the Contrast slider and reduce the setting for the Exposure slider so that the data does not burn out.