Original do-it-yourself panel: options and production. Beautiful do-it-yourself panel from scrap materials Do-it-yourself decorative panel at home
Read also
Original bright accents in the interior can be paintings, photographs or panels of flowers on the walls. Decorating your own apartment is an opportunity to realize creative ideas and express yourself through unusual decor. You can create voluminous flower arrangements yourself or order such creative works from experienced decorators.
You can add individuality to the interior of your home by placing exclusive floral panels on the stele using other materials - twigs, fruits or ribbons.

Such works will definitely attract the eye due to their special characteristics:
- A bright composition on a plain background attracts attention;
- Delicate flowers used in the work will add calmness to the interior;
- Volumetric work looks unusual on a flat wall;
- All compositions are made by hand and therefore unique.
When placing a flower arrangement on the wall, you don’t have to be afraid that it will emit harmful substances and be hazardous to health, because all the materials used are environmentally friendly.
Depending on the type of room in which the panel will hang, it may contain artificial, fresh or dried flowers, fruits, pebbles, mother-of-pearl or other or artificial materials. Collected in one composition, they will create a certain image for the room.
You can get ideas for decorating panels and rooms in general in special stores, florist catalogs, handicraft magazines, attend a master class, or look at examples of the work of designers or amateurs.
How to make a floral panel with your own hands
To decorate the walls, you can order panels from experienced craftswomen, but it is better to make such a composition with your own hands, especially since it is not so difficult. Such a floral panel will not only be unique, but its performer will also feel proud when guests appreciate her work.

Before you start creating, you need to decide what flowers and other decorations will be used.
You can choose from the following colors:
- Artificial ready-made;
- Alive;
- Dried flowers;
- Tape;
- Paper;
- Knitted;
- Made from natural materials.
You don’t have to limit yourself to the list presented above, because some craftsmen make flowers from any available materials: cotton pads, plastic forks, fabric, dough, plasticine and other things.
Particular attention should be paid to the background, since it is it that will unite the composition into a single whole. The background of the painting should not be bright or contrasting with the color of the wall on which the panel will hang, otherwise the painting will not be effective enough.
A panel of artificial flowers - simple and effective
The simplest option for creating a floral panel would be to create a composition of artificial flowers. Even a beginner can do such work; it is only important to decide on the general idea of the composition.

A tapestry panel in the interior is an excellent option to decorate a wall in your home. We will tell you about the history of the creation of tapestries and their use in interior decoration in the article: .
The panel may depict:
- Bouquet of flowers;
- A simple picture;
- Flower bush;
- A tropical forest.
When assembling a composition, you need to pay attention to the color of the elements used so that they match each other. All necessary materials must be prepared in advance, so to create a floral panel with your own hands you will definitely need artificial flowers, a base (burlap, paper, plywood, cardboard), glue (Moment or PVA), a frame and glass.
Whether to use glass or not depends on individual preference. The decorative composition will be stored behind glass longer, but if you refuse it, you can place some elements outside the frame. Thus, the picture will turn out interesting and voluminous and will enliven the wall.
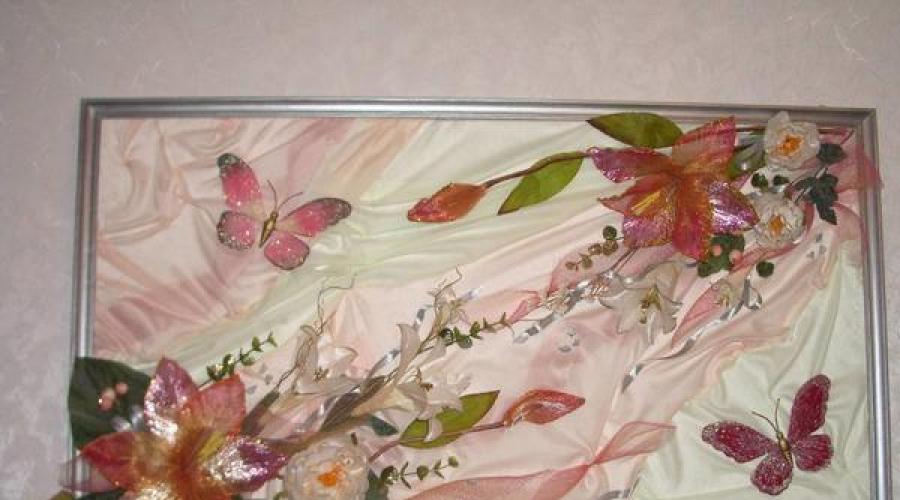
Original floral panel made of fresh flowers
A beautiful decorative panel can also be made from fresh flowers. In this case, the work will turn out to be more fragile and less durable, but very sensual and tender.

An original panel for a children's room can be made from wallpaper. We'll teach you in the next article: .
To create a panel of fresh flowers, you can use the following ideas:
- Attach a small vase with water to the base of the panel in the frame, in which you can place bouquets of your favorite fresh flowers;
- Glue fern leaves onto the base at different angles to create the feeling of an impenetrable jungle;
- Attach wildflowers to the background with tape, such work will quickly deteriorate, but the flowers can always be replaced with fresher ones, and every day the composition will have a different look, and from dry ones you can make a different picture;
- Install a special tray with soil in which the shoots of indoor flowers will grow in a certain way.
When working with fresh flowers, we must not forget about water and special care, because they can easily be damaged and thereby spoil the overall appearance of the composition. Pictures of fresh flowers look beautiful, complemented by other decorative elements - beads, sparkles, butterflies. You can create entire paintings from flowers or limit yourself to compact bouquets.
We do it ourselves: a panel of flowers (video)
Making a flower panel is not that difficult, you just need to be patient, prepare the necessary materials and use your imagination. In addition, the elements used can be easily found, for example, dry roses from a donated bouquet or unnecessary shoots of indoor plants, make flowers from old magazines or use other hand-made materials.
Examples of panels made from dried flowers with your own hands (photos in interiors)


Wall panels are an opportunity to create an individual interior by decorating walls using available materials. If we talk about panels as a product, then it is always an original, handmade work, which has a fairly high cost. Decorating an apartment with such fakes is not always relevant, because the product is selected according to the existing interior and if renovations are done, the panel becomes unnecessary, and it’s a pity for the money spent. But it’s a completely different matter when the panel is made independently. This makes it possible to choose the theme, size, texture, material, color, but at the same time the cost of money is minimal.
How to do it?
In fact, there is nothing difficult about making a panel yourself; no special skills or knowledge are required. The first thing that is necessary is to choose the place where it will be placed, choose a thematic direction and prepare the necessary materials, which most often are available to any housewife.
A few important points
- If the room is small, you should not use large panels, they will not look harmonious and will make the room visually smaller.
- When the room is large and a bare wall is being decorated, you can use a large panel or several small ones of the same theme.
- If the room is colorful and has many decorative elements, the panels should be chosen in soothing colors, with a minimal combination of colors.
- When using several panels on one wall, they need to be perfectly combined with each other, support the same theme, or be perfectly harmonized in color.
Made from improvised materials
Materials that are suitable for making panels are, as a rule, what is at hand. You don’t need to purchase anything special, and the technique is reminiscent of the handmade forgeries that many people made in schools.
Of course, stores offer a variety of products where they are used:
- glass;
- ceramics;
- metal;
- photo printing is used.
But our panels, which we will learn to make today, have nothing in common with decorated tiles and photo wallpapers. Unless they have one goal - to make everything beautiful and unique.
You can use:
- threads;
- fabrics;
- buttons;
- ear cancer;
- flowers;
- leaves;
- cereals;
- coffee beans.
You can consider the features of thematic products.
Panel on the wall in the kitchen
This is perhaps the only place where the use of food for decoration purposes will be completely justified. Appropriate here:
- cereals;
- grains;
- vegetables;
- fruits.
But, by the way, coffee beans are a universal material and can be used in any room. They are easy to work with, and during use they do not lose their appearance and color.
With their help, you can lay out any pictures, for example, a cup of coffee, which already matches the theme. You can cut out photographs of beautiful fruits and vegetables, complementing them with cereals.
Coffee beans are a universal material
New Year's panel
In this case, the brighter the better. Such a picture should speak of celebration, fun and good mood. Here it is permissible to combine any materials and surrender completely to your imagination. And if you are invited to visit, a hand-made panel will be an excellent gift.
Suitable use:
- spruce branches;
- cones;
- rowan berries.
As a background, you can use a New Year's picture, for example, printed on a printer, and decorate it. Snow-white snow can replace crumbled polystyrene foam, cotton wool and even semolina.
Children's
If a girl is into dancing, you can make a painting of a ballerina. This kind of work on a fake will definitely interest your child, so you can make a joint fake.
Macrame panel
When making such products, you need knowledge of weaving techniques. If you have made macrame, you can create incredibly beautiful decor. The advantage of the products is that everything will depend on desire and imagination. They can be:
- large;
- small;
- round;
- square.
You can decorate them:
- beads;
- stones;
- ribbons.
Material selection
Knowing about the main points, you can consider in more detail how to make panels using this or that material.
Made of wood
Additionally, you need wire, thin tree branches, and glue. You can use wooden planks for the frame if you want a square or rectangular picture. For an oval or round frame, you can also use thick wire, and for decoration, wrap it tightly with thread.
For the background you can use plywood, white cardboard, burlap, or leave it empty. In the latter version, all elements are attached to each other and secured to the frame.
Advice
To give wood a glossy surface, it is coated with varnish.
Design ideas:
- You can place spots on the branches that are attached with glue. To prevent the bottom from looking empty, you can fill it with the same blanks.
- A composition of patches laid out in the shape of a flower will look beautiful, if this is a large product you can use cones or dried flowers.
- It could be a laid out heart or a star.
In order not to spoil the impression, it is better not to use synthetic materials in the composition.
From fabric
The fabric is easy to work with, and its variety allows you to create amazing pictures. With its help you can create:
- abstract drawings;
- sew animals;
- nature;
- create whole pictures.
Fabric is a material that is easy to work with
- Absolutely any fabric is suitable for work; the more different fabrics there are, the wider the choice when implementing ideas.
- You will need threads, frames, cardboard, elements.
- As in the previous version, you can make the frame yourself. The panels will look great without the use of frames.
- You can choose any base on which the picture will be created: thick cardboard, fiberboard or chipboard, plastic and other available materials. It needs to be covered with material and secured on the reverse side with glue or a stapler.
Advice
Don't throw away small pieces of fabric and shreds; they will be useful for future work.
Ideas:
1 It could be nature, flowers, trees. To make a tree or flower look alive, you should use the following technique. The trunk or stem is drawn on the fabric and cut out, glued to the canvas. The leaves are also cut out, but only one side is glued to the canvas. For a flower, you can first create a composition using a needle and thread, secure it, and then glue it.
2 Nowadays, many interiors use panels using one material, without any additional elements. The idea is as follows, for example, you have a living room where two or three primary colors are used in the interior: beige, orange, red. You need to choose a material with a pattern, where red flowers are painted on a delicate background. Or take a fabric with a red background with small beige flowers on it.
It is ideal to choose three different fabric options. Next, take a base, a square or rectangular sheet of plywood and cover it with fabric. The sizes of plywood can be different, the main thing is that in the end they look harmonious.
3 Pictures look great, for this you need to choose a drawing as an example. Then cut out the parts and glue them to the base. This is a bit of a time consuming process and it is better to start with simple drawings.
Advice
To add volume, you can place cotton wool under the fabric elements.
From photographs
The use of photographs to decorate apartments has been used for a long time and, probably, every family uses such a technique. And although it won’t be possible to surprise you with the material, the design method will definitely work.
- Absolutely all photographs are suitable for this method.
- Black and white photos look beautiful.
- Additionally, you can use photos of nature and beautiful landscapes.
Design ideas:
Framework. Depending on what kind of panel is expected in the final result, you need to choose a frame. It can be made of cardboard, where only the front part of the frame is cut out of thick cardboard and glued to the photo; on thick cardboard, it can also be glued to the back, as a base. If the photo will be glued directly to the base, but a frame is not needed. You can use the fabric for the front of the photo as a frame.
A family tree looks very beautiful in the interior; it brings comfort and creates a special atmosphere. Making it is quite simple, you will need a base, you can work with cardboard, the main thing is to find the dimensions. It can be painted or wrapped in fabric. Then a tree trunk and branches are cut out of the same cardboard. Covered with paint, if something doesn’t work out, problem areas can be easily covered. Then photos are attached.
On the same basis, you can place photos in a chaotic order, and decorate empty spaces with additional elements. To delimit the photo, you can use colored tape or thick thread.
Another original option is to take a large frame and stretch the threads horizontally. Then use clothespins to attach the photo to them.
Advice
Photos of different sizes look beautiful, but geometry and accuracy should not be observed.
From paper
Paper is another convenient and affordable material that is easy to work with.
Paper is another convenient and affordable material that is easy to work with
Design ideas:
Butterfly panels are widely used. To do this, take colored paper and cut out butterflies according to approximately one sketch. You can use one color or several, only in one color palette, for example, from soft pink to burgundy. Then butterflies are glued onto the base (cardboard, plywood) or directly onto the wall. It can be in the shape of a heart, with the lightest color at the bottom and ascending to the top. This could be a flying composition. Only the body needs to be glued; the wings should lag behind the surface.
You can create a composition of flowers. Here it is better to use soft paper; cardboard will be difficult to handle. We take a square sheet of paper, it needs to be folded like an accordion. Next, the accordion is folded in half and these edges are secured with glue or a stapler, the free ones are stretched and also fastened. To make the edges of the flower appear curly, cut the folded paper with an accordion at both ends.
It can be beautifully decorated with small beads, stones or beads.
Advice
If you have a panel of butterflies, you can place them additionally around the room!
From plaster
They can be called luxurious and elegant. Stucco molding from gypsum has always been valued, and now it is possible to make panels using gypsum yourself. Plaster can be purchased at any store, as well as forms for future compositions. But if you put in a little effort and time, you can do it without forms.
- Craftsmen who do this professionally use special devices. To create it at home, you can use any available tools, pencil, spatula. That is, those objects that will be convenient for drawing.
- You should start with the simplest forms to become familiar with the material.
- Difficult works of art are unlikely to be achieved, but once you master the basics, you can produce beautiful drawings.
Design ideas:
- You can work with plaster directly on the wall, but then you need to have a perfectly flat surface.
- Apply a little plaster so that it does not have time to dry. You can decorate flowers and patterns. If you draw well, you can create complex compositions.
- The material itself is not bright, so you can decorate it with a bright frame and paints. In the latter case, you should not overdo it so that the material does not resemble plasticine.
To create, you can use any available means - pencil, spatula
Advice
In the first stages, you can simply get acquainted with the material to know how it behaves in work.
From threads
Using ordinary threads and nails, you can make a panel that will make you admire it. Such crafts belong to the art of string art and are popular all over the world. And on sale they are highly expensive.
- It is better to use wood or plywood as a base.
- In addition to multi-colored threads, you will need nails or pins; nails with beautiful heads will look beautiful.
- A sketch of the future panel (drawing) is applied to paper. Next, it is applied to the base and secured. Nails are hammered along the contour of the pattern; the less they are hammered, the more voluminous the pattern will be.
- Then the paper is torn off.
- A thread is wound around the nails horizontally and vertically.
Decor:
- Flowers and stars. These can be three large flowers or several small ones. Flowers will look beautiful when using different colored threads.
- It could be a big heart, a cat, a dog or a bear. Even the simplest drawing will look original and unusual.
- You can make a drawing from several elements, but it will require patience and time.
Advice
When using thick threads, the consumption will be lower and the work will be done faster.
From beads, buttons
Such panels can be safely called bright and original decorations. Beads are used in many fakes; thanks to the multi-colored palette and durable material, you can create incredible compositions.
- To create such fakes, you can use beads separately, combine them with buttons or with other materials.
- You can use fabric, polystyrene foam, wood, cardboard as a base.
- The material is attached with glue.
- Before creating a bead pattern, you need to draw an outline with a pencil and fill it in small areas. First, glue is applied with a brush, then covered with beads.
Ideas :
- It is better to start artistic fakes with simple drawings, for example, flowers, trees, animal themes. Try making a butterfly; to do this, draw an outline and highlight areas where different colors will be used.
- If the picture is large, you can use buttons, so the picture will be filled out faster, but will be no less beautiful.
- When you have artistic talent, you can draw a picture and highlight some of its elements with beads.
Advice
It is better to hang a beaded panel on an empty wall so that it serves as a bright accent in the room.
From plaster, putty
This work is similar to gypsum, but if gypsum is used in small areas, then plaster is most often used as a material for large panels. This is not to say that this look is easy for beginners in this business, but with a little training, everything will definitely work out.
This way the panel is made directly on the wall; it is better to practice on some smooth surface.
Work technology:
- The drawing is applied to a piece of paper, the following work is performed based on this sketch;
- Then the drawing is transferred to the plaster;
- According to the drawing, the form is applied layer by layer;
- To smooth the sheet without damaging the shape, you need to cover this area with film and carefully adjust and smooth it;
- To give the surface texture, you can use a brush with hard bristles;
- When the pattern has formed, you need it to dry completely;
- Next, use sandpaper to level the zones;
- You can paint the canvas.
The process is labor-intensive and requires patience, but the result is worth it.
From the traffic jam
The only difficulty in creating such a panel is finding a sufficient number of corks. If you have wine corks at home, then creating an original panel is not difficult. This material is easy to process, lightweight and comfortable.
- They can serve as a background if cut into circles.
- Attached with glue.
- Combines well with natural materials.
Design ideas:
- Corks are available in both delicate beige tones and rich brown. If you cut different corks, you can use them to lay out a design.
- The cut circles can be painted with letters to form a phrase.
- You can cut out figures from them, which are then attached to the base.
From disks
With the advent of flash drives, disks have faded into the background. Probably every family has these computer accessories. It’s very good that they have been preserved, because there are many ideas on how to make unique, luxurious panels from them.
Design ideas:
For families with children, it would be important to make “Smeshariki”, cartoon characters. To do this, cut out parts from colored paper or fabric (nose, eyes). Then they are glued to the disk using glue. The characters are applied to a base, which can be made of cardboard or thick fabric.
- The discs are well cut into different parts, which makes it possible to decorate panels with their help. In the light they shimmer and shine.
- Another option is to cover the disc with paint; you can choose any background that will suit the interior. When the paint is dry, apply the pattern using a pencil. Next, along the contour of the drawing, a layer of paint is removed using a knife.
- You can use a floppy disk as the basis of a panel. To do this, it can be decorated with paint or wrapped with thread.
From shells
If a family likes to relax on the seaside, shells are a must-have souvenir. Children love to collect them and replenish household supplies. But very rarely there is a use for them, so from year to year they lie and wait for their time. Now is the time when they can serve as the main element of a beautiful panel.
- Before using the shells, they need to be washed and dried well.
- To apply them to the base you will need glue.
- Before work, for convenience, it is better to sort them by size.
- To diversify the design, you can additionally use sand, pebbles, and beads.
- You can add color using paints.
- To make the surface of the shell glossy and shiny, it can be coated with colorless nail polish.
Ideas:
- It could be a flower made of shells or a chaotic arrangement. Much depends on where the panel will be placed. You need to maintain a marine theme or create an overall picture.
- Such elements will look beautiful on burlap, and simple branches tied with thread can serve as a frame.
- You can take a marine theme as a background and decorate it with shells.
- To create volume, shells are attached to the sidewall.
As you can see, any thing can be used. Here are some more examples of how to beautifully decorate a wall.
Decoupage panels
This option can be considered an update of old things. In this case, any canvas is taken as the basis. An old painting, wooden planks, iron or glass elements. The base is decorated using paints, beads, threads and other materials.
Most often, products do not require a frame. They are hung by a rope or simply on a hook. It is better to use natural materials for decoration. This can be several paintings that are connected to each other.
You can use one intended for photos or paintings as a frame. You can do it yourself if you have thin planks. For the background, the fabric with which the base is covered is most often used. Since the doll has a certain weight, the base must be reliable - wood or plywood.
As additional materials you can use:
- ribbons;
- bows;
- beads;
- buttons.
If you have time and desire, you can make dolls that resemble family members and create a family panel.
Watch
Now you can buy any wall clock. They have different shapes and sizes, color and texture. But it’s unlikely that you’ll be able to find a unique model; making it yourself is much easier. Such panels are convenient because you can choose all the parameters yourself. The only thing that should be taken into account are the general rules for all products.
The topic can be completely different:
- time of the year;
- nature;
- romance;
- flowers;
- abstraction;
- patterns.
All that is required for the job is the selection of appropriate materials and a base. The base can be foam, wood or plywood. First of all, it needs to be prepared. You can decorate with paint or covered fabric. If you plan to use multi-colored elements, then the base should be chosen in a single color.
It is not necessary that the clock be located in the center. On the contrary, if they are located on the edge, this will significantly expand the possibilities and you can create a beautiful composition.
Here you can use all the techniques presented above. If the watch has a voluminous glass and it looks rough in the overall picture, it should be removed.
As a rule, watches have their own background; if they have already been purchased and the background does not match the overall interior, this problem can be easily solved. The watch can be easily disassembled, the main thing is not to damage the mechanism. The removed base can be painted or decorated with beads. You can use pieces of floppy disk that shimmer beautifully in the light.
With pockets
Such a panel will not only bring beauty, but also benefit. It is suitable for the kitchen, bathroom, children's room. Its main advantage is pockets in which you can put any accessories. You can make them in different sizes and shapes, and use as many pockets as you see fit. This panel consists of a base to which pockets are sewn. A plank is attached to the top; it is better to use a wooden one. Depending on what accessories will be stored in the pockets, the base is selected. The heavier they are, the stronger the base should be.
Plywood is perfect; it does not deform and will hold the shape of the panel perfectly.
Such panels are made from the pockets of old jeans and trousers, which looks very original. This product will perfectly complement the interior of the corridor.
You can decorate:
- ribbons;
- bows;
- buttons;
- stones.
If colored material is used, then its design is quite sufficient.
You should never give up, because the first successful job will bring positive emotions and pride in the work done.
Topic disclosure
Reliability of information
- Availability
- Saving money
- Unique design
- Time for crafts
- Sometimes hard to find materials
- Often, after an unsuccessful first time, work is suspended
All people are looking for any ways to decorate their home and make it more comfortable and attractive. Beautiful DIY panels will fit perfectly into the interior. Before you start creating, you need to know what a panel is.
A panel is a painting designed to fill sections of walls or ceilings. The owners of their houses will be able to use available materials to create it. In this article you will learn how and from what you can create a panel with your own hands.

We offer you original ideas on what kind of panel you can make at home. You don’t have to be an artist or designer to realize your ideas. If you have the desire and good imagination, then you can easily decorate your home with personal modern products.


Panel for the kitchen
Now we will conduct a master class on how to make a panel with your own hands for the kitchen. Together we will try to create a picture from everything that is in the kitchen. This could be pasta, cereals, bottle caps, broken dishes, unnecessary forks, spoons or cups.

You can also use nuts, spices, coffee beans, dried fruits and even salt dough. Artificial fruits and vegetables are also ideal as materials.

To create a product you need to prepare:
- universal glue;
- frame;
- hard cardboard;
- a piece of burlap.

First you need to prepare the foundation and you can get to work. If you don’t know what exactly to depict in your painting, look on the Internet for photos of how to make a panel.

Photopanel for the bedroom
The wall of the room in which you spend half of your time can be decorated with family photographs, creating a collage of them. Let's start studying the instructions on how to properly make a panel for the bedroom.

For the product, it would be appropriate to use photographs with which you have good memories. Or take your best photographs taken throughout your life and paste them on the wall in chronological order.


To create a collage, you need to prepare:
- several frames for images of the same or different sizes;
- universal glue;
- photos.

Inserting images into photo frames is not difficult, anyone can do it. Next you need to glue the frames to the wall and the panel is ready. You can add mementos, inscriptions, ribbons or handprints to your product.


A collage of photographs can decorate not only the bedroom wall, but also the living room. Moreover, to create it it is not necessary to prepare the same frames. They can be round or square, with completely different sizes and shapes.

Wallpaper panel
After renovations, there are always pieces of wallpaper left in the house. Housewives are accustomed to not throwing them away in order to use them in the future. This day has come, wallpaper will be useful for creating panels. They can be glued to the entire wall on top of other wallpaper and used as a base if they are plain and without a pattern. On top of them, the owners will be able to dream up, draw some kind of abstraction, or simply make multi-colored stripes.

Wallpaper with patterns can be placed in a large frame, thus creating an original picture. If you have a huge number of different pieces of wallpaper, cut out small identical squares from them and glue them to the wall in the nursery or any other room.

Button panel
There is also another great option for creating an original wall decoration. For it we need to find:
- buttons;
- frame;
- cardboard or a piece of wallpaper without a pattern;
- pencil;
- glue.

First you need to make a drawing, and then the base of the product. We take a pencil and draw something. For example, an animal or a tree. If you don't know how to draw, use stencils. You can also print the drawing on a printer.


We attach the cardboard or wallpaper with the image to the frame using glue. Next, glue the buttons on top of the drawing and the original wall decoration is ready.


Panel made of threads and nails
Using threads and nails you can make a beautiful and unique painting that will decorate any wall in your home. To create this product, you should prepare:
- wooden board for the base;
- multi-colored threads;
- small nails;
- stencil drawing (drawn yourself or printed from the Internet);
- scissors;
- hammer.

Cut out the stencil and attach it to the base with tape. We will remove it when the last nail is driven in. Next, we drive nails along the contour of the picture. We tie a thread to one of them and wind it. You can wind it in zigzags, lines, or create your own pattern. The main thing is that in the end the thread is wound evenly everywhere.


We have introduced you to the basic ideas for creating an original and modern wall decoration. After reading the information and learning what a panel is, you can make your own product from everything you have at hand.

DIY photo panel


With the help of a panel for which fabric is used, the wall is transformed. In this way you can decorate the hall with your own hands; you can also decorate the wall in the nursery or bedroom. Children can also help decorate the house, since such crafts are not difficult to create. And the master class becomes an assistant in this.

Decorative panels made of fabric for the wall can be made in different styles and have different themes. Children will help decorate the house before the New Year with the help of panels, since this exciting activity requires minimal costs.

The master class suggests creating a simple but cute panel. The wall can be decorated with your own hands with a canvas depicting Santa Claus carrying a Christmas tree or riding a sleigh (photo).

In order to make such a panel, fabric and a frame are used. The cardboard is covered with a piece of chintz. This fabric is most often used to create panels. Next, a template is created and the silhouette of a fairy-tale character is cut out. Such decorative panels are suitable for decorating any room in the house. With their help, a wall in a nursery, bedroom, or living room is decorated. Children will be happy to participate in the process of decorating the house. In addition, such a panel can be an excellent gift for loved ones for the upcoming holiday.

Features of creating an application
A master class on making fabric panels on the wall with your own hands suggests making a simple, but at the same time original craft for home decoration.

This can be a wonderful decoration that will complement any interior. The wall can be decorated with such an element, thanks to which a unique atmosphere of comfort is created.

To create such a craft you will need fabric, a frame, you can also take thick cardboard or plywood. A fabric panel on the wall can be created quickly with your own hands; children can help with this.

To make a panel for which fabric is used, you will not need a large amount of time or financial costs. It’s easy to do, just watch the application master class.

So, in order to create decorative panels that decorate the wall, you need:
- Stretch the prepared fabric onto a cardboard or plywood base. On the back side of the base, the fabric is wrapped well and fixed with glue or a stapler. The finished base blank is carefully attached to the frame, which can be made in advance from small wooden strips.
- To make a panel using fabric, you don’t have to use a frame. But you will need to take a flat piece of plywood. The front side is covered with foam rubber or synthetic padding. The finished base is covered using pre-prepared fabric. On the back side of the workpiece, it must be fixed with glue, a stapler or small nails.
- Ready-made decorative panels are decorated using various materials. This requires imagination and creativity. You can make an applique based on colored beads and multi-colored buttons of different sizes. And some craftswomen prefer to decorate the finished panel with flowers made from multi-colored scraps of fabric. This way any wall is transformed and becomes the highlight of the room.
- To create a children's panel, it is recommended to choose fairy-tale or cartoon characters who will become the basis of the craft. They will complement the children's room and create unique comfort.

From floral motifs
The master class offers to decorate the hall using more complex techniques. Simple step-by-step instructions allow even novice craftswomen to create an unusual thing that will decorate the room.