Phalaenopsis orchid - care at home. Phalaenopsis: growing and propagation Phalaenopsis orchidee care at home
Read also
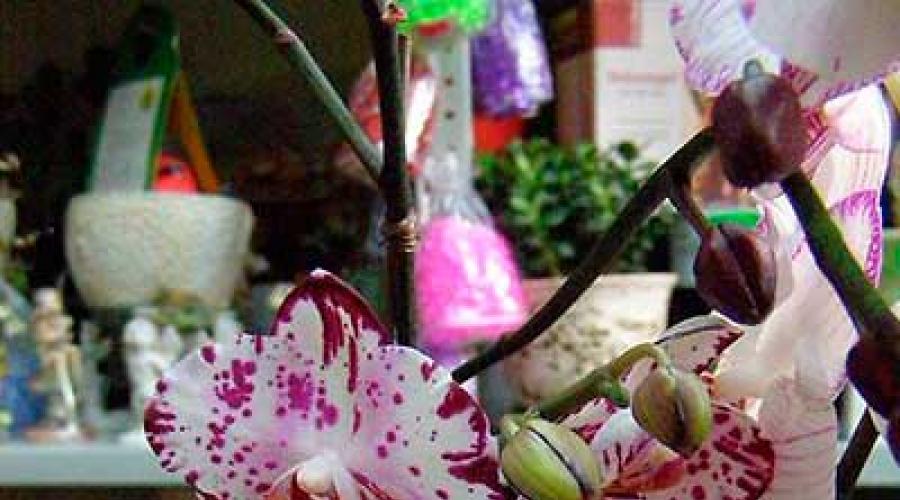
The Phalaenopsis orchid belongs to the tribe Vanda, and accordingly to the Orchid family. It is a herbaceous plant that grows primarily on trees. It belongs to plants - epiphytes, which is why requires the creation of an artificial microclimate. Juicy, bright green leaves form basal rosettes. Racemose inflorescences of bright colors are formed on long, curved peduncles.
Caring for a Phalaenopsis orchid after purchase
 Immediately after purchasing the plant in a store, it must be placed in a kind of “quarantine”.
This is necessary for the plant to adapt to new conditions. To do this, you should follow simple recommendations:
- For 2–3 weeks, the plant is placed separately from other indoor flowers. This is necessary in order to identify pests or signs of disease in a new plant in time;
- It is recommended to place the orchid in a shaded place, avoiding direct sunlight;
- Watering should be moderate, but the substrate should not be allowed to dry out;
- It is undesirable to “overload” the orchid with fertilizer.
At this time, you need to constantly monitor the roots, leaves and flowers of the plant. This will help you notice the first signs of disease or pest infestation in time.
Attention! You need to move the orchid to a permanent place gradually. This will allow the plant to fully adapt to the new lighting and watering conditions.
After purchase, the plant does not necessarily need to be replanted. This is only done if the plant was originally planted in sphagnum moss. In a high-quality substrate it can live for 1 – 2 years. It is not advisable to spray the plant with any “anti-stress” agents. A healthy plant is able to go through the adaptation period on its own.
How to care for leaves
 The dark green, fleshy leaves require special care. They need to be dusted and sprayed frequently.
With proper care, the length of the leaves reaches 50 - 70 centimeters.
When the lower leaves forming the rosette die off, they need to be cut back to healthy leaves. Such pruning will be beneficial; it continues to grow even more actively.
Reference! Like all monopodial plants, the leaves of the Phalaenopsis orchid are important.
The leaves are sprayed with warm water 3 – 5 times a day. This allows you to maintain the desired level of humidity. This is especially important in autumn and winter, since the air becomes especially dry during the heating season.
Root care
 Since the Phalaenopsis orchid grows wild on trees, it The plant has green aerial roots.
They are located on top of the soil, the pot serves only as a stand.
The roots of the plant have access to fresh air; for this purpose, they lie freely on top of the substrate, and can even stick out above the pot. You cannot sprinkle them with soil or bury them in the substrate.
Reference! The roots of the plant participate in the process of photosynthesis. They should always have constant access to sunlight.
Old and limp roots that acquire a brownish color need to be cut off, giving the opportunity for new ones to grow. It is best to grow an orchid in a glass pot. This will make it easy to monitor the condition of the roots. The pot can be installed in a decorative flowerpot.
Carefully! The Phalaenopsis orchid also has aerial roots. You need to make sure that they do not climb into other pots with plants.
Peduncle care
 Before flowering, pots with orchids are placed in a cool place and watered moderately. This will provoke rapid flowering.
With skillful care, the plant can bloom twice a year.
At an air temperature of 18 - 25 C, plenty of sunlight and a humidity level of 30% to 40%, the duration of continuous flowering is 6 months.
Attention! Only dry flower stalks, which spoil the decorative appearance of the plant, should be pruned.
Transfer
The plant should be replanted every 2–3 years. when the substrate in the pot is completely depleted. The unsuitability of a wood substrate can be determined by the fragility and dark color of its particles.
An unpleasant, putrid odor often appears. This problem can also occur with excessive watering of the substrate. This leads to rotting of the plant roots and damage to the base.
Important! The substrate must be changed every 2 - 3 years, since it must always be clean and fresh.
 Landing
 For planting you will need Phalaenopsis orchid shoots, a glass or ceramic pot and substrate. To prepare it you will need:
- Wood bark of small or medium fraction;
- Sphagnum moss.
The bark is pre-soaked for 2 days in cold water. Then rinse with clean water. Afterwards, pieces of medium-fraction bark are placed at the bottom of the pot, and the top is filled with smaller pieces of bark. At low humidity, sphagnum moss is added to the mixture, which retains water at the roots.
Reference! Experienced orchid lovers grow Phalaenopsis on special blocks. But this is a rather complicated method that requires professional plant care.
Reproduction
 Unlike other types of orchids, Phalaenopsis is not propagated by dividing rhizomes. For this, 2 main methods are used:
- Seeds;
- By shoots.
Growing seeds at home is extremely difficult. After the plant has flowered, side shoots can be separated from it for propagation. Only strong shoots with 2–3 leaves are suitable for this. Aerial roots on such shoots should be no less than 5 centimeters in size.
Peculiarities! It is worth cutting off the shoots 1 – 2 months after flowering. During this period, the plant will have time to rest and will easily tolerate this procedure.
Trimming
 After the flowering period ends, it is recommended to trim off the dried flower stalks.
Usually, After the inflorescences fall off, the flower arrows dry up. Those flower stalks that remain green can be:
- Trim completely;
- Cut off the top only;
- Don't touch it at all.
In the third option, an inflorescence may once again form on this peduncle. After complete pruning, the green peduncle can be placed in a jar of water. After some time, a “baby” may appear on it, which can be used for reproduction.
Peculiarities! Left green arrows after about 2 months of rest can produce lateral peduncles. It is on them that new inflorescences will appear.
Rejuvenation at home
If the orchid has stopped blooming and has taken on an unkempt appearance, it’s time to rejuvenate it. It refers to the separation of the top from the roots. Afterwards they are transplanted separately. New roots will appear at the top again, and “babies” may appear at the bottom. A few months after this procedure, the plant may bloom again.
Peculiarities! The Phalaenopsis orchid has quite powerful aerial roots. This allows it to bloom magnificently even after unfavorable conditions.
To rejuvenate an orchid you will need:
- Secateurs;
- Tree bark for substrate;
- Sphagnum moss;
- New pot for replanting;
- Iodine (necessary for processing sections).
From the video below you can learn more about how to rejuvenate an orchid:
The top is cut off from the plant so that at least 2 to 3 adult leaves remain on the mother plant, and the top has aerial roots. After that:
- The sections are treated with iodine;
- The top is transplanted into a separate pot. It is pre-filled with substrate;
- All voids in the substrate are filled with moss - sphagnum.
Divided orchids are moved to the windowsill to provide better access to sunlight. On the maternal part cut off in this way, with good care, a “baby” will appear in 2 months. After this, the plant will be able to bloom. The cut top takes root slowly.
Attention! Only old plants that have stopped blooming should be divided.
Watering
 For good development of the orchid, the substrate must be constantly well moistened.
It should not be allowed to dry out, as this will affect the growth of the plant. At the same time, excessive watering should not be allowed. This can lead to rotting of the roots and growing points.
If the plant is planted in a transparent pot, you can monitor the desired level of substrate moisture by looking at drops of moisture on the walls.
Peculiarities! If the orchid grows in a ceramic or plastic pot, you need to regularly check the moisture level of the substrate. It is worth carefully raking the substrate; it should also be moist inside.
Well-moistened roots have a bright green color. Aerial roots will be white. In any case, the roots should be light. You can also determine the humidity level by the weight of the pot. If it becomes unexpectedly wet, it is worth watering the plant. Watering can be done in two ways:
Moisturizing the substrate;
Careful immersion in a container of water.
It is undesirable for water to get on the leaves of the plant. If it is not of good quality, it can lead to stains on them. Once every 30 days, it is advisable to wash the Phalaenopsis orchid in the shower, the water should be warm. After this procedure, the leaves need to be wiped dry.
Carefully! To prevent pieces of bark from floating away during bathing, it is recommended to cover the substrate with gauze.
Between watering procedures, it is important to dry out the plant. This will prevent the roots from rotting.
Pollination
 As with other orchids, Phalaenopsis can only be grown artificially at home.
The process of obtaining seeds is quite simple, but requires extreme care.
To do this, you only need tweezers and a flowering plant. To pollinate a plant:
- On the stigma of flowers there is a so-called “column” containing polylines. It must be carefully removed with tweezers by pulling the tail. After this, you can see the lines inside the flower. It is with their help that pollination occurs. The backs of the polynias are sticky, since this is how they are carried on the backs of insects;
- Using tweezers, the pollen is placed in the axil inside another flower. Polinia are attached to its sticky walls;
- If everything is done correctly, after 24 hours the axil will close as pollination has occurred.
The flower from which the pollinia are taken will dry out. The pollinated flower also begins to wither and its stem swells.
Reference! The seed ripening process takes from 6 to 8 months. After this, with sufficient experience, new plants can be grown from them.
Bloom
 Under favorable conditions, Phalaenopsis can bloom at any time of the year.
Depending on proper care The duration of flowering can be from 2 to 6 months. Flowers range in size from 2 to 15 centimeters.
The color of the inflorescences can be very diverse: white, violet, yellow, red. There are also varieties that have a color combination of specks and spots.
Peculiarities! The number of flowers on the arrow depends directly on the degree of branching of the peduncle.
Each peduncle can contain from 3 to 40 flowers. In some varieties, the length of the peduncle can reach up to 1 meter. Up to 100 flowers can form on it at one time.
Diseases and pests
 Phalaenopsis are susceptible to both infectious and non-infectious diseases.
In all cases, the cause of infection is improper plant care. The most common fungal diseases are:
- Fusarium;
- Various rots (gray, black, root).
Fusarium infection is the most dangerous because the infection spreads quite quickly. The disease affects the roots, then quickly spreads to the entire plant. The infected plant must be destroyed to prevent the infection from spreading to other plants. In case of rot infection, the plant must be treated with fungicides. The most common non-communicable diseases are:
- Hives(occurs due to low temperature, too high humidity or poor air exchange in the room);
- Botrytis(occurs due to too high humidity combined with poor air ventilation).
 The main measures to combat the problem are proper care. Once the errors are eliminated, the plant will recover.
The main pests that can attack the Phaliopsis orchid:
- Mealybug. The main symptom is yellowing and then falling of the leaves. A measure to combat it is spraying with a solution of laundry soap;
- Spider mite. If there is insufficient air humidity, characteristic “cobwebs” may appear on the leaves, roots and peduncles. This problem is also solved by treating with a soap solution;
- Thrips. Brown spots appear on leaves or flowers. The main control measure is treatment with systemic insecticides;
- Shield. Small tubercles appear on the leaves. The problem can be solved by treating with a soap solution. This procedure is repeated 2 times at intervals of a week.
As a preventative measure, you need to inspect all plants near the affected one. This will avoid infecting healthy orchids.
How to resuscitate?
Violation of the rules of care can lead to deterioration in appearance, or in the worst case, to the death of the plant. The most common problem is rotting roots. The following common errors lead to this problem:
- Air humidity is too high (its level in the room should not exceed 30 - 40%);
- Insufficient lighting (for example, if the plant is on the windowsill of a window on the north side);
- Excessively compacted substrate (untimely replacement can lead to the death of the plant).
Another reason could be improper application of fertilizers. This can lead to chemical burns to the roots.
Attention! In case of a chemical burn to the plant, fertilizing should be stopped immediately. The plant is transplanted into fresh substrate.
 When the roots rot, the plant literally falls apart, and the rotted roots die.
If the rotting process does not affect the growth point, the situation is reversible. You can try to grow new roots, thereby saving the plant.
If some of the healthy root system remains, the orchid has a better chance of surviving. But even if the roots have rotted completely, you can try the following:
- Completely cut off damaged roots to the growing point;
- If necessary, treat the growing point with a fungicidal preparation,
- Leave the plant in the shade for 2 - 3 hours. This is necessary so that the cut area is tightened;
- Then water is poured into a suitable glass vessel. Place the plant in it so that the growing point is in the water. At this time, the leaves should be on top and ventilated;
- Place in a well-lit place with constant air circulation. The room temperature should be 23 - 25 C.
After some time, new roots will appear from the growing point. It is recommended to periodically wipe the leaves of the plant with a sponge soaked in a solution of succinic acid.
Peculiarities! It is advisable to replant the reanimated plant into sphagnum moss. Only when it gets stronger can you return to the usual substrate.
Video about how to grow a flower
You can learn more about caring for the Phalaenopsis orchid from the video below:
conclusions
Phalaenopsis orchid is the most common species grown at home. It requires quite complex care. But if all growing rules are followed, it can bloom for up to 6 months a year. Careful care of leaves, roots and peduncles is required. To grow, you will need a special substrate consisting of tree bark and moss. But even a plant that has stopped blooming or has been damaged by improper care can be saved.
Did you know that the orchid is one of the oldest plants on Earth? It is about 145 million years old! And what about the fact that some orchids can live up to 70 years or even more? Or that the name of this exotic is translated as “testicle”?
The most common type of orchid in cultivation is the phalaenopsis, the flower of which is “like a moth.” In this article we will tell you how to:
- properly organize the care of phalaenopsis;
- stimulate its flowering;
- create conditions for the plant to rest during the dormant period;
- reproduce vegetatively;
- protect the orchid from diseases and pests.
Listen to the article
Planting and caring for phalaenopsis
- Bloom: any time from 2 to 6 months.
- Lighting: bright diffused light (windows of western, eastern or north-eastern orientation) or light partial shade.
- Temperature: maximum – 42 ˚C, minimum – 12 ˚C, comfortable – within 15-25 ˚.
- Watering: after the soil has completely dried.
- Air humidity: 30-40% with good ventilation of the room.
- Feeding: solution of complete mineral fertilizer weekly.
- Rest period: not clearly expressed.
- Transfer: as the substrate sours and cakes, approximately once every 2-4 years.
- Reproduction: vegetatively (by side shoots).
- Pests: mealybugs, spider mites, thrips, scale insects, slugs.
- Diseases: fusarium, rust, anthracnose, spotting, black, brown, gray and root rot.
Read more about growing phalaenopsis below.
Phalaenopsis flowers (lat. Phalaenopsis)- herbaceous plants of the Vanda tribe of the Orchid family, native to the rainforests of Australia, Southeast Asia and the Philippines. Phalaenopsis orchids are mostly epiphytes because they grow on trees, but sometimes they also grow on rocks. The first phalaenopsis on one of the Moluccas islands was discovered by the German naturalist Georg Rumph, but the flower received its name from Karl Blum, director of the Leiden Botanical Garden, who, looking at the exotic orchid through binoculars, mistook it for a butterfly, and therefore called it phalaenopsis - “like a moth.” And to this day, flower growers call these flowers “butterfly orchids.”
The Phalaenopsis genus has about seventy species. The phalaenopsis flower, which is sold in flower shops, is incredibly popular not only because of its exquisite and extraordinary beauty, but also because growing and maintaining phalaenopsis does not cause trouble and does not require costs.
Phalaenopsis orchid - growing features
Any plant has its own preferences, and even more so for such a rare flower in our latitudes. The peculiarities of growing phalaenopsis are due precisely to the fact that they come from humid mountain and lowland forests, where they grow on trees, and therefore require a microclimate, which must be created artificially in our homes.
Here are some features of phalaenopsis:
- the pot and soil in which the phalaenopsis grows are required almost exclusively as support;
- Phalaenopsis roots should be in the air and in the light;
- Phalaenopsis roots are green, in nature they receive moisture and rainwater from the atmosphere, and food comes from the bark of the trees on which the flower grows. The roots participate in photosynthesis, so they must be exposed to light;
- In addition to ordinary roots, phalaenopsis has aerial roots that branch in constant search for food, so make sure that they do not climb into neighboring pots.

The succulent leaves of phalaenopsis, arranged in two rows, form a basal rosette. Peduncles are long, curved, butterfly flowers are collected in racemose inflorescences. The variety of colors is amazing: purple, lilac, white, yellow, green and red, brown... Often the lip of a flower stands out against the background of the petals (plain, tiger, mesh or striped) with a contrasting color. Phalaenopsis, like vandas and dendrobiums, are monopodial orchids, that is, they do not form bulbs.
The most pleasant feature of phalaenopsis is that they do not have a pronounced dormant period: their flowers bloom twice a year - in spring and autumn, although persistent flower growers achieve three blooms.
Caring for phalaenopsis at home
How to care for phalaenopsis
Caring for phalaenopsis consists of choosing a place for the flower, properly organized watering, fertilizing, temperature conditions and protection from pests and diseases. It is best to place a pot of phalaenopsis on a western, eastern or north-eastern window sill.
If this is not possible, and you have to place the orchid on the south side, place it on a table near the window, behind a curtain that creates a light shadow - direct sunlight leaves burns on the plant that look like spots on the leaves and flowers of phalaenopsis. Every 2-3 weeks, turn the plant 180º so that it does not lean to one side. But during the formation of buds it is better not to disturb the plant.
Phalaenopsis blooms in partial shade at a temperature of 18-25 ºC, and the plant can tolerate higher temperatures for some time, up to 35 and even 42 ºC, and lower temperatures - up to 12 ºC. But do not test the strength of phalaenopsis, try to keep the temperature within 15-25 ºC.

Air humidity is required at 30-40 percent, and good ventilation of the room is necessary. With insufficient humidity, the leaves lose turgor and the flowers fall off. To avoid such trouble, place the plant on a tray with wet pebbles. Too high humidity can cause rotting of the orchid roots and spots on the leaves.
Spraying phalaenopsis is undesirable even in very hot weather, since water flows into the core and axils of the leaves, which can lead to rotting of the plant. In addition, moisture evaporating from the surface of the leaves can cause them to burn.
Phalaenopsis fertilizer
Feeding phalaenopsis carried out during irrigation by adding Kemira-Lux complete complex fertilizer to the water at the rate of 1g per 1l twice a month. You can feed the orchid weekly, but then the concentration of the fertilizer needs to be reduced. Fertilizer is poured only onto a damp substrate.

How to water phalaenopsis
Watering phalaenopsis is carried out after the soil has completely dried, but it should not remain dry for a long time. If you grow phalaenopsis in a transparent container, then a signal that it is time to water the orchid is the lack of moisture on the walls of the pot. In addition, due to lack of moisture, the green roots of the flower become lighter. If the container is opaque, you will have to rake the substrate to determine how deeply it has dried.
Do not water the orchid over the leaves, water the substrate, or use the method of bottom watering the orchid - immerse the flowerpot in a container of water to saturate the substrate with moisture through the drainage holes. The water for watering phalaenopsis must be soft and clean: it is not enough to filter the water, it also needs to be boiled. Or use distilled water for watering.
Once a month, phalaenopsis likes to take a shower or wash itself under the tap, after which the plant should be wiped dry. Avoid overwatering the phalaenopsis, otherwise its leaves will become limp and the growing point may rot. In the best case, the orchid will develop a side shoot, in the worst case, the plant will die.
How to replant phalaenopsis
In what cases is phalaenopsis transplanted? When the plant is in the same pot and in the same substrate for 2-3 years. Usually, by this time the substrate cakes, turns sour and becomes unusable, therefore, it needs to be replaced. If you notice strong branching of the roots and their growth through the drainage holes, this is also a sign that it is time to replant the phalaenopsis orchid. This should be done after flowering.
If your orchid is not sick in any way and is planted in a substrate of a large fraction, then it can be carefully transferred to a new, large container with a drainage layer and topped with fresh substrate, the main component of which is the bark of the small and medium fraction. In addition, the substrate for phalaenopsis includes sphagnum moss. You can purchase ready-made substrate Or you can buy the ingredients and carefully prepare a mixture for your overseas beauty: place drainage made of expanded clay or pieces of foam plastic on the bottom of the pot, then medium-fraction bark, then fine-fraction bark mixed with crushed moss. Please note that dry bark quickly allows water to pass through, so before making a substrate out of it, you need to rinse it and leave it in water for a couple of days to swell, then rinse the bark again in clean water.
How to prune phalaenopsis
If the phalaenopsis has faded, watch for a while how the old arrow behaves. If it begins to turn yellow and wither, then remove it without regret, but if it is still green and juicy, then, most likely, after a two-month rest, flower buds will appear on it again. The new arrow must still grow, and only then lay buds and produce flowers. If the old arrow is too long, shorten it by cutting 1 cm above the developed bud.
By the way, the lower you cut the peduncle, the more flowers there will be on the side arrow. In any case, there is no need to cut the peduncle below the third bud: you will have to wait a long time for flowering on the shortened arrow.

Phalaenopsis flowering
Phalaenopsis orchid blooming
These plants can bloom at any time of the year, and depending on the general condition of the orchid and the conditions in which it is kept, flowering can last from two months to six months. Phalaenopsis usually bloom twice a year, but sometimes a third bloom occurs within one year. Flowers ranging in size from 2 cm to 15 cm in diameter are located on the peduncle in quantities from three to forty pieces.
How many flowers there will be on the arrow depends primarily on how branched the peduncle is and how comfortable the conditions you have created for the orchid are. Some orchids have a peduncle length of up to 1 m, on which up to hundreds of large flowers are placed! The delicate aroma of phalaenopsis flowers is also attractive, as well as their color diversity: from plain white, yellow, purple, red to various variations of specks, spots and veins on the main background.

Why doesn't phalaenopsis bloom?
If three months have passed since the last flowering, then it is time for the phalaenopsis to bloom again. But there are times when the leaves grow, but the phalaenopsis does not bloom and does not bloom. How to make phalaenopsis bloom?
First you need to find out the reasons for this behavior of the orchid. And the reasons could be:
- insufficient lighting (eliminate the cause and wait for flowering);
- the plant is overfed with nitrogen-containing fertilizers (you will have to wait until the nitrogen is processed by the plant, at this time add only phosphorus as fertilizing);
- the plant is simply tired and needs a longer period to recuperate (wait a little and then stimulate the phalaenopsis to bloom).
Phalaenopsis flowering is stimulated by insufficient watering using the preparation “Ovary” or “Bud”. In addition, it would be a good idea to lower the night temperature so that the difference between day and night temperatures is at least 6-8 degrees. Such sudden changes will cause the orchid to bloom.

Phalaenopsis after flowering
Usually, after flowering, the faded arrow dries out and is cut off. But sometimes the peduncle continues to remain green, and then it’s up to you to decide what to do. You can:
- do not touch the peduncle;
- trim the peduncle to the height of the branch;
- cut off the green flower stem altogether.
If you have cut a green flower stalk, place it in water and chances are a baby will appear on it. If you do not trim the old arrow, then side branches may appear on it, on which flowers will appear over time, but the flowering will not be as abundant as on new peduncles.

Reproduction of phalaenopsis
Reproduction of phalaenopsis by children
While some orchids can be propagated by dividing the rhizome, this method is unacceptable for phalaenopsis. Under natural conditions, they reproduce by seeds and new shoots. But the seed method at home is also impossible. How to propagate phalaenopsis at home?
The easiest way to propagate a phalaenopsis orchid is vegetatively, by separating the side shoots formed on the peduncle or at the base of the leaf rosette. They do this by allowing the plant to rest for a month or two after flowering. Those shoots that have already formed a pair of leaves and whose aerial roots have reached 5 cm in length are planted. But don't let the kids outgrow it, as this will have a bad effect on the mother's socket. The separated baby should be dried for 24 hours, and then planted in a fine-grained bark substrate, building a greenhouse over the shoot in which the temperature will be maintained at 22-25 ºC.
The appearance of lateral shoots in phalaenopsis is a rare phenomenon, indicating that you are somehow not properly caring for it. Therefore, if your orchid does not have children, you can artificially awaken dormant buds, which will give birth to children. They do it this way: find dormant points at the base of an old, faded peduncle, use a sharp blade to make a shallow semicircular cut at the base of the covering scales and remove it with tweezers, and lubricate the bud with a growth regulator or fresh birch sap.
After a month or two, rosettes of several leaves will form at the site of the cut, and after three months roots will appear. To speed up the process, put a plastic bag on the plant - in a warmer and more humid microclimate, the children will grow faster.
You can get a baby using a cut peduncle: immerse the peduncle 4-7 cm in a 0.005 percent solution of complex mineral fertilizer, having previously removed the scales from the bud in the manner described above. Build a greenhouse over the peduncle and do not forget to change the water.
Phalaenopsis diseases and their treatment
Phalaenopsis suffer from both infectious and non-infectious diseases. In both cases, the main cause of the disease is errors in plant care.
Of the fungal diseases, fusarium most often affects phalaenopsis, in which the roots of the plant first become ill, and then the disease spreads to the entire orchid. The main cause of fusarium, like other rots, is excess moisture. It is impossible to cure phalaenopsis from fusarium, so the plant is destroyed. But other rots (black, brown, root, gray, as well as diseases such as rust, anthracnose and spotting) are sometimes cured by two-time treatment with a fungicide (foundazol or, for example, topsin-M) with an interval of 10 days.

A common disease in phalaenopsis is urticaria, which affects the leaves at an early stage with large spots 2-3 cm in diameter. The culprit is low air temperature, high humidity and poor air exchange in the room. Eliminate deficiencies in care, and everything will go smoothly.
And from a disease such as botrytis, the plant suffers in conditions of high air humidity and poor ventilation in the room, but it affects not the leaves, but the phalaenopsis flowers: first, dark brown spots appear on the petals, then the petals fade. If you raise the temperature in the room, the disease will slow down its progression. In addition, ensure good ventilation of moist air in the room and treat the plant with a bactericidal preparation.

Non-infectious diseases are caused by the use of pesticides, excessive lighting, improper feeding, uneven watering and are expressed by drying of the tips of the leaves, necrosis of the roots, damage to other plant tissues and all kinds of spotting. Find and eliminate the cause of the disease, and, quite likely, you will be able to save your orchid, but you should know that resuscitation of phalaenopsis is a labor-intensive process and is not always successful.
Phalaenopsis pests
In addition to diseases, phalaenopsis and pests debilitate. For example, a small insect such as a mealybug causes leaves to turn yellow and fall off. It is destroyed by treating the leaves and stems with an aqueous solution of laundry soap.
Spider mites, which attack any plant when there is insufficient air humidity, can also harm phalaenopsis. The mite expresses its presence with a silver web on the leaves, as if pricked with a needle. If you find a spider mite at the very beginning of occupying a plant, you can remove it, like aphids and mealybugs, with a soap solution, but if the matter has gone far and the pest has firmly settled on your orchid, you will have to use acaricide treatment to combat it.

After this article they usually read
Nowadays, the homemade phalaenopsis orchid is very popular in our country and abroad. This is the perfect flower for an apartment. It is unpretentious, which is why many people begin their acquaintance with the wonderful world of orchids with it.
Features of Phalaenopsis
Phalaenopsis is a genus of herbaceous plants from the orchid family. Translated from Greek, the word “phalaenopsis” means “butterfly”, and indeed, the flowers of this orchid are very similar to large bright butterflies hovering in the air on almost invisible peduncles.
There are about 40 species of phalaenopsis in nature, most of them grow in Southeast Asia. The name of the genus was given by the botanist Blume. The scientist discovered these plants in 1825. At dusk, the Dutchman Blume, who was on one of the islands of the Malay archipelago in order to study its flora, saw a flock of butterflies, but when he came closer, he realized that he was attracted not by butterflies, but by beautiful flowers, which he later named Phalaenopsis amabilis. .
Like many plants of tropical flora, phalaenopsis have a monopodial type of branching, that is, the apical bud remains on the shoot throughout the life of the shoot. For comparison, in sympodial plants a generative shoot appears from the apical bud, which stops growing after flowering, and then a new shoot develops at the base of the old one. Monopodial branching is more primitive than sympodial branching, which indicates the ancient origin of orchids.
Phalaenopsis leaves form a rosette. The stem is very short, the internodes on it are barely noticeable. 
Phalaenopsis flowers are round or star-shaped. Species with round flowers are grouped into the Euphalaenopsis series, the rest are included in the Stauroglottis series.
- Euphalaenopsis - blooms in the cold season.
- Stauroglottis - blooms in the warm season with small flowers shaped like stars. They don't grow well in an apartment.
The plant has thick roots with a round cross-section that grow into any rough surface: bark, stone. The roots are covered with light or white velamen.
This is interesting!
Velamen is a dead tissue that is highly hygroscopic. It is present in many epiphytes and plants living in periodically drying substrates. Porous velamen, like a sponge, absorbs moisture from the air and gradually transfers it to the roots. It also protects the fragile roots of phalaenopsis from mechanical damage.
Phalaenopsis peduncles are long, thin, flexible. They grow from the axils of the leaves, and can pierce right through the orchid leaf. In some species, peduncles reach a meter in length and bear up to hundreds of flowers ranging in size from 1 to 13 cm.
When all the flowers have faded, lateral branches appear on the peduncle and flowering continues. Thus, the flowering of phalaenopsis can last up to six months. Some types of phalaenopsis are capable of forming babies on peduncles, which can later be rooted.

In nature, phalaenopsis grow in entire colonies, growing with the help of children in the same way as strawberries grow with mustaches. In areas of natural growth, such orchids are found along the banks of reservoirs, on trees, and rocks. There are species that grow on the sea coast, attaching themselves to rocky shores and bathing in the spray of sea water.
Phalaenopsis always settles near water and does not lack moisture, so they do not form pseudobulbs, as other orchids do.
Pseudobulbs are formations in which orchids store water and nutrients. Phalaenopsis stores nutrients and water in its fleshy, thick, wide leaves. In some species the leaves reach a meter in length.
There are deciduous phalaenopsis, but in indoor conditions they do not shed their leaves.

Phalaenopsis in the apartment - care
Orchids in nature settle in the crowns of trees and under them - so they do not need a lot of light. When growing phalaenopsis in an apartment, the optimal light level is 10,000 Lux. This parameter can be achieved by placing the flower away from the window and lighting it with a fluorescent lamp. Under these conditions, the home orchid develops well, sometimes outperforming greenhouse plants.
On southern windowsills in summer, the plant is carefully shaded. In winter, phalaenopsis can be kept on any window. During this period, lighting is useful even on southern windows, since the duration of daylight hours for phalaenopsis should be at least 12 hours (14 hours in summer).
For irrigation, use warm, preferably rainwater. During the flowering period, plants especially need moisture, and the substrate should always be kept slightly wet. In unfavorable weather (cold or cloudy), the plants are not watered.
The most difficult period in the life of plants is December and January. At this time, they are slightly dried, watering is stopped, and the phalaenopsis enters a stage of slight dormancy. Water phalaenopsis in the morning or early afternoon, making sure that water does not get into the outlet. The trapped moisture is removed from the leaf axils with a paper napkin.
Once every few weeks, the plants are rinsed in the shower to wash away the dust. Orchids love this procedure, as in nature they literally bathe in splashes of rain and river water. Phalaenopsis prefer damp air, but in room conditions they can grow at 40% humidity, standard for an apartment.
Young plants obtained from seeds or babies are kept in a greenhouse, creating the most comfortable conditions for them with high air humidity until the diameter of the rosette reaches 10-20 cm. Adult plants grow well in a window and do not need high humidity.
When growing phalaenopsis, you must always remember that excess moisture at low temperatures or poor lighting is extremely dangerous.

Feeding
During the flowering period, plants are fed once every 1-2 weeks with orchid fertilizer. The peculiarity of all orchids is that they do not tolerate high concentrations of minerals, so special - not concentrated - fertilizing is created for them. If you have to feed phalaenopsis with regular fertilizer, then it must be diluted with water much more than recommended in the instructions.
In winter, fertilizing is carried out once a month with fertilizers with a minimum concentration. Plants grown without lighting are not fed at all in winter.

Growing methods
Phalaenopsis is grown in pots, baskets or on blocks. Species with huge leaves, such as Phalaenopsis gigantea, or small plants in greenhouses grow on the blocks. Plants on blocks are placed “upside down” - this is how they grow in nature.
In all other cases, it is more convenient to use ordinary plastic containers with additional holes in the bottom. A third of the pot is covered with drainage, then the plant is installed and the roots are carefully covered with the substrate without compacting it.
You can make a substrate for young phalaenopsis yourself by taking moss and foam granules. Adult phalaenopsis are grown in a substrate consisting of pieces of bark, to which a little sphagnum can be added.

Transfer
Phalaenopsis can be replanted at any time of the year, but it is advisable to do this during the period of root activity. For each variety and species, roots can begin to grow in different months, so you need to monitor the plant - as soon as new aerial roots begin to appear, you can replant it.
Adult phalaenopsis are replanted every 3 years, and seedlings and young ones - twice a year.
Having transplanted an adult plant, it is sprayed with a fungicide and placed in a shade for 2-3 weeks. The leaves are sprayed with water daily. You can transfer it to the windowsill only after 2 weeks.

Reproduction
Propagating phalaenopsis is not easy. Some species and hybrids give birth easily, while others have a very difficult time. You can propagate your favorite orchid by division, cutting off the upper part with several aerial roots. As a result, one plant will produce two. The sections are powdered with charcoal powder or treated with sulfur and dried for a day. Then the upper part is planted in the substrate, trying to expose the cut to the air.
The parent plant remaining in the old pot is cared for as usual. Soon a side shoot will form on it and the plant will continue to develop.
Some varieties are capable of forming babies on peduncles. To carry out propagation in this way, the buds closest to the base of the peduncle are treated with pastes containing plant hormones.
Hormone-containing pastes:
- lanolin + 5-benzylaminopurine (5 mg/ml) + transcinnamic acid (50 mg/ml);
- cytokinin paste;
- Keikigrow plus.
Dormant buds are stimulated with hormones when the last flower opens on the peduncle.
Making your own cytokinin paste
Cytokinin paste is a rare guest in the domestic retail chain. Not everyone has the opportunity to order it from a Chinese or European online store. You can prepare the “magic” drug with your own hands.
You will need:
- anhydrous lanolin - sold in pharmacies that make prescription drugs, costs a penny;
- 6-bap - sold in reagent and nutritional supplement stores.
Cooking pasta
- One gram of 6-BAP is dissolved in a tablespoon of pure alcohol.
- 100 g of lanolin are placed in a water bath and melted until liquid.
- Pour an alcohol solution with 6-BAP into lanolin and mix.
- Leave the jar open for 2 days so that the alcohol evaporates.
The pasta is ready. It is stored in the refrigerator in a closed glass bottle. The glass must be dark - in this case the paste does not lose its beneficial properties for three years. Work with the drug wearing gloves. Before use, remove from the refrigerator and keep for a while at room temperature.

Propagation by seeds
Orchids are propagated vegetatively by amateurs and those who need to breed a rare and valuable variety. In industrial conditions, phalaenopsis is propagated by seeds on sterile media. It is possible, especially since recently trade has been offering orchid seeds and artificial environments in which they can germinate.
To germinate phalaenopsis seeds you will need:
- glassware with a screw-on lid;
- glass test tubes;
- distilled water;
- agar-agar
- litmus paper or other acidity tester;
- pressure cooker;
- bleaching powder;
- seeds and nutrient medium.
Step-by-Step Guide to Preparing Sterile Nutritional Formula
- Measure 200 ml of distilled water into any container and add agar-agar.
- After 2 hours, when the agar-agar swells, place the container in a water bath and wait for dissolution.
- As the agar dissolves, add the components of the nutrient medium in the order specified in the recipe.
- Determine the acidity of the solution (optimal pH for phalaenopsis is 4.8-5.2).
- If necessary, acidify with hydrochloric and nitric acid.
- Heat the mixture again in a bathhouse, stirring constantly.
- Pour into test tubes (layer height should be 1.5-2 cm).
- Seal the test tubes with stoppers and cover the top with additional foil.
- Sterilize the test tubes in a pressure cooker by placing a wire rack on the bottom. Sterilization under a closed lid lasts ten to fifteen minutes.
- Remove the vessels and place them vertically, without tilting or turning them over.
- Allow the solution to harden.
Test tubes with the prepared substrate can be stored in the refrigerator for several months.
Before sowing, the seeds are disinfected in a solution of bleach (50 ml of water and 7 g of bleach, shake for 15 minutes, pass through filter paper). The seeds need to be poured into a flask with filtered lime, left for 10 minutes - and you can start sowing.
The flasks with the nutrient medium are placed vertically on a grid, opened and the seeds are transferred to the nutrient solution, collecting them from the test tube with a sterile pipette. The flask is capped and placed in a warm place (18-23 °C). For successful germination, the duration of lighting should be 12-14 hours a day, the light needs to be diffused.
If everything went well, in a week the seeds will turn green, and after a few more weeks the suction hairs and the first small leaves will appear. Seedlings develop extremely slowly. After the third miniature leaf grows, roots will begin to appear. Only after a year can the seedlings be transferred from the test tube to a regular substrate using tweezers with rubber tips.

Diseases and pests
In experienced hands, phalaenopsis rarely get sick and are not affected by pests. In poor conditions, a red flat mite (greenhouse flat beetle) can settle on the plant. This multi-row pest lives on plants with fleshy leaves: violets, orchids, citrus fruits, ficus, azaleas.
The pest is difficult to see on the surface of the leaf without a magnifying glass. When a mite appears, the leaves of the phalaenopsis become “shagreen,” that is, finely punctured.
To combat ticks, acaricides or insectoacaricides are used:
- "Sunmite"
- "Envidor"
- "Fitoverm"
- "Neoron"
- "Aktellik"
- "Marshal".
Scheme for treating phalaenopsis against ticks:
- first treatment – “Sunmite”;
- after 6 days, a second treatment with a mixture of Nissorana and Actofit.
With excessive watering, orchid diseases appear - bacterial and root rot. Rot appears especially often in winter, when the lighting drops. Rots develop secretly on the roots, and then move to the stem, after which the phalaenopsis dies.
Light-loving species are especially vulnerable to rot: violacea, tetraspis, pulcherrima. In nature, they live on the tops of trees, so they need good lighting. With a lack of sunlight, light-loving phalaenopsis lose leaves until the growth point dies. There is no need to rush to throw away such plants. Sometimes it is enough to wash it with fungicides and wait a little - one or two babies may emerge from the sinuses.
An orchid can be affected by about 20 viruses, of which the tobacco mosaic virus is the most dangerous. The disease manifests itself by the appearance of red spots and streaks on the leaves. Under favorable conditions, these symptoms may disappear and reappear several years later when conditions change. Treatment of such diseases is impossible.
Accurate diagnosis of viral diseases requires laboratory tests. An ordinary gardener will not be able to determine which bacteria or virus is killing his phalaenopsis, but this is not necessary. It is enough to have an idea of the signs of infectious diseases. If there are streaks or spots on a young leaf that has just appeared, which then change color to dark or blackish, then most likely the plant is affected by a viral infection and it is better to get rid of it so that the rest of the orchids in the collection do not become infected.
Phalaenopsis may develop black spots caused by cypripedium bacteria. The symptom of the disease is watery round spots located in the center of the leaf blade. They spread across the leaf, reaching the growth point, and then move to new leaf plates.
Sick plants should be isolated, the affected areas should be cut out, and the sections should be sprinkled with fungicide. The plants themselves are sprayed with “Fundazol” or watered with a solution of colloidal sulfur. They are then quarantined. If necessary, repeat the treatment.
Strong, hardened plants with a powerful root system have good immunity and are not damaged by diseases and pests.

Hybrid phalaenopsis
Most of the species of phalaenopsis are grown only in the collections of specialists. Ordinary gardeners are content with hybrid phalaenopsis. They are offered by retail chains and flower shops. These are extremely unpretentious flowers, caring for which does not require special knowledge.
In recent years, tremendous progress has been made in breeding hybrids. Plants appeared with flowers of all patterns and colors. Only sky blue and black phalaenopsis have not yet been bred.
Hybrid phalaenopsis are suitable for cutting. The diameter of some flowers reaches 15 cm. Pleasant-smelling hybrids have already appeared.
Indoor (potted) hybrid phalaenopsis are extremely popular. They bloom most of the year and do not die due to lack of light and watering. Hybrid phalaenopsis can withstand the harshest conditions. They can be watered once a month, fed once a year, and they will still bloom every year, although in this case their inflorescences will never be as luxurious as they could be with proper care.
Phalaenopsis hybrid is watered when the substrate is completely dry. Lift the plant and pot together. If it turns out to be unexpectedly light, then it’s time to water. Hybrid phalaenopsis are usually grown in transparent or translucent plastic pots, so the moisture level of the substrate can be determined visually.
It is more convenient to water hybrid phalaenopsis using the immersion method: lower the pot completely into a basin or bucket with rain or distilled water (in extreme cases, tap water separated from chlorine) and then lift it, allowing excess water to drain through the holes at the bottom.
Hybrid phalaenopsis thrive in morning and evening direct sunlight, but it is better not to expose them to the sun. Plants are replanted after they have flowered.
Signs indicating the need for a transplant:
- the plant does not form new leaves;
- the roots turned brown.
Transplant algorithm:
- remove the plant from the pot;
- shake off the old substrate from the roots;
- cut off the thickest and most lifeless-looking roots;
- powder the cuts with crushed charcoal;
- transfer the plant to a new pot with a thick layer of drainage at the bottom and sprinkle with fresh substrate.
You can make your own substrate or buy it in a store. For phalaenopsis, a composition of pine bark, charcoal and sphagnum in a 1:1:1 ratio is suitable. A freshly transplanted plant can be tied to a support for the first time.
When replanting phalaenopsis, do not wash its roots in running water to free them from the old substrate, or disinfect them with potassium permanganate. All orchids have a microscopic fungus living on their roots, forming the so-called mycorrhiza, with the help of which the flower can absorb substances. Having lost its mycorrhiza, the orchid dies.
Phalaenopsis hybrid blooms and grows at the same time. Its buds open one after another until an inflorescence of 10-20 flowers is formed on the plant. After flowering ends, the peduncle begins to dry out. There is no need to rush to trim it. It is enough to remove the dried part. There are dormant buds on the peduncle. After some time, they may awaken, giving rise to new flower stalks, and flowering will continue.When flowering ends, the phalaenopsis should throw out a new leaf. At the same time, the lower old leaf begins to die. It is better not to cut it off, but to wait for it to fall off on its own.
To fertilize domestic hybrid phalaenopsis, you can use the products from Table 1.
Table 1. Fertilizers for phalaenopsis
Name Action "Bona Forte" Liquid fertilizer is considered the best for phalaenopsis. After flowering, the fertilizer is diluted in accordance with the instructions; during and before flowering, it is diluted by half. "Mr. Flower Orchid" Apply during the period of flower stalk formation Pocon Increases resistance to adverse conditions Greenworld Extends the flowering period "Doctor Folly Orchid" Spray for foliar feeding - for spraying leaves above and below and aerial roots. Stimulates flowering and prevents chlorosis.
, it should be remembered that it is better to underfeed this plant than to overfeed it. In nature, orchids are content with crumbs that fall on their roots along with rain or dust, so they react very poorly to excess nutrition.Now you know how to care for a phalaenopsis orchid so that it becomes a decoration in your home collection, delighting with luxurious blooms and making a strong impression on guests.
How to care for phalaenopsis? The phalaenopsis orchid is very popular among indoor plant lovers. Large flowers that resemble butterflies come in a wide variety of colors. A large palette of color shades allows you to choose a plant to match the tone of the room. Caring for phalaenopsis is quite simple. For growing at home, the plant is ideal for beginning gardeners. The exquisite beauty of the phalaenopsis genus attracts lovers of indoor plants. But in order for the plant to feel good in the home flower garden, you need to know how to care for the phalaenopsis orchid.
Varieties and types of phalaenopsis orchids
Varieties and types of phalaenopsis orchids differ from each other in the color of the buds, the shape and size of the foliage and petals. This amazing plant is very versatile and includes a rich palette of colors. Phalaenopsis has a short stem on which is a five-leaf rosette. There are more than one hundred varieties of orchids of the genus Phalaenopsis. Almost all varieties are hybrid.
One of the currently popular varieties is considered "Phalaenopsis pleasant". The fleshy leaves of this plant are green in color and have an oval shape, pointed at the end. Each inflorescence contains up to thirty snow-white flowers, which bloom not simultaneously, but alternately. In the center of the flower there is a kind of lip, decorated with yellow or red stripes.
With proper care and timely pruning of dead parts, flowering can last throughout the year. “Phalaenopsis pleasant” will delight you not only with the beauty of its buds, but also with its delicate, delicate aroma.
The active growth and development of this representative of orchids is facilitated by the required air temperature in the room. Since the Phalaenopsis Pleasant variety was introduced from the Philippines, it needs a warm and sunny habitat. Comfortable temperature for the plant is +24 degrees. If you follow all the rules for caring for phalaenopsis, the leaves acquire a reddish tint.
The "Parisha" variety refers to miniature orchids. The peduncle has about ten milky-white flowers with a pleasant fruity-caramel aroma. The wide lip in the center is colored purple or lilac. If you properly care for phalaenopsis at home, the plant blooms for a long time; after some flowers die, others bloom almost immediately.

Phalaenopsis variety "hieroglyphic"- a large plant with oval leathery leaves and amazing numerous flowers resembling a star. Pointed petals can overlap each other. The flowers are represented by a wide palette of colors (from white to cream), with a greenish tint along the edges, and decorated with patterns of red, brown, and lilac. The lip is white with a pinkish tint. The flowers do not fade until one month.

Another miniature type of orchid is represented by the variety "phalaenopsis equina". It attracts with its rich, bright purple color. The flowers are quite small, 2–3 centimeters in size. During the flowering period, the peduncle lengthens, and new flowers form in place of old flowers. This orchid can bloom for several months. Peak flowering is considered to be from February to April and from September to November.

The varieties listed are the most popular. They won the hearts of flower growers thanks to their external features. These plants can decorate any room. Proper care allows you to enjoy flowering for a long time and inhale the wonderful aroma of these exotic flowers.
How to care at home?
To properly care for phalaenopsis at home, you need to know its features. In nature, this plant lives in tropical rainforests. Therefore, phalaenopsis is demanding in terms of living conditions. It is important for him to maintain the temperature and humidity correctly.
Optimal care includes the following requirements:
- air temperature from +15 to + 28 degrees;
- humidity within 60 – 80%;
- using a fan in extreme heat;
- diffused bright light or partial shade as lighting;
- replanting depending on the caking of the substrate.
The microclimate for phalaenopsis must be created artificially. Any plants have their own care requirements. Therefore, flower growers who want to decorate their home flower beds with a representative of the phalaenopsis genus must adhere to the basic requirements for growing orchids.
Lighting and temperature conditions
Proper care of phalaenopsis includes maintaining optimal lighting and temperature conditions, as well as choosing the right location for the flower. It is better to place the pot on the western, eastern or northwestern window sill. This will provide the correct lighting for the plant. In the case where the flower can only be placed on the south side, it is better to choose a place not on the windowsill, but on a table next to the window, covered with a curtain. Then the plant will be protected from direct sunlight. Periodically, the pot with phalaenopsis needs to be rotated 180 degrees. Lack of light has a detrimental effect on the life processes of orchids. For light-loving varieties of phalaenopsis, for example “indigo”, it is necessary to prepare additional lighting during the daytime, especially when the weather is cloudy outside: from mid-October to early spring.
You can compensate for the lack of light with 60-watt fluorescent lamps. The distance between the lamp and the orchid should be 20–30 centimeters. Under artificial lighting, phalaenopsis can be placed in any part of the apartment, not just on the windowsill.

Comfortable temperatures for orchids will be from +15 degrees at night and from +24 during the day. The air temperature should not be allowed to drop below normal. Rare temperature fluctuations will not affect the plant, but this does not mean that it is not necessary to observe the temperature regime.
Air humidity should not exceed 80%. Comfortable humidity for phalaenopsis is 60%. Dry air contributes to the loss of turgor and the falling off of flowers. High humidity can cause root rot and leaf spots.
The room in which the phalaenopsis is located should be frequently ventilated. Good ventilation should be not only in summer, but also in winter. It is important to avoid drafts, especially in winter. Low air temperatures contribute to rapid frostbite of leaves. Therefore, during ventilation, you need to remove orchids from the windowsill. Cold window glass should not come into contact with phalaenopsis leaves, so that this does not lead to their death.
Watering
Watering phalaenopsis is carried out after the substrate has completely dried. It is necessary to ensure that the plant does not remain dry for a long time. If the pot in which the phalaenopsis is grown is transparent, then the lack of moisture on the walls indicates the need for watering. In an opaque pot, check the soil moisture with your finger. Do not rely on the dryness of the substrate at the top. Inside, the soil may be quite moist. Water for irrigation should be soft, so it is better to use settled boiled water or water filtered with a special filter. The water temperature should be equal to room temperature or two to three degrees warmer. The maximum temperature should not exceed +28 degrees. Water that is too hot can scald the roots.
Phalaenopsis is watered in two ways:
- From the watering can through the top of the pot.
- Immerse the pot in a container of water.
During the flowering period, watering is best done from a watering can. It is necessary to avoid getting water on the flower to prevent it from rotting. The submersible irrigation method is used when the plant is not blooming. The pot is placed in a bucket of water for 1–2 minutes, and then the excess water is allowed to drain and the phalaenopsis is sent to its place.

Orchids do not require frequent watering. Constant moisture harms the roots, they begin to deteriorate and the plant dies. The substrate in which phalaenopsis is grown is destroyed by frequent watering.
Phalaenopsis does not need spraying. Moisture can stagnate in the leaves and at the growing point, which will trigger the development of rotting processes. If water gets on the leaves during watering, they need to be wiped dry.
Phalaenopsis needs to be cleaned once a month. To do this, the plant is washed under running water, after which the leaves are wiped well. The orchid cannot be over-watered, so water procedures should not take much time.
Feeding and fertilizer
Feeding and fertilizing phalaenopsis is included in the complex of necessary measures for caring for the plant. To do this, use special fertilizers for orchids. They are sold in flower shops.
Fertilizing should be done regularly through watering. During the flowering period, phalaenopsis is fed 2-3 times a month. If you fertilize the orchid more often, the concentration of the product should be halved according to the instructions. The composition of the fertilizer should be the same as for other indoor flowers. Complex feedings should be alternated depending on the phase of growth and flowering of phalaenopsis.
The necessary elements for the normal growth of orchids are:
- nitrogen – for leaf growth and development;
- phosphorus - for the formation of flower stalks;
- potassium – to improve immunity;
- magnesium – to ensure photosynthesis processes;
- iron – to maintain metabolic processes;
- calcium - to strengthen the stem and root system;
- copper – for developing immunity to fungal and infectious diseases.
The lack of these components contributes to slower growth, the appearance of spots on the leaves, and the development of fungal diseases. An excess of chemical elements can lead to rapid leaf growth and lack of flowering, as well as tissue death.
A deficiency or excess of one component affects the digestibility of others, so phalaenopsis requires complex feeding. Organic fertilizers are not as important for an orchid as mineral ones. But to maintain a healthy diet, some gardeners add organic matter.
The disadvantage of mineral fertilizers is the deposition of salts in the substrate, especially if watering is done with hard water. In this case, the substrate should be washed with running water once a month.
Among complex mineral supplements, Doctor Foley, Mister Color, Stimul, and Ferti Mix are often used. For abundant flowering, use Bona Forte. This drug is produced in two series - “beauty” and “health”, which must be alternated. The German drug Schultz Orchid Food and the liquid fertilizer “Ethisso” for flowering orchids have received many positive reviews.
Growth stimulants such as Epin and Zircon are also used to feed phalaenopsis.
In addition to industrial fertilizers, some gardeners use folk remedies. The most popular among them is watering phalaenopsis with strong tea and coffee. These drinks help acidify the substrate. They contain a rich set of microelements, but in small quantities. Therefore, such feeding will not be enough.
Water after boiling potatoes will help saturate the plant with potassium. It is filtered and cooled to room temperature, after which it is added along with watering. Potassium promotes the formation of flower stalks and strengthens the immunity of phalaenopsis.
Wood ash from coniferous plants contains a large amount of microelements and is easily digestible. But a high concentration harms the roots of phalaenopsis, so a weak solution is prepared for feeding. 200 grams of ash are diluted in one liter of water and infused for a day. After this, the liquid is filtered and used for watering at the root.
The disadvantage of using self-prepared fertilizers is the inability to calculate the proportions of microelements included in their composition. The environmental friendliness of folk remedies has not been scientifically studied. Therefore, to maintain the health and appearance of phalaenopsis, you need to use not only home recipes, but also industrial complex supplements.

Reproduction
At home, phalaenopsis is propagated vegetatively using lateral shoots. The formation of new shoots is facilitated by proper care and the temperature difference between day and night. Children can develop at the base of the leaf rosette and on the peduncle. After the shoots form, they are left on the peduncle until leaves and at least one root of their own appear. And then they are transplanted into a separate pot in a fine-grained substrate.

Another method of propagation is by dividing an adult plant. This method is used for phalaenopsis that have a large rosette of leaves. Using a sharp knife, cut off the top of the plant with several leaves. The apical cut is treated with wood ash and planted in a separate pot. Proper care helps the cuttings take root and, after a few years, turn into a full-fledged flowering plant.
Phalaenopsis flowering
To initiate phalaenopsis flowering, gardeners recommend reducing watering and placing the plant in a cooler place. After 3–4 weeks, the flower is returned to its usual conditions. Soon the phalaenopsis will give new arrows and bloom.
Usually, daily fluctuations in temperature and optimal humidity are sufficient for normal flowering of an orchid. With proper care and regular feeding, the plant will delight its owner with exotic flowers for a long time.

How to transplant phalaenopsis?
After purchase, phalaenopsis does not need to be replanted. It is replanted when the substrate has deteriorated and caked, that is, every three to four years. The procedure must be carried out after flowering in the spring. In winter, the plant is dormant, and replanting can negatively affect the processes of further growth and flowering.
When replanting phalaenopsis, you need to remove dry dead roots and old substrate. Roots that have stuck to the walls of the pot should be carefully separated. To do this, phalaenopsis is watered an hour before the procedure.
Replanting should be done in a substrate of fine and medium fractions, pre-soaked in water for two days to become saturated with moisture. Before planting the plant, the substrate is washed and mixed with chopped moss.
It is better to choose a transparent container for planting. Since the root system is involved in photosynthesis and needs light.
After transplantation, phalaenopsis needs to be fed once every two weeks. The drug “Zircon” is well suited for this.

Phalaenopsis pruning
Phalaenopsis pruning is carried out after flowering. The procedure is necessary to remove the stem on which the flowers were located.
The arrow is not cut immediately. In some cases it may bloom again. The peduncle needs to be trimmed when:
- the arrow has turned yellow or brown, and the purple one has turned dark pink;
- the peduncle has dried up;
- the arrow remains green for more than 6 months, but the phalaenopsis does not bloom.
You can trim the peduncle only after it has completely dried. To do this you will need regular scissors or pruners. The instrument must be disinfected before use. It is important not to damage the leaves during pruning. Damaged tissues are susceptible to infections. If the peduncle is completely removed, a new arrow will form in two to three months.
Stimulating pruning is carried out 5 centimeters above the dormant bud. It is better to do this in the spring. The procedure can push phalaenopsis to produce children.

Diseases and pests
Like other plants, phalaenopsis is affected by diseases and pests. Although orchids are considered capricious, they are rarely subject to diseases. Improper care of phalaenopsis at home makes it vulnerable to infections and fungi.
Due to incorrect temperature conditions and excess moisture, the root system suffers. Root diseases include gray and black rot. Signs of these ailments include:
- growth slowdown;
- softness of the roots and release of liquid when pressed;
- brown leaves.
Gray rot is characterized by the presence of fluffy white spots on flowers. At low temperatures and high humidity, it is difficult for phalaenopsis to fight the disease on its own. To save the plant, you need to monitor the conditions, remove the affected parts of the plant, and treat the cuts with any drying agent, such as wood ash. For treatment, a two percent Topsin solution is used. Three treatments are carried out at intervals of 10–14 days.

Black spots on the leaves indicate the presence of black rot. This disease is contagious, so the affected phalaenopsis must be isolated from other indoor plants. Treatment is carried out by spraying the plant with a solution of “Fundazol” or “Topsin”, and the affected areas will also need to be treated with the product.

With anthracnose, the shoots become covered with black spots. It can appear in poorly ventilated areas with high humidity. Treatment consists of treating the plant with preparations containing copper, such as Bordeaux mixture. The affected parts of the plant are removed, and the sections are sprinkled with colloidal sulfur.


Since pests can crawl onto other plants, infected specimens are transferred to a separate room until complete recovery.

Proper maintenance and care of phalaenopsis reduces the risk of disease. And for successful treatment it is necessary to identify and eliminate problems in time. This will help the plant recover faster and regain its former beauty and attractiveness.
17 but I 2016
Phalaenopsis- the most unpretentious orchid when growing at home. The phalaenopsis orchid is recommended for all beginning gardeners to buy, since this exotically beautiful plant is most adapted to home conditions, requires simple care compared to other orchids, but blooms no less impressively.
Phalaenopsis is called a butterfly orchid; translated from Latin, the name of the orchid literally means “like a butterfly.” The fact is that the Dutch botanist Blum, who was the first to find this orchid on tropical islands, from afar mistook its flowers for fluttering butterflies, and so the name was born from two words “phaluna” - butterfly and “opsis” - similar.
Phalaenopsis orchid flowers depending on the type and variety, the diameter can reach from 2 to 15 cm. They have an original shape, which is formed by three upper petals, two lower ones and a protruding center with two side lobes and a lip on which there may be antennae. The orchid flower seems to be cast from wax, has a beautiful color in a solid white, pink, purple or red color, with tints and bright spots, strokes or stripes. There are species of phalaenopsis with flowers that have a subtle, pleasant aroma, which can be detected for several weeks after the flowers bloom in the mornings or evenings.
The peduncle of phalaenopsis is long, arched, weakly branched, and the flowers on thin stalks seem to fly up from it. Phalaenopsis is also valued for its long flowering; each blooming orchid flower lasts for 2-5 months. In addition, the phalaenopsis orchid, under favorable conditions and proper care, can bloom 2-3 times a year, producing new flower stalks, so you can admire the luxurious flowers all year round.

Phalaenopsis orchid leaves dense, leathery, shaped like a long tongue, they grow in pairs, located on the shortened stem of the plant. Adult orchids can have 5 to 10 leaves. The lower leaves gradually die off naturally, they turn yellow and dry out. To replace the old leaves, a new pair of leaves appears alternately from the growing point. Young leaves are bright green, but they darken over time. Phalaenopsis can grow up to three new leaves in a year.
Orchid roots thick, cord-like, can be green, yellow or white. Since phalaenopsis are epiphytic plants, in nature they grow on trees, snags, stumps, their roots are not adapted to develop in ordinary soil, they need air and light. The roots of phalaenopsis, like the leaves, participate in the process of photosynthesis. At home, phalaenopsis is grown in transparent pots, in a substrate consisting of pieces of bark with the addition of moss, so that the orchid roots are in an environment similar to the natural one. If phalaenopsis is planted in ordinary potting soil, the roots of the plant will quickly rot and the plant will die.
New roots constantly appear at the base of the orchid stem; at first they look like small bumps, then they thicken and lengthen. Young orchid roots have a grayish coating; they like to climb out of the pot and turn green in the light. Orchid peduncles, unlike roots, can be seen in the axils of the lower leaves. The young peduncle has a light green color, it stretches upward and you can see buds on it, which over time can give rise to new branches or buds.

Genus Phalaenopsis (Phalaenopsis) There are up to 50 species of orchids. Mostly hybrid phalaenopsis go on sale; they are more suitable for growing at home, they bloom better, and the choice of orchid based on the color and shape of the flowers is yours. When purchasing an orchid, the plant is also selected by size. Large orchids have leaves from 20 to 40 cm long, their flower stalks rise to a height of 80-100 cm, such plants occupy a lot of space. Specially bred orchids with average parameters or mini phalaenopsis are better suited for home conditions; they accordingly have smaller leaves, their peduncles are shorter and their flowers are slightly smaller in size than those of large orchids.
Conditions for phalaenopsis orchids
Temperature. In nature, phalaenopsis grows in the hot tropics of Asia. The optimal temperature for the growth and flowering of an orchid is within +18...+25 degrees, but not lower than +16 degrees. It’s good if the temperature during the day is +22…+25 degrees, and at night 5 degrees lower than +18…+20 degrees. Such a difference can be created on the loggia in the summer or by placing the orchid on the windowsill, where under the sun's rays the plant will heat up during the day and cool down at night. With such a temperature difference between day and night, your orchid will bloom magnificently. If the temperature of the orchid is higher than normal, it will actively grow, forming new leaves, but will not bloom. At low temperatures, the risk of root rot increases, buds fall off and growth weakens.

Growing a phalaenopsis orchid at home is easy because this heat-loving plant prefers regular room temperature. For this orchid, you do not need to create special conditions with a certain temperature, humidity and lighting. Phalaenopsis has virtually no dormant period; new flower stalks and buds can form at any time of the year, sometimes with a short pause of several weeks or months between flowering.
Orchids do not like drafts; phalaenopsis needs enough air in the apartment; it is not advisable to take them outside in warm weather. Orchids are sensitive to sudden changes in conditions; they do not need hardening.
Lighting. Phalaenopsis needs sufficient lighting to bloom; the sun's rays should illuminate the orchid in the morning or evening; the plant should be shaded on a south-facing window during the day. It is best to place phalaenopsis on an eastern window, where the flower will receive enough light and not suffer from the hot rays of the sun. With the reduction of daylight hours from November to January, phalaenopsis can be moved to a south-facing window without shading, then the orchid will not stop flowering even in winter.
An orchid always grows towards the light, so that its stem does not bend; every 2 months the pot with the plant is turned first on one side, then the other towards the window. When the peduncle grows and buds form, you cannot turn the orchid, as the buds that appear may fall off. After the flowers open, the orchid can be turned so that the peduncle decorated with blossoming flowers and butterflies is clearly visible. A sudden change in light level, for example, prolonged cloudy weather, can also cause buds to fall off the peduncle.

Air humidity Phalaenopsis prefers tall, since the plant comes from tropical rainforests, but it tolerates dry air in an apartment even in winter. However, with low humidity, orchid leaves do not grow to normal size. To increase air humidity, place the orchid pot on a wide tray filled with damp moss or expanded clay. You should spray the orchid carefully so that the droplets do not fall on the flowers.

Phalaenopsis - home care
Placing an orchid in the house and providing the plant with the most favorable conditions does not mean that the phalaenopsis will bloom luxuriously when cared for like ordinary indoor flowers. An orchid requires special care when grown at home; the choice of pot, substrate, planting, watering and fertilizing of a home phalaenopsis orchid has its own characteristics.
Planting phalaenopsis carried out in transparent pots with large drainage holes in the bottom. Plastic transparent pots are convenient to use for growing orchids; you will see the condition of the roots and substrate, and also determine the time when it is time to water the orchid. An orchid is replanted as needed, when the roots become cramped in the pot and the substrate loses its properties - it turns green or becomes moldy. Usually an orchid is replanted after 2-3 years; the plant painfully endures damage to its fragile thick roots.

To plant phalaenopsis, use pieces of bark with the addition of sphagnum moss and a small part of charcoal. Since in nature phalaenopsis grow on trees in the forks of branches, settling on bark with moss, their roots need access to air and light. Usually they use boiled pine bark with pieces 1-2 cm in size. Having placed the orchid roots in a pot, they are covered with pieces of bark on top and the surface is covered with sphagnum moss.

Watering phalaenopsis also has its own characteristics. The thick roots of the orchid do not tolerate constant humidity; they need access to air, so when growing at home, the orchid is grown in a substrate made from pieces of bark. In the tropical forest it often rains, washing the plants with warm, soft water. At home, you should also water the orchid with soft filtered water heated to a temperature of about 35 degrees, i.e. warm to the touch. Warm watering activates the growth of leaves, peduncles and the formation of buds in the orchid.
Water the phalaenopsis by immersing the pot in water to the top for 15 minutes, during which time the roots of the plant will be saturated with water and pieces of bark will absorb moisture, and then gradually release it to the plant. Having taken out the pot, the water from it should completely drain through the drainage holes, then the plant can be returned to its original place.
You need to water the orchid only after the moisture has completely evaporated from the pot; you can tell by the fact that the droplets disappear on the transparent walls. It is better to water phalaenopsis less often than more often; usually, the procedure of immersing the pot in water is carried out once every 3-4 days in the summer or once a week in the winter.

Fertilizer. In nature, phalaenopsis has limited access to nutrients, receiving most of it from water and air. When growing in an artificial environment, we have the opportunity to give the plants additional fertilizers, but for orchids, fertilizers for ordinary flowers that grow on the ground are not suitable. For orchids, there are special fertilizers with the required ratio and concentration of nutrients, which must be applied strictly after a certain period of time. The orchid needs additional feeding during the period of peduncle growth and bud formation, but as soon as the first flower opens, you cannot water the orchid with fertilizer. Excess nutrients can lead to bud drop and fatty leaves.