Window opening without a quarter. Guide to self-installation of windows. Preparation for window installation: tools, dismantling and alignment

Plastic windows have long been firmly established in modern life. They are installed in buildings and structures for absolutely any purpose due to their versatility and unsurpassed qualities compared to traditional wooden structures. Dimensions play an important role when installing windows. The quality installation of plastic windows depends on correctly taken measurements.
The importance of correct measurements
The manufacturer usually offers the services of its own measurer. This service is free. The product is manufactured on the basis of a measurement sheet, where the measurer indicates all the necessary parameters. If, when installing a window, difficulties arise due to an incorrectly manufactured product, the manufacturer will bear responsibility.
As a rule, window measurements are carried out by the manufacturer
If the customer provides the dimensions himself, then at the stage of signing the contract for the provision of services for the manufacture and installation of plastic windows, he signs the measurement sheet, which is drawn up by the manager based on the provided dimensions.
With his signature, the customer confirms the correctness of the dimensions indicated in the measurement sheet, in his words, which means that if the window does not fit during installation, the customer will bear responsibility and all financial costs for remaking the product will fall on his shoulders. When taking measurements yourself, it is important to approach this matter extremely responsibly.
General rules
Measurements of window openings are performed from two sides: from the inside and from the outside of the room. In this way, the first important value is determined - the depth of the window opening.
In panel houses, a typical situation is when the window openings were initially made with significant distortions at the stage of installation of slabs during the construction of the house. These values should be taken into account when installing plastic windows, and based on them, increase the size of the manufactured window. Internal and external measurements should be compared and the error determined.
 When taking measurements, it is necessary to take into account possible distortions
 After installing the window, to visually correct the curvature, you can use slopes, which not only give the window opening a neat appearance, but also prevent condensation from accumulating due to high humidity, thereby preventing the formation of mold.
To identify possible miscalculations, it is useful to compare the internal dimensions of the opening with the expected dimensions of the new window. The error in measurements should not exceed ten millimeters.
Quarter windows
When installing a plastic window in a brick house, there are some nuances. Window openings in brick houses are characterized by the presence of quarters, which are protruding brick fragments that prevent the possible loss of window frames. According to standards, a quarter should have a size of 6.5 cm, but in practice this size can be any.
 The standard size of a quarter is 6.5 cm
 Therefore, it is extremely important to take this feature into account so that during installation there are no problems with the installation of drainage. To do this, provide a distance from the upper border of the lower quarter to the window frame of 1.5 - 2 cm. The window frame should be installed no higher than 1.5 cm relative to the upper quarters, and 4-5 cm relative to the side quarters.
During installation there should be no contact between the frame and the existing window opening. The gap size at the bottom should be at least 4 cm, at the top and side - at least 5 cm. This is due to the fact that plastic windows are installed using polyurethane foam, which has the property of primary and secondary expansion.
 When installing a window in a brick house, it is necessary to take into account the presence of quarters
 To prevent the structure from “sinking” after a secondary increase in foam volume, spacers are installed around the perimeter of the window at the window installation stage.
If, when installing a window, it is planned to install an external drainage system and a window sill, then this entails the need to install a support profile to which these elements will be mounted. Therefore, the height of the window must be reduced by the height of the stand profile, which is 3 cm.
Windows without quarters
When deciding how to measure a window without quarters, you need to do a few simple steps. The width of the future window is calculated after measuring its upper and lower parts. In this case, for the calculation, a smaller value is taken, from which 4 cm is subtracted for the placement of installation seams on both sides - the result is the width of the future product.
It is worth considering that the greater the error when measuring the width in several places, the greater the number of centimeters that will need to be subtracted to determine the final size.
 The size of the seams must be subtracted from the width of the window opening.
 Calculating the height of a window product follows the same rules as determining the width, only in this case, about 2.5 cm should be subtracted from the resulting value for the installation seam and 3 cm if a stand profile is installed.
Why do you need a stand profile?
A stand or substitution profile is an element that is placed at the bottom of the window product and has a height of 3 cm. An external drainage system made of powder-painted metal is attached to the stand profile. The ebb prevents the accumulation of precipitation and protects the installation seam from it.
 A support profile is needed to secure the drainage system
 On the inside of the room, a PVC window sill board is attached to the stand profile, which also hides the installation seam and makes the appearance of the window aesthetically pleasing.
 A window sill is attached to the substitution profile from the inside
 It is important to know that when installing a PVC window sill, its width will be 5 cm greater than a standard wooden one. At the request of the customer, the window sill can be made up to 70 cm wide, but it is necessary to take into account that the heating radiator does not pass under it, since a wide window sill will prevent the proper circulation of warm air.
 It is not recommended to install a window sill that is too wide above the battery
 When calculating the width of the window sill, take into account its overhang, which cannot be less than 1 cm. The length of the window sill is equal to the width of the opening with access to the wall on both sides, which should not be less than 5 cm.
Features of measuring a balcony window
The structure on which the window will be installed in this case will be the balcony fencing, so the width of the window will be equal to its length. Since the combination of the side and front parts of the structure will be carried out by installing a corner profile in the required place, their width should be subtracted from the length of the fence - this will be the width of the new window.

The height of the product is the distance from the top of the fence to the balcony slab of the above floor. From this value you need to subtract 3 cm for making the installation seam.
Features of measuring window openings in private houses of old construction
Before measuring a window opening in an old private house, it is necessary to identify the actual dimensions of this opening. This requires dismantling the slopes. Often, significant gaps are hidden under the slopes, sealed with cement or insulation.
 Before measuring a window opening in an old house, it is necessary to dismantle the slopes
 During dismantling of the old frame, this entire additional structure may collapse and it turns out that the opening is much larger, which will only be a plus. But, if measurements were previously made using old windows, then all the free space will have to be restored instead of using wider windows.
When choosing a design, you should decide on its color, configuration, the presence of sashes and the desired opening mechanism, the presence of a window sill and ebb and flow.
As for the color range, the standard color of PVC windows is white; laminated profiles in walnut, mahogany, cherry, and oak are common. It is also possible to produce them in other colors, but due to their limited use, the cost of such windows is much higher. It is important to take into account that all windows on the facade of the building must be made in the same style and color, otherwise its architectural appearance will be disrupted.
The window configuration can be different: square, rectangular, round, triangular, polygonal, arched. Modern technologies for the production of plastic windows make it possible to realize any design ideas. In this case, the diameter of the arched structure should not be less than 50 cm.
 The diameter of the arched window must be at least 50 cm
 A plastic window can be blind or have sashes that are positioned vertically or in the form of a transom. When choosing the width of the sashes, it is important to consider that it may have a limit according to the catalog of window systems. Since perimeter fittings have limitations, the swing-and-turn sash cannot be made less than 40 cm wide.
The opening mechanism can be rotary, tilt or turn-tilt. When installing windows in panel houses, casing is not installed, but the slopes are finished and drainage is installed.
 In panel houses, when installing plastic windows, drainage systems are installed and slopes are finished
 In private homes, cashing is used to mask the installation seam and protect it from the effects of precipitation. If a low tide is installed, then cashing is mounted on three sides; if there is no low tide, then on four.
If all the windows on the facade are to be replaced, then everything must be measured at once. Their height may be almost the same, but their width may differ. For manufacturing, you need to take the smallest value of the measured window.
To determine the location for installing the window unit, the thickness of the wall must be known. From the inside, the structure should be mounted to a depth equal to 2/3 of the width of the wall, while you can take into account the width of the external insulation and install it further.
If you add 5 cm to the width of the opening for the bend and 4 cm for the protrusion, then the required value of the drainage width will be known. If the wall is sheathed, then this thickness must also be taken into account. The width of the slopes is measured only after installing the window block.
If you or someone you know has previously used the services of companies installing double-glazed windows, then you know that installation can be normal and in accordance with GOST. The second option is more expensive, but if all the requirements are met, the quality will be much higher than in the first (you can read more about the standards in GOST 30971-02).
Consists of several stages.
Note! Manufacturers do not provide a guarantee if the measurements were not carried out by their employees. If installed incorrectly, the windows will soon begin to freeze, and if even the slightest mistake was made in the calculations, the structure simply will not fit into the opening.
However, if you study all the intricacies of the process, then no difficulties will arise during installation. Moreover, this way you can save a decent amount of money.
Video - Installation of PVC windows according to GOST
Stage 1. Measurements
In most apartments there are openings without a quarter.
Note! A quarter is an internal frame 6 cm wide (or ¼ brick, hence the name) that prevents the window from falling out and strengthens the structure as a whole.
If there is no quarter, then the frame will be installed on anchors, and the foam will be covered with special covers. Determining the presence of a quarter is quite simple: if the internal and external widths of the frame are different, then there is still a quarter.

- First, the width of the opening is determined (the distance between the slopes). It is recommended to remove the plaster for a more accurate result.
- Next, the height is measured (the distance between the slope above and the window sill).
Note! The measurements must be repeated several times and the lowest result taken.
To determine the width of the window, two installation gaps are subtracted from the width of the opening. To determine the height, the same two gaps plus the height of the profile for the stand are subtracted from the height of the opening.

The symmetry and straightness of the opening are checked, for which a mounting level and plumb line are used. All defects and irregularities must be indicated in the drawing.
To determine the width of the drainage, add 5 cm to the existing drainage for bending. Also, the width of the insulation and cladding is taken into account (subject to subsequent finishing of the facade).

The dimensions of the window sill are determined as follows: the width of the opening is added to the size of the overhang, and the width of the frame is subtracted from the resulting figure. Regarding the offset, it should cover the heating radiator by a third.
Note! measured after installation is complete.
Stage 2. Order
After measurements, the finished drawing should be taken to the window manufacturer, where all the necessary fittings will be selected. It is worth remembering that installation can be performed in one of two existing ways:

In the first option, you will have to pull the package out of the frame, insert it into the opening and install the glass back. In the second case, the entire structure is attached as a whole. Each option has disadvantages - if you pull out the package, it can; and vice versa, if the window is installed assembled, it can be damaged due to its heavy weight.
Prices for a popular line of windows
Stage 3. Preparation
This stage of installation begins only after delivery of the ordered windows. First, the workplace is cleared, all furniture is covered with plastic wrap (there will be a lot of dust).


Step 1. If required, the glass unit is removed from the window. To do this, the glazing bead is slightly pryed with a staple and pulled out. First of all, the vertical beads are removed, then the horizontal ones. They must be numbered, otherwise gaps will form after installation.


Step 3. The bolts are unscrewed after the plugs are removed from the canopies. The handle is turned to the “ventilation mode” (in the center), the window is opened slightly and removed. All that remains is the frame with imposts.
Note! Imposts are special jumpers designed to separate the sashes.
Then you need to make a marking for the anchors and make holes along it - two on the bottom/top and three on each side. To do this, you will need ø1 cm anchors and a drill of the required diameter.
If the material from which the walls are made is not dense (for example, cellular concrete), then fastening is carried out using anchor suspensions. The latter should be fixed to the wall and frame with hardened self-tapping screws (eight pieces for each).
Note! To avoid the formation of a thermal bridge in the window sill profile, it should be filled the day before installation. This way the element will not freeze.
Stage 4. Dismantling work
This procedure is recommended to be carried out immediately before installing a new window. In most cases, the old ones are thrown away, so the structure can be torn out along with the fastening, and if necessary, the frame can be sawed.


Step 1. First, the seal and thermal insulation are removed.
Step 3. The window sill is removed and the cement layer underneath is cleaned off.
Step 4. Adjacent surfaces are treated with a primer material (by the way, many installers forget about this). In the case of a wooden opening, a layer of waterproofing material is laid around the perimeter.


Note! Installation can be carried out at a temperature not lower than -15ᵒС. Polyurethane foam must be frost-resistant.
Stage 5. Installation of a plastic window

Step 1. First, wooden wedges are placed around the entire perimeter, a window is installed on them (this will make it easier to level the structure), only after this is it fastened to the wall. You can leave the backings - they will serve as additional fasteners.


Step 2. The absence of a support profile can be considered a gross violation of GOST standards, since it is not only needed for stability, but also makes it possible to install a low sill with a window sill. In the absence of a profile, they are attached directly to the frame, which violates its tightness.
The correct location of the stand profile is shown in the diagram.

Step 3. Next, the evenness of the window is checked in three planes, for which a mounting level and plumb line are used. It is typical that traditional bubble levels are not suitable for this due to insufficient measurement accuracy, so it is better to use.


Step 4. If the window is level, then it is secured with anchors. To do this, a wall is drilled using a hammer drill through pre-prepared holes in the structure (approximately 6-10 cm). The lower anchors are fixed (not completely), the evenness of the package is checked again, after which the remaining points are attached.
Note! The final screed is made only after the final inspection. Do not tighten too much, otherwise the structure will “skew”.
Prices for mounting foams and cleaning gun cleaners
Polyurethane foams and cleaners for construction guns
Stage 6. Drainage

From the outside, the ebb is attached to the stand profile with self-tapping screws. The joints are carefully sealed with sealant to prevent moisture from penetrating into the structure.

The edges of the ebb are recessed several centimeters into the walls, having previously made indentations using a hammer drill.
Note! Before installation, the bottom gap is also sealed.
Stage 7. Window assembly


After attaching the anchors, the glass unit is inserted back.
Step 1. The glass is inserted and fixed with glazing beads (the latter should snap into place, for which you can lightly tap them with a rubber hammer).
Step 2. The doors are opened and their tightness is checked. In the open position, arbitrary opening/closing of the sash cannot happen if the window is installed level.
Step 3. The assembly seam is sealed on the sides. Polyurethane foam will provide high-quality waterproofing and prevent glass from fogging. Before and after sealing, the seams are sprayed with water to improve polymerization.
Note! The seams are filled to no more than 90%, otherwise the structure will “lead.” If everything is done correctly, after drying the foam will protrude out a few centimeters.
Step 4. The perimeter of the window is glued with a special vapor barrier tape, and material with a foil surface is used underneath.
Stage 8. Installation of the window sill

Step 1. The window sill is cut so that it fits into the opening and at the same time rests against the lining profile. There remains a small gap (about 1 cm) for thermal expansion. Subsequently, the gap is hidden by plastic
Step 2. Wooden wedges are placed under the window sill. It needs to be laid with a slight slope towards the room, and then applied with something heavy until the foam dries. Additionally, the window sill can be fixed with anchor plates.

Video - Instructions for installing plastic windows
conclusions
Now you know how plastic windows are installed, so you can safely get to work. The final check of all elements can be carried out only 24 hours after completion of installation (then the foam will have already “set”).
The described technology is also quite applicable to, although it also has its own nuances - such as, for example, installing a parapet to create a partition.


Find out how to do it correctly from our new article.
Depending on the builders’ choice of technology and material for constructing walls, openings in buildings can have different configurations - there are windows with and without quarter windows. The existing differences do not have a fundamental impact on the main characteristics of the houses. However, the further choice of methods for measuring and installing window structures depends on them. To avoid mistakes when choosing windows, determining their correct dimensions and during installation, we recommend that you read the useful information from this article.
Quarter window: what is it?
A quarter window cannot always be identified at first glance from the street, but upon closer examination its distinctive features are immediately visible. In the facade plane along the entire perimeter of the opening, including its lower zone, there is a small side. The technology got its name due to the fact that when constructing walls, the facing masonry covered the window opening by a quarter of the length of the brick. This distance is quite enough so that the protrusion does not impede the operation of the windows and successfully performs the functions assigned to it. This side provides the window structure with a number of advantages:- stable position of the structure in the opening - the quarter insures the frame from falling out;
- higher level of tightness - the presence of sides makes it difficult for moisture to enter the assembly seam and prevents blowing through the structure;
- facilitated installation - the projections serve as a guide and a boundary, so workers do not waste time and other resources on additional operations.
Although all of the above advantages are of great importance, it is necessary to place special emphasis on a high level of tightness. Thanks to this characteristic, heat loss is significantly reduced, windows fog up less, and mold does not form on frames, sashes and slopes.
The presence of a quarter extends the service life of the assembly seam, since the side effectively protects the hardened foam from the harmful effects of ultraviolet radiation, wind, dust and water.This method of constructing external walls is also effective in the construction of concrete and wooden houses. In all cases, the resulting side does not completely cover the frame and serves as an additional barrier and support for it. The presence of a protrusion makes it possible to install a quarter window according to GOST.

Window without a quarter - differences
The difference between the two types of openings lies in the surface topography of the slopes. It is quite easy to detect, and even a person far from construction can do it. Windows without a quarter do not have a pronounced transition from internal to external slopes. Smooth walls around the perimeter of the openings in such houses allow you to independently determine the dimensions of these areas during the installation of window blocks. That is, during installation, the movement of the frame forward or backward is not limited by any structural elements of the building.Typically, such openings are found in private housing construction, since property owners simplify construction technologies for themselves as much as possible. In addition, when constructing modern buildings from large foam blocks, it is problematic to create a small protrusion in the openings. At the same time, the absence of a side does not have a critical impact on the main operational characteristics of window structures, but still creates certain difficulties during installation:
- additional protection of the assembly seam is required;
- problems arise with the use of PSUL sealing tape, which allows the structure to “breathe”;
- it takes more time to give the windows the correct position and securely fix them in the opening.

If the necessary measures are not taken during the installation of windows in openings without a quarter, then depressurization of the installation seam and premature wear of the hardened foam are possible. As a result, the energy efficiency of any windows decreases, condensation occurs, mold and mildew develop, and even there is a risk of structural deformation. To avoid such unpleasant consequences, you need to correctly measure and then install.
Features of measuring windows with and without a quarter
The procedures for determining the correct dimensions of window structures differ for the two types of openings. When taking measurements, it is necessary to take into account the individual characteristics of buildings, otherwise installation problems are guaranteed, which can only be solved by manufacturing new windows.Since when performing this procedure there are many nuances that a person without experience will miss, the measurement of the window and a quarter should be carried out by a specialist. Moreover, this service is provided by many manufacturers and dealers free of charge.However, situations often arise when knowledge of the dimensions of window structures is needed to obtain. In this case, a small error is not terrible, and you can measure the window for such purposes yourself.

For openings without significant distortions, this is very easy to do. This requires:
- Determine the location of the mounting plane in which the window will be installed. Typically, to do this, the total thickness of the wall is divided by 3, after which the depth of the internal slope is measured. Most often it is 2/3 of the wall thickness. Accordingly, the outer slope occupies 1/3 of the total size.
- In the marked plane, the height of the opening is measured at three points (right, center and left). For further calculations, the smallest indicator of the obtained value is left.
- In the same plane at the bottom, middle and top of the light opening, its width is measured. The minimum size is again taken as the calculated value.
- Once you determine the actual height and width, you can easily calculate the window dimensions. To do this, you need to subtract the size of the gaps between the opening and the frame from the obtained dimensions. According to GOST 30971-02, tolerances for installation seams are 40-60 mm on each side.
- For the lower zone of the opening, when determining the gap, it is advisable to take into account the actual height of the support profile.
.jpg)
The recommended algorithm of actions can be used only in cases where the openings do not have significant distortions. In more complex situations, another technique is used, based on inscribing a rectangle into a trapezoid, parallelogram or irregular quadrilateral. These actions should only be performed by the master.
Sometimes a quarter is specially made in a straight opening before installation. In such cases, previously taken dimensions are not suitable for making windows. The procedure for determining the correct dimensions must be repeated using the algorithm for openings with a quarter.When performing this procedure, you need to correctly measure the light opening and determine exactly how much overlap the frame profile will have with the protruding section of the wall. After all, a quarter of a window, the dimensions of which ideally should be 65 mm on each side, in practice can be anything. According to the rules, the window frame must go inward beyond the light opening:
- from above – by 15-20 mm;
- right and left – by 20-40 mm;
- From below, the frame is raised using a stand profile 10-30 mm above the edge of the clearance (this is required for successful installation of the ebb).
- The height and width of the light opening, which is limited by the external slopes, are determined. This is done in exactly the same way as when taking dimensions from a window without a quarter.
- On each side, the dimensions of the internal protrusions along the entire perimeter of the opening are taken.
- Taking into account the obtained data and recommended tolerances, the possible overlap of the wall and frame in the upper and side zones is calculated. All this is done traditionally, taking into account the width of the installation seam (40-60 mm), filled with expanding foam.
- For the lower part of the window, the exact size of its elevation above the lower plane of the opening is determined.
- When calculating the height of the frame, you also need to take into account the distance between the inside of the wall and the window sill.

Specifics of installation in an opening with and without a quarter
Installation methods in different openings are not fundamentally different. After all, the protrusions only additionally protect the structures from falling out, blowing and exposure to moisture. At the same time, frames in different types of openings are subject to the same loads, so they must be fixed taking them into account. Installation of quarter windows is carried out according to the requirements contained in GOST 30971-2012, which can be found at OknaTrade.When installing windows without a quarter protruding into the opening, it is no different from the procedure according to GOST. All requirements remain relevant - the width of installation seams, the distance between fasteners and permissible distortions of the structure. The differences lie in the need to take measures to protect the installation seam from the outside. For these purposes, it is recommended to use special flashings and external platbands. They help not only protect the hardened foam, but also allow you to install PSUL tape, which will give the windows the opportunity to “breathe”.

It is preferable to install windows in openings with a quarter. If this is not possible, then all measures must be taken to protect the installation seam from external influences. It is recommended to discuss this point in advance with the installation team.
Installation of plastic windows begins... No, not with measurements, but with calculations: think about whether it’s worth spending time and whether you have the right tool. Yes, installing windows is not difficult, but it will require a whole day for three or four window openings. If you do not have a tool (at a minimum, you will need a powerful drill, or even better, a hammer drill) and the skills to work with it, then the work will take more time.
Advice: It is interesting to calculate how profitable it can be to install plastic windows, based on your income per day/week and an estimate of the time you will spend on installation yourself. If you are confident in your abilities, then you can choose to install it yourself, especially when it comes to wide, large windows. If we are talking about small window structures, specialists can do this too. And yet, installing windows alone is difficult; start preparing for installation by “working” with friends who can help you.
You have decided to install windows yourself: where do we start?
We start by inspecting the window opening. The first thing to determine is the type: with or without a quarter. It would also be useful to measure the depth of the window, because the greater it is, the warmer the window can be installed in the opening.
With or without a quarter – how can you tell?
- A quarter window has overhangs (their height is approximately one-quarter the length of a standard brick).
- A window opening without a quarter of protrusions does not have any projections, which means that the window is less protected from falling out.
Why do you need a quarter and what problems will happen if it doesn’t exist?
The quarter performs two functions:
- Window protection from falling out.
- Protection of the mounting foam (and the entire mounting assembly) from sunlight and moisture.
When installing a window in an opening without a quarter, you will have to use more fastening points. For windows with a quarter, it is enough to place the fastening points at intervals of 70 cm. For openings in which there is no quarter, it is better to play it safe and make smaller intervals - 40-50-60 cm, depending on the size and weight of the window.
Advice: How can you tell if a window opening has a quarter? It's simple, measure the height of the bottom/side of the frame, inside and out. If it's smaller on the outside, it's a quarter window. Remember that, depending on the design of the house, the quarter can be located both on the sides of the window and on top, and along the entire perimeter of the opening or only on the sides.
In a word, we now have to measure the window: and not seven times, but more.
Correct measurements before installing windows
Even in houses built according to a standard design, no two windows are alike. You can call a specialist to measure the openings: the cost of measurements will range from 400-600 rubles - in fact, you only pay for the visit of the specialist. It makes sense to call a measurer if you order the production of windows. When purchasing ready-made ones - and companies that install plastic windows often offer ready-made window structures for window openings of typical houses - you can measure the openings yourself.
We measure:
- The width of the window opening in three places - at the top and bottom of the opening and in the middle.
- The height of the window opening is on the right, left and in the middle.
- If there is a quarter, we measure the parameters of the opening from the right to the left side quarter and from the top quarter to the bottom of the opening.

From the obtained dimensions we subtract, if the window is without a quarter:
- 5 cm vertically.
- 3 cm horizontally.
If the window is a quarter, then subtract 3 cm from the distance between the upper quarter and the bottom.
The measurements are not over yet, since we need to estimate what the length and width of the window sill and ebb will be. We measure:
- The length of the window sill is added to it by 5-10 cm.
- The width of the window sill, add 4-5 cm to it.
- The length of the ebb is as accurate as possible.
- The width of the ebb, add 5 cm to it.
The measurements are completed.
Let's summarize the measurements
You can go to a company that produces and sells plastic windows if you have the following numbers:
- Window height.
- Window width.
- Length and width of the ebb.
- Length and width of the window sill.
Using these measurements, you can select a window from ready-made solutions or place an order for production.
Advice: Check what the manufacturer provides a guarantee for. If the warranty covers the fittings, the integrity (tightness) of the glass unit and profiles - everything is fine. If only for fittings, that’s also good. If the manufacturer refuses to give a guarantee on fittings or double-glazed windows, citing the fact that “you install it yourself, we cannot guarantee anything,” feel free to go to another company.
Are you sure everything is in order with the warranty? Check the delivery contents. In addition to the window of the specified size and the assembled double-glazed window, you should be delivered:
- Windowsill.
- Spacer profile.
- Window sill plugs.
- Low tide.
- Anchor plates that will be used to secure the window in the opening.

When ordering a window, please specify:
- Profile width.
- The number of cameras in a double-glazed window.
- The width and length of the supplied caps, flashing and window sill and spacer profiles.
Advice: ask about the thickness of the double-glazed window and what is the distance between the glasses in a two- and three-chamber package. If it is not the same, they sell you a good double-glazed window, made in accordance with GOST recommendations.
We deliberately do not touch upon the issues of choosing a window based on the type of fittings, double-glazed windows and design features (fixed, single and double-leaf, with a transom or window, etc.) This is a topic for a separate volumetric material. In the meantime, specialists from companies that manufacture and install plastic windows can talk about this in detail, with examples.
Choosing the installation method: plastic windows and installation technology
When ordering installation, the cost of installing plastic windows does not depend on how they will be installed. If you decide to take on the matter yourself, it is important to understand the differences between the two technologies:
- With preliminary unpacking and disassembly of the window.
- In one piece - without dismantling the packages and removing the doors.
The second option is chosen by installation teams: two or three people can easily install the window unassembled. If you install the window yourself, it will be difficult to hold the massive structure - it is much easier to disassemble the window by removing the double-glazed windows. But. In case of careless dismantling, the glass may be damaged, the seal of the bag may be broken, scratches and chips may appear on the glazing beads that hold the bag in the frame. You need to choose: are you ready to spend an extra hour carefully dismantling the double-glazed window, or do you feel able to lift and hold the window without disassembling it - even if only for a short time?
Depending on whether the installation is done with disassembly (unpacking) or without, the frame is attached to the walls of the opening in different ways:
- When installing a plastic window with unpacking, the fasteners are made through the frame to the wall, which, on the one hand, increases the strength of the structure, and on the other hand, makes it necessary to more carefully mark the places for installation.
- When installing a window without unpacking, the frame is attached to the opening through anchor strips, which are mounted on the top and sides of the window, thus located between the frame and the walls of the opening.

With the exception of increased power loads, the second option without unpacking has no disadvantages. The risk of damaging the glazing beads or plastic of the frame/sash is minimal, and you won’t have to accurately check the locations of the fastening points, because the anchor strip can be rotated as needed, choosing a suitable place for the reciprocal fastening to the wall.

Advice: If you are an inexperienced installer, then choose the installation option without unpacking - it will be faster. If you install windows at a low height, up to the 5th-6th floor, then you can also refuse unpacking. If the window is located high, from the 10th floor and above, choose the option with unpacking. If the windows are large, too.
Preparation for window installation: tools, dismantling and alignment
So that after installing plastic windows you do not find dew inside the double-glazed window, so that the window does not bend in an arc from the pressure of the foam or does not begin to “walk” along with the surrounding sections of the wall, the place for installation must be prepared. We have to:
- Remove the old window.
- Remove any remaining fasteners and trim.
- Treat the window sill, slopes and ebb.
Important! In wooden houses, installation of windows is complicated by the fact that seasonal (temperature) expansion and contraction of logs or beams will have to be taken into account. To compensate for them, a rather complex design is used - a pigtail. This is discussed in a separate paragraph in the instructions for installing plastic windows.
Removing the old window
Most likely, you need to dismantle a wooden window - firmly sitting on durable Soviet hardware. It’s better to start by removing the sashes: the smaller the weight of the dismantled structure, the easier it is to dispose of it. Is it worth removing the glass? Rather yes than no. Glass can still be useful, but remember that the larger it is, the more difficult (and dangerous) it is to carry. If you can’t think of a use for glass, feel free to leave it in the frame.
Adviсe: First, always remove the sashes before dismantling the window. Use a chisel or the flat part of a pry bar to “break” any stubborn paint or rust and lift up the sash hinges. After this, it is usually easy to remove by hand. Second, cover the glass crosswise with tape. The wider it is, the better. Apply adhesive tape to the joints of the glass and the sash. This will protect you from glass falling out and from fragments if the glass breaks.
It is easier to remove the frame by first sawing it on the sides, top and bottom. The separated sections of the frame are removed using a pry bar or a chisel and hammer.
Do not rush to remove the entire wooden frame of the frame at once - leave one “cut”: during installation, plastic windows require lining and leveling wedges, which can be quickly cut from the same sash.
Preparing a window opening after dismantling the old window
Remove dust and small construction debris from the surface of the window sill and slopes. Drive the old fasteners deep into the wall or pull them out: it is better to fill the holes from the old anchors with putty.
The window sill is also removable - the surface underneath does not need to be leveled, since the new plastic window sill will rest on a foam cushion and, possibly, wedges.
If you have time, then, of course, you can do a little work on leveling: using quick-drying putty.

Installation of a plastic window
Take your time, first mentally divide the work into stages. The most convenient way to distribute it is like this:
- We mark places for fasteners.
- We install fasteners in the frame.
- We deepen the places marked for fasteners in the window opening - that is, we simply knock down plaster, concrete or brick to a depth of 4 cm. In terms of width, if you are installing a window for the first time, it is better to play it safe and make the deepening area larger.
Marking the space for fasteners
Here everything should be done according to GOST: the distance between the fastening points should not exceed 70 cm. At the same time, a distance of about 10-15 cm can be left between the walls of the opening and the outer fastening elements.
Make the markings with an indelible marker, so that you don’t have to look for erased marks later. If possible, mark the marked areas. This will simplify their search and make drilling for dowels or anchors more accurate.
Advice: It would be useful to connect the fastening points with lines, along which you can quite accurately estimate the distance between the fastening points and on the frame itself.

Installing fasteners into the frame
Let us remind you that if you choose to install a plastic window with unpacking, you will have to prepare the window:
- Remove the glazing beads.
- Remove the glass unit.
- Place and level the frame, first opening the doors.
After this, long self-tapping screws are used to fasten the window through the frame into the opening. The difficulty is that the window will have to be aligned vertically/horizontally in advance, and there will be practically no opportunity to somehow correct the inaccuracy of the markings.
If you followed the advice and preferred installation without unpacking, it’s time to start installing the fasteners on the frame. Here we will be helped by previously made measurements and marks on the surface of the window opening. Special precision is not needed here, since the direction of the anchor plate can always be changed.
 For leveling, wedges are used - stands made of wood, brick or a suitable piece of concrete. It is better if these are wooden wedges: they can be used with separate pieces of the old wooden frame disassembled during dismantling. As a rule, this is wood that has been tanned by wind, rain and sun, and is strong enough to support a heavy window.
If you have prepared the window opening correctly, then most likely you will not need wedges. If the window does not want to be aligned horizontally and vertically, we begin to work with wedges. Need to remember:
- It's better to have two smaller wedges than one big one.
- The wedges must be placed strictly under the perpendicularly located parts of the frame: the lower and upper ones - under the vertical ones, and the side ones - opposite the horizontal ones.
- The order of installation of wedges is two lower, two upper (vertical), right and left.
After setting the height of the window, you can fasten the upper anchor plates - not completely, but so that the window is fixed.
The presence of a mounting strip greatly simplifies the alignment process.
The window, adjusted in height and horizontally, can be fixed. And here many people have a question: how to fasten it. Dowels or anchors? In principle, there are enough dowels to support even a large window. But is it worth saving on a window? In our opinion, anchors are preferable as a more reliable fastener, although you will have to tinker with driving them in.
During fastening, the anchor plates can be rotated; the angle of rotation depends on how accurately you have marked the fastener locations and how accurately you have matched the fastenings on the frame to them.
 The ebb is pre-cut to the required length. Mounted externally, on self-tapping screws. It is better to choose self-tapping screws with a moisture-proof cap or seal for fastening.
Possible options:
- Installing fasteners into the frame (undesirable, since a metal screw is a real cold bridge between the street and the internal chambers of the window profile).
- Fastening to the wall under the frame.
Before installing the drip tide, you need to clean and dry the section of the wall that it will cover. Additionally, the joint between the frame and the lower part of the window opening is treated with sealant.
After this, you can begin sealing the window.
Window sealing: PSUL, foam, membrane
Leaky or incorrectly made installation seams between the frame and the walls of the window opening are one of the main causes of problems with plastic windows. Incorrect means ignoring the recommendations of the domestic GOST 30971-2002 Assembly seams of junction assemblies.
According to GOST, the seam between the wall of the window opening and the frame must be multi-layered; this is the only way to succeed:
- Seal the contact area between the wall and the frame.
- Provide protection from moisture (including condensation) and wind.
- Protect the seam from ultraviolet radiation and high temperatures.
The construction seam according to GOST includes three layers:
- Protective external vapor permeable.
- Internal heat insulating.
- Internal membrane, moisture-proof.
The first (outer) layer is perfectly done using PSUL - a pre-compressed self-sealing tape. It is located:
- In the seams between the frame and the window opening.
- Under the tide.
- Between the window sill and the spacer profile.

This tape can be found at any hardware store. The adhesive layer allows you to securely attach it to any surface. In our case, the PSUL is placed on the wall, after some time the tape expands, filling the smallest voids in the seam.
After the tape, the seams are foamed. To prevent the polyurethane foam from pressing on the frame profiles, it must be applied in several stages, with an interval of 10-15 minutes.
The next layer of “seam of the junction assembly” can be done later, a day or two after installing the window, during which time the foam will finally harden. As the last layer, you can use membrane adhesive tape.
 Everything is quite simple here:
- The window sill blank (profile) is cut to the required length.
- The finished cut is applied to the spacer profile.
- Wedges are driven under the window sill to ensure even horizontal/height alignment.
- Plugs are placed on the windowsill (included in the kit).
- The cavity under the window sill is foamed.
- We place a load on top of the window sill - containers with water, heavy things.
- We wait a day.
- We cut off the foam and, if necessary, treat the cut surface with putty - for painting, plaster or wallpaper.
In general - everything. All that remains is the finishing work, which can be carried out after installing the plastic windows in two to three days:
- Installation of plastic slopes or plastering.
- Plastering the external surfaces of slopes.
You can also check how smoothly the window was installed and how the fittings work. Open/close the window, open it and see if the sash opens on its own.
Installation of plastic windows in a wooden house
The technology for installing plastic windows in a wooden house differs significantly from the traditional one. The bottom line is that the thermal expansion of wood (timber, logs) and plastic differs. Plus - the tree either absorbs moisture, expanding, or gives it away, drying out. Therefore, the installer’s task is to compensate for the thermal expansion of the walls, to make the window “floating” in the opening.
To solve the problem, a pigtail is used. This is a wooden structure, a box and timber, which is put on vertical and horizontal grooves in the window opening.
Otherwise, the installation procedure is similar, except that it is not worth spending so much time on the exact alignment of the fastening points on the frame and in the opening.
As you can see, installing the window yourself is not difficult. If you are not sure that you can cope with the task, if the window has a complex shape (arched, round) or is simply very large, it is better to order installation along with production. You can select a manufacturer and company that installs plastic windows in the appropriate section of our portal.
Before starting installation work, it is necessary to completely clear the window opening and the space next to it:
- remove everything from the windowsill,
- take down the curtains
- clear the approach to the window by moving the furniture at least 1.5 meters from the window.
Protect the room from dust and dirt by covering the floor and furniture with cloth or thick oilcloth.
For ease of installation, supply 220V power via an extension cord and prepare garbage bags.
Removing the old frame
Once the room is ready for dust and debris to appear, begin dismantling the old window frame.
The sashes are removed from the window. Window casings are dismantled. If necessary, the slopes are dismantled (knocked down).

The old window frame is dismantled, which usually causes serious damage. If you want to use old windows, for example in a country house, you should specify the option of preserving the old windows when ordering.
The old sill and the old window sill are dismantled.
PVC window installation

The sashes are removed from the plastic window and the glass unit is removed. The window frame is inserted into the prepared opening and secured with anchor bolts or mounting plates. In this case, it is necessary to strictly ensure that the frame is level, and not along the opening (in houses there are often cases when the horizon line of the window opening is far from ideal; the frame should also be aligned vertically). Otherwise, the window will not function properly.

The gaps between the wall and the frame are foamed with polyurethane foam. Foam performs both an insulating function and is a fastening element. The overall result largely depends on the quality of this installation stage. The foam should be applied evenly and fill all the recesses and cavities of the opening, and the degree of expansion of the foam must be taken into account.

Installing a plastic window in most cases means that along with the new window a new window sill and a new sill will be installed. An exception is the case when the apartment (house, room) is undergoing renovation work and the window sill can be installed on its own.

If the window being mounted opens onto a balcony (as in this case), then it is quite practical and functional to install a window sill instead of a low tide (on the outside of the window).
If you have a good old sill, you can save it for a new window, but in this case you will need to restore it (restoration) - a paid service, the cost of which differs slightly from the cost of a new sill.
The window sill is cut to fit the opening and attached to the window (to the stand profile). If the opening under the window sill is small, then it foams. Otherwise, masonry or sealing of the opening with mortar is necessary. When installing a window sill board, make sure that it has an inclination from the window within 5 degrees, and that the overhang beyond the inner surface of the wall is no more than 60 mm.
When installing the window sill, you should take into account that its edges extend beyond the finishing of the internal slope to a depth of at least 15-20 mm.

Advice: when choosing the width (depth) of the window sill, it should be taken into account that the window sill is “recessed” under the window frame by 2 cm, so the width of the installed window sill will be 2 cm less)

All gaps between the window and the opening are filled with foam, and when it dries, they are insulated. The outer layer of insulation is designed to protect the insulation layer (which is a layer of foam) from the penetration of moisture into it, as well as from the damaging effects of the sun.

So, the main part of the work is finished. However, to finish the opening there are not enough slopes (which are both a decorative addition under which the mounting foam can be hidden, and a functional element - increasing the thermal insulation and sound insulation of the window opening). Plastic slopes will give the window a finished look, moreover, this is the best combination with plastic windows.
Installation of plastic slopes

Plastic slopes are installed on the same day as the window for panel and block houses and on the second day for Stalinist houses.

The slopes are either a Belgian sandwich panel (in the image) or German plastic VEKA slopes with removable trims.
The differences between the various plastic slopes are not significant, but you should know them.
The Belgian sandwich panel can be installed at dawn (not at a right angle to the window), which visually increases the window opening. The choice of VEKA plastic slopes is justified for more accurate wallpapering with already installed slopes. Thanks to the removable casing, the edges of the wallpaper will be neatly hidden under it.
Advice: If you are renovating your apartment, then it is better to install platbands on the slopes from a Belgian sandwich panel after gluing the wallpaper yourself - it will turn out neater and prettier).
Installing accessories on windows

At the final stage, a double-glazed window is installed in the window frame and the sashes are hung. Additional accessories are installed, additional fittings and components are attached, such as: step ventilator, clamp, mosquito net, blinds, etc.

The window is ready. Upon completion of all work, a work acceptance certificate is signed. In it, if necessary, the customer indicates his comments on the work performed, if any.
Almost immediately after all the work is completed, the PVC window can be used. The exception is windows with large opening sashes, which are not recommended to be opened within 24 hours after installing the PVC window.
In terms of functionality, a plastic window is much better than old wooden windows. If you follow simple instructions for its care and use, it will last you forever.
Don't forget to remove the protective film from the outside of the PVC window!
According to GOST 30674 "Window blocks made of PVC profiles":
Removing the protective film from the front surfaces of the profiles should be done after installing the products and finishing the installation opening, taking into account that the duration of exposure to sunlight on the protective film should not exceed ten days.

If renovation work is still underway in the room where the windows were installed, the protective film may remain on the product until completion. However, on the outside, the film should not be exposed to sunlight for more than 10 days.
The adhesive base of the protective film loses its properties when exposed to heat and UV and can spoil the aesthetic appearance of the plastic profile.
General installation requirements according to GOST
GOST 30971-2002 “Mounting seams of junctions of window blocks to wall openings. General technical conditions" was put into effect by order of the State Construction Committee of the Russian Federation on March 1, 2003.
Due to the need to adjust design documentation for design and construction organizations, the transition period for the development of GOST is set until 07/01/2003. The republics of Azerbaijan, Kazakhstan, Kyrgyzstan, Moldova and Uzbekistan have joined the Russian standards.
What's new? New standards bring significant formalization of window installation and require numerous documents. Among them, it should be noted the need for each installation company to have “Window Installation Instructions” approved by local authorities, the need to develop window installation units for each facility under construction and coordination of units with the customer, it is recommended to analyze thermal fields, and also provides for the execution of delivery certificates - acceptance of window openings before installation, acts of hidden work and acceptance certificates of completed window installation.
Of particular interest in the standards are the Annexes:
- Appendix A (recommended) contains drawings with examples of window installation;
- Appendix B (recommended) sets out requirements for fastening windows in openings;
- Appendix B (mandatory) represents the actual requirements for the installation of windows as a whole and is essentially the main working document;
- Appendix D (recommended) describes the requirements for the method for calculating thermal fields (isotherm analysis).
In general, Russian installation standards bring us closer to the standards adopted in Europe, and, in particular, in Germany.
GOST requires a large number of formalities from window companies and has more requirements for testing joint designs and materials used for them.
Formalization is justified by the fight against Russian negligence.
Testing of materials and seams is generally justified by the fact that until now in Russia there were no detailed standards for installation at all, there is no accumulated scientific experience in determining the properties of installation materials and the quality of seams. Of course, there is no need for the consumer to know all the provisions of this GOST; this is the responsibility of professionals.
Without delving into the subtleties, we can talk about three basic principles for installing windows, to which you need to pay the closest attention.
Three layers of seam sealing
The content of the main part of the standards is devoted to the rules for filling the installation gap between window blocks and openings according to the principle “the inside is tighter than the outside.” Each installation unit must have three layers of sealing: on the outside - protection from climatic influences, in the middle - insulation, on the inside - vapor barrier. You can use different materials for the outer layers and different mounting foams, but, in one design or another, these three sealing planes must be present.
Outer layer is designed to protect the insulation layer from moisture penetration into it, and must be vapor permeable in order for the insulation to be ventilated through it. That is, the outer layer must be waterproof and vapor permeable.

These requirements are due to the fact that when moisture penetrates into the insulation, its thermal insulation qualities decrease. PSUL (pre-compressed sealing tapes) best meets modern requirements for the outer layer. These are special mounting tapes that are glued to the window frame before installing it in the opening, and then, expanding, they fill all the leaks in the quarter in the opening.
Despite serious advantages: optimal construction physics and technological simplicity, they also have disadvantages. It is convenient to use these tapes in new construction when the opening has good geometry. But when replacing windows in old houses, when the slopes are uneven, and even more so, plaster, their use is difficult. Another drawback is that PSUL cannot be covered with plaster.
To a limited extent, silicone can be used outside. In this case, certain rules must be observed: the thickness of the silicone layer must be half the width of the seam being filled, and the silicone must be glued only on two sides and work in tension, the remaining sides must remain free.
Sealant can be used when insulating the installation seam. Although it is not clearly stated in GOST, there is no ban on its use, no matter how much the supporters of mounting tapes might want it. An example of using silicone outside and inside a room is shown in node A.14 in GOST 30971-2002. It is unacceptable, of course, as can sometimes be observed on objects, to simply spread silicone on top of the foam - this is an imitation of seam protection, but not the protection itself.
Central layer– thermal insulation. Currently, polyurethane foams are used for its implementation. It is best to use foams designed specifically for window installation. Such foams fill the joint evenly and do not need to be trimmed after hardening. After installation, other foams hang in clumps from the side of the room, and they are cut off, breaking the protective outer crust.
Inner layer– vapor barrier. Its function is to protect the insulation (foam) from the penetration of moisture vapor from the room. For these purposes, when plastering slopes, vapor barrier tapes, mainly butyl-based, are used, as well as paint-based vapor barriers for moisture-resistant plasterboards. It is possible to use silicone according to the rules mentioned above.
No cold bridges
An assembly seam is a node where the joining of wall and window structures, which have completely different properties, including in terms of heating technology, occurs. And it is important to make the knots in such a way that there are no cold bridges on the window slopes.
Basically, the problem of cold bridges is a problem of single-layer wall structures that were used in houses of past years (solid brick, expanded clay concrete, etc.). In this case, the weak area is the wall itself around the window frame due to its low heat transfer resistance. An area appears on the slope with a surface temperature below the dew point. In this area, firstly, high heat losses occur, and secondly, condensation occurs on it. If moisture condensation on a slope occurs frequently, then fungus (mold) may subsequently form in these places. The same applies to openings without quarters. In their absence, the danger of cold bridges seriously increases, and here the heating engineering of the junction units should be especially carefully considered.
An important recommendation is that if quarters are missing, use window frames with a width of at least 130 mm. With a narrow window frame, high-quality sealing of the seam is difficult and the likelihood of cold bridges is high. The options given in GOST with false quarters from the corners or from the platband are possible only with external plaster, and still remain problematic from the point of view of heating engineering.
If there is effective insulation in the wall (mineral wool or non-flammable polystyrene foam), the window should be placed either in the plane of the insulation or behind a quarter of the insulation. In walls where aerated concrete is combined with external cladding and brick quarters, as a rule, cold bridges also do not occur due to the good thermal properties of aerated concrete.
Fastening the window block in the opening
The specificity of plastic windows is that they have significant thermal linear expansion. That is, when windows are heated by the sun's rays, the bars of the frame and sashes increase in size. The calculated values of thermal expansion for white windows should be 1.5 mm per 1 linear meter, for colored windows - 2.5 mm per 1 running meter (the difference in thermal expansion is due to the fact that white window profiles heat up much less than colored ones).
In accordance with this factor, the window is fastened to the wall. The corners of plastic windows must remain free; the outer fasteners are placed at a distance of 150 mm from the inner corners of the frames. The remaining fasteners are placed around the entire perimeter with a pitch of no more than 70 cm for white profiles, and no more than 60 cm for colored profiles. Near the imposts, the fasteners are also placed at a distance of 150 mm from the corner. The gap between the frame and the wall must be at least 15 mm. This is due both to the thermal expansion of windows and to the fact that a thinner seam is very difficult to fill evenly with foam insulation.
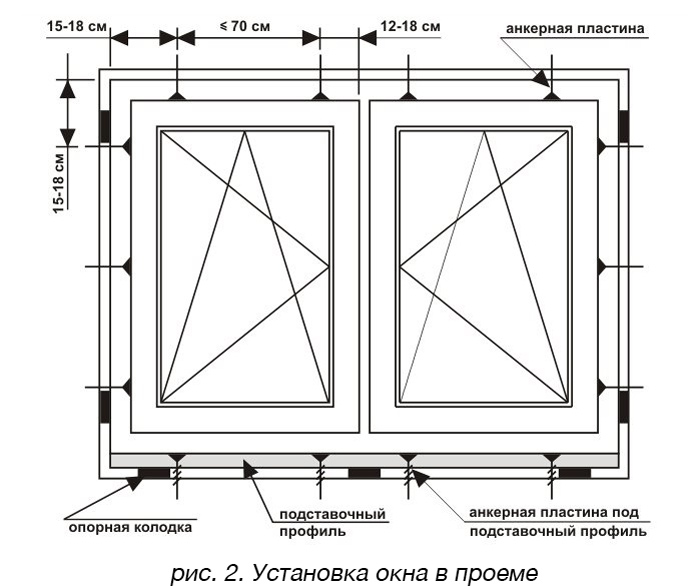
Bearing blocks are placed under the lower corners of the box and under the imposts. The blocks are also placed on the sides as follows: if you look at the window from the inside, then with one turning sash, the blocks are placed on the side opposite the hinges at the top and on the same side as the hinges at the bottom. With two doors, four blocks are installed, respectively.
Schematic diagrams of junctions between window frames and walls

1 – window sill board;
2 – foam insulation;
3 – vapor barrier tape;
4 – flexible anchor plate;
5 – support block for the window sill board;
6 – plaster mortar;
7 – dowel with locking screw;
8 – liner made of antiseptic lumber or leveling layer of plaster mortar (recommended only for the lower unit);
9 – waterproofing, vapor-permeable tape;
10 – noise-absorbing gasket;
11 – drain;
12 – insulating self-expanding vapor-permeable tape (PSUL);
13 – thin layer of sealant

1 – foam insulation;
2 – insulating self-expanding vapor-permeable tape (PSUL) or vapor-permeable mastic;
3 – frame dowel;
4 – sealant;
5 – vapor barrier tape;
6 – panel for finishing the internal slope;
7 – plaster leveling layer of the internal slope.
Thermal gaps must be taken into account especially carefully when designing large-sized glazing elements: when making bay windows, shop windows, glazing to the entire height of the floor. These are the three main principles when installing modern windows, although, of course, there are many nuances and subtleties that depend on the different wall designs and on the materials used for sealing the seam. And - as we already said at the beginning of the article - the human factor is very important - responsible and high-quality work of installers.
Deviations from vertical and horizontal

According to GOST 30971-2002 “Mounting seams of joints connecting window blocks to wall openings. General technical conditions", pp. 5.6.4 Deviations from the vertical and horizontal of the mounted window units should not exceed 1.5 mm per 1 m of length, but not more than 3 mm per product height.
In the updated version of GOST 30971 from 2012, the maximum deviations of the window and door unit from the vertical and horizontal levels are the same (clause 5.2.4) - no more than 1.5 mm per 1 m of length, and no more than 3 mm per height of the entire product .
When can windows be installed?
With the entry into force of Moscow Law No. 42 “On Silence”, disturbing the peace of neighbors is an administrative violation. Carefully read our instructions on carrying out noisy work in order to comply with the requirements in force in Moscow and the Moscow region in various buildings.
How much does it cost to install windows according to GOST?
The cost consists of two components: the cost of work (hours) and materials.
The installation seam will comply with GOST for the installation of windows, when using both expensive and economical materials. The use of one or the other will affect the stages (duration) of the work and the final cost of window installation.
Video instructions for installing plastic windows