Vegetable garden above ground growing technology. DIY raised beds. Advantages and disadvantages

Growing potatoes the Dutch way is a technique in which every little detail is taken into account. When planting using this technology, up to 250-300 kg of tubers are collected per hundred square meters.
Dutch technology provides potatoes with:
- sufficient warmth;
- supply of oxygen to the roots;
- fertilizers
How many potato growing technologies are there?
In addition to growing in the traditional method and in the Dutch way, there are other new methods: Chinese; technology developed by Doctor of Agricultural Sciences Jacob Mittleider from the USA; the method of Galina Aleksandrovna Kizima, who spent her childhood in a working-class village in the Southern Urals.
Which varieties are suitable
Varieties from Holland are immune to diseases, they are high-yielding, but they are not not suitable for planting in northern Russia. There it is better to plant domestic zoned varieties adapted for home conditions.
It is necessary to plant both early and late potatoes in the country.
Suitable Dutch potato varieties:
- Anosta- early. The tubers are yellow and smooth. The pulp is creamy. Potatoes are immune to nematodes.
- Red Scarlett- early. The tubers are scarlet in color, the flesh is snow-white, and does not change color when cooked.
- - early variety. It is planted in the Central regions of Russia and in the Siberian Federal District. It takes 50 days from germination to harvest.
- Jarla- early. It is unpretentious in care and can be planted even in depleted lands.
- Prior- early. He is immune to viral diseases, nematode, late blight.
- - mid-early. The tubers are pinkish, the flesh is snow-white. Immune to late blight.
- Monalisa- mid-early. Has immunity to all diseases.
- - mid-season. The tubers are yellow, the flesh is creamy. Resistant to mechanical damage.
- Eba- mid-late. Immune to viral diseases. The tubers are yellowish in color.
Domestic varieties:
- - mid-early variety. Immune to nematode, cancer, scab, mosaic and other diseases. But its disadvantage is that tubers are stored at a temperature of about 0 degrees, otherwise they will germinate.
- . Has immunity to diseases. It tastes great, but the tubers have very little starch, so they don't cook well. You can harvest 600 kg of potatoes per hundred square meters.
- - early variety. Has immunity to all diseases. The tubers are yellowish, the flesh is snow-white.
- Zdabytak - late variety. Immune to diseases. In tubers a large number of starch.
Is this method suitable for growing potatoes in the country?
Potatoes are grown in the fields, using machinery, and in dachas, doing all the operations manually.
Technology in detail
What is the Dutch way?
- To grow tuber crops, varieties from Holland are taken that are immune to diseases and produce a large number of tubers. And in northern regions In Russia, domestic zoned varieties are planted. Selecting required only healthy tubers. Change the varieties planted.
- Tubers are selected that are 3-5 cm in diameter, with 100% germination.
- According to the planting scheme, they plant per 1 m² 6-8 tubers. It seems to the Russian gardener that with such planting the land is empty in vain, but with this technology the bushes grow spreading, they have powerful roots, and the harvest is larger than with the traditional planting method.
- The Dutch also feed potatoes, taking into account the needs of this variety.
- Requires hilling and pour ridges 10 cm high.
- The harvest must be collected on time. If you need seed material, potatoes are dug up a month earlier than tubers intended for consumption.
Selection and preparation of seed material
Select smooth, healthy tubers for planting diameter 3-5 cm, best varietal.
Potatoes that are smaller in size should not be chosen, as the grown bushes will be very weak. Potato bigger size Plant only if the harvest comes from your own seeds. Each selected tuber has 5 eyes.
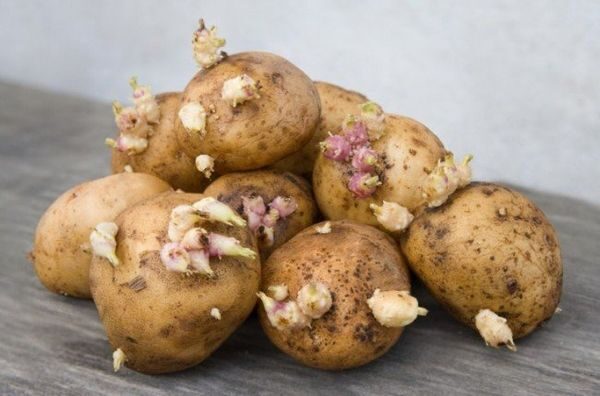
A month before planting, potatoes are sprouted. Potatoes are planted when the sprouts at the eyes are 0.5 cm, but this is for mechanized planting.
It is necessary to choose the right time for planting so that the sprouts do not die from return frosts. The tubers are carefully placed in polyethylene bags with handles when the sprouts are 0.5 cm high. This makes it convenient to transport the potatoes to the planting site. To plant manually, wait until the sprouts placed in plastic bags, will grow to 2.5-3 cm.
Tilling the land before planting
Potatoes will be less sick and affected by pests if they are planted in one place once every 3 years. It is necessary to give the soil a rest and not plant anything at all for 1 year, but mow it weeds. If you do not have such an opportunity, then plant tubers in the place where beans, peas, oats, and rye previously grew.
In the fall, phosphorus, potassium, and nitrogen are scattered on level ground and the soil is dug to a depth of 22-27 cm.
If you have a slope, then in the fall do not dig up the soil and do not apply fertilizing, since in the spring everything will be flooded. useful material will wash away.
Care

- In the spring the soil is dug up, make holes 6-8 cm deep. The distance between rows is kept at 75 cm, and between holes - 30 cm. But such a large distance has its advantages:
- The soil for hilling is poured from the row spacing, because of this the tubers are located above the row spacing. The ridges are well illuminated by the sun's rays, and oxygen is supplied to the root system.
- The cross-sectional area of the ridge is 1200-1500 cm².
- During heavy rains, water does not stagnate under the bushes, as it is located between the rows;
- When it is hot and there is no rain, there is enough moisture in the ridge so that the potatoes do not die from drought before rain or watering.
- Rotted manure or humus is first placed in the hole.
- Then add 100 g of ash and a handful of crushed egg shells, as well as a little onion peel, which will repel wireworms and slugs.
- Tubers placed in the holes with the sprouts facing up and sprinkle with soil.
- If you see weeds growing, pull them out.
- When the sprouts grow, hill them up so that the ridges are 10 cm high.
- If there is a threat of frost, then young shoots are sprinkled with soil, and tall shoots are bent down and covered with soil. When will it come again warm weather, then the bushes are lifted and watered with water from a watering can.
- 14 days after planting, the weeds are pulled out and the soil is removed from the rows add to sprouts so that the ridges become approximately 25 cm high, the width of the ridges at the base is 75 cm, and at the top - 30 cm.
- When attacked Colorado potato beetles bushes are sprayed with insecticides.
- If there is a drought, then the bushes are watered 1-3 times per season (1-2 times before the buds open, 1 time when the flowers open).
When and how to harvest
First, mow the tops, and after 10 days, dig up the bushes.
Then the peel will be strong and the potatoes will be able to stand large quantity time without spoiling.
That is, growing potatoes in the Dutch way means planting tubers at a distance of 30 cm, maintaining a distance between rows of 70 cm. This also means pouring high ridges and taking into account the need of potatoes for fertilizers.
How to make your work easier when growing vegetables? This question is asked by many summer residents and owners of personal plots. There are many options. Mechanization tools help to complete the work of digging the earth. What can be done so that the summer resident does not have to constantly bend over to work with plants? Application raised beds changes the height at which a person maintains his garden.
Small historical reference emergence of technology for growing in barrels
Vegetable gardening differs from other types of plant growing activities in that caring for vegetables requires regular various types work from the moment of planting (sowing) until the end of harvesting. This is the most labor-intensive direction in agriculture. The desire to make work easier has always forced vegetable growers to look for ways to implement the task. The most simple solution it turned out to be the use of outdated barrels. They were filled with soil and then plants were planted. Also in late XVIII century in the Tver province, the technology of using cooper's products for growing cabbage and turnips was tested. Even the newspapers of both Russian capitals wrote interesting articles. Catherine the Great, on a voyage to new lands (Crimea), visited the estate of the landowner Seliverstov and personally tasted fresh vegetables from a barrel. She pointed out to Prince Potemkin this interesting experience, he promised to “put all his zeal into spreading this useful work throughout Great, Lesser and White Russia.” In some places he managed to instill such a useful initiative. In the Kherson region and Crimea, hundreds of tubs were made according to Potemkin’s drawings, in which local peasants began to grow garden plants. Particularly successful were tomatoes (the Empress simply adored them) and eggplants.
The appearance of high ridges in Russia
Prince Potemkin was a rather smart person; he suggested using not barrels, but making log houses from oak trunks 5 arshins long, 2 arshins wide and 1 arshin and an inch high. By his decree, 8 similar structures were prepared in Tsarskoye Selo. Returning from the south, the empress appreciated the talent of her favorite. Local peasants also saw the right thing for themselves; for some of them, raised beds (many home craftsmen began to make them with their own hands) became the main form of income in the winter. They even put them up for sale. The fashionable invention was seen by ambassadors from the West. The idea was quickly copied and transferred to European countries. Everything worked out very well; vegetable gardens on such ridges produced high yield, but in those years they did not know about the need for annual replacement of plants (crop rotation). After two or three years of successful gardening, the yield dropped sharply and plant diseases developed. The talented idea seemed ineffective to most, so they forgot about it.

Dissemination of Russian experience in Europe
Already in early XIX centuries in a number of lands in Holland, Germany and France, gardening on ridges raised above the ground showed its superiority over conventional agriculture. The emergence of new building materials helped make it easier to build vegetable gardens in a new way. The Dutch especially liked this technology: they began to grow their famous tulips in greenhouses, where they made dozens of high beds with their own hands. The Germans were the first to propose using defective tiles to create walls. In their gardens and flower beds, this method of cultivating crops spread everywhere. A brochure entitled “Do-it-yourself raised garden bed, a guide to action” was published in Munich; it was very popular (only a few copies of this interesting book have survived today). The French, and then the British, translated the useful publication into their languages and published a manual on gardening in high beds.

High ridges inXIXcentury in Russia
In 1815, Count Orlov brought French book about gardening in Russia. After exile (participant in the December rebellion of 1825) to the Kaluga province, he began to engage in agriculture. On his estate, he taught peasants how to create a raised bed with their own hands. The Russian press of the 19th century periodically published information about new technology gardening. Even in fashionable women's magazine“Women's Messenger” gave recommendations on how to properly design beds. The magazine "Farmer" periodically gave advice on gardening. In it I.E. Ovsinsky wrote several interesting articles By organic farming. The idea of growing vegetables permanent place, elevated above ground level, he liked it. It was easy to implement the principles here no-moldboard processing soil, which is one of the foundations of ecological cultivation of the land. One of his articles in 1892 was called “High garden bed with your own hands - a way to increase the fertility of Russian lands.” Being a practical scientist, Ovsinsky tried to introduce his findings into Russian agriculture. His name remains in memory as the name of the founder of the necessary direction to increase the fertility of the earth.

Revival of high ridges in our country
Publications about raised beds for growing vegetables in dachas and personal plots resumed in the mid-eighties. They highlighted German experience in new technology for cultivating plants. Several interesting articles described the process under common name: “Do-it-yourself raised bed.” A fairly detailed description allowed summer residents to make them on their plots. Today, this technology is quite widely used for growing vegetables in open and protected ground.
How to create a raised bed with your own hands
It is necessary to take into account that a high bed is not created for one year. It will last for several years. Therefore, the criteria for choosing a location for its placement can be defined as follows:
- the place must have sunlight for at least 6 hours a day;
- the garden bed must be approached from all sides. Construction against a wall is allowed, but in this case the bed will be narrower than with a two-sided approach;
- the recommended height of the beds is just below the waist, so as not to bend over when performing basic work;
- the length is not limited, and the width with a bilateral approach is about one hundred and twenty centimeters, with a unilateral approach - about ninety centimeters.

To follow all the recommendations, you need to decide on the material for making a high bed. The Germans propose using asbestos-cement sheets with a corrugated profile. They are not subject to rotting, have the necessary rigidity and are easy to install on site.
Creating a fertile layer of soil in a high bed
To create high fertile layer, V bottom part beds are laid with organic components of long-term decay, for example, branches, remains of logs, etc. It is even recommended to use newsprint, which absorbs moisture and can retain it for a certain period of time. Subsequent layers are formed with a height of about 15-20 cm. They should be soil, organic and sandy. Their alternation will make it possible in the future to create a thick soil layer, where root system plants will be in the most favorable conditions. Convenient watering and air filtration into the soil will be guaranteed. The labor intensity is, of course, high. But such a bed will allow you to produce a high yield of vegetables for a long time. For middle zone Russia over similar design It is also easy to create devices that protect the soil from the external influences of bad weather.
– bulk, raised above the ground earthen structures intended for planting and growing herbaceous plants. Apply to garden plots under garden crops and for planting flowers.
Advantages and disadvantages
A raised plot of land has a number of advantages and disadvantages:
| pros | Minuses |
| No shedding of the side walls of the soil, with structures protected by partitions. | Through side walls made from “breathable” material, soil moisture leaves faster, as a result of which the frequency and volume of watering has to be increased. |
| Independent of the soil located on the site - you can use purchased chernozem. | Periodic costs are required to purchase black soil. |
| Creating a favorable climate for plant growth - elevation above the general ground level significantly reduces the risk of cold damage during frost periods. In addition, the bed can be easily protected from external influences by covering it with a tarpaulin or covering material. | The limited interaction with the general mass of the earth forces an increase in the use mineral fertilizers. |
| More early period growing crops - in spring period The snow melts earlier and the soil warms up faster. | There is a risk of insects breeding that will harm the planted plants. |
| The possibility of creating a greenhouse or mini-greenhouse, which is dismantled with the onset of the warm season. | On initial stage creating high beds, you have to incur material costs and make additional physical efforts to create a land structure. |
| Good drainage to optimize watering and soil moisture. Thanks to this, there is no risk of soil swamping, moss growth, and plant rotting. | Limitation on plant assortment - not all plants tolerate an open, ventilated area. |
| Deep digging of the soil is carried out once every 3-4 calendar years. The rest of the time it is enough to carry out shallow loosening. | |
| Convenience when working with low-growing plants, this is especially important for older people or those with limited mobility. | |
| Getting more yield compared to traditional methods growing plants. | |
| The high level of the ground allows you to reduce the physical effort required when cultivating the soil, caring for green spaces, harvesting - for example, you can use a folding chair. | |
| Optimal garden layout. | |
| Creation of beds with unusual shapes and designs. |
From the above comparative data, it is clear that the idea of high beds has the right to life. Measures aimed at reducing negative factors will contribute to this.
How to eliminate the disadvantages?
Ways to reduce negative factors:
- Reducing the amount of mineral fertilizers applied to a raised plot of land is facilitated by the expanded use of organic fertilizers:
- bird droppings, manure from cattle, creating tinctures for liquid nutrition based on them;
- the use of ash from burning wood in stoves or fireplaces;
- creation of your own on the site compost pit for processing residues from plants and human food, which will reduce the amount of purchased black soil;
- using sludge from a septic tank.
- A “drip” mode device will help reduce dependence on irrigation: Such designs can be found in abundance on the Internet.
- Reducing the material costs required when creating high beds is facilitated by:
- use of materials left over from construction country house or arranging a fence, for example, or corrugated sheeting;
- the use of industrial substandard material, which is sold at significant discounts;
- leftovers construction products that appear during the demolition of dilapidated housing, or in other similar cases.
- Appearances harmful insects and weeds can be avoided by preliminary preparation soil:
- treatment with chemicals,
- removing roots.
Kinds
Raised beds differ from each other in several ways:
- geometric dimensions - length, width and height above the general level of the site;
- finishing of the side walls.
Wooden

Wooden raised beds
As side supporting walls wood material used:
- boards;
- plywood of moisture-resistant varieties, for example, OSB-3;
- log structure;
- materials with the presence of wood, for example, wood concrete sheets (wood concrete) - a mixture of cement and shavings;
- wicker rods.
Main advantage this material is its availability and ease of processing. But common deciduous (birch, aspen) and coniferous (pine) types of wood are susceptible to rotting and are worn down by bugs. Application resistant species, for example, larch, is associated with its more high cost and difficulty of processing. But this type of wood improves its properties over time (part of old Venice still rests on Siberian larch).
Plastic

For fencing, products made of dense plastics are used:
- plexiglass;
- , including cell phone;
- corrugated polymer sheeting;
- plastic pipes, for example, used for sewerage installations with a diameter of 100–200 mm;
- containers - plastic boxes with perforated walls.
Dignity– plastic is one of the “eternal” materials, it does not rot, does not decompose, and is resistant to water and exposure to bacteria and insects.
But in winter it becomes brittle, so during this period of the year it requires careful handling.
Easy to give in machining, easy to install. Plastic products have a varied color scheme, which helps to decorate the garden area.
Metal

To construct an earthen embankment, they are used finished goods and semi-finished products:
- galvanized a metal sheet, for example, going to the roof;
- corrugated sheets and other metal products.
Basic requirement for metal– absence of corrosion, therefore, in the absence of protection, it is necessary to take measures to cover the surface of the products with anti-corrosion compounds. Externally, the beds can be made in the classic rectangular shape or give designer look, – model an oval structure reminiscent of a large bathtub.
In addition to the above materials, they are widely used slate sheets, brick, concrete products, gabions and many other products that fall under the requirements for earthen embankment fencing.
Technology
Before considering the technology of constructing a high bed, you need to familiarize yourself with a number of rules.
Creation Rules
Requirements for beds are necessary for correct placement on the site, must take into account local climatic conditions and the range of plants grown.
- Bed sizes. The length of the earthen embankment is limited by the size of the site and ease of passage. Hence: the optimal range is 2–5 m. Width is up to 1–1.2 m; a larger value will create inconvenience when processing the middle part. The height of the structure should not exceed 1 m, otherwise it will also create problems with plant maintenance and require significant costs when using purchased soil. The minimum level is 25–30 cm, determined by the climate and the size of the fence available “at hand”.
- The soil. The purpose of creating high beds is to increase fruiting and speed of harvest. Chernozem is one of the components. Therefore, saving on the quality of the land means wasting your efforts, time and finances in vain.
- Location. Abundance sunlight– one of the keys to normal plant growth and fruiting. It is advisable to place the beds in open, unshaded areas. But it should be taken into account general layout plot - without prejudice to other plants and outbuildings.
- Fencing material. You should not chase ultra-modern products - boards left over from formwork, or old brick will fully perform the functions of enclosing walls. And money will be saved.
- Protection of green spaces. Most of the country is located in difficult climatic conditions, in which frosts are not uncommon at the beginning and end of summer. A pre-installed protection system, for example, a structure for a greenhouse, will help reduce the risk of plants being damaged by cold air.
Construction of an earth embankment
Stages of work:

Planting planning
It is advisable to set up high beds in late summer or early autumn - this will contribute to additional overheating of organic matter and the creation of your own local microflora. If necessary, create seat In spring or summer, if possible, the soil should be filled in at least 1 month before planting the plant material.
On raised soil plots you can grow most vegetables, berries and flower crops. Moreover, they can be successfully placed in one fenced area. For example, cold-resistant: radishes, green onions, lettuce, can be planted around heat-loving plants - in the summer all these plants will be comfortable, and the tomatoes will get additional protection when the air temperature drops.
Berry and vegetable crops on such raised embankments in favorable conditions temperature conditions and timely watering, they ripen 1-2 weeks earlier, so it is necessary not to miss the harvest time, otherwise it will begin to rot and simply disappear.
You can evaluate the advantage of high beds even from one initial experience - just start with simple crops, - onions, radishes, carrots and gradually expand the experience gained to other plants.
Watch the video GROWING ZUCCHINS WITHOUT LAND! THE BEST WAY TO GROW ZUCCHIN SEEDLINGS! V good quality| Zucchini is a very healthy vegetable crop. Perhaps zucchini is the most popular crop among gardeners. Such variety delicious recipes like zucchini, there is no other vegetable crop. Zucchini is very easy to grow. There are many ways to grow it. There are traditional methods and there are non-traditional ones. I grow zucchini, as well as cucumbers, without soil. It is best to grow seedlings in roll-ups or snails without soil. In a few days, this way you can grow excellent seedlings without soil. The seedlings are sterile, they are not susceptible to blackleg. Such seedlings can be planted in the ground, or also planted in cups and grown to the required age. To get early harvest zucchini, they can be grown in a greenhouse in mobile beds. Today I will show you how to grow zucchini without soil. In rolling papers. This The best way growing zucchini seedlings. **************************************** ****************** - real earnings on YouTube. I recommend my affiliate program!
*******************************************************************
Subscribe to the channel of my granddaughter Polina
********************************************************************
Subscribe for new videos!! ☛ ************************************************* ******************* Link to the channel VEGETABLE GARDEN ABOVE THE GROUND ************************* *****************************************
Good afternoon friends!
Today we’ll talk about not quite ordinary planting. Gardening above ground, the technology of growing vegetables and berries above the main surface of the soil, is not new. But sometimes it seems that only people remember her landscape designers and landscapers - decorators. Ordinary gardeners and gardeners seemed to have forgotten about its existence.
For each specific site, you should select beds that will ideally fit into the structure of your garden or vegetable garden and will not lose their main functional purpose.

Benefits of gardening above ground
In addition to purely aesthetic pleasure, vertical beds and flower beds also provide enormous practical benefits.


Materials
The choice of material and design features are limited only by your imagination. Boards, decks, brick, slate, concrete, stone are suitable, you can use wooden or plastic boxes, flower pots, PVC pipes, car tires and much more. You can look up the design of your future vegetable garden on the Internet or come up with it yourself. In any case, the end result will look exclusive and none of your friends will have anything else like it.

I ordered wooden pots on the website Master Gardener.ru. Very cool))
Do-it-yourself pyramid flowerbed made of wood
There are a huge number of design options for multi-tiered flower beds, I will tell you about the most popular and, at the same time, available option. Consider a multi-tiered “pyramid” flower bed made of wood.

- so you will need edged board(preferably hardwood), thickness 40 mm - 50 mm and width 25 cm - 30 cm;
- we trim off four blanks of one and a half to two meters each, using self-tapping screws we twist the blanks into a square;
- place the square in the place of the future flower bed and secure it with wooden or metal pegs (2 on each side);
- the bottom of the square must be covered with crushed stone or expanded clay, a layer of 5 cm - 10 cm for unhindered drainage. We fill the remaining space with a fertile layer;
- We use the same principle to make the second box, with one small difference - its sides should be 20–30 centimeters shorter than the first. We install the second box in the center of the first and fill it in the same way. In total, such a flowerbed can have three or four levels.
That's it, a reliable and, at the same time, cheap flower bed is ready. You can plant at least flowers, even strawberries.