Decorating a pond at your dacha with your own. Plastic pond: how to choose and install. Choosing a site for constructing a reservoir
Read also
One of the brightest tools in landscape design is a decorative pond. Of course, most suburban areas are limited to the traditional six hundred square meters, and the owners simply cannot build a large pond, but because of this you should not give up the dream of acquiring an artificial pond. As for the technical part, it will not be an obstacle, but only if you have good instructions and desire. So, today we will find out how to make a pond at the dacha with our own hands step by step.
First you should find out what purpose the construction of a pond on the site will serve. From this point of view, reservoirs can be divided into four large groups.
Table No. 1. Classification of artificial reservoirs by functionality
| Group name | Short description |
|---|---|
| They are an element of the landscape composition and are intended, first of all, to decorate a particular area of the garden. Active recreation is not provided near such bodies of water. |
| They are deeper and are often decorated with fountains, bridges, and sometimes equipped with lighting. Such ponds are built near a house or gazebo, and benches with canopies are placed nearby. Therefore, it is quite obvious that such reservoirs are the heart of the recreation area for the residents of the house. |
| This option is suitable not only for avid fishermen, but also for families with children - the latter will enjoy watching colorful fish while relaxing in nature. |
| They also belong to artificial country ponds and not only perform an aesthetic function, but also provide an opportunity to freshen up or even swim (it all depends on the size). |


Then, based on the goal and our capabilities, we proceed to choosing the style, location, dimensions and shape.
Second phase. Deciding on a style
An artificial pond can be made in one of two possible options, and each of them also has a great variety of modifications.
Table No. 2. Artificial pond styles
| Name | Short description |
|---|---|
| This name exactly reflects the essence - these are structures that are distinguished by clearly defined outlines. The correct shape of the pond in terms of geometry is suitable for those areas that are decorated in the style of minimalism, high-tech, modern or classic. But, characteristically, the shape can be not only rectangular, but also square, round, oval, and broken. |
| They are more popular because they are characterized by naturalness and irregular contours of the banks, which means they bring people closer to nature. The shape of the reservoir here depends only on personal preferences, but the more complex it is, the more difficult it will be to lay the film (more on this later). |


The topography of the site also plays a big role when choosing a style. So, if the surface is fairly flat, then the shape of the pond can be any. If there are unevenness and drops on the site, then they need to be given special attention, but they make it possible to additionally arrange a cascade or waterfall. In addition, against the backdrop of all this, say, an artificial slide will look great.
Also, the reservoir can be raised slightly above the ground. In this case, the construction technology will differ only in the arrangement of the foundation, which will prevent possible distortions of the bowl.

When creating such a reservoir, excavation work is minimized, and caring for it will be much easier.

Note! If the reservoir is built with a fountain, then preference should be given to a tall structure.
Third stage. Choosing a place
Let's start with the fact that we place the reservoir in the most favorable place, so that you can admire your creation from anywhere on the site. That is why we take into account several important factors when choosing.
- Land area. Not only the size of the pond, but also its shape directly depends on it.
- Illumination. It is preferable to place an artificial pond in a shaded place where exposure to direct sunlight does not exceed five to six hours a day, otherwise some of the water may simply evaporate. Moreover, in sunlight, biological activity may develop, which is unlikely to beautify the pond. Therefore, having chosen a specific place on the site, we observe the solar regime for several days.
- Relief. The shape of the pond depends on it, and it also simplifies the installation of additional elements (for example, fountains).
- Groundwater level, soil composition. These indicators affect not only the depth of the reservoir, but also the complexity of the work and the need for additional consumables.
Note! The greater the depth of the pond, the more illuminated place it should be located. If the reservoir is intended for fish, then we take the location even more seriously, since the oxygen content in highly heated water decreases.
- Expandable. Don't forget about perspective, so we leave some free space on one side.
- Visibility. It is advisable to position the pond so that it can be seen from home and recreation areas.
- Electricity supply. If a fountain or lighting is additionally equipped, then we will think about electrification in advance. It is better to lay the wires during development, underground and in a reliable protective corrugation. There should be small access hatches at the connections.
- Reflection. The pond will look more attractive if the surface reflects the sky or beautiful buildings, rather than some kind of utility structure.
- Landscaping. Vegetation near the pond is, of course, beautiful, but the leaves will pollute it and form silt. Moreover, tree root systems can damage the waterproofing layer.
- Compatible with general design and other objects.
We begin work in the spring - this way we will have enough time for the reservoir to “take root” on the site.

Fourth stage. Deciding on the sizes
It’s hard to say that a large pond will cost more than a small one, since there are a lot of nuances here. Therefore, let's look at the key points.
1. Dimensions. They depend on the location of the reservoir. Many say that the pond should account for an average of 3-10% of the total area of the site, although there cannot be any clear recommendations in this case. As for the specific length and width, they depend not only on the area of the land, but also on our capabilities. After all, we will dig a hole under the pond manually.

2. Depth. It depends on the purpose of creating the reservoir, as well as its size.
3. Difficulty of content. The larger the pond, the easier (no matter how paradoxical it may sound) to care for it.

4. Zoning. The reservoir is divided into the following zones:
- coastal (from 10 cm to 40 cm), which will serve as an entrance and for planting;
- shallow water (from 40 cm to 100 cm), where crops that grow deeper (for example, winter-hardy water lily) will be planted;
- deep-sea (more than 100 cm) - it is required only in those reservoirs where fish breeding is planned; the area of this zone depends, first of all, on the number of fish, but on average it should be more than 20% of the total area of the reservoir.

5. Biological balance. In any case, living creatures will inhabit the pond, which means that conditions must be provided so that it can clean itself. No oxygenation or chlorination of water is provided here. It is worth remembering: no more than ½ of the entire area can be allocated for plants.
Note! The lowest point should be lowered below the soil freezing line, especially if you plan to breed fish - this way they can survive the winter in non-freezing water.
Fifth stage. Selecting materials
The next issue that needs to be dealt with is the choice of consumables. There are many options on the modern market that can be used to create an artificial reservoir. Let's look at them.
concrete pond

The most expensive option, which, nevertheless, allows you to operate the reservoir for quite a long time. Although concrete pouring is more suitable for arranging a swimming pool.
Finished plastic container

This option is more suitable. The form, made of fiberglass or PVC, allows you to build a pond in record time and use it for up to 30 years (the specific period depends on the quality of the container).
The procedure itself will consist of only four steps:
- digging a pit;
- set the form;
- fill the remaining voids with sand;
- We plant plants and fill the pond with water.

The disadvantage of this method is the difficulty of transportation (if the volume is large) and the need for basic installation knowledge (otherwise the bowl may be damaged). Moreover, plastic containers degrade over time when exposed to UV radiation.
Note! It is preferable to use a fiberglass bowl that is reinforced with rubber - this design is more reliable and repairable.

Polymer film
In terms of pond shape, this option provides simply unlimited possibilities. The most affordable material is polyethylene film, although it will not last long.
PVC film has a longer service life; with proper installation, it can last up to ten years.

Perhaps the most reliable option. For ponds with a rocky bottom and great depth, it is recommended to use a butyl rubber membrane (EPDM), which has a service life of up to 50 years. In addition, this material can withstand repeated frosts.

There are several folk ways of making a pond, which use available materials. Let's take a look at the most popular of these methods.
Pond from an old bathtub

An excellent option, because a bathtub is a container that was originally intended to hold liquid. The bathtub can be painted in bright colors and placed in a picturesque corner of the site or, alternatively, buried in the ground.
Tire pond
A simple way to create a mini-reservoir on your site. The manufacturing procedure is shown in the photo below.

Pond from a basin
An even simpler way. The basin is able to hold water well, so it can be installed in the same way as a bathtub. With proper decoration, such a mini-pond will become an excellent decoration for the yard.

Note! Not only the aesthetic characteristics of the pond, but also its service life depend on the choice of material. It is desirable that the selected material is environmentally friendly.
Sixth stage. We prepare the equipment
To create a simple artificial pond, we will need a level, a cart with a shovel, a cord, a hose that is used for watering, and pegs.
If the pond is more technologically advanced, then the following equipment will be needed:
- cleaning filter;
- sterilizer (this will remove algae to keep the water clear);
- pump for pumping/draining water;
- aerator for oxygen saturation (especially important when breeding fish).

Seventh stage. We create an artificial pond
There are plenty of materials that can be used to create a pond, but we will focus on polyvinyl chloride film. The fact is that it is cheaper, takes the desired shape better, can be repaired, and does not require specific knowledge or skills to operate.
Step 1. First, choose the color of the film. There are several possible options here.
- Black film – it will turn the bottom into a mirror (plants, clouds, etc. will be reflected).
- Cream, blue- this way the pond will look more like a swimming pool, and the fish will be more clearly visible against a light background.
- Brown– will imitate the soil of natural reservoirs. An excellent option for a landscape pond.

Also, when choosing a film, pay attention to the composition (PVC is more durable than PE) and thickness (for a pond you will need material thicker than 0.5 mm). Moreover, the greater the depth of the reservoir, the greater the film thickness should be. Equally important is resistance to UV radiation and mechanical damage.
Note! If the depth of the pond exceeds 1.5 m, then we use butyl rubber. This film is resistant to stretching, deformation and UV, moreover, it can withstand temperatures of 40-80°C.
- pond width + (depth x 2) + stock (55-60 cm) = material width;
- pond length + (depth x 2) + reserve (55-60 cm) = material length.
For gluing we will use special glue (for example, “Tagnit”) or adhesive tape (Quick Seam 3).

Step 3. The next step is to create a diagram.

First, we draw it on paper, and then transfer it to the ground. We indicate the sizes of steps or “shelves” for plants - this will avoid possible problems. To apply markings, use sand or a flexible garden hose (preferably in a bright color).

After this, we cover the marked area with a piece of light film and examine it from different angles. We make adjustments if necessary.
Step 4. Digging a pit. To do this, perform the following steps.
- First we remove the turf.
- Then we dig the pit itself. At the same time, we move from the edges to the center, going deeper in the required places - it’s more convenient. To lay out the stone and decorate it, we arrange a ledge 60-70 cm deep.
- We remove the soil, and along with it roots, stones, debris and anything that can damage the film. By the way, you can make an alpine slide from excavated soil.

When carrying out excavation work, we pay attention to ensuring that the banks of the future pond are located on the same line. If a waterfall is created, then we maintain the required height difference.
Note! If a large level is required, we can make it ourselves. To do this, place a regular level on a long, flat board.
Step 5. We lay the substrate. We carefully compact the bottom of the finished pit, after which we proceed to the waterproofing layer, which will prevent water from penetrating into the soil.
The substrate can be made in several ways:
- we cover the bottom with stones and fill it with sand (this kind of waterproofing will lose its properties after just a few years);
- we lay a layer of geotextiles, which we fill with sand (this will cost a large amount);
- lay PVC film (the most reliable method, so we’ll focus on it).
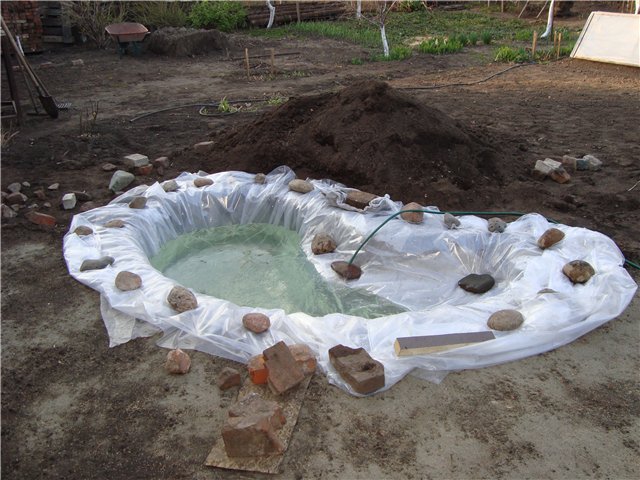
Step 6. Next, we lay the film, preferably on a sandy “cushion” (the latter will prevent damage from stones and other dangerous objects). It is advisable to install on a hot day - as the film heats up, it becomes more pliable.

This may cause difficulty in forming folds. We try to make one large fold, rather than a large number of small ones, and then glue it or press it down with stones. The film should be loose and loose.
To secure it with a swarm there is an additional trench around the perimeter. We lay the film there, and then fill it with crushed stone. Next, fill the trench with large stones with a flat bottom (so that the film does not tear). We lay the walls with round stones (flat ones will slide). At the end, we fill the pond with water - we supply it without pressure, directing it to the center of the pit. After two days, cut off the excess film.
Step 7. We strengthen the banks. Their slope depends on the type of soil: if it is sandy, then the walls should be sloped, if we are talking about clay or black soil, then vertical. The optimal slope angle should be approximately 45°.
The strengthening itself depends on the type of banks.
If they are flat, then you can use:
- geomat;
- geogrid;
- polymer geogrid.

You can also use a regular chain-link mesh, filling its cells with soil with seeds of perennial grass (for example, clover). There is another option - to strengthen the banks with shrubs or plants.
If the coast is steep, then we can use:
- piles;
- gabions;
- retaining walls.

It can also be effectively strengthened using biological methods (planting). Ideally, biological enhancement methods should be combined with engineering ones.
Eighth stage. We design an artificial pond

There are several ways to decorate a pond. To make it a full-fledged design element, we use one or more of the methods below.

As a conclusion. Features of care
Finally, a few words about further care of the artificial reservoir.

Video - Creating a pond from film
A decorative pond in a dacha is a unique element of landscape design, an object for pleasant contemplation. In addition, the pond will humidify the air and improve the illumination of the garden, thanks to the reflective surface of the water surface. If you are thinking about arranging a personal artificial pond, you immediately need to wisely choose the style, lighting and decorative elements.
Choosing a location for a pond
The choice of place to create a reservoir depends on many factors: soil, landscape, relief, lighting, and the presence of vegetation should be taken into account.
| Relief and soil | When choosing a place for a future pond, it is better to stay in an area that remains wet for a long time after rain. Obviously, somewhere in the soil layers in this place there is clay or loam. If the choice of places is limited, then it is always better to choose low-lying areas. |
| Illumination | The correct choice of lighting will make it possible to avoid strong growth of algae and flowering of the pond. The ideal option is that at noon the shading reaches at least 40% of its area, and the total illumination reaches 6 hours. |
| Neighborhood with plants | The pond should be set up in an open place, away from tall vegetation, which will pollute its surface with leaves, seeds, and debris. |
| Landscape | The pond must fit harmoniously into the landscape of the site. Often it settles down in front of the house or near the gazebo. |
There are some specifics if the pond is planned to be equipped with live fish: for example, koi carp. In this case, it will be important to provide them with optimal water temperature, which depends on the breed of fish.
Excavation and waterproofing works
You have chosen a place for the pond and determined what shape it will be. Now it's time to dig the pit. First, turning points and contours are marked with pegs. Then terraces are torn off, 30 cm deep and 20 cm wide. Several levels of terraces can be formed to place plants on them.
Now the main bowl is dug out. The slope of the banks should be approximately 45 °C. The walls of the bowl should taper downward to prevent soil from crumbling and reduce the load of water mass. The minimum depth of the reservoir should not exceed 60-80 cm: a shallow reservoir will freeze completely in winter and become very warm in summer, which will make it impossible to breed flora and fauna.
If waterproofing with a film is planned, to secure it, a ditch about 15 cm deep is cut around the perimeter. After the pit is ready, its bottom is leveled, all stones and roots that could damage the film are removed. The surface is covered with clean, washed sand to a depth of 5 cm, and a monolithic slab of M150 concrete is poured on top. After hardening, it is completely covered with geotextile fabric. All these measures will protect the waterproofing film from damage and extend its service life.
The next step will be waterproofing - laying butyl rubber or PVC maple. The size of the canvas is calculated from the total length of the pond and twice the depth. To secure the canvas along the edge, about half a meter of reserve is enough. The sheet is laid out freely, securing the edges with bricks along the edge. To eliminate the negative impact of groundwater, a reliable drainage system is created, which is also included in the waterproofing system.
All of the above waterproofing work is carried out before concreting, if this form of waterproofing device is chosen. When creating small ponds, concrete work is first carried out, and then the concrete surface is treated in several layers with a mixture of Hydroshield.
Do-it-yourself concrete foundation installation
Concrete work begins before waterproofing with the casting of a base plate made of M150 concrete, which is designed to protect the reservoir bowl from ground movements. On top of this slab, after it dries, waterproofing is laid.
After the base for the bowl has been dug, a drainage system has been installed, a sand and gravel cushion 20-30 cm thick has been poured, a concrete preparation 10 cm thick has been poured, and the walls of the pool are reinforced. For this you will need reinforcement A 12 mm. The rods are connected with knitting wire in the form of a mesh with cells of 20 x 20 cm.
Installing mortgages is an important stage of work. Before the start of formwork work, the following components are installed: bottom drain, nozzles, lights, skimmers. Electrical wiring is also being installed.
The formwork is installed using moisture-resistant plywood 15 mm thick and wooden support beams. High-quality formwork will help save material and other leveling agents.
Concreting is carried out with high-grade heavy concrete with plasticizers. The walls vibrate to prevent voids from forming. It is more convenient to fill the bowl in 2 steps - first the bottom, then the walls. To prevent water from penetrating through the cold seam of a leaking joint, a self-expanding bentonite cord is placed into the joint when pouring, which increases 6 times when exposed to water.
The pool bowl is leveled with a layer of plaster. Using plaster, you can achieve a perfectly smooth pool bowl. The plastered surface of the bowl has no cracks, voids, depressions or other irregularities.
Devices for creating water effects and lighting
If the pond was originally planned with the use of water effects: fountains, cascades, jets, then an underground, waterproof electrical cable must be connected to it in advance. Lighting and pump can be connected to one source.
What energy design elements can be introduced into the design of a pond at the dacha:
- A closed-circuit fountain, where a pump from a reservoir drives water into the fountain bowl, from where the water flows back into the reservoir. Subsequently, the water flows back into the tank.
- It is better to place a cascade or waterfall on the shore, where it will be in harmony with the alpine slide.
- For illumination, you can use lamps located in the water, above the water, and even built into the body of the fountain. Along the contour you can install garden lamps that are recharged from the sun and provide light in the dark.
Aquatic plants in design
There is a huge variety of aquatic plants. In order for the pond design to look attractive and function properly, the following types of aquatic plants must be present in it:
- Oxygenators are plants that produce oxygen. They carry out biological water purification and are food for fish (for example, koi carp). These include swamp turcha, hornwort, spicate urut, and water star.
- Floating plants serve to decorate the pond's surface. They can be placed in containers on underwater terraces. The most popular are duckweed, watercolor, azolla, and thick-petioled eichornia.
- For shallow ponds, deep-water plants are used in combination with floating ones. They are also planted in containers. The easiest to care for are water lily, egg capsule, and apongeton.
- Embankment plants are necessary to decorate the contours of the pond and to protect the water from overheating. Typically, low embankment plants are used for these purposes: fern, thuja, barberry, juniper, etc. Other plants planted in pots also look good.
Design of banks and reservoirs
There are many ways to design the shoreline of a reservoir:
- the use of large stones of different shapes. The main types of stone used for decoration are marble, granite, sandstone, quartzite, etc.;
- construction of decks and bridges from logs;
- decorating the shore with slabs or tiles;
- with a special decorative film, immediately covered with a layer of gravel and imitating rocky terrain.
When choosing a design method for a reservoir, you need to take into account its size and shape. The size of the stone should be proportional to the pond itself. Large stones will harmoniously combine with a large pond, and small ones with a small one. Ideally, the shape of the stones should be similar.
Large boulders are placed around the perimeter so that part of the stone hangs over the water. There is no need to make a continuous coastline of stones. The edging of the pond should alternate plants and stones in random order. After placing all the stones, they need to be fixed in cement, buried in the solution to a third of their height.
It is better to edge reservoirs of strict geometric shapes with similar materials: tiles, logs, boards.
Stylistic design
The design of the pond can be different - the main thing is that it is combined with the landscape of the site. A variety of stylistic solutions allows you to create amazing compositions that demonstrate the beauty of the water element.
Chinese
A pond is an indispensable companion of Chinese gardens. Traditionally, a path of large boulders should lead to a Chinese pond, and the banks should smoothly descend into the water. A small wooden bridge was often thrown across the pond, and a gazebo was placed next to it for contemplation and tea drinking. Koi carp and lotus are a typical feature of a Chinese pond. A Chinese-style pond is decorated with bright and lush vegetation.
French
The French pond is an example of elegance and sophistication and at the same time severity of form. It attracts with its clear boundaries and neat shape. Typically, French-style banks rise above ground level. This style features fountains, cascades, steps and sculptures.
Italian
A characteristic feature of the Italian pond is its symmetry. A pond of regular geometric shape, usually with a decorative fountain or cascade type, is located at the head of the garden. Since Italian landscapes are regular, compositional, and terraced, the pond may also have several levels. The banks are framed by a variety of ornamental plants in terracotta pots, or in tubs and beautiful containers. Italian ponds are often decorated with street lamps.
Japanese
A Japanese pond should resemble a natural one as much as possible. You will never find rectangular ponds in nature, so there are none in the Japanese style. A Japanese pond may have a waterfall, but not a fountain. In general, the art of creating a Japanese pond is similar to creating a bonsai - everything is real, but in miniature. The pond should look like the ocean, the pebble on the shore should look like a rock rising above the ocean. On the shore you can place a sculpture depicting Buddha, a dragon, an animal or a bird so that it is reflected in the water surface.
English
An English-style pond is much easier to arrange, since it does not require clear boundaries. The lines of an English pond should be smooth. An English pond is usually created as a landscape type - trees and shrubs grow in abundance around it. English ponds look natural.
After constructing a pond at your summer cottage and designing the landscape, you will have to take care of the reservoir. What is included in the concept of care:
- In spring, the filters and pump are usually turned on in mid-April. Immediately you need to carry out bottom cleaning and clean the surface of debris. At the same time, annual plants are planted.
- Tropical plants have been planted since June.
- Bottom cleaning should be regular and done using a bottom vacuum cleaner.
- In summer, a skimmer must be used to remove debris from the surface of the water.
- In summer, thread algae must be removed. If oxygen generators do not have time to clear the water of green algae, you can use special chemicals - algaecides.
- Water lilies and irises need to be fed with fertilizers.
- All summer it is necessary to monitor water quality with special tests.
- In the fall, tropical plants are removed from the pond, placed in containers with water and placed in a bright, frost-free room for the winter.
- In the fall, during the leaf fall period, it will be more convenient to cover the surface of the pond with a fine mesh so that the yellow leaves do not sink to the bottom, and to remove it by winter.
- In winter, the water from the pond is drained. It is necessary to drain water from all pipes and hoses. Remove and clean filters and pumps.
Conclusion
A pond on a garden plot is prestigious, fashionable and simply beautiful. If maintaining a large deep pond with fish is quite troublesome, then building a small pond with your own hands is within the means and within the power of even the owner of a small plot.
Decorating a summer cottage with a decorative pond is a good solution. The cool pond is especially pleasing in the summer heat. Even a small pond at the dacha can be equipped with a fountain or waterfall, planted with plants and flowers, decorated with stones and placed chairs or benches nearby. This will make a wonderful relaxation area. Any summer resident can make this beauty with his own hands in 1–2 days without significant financial costs.
What can you use to make a decorative pond?
There are a lot of materials for making garden ponds. You can choose more expensive ones and build an impressive deep lake, or you can find scrap materials for free and make a small decorative pond.
From a tire
Old used tires from heavy construction vehicles or tractors can be bought for pennies or found for free. According to its properties, the rubber from which they are made perfectly withstands seasonal temperature changes from frost to heat and does not allow water to pass through. This material has a long service life and a perfectly round finished shape. You can find this material at tire shops or auto repair shops.
You can make a multi-level pond with a small “waterfall” from tires
From an old bath
An old bathtub made of cast iron, steel or acrylic has an oval or angular shape and a shallow depth, just suitable for a country pond. If you are not happy with the enamel color, you can paint the bathtub blue for the effect of clean water or brown to match the color of the soil.
If you line a bathtub with stones, no one will guess what the pond is made of
From a plastic container
Special ready-made plastic containers are sold for creating reservoirs of various sizes and depths. These bowls can come in a variety of configurations, with steps and separate shallow and recessed areas. Durable material will withstand all loads and last for many years. A large assortment of colors allows you to choose a bowl to suit every taste. There is no need to drain the water or dismantle the pond for the winter.
Blue and light blue containers look more positive than black ones
Made from PVC film
Flexible rolled waterproofing materials and membranes for swimming pools are excellent for creating a reservoir of complex multi-stage shape, due to their flexibility and softness. PVC film is the most affordable of all products produced. Only polyethylene is cheaper, but it quickly deteriorates under the influence of ultraviolet radiation; it will have to be laid in 2-3 layers. It is recommended to use polyethylene film in this capacity only for temporary structures.
You can make springs of any shape and any size from PVC film
Other
Butyl rubber membrane for swimming pools costs a lot, but it is specially created for waterproofing, does not freeze, and does not rot. The service life of this film is 50 years, it is capable of tenfold stretching under significant loads without the risk of rupture.
A monolithic concrete bowl is considered the strongest and most durable; you can walk on it freely if you need to clean the bottom or replant pond plants. Creating such a pool will require more time due to the time it takes for the material to harden and gain strength. The additional costs for reinforcement and drainage will more than pay off, especially in the case of a large reservoir.
A pond made of a monolithic concrete bowl is more practical and more effective than others
Choosing a location for a pond on a summer cottage
In the process of design and design ideas, it is important to determine a good place to place the future pond and adjacent recreation area. Small volumes of water quickly heat up in the sun; it is better to place them in the shade. The sun's rays should not hit the surface for more than 6 hours a day. In the shade, the water will not overheat, and biological pollution will occur more slowly. On hot summer days, evaporation from the surface of a small pond can reach 5 cm, which is dangerous for animals and plants.
Fallen leaves and fruits from trees pollute the surface of the water, and the growing root system can damage the waterproofing layer. Therefore, it is better to place the bowl away from deciduous and fruit trees and shrubs.
Choosing plants for a pond in the garden
A bare pond without plants does not look aesthetically pleasing; it does not look like a real natural pond. You should choose suitable plants that naturally live near ponds and lakes, in swamps. They are divided into three groups:
- floating in water;
- immersed in water;
- coastal.
The first group includes free-floating plants not anchored by the root system in the bottom soil. The depth of the reservoir is not important for them. The following plants are popular in this group:
- eichornia (water hyacinth) - perennial, with large blue flowers and leaves immersed in water;
- pistia (water rose) - has light green rosettes of leaves that look like roses;
- It is recommended to grow watercolor in small ponds; this plant with small white flowers and round leaves floats in the water, and in the fall its foliage dies off.
A healthy microclimate is formed in water protected from overheating by large floating leaves.
Crops immersed in water and growing at the bottom in soil, a special container or pot are included in the second group. The following plants are popular:
- The water lily is one of the most beautiful and popular aquatic plants. Water lilies are planted in pots that are placed at the bottom of the pond. Water lily flowers are white, pink and yellow;
- hornwort is an oxygenator, it floats in the water column and helps to naturally maintain the purity of the pond and oxygen saturation;
- Arrowhead got its name from the shape of its leaves; it is planted to a depth of about 10 cm.
Coastal plants are planted around the reservoir; they grow well in waterlogged soil, decorate and shade the coastal zone. Popular plants:
- calamus - tall grass with sharp arrow-shaped leaves, an excellent companion for flowering crops;
- marsh marigold - unpretentious bushes with a scattering of small yellow flowers;
- Swamp iris is similar to garden varieties, has yellow flowers, and grows in large bushes along the banks of rivers and lakes.
Swamp iris can become the main accent in the composition of a country pond
How to build an artificial pond at your dacha with your own hands
This garden decoration is easy to do yourself, and you don’t need to spend a lot of money on it. If you strictly follow the technology and find the necessary materials at hand and prepare the tools, then in a couple of days you will be able to admire your creation - a beautiful pond. A large deep pool will be ready in 2 weeks due to more thorough preparation of the base.
From a plastic container
Polypropylene, polyethylene or fiberglass bowls are available in various depths and shapes. The most popular is the irregular rounded configuration, imitating a natural body of water. To install the container you will need the following materials and tools:
- tape measure, pegs and lace for marking;
- shovel;
- level;
- sand and crushed stone, water, cement;
- fittings
The design of an object includes a sketch on the site plan, a drawing with the placement of boulders, plants, and technical communications. There are ready-made schemes and design options for a country pond.
Installation of a bowl for a decorative pond
Depending on the planned purpose of the pond, you can buy a container of the required dimensions. If the reservoir will perform a purely decorative function, then it is recommended to make it multi-stage, shallow and small. To breed ornamental species of fish and amphibians, you should choose a bowl with a central area deeper than the freezing point so that the animals can overwinter.
A small fountain will decorate any country pond
Before installing a small plastic bowl in the chosen location, you need to prepare the base by making a sand cushion. To do this you need:

If you purchased a container of impressive size, then a sand cushion is not enough; you will need a concrete base. To do this you need:
- Mark the outlines of the sides of the bowl, sprinkling the outline with sand. At a distance of 15 cm from the sand line, drive in pegs to mark the edge of the pit.
- Clear the surface of grass, turf and stones.
- Dig a hole 30 cm deeper than the height of the reservoir.
- Level and compact the bottom and fill it with 5 cm of sand.
- Pour a 10 cm layer of medium-fraction crushed stone on top, lay a reinforcing mesh and fill it with 5–7 cm thick concrete mortar. The hardening time of the pillow is approximately 2 weeks.
The bottom of the future pond should be level
Installing the bowl on the base takes several steps:
- Pour water to 1/3 of the volume, pour wet sand into the spaces between the bowl and the walls of the pit, and compact it.
- Gradually add water and pour sand into the pit until the entire container is dug into the ground.
- After 2 days, the sand will subside and the mold will firmly fall into place.
Now you can install the technical part: fountains, additional equipment, pipes, filters. An excellent option for a country pond would be a floating fountain, which simultaneously serves as a filter and saturates the water with oxygen. This model will not only decorate the pond, but also clean it and ensure the health of fish and coastal plants. Installation is done like this:

After completing the technical work, you can begin decorating and planting plants:

Made from PVC film
The optimal choice for price and durability of rolled material for creating a pond is PVC film. For installation you will need:
- PVC film with a margin of 50 cm of width on each side;
- roulette, level;
- shovel, rake;
- a film welding machine or a hair dryer with a nozzle;
- sand, water.
When designing film structures, you can show more imagination and come up with a complex shape. A flexible and soft membrane will allow you to realize your design idea. The stepped structure will allow you to plant plants or enter the water for swimming. First you need to make an accurate drawing to scale and a sketch with design and decor options.
A waterfall will fit well into the pond design
The base should be as level as possible, clean and free of sharp stones and clods of earth. A sand cushion is sufficient.
Stages of work:

Now you can lay tiles or stones, which can be held together with cement mortar, decorate the pond with boulders and coastal plants, which are placed in pots on underwater steps near the surface of the water or in the soil in the coastal zone around the boulders. Floating oxygen generator crops saturate the water with oxygen; water lilies and lotuses decorate the surface with magnificent flowers.
Light shades of the film will allow you to better see fish and plants, while dark shades will create a complete imitation of real bottom soil.
You can decorate a pond with a dark base with plants and decorative figures.
Floating filters and UV lights will help your water stay clean longer. Snails will clean the walls of plaque, frogs and fish will reduce the number of mosquitoes and other harmful insects.
From a tire
Having available materials, such as old tires, you can set up a pond absolutely free in one day. The round shape is predetermined. An interesting version of this design consists of three tires of different diameters, which are installed at different heights. The result is a natural cascading three-stage waterfall.
To work with rubber you need to prepare:
- shovel;
- level;
- waterproofing film;
- knife with a metal blade;
- sealant;
- sand and crushed stone;
- stones and plants for decoration.
When designing, it should be taken into account that the tire can be dug into the ground completely or only up to half the height, or it can even be placed on the surface. The frost resistance and durability of the rubber will allow you to leave the pond in its place for the winter. The largest diameter of 3m and height of 1m are the tires of the Belarus tractor or tires from BelAZ equipment. You can even swim in such a pond.
Several separate ponds do not need to be combined - the composition will turn out harmonious from several tires of different sizes
Preparing the base:
- Mark the area by laying and guiding the tire around. Remove turf and remove plants.
- Dig a pit, widening it by 15 cm from the size of the tire and deepening it to the height of the tire plus 15–20 cm.
- Remove stones, clods of earth and debris, level the bottom of the site and compact it. A layer of geotextile can be laid to stabilize the soil and prevent the germination of weeds and tree root systems.
- Pour a layer of 10 cm of crushed stone and 5 cm of sand, pour water and compact it, check the level.
- This point is fulfilled if it is decided to make a concrete platform for a pond. A rebar grid or reinforcing mesh is placed on top of the sand cushion and filled with 7 cm thick concrete mortar. Cover with plastic film and wait until the screed dries after about 2 weeks.
The base is ready, and now you can begin installing and decorating the country pond. The work includes the following stages:

You can create a wonderful ensemble with a pond if you build a small alpine slide nearby. Pour a mound of soil, compact it a little and give it the desired shape, then lay it out picturesquely with stones. You can use driftwood, old ceramic pots and vases. Plant unpretentious, creeping plants in the soil between the stones, and moisture-loving crops closer to the water. Over time, the plants will grow and the hill will take on a wild, natural appearance.
Video: do-it-yourself small pond with a fountain
Arrangement ideas
The style of the reservoir should be in harmony with the general style direction of the entire summer cottage or garden. On a small estate, you can make a pond a central decoration and create a recreation area around it for the whole family. There are many landscape design ideas - everyone will choose the ideal option for themselves.
By following simple care rules and paying attention to animals and plants, you can create a wonderful corner of freshness and coolness that will become a favorite vacation spot for the whole family. Construction does not require a lot of time and money, and the result will be impressive.
Everyone dreams of recreating a miniature paradise on their site. We associate it with a beautiful landscape, garden trees and shrubs, a gazebo for relaxation, entwined with plants, and a fireplace for cooking over a fire. An addition to this idyllic picture will be. A pond can organically fit into the natural ensemble and become its decoration, because water is the fourth element that a person needs to feel harmony.
Creating an artificial pond is not so difficult; the main thing is to decide on its size, design and place where to place it.
Pond dimensions
The determining factors here are the area of the site, how you see the reservoir and the place that can be allocated to it. Conventionally, home ponds are divided into three categories:
- small decorative ponds that decorate the site and complement the landscape design (up to 5 square meters);
- a pond that performs a decorative function, but at the same time is in it (from 10 sq. m.)
- landscaped pool where you can swim. The sizes depend on the capabilities and free land that can be allocated for these purposes.
Ecoponds, as an alternative to a tiled pool, are becoming increasingly popular. Apparently, this is caused by a subconscious craving for pristine nature.
- Small decorative ponds are made from different materials.
At the dacha or site of the house, you can make it from large tires, plastic containers, old bathtub, ready-made molds that you can buy. If desired, equip them pump for water circulation and filter, make a cascade or waterfall. You can launch a small number of decorative fish, koi carp or shubunki.
The design of the pond and plants will become the basis of the water composition. The beauty of small ponds is that you can make them yourself. You will be able to realize your fantasies and tastes in design, so that you can subsequently enjoy your work. 
- Medium-sized ponds are more labor-intensive to manufacture and require certain professional skills.
Making a medium sized pond, basics


This is a rather complex ecosystem where it is necessary to correctly install equipment and select plants that would maintain the natural balance and purify the water.
Important. There are several rules for choosing a reservoir location:
- Trees should not grow nearby due to falling leaves;
- avoid planting plants with a strong root system near a pond;
- The pond should not be in the sun or get too hot. You need to choose a place so that it is in the shade during the hottest part of the day.
Decoration of the shoreline of the pond
The most interesting and pleasant moments in landscaping a water garden is the design of the coastline. This is where your talent and creativity can shine. Before you start decorating, you need to decide on the style.
What techniques are used for decoration:

The terrace board is one of the elements for decorating the shoreline of the pond; it fits well into the landscape composition of the reservoir. A bridge or path across a pond will become a detail that will add additional originality.
These rules are general in nature. The main thing is to bring your vision and creative energy into pond decoration. The main thing is that it is beautiful and pleasing.
Plants for pond decoration
When choosing vegetation for a pond, you need to focus on the size of the reservoir and its depth.
Important. 2.3 plants are planted per 1 square meter. 1/3 are submerged to maintain ecological balance.


The optimal time for planting is spring, early summer. It is better to line the containers with film and sprinkle with pebbles to prevent the soil from being washed away. As it grows, excess vegetation is caught and thinned out. As it evaporates, water is added to the pond.
Making a pond at your dacha with your own hands is not difficult if you work a little and take into account the recommendations.
- It is better to choose a place in the shade of a house or near a fence. This is the optimal location for a pond and relaxation during the hottest part of the day.
- Nearby you can put a gazebo for relaxation, a barbecue, and benches.
- A pond made of film would be optimal and less labor-intensive.
- Try to locate the pond close to the water supply point.
- When digging a pit, pay attention to how close the groundwater lies. If the water is shallow in the ground, it can accumulate and squeeze out the bottom of the reservoir.
- Buy film with a reserve. You can measure it using an ordinary cord, which is pulled through the bottom of the pit from one edge to the other.
- After filling the pond, let the water sit for a while.
A pond at your dacha or at home will become your favorite relaxation spot. If it is made with your own hands, then it is a source of pride. It's nice to spend a summer evening on the shore of your own small lake.
Creating a pond on video
Photo gallery of pond design examples


If the garden area is quite spacious, and there is a lot of free space on the plot near the house, take advantage of the opportunity to arrange a decorative pond. Such an object will perfectly complement the area on the site intended for recreation. We are sure: near the pond it will be much more pleasant to spend time reading newspapers or refreshing your feet, relaxing after a hard day.
And taking into account that the appearance of such a reservoir can be different, you can design the water corner in such a way as to create even more comfortable conditions for relaxation.
You can get creative ideas for arranging such a facility from this article by looking at photos and pictures of artificial man-made ponds created on summer cottages through the efforts of their owners.
 How to design an artificial pond at your dacha, photo
 Location
If you have decided to build a pond or other body of water for swimming in your garden with your own hands, first of all, choose the optimal place to place it.
When choosing an area to create a pond, take into account the following points:
- It is preferable that the water body be located in an open area. The presence of trees in the pond area will distort the landscape, in addition, they will begin to pollute the pond with leaves and twigs, and there will be a need for its constant cleaning;
- try to choose an area in which there will still be space left after creating an artificial reservoir. Perhaps over time you will want to increase the size of the pond, include new decorative elements in the water complex - keep in mind that some of them can be quite large;
- refuse to create a water body in an area located under the scorching sun, otherwise the reservoir will quickly dry out, the water in it will bloom, and harmful bacteria will develop in it.
Ideally, the sun will illuminate the water body only in the first half of the day or, conversely, in the second. At lunchtime, the place where the country pond is located should be in the shade. Explore the possibilities for creating a shadow zone in advance: mark the water body in the optimal location and evaluate how its illumination will change during the day.
To create a shady area, you can use buildings located near the pond or tall plants. Shrubs and trees (for example, weeping willows) will decorate the pond and give it a natural appearance.
You need to be able to harmoniously include a body of water into the existing landscape - be sure to take this point into account when planning a reservoir.
 Do-it-yourself pond at the dacha: landscape ideas, photos
 If you decide to create a water feature in a low-lying area in wet areas of the garden, you will be able to use the drainage system to ensure the removal of water from the garden area. If the area is flat, place the pond on the border of the garden area - where shrubs and trees grow, or close to a hedge (in this case you will need to create a soft transition from perennial vegetation).
Refuse to form an artificial pond on your summer cottage in the lawn area. If there is no other place, visually separate the pond and lawn grass by planting different varieties of plants on the border, including low vegetation so that you can see the water.
Many owners of summer cottages form decorative ponds next to rock gardens and rock gardens. The boulders that make up such objects can be successfully combined with the design of the pond.
Do not ignore the ravines and other irregularities on the site: they will become an excellent basis for the formation of streams flowing down to the pond over boulders. Over time, you can install a bridge in this area - it will become another element of the landscape decor.
Choosing a shape and style
Before you build a pond on your summer cottage with your own hands, you need to think about a few more nuances. First of all, decide on the style in which the water feature will be decorated. The shape of the reservoir will directly depend on the chosen style.
For example, the English direction is characterized by rounded shapes. Regular modern design is dominated by laconic lines and precise proportions.
 Imitation of a pond at the dacha with your own hands, photo
 And Asian-style ponds look most natural. This design is characterized by unevenness and asymmetry of shapes.
There are no strict requirements for the appearance of a reservoir at a summer cottage. But it is preferable that it looks natural.
A good idea is to combine several different shapes when forming an artificial pond in a spacious area.
 Decoration of a pond at the dacha, photo
 Selection of materials
Independent creation of a water feature on a summer cottage begins with the preparation of a pit. A reservoir can be formed in two ways:
- through the use of ready-made molds made of polyvinyl chloride or fiberglass. Plastic and polypropylene ponds are also very popular. When choosing, proceed not only from the price, but also from the quality parameters, if you want the pond to maintain a presentable appearance for a long time;
- using PVC film or special rubber based on butyl rubber. The main advantage of these materials is their durability. The film will last ten years, and rubber - for half a century.
 Artificial pond at the dacha, photo
 Each of these methods has its own advantages. When using a ready-made form, you will quickly complete the construction of the pond, since to form a pit you only need to secure it well from the inside. The second technology makes it possible to select the parameters of a reservoir and create a natural design - it is used if it is decided to build a concrete object.
In addition to materials for shaping the shape of the pond, prepare everything necessary to maintain it in optimal condition. At least buy a pump - you will definitely need it.
Before you start arranging a pond in the garden, we recommend that you study the recommendations of landscape design professionals presented in this video:
Master class on forming a reservoir without a film base
We offer step-by-step instructions on how to independently create a decorative pond in the garden using a rubber base or film. You need to start by preparing the pit: if the pond is small, use a shovel; for a large pond you will need special equipment.

Mark the area using pegs.
Remove the surface layer of soil, removing the terraces to a depth of 30 cm and a width of 20 cm, and dig the main hole.
Important! The edge of the pond should have a 45-degree slope, and the depth of the pit should be at least 60 centimeters. If the depth is shallower, the reservoir will freeze in winter and become very hot in summer.
To ensure a high-quality construction of a reservoir with film waterproofing, make a 15-centimeter trench around the perimeter of the water body to more securely fasten the film.
Having prepared the pit, level the bottom, removing boulders, and make a sand cushion 0.15 m high. Cover the pit with geotextile to protect the film material.
After this, you can start laying the film. Its parameters are selected taking into account the depth of the reservoir, multiplied by two, and its length. Please note that the film will need to be strengthened along the edges, that is, a reserve of another 50 centimeters will be required.
Spread the film, securing the edges with bricks, and fill the pond with water. There is no need to cut off excess film around the edges; within 24 hours the material will take the required shape. After this time, it will be possible to cut off the edges, leaving 25 cm for the blind area.
 Decorative pond at the dacha with your own hands, photo
 Design the blind area based on individual preferences. It can be made of stone, or it can be made of tiles or brick. Cement mortar is used to fix the materials. The minimum width of the blind area is 60 centimeters.
Pond from the bath
A homemade small pond on a summer cottage can be created from an old font. Let's find out in more detail how to implement this idea step by step. Start by forming a pit; its dimensions will be small. The depth depends on the dimensions of the bath.

Fill the pit with sand and make a cement screed so that over time the reservoir will not be washed away by groundwater. A 10-centimeter sand layer and a 3-5-centimeter cement layer will become a reliable cushion. A week after creating these layers, also form a gravel layer, approximately 25 centimeters high.
Lower the bathtub into the prepared pit. Having installed the font, fill the cavities on the sides with gravel (at least 10 centimeters from the font to the cut). Make sure that the edges of the bathtub do not protrude above the shore. Decorate the perimeter of the pond with small smooth stones or large boulders.
 Design of a pond at the dacha, photo
 If you want to make a pond out of a bathtub on a flat area with your own hands, secure the bathtub on one side with a large boulder, making a full excavation for one side and a partial one for the one that is free. The appearance of such a composition will resemble a rock garden.
Creating a mini pond
As already noted, an artificial reservoir created by one’s own efforts on a summer cottage can have any configuration. If you want to create a pond that will serve only a decorative function, you can use small-sized containers.
For example, you can create a miniature pond from a basin. The pond is formed according to the same principle as a pond from a large bathtub. To realize this idea, you can use not only a basin, but also an old trough, containers for flowers and barrels.
Very often, miniature ponds are designed from car tires. To create such a mini-pond from tires, it is necessary to form a reliable bottom.
 Do-it-yourself small pond at the dacha, photo
 Having studied the gallery of photos of finished ponds on a summer cottage, you will see that small reservoirs can be deepened or, on the contrary, raised above the holes. Large boulders, colored sand, brick, crushed stone and vegetation are used to decorate such objects.
Subtleties of care
In order for a homemade pond to maintain a presentable appearance for a long time, it needs to be properly cared for and special procedures carried out in a timely manner. How to care for such a garden pond? First of all, you need to form a small ecosystem and choose the right aquatic vegetation.In summer, remove weeds and algae that appear in the water surrounding the pond. Use nets with rakes and other tools to purify water.
 Do-it-yourself artificial pond at the dacha, photo
 Important! You can also clean a pond at your dacha using special products that are also designed to saturate the water with oxygen and do not harm fish and other aquatic life.
If the water feature begins to dry out, replenish it with water. With the arrival of autumn, promptly clean the water surface from leaves, branches and other debris so that they do not sink to the bottom. Certain types of ornamental plants need to be replanted in containers for the winter, and vegetation that is too dense needs to be thinned out.
After the end of the swimming season, use mesh material to protect the reservoir from pollution.
In the spring, prune dried plants and clean the walls and bottom of the reservoir from accumulated silt. Cleansing is best done using special equipment. In April it will be possible to launch a fountain, if one is provided in the pond complex.
Be sure to remember about strengthening the banks of the pond at the dacha - the shorelines of the reservoir at the first signs of deformation can suffer significantly over time. It is better to entrust this work to professionals.
If these measures are carried out in a timely manner, you will not have to spend a lot of time caring for the reservoir.
 Arrangement of a pond at the dacha, photo
 What vegetation to prefer
Owners of summer cottages who have decided to arrange a pond in the garden are interested in what ornamental plants can be planted around the pond. Not all plants can adapt to high humidity conditions. Let's look at this issue in more detail.
The coastlines of large bodies of water can be decorated with lush vegetation. For example, willow loosestrife, marsh iris, tall reed, dharmer and coin loosestrife.
Perennial plants are also suitable for decorating an artificial pond. Here is a list of the most popular varieties:
- hosts;
- Rogers;
- marsh iris;
- astilbe;
- gunner.
Forget-me-nots or sedums can be planted between the stones surrounding the pond.
Important! It is better to plant vegetation in the area of an artificial reservoir not in the ground, but in special containers that can be moved to an insulated place during the winter.
 Design of a decorative pond at the dacha, photo
 Now you know what kind of vegetation to decorate an artificial pond at your summer cottage. But you also need to choose the right plants that will decorate the water surface. For this purpose, water varieties of hyacinth, multi-colored water lilies, and duckweed are used.
Read about how you can make original nets with stones of various shapes and sizes.
You can see photos with examples of metal carports for a country house in the article.
Features of making garden sculptures are described in the article at:
Other decorative elements
One of the most popular ideas for decorating artificial reservoirs is installing fountains. The fountain can be made large and placed in the central part of the pond, or you can use several small fountains that emphasize the aesthetic appearance of a small reservoir.
To create a water feature with a fountain yourself, you need to buy special devices for spraying water. The sprinklers are installed on iron stands, which are screwed to the body of the fountains. The legs must be sanded so as not to damage the film in the pond.
The structure is placed in the water in a suitable place.
 Decoration of an artificial pond at the dacha, photo
 You can attach a hose to the fountain and run water through it so that it flows through the decorative elements. Thus, you yourself will create a pond with an imitation of a waterfall.
Another decoration for an artificial pond in a summer cottage is created from stones and boulders.
You can make small steps that highlight uneven landscapes, fences made of stones or sculptures, organically blending them into the natural landscape.
A stone pond can be decorated in any color palette.
Another interesting option for arranging an artificial reservoir on a summer cottage is the installation of decorative bridges. These designs can be purchased ready-made or made by yourself. Bridges can be wooden, stone or metal - welded or forged. The advantage of these elements is that they are suitable for decorating plastic ponds and any others.
Near the pond you can install beautiful benches or benches with a table, hang a hammock, thus creating a full-fledged recreation area.
 Do-it-yourself pond design at the dacha, photo
 A popular technique for decorating a pond at a summer cottage is the use of water lighting (lighting can also be done around the perimeter of the reservoir). In the dark, lighting will focus attention on the body of water, create a comfortable atmosphere for relaxation, set the mood for reflection and emphasize the beauty of the body of water.
 Decorating a pond at your dacha with your own hands, photo
 To get as close to nature as possible, you can place fish in the pond. Red carp look especially impressive, but you can also think about keeping crucian carp in a pond, then your pond will become an ideal place for fishing.
But do not forget that the fish in the pond need to be fed, otherwise they will die.
 Beautiful ponds in the country, photo
 There are many options for arranging and designing decorative ponds in the garden. Such elements of landscape decor make the areas even more beautiful. There are a lot of interesting concepts that you can implement on your own.
If you wish, you can use several design ideas at once to make the water feature look even more original.
Video
From this video you will learn the details of how to independently create and decorate an artificial pond at your dacha - details on how to improve the area, make and decorate a pond at your dacha with your own hands:
Photo gallery
A selection of photos with the most striking landscape ideas for the design and decoration of large and small, but beautiful ponds on the site near the house - for your inspiration:


