An unusual gift for any occasion. VAT has increased, and we have reduced prices

Which is made by hand. You can make it for a loved one.
I suggest knitting as a gift original case for electronic media. Except pleasant impressions, the person will receive useful thing to prevent damage to the flash drive when dropped or exposed to low temperatures.
To work you will need: a flash drive, a ruler, a hook and thread.
The proposed model uses “Iris” cotton threads, but if desired and possible, you can use any.
Before knitting, you should measure the length and width of the flash drive. Knit a chain of 25 chain stitches, one and a half times longer than the length of the flash drive itself.


Then, without turning the product, we continue to knit stitches in a circle, sticking the hook into the air loops of the chain.

In the last loop we knit 3 single crochets. We proceed to the second row without a lifting air loop. Now we knit single crochets all the time in a circle without adding 11-12 rows so that the flash drive placed inside is completely hidden inside.


This produces a small bag with a height of about 2.5 centimeters.


We do not tie the connecting row to the end by 2 cm - a distance equal to the width of the flash drive, so that it can freely enter and exit the case. We pass the thread through the last loop and tighten. We pull the thread inside out with a crochet hook, fasten it and cut the end.

For reliability, I recommend attaching the flash drive to the case. This way you don’t have to worry about losing the case and can comfortably wear it on your hand or neck.
You need to tie a string. To make it stronger, you need to knit it in two threads. To do this, you should unwind, without tearing it from the ball, a thread four times longer than the required lace. Then knit a chain of air loops of the required length with a double-folded thread.

When the lace is ready, we thread it through a special hole on the flash drive.

Turn the cover inside out and thread the lace through the bottom of the cover using a hook.
If your flash drive casing is worn out or the cap is lost, you can update it using an easy-to-use case "Owl". You can also bind a new flash drive as the original one. Master Class .
Knitted case for flash drive “Owl”
To work you will need:
- Iris threads, Fuchsia color, Lilac color, yellow, white and black;
- hook No. 1.5;
- loop with carabiner, for keychain, ready-made;
- heat gun with rods.
Description:
Head + body with threads in the color “Lilac”
1st row - cast on 5 chain stitches + 1 chain stitch, then knit two half double crochets into the first loop, from the second to fifth loops - knit one half double crochet into the corresponding base loop, tie three half double crochets into the fifth loop. Next we knit on the cast-on chain on the other side, making an oval. Until the end of the row, knit with half double crochets in each loop, including the tenth (aka the first).

2nd row - do not make lifting loops - knit spirally with half double crochets, this will look neater.
After knitting two or three rows, be sure to try it on your flash drive; the knitting should not fall off it.

So knit to the length you need, in in this example this is 13 rows. Finish knitting like this: when you reach the “sidewall” of the flash drive, knit four single crochets and three half-crochet stitches into the corresponding loops of the base, as if smoothing out the spiral.

Knit the head in a similar way, only reducing the number of rows to six, and in the last row, use single crochets to connect the “head” to the “body”. Before you cut the thread, be sure to check that the head can be removed well.

Wings with fuchsia threads:
1st row - cast on a chain of 5 air loops (hereinafter VP) + 2 lifting loops;
2nd row - in the first loop, knit two double crochets, from the second loop to the fourth, knit one double crochet, in the corresponding loop of the base, in the fifth loop, knit seven double crochets. Continue knitting in the same row, making an oval. And so on from the sixth to the eighth loops - knit one double crochet. In the last loop, in which two stitches are already connected, add 4 more double crochets, secure the row with a connecting loop;
3rd row - three air loops, single crochet in each corresponding base loop around the entire circle;
4th row - one single crochet, three chain stitches and secure them with a single crochet under the arch of three chain stitches of the previous row, so knit to the end.

Eyes:
Turn on the hot glue gun to warm up, and in the meantime, thread white cast on a chain of six air loops, close it in a ring, hide the “tails” and cut the thread. Using black thread, make a chain of three air loops, also close it into a ring, but leave long ends. Insert the black part into the white “donut” and, holding everything by the long ends, coat everything with hot hot glue. Now you can trim the long ends of the black threads.

Make two eyes this way.
Beak yellow threads:
Cast on a chain of three air loops, two lifting loops and knit unfinished double crochets from all loops, ending them with one loop.

Tassels Fuchsia threads:
Take the connected body and head, cut about 10 cm of fuchsia thread, fold it in half and pull it through the loops of the head with a crochet hook, secure with a knot and trim evenly. Make two tassels.

Now it's time to attach all the parts. You can sew them on, but a heat gun can handle this faster and easier. First glue the beak, then “crawling” onto it a little, glue the eyes.

Now turn the owl back and apply glue to the center of the wings and glue them to the body.

Turn the owl “face”, add wings to the front, hook it with a keychain holder and that’s it.

The owl flash drive is ready!


Now the flash drive has taken on a completely different look. In addition, according to Feng Shui, it is a symbol of wisdom and knowledge, helps to succeed in studies, and helps those who do not study to manage their lives wisely. So now you also have a good talisman.
More interesting:
See also:
DIY bonbonniere
I'm glad to introduce you to another one step-by-step master class Antonina Mazur - how to make a box - bonbon...
Potholder "Chicken", crocheted
Every housewife should have an oven mitt in the kitchen. After all, it is she who saves her hands from burns during...
DIY curtain tiebacks
Magnetic tieback for curtains made from ribbons will help make simple window curtains more interesting...
We welcome all beginners as well as experienced life hackers on this site!
We have an electronic magazine in which we write various interesting articles about useful gadgets and unusual concepts. We also look into the future or make the present more interesting, beautiful and useful. Read the next article of the electronic magazine.
Almost everyone has USB flash drives today. But despite all the diversity, the range of housings for such devices is quite limited. Why not make a case for the flash drive yourself? It's not as difficult as it seems, you just need to spend a little time. But you will become the owner of a unique thing.
So let's get started! Following step by step instructions, we will make a case for our USB flash drive from bricks from children's construction set Lego.
 This is what she will look like
Tools and materials
Penknife
Pliers
Several Lego bricks
Super glue
Sandpaper
Metal polish
Flash drive
Step 1: Body Base
 Internal elements are broken
USB memory cards are available different sizes. We will be packaging a fairly large board. Therefore, we will need a Lego brick measuring 6x3 cylindrical landing elements(let’s agree to call them “points”).
With a penknife everything needs to be trimmed internal partitions bricks and then break them out using pliers.
We use two more low-profile bricks with dimensions of 4×2 and 2×2 “points” to create the lid. Also for the lid you will need a low-profile element 1x6 “dots” (for the lid you can use other combinations of construction parts, or you can simply take exactly the same brick as for the base of the body (6x3) and carefully cut off its upper part with a jigsaw parallel to the horizontal plane).
Using superglue, glue the lid elements together to create a part measuring 6x3 “dots”.
Step 2. Install the board
 Board in case
At the end of the case we cut out a groove for the USB connector, and after a little adjustment using a penknife we install the device into the case.
Step 3: Mounting the board
 Fill the body with silicone
We place brick scraps on the bottom of the case and ensure that the board is parallel to the horizontal plane and does not press through. We fill all the remaining space in the case with transparent silicone, sealing it to reduce the possibility of any movement of the flash card inside the case.
It is important to use transparent silicone, since the indicator LED will need to shine through it.
Step 4. Gluing and polishing
 Cleaning the edges
 Polishes of different abrasiveness
To ensure that there are no gaps between the lid and the body, we take sandpaper, put it on flat surface, and align the bottom plane of the lid on it.
After we have glued the lid to the body with superglue, using the same sandpaper we remove burrs and glue smudges from the side edges of the case.
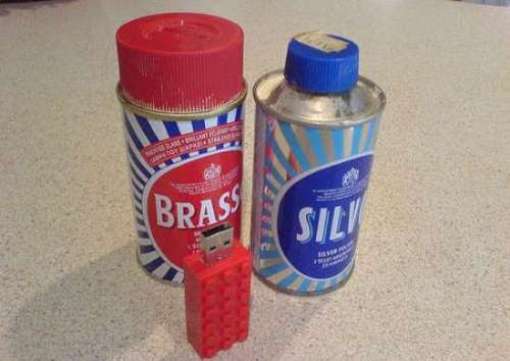
Then we finally polish the body with polish.
Step 5. Completion
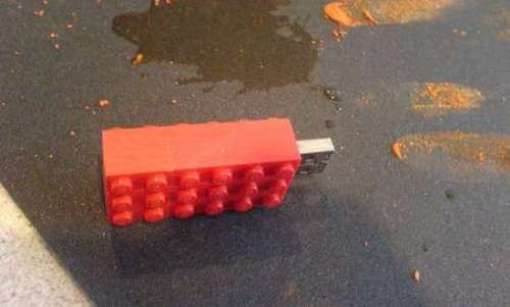
 The case is ready
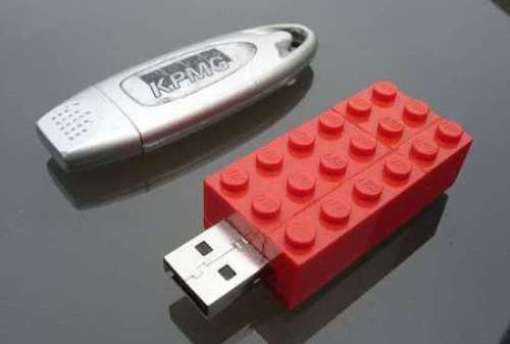 Compare your exclusive and mass consumer goods
 Looks stylish!
But that's it creative possibilities for creating exclusive flash drives is not exhausted. On the contrary, there can be an infinite number of types of cases for them.
Look what other craftsmen have done.

Do you have an original flash drive? What ways of individualizing this mini-media do you know?
Meanwhile, the mini-magazine still contains some unread curiosities: a visionary video about the medicine of the future; gadgets - stationary cellular telephone and a bottle for tourists to disinfect water. and don't miss anything!
Flash drives often break and, as a rule, the outer shell - the housing - fails. How to reanimate a drive so that it serves you for a long time? Read on to learn how to make a case for a flash drive with your own hands: instructions step by step.
Today we will look at several questions:
- how to properly disassemble flash drives of different designs;
- what tools will be needed for this;
- how to make a case for a flash drive.
In addition, we will tell you which materials at hand can be used to create a new case, and which ones are better not to use so as not to damage the media. At the end there will be small master classes on how to design this device in the form of a Lego cube and a lighter.
Flash drives are an integral part of life modern man. Of course, there are various other types of storage media. Computers and laptops have long been in use; in the end, some even use their smartphones for this. But despite this, these storage media do not lose their relevance: they can store large amounts of information, quickly and easily connect to various devices, do not take up much space. They are used to store photos, videos, films, music, and for many they are an indispensable thing at work, for transmitting reports, presentations and important documents.
Usually they are in a plastic “body”, sometimes in silicone - manufacturers like to make these types in funny shapes like fruits, cartoon characters and TV series. And much less often they are more impressive, for example, steel. Plastic storage media are easily damaged; they can split from an unexpected fall, bend at a break, or crack when caught under a heavy object.
What is the way out of this situation? Spend money on buying a new device, time to transfer information? Why, if you can just read this article and find out how to create your own original case for a flash drive. IN possible options you are limited only by the availability of materials and your imagination, methods and types homemade buildings can be different: starting from a Lego cube or a piece of a block left after repair, and ending with a regular cork. Some craftsmen create real works of art in different styles and even sell them. Since there are many options, we will look at the basic principles - how to properly remove a flash drive from the old “body” and how not to damage it, what tools you may need and what items can be used to create a new design, and what materials should not be used.

Removing the Flash Drive
So, let's begin! First, just in case, transfer all the contents to another device. A flash drive can be:
- whole;
- collapsible.
If the former have a visible gap in the body, then the latter look monolithic. But both of them can be easily disassembled, the main thing is to know how.
Let's start with the “solid” type. Its connector is connected by a latch to the board, and this latch snaps into place, and disconnect it in the usual way impossible. We will need a thin, flat pen screwdriver. Using this tool we make a hole between the body and the latch. Carefully, so as not to damage anything, lightly pressing, swing up and down. Such holes need to be made in three or four places where the connection is made, now we can easily remove it.

Now let’s talk about how to remove the case from a “collapsible” flash drive. This type of drive is much simpler and its disassembly requires less effort: there is a small slot along the body that makes work easier. We will also need a thin feather screwdriver. Unlike monolithic type, there is no latch here, but there are latches that we need to open. We insert the screwdriver into the groove and use the same rocking method to open the case. The latches may break, but this will not cause any harm to the drive.
Making a case for a flash drive
Well, we've disassembled the flash drive, and now let's move on to main task- how to make a case for a flash drive? Your homemade version, as mentioned earlier, can have any form - the main thing is to maintain the functionality of the drive. Firstly, the item should be easy to connect to the computer, and secondly, the materials should not damage its components.
That is, protruding edges should not interfere with the connection to the USB port, since a part that is not fully inserted may not work, and collisions of components with hot glue, paint and other aggressive materials must be avoided. The new case must be sealed and prevent moisture from entering the board. The easiest way is to choose plastic. It is much more difficult to create a shell from wood or metal, but it will definitely last a long time and will retain its “sales appearance”.

One of the housing options is made of electrical tape
Making a flash drive body from a lighter
We will look at the simplest option, made from a regular lighter. Almost everyone has an old used lighter lying around somewhere at home, and sometimes they also have interesting design. We will need stationery knife, glue gun, a lighter of a suitable size, a screwdriver with a 3 mm drill. A lighter is suitable so that the flash drive without a case fits completely into it and only the USB port protrudes. You can use any glue suitable for plastic.
First you need to release the remaining gas from the lighter, then make two holes in the bottom. Next, use a knife to make a cut along the contour framed by the holes. We install the flash drive inside and glue it to the body, removing the remaining glue. Our new drive enclosure is ready. We now have an interesting and practical flash drive-lighter. As you can see, it is not at all difficult and does not take much time.

Flash drive - Lego cube
Another way to design a flash drive in an original way is to make it in the form of a Lego cube, which almost everyone has. We will need several Lego bricks, a pocket knife, pliers, glue suitable for plastic, polish and sandpaper. First, we select the appropriate size cubes for our flash drive. You can make a case from several cubes of different sizes and colors. We cut off all the internal partitions with a penknife, now we break them out with pliers. We use the second same cube for the lid, cutting everything off to the top. We cut a hole in the end for the USB connector, adjust it, and install the device.

Using the remains of the brick, we fix the flash drive so that it lies parallel. We fill the empty space; for this you can use transparent silicone. To ensure that there is no gap left between the base part and the lid, we rub the joint with sandpaper and glue it together. After the glue has dried, remove the residue using sandpaper. Using polish we finish the job.

Your exclusive DIY flash drive is ready!
So, as you may have noticed, making a case for a flash drive is not that difficult. The main advantage of making it yourself is that it will be truly original. After all, before you begin to implement it, you turn on your imagination, select materials from those at hand and those that are more accessible to you, put them together and in the end you have an original and individual flash drive, which 100% will not go unnoticed. It will certainly highlight your individuality and creativity.