Setting up Yandex mail in the bat. Setting up The Bat! in the Yandex mail service
In this article I will tell you how to correctly and quickly configure a client email program. The Bat! with postal service Yandex. Here we look at the most basic setup elements that do not require any knowledge or skills in working with email. Presumably previously registered account in the postal service Yandex and already installed mail client The Bat.
This information is intended primarily for beginners, so there is a lot of big amount screenshots and detailed description actions that may seem completely unnecessary to the average user. Please be understanding.
And so, it is assumed that we already have an installed mail program The Bat!. If the program is launched for the first time, an information window will be displayed asking you to create a new mailbox. Therefore, we can go straight to paragraph 3 of this article. In all other cases, follow the instructions:
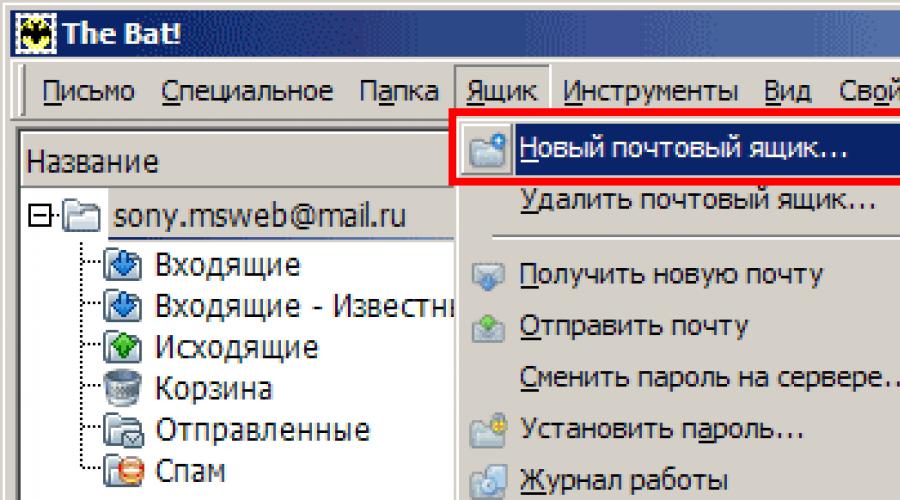
1. In the main menu of the mail program, go to the category Box, as shown in Figure 1.
Picture 1.
2. Next, in the pop-up menu, select the item New mailbox. See Figure 2.  Figure 2.
3. An information window appears asking you to create a new mailbox, or restoration of an existing one. We are interested in the first point, circled in Figure 3 with a red marker. Mark it and then press the button Further. Figure 3.
4. In the window that appears, you are prompted to enter a name for the mailbox. In my case, the name looks like [email protected]
. Let me note right away that this is not an email address, but a regular display name. It may look like: My mail, Yandex Mail etc. Complete the input by pressing the button Further. Figure 4.
5. Now you are prompted to enter your full name and address Email and organization, as shown in Figure 5. In the field Name- enter your real name, full name or nickname. In field Email address Enter your current email address. Organization- the name of your organization. In the future, this data will be used in mail program templates when sending letters. If desired, this data can be changed in the mailbox settings. To apply the input, press the button Further. Figure 5.
6. We see a window for selecting a protocol and entering server addresses for receiving and sending email. Check that the protocol is selected POP3 - Post Office Protocol v3 as shown in Figure 6. Server for receiving mail - pop.yandex.ru, server for sending mail - smtp.yandex.ru. Also, check for the corresponding option checkbox My SMTP server requires authentication. Then click Further.
Comment! If your mailing address has a prefix @narod.ru, the servers for receiving and sending mail will look like pop.narod.ru And smtp.narod.ru respectively!  Figure 6.
7. B next window You must enter the identification data you provided when registering your email account. The red marker in Figure 7 marks the fields for entering the username and password. Please note that the username is entered without the server name, i.e., if your email mailbox looks like [email protected]
, then the username you enter will look like ivanov.ivan
Here you can also select the function of deleting letters from the server upon receipt. To do this, uncheck the box labeled Leave emails on the server, marked in blue. After that, click the Next button.  Figure 7.
8. In the last setting item, when asked about checking other properties of the mailbox, check the box No, as noted in Figure 8. And, to complete the setup, press the button Ready. Figure 8.
Not only is it among the most secure mailers, but it is also distinguished by a fairly comprehensive set of functions, as well as flexibility of operation.
Using this software solution may seem unreasonably difficult to many. However, mastering The Bat! can be done very simply and quickly. The main thing is to get used to the somewhat “overloaded” interface of the email client and customize it for yourself.
Get started with email correspondence in The Bat! (and in general working with the program) is possible only by adding a mailbox to the client. Moreover, you can use several mail accounts simultaneously in the mailer.
Mail.ru mail
Integration of the Russian box into The Bat! as simple as possible. IN in this case the user does not need to make absolutely any changes in the web client settings. Mail.ru allows you to simultaneously work with both the outdated POP protocol and the newer IMAP.
Gmail
Yandex Mail
Antispam for The Bat!
Despite the fact that the email client from Ritlabs is one of the most secure solutions of this kind, filtering unwanted emails is still not the most strong point programs. Therefore, in order to prevent spam from entering your email inbox, you should use third-party extension modules designed specifically for such purposes.
Best on this moment The AntispamSniper plugin copes with its responsibilities for protecting against unwanted electronic messages. Read about what this plugin is, how to install, configure and work with it in The Bat! in the corresponding article on our website.

Setting up the program
Maximum flexibility and the ability to configure almost all aspects of working with mail are some of the main advantages of The Bat! in front of other mailers. Next, we will look at the main parameters of the program and the features of their use.
Interface
The appearance of the email client is absolutely inconspicuous and it certainly cannot be called stylish. But in terms of organizing a personal workspace, The Bat! can give odds to many of its analogues.
Actually, almost all elements of the program interface are scalable and can be moved by simply dragging them from one place to another. For example, by grabbing the left edge, the main toolbar can be dragged to any area of the visual representation of the email client.

Another way to add new items and reorganize them is through the menu bar item « Workspace» . Using this drop-down list, you can clearly determine the location and display format of each component of the program interface.

The first group of parameters here allows you to turn on or off the display of auto-view windows for letters, addresses and notes. Moreover, for each such action there is a separate key combination, also displayed in the list.
The point deserves special attention "Toolbars". It allows you not only to hide, show, and change the configuration of existing panels, but also to create completely new ones - personalized sets of tools.

The latter is possible using the subparagraph "Tune". Here in the window "Customizing panels", from dozens of functions on the list "Actions" you can assemble your own panel, the name of which will be displayed in the list "Containers".

In the same window, in the tab "Hotkeys", you can “attach” a unique key combination to each action.
To customize the appearance of the list of letters and the emails themselves, we need to go to the menu bar item "View".

In the first group, consisting of two parameters, we can choose which emails to show in the email list, as well as what criteria to sort them by.
Paragraph "View threads" allows us to group letters combined common feature, in message threads. This can often make working with large volumes of correspondence much easier.
"Letter Header"— a parameter in which we are given the opportunity to determine what information about the letter and its sender should be contained in the header panel of The Bat! Well, at the point "Columns of the list of letters..." we select the columns shown when viewing emails in a folder.
Further list options "View" relate directly to the format for displaying the contents of letters. For example, here you can change the encoding of received messages, enable the display of headers directly in the body of the letter, or specify the use of a regular text viewer for all incoming correspondence.
Fundamental Parameters
To go to a more detailed list of program settings, you should open the window "Setting up The Bat!", located along the way "Properties" — "Settings...".

So the group "Basic" contains parameters for autostarting the mail client, displaying the The Bat! in System Windows panels and behavior when minimizing/closing the program. In addition, there are some interface settings " bat", as well as an item for activating birthday alerts for members of your address book.

In chapter "System" You can change the location of the mail directory in the Windows file tree. In this folder The Bat! keeps all his General settings and mailbox settings.

Settings are also available here Reserve copy emails and user data, as well as advanced options for mouse buttons and sound alerts.
"Programs" serves to set specific associations The Bat! with supported protocols and file types.
Very useful feature — "Address history". It allows you to fully monitor your correspondence and add new recipients to your address book.

Chapter "List of letters" contains parameters for displaying email messages and working with them directly in the list of letters The Bat! All these settings are also presented as subsections.

Tab "Date and time", as you might guess, is used to configure the display of the current date and time in the list of The Bat! letters, or rather in the columns « Received" And "Created".

Next come two very specific categories of settings − "Color Groups" And "View Modes". Using the first, the user can assign unique colors in the list for mailboxes, folders and individual letters.
"Tabs" is intended for creating your own tabs with letters selected according to certain criteria.
The most interesting sub-item for us is "List of letters"- This "Mail Ticker". This function is a small creeping line placed on top of all system windows. It displays information about unread messages in your mailbox.

In the dropdown list "Show MailTicker(TM)" You can select modes for displaying a line in the program. The same tab allows you to specify letters with what priority, from what folders and with what statute of limitations will be displayed in the Mail Ticker ticker. Fully customizable here appearance similar interface element.
Tab "Letter tags" is intended for adding, changing and removing distinctive notes to letters.

In addition, the appearance of these same tags is completely customizable here.
Another and quite significant group of parameters is "Editor and Viewer of Messages". This contains the settings for the message editor and the message viewer module.

We will not delve into each item in this category of parameters. We only note that on the tab "Email Viewer and Editor" You can customize the appearance of each element in the editor and the content of incoming letters.

We simply place the cursor on the object we need and change its parameters using the tools below.
Next comes the settings section, which every The Bat user should definitely become familiar with - "Expansion modules". The main tab of this category contains a list of plugins integrated into the email client.

To add to the list new module, you need to press the button "Add" and find the corresponding TBP file in the Explorer window that opens. To remove a plugin from the list, simply select it on this tab and click "Delete". Well, the button "Tune" will allow you to go directly to the list of parameters of the selected module.
You can configure the operation of plugins in general using the sub-items of the main category "Virus protection" And "Spam protection". The first of them contains the same form for adding new modules to the program, and also allows you to determine which letters and files need to be scanned for viruses.

Actions to be taken when threats are detected are also set here. For example, having found a virus, the plugin can cure infected parts, delete them, delete the entire letter, or send it to the quarantine folder.
Tab "Spam protection" will be useful to you when using several extension modules to remove unwanted emails from your mailbox.

In addition to the form for adding new antispam plugins to the program, this category of settings contains parameters for working with letters, depending on the rating assigned to them. The rating itself is a number, the value of which varies within 100.
This way, you can ensure that multiple anti-spam extension modules work as efficiently as possible.
Next section - "Security settings for attached files"— allows you to determine which attachments are prohibited from opening automatically, and which can be viewed without warning.

Additionally, the warning settings when opening files with extensions you define may be changed.

Thus, on the main category tab, you can configure the display of the quick response panel in some functional windows of the program.
Other tabs are used to manage conversion tables used when reading letters, set up confirmations for various actions, add request forms and create new keyboard shortcuts.
There is also a section here "SmartBat", in which you can configure the built-in The Bat! text editor.

Well, the final tab on the list "Incoming Email Analyzer" allows you to configure the incoming correspondence analyzer in detail.

This component of the email client groups and sorts large volumes of messages from specific recipients into folders. Directly in the settings, you can adjust the parameters for scheduling the analyzer to run and cataloging screened emails.
In general, despite the abundance of various parameters in The Bat!, you are unlikely to have to understand absolutely all of them. It’s enough just to know where you can configure this or that program function.
Nowadays, almost every person has their own electronic mailbox. You can’t do without email, because it is through it that registration takes place on various resources of the global network, including in social networks, is underway business conversation in companies, advertisements, useful and not so useful notifications are sent out. With such a flow of incoming and outgoing letters, there is a need for more convenient and centralized management of all mailboxes. This is why they came up with special mail programs that make working with letters much more comfortable. In this article we will take a closer look at how to configure The Bat email program. Let's figure it out. Go!
After you have downloaded and installed The Bat, the first time you launch the utility you will need to configure it for the service you use. It can be any of them: Gmail, Yandex, Mail.ru, Ukr.net or any other.
Mark the line “Create a new mailbox” with a dot and proceed to the next step. Next, enter a name for your mailbox; the “Home Directory” field can be left untouched. Then enter your username and your email. Now important point. You must select the correct protocol to access the server of the service you are using. Below you need to specify the server for receiving mail and the SMTP server address. Be sure to check the boxes next to the “Secure connection” items.

Depending on which service you use, the settings will differ. In the first section, where you need to select a protocol, as a rule, either POP3 or IMAP4 is used. The fields below are very easy to fill out. If you use mail.ru, then specify pop.mail.ru and smtp.mail.ru as the first and second servers. If you selected the IMAP4 protocol, then the first field should look like this: imap.mail.ru. Also, don’t forget to check the “My SMTP server requires authentication” option.
Then enter your mailbox username and password. Please note that only the part of the address up to the “@” symbol is indicated as the login. Then uncheck the box “Do not use the Recycle Bin when deleting.” In the next window, immediately click on the “Next” button. In the “Do you want to check other mailbox properties?” answer “Yes” and click “Done”.
In The Bat window, open the “Transport” tab and set the settings for mail servers:
- smtp.mail.ru and imap.mail.ru - in the sending and receiving mail fields, respectively;
- 465 and 993 - as port numbers;
- Set the type of connection to “Secure on special.” port (TLS)".
![]()
For other popular services, indicate the appropriate server addresses. Immediately after the name of the protocol, indicate the name of the service, for example, smtp.gmail.com or imap.yandex.ru. The port numbers are in most cases the same as those listed above.
In the “Sending Mail” section, click on the “Authentication” button. In the window that appears, make sure that “SMTP Authentication (RFC-2554)” is checked and that the use of mail receiving parameters (POP3/IMAP) is selected. Apply the specified settings and log into The Bat again.
Right-click on the mailbox name and select “Refresh Folder Tree.” After that, in the same menu, click “Mailbox Properties”. In the “Mail Management” block, set “Sent” in the item of the same name and “Deleted” in the “Trash” line. Below, check the box “when you start The Bat”.
Select “Delete” from the menu on the left. In both “Move to specified folder” fields, set “Deleted”. At the bottom of the window, check the boxes next to “Automatically compress...” and “Mark deleted...”.

In the “Options” window, enable the “Scan when The Bat starts” and “Compress all folders...” functions.
According to statistics from Zecurion, 78% of thefts of personal and corporate information occur through email. To counter cyber threats, in addition to increasing control on the part of the client (double identification, linking to a phone), security measures are being strengthened in email clients and programs. One of such software that puts the protection of user information at the forefront is The bat!.
The bat! - what it is
This software from the Moldovan IT company Ritlabc. The application specializes in collecting, storing and sorting email. It can work with an unlimited number of mailboxes and process an infinite number of letters and files. Credo The bat! - not only the convenience and speed of working with letters, but also the safety of the user. The program is paid, designed for private and corporate clients.
Confidentiality is achieved by encrypting data on the client’s computer’s hard drive and traffic, a separate address book in case of data destruction, etc.
Almost everyone can work with the program, including Yandex. Mail. Setting up The bat! for the most popular search engine in Russia will be discussed in this article.
Setting up The bat! for Yandex via POP3 protocol
POP3 is a mail protocol that allows you to download all files from an email box at once. Implemented via port 110.
In practice, this means the following: in order to view a letter with an attachment, the program will first download it to a special folder on the client’s machine’s hard drive. It is deleted on the mail service server. The advantage of the POP3 system is the fast response and the ability to work with letters offline. The disadvantage is that attachment files are stored in the computer's memory, which means they can be damaged or lost.

Setting up The bat! for Yandex via POP3 in steps:
In the “Box” tab, select “New”.
We come up with a name for the box, for example, “Worker”.
The user's full name will be in the signature (for example, “Alexey Petrov”) and Yandex address ( [email protected]).
To access the server, select Post Office Protocol - POP3. The server for receiving mail will be pop.yandex.ru, for SMTR - smtr.yandex.ru.
Check that the boxes next to Secure connection and “My server requires authentication” are checked.
We indicate (before the “@” sign, in our example it is “alex.petrov”) and the password for the mailbox. The checkbox next to “Leave emails on the server” means that attachments are not deleted after uploading to HDD user.
We indicate the connection method local network or manual connection.
As you can see, everything is very simple. Creating a box takes a few minutes, as does setting up The bat!. Yandex.ru contains more detailed instructions for advanced users.
Setting the correct mailbox properties
Right-click on the name of the mailbox. Select “Properties” from the drop-down menu.
In the “Transport” menu, mail is sent through the SMTR server: smtr.yandex.ru, port 465. Reception is made through pop.yandex.ru, port 995. Everywhere there is a secure connection via a TLS port.

We check the settings of the mail sending server by clicking the “Authentication” button. SMTR Authentication must be enabled with the value "Use Receive Options via POP3/Imap".
Setting up The bat! for Yandex via imap
imap mail protocol - more modern development, which appeared along with cloud technologies. Implemented via port 143.
Imap downloads a list of files first, then selectively downloads the files themselves. In practice, the user sees the letter, its subject, the size of the attachment, and the beginning of the letter. To work with a specific file The bat! downloads a letter from the server. Attachments remain there and are additionally saved on your local drive.
Imap allows you to work with letters in offline and online modes directly on the server while saving information.

Setting up The bat! for Yandex via imap:


Surely each of us knows the domestic one. But not everyone knows that it can be managed not only through the official website.
There are also a number of mail programs that serve to conveniently manage your mailboxes on different domains. Today we’ll look at the settings of Mail.RU for the most popular one for almost two decades.
There are two types of The Bat settings for Mail.Ru: via the IMAP protocol and via the POP3 protocol. We'll look at both, starting with IMAP.
Let's go into The Bat! itself. In the "Mailbox" menu, select "New mailbox".

The name of the box is entirely your imagination. Click "Next".
There is already a more specific page where you need to enter “Your full name", which will be displayed in the "From:" field in sent messages, as well as "E-mail address", where you enter your address for which we are setting up the program, and, if necessary, fill in the "Organization" field. Click "Next" ".

Now the page is even more stuffed with settings! Here we enter everything exactly as in the instructions:
- To access the server, use the IMAP protocol;
- Server for receiving mail - imap.mail.ru;

In the "User" field of the next window, enter your mailbox, including your login, the "@" sign and the mail.ru domain. In the "Password" field - the password for the mailbox.

After clicking the “Next” button, we answer the question “Do you want to check the remaining properties of the mailbox?” positive, and click “Done”. In the new menu, select the "Transport" item, and in the "Connection" items for both sending and receiving, select "Secure to a special port (TLS)". This is necessary to ensure maximum security through encryption. You also need to check that the SMTP port (Sending Mail) is 465 and the IMAP4 port (Receiving Mail) is 993.

We don’t leave this menu anywhere, but click “Authentication...” next to the “SMTP server” field. Check the box next to "SMTP Authentication (RFC-2554)" and select "Use mail receiving settings (POP3/IMAP)". Click "OK".

On the newly created account, you next need to right-click and click “Update folder tree” so that the list of folders is similar to the list of folders in the mailbox.

We return to this context menu again. Now you need to configure the place where letters sent using the program and other letters from system folders will be saved. Click "Mailbox Properties...".

We look for “Mail Management” on the right and check the boxes next to “Sent” and “Trash”. In the field on the right, select items identical in name.

The "Mail Management" section has a "Delete" subsection. We go into it and check the boxes next to “Move to the specified folder”, select the “Trash” folder using the “Browse” button. Remove the checkbox from “Use alternative deletion for old emails” and check the “Mark deleted emails as read” checkbox.

This completes the IMAP setup. Now let's look at setting up POP3.
In the same way - “Box” - “New mailbox...”.
Select any mailbox name in the “Box name” field and click “Next”.
Identical to the previous settings, put the sender’s name in “Your full name”, and the address of the mailbox being configured in “E-mail address”. Click "Next".

A menu opens where you need to select the following items:
- To access the server, use the protocol - POP3;
- Server for receiving mail - pop.mail.ru;
- The SMTP server address is smtp.mail.ru.

Immediately check the “Leave emails on the server” checkbox in the next window, and in the “User” and “Password” fields - your login and email password. The login, I remind you, should consist of the name, the “dog” icon and the mail.ru domain.

We'll enable encryption here too. We answer the question “Do you want to check the remaining properties of the mailbox?” in the next window click “Yes” and click “Finish” to go to properties.
In the "Transport" section, place in the "Connections" items "Secure on a special port (TLS)", check the ports: POP3 server - 995, SMTP server - 465. Opposite "SMTP server" click "Authentication..." , check the box next to "SMTP Authentication...", check the box "Use mail receiving settings (POP3/IMAP)". Click “OK” everywhere - mail via the POP3 protocol is configured.

As you can see, there is nothing complicated. Use the mail program The Bat! with pleasure. See you!