Pump to create oxygen in a pond. Water deferrization system based on a homemade aerator. Structure and equipment of aerators
Artificial ponds are very popular today; they are widely used by designers in landscape design. Almost every owner suburban area tries to arrange at least a small pond or fountain in his garden.
But probably everyone knows about the difficulties of such an event, and the main one is stagnation of water and flowering of reservoirs. A foul-smelling pond with muddy green water is unlikely to promote relaxation and rest.

Why water stagnates in artificial ponds, why aerators are needed, and how you can assemble such a device with your own hands - there will be an article about this.
Purpose of aeration
Pond aerators are compression units that mix water with air, thereby saturating it with oxygen, which is why these devices are also called air compressors.
As you know, without oxygen life on the planet would be impossible. Everyone needs to breathe: humans, animals, birds, plants and even fish. Plankton and algae, which are found in every pond, require a constant supply fresh air. And if there is fish in the reservoir, the need for oxygen will double.
In natural rivers, seas and lakes, the air exchange process is clearly established: oxygen constantly enters the water when mixing water flows when rivers flow into seas, for example, or it's raining, strong wind blows. Fresh portions of oxygenated and useful minerals water is regularly added to the reservoir from underground sources and springs.
At the same time, artificial ponds differ significantly from lakes and rivers, since they are an autonomous, isolated ecosystem. The bottom of a home pond is usually lined with a layer of insulation, which makes it impossible for oxygen to flow from the soil. The surface area of the reservoir is usually small, and it is located in the garden among the trees, so wind and rain cannot saturate the water well with air.
Due to the lack of oxygen, fish, plankton, snails and other inhabitants of the pond begin to die, but a lot of silt, putrefactive formations and bottom sediments form here - a beautiful pond turns into a swamp.
Attention! The owner can find out about the lack of oxygen in his pond by the following signs: a film appears on the water, fish pop up to the surface to breathe, snails from the bottom rise to the top, the pond silts up.
If water begins to stagnate in the pond, an aerator will help.
Types of aerators
Various are used for ponds aeration units, the purpose of which is to mix layers of water, creating artificial streams, saturation of the reservoir with oxygen.
All aerators are divided into two large groups: mobile and stationary devices. Mobile aerators can be used temporarily, seasonally, they can serve several reservoirs at once. Such compressors are used for small ponds or where there is no constant need for artificial saturation water.
Stationary aerators are capital devices that are installed on a specific body of water and operate constantly or in accordance with a given regime.
According to the method of location and principle of operation, all aerators are classified into several groups:
Advice! Wind aerators are simply indispensable for summer residents or those who rarely visit their site. The devices will be able to work all year round without any intervention from the owner.
How to make a pond aerator with your own hands
A homemade aerator is an excellent solution for owners of small home ponds. Purchased installation It is quite expensive; in fact, the aerator is the most expensive part of an artificial reservoir.
Small homemade ponds do not require powerful purchased pumps; the simplest aeration device, which can be assembled from scrap materials, will be sufficient.
How to make an ejector aerator for a home pond
First of all, you need to look around your garage and select the necessary parts:
- drainage pump (not very powerful);
- a two-meter section of sewer pipe (diameter 32 mm);
- forty-centimeter pipe (of the same diameter);
- 45 degree corner tee;
- good double braided cable.
Important! The tee must be exactly forty-five degrees. If you connect the aerator pipe at a right angle, water will constantly be thrown into the device.
It’s easy to assemble a homemade aerator:
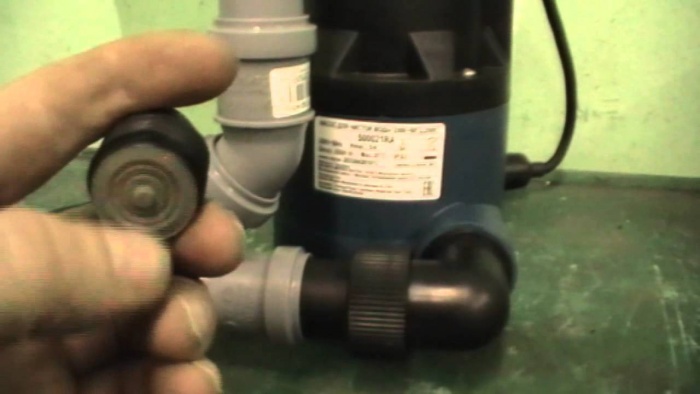
- The sewer tee is connected to drain pump using the supplied fitting. For reliability, you can use silicone sealant.
- On the other hand, a shorter length pipe is inserted into the tee.
- You need to insert a 45 degree angle into the upper outlet, and then attach a long pipe.
- Now you need to connect to the aerator electrical cable. The wire must be sealed, so it is wrapped in several layers of electrical tape and placed in a hermetically sealed corrugation.
- The pump must always be located at a depth of 70-100 cm from the surface of the water, while the intake pipe must be located above the water level. To ensure this, it is necessary to weld a mast from a metal pipe and fix it at the bottom of the pond.
- All that remains is to attach the aerator to the mast and apply voltage.
Advice! If there are fish in the pond, it is better to enclose the pump in a mesh box.
Do-it-yourself bottom aerator for a pond
Such a device will cost very little, especially if the owner has an unnecessary one. Automobile compressor with receiver. So, for a homemade bottom aerator you will need:
- compressor (from a car, vacuum cleaner or refrigerator);
- hoses high pressure;
- clamps;
- tees;
- sprayers or nozzles.
Advice! You can make nozzles from simple improvised means. For example, empty plastic bottles in which you need to make small holes are suitable. If you need to further reduce the size of the air bubbles, you can wrap the bottles with thin foam rubber.
Assembling an aerator with your own hands is not at all difficult:
- The compressor unit is placed in comfortable spot(this could be a barn located next to a pond).
- A central hose is connected to the compressor and pulled towards the pond.
- Using tees, it is necessary to make bends according to the number of nozzles. To ensure a reliable connection, it is better to use clamps.
- Fix the nozzles to the tees.
- Attach sprayers to the bottom of the pond. They can be pressed down with cobblestones or metal pins with a curved end driven into the bottom.

Attention! Such an aerator will not be able to work continuously, and the device will make a lot of noise. Therefore homemade bottom aerator Suitable for occasional saturation of ponds.
DIY wind aerator
IN winter time engines and compressors do not “feel” very well. If you need to enrich the pond with oxygen in winter, it is better to use a wind aerator, and it can be assembled from the most ordinary parts.
To work you will need:
- metal square with sides 30x30 cm;
- a long smooth metal rod with a cross-section of about 20 mm;
- bearings closed type, corresponding to the diameter of the rod;
- two metal strips 2 mm thick, the length of which is slightly longer than the dimensions of the bearings;
- plastic barrel;
- a fan from the car’s cooling system or something similar;
- fasteners and tools.

You need to assemble a wind aerator like this:
- You need to cut 8 identical squares from metal, and then weld them into cubes.
- A cross member should be installed inside each cube, a hole should be cut in it and a bearing should be installed inside it. The centers of the holes in both bearings must be strictly on the same line.
- A metal rod is inserted into the bearings.
- The plastic barrel should be cut into two equal parts - these are the windmill blades.
- Using metal loops, secure the blades to the top of the rod.
- The fan blades are fixed to the bottom of the metal rod - they will be located under water.
- Assemble the mast for the wind aerator and install it in the pond, attach the self-assembled device with blades.

Attention! The wind aerator can be made floating. To do this, foam plastic is attached to the bottom of the mast, plastic barrels or bottles.
This aerator design is relevant for large ponds, and to prevent the device from floating too far, you can tie a rope.
Conclusion
An aerator is an indispensable device for small artificial reservoirs. It prevents stagnation of water, the appearance bad smell, silting of the bottom and walls, saturates the water with oxygen and creates favorable conditions for plant and animal life.

It is not at all necessary to spend a lot of money on purchasing an aerator; it is quite possible to make one with your own hands, using the most simple materials and tools. You can watch the video on how to assemble a pond aerator:
Popularity artificial ponds never faded away. Now such reservoirs have reached new level, they can be found in many private properties. The sizes can be very diverse, depending on the purpose of their creation. For the normal functioning of reservoirs, you need to take care of creating a pond aerator with your own hands, which is quite possible, so as not to spend money on ready-made models.
Why are aerators needed?
First of all, they ensure purification and simultaneous saturation of water with oxygen, and this in turn prevents water from stagnating. In addition, without purification, the water will bloom, and the smell from it will become unbearable.
Factors indicating the need to install an aerator

Aerators for ponds and reservoirs are compression-type installations, the main task of which is to mix water with oxygen. Such units have a second name - air compressors.
In natural reservoirs this process occurs on its own, since air constantly penetrates into the water as a result of mixing water flows: rivers flow into the seas, waters are filled with precipitation, blowing strong winds, filling occurs through underground springs with natural microelements. Accordingly, such exchanges do not occur in artificially created ponds, so they must be created with your own hands.
Home ponds have their own ecosystem, which functions according to a different principle. This is due to the fact that when creating a pond or lake, the bottom is lined waterproofing material, which becomes an obstacle to the penetration of oxygen from the soil. The surface area of artificial reservoirs is often small, and they are located mainly surrounded by trees, therefore, no air currents carried by the winds or precipitation cannot fully saturate the water with everything necessary.
Lack of oxygen in the water leads to the death of plankton, fish, snails, frogs and other living creatures. As a result, silt, rot, and bottom sediments appear in the water, and all that remains of a beautiful reservoir is a swamp.
Note.
A lack of oxygen in a reservoir is indicated by the formation of a film on the water, fish often appear on the surface of the water, snails rise from the bottom, and silt appears.
Types of pond aerators
Aerators are divided into two groups:
- Stationary– units of a capital type of installation, which are intended for installation in a specific pond and operate on an ongoing basis in a given mode.
- Mobile The devices are designed for seasonal use; their power is enough to fully service several ponds. Aerators of this type are best suited for small ponds or for those that do not need constant filling with oxygen.
Classification of pond aerators
Depending on the type and location of installation, as well as the characteristics of the work, there are several types.
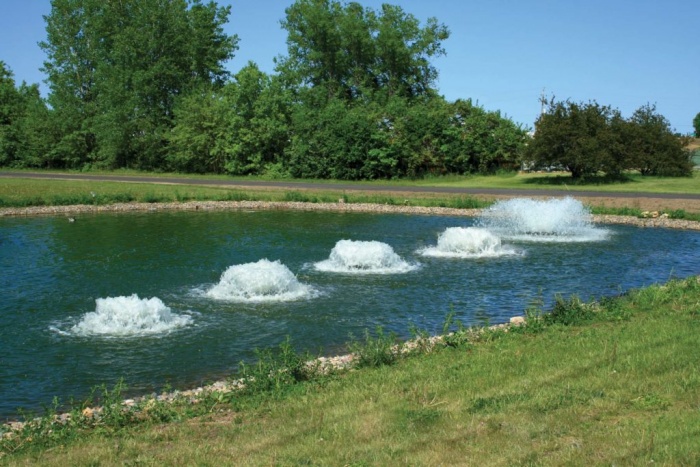
External aerators compressors for ponds . These installations look like fountains small sizes or waterfalls. Often used for installation in home ponds to add an attractive feature. appearance. An important point of such units is that not all pond inhabitants will appreciate the sound of falling water. The operating features of external aerators consist in drawing water from the pond with a pump, and then releasing it in the opposite direction. When there is a flow of water in the air, oxygen saturation occurs.
 Ejectors.
The operating principle of these installations resembles the features of external compressors, with the difference that water is not sucked from the pond. The process of saturating water with oxygen is carried out by blades, which are driven by a motor. The blades hit the water with a certain force, mixing it and saturating it with air. Please note that these installations also make a lot of noise.
Ejectors.
The operating principle of these installations resembles the features of external compressors, with the difference that water is not sucked from the pond. The process of saturating water with oxygen is carried out by blades, which are driven by a motor. The blades hit the water with a certain force, mixing it and saturating it with air. Please note that these installations also make a lot of noise.
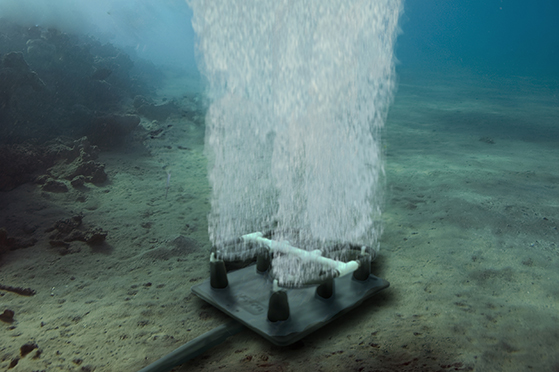
Pond bottom aerator . This is a new pond device that has gained a reputation as the most effective one available today. A compressor that makes noise is installed on the shore of a reservoir, and a tube with a diffuser is lowered into the water. Oxygen enters through small holes, passing through layers of water. The result of this installation is the saturation of the pond with oxygen and the mixing of all layers of water. This aerator is characterized by quiet operation.
Combined aerator. The operating principle of the installation is based on the functioning of a pump or compressor. The compression unit is installed on the shore of a reservoir, and the diffuser is mounted in the water. The diffuser head remains above the surface of the water, and air saturation is carried out due to the flow of water that flows like a fountain.
Wind aerator for pond . This installation differs from all other types of aerators autonomous operation. The unit is driven by the force of the wind. The design can be mobile or stationary, created from large blades located on the water surface, as well as a propeller immersed in water. The operating principle is as follows: the wind drives the blades, they activate the propellers, which mix the water and create a seething.
Note.
Wind-type aerators are most often used in the country, as well as in those areas that remain for a long time without human intervention. The installation can operate year-round without adjustments to the process by the owner of the reservoir.
We create a pond aerator with our own hands
Making an aerator for a pond yourself is not difficult. The main thing is to study the assembly instructions and also stock up necessary materials. Price ready-made installations not small, but at self-production you can save a lot of money.
For small ponds, it is enough to use an aerator of a simple design, which can be assembled from materials that the summer resident always has on hand.
Assembly of the ejector aerator
Materials:
- drainage pump with low power;
- a piece of pipe with a cross-section of 32 mm and a length of 2 m;
- pipe 40 cm long and 32 mm cross-section;
- angled tee 45º;
- double braided cable.
Note.
The importance of choosing a tee with an angle of 45º is explained by the fact that when connecting the pipe at an angle of 90º, there will be a constant flow of water into the unit.
Build process:
- The sewer tee is attached to the drainage pump using a fitting for connecting the pond aerator hoses. To ensure a reliable connection, silicone-based sealant is used.
- WITH reverse side a pipe is inserted into the tee, the length of which should be less.
- A 45º angle is inserted into the upper outlet, then a two-meter pipe is fixed.
- An electric cable is connected to the aerator. The wire must be sealed using electrical tape, which is wound in several layers, and then placed in a corrugation.
- The pump is placed at a depth of 70 - 100 cm of the water surface, and the water intake pipe should be located on the surface of the water. In order for you to succeed, from steel pipe make a kind of mast and secure it to the bottom of the reservoir.
- At the last stage, an aerator is attached to the mast and electric current is supplied.
Assembling the bottom aerator
The cost of assembling an aerator of this type with your own hands is small. To do this, you will need to find a compressor from a car with a receiver.
Materials:
- High pressure supply hose;
- Clamp;
- Tees;
- Nozzles, sprayer.
Note.
The nozzle can be made from plastic bottle, having previously made a hole in it. To reduce the size of air bubbles, the bottle is wrapped in thin foam rubber.
Build process:
- The compressor is placed near a pond or hidden in a nearby outbuilding.
- The central hose is connected to the compressor and pulled to the pond.
- Using tees, branches are made depending on the number of nozzles. For reliable fixation, staples are used.
- The diffusers are attached to the tees and placed at the bottom of the reservoir. To prevent them from rising to the surface, you can place heavy stones on them or fix them at the bottom using pins with curved ends.
Note.
The operation of bottom aerators for a pond cannot be continuous; in addition, the unit produces an annoying loud sound. Devices of this type are used to periodically saturate water in ponds with oxygen.
Assembling a wind aerator for a pond in winter with your own hands
Installations of this type the best way suitable for work in the winter season. Assembling it will not be difficult; you will need the most common parts that can be found on the farm.
Materials:

Build process:
- Cut eight squares out of metal and connect them into cubes. A cross member is installed inside each of them, in which a hole is cut out and a bearing is inserted. The central parts of the bearings must be in line.
- A steel rod is placed in bearings.
- A plastic barrel is cut into two parts and blades for a windmill are obtained.
- With help metal hinges, secure the blades at the top of the rod.
- At the bottom of the steel rod, blades are attached, which will eventually be located above the surface of the water.
- The assembly of the mast for the wind-type aerator is carried out at the last stage and after that it is installed in the reservoir.
A floating wind aerator for a pond is created using plastic barrels, bottles or foam.
Breathing is the source of life not only for humans, but also for all animals. It is known that even plants that release oxygen through photosynthesis at night, when sunlight absent, breathing, i.e. consume oxygen. Oxygen is needed not only by those who are on the surface, but also by those who live under water. Therefore, it is important to know how to make a pond aerator with your own hands.
Water aeration
IN natural conditions where bodies of water flow into one another, the water is saturated with oxygen. Continuously flowing springs replenish water bodies with microelements. But ponds may require forced aeration. The need for this is due to a number of reasons:
- Seasonal and daily temperature changes. How warmer water, the faster the metabolism occurs in the inhabitants of flora and fauna. This leads to greater oxygen consumption.
- Too much a large number of silt. This sediment interferes with normal oxygen exchange.
- Excess vegetation. If you do not clean the pond in time, the algae occupy a large area and impede free gas exchange.
- Excessive number of inhabitants. The more representatives of the fauna, the more active the life activity and the more its products are released.
- Rare precipitation. Rainwater It is also a source of minerals and provides the opportunity to increase oxygen levels.
- The need to mix the layers of water to prevent stagnation.
- During aeration, the temperature regime is normalized.

In order to determine whether the installation of an aerator is really necessary in your case, it is enough to observe a little what is happening in the pond:
- If there is a fish, does it constantly rise to the surface to take in air?
- Has a film appeared that indicates stagnation?
- Watch the snails. If they move freely on the rocks, then everything is fine, if they are all on the seaweed and trying to rise as high as possible, there is reason to worry.
Types of aerators

If you determine that it is urgently necessary to save the living creatures in your pond, then they will come to the rescue special devices that allow you to do this are aerators. They are divided into two large groups:
- stationary;
- mobile.
The first ones are installed and used constantly. The second option can be applied to several reservoirs. Aerators are distinguished by location methods.

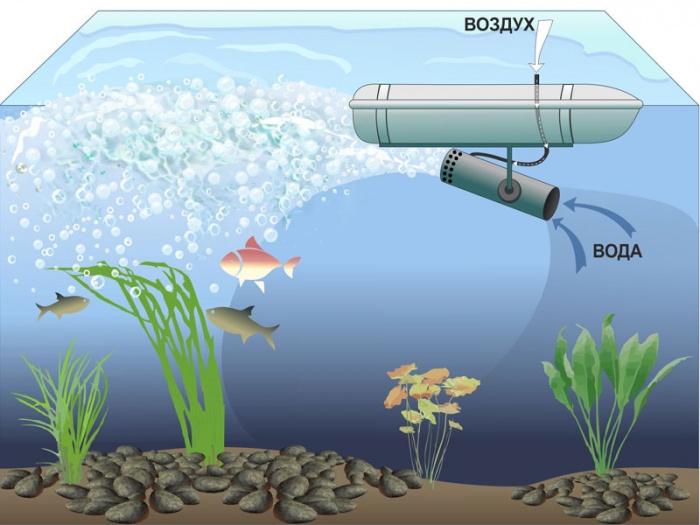
Superficial. These include units that move freely on the surface of the water. Their operating principle can be fountain-like. The pump draws water into itself and releases it in the form of a geyser above the surface. Water, being in the air, is saturated with oxygen and ionized. When water flows back into the pond, it transfers air to the pond's inhabitants. In other options, the ejector method of aeration is used. The design of such a device may include an engine with blades that, when hitting the surface with great strength and speed, lead to the formation of air bubbles and mixing of layers. In other cases, a pump is used that sucks in water, mixes it with air and returns it back to the reservoir.

Bottom or shore. This type is the most effective. The principle of its operation comes down to the fact that there is a compressor on the shore near the reservoir. Its purpose is to supply air through tubes to special diffusers, which are mounted in several places at the bottom of the pond. The bubbles, passing through the space, saturate the entire thickness of the water with oxygen; the layers are also mixed and the sludge rises for further filtration. To prevent liquid from flowing back and entering the electrical appliance valve is installed.

Combined. More often they are classified as superficial. Here, as in previous version, there is a compressor unit that is located on the shore, it supplies compressed air, which disperses into the upper layers of water through the floating head. In another option, a pump is installed. Water is taken in through a moving module, mixed with air and supplied back from the shore in the form of a fountain or waterfall.

Wind aerators. They are a floating or supported structure. The wind sets the blades in motion, which transmit rotational torque to the underwater part, which creates a current, as a result of which air bubbles form on the surface.
It’s not always worth settling on the option that you personally like. It is necessary to take into account the characteristics and needs of the inhabitants of the pond, including plants. Some of them do not like noisy falling jets, so you will have to take care of bottom options.
With your own hands

In most cases, you can save money by not buying a ready-made device. Just take a good look around your garage and you may find that you have all or part of the necessary components for self-assembly. First, let's assemble an ejector-type aerator. For this we need:
- drainage pump ;
- sewage pipe with a diameter of 32 mm - 2 m and a pipe of 30 - 50 cm;
- 45° angled tee;
- corner at 45°;
- double braided wire.

You don’t need to take the most expensive and powerful pump, it’s simply not necessary. The cross-section of the cable for laying the supply line is selected in such a way that the current consumed during constant operation is maintained. Assembly does not take much time.
- The pump usually comes with an angled outlet and a hose fitting. IN sewer tee insert rubber seals. We connect it to the fitting. To do this, simply press them tightly together. To be on the safe side, silicone sealant can be applied to the inner wall of the tee.
- On the other side, we install a short pipe into the tee.
- We set an angle of 45° in the upper outlet, and attach a longer pipe to it.
- Now we connect the corner adapter from the pump and the entire assembled structure.
- Summing up electrical wire. To make the connection more airtight, it is advisable to cut the plug. Next, the wires are twisted together, covered with several layers of electrical tape and placed in a sealed coupling with gaskets or filled with a polymer compound. If you don’t want to cut off the plug so as not to lose the warranty, then you will need to make an extension cord and place the socket with the included plug in several layers of polyethylene, and then wrap it with electrical tape.
- In order for the pump to be kept at a constant depth (0.7 – 1 m will be enough, but so that the intake pipe can be above the surface of the water), it is necessary to install a mast. It can be made from a metal pipe that is simply driven into the ground at the bottom. The unit is simply secured with wire.
- It’s good if the pump is placed in a mesh container with small windows, then you can be sure that no living creatures will be harmed.
- Next, voltage is applied.
If desired, you can make some changes that will improve the performance of the aerator. For this you need gusset from the pump, replace it with a straight pipe; you can also install it in a pipe located on the surface check valve with a soft spring. This way reverse current will not occur.
You may be wondering why you can't use a 90° tee? In fact, everything is very simple - at an angle of 45°, air is drawn in and moves along with the flow, mixing with water. If you take a tee with an angle of 90°, there is a high probability of air flowing back.

Next possible way making an aerator will not only be useful, but will also improve the aesthetic appearance. We will need:
- Centrifugal pump (it is better if it is self-priming) or pump.
- Reinforced hose or HDPE pipe.
- Connecting fittings.
- Cable for supplying electricity.
- Wild stone for decoration.

The number and diameter of fittings is selected depending on the specific landscape solution, and also in accordance with the diameter of the pipes. The sequence of work is as follows:
- If selected centrifugal pump, then you can install it right on the shore. It is not necessary to dig a hole for it; it is enough to provide a convenient place for storing it (for example, a metal box or shed, where it will be protected from precipitation). It is advisable to place the pump in a cube made of metal mesh and put it in water.
- The supply hose is installed and connected to the pumping device. Don’t forget to install a check valve on the fence, as well as a mesh that will prevent large particles from getting onto the impeller.
- Next, connect the hose through which the output will be carried out.
- On a selected area of the pond, a slide is built from natural stone. The hose is connected to it.
- To make the flow of water more effective, you can find a vase or other beautiful vessel, make a hole in its lower part and fix a hose in it, the rest of which will be covered with stones.
- The electrical part is connected.
- To make the first start easier, it is better to fill the intake hose with water through a special hole on the pump.
 You can also build a bottom aerator at home. This is easy to do if you have a car compressor with a receiver. So, we will need:
- Compressor.
- High pressure hoses.
- Tees.
- Clamps.
- Sprayers.
You can make the latter yourself. To do this, for example, you can take several 0.5 liter plastic bottles. Holes are made in them using an awl. To make the escaping bubbles even smaller, you can wrap the vessels in foam rubber.
How to make a compressor yourself using a compressor from a refrigerator, see below:
- The compressor is placed in a place convenient for you.
- A branch of the central hose is laid from it.
- Using tees and clamps, a branch is made to required amount aerators.
- In order to secure the hoses to the bottles, you need to purchase a herringbone connector with external thread by ½". It is fixed in the neck using a two-component polymer resin or others in a convenient way. On the Christmas tree, the hose is clamped with a clamp.
- Aerators are fixed to the bottom. This can be done by carefully placing them under a cobblestone or attaching them to a hammered rod.

Before the first start, it is better to set the pressure to a value less than average. It can be added as needed. One of the disadvantages of such a system will be the impossibility of its continuous use, as well as noise.
If you do not have a compressor, you can replace it with an engine from regular vacuum cleaner. In this case, it would be better to use ordinary corrugated hoses rather than high-pressure hoses. You also need to correctly calculate their length so that the flow can easily push them through.

The next type of device will be especially relevant in winter, when engines do not perform so well. It also does not require electricity and operates completely autonomously. For production we will need:
- a metal corner or square measuring 30x30 mm (more is possible);
- round reinforcing rod without ribs with a diameter of 20 mm;
- bearings, the inner diameter of which will correspond external size fittings, it is better to take a closed type;
- 2 metal strips with a thickness of 2 mm (their width should be 20 mm larger size bearing);
- plastic barrel;
- fastening material;
- Bulgarian;
- roulette;
- a propeller from a car radiator or something similar.

The build process will be like this:
- Dimensions are selected for specific conditions and the depth to which the product needs to be lowered.
- Using a grinder, 8 identical pieces of material are cut.
- Two identical squares are made from them.
- In each square of metal strips The cross member is welded. It is necessary to cut a hole in the middle along the outer diameter of the bearing and install it inside, securing it with tacks.
- Using four jumpers, these squares are connected to each other to form a cube or parallelogram. The centers of the bearing holes must be strictly in the same plane.
- A rod made of reinforcement is mounted in the bearings. To prevent it from slipping, it must be secured to the inner ring with tacks.
- The barrel is cut into two parts, they will serve as blades that catch the wind and rotate the shaft.
- They are attached to the fittings using metal hinges.
- Next, the support legs are welded.
- A propeller from the radiator is installed at the end of the shaft.
- The entire structure is lowered into the water.
The wind spins the blades, and the force is transmitted through the shaft to the propeller below, which creates turbulence, saturating the water with oxygen and preventing it from freezing in winter.
Blades can be made from any sheet metal or other material. The most important thing is to position them so that they can catch the air flow. The platform itself can be made floating. For this purpose, polystyrene foam, plastic barrels, old cylinders or bottles are used. To prevent the structure from floating far, it is tied to the shore with a cable.
Based on these decisions, you can build a structure that will suit your needs. We are interested to know what happened for you personally. Share your ideas in the comments.
Video
The following video shows how to assemble ejector aerator from improvised means:
How to assemble a wind turbine for a wind aerator, see below:
It may turn out to be a failure. Proper sowing, cutting, watering and fertilizing are not the whole package for caring for greenery. To keep it healthy and emerald green, you need to use a lawn aerator. What kind of device is this and how to assemble it with your own hands - you will find the answers in the article.
Lawn aerator: description and technology
The aerator ensures the flow and circulation of air in the upper soil layers. The fact is that the soil under the grass tends to cake. Even if you don’t walk on the lawn with your feet, the soil will compact under the influence of precipitation and other factors. In such conditions, the roots do not develop well enough. Plus the moisture supply is poor. Plants become lethargic, prone to yellowing, and unstable to disease.
There are models of lawn aerators for sale to suit every taste: manual, mechanical, electric powered fuel generator. But the end result of their action is the same - punctures in the ground, through which gas and moisture exchange occurs. The operating principle of aerators is simple, so they are not difficult to make. with my own hands. Especially if your site is occupied ornamental grass, not very big.
Attention! It is especially important to work with an aerator in places where moss grows, excess moisture, as well as in dry bald spots and trampled areas.
The simplest models of lawn aerators
Most easy way aerate the soil under the lawn using a garden fork. Walk with them through the grass, piercing it every 10-15 cm to a depth of about 8-10 cm in autumn or about 4 cm in spring and summer. For a very small lawn this is the fastest and affordable option aerator. However, it is quite difficult to work with a pitchfork over large areas, and the thick spikes are used rather roughly: the decorative effect may be disrupted. There are several automated homemade devices for this case.
- nails or screws 10 cm long;
- straps and handles from old backpacks, bags;
- sheets of plywood or board;
- jigsaw;
- locksmith kit.
Work order:
- Cut a couple of blanks from plywood in the shape of your leg, but a couple of sizes larger than yours. To do this, simply place your foot on the material and circle with a margin of 10-20 mm. After all, you need to wear sandals over regular shoes.
- Drive nails into the blanks. For each plywood insole - approximately 10 pieces.
- Make slits on the sides of the future aerator. Fix the straps in them and tighten them based on your own comfort.
Advice. The piece of plywood should have a thickness of at least 3-5 cm. On top of the heads of the driven nails, you can attach an insole made from a piece of plywood or rubber of the same shape.
Lawn aerator: model on wheels
Such a roller design will speed up the manual processing lawn grass and reduce the burden of work. Required tools and materials for the aerator:
- a pipe section of about 1 m with a cross-sectional diameter of 200 mm;
- nails about 10 cm long - 30 pcs.;
- gravel, sand, cement or similar weighting material;
- shaft with a pair of bearings;
- a wooden holder from an old shovel or a rake (an alternative is metal pipe from 20 mm thick);
- welding machine and plumbing kit.
The procedure for assembling the aerator:
- Weld nails on the outside around the entire circumference of the pipe in a checkerboard pattern. Fill the cavity with weighting material. Weld the end holes.
- Attach the structure to the shaft with bearings.
- Attach the shaft to a metal bracket. In turn, fix it on the holder.
The larger the pipe diameter, the higher the productivity homemade aerator. You can use an axle from an old car as a base. If you don’t want to work with your hands or the processing area is large, weld a short handle. It is suitable as an attachment for a mini-tractor.
Lawn Aeration Basics
Making an aerator with your own hands is half the battle. It is important to be able to operate it correctly. This process is different for different types plants and climatic conditions. If there is a high load on the grass surface, it is necessary to treat the soil 3-4 times a year. If frequent precipitation is added to this or, conversely, a tendency to drought, then the number of treatments increases by one more.
Attention! Sandy soils do not require frequent aeration, since they are not naturally prone to caking. But clayey ones, on the contrary, need to be processed at least 2-3 times a season in any case.
You should start working with the aerator as soon as yellowing, moss-covered bald spots have formed on the grass. Without external signs and the examples in the photo can also determine the needs of the lawn. Cut a small piece out of it and examine the roots. A length of up to 5 cm indicates that they are not sufficiently developed. Before using the aerator, water the grass thoroughly. The right technology piercing the soil will allow you to create perfect lawn Location on.
DIY garden aerator: video
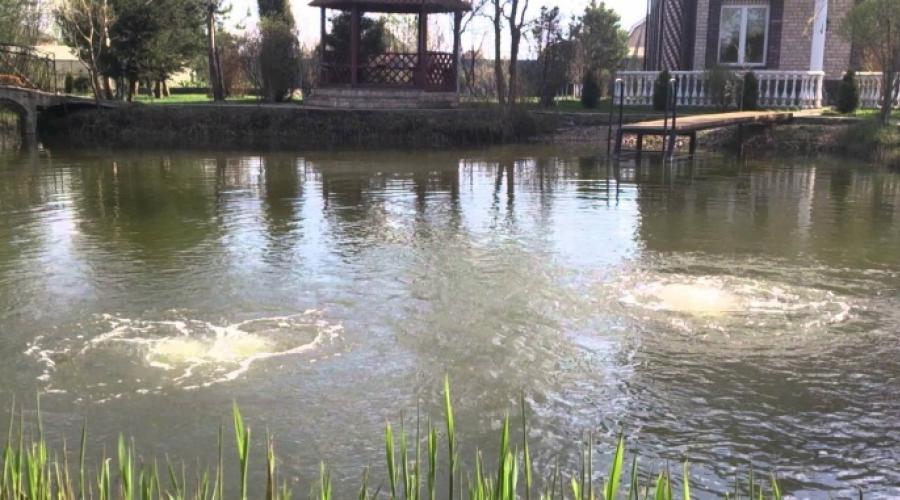
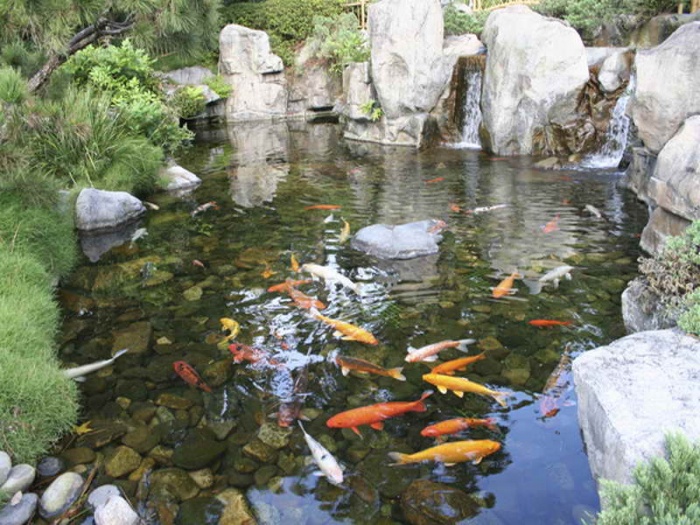
An artificially created landscape with artistic relief, a pond and walking peacocks looks attractive only with proper care. A pond aerator will allow you to saturate the water with air and life. Without renewal, stagnant water will bloom, become covered with an unpleasant slimy film and acquire a foul odor. All living things need oxygen. A pond populated with fish and water lilies can only be created using aeration.
Objective reasons for aerating stagnant water
 The entire water system of the planet is in continuous movement and turnover. Groundwater, rivers, lakes and the salty ocean are connected, water exchange includes the atmosphere. Mixing, the jets entrain air. And only the ponds do not participate in the general round dance. Their bottom is lined with insulating material; the small surface cannot saturate the thickness with dissolved oxygen obtained with raindrops. As a result, the water surface of the pond is at first lifeless, and then gives shelter to malicious algae and rot that develop in such an environment. Instead of a pond, a fetid swamp will eventually appear.
 To supply air to the pond, install an aerator for the pond:
- The warmer it is outside, the less solubility of the gas and the poorer the pond becomes in oxygen.
- Spent microorganisms sink to the bottom in the form of sludge and begin to rot in the absence of oxygen.
- To prevent stagnation, water movement in the pond is necessary.
- Biological processes are active in oxygen-rich water.
If there is not enough oxygen in the water, the fish swim to the surface and stick their mouths in to catch air. Snails that clean the pool by eating plankton tend to rise above the surface of the plants.
If the pond has not experienced oxygen starvation for years, at some point this happened, an analysis is required. Any ecosystem can bear a certain load. The pond may have become overgrown, too many plants are using oxygen and there is not enough of it. The reason may be excessive feeding of fish in the pond, the mass sours and uses oxygen. Excessive fishing also has a detrimental effect on the system.
Methods of supplying air for aeration
 Any pond aerator must create mixing of water layers while simultaneously saturating them with oxygen. But depending on the volume of the pond and its inhabitants, they use different ways aeration:
- surface;
- injection;
- bottom;
- combined.
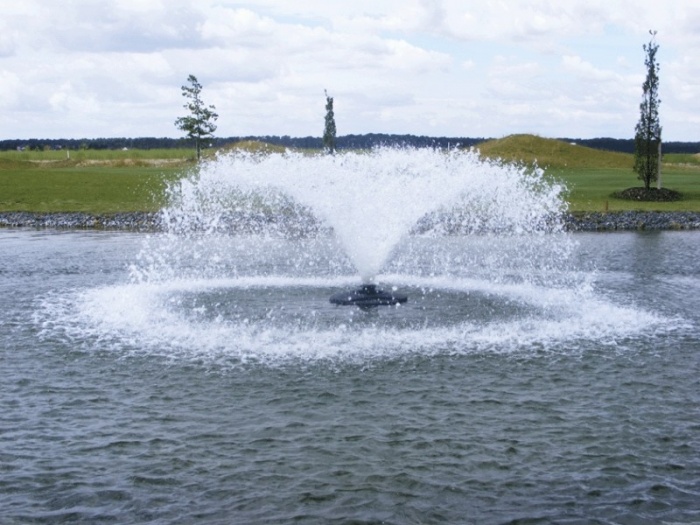
Surface air compressors are units that float on the surface of the water. They can create. Drops of water, falling down, are saturated with air and mixed with the layers. Another type of such installations can be propellers, which mix water like a fan does air, while simultaneously drawing in gas above the surface. The process is noisy and the inhabitants of the pond do not like it.
 The injection method is based on the involvement of incoming air in the swirling flow of water. Created on this principle of the Turbo Jet installation, Aqua Handi have a submersible floating motor with an impeller, forming a funnel into which the air entrained by the jet is sucked in. The mixture of water and air has a directed radial movement of the funnel, eliminating the formation of stagnant zones. These aerators are suitable for fish ponds; they are low-noise and produce a low hissing sound when operating.
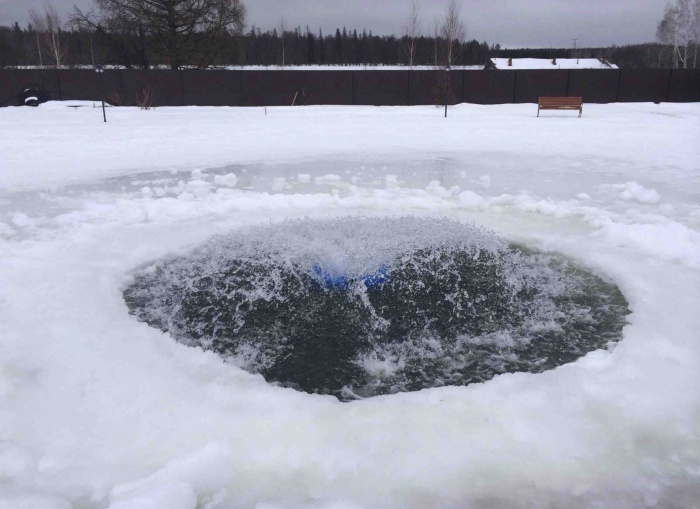
 The bottom method is most often used for aerating ponds. In this case, a method can be used where the compressor stands on the shore, and the air is transferred through a hose to the comb in the bottom zone. Are used submersible pumps, installed on the bottom. They drive air through hoses with air fittings. Aerators mix the water, saturating it with gas and equalizing the temperature. Immersed in water in winter, they will prevent a crust from forming on the surface.
Combined installations have a compressor on shore and a surface air supply. When using an additional pump, a gas-water mixture is obtained.
 Which arrangement method to choose is decided for each pool, depending on the size and living creatures inhabiting it. But it is necessary to provide air supply taking into account climatic conditions, preventing the pond from freezing. In winter, a pond aerator will save the pond from complete freezing and the fish from death. Due to the fact that the water is constantly renewed and rises, there is no possibility of ice forming on the surface of the mirror.
Installation selection criteria
 Each compressor is designed for a certain volume of water. For the inhabitants of a reservoir, excess oxygen is as harmful as its lack. It is necessary to take into account the need for oxygen in different climatic periods of the year.
If you need to choose an air compressor good quality, give preference to the German manufacturer. The price of a pond aerator depends on many indicators:
- power air compressor;
- Possibility of use at different temperatures;
- unit noise;
- manufacturer's reputation.
Summer aerators for small decorative ponds can be purchased at a price of 4-10 thousand rubles. For medium-sized artificial reservoirs, prices for pond aerators start at 40 thousand rubles. Stocked large ponds with winter air supply from famous manufacturers cost over 100 thousand.
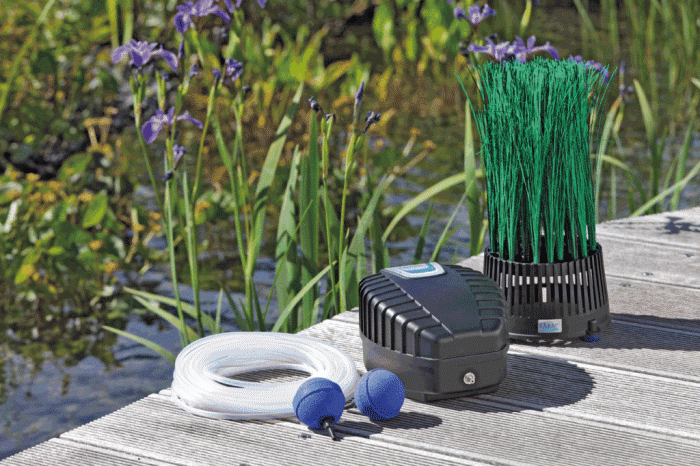
 For example, the OASE Aqua-Oxy CWS 2000 pond aerator is suitable for supplying oxygen to 20 cubic meters of water. The installation costs 12 thousand, and comes complete with a motor with two aeration nozzles and hoses 2 and 5 meters long. The installation consumes only 250 W, low noise. The length of the wiring from the source to the outlet is 120 meters. The energy part can be located on the shore and even below the level of the pond, since a check valve is provided in the line. The set includes two decorative stone, stylized as hummocks with grass.
Assembling the aerator installation with your own hands
 There is no need to buy the installation at all. It is enough to know the operating principle of an air compressor and have a long-term supply of obsolete tools. You can create an aerator for a pond with your own hands if you have:
- drainage pump, which is used to pump flooded pits after a flood; it can be used with installation under water;
- inch sewer pipe - 2 m;
- pipe with a cross section of 32 mm and a length of 30-50 mm;
- tee with outlet 45 0;
- corner;
- waterproof wire in a double insulating tube.
Let's start installing the unit. To do this, connect the tee to the hose fitting. On the other side, a pipe is inserted into the tee. Turn the outlet at 45 degrees and insert a large pipe. Connect the adapter into the assembled unit. A check valve must be installed in the design.
All submersible pumps have a sealed housing. The supply wire is double-jacketed and hermetically sealed.
After this, carry out waterproof wiring. Hammer into the ground installation pipe and attach the structure to it so that the air intake pipe is slightly above the water level. In order to cover the structure from fish, place it in a net. The pipe must be inclined so that the air smoothly enters the water flow and mixes with it. We received an injection mixer. 
If in stock deep well pump, you can build a picturesque house for him on the shore. Place a check valve and a protective mesh on the pipe and connect the hose to the pond. IN in the right place the aerator hose for the pond is decorated, and a small waterfall or something similar is organized, depending on the designer’s imagination. When starting, the hose must be under the fill to prevent airlock. The same installation with a pump must be immersed in water in a protective mesh casing.
 Do you have a compressor? Then we make a submersible aerator. It doesn’t matter whether it’s from a car with a receiver or from a refrigerator, we will arrange them on the shore, connect them with hoses to RET bottles and place these devices along the bottom of the pond. Air will continuously flow upward into the holes pierced by needles. But in order not to overheat the motors, you will need to set a timer to turn it on periodically.
The compressor will successfully replace the motor from a vacuum cleaner, attach the liner to a corrugated hose to create a comb for air outlet, fill the bottles with pebbles to sink them, and let them swim with the fish underwater. 
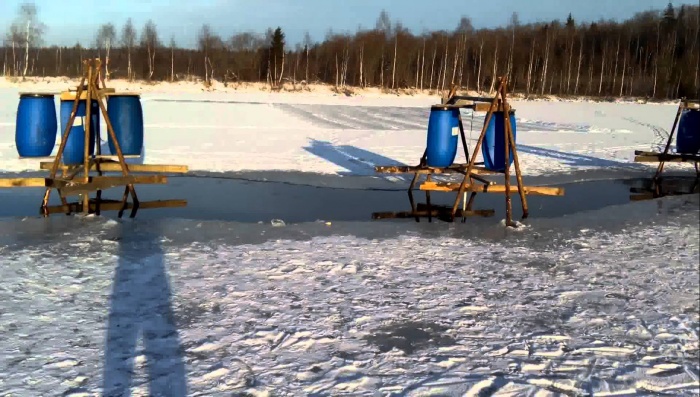
It is possible to assemble a wind-driven installation. Such aerators for fish ponds will come in handy in winter. Wind aerators have long been successfully used in winter pits where fish migrate. And it doesn’t matter what the propellers are made of - a sheet of metal or a cut barrel. They must spin on the shaft and transmit rotation to the submersible mixer. The installation itself can float on the surface of the pond, driven by the force of the wind, or be tied to one place. Usually the rotating mast is mounted on a wooden raft. The rotating rod is secured by a clutch in a plain bearing. The lower stirrer is three-bladed, made of tin or plastic.
Another noteworthy design is made on a battery-powered electric motor on a foam raft. Light four-bladed turbines are driven from the horizontal axis, and the raft moves independently across the pond. Surface aeration. The engine is in a closed casing, stability is maintained by securing the turbines to independent floats on which the rotating shaft is mounted.
Using the information, any summer resident will be able to build the smallest decorative pool from old ones car tires, equip a corner with a waterfall created by an aerator from scrap material to the delight of the children.
Do-it-yourself aerator for a garden pond - video