What is the ceiling plinth glued to? How to properly glue ceiling plinths. Without special devices
Read also
Construction work that involves finishing corners is always rated higher by craftsmen, and people overpay for what they can do on their own. For example, few people know how to glue a ceiling plinth so that it turns out beautifully and does not take much time. Armed with step-by-step instructions and high-quality material, you can do it no worse than any professional.
Ceiling plinths are often called fillets, so when choosing them in a store, such a name on the price tag should not be intimidating. This element is used to add completeness to the work done, in order to hide the often-forming defect between the ceiling and the wallpaper.
Before you figure out how to glue ceiling plinths in the corners and make invisible joints, it’s worth finding out what you should pay attention to when choosing:
- is considered the highest quality material for the manufacture of ceiling plinths, but on the market you can find PVC and polystyrene foam, as well as wooden and gypsum fillets;
- the length should be standard - from 1.3 to 2 m, the rest can be considered scraps or unformatted;
- when pressing on the surface of the corner of the ceiling plinth there should not be a dent - otherwise we can talk about low quality;
- The style of the edging is thought out at the stage of choosing and wallpapering so that it harmonizes with the interior.
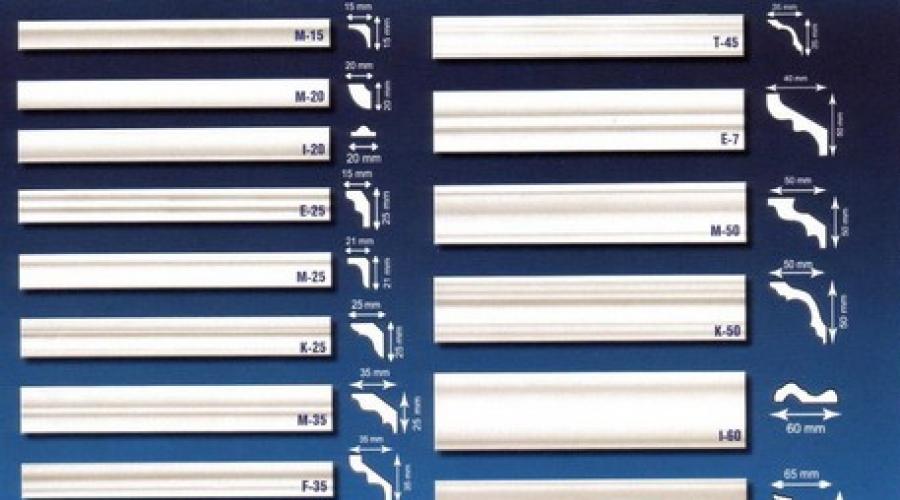
Dimensions of baguettes and corners
You should not buy material on spontaneous markets or from dubious suppliers, even if they offer such tempting prices. A ceiling plinth made of low-quality material glued into a corner can seriously ruin the impression of even an expensive repair.
Step-by-step instruction
In order to carry out repairs correctly and beautifully, you need to adhere to some consistency in actions.
We prepare a preliminary estimate
There are no small details in repairs, so it is necessary to calculate the required amount of ceiling plinth at the planning stage. If wallpapering is done independently, then the necessary values and measurements will already be on hand, since the perimeter of the room is the required total length of the required material.
When planning, you should take into account the material with a standard length of 2 m, and choose it in the store - in this case, you can avoid a large number of joints, and it will be easier to glue the corners.
To be on the safe side, you can buy one additional two-meter piece. It can also be useful if you get an uneven cut or if you have to practice first.

Numbering of skirting boards
Preparatory work
Before gluing ceiling plinths, you must select them, not forgetting to check the quality and availability of all consumables. In addition to the corners themselves, which must be free of dents, scratches and other visible defects, you will also need:
- glue (mounting glue or “liquid nails” are suitable, just so that the drying time is minimal);
- tape measure (for taking measurements);
- mounting knife (it’s easier for them to make cuts);
- plaster tape;
- miter box (to bend the baseboard correctly);
- white sealant (for formed cracks).
Hands and tools must be clean before work, as the material can easily become dirty. When choosing the angle from which to start work, follow a simple rule: where there will be fewer sawn-off edges, start from there. You can practice a little and cut the material so that the corners of the ceiling plinth are equal to 45 degrees. A miter box will help with this. Beginners rarely get it right the first time. If you prepare templates in advance, then unsuccessful attempts can be avoided and the work will progress faster.
Gluing the baseboard
Having familiarized yourself with how to properly glue corners, having prepared all the necessary material and the required number of ceiling plinths, you can proceed directly to the work itself. Surfaces must be dry and free of flaws, irregularities, bumps or protrusions, as this will affect the quality of adhesion.
The adhesive is applied to the wall in a thin, even layer. Great thickness should be avoided, as the glue will leak out from under the corner. How to glue baguettes to the ceiling so that the glue or liquid nails are distributed evenly, even in the corner? Ideally, it will be one continuous strip of glue. If excess glue does form, it should be removed with a dry, clean cloth.
A little trick. It is advisable to stick the baguette on already dried glue, so after application it is necessary to let it dry for some time.
Now you need to lightly press the plinth so that it “sits” evenly and the joints with the wall are as straight as possible. Using a hand or a dry cloth, rub it over the entire corner, lightly pressing it, starting from the corner to the center of the room. After the first strip takes its place, you can proceed to the second, which will be end-to-end, and so on until the room is completely covered.
Joints should be hidden as much as possible. It is best if they are located only in the corner, but sometimes the size of the room does not allow this. In this case there are some nuances. Let's look at how to glue a ceiling plinth in a large room:
- if the baseboard is made of foam plastic, then it is better to make the joints straight rather than inclined. The joints can be easily sealed with putty;
- Craftsmen advise cutting polyurethane or wooden skirting boards at an angle (not forgetting that the pattern must match), and sealing the joint with silicone sealant, which should be sanded after hardening.

These are all the steps that need to be completed to make the ceiling plinth a real decoration of the interior. After completing the work, all that remains is to clean the corners, remove any remaining glue and align the joints. Additionally, you can treat the baseboards with a primer solution and paint them. Simple water-based paint is suitable for this. The shade is selected depending on the interior and the wallpaper: if a contrasting color is chosen, then when applying the paint you should use masking tape to protect the wallpaper from contamination.
The technology is simple and straightforward. Once you try it, you can become a real specialist in this matter and easily perform similar work in the future, when the need arises to re-glue the wallpaper.
More videos on the topic
When communicating with builders, do not be embarrassed if they talk about fillets - by this unfamiliar word, experts mean nothing more than ordinary skirting boards for the ceiling. When talking about how to glue skirting boards to the ceiling, builders can slightly inflate the price - in fact, there is nothing easier than gluing fillets, so you can completely calmly do it yourself.
Ceiling skirting boards - options
Ceiling plinths are a very convenient way to give a finished look to your interior. Fillets, as they are called in a professional environment, can serve as either an additional element, closing the gap between the wallpaper and the ceiling, or as an independent element, giving the atmosphere a special atmosphere. Manufacturers produce ceiling plinths from materials such as polyurethane, polystyrene foam and PVC, the length standards for them are from 1.3 m to 2 m. Manufacturers often produce ready-made corners for convenience. However, making corners yourself is also not difficult.
The highest quality type of ceiling plinths is made of polyurethane. It has great lightness, strength and is not afraid of moisture. Builders love polyurethane fillets for their high elasticity, which allows them to be used in the design of almost any interior. The second most popular type of fillet is made of polystyrene foam. They are also lightweight, moisture resistant and have soundproofing properties. However, when exposed to artificial light sources, they may darken over time. In addition, they have rather weak strength characteristics.
The site’s masters have prepared a special master class on the topic for you. Step-by-step instructions with exclusive photos and video materials.
The cheapest ceiling plinths are PVC products. They are available in different colors, but have the lowest strength, so working with them is quite difficult - as soon as you press a little, a dent immediately appears. They are not flexible either, and high humidity is simply dangerous for them.
So if you are asking the question for the first time: “How to glue ceiling skirting boards?”, and decide to do it yourself, we recommend, the most reliable and affordable option.
You can view and purchase a large assortment of ceiling skirting boards and more on the website www.ext-decor.ru
How to glue skirting boards to the ceiling - step by step
So, you have painted the ceiling and are ready to wallpaper the room. However, think about the wallpaper edging option in advance. If you have chosen fillets for this, then it is better to postpone gluing the wallpaper until last - this type of edging glued to the wallpaper does not hold up as well.
How to glue skirting boards to the ceiling - step-by-step diagram
Step 1: Do the calculations
First, calculate the required amount of material. If you glued the wallpaper yourself, then you can handle this task easily, since you already have the necessary values. The perimeter of the room is the total length of the ceiling skirting boards. It is best to take products 2 meters long - with them you will have fewer joints. So, divide the perimeter of the room by the length of the baseboard and get the required amount. We round the resulting number upward, and even if it is even, we buy one spare two-meter, since their price is quite affordable. We may need a spare plinth in cases where we get an uneven cut or a dent.
Step 2: Let's go shopping
In the store, be sure to inspect your purchase - they may give you fillets with visible dents and scratches; we reject these. Check whether the skirting boards they sell you are from the same batch - they are similar in appearance, products from different batches may differ in size. Don't forget to buy glue (usually liquid nails or special assembly glue is used, the main thing is that it dries quickly) and the tools that are needed for the job. These tools will come in handy more than once around the house, so don’t skimp on purchasing a tape measure, a mounting knife, a miter box, plaster tape and white sealant. You will need a miter box to properly adjust the corners of the baseboards, and with the help of sealant you can seal the cracks, giving them the perfect look.
Step 3: Getting Started
Before starting work, wash your hands well and dry your tools - white baseboards get dirty very easily. Determine the angle at which you will start working. It is recommended to start gluing from the corner, in this case you will have less scraps. First, practice cutting the baseboard at a 45° angle. A miter box will help you with this. If you have never practiced this before, the result is unlikely to be satisfactory on the first try. However, do not forget that you have one backup option, so you can practice. It is best to prepare templates with internal and external joints, and with their help things will go much faster, and the number of unsuccessful attempts will sharply decrease.
Step 4: Glue the baseboard
So, you have two even cuts at the right angle, it’s time to start gluing our fillets. The glue must be applied both to the surface adjacent to the ceiling and to the surface adjacent to the wall - saving is not the place here. Apply the glue in one continuous strip. Once an even strip of glue is on the baseboard, you can put it aside and proceed to the next one - before gluing it will be better for the glue to cure a little. Prepare a dry, clean rag with which you will remove excess glue.
Carefully bring the baseboard to the ceiling and press it into the corner, then run your hand along its entire length. It takes about a minute for the glue to set properly. Wipe off any excess glue that has come out from under the baseboard with a rag. Having glued the first strip, proceed to the second, the one that goes end-to-end in the corner. When the first corner is completed, proceed to the next corners - after gluing the corner fillets it will be much easier to mark and close the empty spaces between them.
In old houses, and not only, the walls and ceilings may be uneven, which is why the baseboards often come off. To secure them, you will need plaster tape, which does not leave marks on the surface. After gluing the fillets, seal the gaps with white sealant. To do this, it is better to use a special skeleton gun, which allows you to squeeze out a thin and clear line. Apply the sealant to the gap, and then run a wet finger over it, as if pressing it inward. Thanks to this simple technique, the edging will look just perfect! After completing all the steps, you will become a real expert on how to glue skirting boards to the ceiling!
How to glue fillets onto a suspended ceiling - gluing features
If you decide to combine fillets in your interior, you will have to take into account some of the features of this “duet”. In this case, the question is not entirely correct - in principle we will not glue fillets onto a suspended ceiling! Since a stretch ceiling is a synthetic film, it is unknown how the composition of the adhesive may affect it. At best, the glue can deform it, at worst, even dissolve it. In addition, the stretch ceiling is not firmly fixed to the surface, and its slight vibrations can damage the adhesive seam between the ceiling and the baseboard.
And yet, how then to glue fillets onto a suspended ceiling? The way out of this situation is quite simple - we glue it not to the ceiling, but to the wall. In specialized stores you will even find special skirting boards with a larger lower part. A small gap should be left between them and the ceiling. Although you can do it big - inside the baseboard you can put an LED lamp (namely LED - it doesn’t heat up!), illuminating the ceiling.
When performing repair and finishing work, each stage should be treated responsibly. The final stage, when additional and decorative elements are installed, requires special care. Most often they are in plain sight, so any mistake can ruin the appearance of the entire interior. Therefore, it is necessary to strive for perfect execution of the final stages of repair and finishing.
The completion of any ceiling finishing work is the installation of ceiling skirting boards, which are called frieze or fillet. Thanks to this element, the transition between the ceiling and the wall becomes smooth, and the renovation takes on a complete look.
The main purpose of the ceiling plinth is to decorate the room, so you need to choose a fillet in accordance with the overall interior. In addition, this element allows you to mask minor defects at the junction of the ceiling and walls. Therefore, it is important to know how to properly glue fillets.
Main stages
Installing a ceiling plinth cannot be called a complex and labor-intensive process; even a novice master can do it. However, to perform the job efficiently, you need to know all the intricacies of installing ceiling skirting boards. When addressing this issue, you should pay particular attention to the design of the corners. Errors and shortcomings at this stage cause the formation of cracks and discrepancies, which largely spoil the appearance of the entire ceiling. Therefore, the problem of how to glue the ceiling plinth in the corners can be called urgent.
Selection of material and calculation of the number of skirting boards
Ceiling plinths made from polystyrene, polyurethane and expanded polystyrene are very popular. The main advantages of such products are lightness, resistance to moisture and temperature changes. Thanks to the varied widths and large selection of patterns and reliefs, it becomes possible to choose a plinth to create any decorative effect. Additional painting of ceiling plinths makes it possible to create a variety of artistic decor.
The problem of how to stick polystyrene and expanded polystyrene skirting boards to the ceiling should be solved with extreme caution, since they are easily deformed and damaged under mechanical stress. As for polyurethane fillets, such design elements are characterized by increased strength and the ability to maintain a clear relief shape.
Ceiling plinth made of polyvinyl chloride is widely used in cases where the budget for repairs and decoration of the premises has limitations. However, when using it, you should remember that it is not recommended to paint such products. In addition, PVC plinths are afraid of temperature changes; under their influence, deformation of the product can occur.

When choosing gypsum, wood or aluminum skirting boards for finishing the ceiling, you should remember several very important points. Firstly, such products cannot be bent due to the low ductility of the base material. Secondly, skirting boards are quite heavy. The presence of these qualities makes the solution to the question of how to glue fillets on the ceiling special.
Before you go shopping for ceiling skirting boards, you need to make a few calculations. In particular, it is necessary to determine how much material will be needed to finish the ceiling in a room of a certain area. First, you should measure the perimeter of the room; this value will correspond to the total length of the ceiling plinth. To calculate the number of fillets, it is necessary to divide the perimeter of the room by the standard length of the products, which corresponds to 1.2 meters, 1.4 meters and 2 meters. Experienced craftsmen who carry out finishing work recommend purchasing longer skirting boards, in this case fewer joints are obtained.
The width of the plinth is determined depending on the height of the ceilings in the room. In rooms with low ceilings it is better to use narrow products; for high rooms it is recommended to install a wide ceiling plinth. Thanks to this, the height of the room is visually reduced.
Preparatory process
Before gluing the plinths to the ceiling in the corners, you need to prepare the tools that will be needed when gluing the ceiling plinths:
- To calculate the required amount of materials you need a tape measure.
- It is recommended to fasten ceiling skirting boards using quick-drying glue or putty.
- You can mix the adhesive composition in a pre-prepared container; it is best to apply the putty with a spatula.
- Remove excess glue or putty with a dry, clean cloth.
- To cut skirting boards at a certain angle, it is best to use a miter box.
- Direct cutting of products is carried out with a sharp construction knife or file.

It is recommended to stick the ceiling plinth onto a previously putty and leveled wall. As for the wallpaper, they are glued after installing the fillets. In this case, the fastening of the elements will be more durable. In addition, when gluing new wallpaper, there is no need to change the ceiling plinth, since the wallpaper strips are glued along the lower edge of the fillet. Fixing it on top of the wallpaper reduces the fixation strength of the baseboard and requires its dismantling when changing the finishing material for the walls.
It is recommended to solve the problem of how to properly glue the ceiling plinth in the corners using acrylic or silicone glue, characterized by quick drying, or construction putty. Using putty, the baseboard is glued directly to the wall; the frieze is glued to the wallpaper using quick-drying glue. When using these materials to fix products, there is no need to hold the elements for a long time to set the adhesive base. In addition, putty can simultaneously seal wall defects in the form of unevenness and cracks.
Using a thread or construction cord, it is necessary to draw a control line in accordance with the width of the frieze. In this case, you can count on a more even gluing of the ceiling plinth, and the process itself will not cause much trouble.
Cutting skirting boards at an angle
The process of deciding how to glue a wide ceiling plinth always begins in one of the corners. During the manufacturing process, many manufacturers cut skirting boards at a certain slope for easier design of external and internal corners. The problem of fitting fillets that have a complex pattern or pattern is especially pressing. When using a cornerless ceiling plinth, you can correctly and beautifully design a corner using a miter box or a file.

In order not to spoil the appearance of the baguette, it is necessary to cut off its corners correctly. To form a regular right angle, the baseboards should be cut at an angle of 45 degrees towards each other.
Determining the slope and cutting the plinth is carried out as follows:
- The product is applied to the ceiling to understand the cutting direction for proper installation.
- You need to cut baguettes in a mirror image.
- To decorate the inner corner, the top edge is made shorter than the bottom edge.
- The correct outer corner is formed if the top edge is longer than the bottom.
- On the ceiling plinth, which will be located on the right side, a cut is made on the left side.
- For a product located on the left side, the cut should be on the right side.
- When cutting the baseboard, you must carefully move the knife in one direction. In this case, the formation of chips and roughness can be avoided.

The appearance of the ceiling depends on the correct solution to the question of how to glue and cut ceiling plinths.
To make your own miter box, you must perform the following steps:
- Take any solid base and draw a line on it.
- Then they retreat about 10 cm and draw a line parallel to it.
- A line is drawn through the parallels at right angles to them.
- From this line, measure 5 cm on each line and connect the opposite points.
- The resulting lines form an angle of 45 degrees with the parallels.

To cut a plinth using a homemade miter box, lay the product along the parallels and make a cut along the marks, taking into account the direction of the angle.
However, it should be understood that for angles other than 90 degrees, it is necessary to cut the baseboard at a different angle. In this case, the product is applied to the wall and its boundaries are outlined. Then the intersection of the skirting boards is determined and the corresponding marks are placed. The baguette is cut according to these marks.
Gluing the ceiling plinth
To ensure high-quality gluing of the baguette, you must do the following:
- Take a baguette and apply glue to its back side.
- The place where the product is fixed can be moistened with a primer or plain water to increase the adhesion of surfaces.
- The plinth is pressed tightly against the wall and ceiling and held for some time.

- Excess glue or putty is removed immediately.
- The resulting cracks and gaps are covered with putty.
If necessary, the skirting boards are painted in the desired color.
The ceiling plinth, which is properly called a fillet, gives the room a neat and finished look. If you glue it correctly, paint it white and make an even seam, the plinth will visually expand the room.
How much skirting boards do you need to buy?
It is necessary to measure the perimeter of the room. For example, let's take a room 5 by 4 meters (20m2). The perimeter of the room is 18 meters. The length of one fillet is 2 meters, which means you need to buy 8 fillets + 1 in stock, for a total of 9 pieces.
The higher the ceiling, the wider the fillet you can buy, and she won't seem overweight. If the ceiling is about 3 meters high, then a fillet 5 cm wide is quite suitable.
Types of skirting boards and their costs
- polyurethane 300-500 rubles per piece
- plastic from 40 rubles per piece
- expanded polystyrene from 20 rubles per piece
When purchasing planks you need to pay attention to:
- So that the skirting boards are the same color from the same batch
- Without defects
- No curvature
Step-by-step instruction
We will need:
- fillet
- roulette
- Can you use a laser builder?
- miter box and hacksaw for metal (or miter saw, or sharp knife, or grinder)
The blanks are cut using a miter box and a hacksaw according to the markings.
If you haven't hung wallpaper yet
- PVA glue
- container for stirring the mixture
- putty knife
- putty (read about and)
- water-based paint and brush
- sandpaper
If wallpaper is glued or there is a baseboard in the bathroom between the tiles and the ceiling
- white acrylic sealant
- mounting adhesive Moment Montazh Express decor white
- mounting gun
- rags
How to cut a corner and make a blank?

First you need to understand which corners are in the room and mark out your blanks for each type (they are different!).
- External corner- in this case, the length of the base of the workpiece will be equal to the length of the span, and the cutting angle will be obtuse (that is, the upper edge of the workpiece will be longer than the length of the lower edge, 135 degrees).
- Internal corner- in this case, the length of the base of the workpiece will be equal to the length of the span, and the cutting angle will be acute (the upper edge of the workpiece is shorter than the lower edge, 45 degrees).
The saw must be used carefully and accurately to prevent chipping.
The blanks are cut using a miter box and a hacksaw according to the markings. To check the correctness of the cut blanks, you can dock “your creation” on the floor. If all the corners meet correctly, then you can start gluing and join them in place.

To check the correctness of the cut blanks, model “your creation” on the floor. If all the corners meet correctly, then you can start gluing.
If the corners do not meet, we make a new blank - this is why we bought fillets with a reserve.
Often the angles between the walls in rooms are not equal to 90 degrees. In such cases, you need to mark the workpieces “in place” and cut the corner without using a miter box. For this purpose they are made paper and cardboard templates, and then a fillet is cut along them with a sharp stationery or shoe knife.
How to glue a ceiling plinth before wallpapering
Advantages:
- You won't stain the wallpaper
- It’s more convenient to glue the baseboard evenly if the wall is uneven, leveling it with putty as you go (we wrote about finishing putty for wallpaper in)
- To change the wallpaper, you do not need to dismantle the baseboard (by the way, read a good article about liquid wallpaper)
- The fillet sticks to a bare wall more strongly than to wallpaper
Preparation of putty mixture
We prepare a mixture of putty and PVA glue for gluing the ceiling plinth to the wall and ceiling, as well as for sealing cracks and corner joints. 4 parts plaster and 1 part PVA glue mix with water until creamy, let it sit for 5 minutes and stir again. After this, you can use the mixture for 1.5 hours.

- Dust the workpiece and the wall/ceiling area before applying the glue.
- Apply putty in the center of the fillet along the entire length, press for 10 seconds, release, remove excess mixture.
- We start gluing from the corner and from the wall that is opposite the door.
- You can draw a line around the perimeter using a laser builder and glue the fillet along it.
- We join pre-made blanks in the corners. If spans more than 2 meters, we make a straight joint of fillets.
- Seal the cracks with the prepared mixture along the gluing process.
- The next day, after the putty has dried, we sand down the uneven areas and cover the baseboard with water-based paint.
You need to press the ceiling fillet gently and smoothly so as not to leave fingerprints or breaks on it.
Foam skirting boards are decorative components that are attached to the ceiling or floor. They can be made of wood, gypsum, polyurethane, and other materials. Hides minor defects such as chips, unevenly cut wallpaper and crooked walls or ceilings.
You can glue the ceiling plinth (fillet, baguette, border) with your own hands, without hiring professionals. You need to choose the right adhesive composition and tools, and be able to cut corners.
How many skirting boards are needed?
For gluing, you must carefully measure the perimeter of the room.
Example. The room to be decorated has a size of 3 by 7 m, an area of 21 sq. m., and a perimeter of 20 meters. The standard length of a baguette is 2 m. This means you need 10 skirting boards and 1 spare. Total 11 pieces.
The higher the ceiling height, the wider the baseboard you can buy. Wide baguettes will look light in high rooms. A five-centimeter fillet is suitable for rooms with a ceiling height of about 3 m.
What is glued first: wallpaper or baseboards
If you need to decorate a room with wallpaper, then you can attach the baseboard both at the beginning and after gluing the wallpaper. In this case, it is necessary in each case to select the correct adhesive depending on the type of baguette.
When the baseboard is glued before the wallpaper, it is more convenient to level the curved walls with putty along the way. There is no need to dismantle the baguette if you suddenly decide to change the wallpaper. During gluing, the wallpaper does not get dirty. The advantage of initially gluing fillets is that they adhere more firmly to a bare wall than to wallpaper.
The advantage of fixing it on top of the wallpaper is that it can be done even for existing repairs and the baguette itself can be replaced with a new model at any time.
Choosing adhesive for ceiling plinths
Before buying glue, you need to know exactly what type of wall you need to attach the baseboard to and the material from which it is made. The price and its characteristics will depend on the glue. Some compounds are only glued, while others are also leveled. This is important for walls that have significant unevenness and differences.
Polymer adhesives
It is based on PVC and vinyl polymers, which have additional viscosity and a high degree of adhesion to wallpapered or plastered surfaces.
You can glue large skirting boards and massive decorative structures. Polymer adhesives can harden instantly or gradually. They work with them wearing a respirator. All polymer-based products have an unpleasant odor and toxic fumes.
Titanium

Used for gluing wooden, plastic, cork, gypsum structures, MDF, polystyrene foam baguettes. You can glue laminate, parquet, other floor coverings, elements made of leather, ceramics, and rubber.
Titanium is used at any humidity and ambient temperature. The composition is resistant to fading in the sun, has an elastic seam, does not flake or crumble. You can glue the plinth to the ceiling in a children's room, since its composition, after hardening, is harmless to humans.
After the seam has completely hardened, the plastic plinth cannot be torn off from the surface. The final coupling period is one day.
It is used both indoors and outdoors. The composition is colorless, after drying the seams are invisible.
Moment
The brand is used by professionals. Usually they buy “Moment Montage Express Decor”.

Due to its rapid hardening, it is not suitable for beginners, since if applied incorrectly it will be difficult to correct the mistake.
The advantage is the high quality of the seam. Moment glue can be used for gluing joints and attaching decorative elements.
The glue contains a very toxic component - ethyl cyanoacrylate, which causes an allergic reaction upon contact with skin. Work with glue in a respirator and gloves. Severe consequences are caused by contact of the product with the eyes. Without prompt assistance, the victim risks losing his sight. “Moment” has high consumption and a high price, which precludes its use over the entire surface of the plinth. It is mainly used for gluing corner joints.
Eco-naset

The composition is similar to “Titanium”, so it is better for them to glue polyurethane baguettes, polystyrene tiles, ceramics, plaster, cork, wood. Reliably adheres to brick, concrete, gypsum, plasterboard and putty surfaces.
Advantages:
- low price;
- transparency;
- absolute safety for humans.
Polyvinyl acetate adhesives
They can only be used to secure small elements of polyurethane and light baguettes.
The disadvantages include high consumption, since you need to apply a fairly thick layer to the surface.
Liquid Nails
It is effective to glue foam ceiling skirting boards with liquid nails, since the product does not damage the texture of the material and has high adhesive ability.

There are two types of liquid nails.
- Neopropylene. The composition contains a solvent, so the glue smells sharp and emits toxic fumes. It becomes safe after complete drying. The main purpose of neopropylene nails is gluing in places with high humidity.
- Acrylic. Odorless, water-based, safe for humans. Cannot be used at low temperatures as the seam quickly crumbles. It has low adhesion, which is why it cannot be used to fix a large baguette.
Putty
Working with acrylic putty is difficult, but it helps when baguettes are attached to uneven walls. It covers cracks, crevices, and uneven surfaces and visually improves joints. The material sticks well in the corner of the ceiling, does not peel off, and does not stand out against the general background. Acrylic putty is safe, odorless, and does not emit toxic fumes. You can work in conditions of high humidity and low temperatures.
Silicone sealants
It is justified to use when there are large joints that require additional sealing of the seam. Sealants have a dense consistency, they are elastic, and after drying they form a strong white seam that is resistant to moisture and dirt. They are produced on the basis of silicone rubber, plasticizers, vulcanizers and surface adhesion enhancers.
There are antiseptic adhesives and sealants for gluing to the ceiling in the kitchen, bathroom, and other rooms with high humidity.
When gluing in the hallway, it is better to use two types of sealant:
- treat the back side of the baseboard with cheaper transparent one;
- Seal the joints with white.
Homemade glue
You need to take one part of PVA, pour it into a jar with 4 parts of dry putty and dilute with water to a concentration of thick sour cream. Stir the mixture well so that no lumps remain. Leave the finished mixture for 15 minutes, then mix and use completely within two hours.
The homemade paste is applied to the curb from the reverse side, then pressed against the wall and held for several minutes. Excess glue that has leaked outside the baguette must be removed before it hardens.
Selection of glue for baseboard material
The adhesive composition is selected taking into account the material from which the baguette is made. There are quite aggressive agents that can damage its structure; they cannot be used in the work.
Polystyrene and foam
These skirting boards are the most practical and affordable. Purchased at construction and hardware stores. They can be painted, the look will be no worse than plaster. They come in regular, two-level and with grooves (fillets). Even inexperienced repairmen can glue such borders.
Foam fillets can be fixed to wallpaper; they are lightweight, so they can be glued using any means.
The only drawback is fragility, so cutting such borders must be done very carefully. After cutting, two strips of glue are applied to the reverse side. The easiest way is to plant a foam baguette on acrylic putty. You can seal the gaps between the planks and the ceiling with finishing gypsum with the addition of PVA. The joints will be almost invisible if they are sealed with white sealant.
Polyurethane and plastic
Curbs made of polyurethane and plastic are flexible, resistant to wear and temperature changes. They are glued in corners, on bends, in places where there are recesses of different shapes and sizes. They can be combined with suspended and stretch ceilings, and decorate columns.
Skirting boards may shrink during use; take this into account when choosing glue. The joints must be sealed tightly, and any cracks must be filled with silicone sealant. In this situation Liquid nails, “Moment”, “Titan” are better suited. During gluing, the ends must be thoroughly coated with a special agent.
The package of plastic skirting boards includes external and internal corners and connecting strips. They can be “planted” on liquid nails or other products with high adhesion.
Plaster and wood
Wooden and plaster moldings should not be installed in rooms with high humidity. This is an excellent design for classic interiors. Lighter skirting boards can be mounted on liquid nails, while heavier ones can be drilled with self-tapping screws.
Gypsum plinth is quite strong and durable, you can make it yourself, for this you need to buy a mold for casting parts and dry mass.
It is better to fix them using a mixture of alabaster with PVA or other polyvinyl acetate compounds. Massive structures can be mounted on liquid nails.
How to properly glue ceiling plinths
If you don’t level the walls before gluing the plinth and don’t make careful calculations, you can end up with a crooked molding, poor joining and peeling of elements. To prevent this from happening, you need to thoroughly study the installation instructions.
Required Tools
- To cut wide baguettes, you need to prepare a hacksaw; narrow structures up to 2 cm wide can be cut with a stationery knife.
- Miter box, if there is a need to form corners.
- A narrow spatula.
- Fine-grained sandpaper for sanding rough surfaces.
Surface preparation
- Inspect the walls around the perimeter, in those places where you plan to secure the curb. Eliminate defects, straighten crooked walls. It is especially important to do this perfectly if a thin baseboard will be used. Sand the walls with a block to which fine sandpaper is nailed.
- Prime the walls and wait until the surface dries completely.
- You make markings. To do this, place individual parts of the plinth on the places where they will be fixed. Mark the joints with a pencil. Even before purchasing a baguette, you can draw an approximate diagram of its location on paper and calculate the number of elements.
- Cut the parts. This is the most critical stage for beginners. It can be difficult if you are working with a foam border, which crumbles, crumbles and can be cut unevenly. In such skirting boards, the joints are cut straight and the corners are cut at 45°. It's better to practice on small pieces first.
Gluing onto putty mixture
Gluing the ceiling fillet with putty is done in rooms where there is no wallpaper yet. This ensures maximum adhesion to the surface.
Putty comes in finished form or in the form of a powder, which should be crumbly and without lumps. Professionals can replace the putty mixture with a gypsum compound, which is strong but sets much faster. To increase adhesive properties, you can additionally apply and pre-treat the surface with it before gluing.
Usually the dry mixture is poured into a bucket, then water is poured into it and kneaded with a mixer or by hand. Dilute the mixture gradually, then adding putty, then adding water.
The principle of working with ready-made putty:
- take some solution;
- Apply a thin layer of it to the back of the baguette;
- if the front side is accidentally stained with putty, it must be cleaned with a sponge or rag;
- You can install the plinth from any angle;
- carefully press the element to the marked place and visually evaluate the installation;
- Do not put too much pressure on the plinth; it will adhere to the wall without effort;
- remove excess mixture immediately, but in case of uneven walls, it is better to distribute the putty under the edge of the curb;
- When attaching the next baguette, you must first lubricate its end with putty and only then attach it to the first;
- Glue all the elements in the same way, leave them to dry completely for a day;
- After 24 hours, sand down all the unevenness and you can paint the baguette.
Glue mounting
Pasting is done on top of wallpaper, although it is also possible on bare walls.
The wallpaper must be glued well, otherwise the baguette may fall off after installation along with the rolls.
- Apply the adhesive composition to the baguette in accordance with the weight, size, and material from which it is made.
- Distribute the glue evenly over the baseboard in its central part, which is the main focus.
- Apply the baguette to the wall, gently but firmly press on the structure, hold for the time indicated in the glue instructions.
- Repeat the same steps in relation to other parts of the structure, carefully aligning the cuts of the parts.
- Carefully coat the joints at the end, quickly remove excess glue on the sides and on the front side.
- Leave the baguettes until completely dry. Usually this takes no more than a day.
- After complete drying, seal the cracks with white sealant.
If there are many cracks or they are too large, paint the baseboard with white paint, after priming it. Paint will hide flaws or make them less noticeable.
How to work with joints
Unfilled gaps will form between individual parts of the baseboards. They need to be covered with a small amount of glue or putty. When the joints are completely dry, they are sanded with sandpaper.
Foam skirting boards dry out after a few months of use and the joints may separate. This means that the sealing of the joints needs to be repeated.
How to cut corners
Pasting on a flat surface is easy even for beginners, but to paste the ceiling in the corners, you need to have additional cutting skills.
Without special devices
To cut a corner of a ceiling plinth without a miter box:
- you need to attach the border to the ceiling, pressing the flat part tightly against the corner;
- draw a line near the long edge on the ceiling;
- do the same with the second element on the other side of the corner;
- mark the point where the lines intersect, connect this point and the edge with a line, you get an angle of 45°.
You can create an imitation miter box from thick plywood or an old board. A rectangle is drawn with 45° marked on both sides. The opposite sides are connected by drawn lines. The pattern is then applied to the plinth and cuts are made using this template.
Using a miter box
A miter box is a tray-shaped carpentry device in which you can cut any profile materials at an angle of 45 and 90 degrees. The device can be iron, plastic or wood. Holes are specially made in it for a hacksaw, and more expensive models have a rotating mechanism.
The principle of working with a miter box: The baguette is placed in the hollow, pressed down, cut through the side hole, and the result is a cut of the desired slope.
To create an inside corner:
- take the necessary measurements;
- insert the baguette strip face up into the hollow of the miter box;
- lightly press the bar with your left hand;
- Place the hacksaw at an angle of 45° into the hole of the miter box, make a cut;
- Cut the second piece in a similar way, but in a mirror image so that an internal corner is formed together.

More often, baguettes are cut with a hacksaw, but for narrow models you can use a construction knife, which makes more even cuts.
The outer corner is made according to the following instructions.
- The plinth is measured along its entire length from the beginning of the wall to the outer corner. This length is marked on the wrong side of the baguette, the edge of which should extend slightly outward.
- The material is placed in a miter box at 45°, and a cut is made through its holes.
- The second baguette is cut similarly, but in a mirror image.
- The cut parts are applied to the wall, the evenness of the joints is checked, and imperfections are removed with a sharp knife.
Before cutting the fillet, it is better to practice working with a miter box on the extra pieces.
How to glue baguettes to different surfaces
The gluing differs depending on the material of the ceiling and walls.
On a suspended ceiling
- It is better to choose light, narrow baguettes made of polystyrene foam or polystyrene foam; plastic and polyurethane materials are in second place in terms of lightness.
- It is necessary to take skirting boards in which the upper part, attached to the ceiling, was already lower. Then the adhesive mixture will be applied only to the side that is fixed along the wall; no glue will be applied to the ceiling part.
- The adhesive must have maximum hold, durability and dry quickly.
- If wooden borders or large-sized decor will be attached, it must be additionally secured with glue, dowels, and anchors.
PVC plinth looks impressive on a suspended ceiling, which is attached with clips mounted on self-tapping screws. In this case, you can create a corner with one strip that bends.
You need to be very careful, as glue stains on the ceiling can damage it.
For wallpaper
Wallpaper must be securely glued to the wall, especially if it was glued a long time ago. If the wallpaper has peeled off in places, you need to glue it with wallpaper glue or PVA and wait for 1-2 days to dry completely. The plinth is glued into place with very reliable glue so that it does not fall off along with the wallpaper. To prevent the wallpaper from getting dirty, you must first mark the width of the border with a pencil. Below the drawn line, stick masking tape, which can be easily removed after work.
On drywall
The surface of the drywall is flat, so gluing borders onto it is quick and easy. Difficulties arise only at the joints, where the putty can drip. To avoid them, the joints are cleaned with sandpaper. Any type of skirting boards can be glued to drywall.
Since plasterboard walls reduce the space of a room, it can be visually increased by gluing the planks with the wide side to the ceiling.
For plaster
It is very important to check the evenness of the wall. Small flaws must be sanded or sealed with putty when gluing. It will eliminate imperfections and level the wall. The use of a special soft plinth visually hides unevenness. If the defects are significant, then the wall must be leveled, primed and sanded before gluing.
Common mistakes
- No pre-cleaning of the surface. If the walls are left dirty, the remaining dust and dirt will reduce the adhesive properties of the surface.
- Purchasing skirting boards with a too smooth back surface and lack of sanding. If you do not make the backside rough, the quality of adhesion to the wall decreases.
- Choosing the wrong or low-quality glue, especially when working with large-sized baguettes. If you use too weak a solution, large fillets will not adhere well. If you choose an adhesive with a solvent, you can ruin the polystyrene foam.
- Presence of drafts. You can’t ventilate the room for about a day after gluing so that the glue sets and the craftsman has time to adjust the position.
How much does it cost to work with masters?
The price of the craftsmen’s work ranges from 150 to 350 rubles. per linear meter. If you learn how to do it yourself, you can save about 3-7 thousand rubles in a few hours of work. on one room.