Is it possible to install a gas water heater above the sink? Installing a geyser with your own hands. Organizations and documentation
The most important thing to do before installing this complex device is to assemble everything Required documents for various organizations and comply with all installation requirements that will ensure correct and safe operation equipment.
Organizations and documentation
First of all, you need to contact the Housing Office and obtain plans for smoke removal, water and gas supply. If the house already had a water heater, then you should also get a plan that shows specifications device and its installation location.
As soon as all these plans are in hand, you need to contact the city gas service with an application, which will contain a request for permission to replace old equipment or install new one. This document must also be accompanied by a statement that the gas and water supply system will be repaired or replaced.
When the repair and replacement are completed, the owner receives an approved act and, accordingly, an installed column.
This process becomes much more complicated when installing the device in a new location. After all, such work leads to the need to change gas and water pipes, as well as the smoke exhaust system.
You need to collect a more detailed list of documents. It includes:
Technical data sheet of the speaker or at least the name of its model
Statement of the condition of smoke ducts
Application for refurbishment of living space
Documents that confirm ownership of the apartment
Column installation project
Application for installation work
After all documents are ready and approved, gas service workers will have to carry out all necessary work for installation, configuration and connection of equipment.
Upon completion of all work and sealing of the meter, it will be necessary to obtain certificates from technical supervision and the fire service, as well as a separate certificate stating that the device has been accepted for operation.
You will definitely need to contact the BTI to submit a new project.
Basic requirements for installing and connecting a geyser
According to modern standards, this device can be installed only in two rooms in the apartment: the kitchen or non-residential premises. Before changes to legislation were made, this list also included the bathroom.
This is what the diagram looks like correct location speakers in the kitchen:

In addition to the purpose of the room, when choosing it, you also need to focus on its volume (from 8 m3 or more), ceiling height (at least 2 meters) and wall material (fireproof).
If the walls are made of fire-resistant materials, then the place where the equipment will stand should be protected with basalt insulating cardboard with a thickness of 3 to 5 mm and a galvanized sheet with a thickness of 1 mm.
Hanging the device occurs according to certain rules: its side panel should be located at a distance of less than 15 cm from the wall, and the front panel should be at least 60 cm away from any objects opposite.
To connect this device, you need to correctly install the chimney pipe. It must be made exclusively of stainless or galvanized steel with a thickness of at least 1 mm. Aluminum is not allowed.
A gas tap must be mounted next to the column, the handle of which must be painted yellow- traditional for gas appliances.
Important! If stopcock not installed - the column cannot be installed.
Now about the supply of pipes for hot and cold water. For cold water, a separate pipe is installed from the riser. The same pipes lead to the bathroom, faucets and waste tank. For heated water, it is better to install a copper or stainless steel tube 15 mm in diameter.
Before starting installation work, you should sketch out an installation diagram.
Approximate view:

However, it should be taken into account that this diagram does not indicate a ventilation outlet for removing combustion products and an external power supply, without which the device will not start.
Before installing the column, you need to check whether combustion products will be removed normally. To do this, check the draft in the chimney. The test is carried out using a candle or a lit match.
If you bring the burning flame to the ventilation hole at a distance of about 2 cm, it should deviate slightly (by 45 degrees) - this is normal. If the deviation is insignificant (5-10 degrees), then the thrust is insufficient. And if the flame begins to deviate altogether reverse side, then it is necessary to clean the smoke shaft and only then install the water heater.
There is also a standard draft indicator: it should be 1.96-29.40 Pa (varies depending on the type of room).

What tools will you need?
After drawing up the diagram and checking the functionality of the ventilation duct, you need to acquire all necessary materials and tools (in addition to the gas water heater). These include:
Pipe for chimney installation (wall thickness - at least 1 mm)
PVC water drainage pipe
Metal-plastic gas pipe
Set of fittings, keys and taps
Gas shut-off valve
Filters for water purification that will protect the column from scale
Drill and pipe cutter
Correct choice of location and chimney device
If the installation will be carried out in the kitchen, then the column must be placed away from the electrical or gas stove no less than 10 cm. At the same time, its window, through which you can see how the burner works, should be exactly at eye level.
After this you need to prepare vent, into which the flue outlet of the column will be supplied. A galvanized chimney pipe with a length of at least 1.5 m is inserted into it and connected to the device. The column is attached to the wall with dowels.

When the device is securely fastened and screwed with self-tapping screws, you can connect a gas hose to it and screw it onto a special fitting (you can distinguish it from water fittings by diameter or color).
In the picture, 2 fittings for water are yellow, and for gas - white:

To connect the gas hose directly to the gas pipeline, you need to cut into gas pipe tee. This is done using welding machine or if there is threaded connection, by screwing in the tee.
Connecting the geyser to the water supply
Now you should connect geyser to the water supply. To do this, it is necessary to draw a separate line from the “cold” water supply pipe, which will end right at the special fitting of the column. This will be the "entrance". The “output” is removed from the column and connected to the “hot” pipeline.
To connect to pipes, the same tapping method is used as in the case of a gas pipeline.
It is necessary to have salt and magnetic filters that will protect the device from scale and related damage.

Important! When installing, do not forget about this important element, like Mayevsky's crane. It “airs” communication and thereby extends its service life.
When all the work is finished, you can put the upper pipe of the column on the pipe connected to the exhaust duct and fix the draft sensor.
Functionality check
The installation is complete, all that remains is to check the functionality of the unit and begin operating it with peace of mind.
To check, you need to open the tap and run gas into the column. You also need to check the connection " column-gas hose» for leaks. To do this, prepare a soap solution, which will definitely indicate the presence of a leak: bubbles will appear at the places of poor joining.
Now you can check the water supply. To do this, you need to open the “hot” tap and slightly open the Mayevsky tap. Air will come out of the pipes, the filter will fill and the column will start. If hot water comes out of the tap in the bathroom and kitchen, it means that all efforts were not in vain and the water heater was installed successfully.
Installing geysers is a labor-intensive and very responsible process. After all, an incorrectly mounted and connected device can cause a gas leak, which will lead to irreversible consequences in the form of damage to property, housing and, most importantly, loss of life. Therefore, inexperienced users just need to collect all the necessary documents and not try to install this unit themselves - it is better to entrust the work to professional craftsmen.
Residents of the private sector value autonomy. The main thing is to ensure a comfortable life, which is impossible without hot water. Installing a geyser will solve problems with hot water supply (hot water supply). But how to solve the problem of connecting it? What do you need to do the work yourself? Let's figure out what permits need to be obtained and what documents to draw up in order to legalize the installation of equipment.
Connection procedure and standards
Not all residents try to install the column according to the rules. After studying the opinions of users on the forums, we realized that many install equipment illegally. Nothing complicated: they called a gas technician they knew and connected the equipment. If the gas service comes for an inspection, you are not allowed into the house.
In such cases, people do not take into account the characteristics of the room, whether it is possible to install a speaker in it at all. As a result, things happen emergency situations and explosions that lead to tragic consequences. Not only will no one compensate you for your losses, you will also pay a fine for illegal installation.

If you live in a gasified private house, then you need:
- Contact the housing office for a diagram of the gas and water supply systems, as well as the chimney;
- Receive an act of technical condition chimney in the fire inspection;
- Go to the gas service, taking with you an application, a house plan from the BTI, documents of the owner of the building, a passport;
- Get a project for placement additional equipment. This can be done at any certified gas service.
After this, the organization sends a specialist to install the gas water heater in accordance with all the rules.
Installation Rules
It is important to know the requirements and standards of SNiP.
- Norms fire safety It is prohibited to place a column in wooden house or on a wooden wall;
- The wall for fastening is selected from non-combustible materials: brick or concrete. For protection, the lining is made of basalt cardboard and galvanized sheet 1 mm thick;
- The area of the room must be at least 15 m³;
- Ceiling height - from 2 meters;
- Placement height from the floor - from 1 meter;
- The presence of a window measuring at least 0.5 m³;
- Availability of ventilation or exhaust;
- Pressure in the pipeline - from 0.1 Atm;
- According to safety regulations, installation in a bathroom or toilet is prohibited. High humidity contributes to extinguishing the wick and rapid failure of the device.

Before hanging the speaker on the wall, you should consider the following parameters:
- The distance from the body to the stove is from 20 cm;
- There should be no furniture or other foreign objects at a distance of 60 cm from the front panel;
- The area around the water heater should remain free space: on the sides - 5 cm, below - from 15 cm.
Important! Shut-off valve it is put on gas before installing the equipment.
How to install a column
Before connecting the device, inspect the room. Objectively evaluate the possibility of installation gas equipment in the house.
- Check the room’s compliance with SNiP standards (ceiling height, area, etc.);
- Choose the right column. It must be suitable for your water and gas system. If you experience interruptions in blood pressure, and you buy powerful equipment, then stable operation you don't have to wait;
- Self-installation is carried out using hardware that is included in the kit. If there are none, then dowels measuring 10 mm are used;
- The gas connection is done last and is carried out by specialists.
Is your home not supplied with gas? Then you can put the balloon. IN in this case To start the device normally, you will have to use a water pump.

Chimney organization
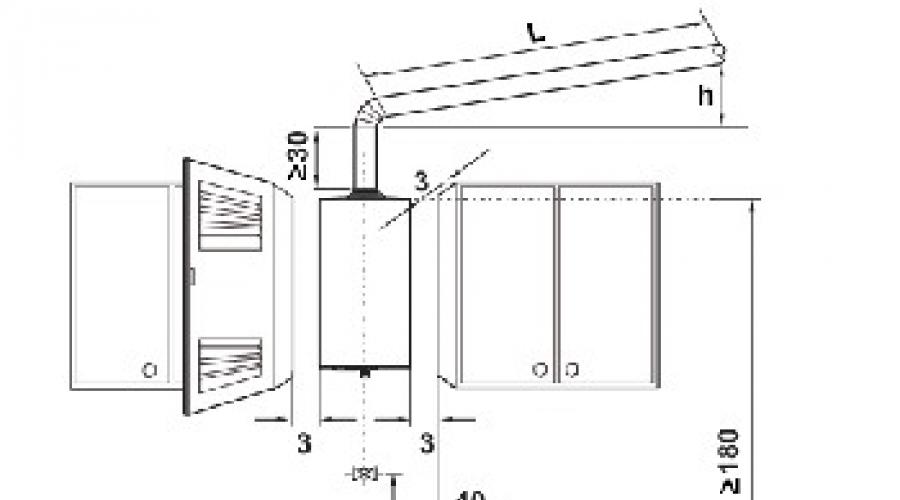
Installing pipes to remove combustion products is not difficult. If the house has a chimney with normal draft, adhere to the following rules:
- From the heater nozzle to the entrance to the chimney, the pipe should not be turned more than three times;
- You cannot connect two devices to one outlet (for example, the pipes of a dispenser and a turbocharged gas boiler);
- It is prohibited to block the chimney outlet with antennas or weather vanes;
- It is important to ensure that the pipes are sealed when extending.
There are two ways to perform installation without a chimney:
- Prepare a pipe made of steel or asbestos. Make a through hole at the outlet above the column. You need to connect the pipe to the device pipe and bring it outside. The pipe should rise 50 cm above the roof of the house, the total height is at least 5 meters.

- Select model closed type. Thanks to the availability closed chamber combustion they do not need a chimney. Horizontal pipe is brought outside through a hole in the wall. It is called coaxial chimney. Inside there is a fan and two tubes. The fan pushes combustion products out through one pipe, and combustion air enters through the other.
Progress
The documents have been collected and the installation location has been selected. Let's start installation:
- Drill two holes for fastening, following the markings;
- Secure the column with dowels or fasteners that come in the kit;
- Connect the gas hose to the fitting on the housing. It differs from water pipes in diameter;
- To organize a water supply from the collector, make a separate outlet to the column. This way, pressure drops in the system will be avoided, and the hot water pressure will be stable. Connected to the fittings flexible hoses no more than 2.5 meters long;

- Use corrugated or steel pipe- connect it to the housing pipe and the chimney. Seal all cracks with sealant - you can use putty or asbestos.
It is better to entrust the connection to the gas main to a specialist. After completing the work, you can check the serviceability of the equipment. From open gas valve, coat the connections with soapy water to prevent leakage. Open the faucet to supply hot water. If there is a hot stream, it means the installation was successful.
We have given the order of work. Act yourself or contact a specialist - it’s up to you. In any case, do not forget about current legislation and safety precautions.
Installing a geyser in an apartment is the most reliable, common and cheap way solving the problem of “hot” water supply. After all, in such volumes it’s already so cheap hot water Only the geyser “generates”. This is actually why most water heaters in domestic houses and apartments are “powered” by gas.
And this article will discuss the installation of a gas water heater - such work is usually not done with one’s own hands, but every homeowner who wants to control the estimate of the management company or gas service should have an idea of the essence of the process.
Geyser - convenience and reliability
Installation of gas water heaters (dispensers) is regulated by the norms and rules set out in SNiP 42-01-2002. According to the recommendations set out in this document, boilers are connected to gas pipelines low pressure(0.3 MPa).

Therefore, connecting the dispenser begins with drawing up a project for the “internal” gas pipeline. Without such a project, no management company will undertake the installation of a new water dispenser. After all, the column needs not only a gas pipe, it also needs an exhaust hood - a channel for removing combustion products or unburned “fuel”. And all the nuances of installation, right down to recommendations regarding the dimensions of the exhaust duct, will be displayed only in project documentation.
|
|
Well, if a water heater is not provided for in the gasification project, then the necessary changes are simply made to the documentation - a diagram of the installation of a gas water heater is drawn on the drawings. And if such a scheme is already present in the design documentation, then the apartment owner can look for a master who is ready to take on this work.
Moreover, all manipulations with the project concern only the owners of new speakers installed in the apartment for the first time. Replacing an existing one gas heater does not require any approval from regulatory authorities: after all, this source of consumption is already included in the housing gasification project.
However, most of them fit the regulated standards for installing a geyser. modern kitchens(according to today's SNiP, water heaters are installed only in this functional area).
After all, premises suitable for installing speakers must meet fairly modest requirements, namely:
- The kitchen area must exceed 7.5 square meters.
- The ceiling height cannot be less than 2 meters.
- The dimensions of the receiving channel for the “chimney” must correspond to a circle with a diameter of 120 millimeters. A standard exhaust vent is suitable for these conditions.
- The supporting surface of the column (kitchen wall) must be constructed of non-combustible materials.
As a result, most apartment owners can order the services of a designer without the risk of wasting money. Simply put: these days the opportunity to install a water heater is available to every owner of a gasified apartment.
How to install a geyser correctly: installation algorithm
After developing and agreeing on the speaker installation project, you can look for a contractor. Moreover, the main search criterion is the contractor’s interest in the fact of the existence of a project for connecting a water heater.
If there is such an interest, then you have a conscientious contractor ready to take responsibility for his work. If not, look for someone else.
After all, the main requirement for installing a geyser is compliance with safety rules.
And if the “performer” is ready to risk not only his reputation, but also your safety, then the conclusions about the competence of such a “specialist” are already obvious.
Preparing consumables
After the contractor has been found, you will have to purchase an additional set of “consumables”, which will include:

- A galvanized pipe with a millimeter-thick wall is used in the construction of a “chimney,” so fittings with a very thin wall (tenths of a millimeter) will simply burn out in such conditions.
- Water purification and softening filter - with the help of this unit you can delay the procedure for cleaning the column from scale. Well, without a filter, the column will become “clogged” with scale in a couple of years.
- A set of fittings, which will include tees, adapters, ball valves and couplings.
- A gas hose used to connect the valve of the home gas pipeline and the fitting of the column.
- Dowels, liners, concrete drills - these components will be consumed during the installation of the column on the supporting surface.
Having purchased all the above components and parts, you can invite a specialist to your home.
Installation of equipment
A typical column installation algorithm looks like this:

- First, you should select the location of the column on the supporting surface (wall). Moreover, this place should be removed from the stove by 10 centimeters (at least) and raised above the floor level to a height calculated as follows - the viewing window, through which you can observe the operating burner, should be located at the user’s eye level.
- Next, the column is secured to the wall with dowels driven into pre-drilled holes with installed liners.
- A gas hose is connected to the fixed column, screwed onto a separate fitting, the diameter of which differs from the dimensions of the “plumbing” outlets.
- The next step is the installation of the “cold water supply-dispenser” line. It is implemented as follows: a separate line is drawn from the collector, ending at the receiving fitting of the column. Moreover, it is very important not to confuse the “receiving” branch with the “graduating” branch. However, experienced craftsmen they don't make such mistakes.
- Next, you need to arrange an “exit” from the column by connecting the outlet fitting to the manifold of the “hot” branch of the water supply.
- At the very end, a galvanized chimney is put on the upper pipe of the column, fixing the draft sensor in a special place. The free end of the chimney is led to exhaust duct kitchens using a special adapter.
- The final stage - checking the operability of the column is carried out as follows: the valve on the branch pipe of the household gas pipeline is moved to the “open” position; check the connection of the gas hose and the column soap suds(bubbles appear - there is a leak); open the “hot” valve in the mixer. And if the water heater started up and hot water came out of the tap, then everything was done correctly.
The specified procedure is observed, with certain deviations, in any case. And if your master behaves somehow wrong, then you should think about hiring a new specialist.
Installing a geyser with your own hands - is it worth doing?
Technically, installing a geyser is no more difficult than connecting a simple boiler. But the consequences of such “amateur activity” can change the lives of not only the apartment owners, but their closest neighbors in the house.

After all, the gas not only burns, but also detonates quite powerfully after connecting with a certain volume of air. Don't believe me? Then conduct a bold experiment - open the burner of the gas stove, count at least 10-15 seconds and bring a match. Did you feel it?! Now imagine all this raised to a power of 1000.
Yes, this is exactly how entire entrances blow up. Moreover natural gas devoid of both color and smell. That is, you will not feel a leak even if you check your self-installed heater literally every hour. And is it worth living in such stress? So you can end up with persecution mania.
That is why permission to install a geyser is given only to people with strong nerves and extensive experience working with pressure systems. Well, we can only trust the professionals. Practice shows that such a solution will be the most optimal both from the point of view of security and from the point of view of legality. After all, no one has yet canceled fines for unauthorized installation of gas appliances.
Add site to bookmarks
- Kinds
- Choice
- Installation
- Finishing
- Repair
- Installation
- Device
- Cleaning
How to install a water heater
There are two types of installation of a gas water heater: installation of a flow-through heater in rooms where equipment was not previously installed, or replacement of an old gas water heater, which includes the task of dismantling previously used equipment and installing new one.
The installation of a gas water heater must be carried out in strict accordance with SNiP 42-01-2002 and SP 42-101-2003.
Installation of gas water heating equipment in a room requires an agreed upon design and well-executed installation gas pipe to the place where the future column will be installed. The project must indicate the installation location of the speaker, the features of the room and the installed equipment. These works must be performed by a licensed specialist, since all work with gas equipment is work increased danger. Incorrect installation and supply of equipment is dangerous both for the owners themselves and for their neighbors.
The installation of gas water heating equipment is regulated by the following acts:
- SNiP 42-01-2002 “Gas distribution systems”.
- SP 42-101-2003 “ General provisions on the design and construction of gas distribution systems made of metal and polyethylene pipes.”
Rules for installing gas equipment
There are rules that must be strictly followed during the installation of gas water heating equipment:

- Installation of gas water heating equipment is prohibited in a room with a volume of less than 7.5 m³ and a ceiling height of less than two meters.
- The room should have natural or artificial ventilation(hood, window, vent, etc.)
- In country houses in the room where it is installed gas water heater, you must have a chimney with a diameter of at least 1-2 cm.
- The pressure in the water supply is no less than one atmosphere.
- Gas water heating equipment cannot be installed in bathrooms.
- The walls in the rooms where the water heater is installed must be finished non-flammable materials, the column must be located at least 10 cm from the gas stove, preferably further.
Gas water heating equipment intended for installation in residential buildings, is divided into two groups: flow-through and capacitive.

Water heater: located next to the boiler and built-in.
Gas instantaneous water heaters are fast and convenient devices with partial or full automation. Instantaneous water heaters are designed to heat water in different places apartments - in the kitchen, in the bathroom. IN instantaneous water heaters gas is supplied through a pipe, which is regulated by a tap. To start the operation of the column, the gas valve opens, the heat received from the combustion of gas heats the passing water.
A capacitive water heater also works using the heat generated by combustion, but the heated water does not enter the tap immediately, but is accumulated from special reservoirs - containers.
To dismantle the flow-through heater, you will need tools such as a gas or open-end wrench.
So, you can dismantle old flow-through gas water heating equipment yourself, saving several hundred rubles, or invite a specialist, saving your time and effort.
Return to contents

When choosing a gas hose, you need to be guided by the availability of a license for it, as well as the price - choose a more expensive option.
First you need to turn off the gas supply by closing the tap on the gas pipe. Using a gas or open-end wrench of a suitable size, you need to unscrew the hose fixing nut. This procedure is quite simple, since it is extremely difficult to damage the pipe during its implementation, unless, of course, we're talking about about a flexible hose connection (as opposed to cases when you are dealing with an old connection through a metal pipe, which can only be dismantled by sawing it). In the process of unscrewing the nut, you need a second wrench hold the gas pipe to prevent damage.
After disconnecting the gas pipe, you need to remove the hose or pipe from the point of entry into the gas water heater. The hose can be reused if it has been replaced recently, but it is better to replace it with a new one. When choosing a gas hose, you need to pay attention to the presence of a license and decide in favor of a more expensive option, since possible problems boiler failures can cost you health and property.
The next installation step is to turn off the water supply system. You need to turn off the special taps at the pump or the entire water supply to the apartment. If taps on the water supply pipes are not provided, they must be purchased in advance in the amount of two pieces - for inlet and outlet. This will make the water heater easier to operate in the future.
So, when the water heater is disconnected from the water supply, you need to remove the air outlet pipe from the outlet of the column and remove it from the chimney. Now the speaker is disconnected, and to complete the dismantling you need to carefully remove it from the wall mount. Next, they begin to install new gas water heating equipment.
Return to contents
Installation and startup of a gas water heater
IN self-installation When installing gas water heating equipment, it is important to do everything step by step, slowly and with strict adherence to all rules and instructions. After installation, it is necessary for a gas service employee to check its performance and register the new equipment.
To install new gas water heating equipment you will need the following materials:

When installing gas equipment that requires the creation of a chimney, it is best to choose all-metal galvanized pipes with a diameter of at least 120 mm.
- Corrugated or galvanized pipe, the thickness of which is at least 1 mm. It comes with some speakers. If this is the case, you are lucky; if not, measure the diameter of the required corrugation on the heating equipment or look at this information in the instructions and buy it.
- Rosette ring for mounting the chimney entrance. It's important to pick it up the right size, suitable specifically for your equipment model.
- When installing gas water heating equipment in a house that requires the creation of a chimney, you need to purchase an asbestos or metal pipe, the diameter of which must be at least 120 mm, or better yet, larger. The length of the air duct pipe must be at least 2 meters or more, since the longer the chimney pipe, the stronger the draft.
- Gas hose, the length of which depends on the installation conditions. To find out the length you need, you need to measure the distance from the edge of the gas pipe to the entrance to the column. It is better to take a gas hose with a small reserve. When purchasing, you need to pay attention to the type of thread at the inlet to the gas water heating equipment - the hose tip must fit it, there must be a match in the type of thread external/internal and a diameter of ½” or ¾”.
- Two connecting hoses required length. They will be useful for connecting the water supply. You can replace the hoses with metal-plastic pipes, depends on what materials you are more accustomed to working with. When using pipes, you need to decide whether there is a need to purchase special couplings to match the pipe and the connection point, thread.
- Dowels for fastening gas water heating equipment.
- Filter for rough cleaning water, if it has not been installed previously. From quality running water The service life of heating equipment largely depends.
For installation you will need the following tools:
- hammer drill and drill with drill sets;
- two adjustable wrenches;
- open-end wrenches 27/30 and 32/36;
- special sealant or tow.
Rapid installation of a geyser is often required to supply hot water dacha suburban area or an apartment, a separate cottage, but there is no way to call a specialist. How to install a geyser solely by your own efforts? Below is a series practical recommendations By independent decision this question.
Choosing a modern geyser
Geyser – universal solution problems of supplying residential premises with hot water. This is a truly convenient and practical device that does not require saving electricity due to low energy consumption. An important point was that the use of speakers was not always safe. But a lot was compensated by convenience - just unscrew the valve, and hot water was supplied to the bathroom and kitchen. Heating was carried out by igniting the column with ordinary matches. The danger was in pressure drops, the column also became clogged, the water could boil over and burst the pipes. Bulky and inconvenient, old devices did not allow them to be installed unnoticed and without the participation of a team of craftsmen.
Modern speakers are much safer and more convenient in design. The external design of the system comes first - such devices easily and conveniently fit into the interior or are camouflaged. These are very functional and ergonomic systems increased security. Ignition is carried out through a piezoelectric element, without the risk of fire.
How to install a gas water heater in an apartment? In urban environments, it is enough to simply contact specialized services, but the procedure costs some costs that can be avoided. You can perform all the necessary manipulations yourself, having necessary tools, the actual gas water heater and with a little effort. Installing a modern speaker is not so complicated - it is only important to know the specifics of the procedure and follow safety precautions.

First you need to decide on the placement of the column. The connection is made to gas pipes, as well as to the water supply, which the heat source must subsequently heat. A preventative check of the system’s performance is carried out, after which the column can be put into operation. It is quite possible to perform all the procedures yourself, so the presence of a specialist is often not required.
Choosing a place for the column
It is important to remember the requirements that the location of the column must meet. Devices can be of different power and for various purposes. Choose a place that is optimal for supplying hot water - near the bathroom, kitchen or in the pantry, where children and unauthorized persons will not have access.
It must be taken into account that the installation of such a device in an apartment must be agreed upon with representatives of housing and communal services, the gas service in a particular area, management company related to the house and apartment. Applications for installation should be sent only to organizations that have a license for this type of work.

The column must fit into the interior in accordance with all technical standards and conditions. It is also necessary to install a hood for combustion products. It can be installed; this option will be especially easy if there is a chimney.
They make a hole in the ceiling and insert an asbestos pipe, which you can make yourself. Its length must be at least 1.5 meters. Only after this requirement is met is the installation of the column under the pipe done. It is also necessary to place the device at a height inaccessible to children, but within an accessible zone, since the operation of the automatic column must sometimes be adjusted manually to achieve a certain temperature.
Connection to water and gas networks
The hood and column are connected using a corrugated sleeve. One end is put on the hole, the second is inserted into the chimney socket. Next, do it yourself key work– connect the gas supply channel. Correct installation gas tap carried out by cutting the tee into the gas pipe. This will require welding or screwing in a tee with a threaded connection.
The column is connected to gas system using a pipe secured with clips. Now gas will enter the system, which should heat the water during combustion. The next step will be connecting the water supply to the column.

Water supply. Installation of connection with water pipe performed using a threaded tee. Metal pipe must be accompanied by installation compression fitting, only after that it is supplemented with a water tap.
The trajectory between the water supply and the column should be marked at the junction of future pipes. A salt filter is placed next to the system, then a magnetic filter.
It is also necessary to install such a part as the Mayevsky crane - it extends the service life of the entire structure. After this, you can run the column to check the quality of work - to the water supply in the apartment.
Checking the system operation
After installing a gas heating device with your own hands, it is important to check the quality and safety of its operation. To do this, open the gas supply valve - it goes into the column. Then make a solution from soapy water– it will help check pipe joints and faucet fastenings. If bubbles appear in these places, then there are some holes that need to be covered and eliminated without fail.

Then they check the operation of the water supply - open the Mayevsky tap and, at the same time, open the hot water. You must wait until the air comes out of the filters, then close the filter. After this, if there are no shortcomings, you can use the speaker in your house or apartment with complete peace of mind.