Is it possible to putty penoplex and other non-standard materials? Choosing penoplex plaster and application rules How to properly plaster penoplex outside the house
When insulating a house with penoplex, it becomes necessary to plaster it. This process does not pose any difficulty, however, it requires strict adherence to technology. Therefore, next we will look at how to properly plaster penoplex so that the finish does not crack or crumble.
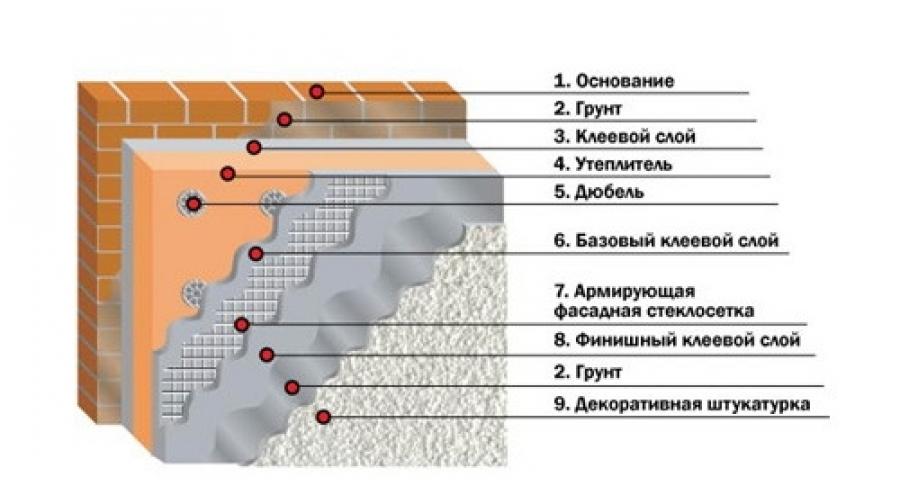
General information
Penoplex is a good heat and sound insulating material. True, contrary to the claims of many sellers, its thermal insulation qualities do not exceed those of foam plastic. Of course, there is a difference, however, it is within the margin of error.
The advantage of penoplex is that it is stronger. However, at the same time, its surface is smoother, which requires a special approach to plastering. In particular, the use of reinforcing mesh, adhesive primer of the “concrete contact” type, and a special adhesive composition as plaster is required.
You can often hear from home craftsmen that they have successfully plastered penoplex. ordinary plaster and without a mesh. However, most often such work has to be redone. Even if the composition sets on such a surface, it will very quickly begin to crack and peel, so you should not take risks.

Plastering technology
The penoplex process includes the following steps:
- surface preparation;
- reinforcement;
- applying decorative plaster and painting.
Below we will take a look at all these stages.

Preparation
So, before plastering the penoplex, you must perform the following steps:
- First of all, it is necessary to fill the gaps between the insulation boards that may appear during its installation. For this you can use polyurethane foam or special foam for insulation systems, for example, Ceresit CT-84. The cost of a can (850 ml) is ~ 600 rubles;
- Next, you need to make sure that the surface covered with penoplex is smooth. To do this, you can use a long rule and building level. All protruding areas should be rubbed with a special grater.
At this stage, it is often necessary to deepen some of the caps of the umbrella dowels below the surface of the insulation. If you can’t hammer them in, you need to cut off the cap stationery knife and drive in another dowel next to it, having previously drilled a hole for it;

- At the end of the work, the surface of the insulation must be primed with the composition “Betonkontakt”, for example, from manufacturers such as Ceresit, VIOLUX, Feidal or others. On average, the price of a primer is 700-1000 rubles per 15 liters.
Before application, the composition must be shaken and poured into a flat container. Then you need to soak it in the liquid. paint roller, lightly squeeze it out and apply the primer to the surface in an even layer, avoiding drips and accumulation of liquids in certain areas;
- After the surface has dried, the primer is applied again.
Advice! If there are enough between the foam sheets wide gaps, they can be filled with fragments of insulation.
This completes the process of preparing penoplex for plastering.

Reinforcement
The next step is reinforcement, which is performed in this order:
- before plastering the penoplex, you should cover the dowel heads and other recesses in the heat insulator;
- then you need to stick aluminum on the outer corners perforated corners. The glue used is the same as for gluing the mesh - Ceresit ST 83, Glims KF, KREISEL 210 or others. The cost of the compositions averages 350-600 rubles per 25 kg bag;
- Next, you need to cut the fiberglass reinforcing mesh, taking into account the fact that the sheets are glued overlapping each other by about 10 cm, and also with a turn at the corners of about 10 cm;

- Next, an adhesive composition with a thickness of about 3 mm is applied to the surface. The consistency should be a little thinner than the manufacturer recommends. The fiberglass mesh is immediately glued to the treated area using a wide spatula or chalk.
It is more convenient to carry out work from top to bottom. In this case, it is necessary to treat with glue small area walls so that it does not have time to set before gluing the mesh;
- After gluing the mesh, another layer of glue is applied to the surface, which is leveled with a wide spatula. Essentially, it performs the function of a draft.
Advice! If the fiberglass mesh is stiff enough and it cannot be bent neatly at the corners, then liquid glue should be applied to the bend area, as a result of which the fabric will become more elastic.

Finishing
As a rule, wall insulation is carried out from the outside, so the instructions for finishing penoplex looks like this:
- first of all, two layers of primer are applied to the surface again;
- then, using a wide spatula or mortar, after the soil has dried, apply decorative plaster;
- when the plaster begins to set, it is rubbed with sandpaper;
- After the decorative plaster has dried, most often the surface is covered with water-dispersion facade paint.
This completes the process of plastering penoplex with your own hands. It must be said that sometimes insulation is carried out indoors. In this case, after reinforcement, ordinary putty is applied to the surface, and then decorative finishing, for example, wallpaper is hung or walls are painted.
Conclusion
As we found out, the process of filling penoplex is quite simple. The main thing is to have some skills in working with tools such as a spatula or malt, and also to follow the sequence described above.
The video in this article contains Additional information on the topic of plastering penoplex. If after reading the material you have any questions, you can ask them in the comments, and we will be happy to answer them.
What and how exactly to plaster penoplex? Should it be used for interior decoration of residential premises? Is it required preparatory primer heat insulator? In this note we are expected to answer these and other questions.
Insulation inside with penoplex.
Distinctive characteristics of the material
First, let's get acquainted with the main characteristics of a heat insulator.
What is penoplex? This is only the company under which extruded polystyrene foam is made. It differs from the more common material - polystyrene foam - only in its great rigidity.
Interesting: let’s immediately dispel one of the myths surrounding material for insulation due to the diligence of managers. The thermal insulation properties of penoplex do not stand out in any significant way compared to polystyrene foam. The difference is practically within the limits of inaccuracy, and is explained by a decent number of tightly closed air cells in the material configuration.

Compare the thermal conductivity of non-pressed (foam) and extruded (penoplex) polystyrene foam.
The properties of penoplex directly follow from the raw materials used in its production and the structure of the material.
- The rigidity is greater than that of polystyrene foam, but not pleasing. A thin layer of plaster on its surface requires reinforcement: otherwise, the very first dent will become the center of a network of cracks, which very quickly lead to peeling of the coating.
- The material is vapor permeable, although to a lesser extent than polystyrene foam.
- Polystyrene, even with fairly low heating, releases toxic and volatile styrene. If so, when insulating the inside, it requires reliable insulation from the living room.
- The adhesive properties of its plane will be somewhat inferior to the adhesive properties of foam plastic.
Untreated polystyrene foam is a flammable material; But when producing penoplex, fire retardants are added to the raw material, which makes it self-extinguishing.
Materials
So, what is the insulation material we are interested in plastered with?
The answer depends on which side of the permanent wall the insulation layer is placed on.
Insulation inside
For finishing the inside, you can safely use putties and gypsum plasters. in particular, the Rotband plaster mixture and the Fugenfüller multifunctional putty are used from the range of the German company Knauf, which is widely represented on the domestic market. Both compositions are vapor permeable and have good adhesion to concrete, brick and other porous surfaces.

The photo shows plaster based on Rotband gypsum.
But are the adhesive parameters of penoplex sufficient for good adhesion to them?
Where no mechanical loads are planned, plastering directly over the insulation is allowed. But when wall decoration at the level of human height, balcony railings, etc. It’s better to play it safe: in such cases, penoplex is primed in advance with adhesive primers with the addition of sand (Betokontakt from Tikkuril, Ceresit CT 19).
They will give the weakly absorbing plane the roughness necessary for our purposes.
What is used as amplification? Basically, a fiberglass-based mesh with a mesh size of 5x5 millimeters and a density of 140 g/m2. Cost sq.m. similar material will cost 15-20 rubles.
Insulation from the outside
Gypsum performs its duties perfectly in the dry air of a living room, but high humidity and especially rain are contraindicated for it. For external insulation Cement-based compositions are used.
Please note: it is strongly not recommended to use ordinary cement-based plasters over penoplex. In this option, special adhesives for polystyrene foam are used (for example, in the Ceresit choice it is the CT 85 plaster-adhesive mixture). The use of cement tile adhesive is permitted.

Adhesive for polystyrene foam from Ceresit.
Priming with adhesive primers in this option is quite possible, but is not considered simply mandatory: the cement laitance gets into the insulation material deep enough to guarantee strong adhesion.
What is plaster reinforced with? Fiberglass mesh, but not the first one available, but alkali-resistant one. Instructions due to the fact that cement is a pronounced alkaline medium: a simple mesh will simply dissolve in it.
Also: the plastered surface both in the middle of the room and on the outside is primed for painting or facing with any other option using acrylic primer.
Technology
So, how to plaster penoplex with your own hands?
- The connections between the insulation panels are filled with foam. The squeezed-out remains of the foam are cut off after it hardens. Sealing connections with plaster means making cold bridges; It is also undesirable to leave voids: in suitable places the plaster will be pressed through very easily, and you need to remember about heat transfer due to convection.

The connections between the panels are filled with foam for installation.
- When facing with gypsum, the penoplex is finished with an adhesive primer. The work continues after it is completely dry.
- The mixture - gypsum or cement - is diluted according to the manufacturer's recommendations.
It is necessary to pay attention: regardless of the composition of the plaster, the dry mixture is poured into the required volume of water, and not water is poured into the mixture. In another option, it will be quite difficult to get rid of undissolved lumps at the bottom.
- Cut a strip of fiberglass mesh about a meter long. It is quite difficult to glue a larger area at once: the glue dries very quickly.
- Apply a medium plaster mixture (width 30-35 cm) using a spatula to an area of the heat insulator measuring approximately 90x90 cm. Thickness - about 3 mm. We intentionally leave the edges of the fiberglass mesh unglued: the strips should overlap.
- Press the mesh into the glue and level it from the center to the edges. Repeat with the next section.

The mesh must be completely pressed into the adhesive layer.
- When the entire wall is glued and the glue is completely dry, it is best to rough sand the inevitable flaws. The work is done manually, plastic or wood grater with a mesh for sanding work.
- We apply a 3mm covering layer, which will be completely hidden by the reinforcement. After drying, the cons are erased again.
- We prime the surface for a final coat.
For finished cladding, vapor-permeable water-based paints, trellises (of course, in the middle of the room) or textured plaster for decorative works.

Textured plaster will decorate the plastered surface.
Conclusion
As you can see, the technology of work does not require any special skills or extensive experience. construction work. The video in this article will tell you more about how to plaster penoplex. Good luck!
5035 09/18/2019 4 min.
Penoplex is modern thermal insulation buildings, the most efficient this moment. The only one significant drawback penoplex - excessive susceptibility to external environment. Sunlight, strong wind and other adversities have a detrimental effect on this material, destroying its structure and leading to loss of thermal insulation properties. A good layer of plaster, a proven remedy against the destruction of penoplex, will provide excellent protection for penoplex.
How to choose the right one
In order to choose penoplex plaster, it is necessary to take into account a number of parameters that it has specific product. Capable of providing the best protection penoplex, but to obtain a high-quality result, it is necessary to take into account environmental conditions.
The video talks about penoplex plaster:
You can find out about the best way to make walls with plaster or gypsum board in this
Necessary materials
To cover a wall covered with penoplex, you will need several types of material:
- Reinforcing mesh. For each square meter coating required 4 kg of material.
- Spatulas of large and small sizes.
- Emery float for leveling the mesh layer.
- For priming you will need a roller with a short pile surface.
You can learn how to use silicone plaster for a facade from this

If desired, the last layer of plaster can be decorated using a porous sponge to create irregularities in the decorative plan. Any tools, spatulas and rollers can be used - the only limits are the builder’s imagination. However, this step is not required. In some cases, it is preferable not to paint the plaster; some mixtures cannot be painted at all.
You can find out whether the purchased plaster can be processed by reading the instructions on the packages. The same rules apply external walls – in rainy climates it is better to take a moisture-resistant one, for windy weather conditions
Textured acrylic plaster is suitable.
The difference between wall plaster and putty can be found in this At material and compliance with the technology of application and rubbing, penoplex covered with plaster will retain its properties for a long time. Manufacturers produce many varieties of plaster mixtures. As a rule, for each product there are 2 types - for attaching the mesh to the penoplex, and for covering the layers after. Some manufacturers produce universal mixtures suitable for both gluing and coating.
November 12, 2016Specialization: finishing of facades, interior finishing, construction of dachas, garages. Experience of an amateur gardener and gardener. We also have experience in repairing cars and motorcycles. Hobbies: playing the guitar and many other things that I don’t have time for :)
A few words about the features of penoplex
I’ll say right away that it’s more correct to call penoplex extruded polystyrene foam, since the word “Penoplex” is the name of the company involved in the production of this material. This is reminiscent of the situation with copying machines, which in our country are still called “copiers”.
As you might guess, extruded polystyrene foam is based on ordinary polystyrene foam, i.e. Styrofoam. Due to the processing of foam plastic with a special thermally the material acquires the following qualities:
- strength, which is several times higher than the strength of conventional foam;
- uniform structure and smooth surface;
- almost zero moisture absorption;
- higher vapor permeability.

On the one hand, the performance qualities of penoplex are much better than those of expanded polystyrene. But, on the other hand, as a result of these same qualities this material has much worse adhesion than foam.
Therefore, the mistake of many beginners is that they try to putty penoplex using the same technology as polystyrene foam. Moreover, similar recommendations can be found even on some construction resources

. All this leads to the fact that the glue, which is used as putty, lags behind the insulation along with the reinforcing mesh. This raises the question: is it possible to putty penoplex? I’ll say right away that this material was not originally intended for finishing. wet method
. However, our craftsmen have come up with a technology that allows you to achieve high-quality results, in fact, I will introduce you to it below. It makes sense to use penoplex for wall insulation only where its properties, such as strength, are really important. Typically this is or low ground floors. In other cases, its use is impractical, since the price of this material is much higher than the cost of expanded polystyrene and mineral mats.

Penoplex putty technology
The process of filling penoplex can be divided into several stages:

Preparation of materials
So, before you start puttingty, you need to prepare the following materials:
- glue for polystyrene foam - you shouldn’t skimp on the mixture, so buy glue from famous manufacturers, For example, good option is Ceresit CT85 glue;
- adhesive primer;

- fiberglass reinforcement mesh;
- finishing putty - needed for interior decoration, for example, for painting;
- plaster perforated corners.

Keep in mind that all materials must be purchased with a small margin.
Surface preparation
The nuances of the penoplex putty technology lies precisely in surface preparation. In other words, how high-quality and durable the finish will be depends on this stage.

So, preparing the surface of extruded polystyrene foam with your own hands is as follows:
- fill the gaps between the slabs with scraps of insulation or special adhesive foam, if, of course, they are available;

- then The surface of the insulation must be made rough. To do this, treat the penoplex with a metal brush, a foam float or a needle roller. Thanks to this, the adhesion of the surface of the material will significantly improve;

- Now the surface of the penoplex should be coated with an adhesive primer using a painter. Try to distribute the soil evenly on the surface of the insulation in a thin layer to avoid drips.
After the first layer has dried, priming must be repeated; - now you need to prepare the glue and putty the dowel caps using a narrow spatula;

- on all external corners, including slopes, perforated plaster corners. Keep in mind that they must be leveled.
If the dowel head rises above the surface of the insulation, the fastener must be deepened by finishing it off with a hammer. If this is not possible, you need to cut off the dowel head with a mounting knife and install new fasteners nearby, having previously drilled a hole to the required depth.
Here, in fact, are all the nuances of surface preparation.

Reinforcement
The next stage is reinforcement, which, in fact, is putty. Instructions for reinforcing penoplex look like this:
- First of all, prepare the fiberglass mesh - cut it into sheets of the required length. Keep in mind that they should be located with a turn at the corners and at the same time overlap each other at the joints by 10 centimeters;
- Now you need to prepare glue with the consistency of thick dough;
- Reinforcement should begin from the slopes. To do this, apply the solution to the slope and smooth it with a notched trowel;

- then apply the mesh to the surface of the slope and smooth it with a smooth spatula. As a result, the mesh should be completely covered with glue. Try to carefully level the surface of the glue with a spatula so that it is as even and smooth as possible.
For alignment internal corners an angled spatula should be used. - The walls are reinforced using the same scheme;

- After the first layer of glue has dried, you need to apply a second layer. To do this, make the solution more liquid (creamy consistency), and apply it in a thin layer using a wide spatula. This procedure is performed as a regular putty.

This completes the process of rough puttying of extruded polystyrene foam. It should be noted that this technology allows you to achieve quite smoothly and flat surface, but far from ideal.

Therefore, reinforced penoplex on facades must be covered with decorative plaster. The latter hides putty defects and also gives the surface a certain texture, which makes the facade more attractive.
Final putty
Finally, let’s look at how to putty penoplex indoors for painting, since it is not always possible to use decorative paint for interior decoration.
Internal insulation leads to the formation of condensation between the insulation and the walls. Therefore, you need to resort to it only in extreme cases, for example, if you need to insulate a wall in an unheated entrance. Internal wall insulation in the apartment itself may be necessary if you do not have permission to change the facade decoration or the wall is adjacent to an unheated elevator shaft.

It must be said that many novice home craftsmen are interested in the forums whether it is possible to putty on polystyrene foam coated with a layer of glue. This procedure is quite acceptable, since the glue combines well with any type of putty. The only thing is in progress finishing putty The following technology must be observed:
- After the second layer of glue has dried, it is imperative to apply a primer according to the scheme described above, i.e. in two layers;
- then apply to the primed surface thin layer finishing putty. Keep in mind that the layer thickness should not exceed 3 mm, otherwise the coating may crack.

The putty is applied with a wide spatula along standard scheme. You can read more about puttying techniques from other articles on our portal devoted to this topic;
- After the putty has hardened, it must be treated with a mesh with fine abrasive - P150. On at this stage all imperfections should be removed to obtain a perfectly smooth surface;

- If the surface turns out to be insufficiently smooth, it must be primed again, first cleared of dust, and covered with a second layer of finishing putty.

To complete the work, you need to sand again with a fine abrasive. If insulation is carried out in unheated room
, for example, in the entrance, putty penoplex should be used with a universal mixture for interior and exterior work.
Conclusion
Penoplex, as we found out, can be putty quite successfully. The main thing is to properly prepare the insulation surface. Otherwise, the work resembles the process of puttying ordinary polystyrene foam.
Additionally, you can watch the video in this article to visually familiarize yourself with the process of filling penoplex. If any of your questions on this topic remain unanswered, write them in the comments, and I will definitely answer you.November 12, 2016
If you want to express gratitude, add a clarification or objection, or ask the author something - add a comment or say thank you! Most Popular thermal insulation material is penoplex. It has many advantages: durability and high density
. In addition, it absorbs moisture well. Used for insulation of walls and floors in country houses . The material has high properties
. In this article we will tell you about the benefits and how to plaster penoplex. Penoplex is effective material
, which is used to insulate rooms, attics and balconies.

Necessary equipment and materials In order to plaster penoplex, you will need putty and plaster mixture
. When working, you will use a spatula, a grater (wooden or plastic), special scissors, reinforcing mesh, a bucket, gloves, a roller and a sponge.
Where to begin? Any construction process
- starts with preparation.
- Cleaning and leveling walls.
- Penoplex fasteners
- Mesh installation.
- Preparation of the reinforcement layer.
- Grout.
- Primer
Penoplex not only has thermal insulation properties, but also suppresses noise. This photo shows material that has not yet been treated with plaster.
Preparation of the solution
To apply it to penoplex, professionals advise using special mixtures. For wall decoration, consumption is approximately 6 kg per square meter and 4 kg for gluing mesh. When mixing, be sure to follow the instructions printed on the package.
There is one important point: for gluing plaster mesh it is necessary to create a consistency a little thinner than indicated by the manufacturer. To level the layer, you need to dilute the mixture as much as possible so that it literally flows off the spatula.
Penoplex is a fairly effective material that provides not only thermal insulation, but does not allow noise to pass through. Among its main advantages is easy installation, which you can do yourself. First, the penoplex must be fixed with glue, and then secured with additional fasteners.
If the work is done poorly, the material may become deformed as a result of temperature changes.
Gluing plaster mesh
In order for the plaster to adhere tightly to the penoplex, it is necessary to install a special mesh for facade works. Its density ranges from 140 to 170 g/m2.
The denser the mesh, the smoother the plaster layer will be.
It should be noted that work begins with slopes, corners and doorways. First you need to cut the strip along the length of the slope. Then bend it in the middle so that when removed there is a “ridge” left on it. Using a spatula, apply the universal mixture to the surface and then smooth it from the corner down. After you have completely glued the corners with a special mesh, you need to start processing the walls. To do this, you need to cut the mesh one meter at a time and apply it with a spatula. Then smooth from top to bottom from the center.
Please note that the mesh must be completely included in the mixture. Add a small amount more mixture to close the mesh. Afterwards you need to wipe the mesh. This can be done with a plastic grater. Grouting is carried out when the mixture is completely dry. This will take several hours. If the weather is cloudy outside, wait about a day.
How to plaster penoplex: level the surface
You can level the surface using a regular spatula. The mixture must be applied to the joints. Next, you need to grout the leveling layer. It is worth paying attention to the fact that the work should be carried out before receiving maximum effect, since you will be applying textured or decorative plaster to this surface.
Primer layer. It is necessary for the final finish to adhere firmly. You can use a primer with the addition of quartz grains. After processing, decorative plaster must be applied to the penoplex. After this you can start finishing insulated cottage.
The final touch

After the work has been done, it is necessary to begin finishing. For this you will need decorative plaster. The base coat should be applied evenly over the entire wall area. The thickness directly depends on the impurities (mineral grains) found in the plaster. It should be remembered that the larger they are, the thicker the layer will be.
After the work is completed, it is necessary to apply another layer and sand the surface. After treatment with plaster, it is necessary to allow the layer to dry thoroughly and cover it with a protective layer.
Plastering penoplex is not a complicated process that you can do yourself. The main thing is to secure the material correctly, otherwise the structure may become deformed. It is best to ask a professional for help initial stage work, and then act alone.
This is what the penoplex finish looks like on the outside. The process does not take much time, and the result is effective.
Decor

Do you want to decorate a wall beautifully after you have learned how to plaster polystyrene foam? Now on the market you can see a wide variety of materials intended for decorating walls, creating relief textures or mosaics.
There are four main types to note:
- Paint with artificial latex added. After the walls dry, they will show slight scuffs. It looks very beautiful and creates an antique effect.
- A crumb that is applied to the glue. The coating is called flock.
- Imitation marble. Marble flour is used to produce this plaster. She looks amazing.
- Structural plaster. It is based on small wood fibers, granules and small lumps. After drying it takes on a granular form.
You can choose any option to your taste. Artistic plaster There are three varieties: polymer, silicone and mineral. Moisture-resistant coatings are used mainly in indoor pools and bathrooms. It is very important to choose the right materials for penoplex plaster. To do this, you must first study the technique of applying plaster and become familiar with its composition.
Penoplex is suitable for finishing cottages and houses inside and outside. Here you see a fully finished country house.