Mosaic from broken tiles: an opportunity to recycle a broken box of tiles or a fashionable trend in decoration - look at the photo and evaluate it. How to lay a mosaic from broken tiles Floor from pieces of ceramic tiles
Today, mosaic is popular as a finishing material, with the help of which drawings and patterns are created. To create such decor with your own hands, you can use both ready-made samples and homemade ones, for example, from tiles. They also develop a sketch of the future composition with their own hands. Below we will familiarize ourselves with the rules for performing such work and design options for this material.
Mosaic allows you to create a drawing of any complexity
Peculiarities
Mosaic decoration is often found in modern homes. The material competes with a more familiar coating - ceramic tiles. It differs in its appearance and decorative value. The peculiarity is that it is represented by a large number of miniature parts, from which various designs are created.
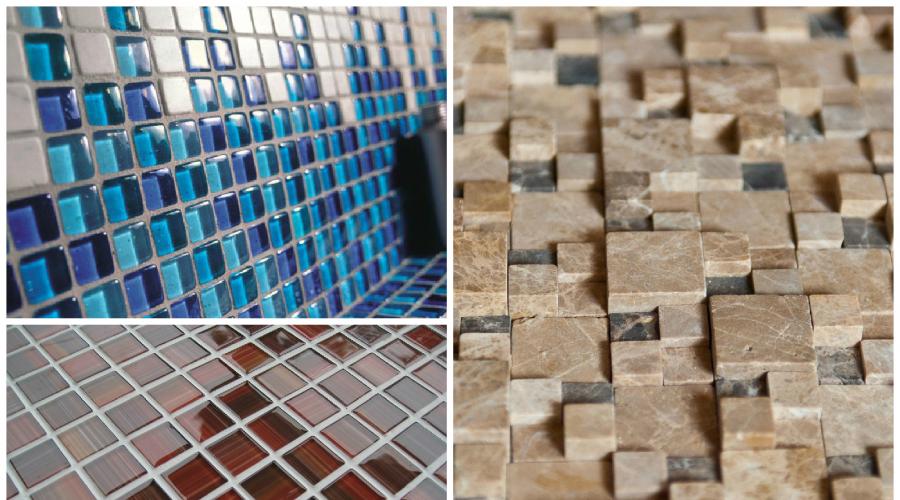
Purchased mosaics are made from three types of materials:
- Ceramics. This is the standard option. It can be matte and rough or covered with glaze. It can be used to create entire paintings on any surface without any problems.
- Glass. A fragile-looking material, it looks incredibly impressive. Translucent parts can visually lighten the design. To avoid damaging the surface, white glue and transparent grout are used for installation.
- Stone. The products are very durable and expensive. Note the heavy weight of such a coating. Basically, the surface of the elements remains rough, creating a feeling of some roughness.

Types of mosaic tiles depending on material
In order to facilitate the work of laying out small parts, some manufacturers provide ready-made picture diagrams or patterns for a set of mosaic tiles. Nevertheless, sketches are created independently. And for even greater savings, think about how to make similar decor from improvised materials.
Homemade mosaic
Creating a unique sketch of an image for surface cladding is part of the work. Ready-made decor costs a lot of money, and therefore alternative options for preparing it on your own have been invented. Let's highlight several ways:
- from tiles;
- from dishes;
- from colored glass containers;
- from plaster.

Varieties of finishing from scrap materials
The easiest and most affordable way is, perhaps, making mosaics from tiles. Of course, with this option you will have to come up with a suitable design, but this is not a problem.
In the work they use old dismantled material, unused tiles from previous renovations, and also buy cheap finishing. This includes the remains of tiles or substandard conditions. It is enough to clean the back surface of the tile from the old glue and break it into small parts. Using the same principle, decor is made from old or damaged dishes and glass bottles.
If the sketch you have developed for the future composition cannot be realized with the help of a chaotic collection of fragments, then take up the production of a gypsum mosaic. To do this, you will need a silicone or polyurethane mold with cells of appropriate sizes. The working mass is prepared using plasticizers. A little white Portland cement is also added for added strength. In order to add color, pigment is introduced into the liquid solution or the inner surface of the mold is painted with it. They also paint the finished mosaic.
Display options
As for the plan, the diagrams are made independently or used in a ready-made form. Of course, to facilitate the process of selecting fragments, it is better to work out patterns from the mosaic you have on hand.
Similar surface decor is available in various variations. Let's highlight the following sketches:
- Chaotic display. With this design, a diagram is not required, since small parts are glued in random order, mixing colors and shapes. The result is a pockmarked or monochromatic surface.
- Recurring motif. The drawing is easy to do with your own hands. The essence of the layout is to create a simple pattern that has repeating elements along the entire length of the working area. For example, waves, geometry, stripes.
- Graphic drawing. The simplest version of the picture is when several colors of tiles are used, often in an achromatic range.
- Concentric pattern. The decor has a midpoint, from which identical lines diverge in a circle, creating a symmetrical composition with elements repeating around the circumference.
- Painting. The most complex sketch, which, when done with your own hands, requires at least minimal artistic skills, patience and endurance. The composition is created using the pixel principle, gradually, so you need to have a ready-made sketch on hand.
- Local inserts. This is a lightweight option when a drawing is created by placing simple elements individually on a plain background.

Examples of mosaic tiles
Rules for performing work
To bring your idea to life, you need to know the basic principles. Applying mosaic decor with your own hands is done in a certain sequence. In order to prevent hitches and mistakes during the main work, think over an exact layout of the material.
The marking of the mosaic pattern is made in several variations. First, draw a sketch on paper. This will allow you to carefully consider the decor and layout of each individual fragment. It is important to maintain an accurate scale. If you have the skills to work with special computer programs, transfer the drawing to a digital version and see how it will look in the interior.
Next, prepare the surface for cladding. It is important to lay the mosaic tiles on a perfectly flat area. Markings are applied to the dried plaster and primer, indicating the position of each matrix and individual chips.
If you are working with a horizontal surface, you can lay the decor out dry and adjust the position of the fragments.
Only after marking the contours of the design do they begin finishing. To avoid confusion, apply a small amount of glue to the surface. Otherwise, you will not see markings for each subsequent segment of the area. This will shift the decor and then you will have to redo some of the work done earlier. For convenience, it is better to move from the center to the edges. This way, you can maintain symmetry and correct inaccuracies in the masonry. The work, done according to the correct scheme, will delight you with excellent results and a beautiful pattern on the lined surface.
To create a cozy and comfortable atmosphere in your home, you need to worry about original interior decorations in advance. Mosaics on walls or floors made from pieces of broken tiles are one of them. This article will tell you about the features of using this material, and will also reveal the secrets of specialists in applying designs from small pieces of ceramics to the work surface.
Features of using broken tile mosaics
- one of the popular decorative ornaments. It is used during:
- arrangement of walls and floors in an apartment or private house;
- decoration of facades of various buildings and structures;
- improvement of garden paths and swimming pools.

Broken tile composition
Unusual and original patterns are made from various materials, the simplest and most affordable of them is broken tiles. It is very often used when decorating bathrooms or kitchens; it fits harmoniously into the interior and complements it.
Every homeowner is capable of laying out beautiful mosaics in their home. In order for the work to be completed competently and efficiently, it is necessary to study all the intricacies of this process. In this article you can find the secrets of experienced craftsmen that they use in everyday life, as well as the technology for correctly laying mosaics with your own hands.
Important! Creating a mosaic is a very complex and painstaking work; its implementation must be taken responsibly and seriously.
Advantages and disadvantages of decorative interior decorations
Tile mosaic has many advantages over other decorative decorations. Thanks to them, original ceramic patterns have been popular for a long period. The main advantages of broken tile mosaics:
- long service life;
- practicality;

Decorating countertops in the bathroom with mosaics
- efficiency;
- the ability to create a variety of original paintings and ornaments (it all depends on the imagination and talent of the master);
- harmonious combination with the interior.
In addition to the advantages, there are also disadvantages. Among them are:
- the need to comply with the technological process (otherwise the mosaic may lose its presentable appearance);
- large time costs, since the work is very painstaking.
Preparing to create a mosaic with your own hands
Creating a mosaic is an interesting but responsible job. It requires special attention, talent, as well as perseverance and endurance from the master. To make it yourself, you need to follow several successive steps.

Fragments of tiles prepared for creating ornamental patterns
- Search and purchase of materials for mosaics
The technological process of creating a mosaic consists of several successive stages, the search and preparation of tiles is the very first of them. The necessary material can be purchased at the store (broken or damaged tiles, which are useful in the work, are often sold at cheap prices or given away completely free of charge) or taken from friends, relatives and acquaintances.
Advice. Both very small pieces of tiles and whole products are suitable for work (in the future they will still be crushed).
- Creating a sketch, examples of drawing ideas for the kitchen and bathroom
Before you start creating a mosaic, you need to make a sketch of it. It will significantly facilitate the work of the master and help avoid unnecessary waste of time, which is important in the process of performing such work.
Experts advise creating drawings or ornaments only for those people who have experience in performing such work, but abstract compositions for beginners.
Preparing the work surface for applying a decorative tile pattern
It is necessary to pay as much attention as possible to the preparation of the walls, since the strength and durability of the mosaic will depend on the correctness of such work.

Surface preparation is very important
The master needs:
- Remove wallpaper or old tiles from the selected area where the mosaic will be located (the wall must be clean).
- Use putty to seal all holes, cracks and crevices.
- Draw a drawing of the future decorative decoration according to the existing sketch.
Advice. To ensure that the applied drawing matches the prepared sketch, you can use a scale grid or a projector.
Adhesive solution, applying it to the wall
If in the process of creating a mosaic you use not only broken tiles, but also pieces of glass, experts recommend attaching all the elements of the design with transparent glue.
A special one is suitable for attaching mosaics; it is used when working with ceramic tiles. The most popular of them is white; it helps maintain the clarity of the design and emphasizes its beauty and uniqueness.

The adhesive solution is applied with a special spatula
To prepare the solution, you must use the manufacturer's instructions. Compliance with this will allow you to make good glue that will reliably attach all mosaic elements to the work surface. In the process of applying the mixture, you will need to use a spatula; this tool will help make an even and smooth layer of the mixture.
Advice. To prevent the solution from drying out, and to ensure that the pieces of broken tiles stick firmly and reliably to the wall, the mosaic must be applied in small sections.
In order for the drawing to turn out neat, beautiful and clear, it is necessary to lay it out correctly. Specialists have several secrets that they use in the process of work:


Grouting process
Grouting the seams of the finished decorative mosaic made of broken tiles is the final stage of the work. It is performed simultaneously not along the entire perimeter of the mosaic, but in small areas. When the grouting is finished, the technician must wait 20-30 minutes (until it darkens), and then remove excess material with a damp cloth or suitable sponge.
Video instruction: how to make an original mosaic from broken tiles with your own hands
Video instructions are modern assistants. They can be found on thematic construction sites or personal blogs of designers. They greatly facilitate the work of a master, even a novice, as they have detailed descriptions of the entire technological process.
- Mosaic tiles should not be cleaned with substances containing phosphorus, wax or oil.
- Abrasive mixtures are also not recommended for use when wiping tile patterns.
- Special substances for cleaning tiles are the most suitable option. They do not spoil the material and easily remove all kinds of dirt.

Do not wash broken tile mosaics with aggressive cleaning agents.
Mosaic made from broken tiles is an original decorative decoration for the home. Make it with your own hands, and you will be able to independently evaluate all its advantages from your own personal experience.
Mosaic from broken tiles: video
Do-it-yourself mosaic from broken tiles: photo


A beautifully laid mosaic made of broken tiles with your own hands pleases the eye with a unique pattern and significantly saves the renovation budget. The possibilities of this cladding method are quite wide and varied, especially in terms of design.
Laying mosaics - general requirements
Mosaic has been used as a facing material since ancient times - in ancient Roman baths and ancient Greek baths, mosaic panels were real examples of high art. Even today, such decor looks great in swimming pools and saunas, in bathrooms, kitchens and toilets, on garden paths, in offices, and when decorating fence foundations or for decoration of facades. You can use not only purchased mosaics, but also use remnants of ceramic tiles, pieces of glass, metal, stone and other renovation waste - in skillful hands they will become genuine designer finds.
How to lay mosaic tiles depends on several factors:
- Where the cladding is performed - outside or inside the room, this will determine the need for frost resistance of the solution;
- If the work area is large, laying mosaics on a mesh is important; making and installing a mesh with your own hands is much easier than covering it with mosaic elements on top;
- When combining mosaics with tiles standard ceramics are always laid first. Installation openings are left for mosaic inserts and panels; their decoration is carried out after the cement mortar under the ceramic tiles has completely dried;
- If it is necessary to lay an auxiliary mesh (see point 2), then this stage is performed before laying the finishing cladding, even if 95% of the entire surface is decorated with ordinary ceramics. For example, when laying tiles for an outdoor porch it is necessary to install a mesh in advance in the “windows for mosaics”, even if these inserts are small in size;
- Laying mosaic tiles with your own hands is associated with a certain risk from the point of view of work safety, especially when making its elements yourself.
The fragments of ceramics and glass have sharp edges, sometimes with razor-sharp edges. This is fraught with deep cuts with any careless movement!
Close proximity to mortar increases the risk of infection in a fresh cut. When laying homemade mosaics, you must wear thick rubberized gloves and measure your movements with the characteristics of the material.
How to make a mosaic from tiles - with your own hands and not only from ceramics
When laying a mosaic of broken tiles with your own hands, garden paths are designed according to one method, borders for flower beds - according to a second one, and bathroom panels - according to a third one. This is due to the specifics of the objects being decorated and the operating conditions of the man-made mosaic.
For example, large pieces of ceramics with an extended straight chip are suitable for borders. By laying it parallel to the path, an aesthetically attractive transition from a horizontal to a vertical surface is obtained. It is quite acceptable to diversify the installation with multi-colored tiles and the same glass, shards of porcelain or splashes of polished metal, but the rampant design imagination should be kept within certain rules.
The main ceramic elements can be of different sizes - but additional pieces of glass or porcelain should have similar dimensions. Similarly, it is advisable to transition from one color to another smoothly, or evenly alternating the tiled rainbow. The desire to test yourself in the role of an abstract artist will most likely lead to a clumsy and incomprehensible pattern - you will have to explain to each guest that this is a mosaic, and not a test for color sensitivity.
In addition, the combined use of factory-made and home-made mosaic elements is quite acceptable. For example, a do-it-yourself mosaic made of broken tiles for inserts on the facade of a house can be refined with tiles left over after renovation in a bathroom or sauna. They will create a kind of “islands of geometric stability” around which a whirlwind of ceramic creativity can be laid out.
Mosaic from broken tiles - do it yourself, carefully and slowly
Laying mosaics does not tolerate chaos and is carried out as planned; its typical stages are as follows:
How to make a mosaic from broken tiles with your own hands - step-by-step diagram
Step 1: Sketching
A sketch is needed for any mosaic cladding, with the exception of a thin panel strip between two rows of tiles. The sketch should take into account the size and color of the main mosaic elements. It can be done with colored pencils (markers) to scale. Drawing a picture on paper is many times easier than thinking about design moves with a solution in your hands. Consider the color and size of the existing elements, think over color transitions and porcelain or glass inserts - any impromptu construction is best achieved with precise planning...
Step 2: Working with the material
If there are not enough broken tiles for the cladding, you can use whole ones after breaking them first. Ceramics can be easily split with a sharp chisel and a short blow with a hammer - we don’t need jeweler’s precision, and it won’t be difficult to maintain an approximate size match. Ceramic tiles can be pre-leveled using an abrasive stone or sandpaper. Rounded corners and smooth surfaces will favorably emphasize the repair plan; you should not use only sharp edges and jagged edges.
Abrasive and sanding preparation will increase the labor intensity of our mosaic project - but the attractive appearance of the tiled surface and its reflection in admiring glances are worth the effort.
Step 3: Surface Preparation
The base for the mosaic should not have large irregularities and at the same time be rough - if the installation is carried out using standard cement mortar. This method is good for horizontal surfaces of any length - floors, upper sections of borders, bath counters, etc. Vertical and inclined surfaces will have to be laid out on adhesive compounds - therefore, they must be smooth, because The adhesive layer is much thinner than the cement mortar. Universal tile adhesive with the addition of waterproof and frost-resistant (for outdoors) additives will be the best installation solution.
Step 4: Lay out the mosaic beauty
After checking the pictorial sketch, we begin cladding in large fragments. The mosaic pieces are positioned freely relative to each other - significant gaps are then filled with small fragments. It is important to maintain an even laying line using a long and massive metal ruler. How to make a mosaic from tiles with your own hands, if large pieces “break the order”, not a single DIY repair guide can tell you. Mosaic elements are placed on the glue (mortar) with characteristic vibrating movements, with “twisting”. Then there will be no air gap left under each tile; it will be in complete contact with the base. Rushing during such work will only do harm - do not be surprised at the low speed of cladding; thoroughness and adherence to the sketch are more important than performance records.
Step 5: Grouting
Grouting mosaic joints is carried out in two stages. First, a liquid mixture is prepared based on the used solution (glue), and all remaining gaps are treated with it. When the primary grout has dried, it is necessary to treat the seams with decorative grout. These compositions are sold in any hardware store and allow color pigmentation within a wide range. The key to the durability of secondary (decorative) grout is the shallow depth of the installation layer, which requires two-stage processing of mosaic seams.
Mosaic is a popular way of decorating household items and interior decoration. Despite its long history, this type of decorative and applied art does not lose its position today. And its most attractive feature is that the simplest ornamental compositions are quite accessible to create with your own hands. In this article we will tell you how to decorate your interior yourself using the stylish trencadís technique using broken tiles.
From time immemorial
The desire to decorate one’s home is typical for humans. Among the many methods, such as painting or sculpture, which require the professional abilities of an artist, there are options that are quite accessible to the amateur. One of them is mosaic.

The art of mosaic has been known as a method of decoration since ancient times. The first known examples of the use of small pieces of tiles, glass smalt or stones fixed to a base with glue to create images or ornaments are dated by archaeologists to the second half of the 4th millennium BC. The mosaic technique became most widespread in Greece and Rome, as well as in the East.
The second wave of interest in mosaics as a way of decorating objects and interiors was Art Nouveau. Mosaic, with its picturesqueness and colorfulness, fits perfectly into the decorative concept of the style.
Mosaic materials
Mosaic panels can be made from almost any material. To make mosaics, natural stone is most often used - cut into tiles or pebbles, ceramic tiles or porcelain stoneware elements, glass smalt, beads and seed beads.

The choice of elements depends on your creative idea and the purpose and operating conditions of an object or room decorated with a pattern of small parts. For example, to create a decorative panel in the kitchen, you can use cereals, pasta, coffee beans or spices as materials. Of course, if the surface decorated with mosaics is exposed to moisture, then pasta will not be suitable as a material.
Roman, Florentine, Byzantine
In addition to the variety of materials, there are various techniques for laying mosaics. Experts distinguish the following main types:
- Roman mosaic;
- Florentine mosaic;
- Byzantine mosaic technique.
During production mosaics in Roman technique elements of different sizes are used. Most often, these are square-shaped pieces of marble of various colors and formats. To create a more accurate contour, additional chopping of the square element is used, turning it into a trapezoid or triangle.

There are several types of Roman mosaic techniques:
- “Opus tessellatum” - elements larger than 4 mm are used.
- “Opus vermiculatum” - laid out from parts measuring less than 4 mm.
- “Opus regulatum” - masonry in a line of elements of the same size and shape, used to create geometric patterns.
- "Opus sectile" - or piece mosaic. To perform this, plates of different shapes and sizes are used, which are selected according to the drawing.
- the most labor-intensive and expensive. In it, elements are cut out from stone, wood, mother-of-pearl or other materials along the contour of the design. The individual parts are pressed tightly against each other so that the seam between the elements of the design is minimal. If the material has its own pattern or texture, such as veins of marble or wood fibers, then the parts are cut taking into account the pattern of the material so that the pattern of the material is included in the laid out image.

Similar to the Roman "Opus vermiculatum". The design is made up of identical small square modules made of glass smalt. High image quality was achieved through the use of very small details. In addition, the angle at which the element was glued into the base played a certain role in the decorative effect of the mosaic panel: smalt elements glued at different angles reflected light differently, creating additional decorative effects. The view of Byzantine mosaics was supposed to be from a great distance.

Broken tile mosaic
One of the varieties of modern mosaics is trencadís. A real masterpiece in this technique are the creations of Antonio Gaudi, as well as his student and associate, Josep Maria Huhoy. It is Gaudi who is credited with creating this colorful mosaic technique.
The trencadís broken mosaic technique dates back to Roman piece mosaics, but in modern versions it uses broken ceramic tiles, broken dishes, and fragments of glass bottles. It’s quite easy to create a mosaic using the trencadís technique with your own hands: remember labor lessons in elementary school.

The simplest ornaments can be laid out without specific patterns, focusing on your own taste and sense of harmony.
Of course, to create masterpieces in the spirit of the work of Haris Cevis, a designer and artist who also uses the trencadís technique in his works, artistic abilities will be required. But here you can “get out”: some computer programs for editing images, for example, PhotoShop, have a function that allows you to automatically split the image into local color spots. Using the program settings, you can adjust the image detail. Having processed any photo in this way, you can print the image and use it as a sketch.

A sketch for a mosaic can be created from a photograph
Where can you use broken tile decor using the trencadís technique?
To decorate with broken tiles, you can use any surface: household items - garden table, flower pots, garden paths, fences. You can finish the walls and floors of a bathroom or kitchen. For a kitchen apron, it would be especially stylish to use a mosaic made of broken tiles with the inclusion of elements of broken dishes.
Attention! The edges of tiles or broken dishes may have sharp edges. If you plan to use the mosaic on the floor or in places that can be touched, you need to additionally sand the edges.
Select an image that suits your taste, then select elements based on color, shape and size. The mosaic can be laid using regular tile adhesive.
Advice. When using tile adhesive, do not use a large volume, because laying mosaics is a painstaking task.
After the glue has dried, the seams between the mosaic elements must be grouted using regular grout. In the video you can watch in detail the process of making panels from broken tiles.

Mosaic made from broken ceramic tiles is an original and stylish decor that will decorate any interior, making it unusual and memorable. In addition, making mosaics with your own hands is a way to realize the creative potential that any person has.
Decorating a table with mosaics: video
Mosaic made of broken tiles: photo


If you want to decorate the walls of houses, garden paths, steps, garden furniture and many other objects, then the ability to lay out mosaics can turn your dream into reality. In addition, you can also use wood particles, which can then be coated with stain and varnish. Before you start making mosaics, you need not only to select the material, but also to decide on the pattern. Read more about this construction craft below.
You can complete the renovation work in the house with an original mosaic made from the remains of ceramics or broken tiles. You can very simply lay out a colored pattern from the remains of ceramic tiles, adding other decorative elements, and thereby create a beautiful and original decoration for your bathroom, kitchen or even garden.
It is best to lay out the mosaic on:
- Plaster;
- Drywall;
- Cement-sand screed;
- Putty.
Each drawing performed is unique, since it is made up of separate fragments, the color and shape of which cannot be repeated. A mosaic picture can consist of equal pieces of the same shape, fragments of arbitrary shape, or a combination of pieces of different sizes and shapes.

Tile mosaic has many advantages in comparison with other materials, and among the main advantages are long service life, cost-effectiveness, practicality, the ability to create original and unusual paintings, and it looks harmonious in the interior. Before starting work, you must prepare the tiles. For this, both pieces of tile and whole products are suitable, which will then be crushed. Particular attention should be paid to the preparation of the walls, since the strength and durability of the mosaic will largely depend on this.
The selected area where the mosaic will be located must be cleaned of the old coating.
Using putty, you need to smooth out all the unevenness, as well as seal cracks and holes. Apply the drawing using pre-prepared templates. If when creating a mosaic you use not only broken tiles, but also pieces of glass, then you need to attach all the elements using transparent glue. To attach the mosaic, a special adhesive mixture is used, which is suitable for working with ceramic tiles. The most popular is the white adhesive mixture, which helps maintain the clarity of the design, emphasizing its beauty and uniqueness. To properly prepare the solution, you must first study the instructions for use. To prevent the adhesive composition from drying out very quickly, and to ensure that the tile pieces stick firmly to the wall, you need to apply the mosaic in small sections.
How to make a beautiful mosaic with your own hands
A variety of materials are suitable for making mosaics, in particular, such as fragments of mirrors, glass, broken dishes, ceramic tiles, pebbles, and small stones. Often, after repair work, ceramic tiles remain, which can be used as a working material.
However, if the pattern is quite complex, you may need to have ceramic tiles in several colors.
Mosaic is widely used to create unusual and original decorations.

It’s very easy to make a mosaic and lay it out, you just need to:
- Prepare the base;
- Make a glue mixture;
- Develop a template drawing;
- Prepare elements for making a mosaic.
Glass is considered a fairly common material for creating mosaics. It is quite easy to cut and easily fixed with glue, and when sunlight hits the surface of the mosaic, the created ornament begins to shimmer beautifully. For beginners, it is better to choose the simplest drawing that anyone can do.
DIY creative mosaic: master class
To lay out a mosaic, you need tiles, from which you must make small shards. Part of the tile can be left whole, and the rest can either be cut using a glass cutter or split with a hammer previously wrapped in cloth. The master class on making mosaics is quite simple; the most important thing is to clean the surface well and strictly follow the technology.
The use of tiles can be in absolutely any form, in particular they can be:
- Smooth fragments;
- Geometric figures;
- Broken fragments.

To get perfectly even pieces or geometric shapes, you need to use special tools for this. You can easily make a variety of free-form elements from old broken ceramic tiles.
To get a beautiful artistic composition, you first need to draw a sketch on cardboard, and then select pieces of tiles according to shape and color to get a beautiful composition.
After this, you need to carefully prepare the surface and move the structure, gluing each piece of tile using a special adhesive. After the glue has dried well, you need to carefully seal the seams using grout powder.
Budget mosaic from broken dishes
The mosaic technique is very often used to create beautiful decorative panels, and quite original and beautiful crafts are also created in this style.
Homemade mosaic from broken dishes must be done in strict sequence, and for this you need:
- Choose an ornament;
- Select pieces of broken dishes by size and color;
- Degrease the work surface and mosaic pieces;
- Glue the mosaic onto liquid nails or PVA glue;
- Grout the seams with a special grout for tiles;
- Wipe the surface with a damp and then dry cloth.

As the work progresses, you will need to adjust the mosaic pieces, making them smaller; for this you can use pliers. Special clarity and precision are not needed, but it is important that the pieces of the mosaic are not larger than the remaining space.
Important! When carrying out repair work, a very important condition is that the surface is absolutely flat and smooth.
If desired, you can purchase ready-made mosaics, which can be ceramic or marble. Modern mosaic production is represented by a wide variety of options, which is why everyone has the opportunity to choose for themselves the required product that will completely suit them according to all their needs.
Various mosaic materials
The material used to create mosaics is presented in a wide range, in particular, mosaics can be ceramic, tile, glass, made of porcelain stoneware or natural stone. Mosaic is widely used in the interior, since thanks to its bright, expressive colors and unusual textures, it is possible to transform absolutely any surface almost beyond recognition.

Mosaic is widely used to create a unique design in the interior and decoration of house facades. The architectural compositions of Gaudi or Bai simply amaze with their splendor and sophistication. A free flight of imagination under the guidance of a master turns into real masterpieces, in which practically incompatible things are very harmoniously combined.
Beautiful mosaic with your own hands (video)
You can cover absolutely any convex and concave surface with mosaics, and you can use elements of only one color or mix several shades and colors at once, while collecting various original compositions.