Installation of electrical wiring in wooden partitions. Do-it-yourself electrical wiring in a wooden house - step-by-step instructions. Installation of electrical wiring in a wooden house with your own hands: interior work

If you look at the statistics of fires in our country, the question of how to properly install wiring in a wooden house is quite relevant. After all, most of all fires in wooden houses occur due to a short circuit, and if you want to protect your home from this, then the closest attention should be paid to electrical supply issues.
Your home's electrical connection is carried out by your energy supply company. After agreeing on all the necessary papers, they must install the meter and connect it to the power supply.
They must do this with a flexible wire in insulation. And to avoid problems in the future, we advise you to check that the insulation on this wire is not damaged.
The meter is usually installed on the street. The distribution panel is usually located inside the house.
To connect it, we will need to punch a hole in the wall of the house, and according to paragraph 2.1.38 “Rules for Electrical Installations” (PUE), protect it on all sides with fireproof material. Typically, a steel pipe is used for this, followed by plastering.
The input itself, according to 2.1.79 PUE, must be located at a height of at least 2.75 meters from the ground surface. In this case, the distance from insulators or wires to the protruding part of the roof must be at least 200 mm.
It is also quite important to provide, and the rules stipulate this, that it is impossible for water to accumulate in the pipe, as well as for it to penetrate into the house through the power supply inputs.
Installation of distribution board
Internal wiring in a wooden house begins with the distribution board. It must be installed in a dry, non-flooding location.
At the same time, the PUE rules regulate that a bathroom, shower or toilet cannot be located above the installation site of your switchboard.
The shield itself must be made on a fireproof basis and be locked with a key. On the market you will now find many such boxes for distribution panels in a wide variety of sizes.

Note! Within a radius of half a meter from the distribution panel there should be no heating equipment, no water supply or drainage systems, no gas supply systems, and ventilation ducts passing through this room should not have branches.
Electrical wiring in a wooden house
Hidden electrical wiring
You can lay electrical wiring in a wooden house with your own hands in an open or hidden way. The hidden method, which is almost universally used in brick and concrete houses, is not so popular in the case of wooden houses.
After all, it is somewhat more difficult to implement it here, and most importantly, the cost of the issue is much higher. In the list below you can see options for laying electrical wiring in a hidden way in accordance with the rules of the PUE, in compliance with fire safety conditions.
So:
- If we use a regular wire sheathed in combustible material (not fire-resistant corrugation), then it must be laid on a lining made of fireproof materials. In the future, the wire must be plastered with a continuous layer at least 1 cm thick.
- If you are using a regular wire sheathed in a fire-resistant material (fire-resistant corrugation), then all you need to do is place a fireproof material under the wire along its entire length.
- If you use a wire sheathed in a fireproof material (metal corrugation), then you can lay the wire directly on the structural elements.
- In boxes made of fireproof materials (steel boxes), even wires can be used directly on structural elements without additional protection.
- In the case of using boxes made of fire-resistant materials (plastic boxes), any wires can be used, but under the box there must be a gasket made of fireproof material, and the box itself must subsequently be plastered with a layer of at least 1 cm thick.

This article is devoted to the topic. We all know that the fashion for building wooden houses has always existed, because wood has enormous advantages compared to many building materials that claim to be environmentally friendly. The main disadvantage of wooden houses is their very good susceptibility to combustion. That is why, electrical wiring in a wooden house First of all, it must meet building safety criteria. It is not enough to have a very good wire; it also needs to be installed correctly. According to statistics, in 80% of cases, gross errors are made during installation, but this is wood and any miscalculation here can lead to a fire, and a fire means loss of property, and in some cases, human lives.
In wooden houses, electrical wiring should first of all begin with your serious approach to this issue, since your safety and the safety of your loved ones depends on it. There is a huge variety of protective electrical materials specially made for wooden houses. In most cases, the main mistakes are made in not knowing these materials properly and inability to use them. We are not even talking about the owners’ lack of knowledge of wooden houses; the electricians themselves do not know them or neglect them in installation; 70% of electricians are self-taught and do not have the proper education, skills and experience, I know from my own experience in this field. But the worst thing is not this, but the fact that these unfortunate electricians do not even strive to learn the knowledge of this profession; in most cases, their knowledge in this area is not much different from yours.
Choosing a wire
It is worth starting with the electrical work of a wooden house, of course, by drawing up. Next, you need to select a wire. It is for electrical wiring in wooden houses that there are special non-flammable or low-burning wires:
- , VVGng-P(A) - copper wire with a solid core, can be two, three, four or five cores. Has double insulation. The inner layer consists of polyvinyl chloride insulation, using multi-colored cores. The outer layer consists of a non-flammable plastic composition. The marking of the wire “ng” means it is not subject to combustion. The temperature of use of the wire is from +50 to -50 degrees Celsius. Letter (A) - indicates the fire retardant category according to GOST R IEC 60332-3-22.
All electrical installation work requires the performer to be careful, pay special attention, and strictly adhere to technical rules and established standards. When planning and carrying out electrification of a wooden house, it is necessary to obtain advice from a qualified electrician, familiarize yourself with regulatory documents, basic requirements and the sequence of laying electrical wires.
Requirements for electrical wiring in a wooden house
Installation of electrical wiring in wooden houses has some differences and features from the electrification of stone houses. Safety must be a priority when designing and installing cables. There are a number of basic rules that require strict adherence:

- Careful insulation of electrical conductors using non-combustible materials (NYM, VVGng, VVGng-LS).
- Aluminum conductors must be replaced with copper conductors with a cross-section of at least 16 mm2. The cable must enter the house through a metal sleeve. The transition of the wire from one room to another is carried out through a rigid metal pipe.
- It is advisable to carry out electrification of a wooden house using the “open” method.
- It is necessary to accurately calculate the cable thickness, leaving a margin of at least 30%.
- Particular attention should be paid to the quality of the materials used. You need to choose a cable with non-flammable insulation.
- If it is necessary to install hidden electrical wiring, it is necessary to use a metal pipe. Laying cables in corrugated pipes is prohibited.
- Installation of an RCD, ground loop and lightning rod is required. In this case, not only electrical appliances are subject to grounding, but also metal pipes in which the cable is laid.
- The input unit - electrical panel should be isolated as much as possible from the wooden structures of the house. Sometimes you have to build a brick wall and make the floors from cement/concrete screed.
Electrical wiring options in a wooden house
Do-it-yourself electrical wiring in a wooden house, namely cable routing, can be done in three ways:

Do-it-yourself electrical wiring in a wooden house: diagrams
According to current standards, when electrifying a private house without installing a transformer, the power consumption cannot be more than 15 kW. This indicator is calculated by summing the power of simultaneously switched on electrical appliances. If the result obtained is less than 15 kW, then install a 25A input circuit breaker, otherwise an additional transformer will be required.
When developing a wiring diagram, connection points are divided into different consumption groups. For example, lighting devices are powered from one machine, a separate device is required for sockets, and an additional device is required for street lighting.
It is advisable to equip personal automatic machines and a separate power supply branch for powerful electrical equipment: an electric stove, a boiler or an electric boiler. Separate power supply circuits are also required for detached outbuildings.
Important! For safety reasons, it is better to increase the number of power supply branches - this measure helps to reduce potentially dangerous connection sections.
Below is an approximate do-it-yourself electrical wiring diagram in a private wooden house.

Some nuances when developing a scheme:
- The input machine and meter of the energy supply organization require to be placed outside for easy control of electricity consumption.
- For outdoor placement, the meter and circuit breaker must be in a sealed housing that prevents the ingress of moisture, dirt and dust. The box's protection class is at least IP-55. The requirements for boxes installed inside a wooden structure are slightly lower - IP-44, the main condition is that the body is made of metal.
- For an emergency power outage, it is necessary to place an RCD - the device will operate in the event of a short circuit in the network.
Do-it-yourself electrical wiring in a wooden house: step-by-step instructions
Development of a power supply project
To develop an individual project, it is necessary to obtain technical specifications from the electricity supply organization (RES), which will become the basis for further work.
Designing the power supply of a wooden house is carried out in the following sequence:

When organizing power supply and drawing up a project, you should be guided not only by personal wishes, but also by certain requirements:
- Only vertical or horizontal arrangement of wires is allowed.
- All turns of the wire are performed strictly at right angles.
- Sockets, switches and distribution boxes must be freely accessible.
- According to the rules, the installation of switches is carried out at a distance of 0.6-1.5 meters from the floor level, the cable is fed from above.
- The optimal placement of sockets is 0.5-0.8 m from the floor, the recommended number of sockets is 1 pc. for 6 sq.m. In rooms with a large number of household appliances, there will be more sockets.
- Wires should not be placed closer than 10 cm from door/window openings. It is necessary to exclude contact of wires with metal elements and adjacent wires (minimum permissible distance - 0.5 cm).
Selection of equipment and cables
To avoid complex calculations to determine the appropriate cable, you can use an electrical engineering reference book. The cross-section of the wire core directly depends on the expected loads.

The power consumption of equipment and electrical appliances is indicated in the technical data sheet or operating instructions. Based on these values, a wire with cores of the required cross-section is selected. To determine the size of the input cable, it is necessary to sum up the power of the installed electrical appliances.
Advice. For a wooden house, you should choose a cable marked “NG” (non-flammable) and “LS” (low smoke emission). Typically, wires with a cross section of 2.5 mm and 1.5 mm are used for internal wiring.
The input circuit breaker is selected with a rating sufficient so that at maximum load the power to the house does not turn off, but the circuit breaks, preventing a short circuit.
For single-phase power supply, the circuit breaker is selected as follows:

When choosing switches and sockets, take into account some parameters:
- the amount of current for which the equipment is designed;
- installation option: external/hidden wiring;
- the number of keys - for switches, the number of places - for sockets.
- Household appliances with high power (electric stoves, washing machines, boilers, fireplaces, refrigerators, etc.) are subject to mandatory grounding. In such situations, it is advisable to use sockets with a terminal for connecting the ground wire.
- "Tees" must be avoided. To simultaneously connect several electrical appliances, install a group of sockets or dual models.
- The choice of switches is determined by the lighting mode. To simultaneously turn on several light sources or one lamp, set the switch to one key; for different modes - two- and three-key switches.
Installation of the machine and input of power supply
According to the developed diagram, distribution boxes are installed, mounting points for switches, sockets and lighting devices are marked. Mount the electrical panel housing in the designated location and perform the following actions:

- Installation in the meter panel housing.
- Installation of the input circuit breaker on a metal profile (din rail). Connection to a two-pole circuit breaker, phase and neutral.
- The terminals (output terminals) of the meter are connected to the input of the input circuit breaker.
- Installing a cable into the house and connecting it to the input terminals of the meter.
- A voltage relay, RCD, and circuit breakers for various power groups (lighting, sockets) are installed on the DIN rail.
Cable entry into the house is carried out underground or over the air. The second option will be cheaper, but this supply is considered less reliable. With “air” input, self-supporting insulated wires are used. The main condition is the installation of a fireproof sleeve at the input site in the house.

With the underground method, a metal pipe is used for entry, protecting the supply cable from various influences. Cable laying using this method must be agreed upon with the power distribution company.
Cable laying, installation of switches and sockets
The wire of the selected cross-section according to the layout plan is laid in a closed or open way.
Do-it-yourself internal wiring technology in a wooden house:

Let's look step by step at how to do electrical wiring in a wooden house with your own hands using wall-mounted cable ducts:

Important! The number of connections affects the system's ability to carry loads - the more there are, the worse the load capacity.
RCD and grounding
Arranging a grounding loop involves performing the following actions:

- Preparation of metal rods diameter 3 cm/length 3 m.
- Digging a trench 30 cm deep in a triangular shape, where the length of each side is 1 m. Install metal rods at the corners of the formed triangle.
- Connecting reinforcement to each other with metal corners using welding.
- Weld an eye (loop) to one corner and fasten a steel rod 1 cm thick to it.
- The rod is laid so that it is connected to the grounding conductor in the electrical panel. The insulation of the grounding conductors of the cables is yellow-green.
It is advisable to place an RCD in the panel after the metering device. This device will protect a person from electric shock if it leaks onto the equipment body. The RCD parameters are selected based on the rated current in the network. Such a protective device is especially important for rooms with high levels of humidity (bathroom, bathhouse, swimming pool, etc.).
DIY electrical wiring in a wooden house: video
Common Newbie Mistakes
Electrification of a wooden house is a responsible undertaking. According to statistics from firefighting organizations, most wooden structures catch fire primarily due to faulty electrical wiring. Some novice masters may ignore the advice of professionals and make a number of serious mistakes:

- Hiding wiring under wooden ceiling structures.
- Laying cables under the baseboard.
- Using corrugated PVC pipes for laying wires. Despite the practical qualities of the material and the ease of its installation, PVC pipes are prohibited for use for the electrification of wooden buildings.
- The location of the insulated cable in the groove without the use of a metal pipe.
- The use of plastic boxes for sockets and switches.
Electricity is an essential part of everyday life. It is quite difficult to install electrical wiring in a wooden house with your own hands. Must have knowledge of electricity and follow all rules and regulations. By following the instructions below, you will carry out the installation yourself, without the help of professional electricians.
What electrical wiring is suitable for a wooden house?
Wooden housing is one of the oldest traditions of world architecture. Even today, in the conditions of a wide choice of various building materials, many owners prefer to build a structure made of wood on their suburban area.
Modern housing cannot be imagined without power supply. Electrical wiring in a wooden house has a number of features, primarily related to the increased risk of fire and requirements for laying cables.
Open or closed?
In wooden buildings, electrical wiring is done in an open or hidden way. The first method involves placing the wiring externally, on the wall or ceiling. This can be done as follows:
In addition to the open one, there is also a hidden method of wiring installation. It can be used if the final covering of the premises has not yet been carried out. In this case, the wiring is laid in a metal conduit or metal pipes; the use of plastic is prohibited. The method is quite expensive, but the electrical wires will be reliably hidden from prying eyes.
It is impossible to unequivocally answer the question which method of installing electrical wiring is suitable for a wooden house.
In each case, this is determined individually, taking into account the level of skill of the electrician, the presence or absence of devices and tools for a specific job.
Drawing up a diagram

All work on installation or modification of electrical wiring begins with the creation of a general diagram. A well-designed project will allow you to install wiring in accordance with the requirements of regulations and GOSTs. When drawing up a diagram, special attention is paid to the following points:
Before installation begins, the necessary tools and components are selected. An example kit for installing electrical wiring in a wooden house with your own hands includes:
- Set of tools with insulating handles. The kit may include screwdrivers, pliers, a knife for working with electrical wiring, etc.
- Electrical panel. There are devices on sale made of plastic or metal. Metal is ideal for wooden buildings. The size of the electrical panel depends on the number of cables that will be laid in accordance with the developed circuit.
- Electrical cable.
- Switches and sockets. The number of such devices depends on the number of electrical appliances to be powered.
- If you plan to do external wiring, you need to purchase cable channels. For the internal one you will need a metal corrugated pipe.
- Counter.
- Distribution boxes, self-tapping screws, insulating clamps, electrical tape.
Calculation of materials and selection of suitable equipment
To calculate the required amount of wire, it is enough to sketch the diagram in detail and measure all the walls. During the work, it is very important not to make a mistake and choose a cable of suitable thickness.
The voltage of the standard electrical wiring of a residential building is 220 or 380 V. When calculating the load, the following should be taken as the nominal value:
- If there are no electric stoves in the house - 5.5 kW.
- If there are electric stoves - 8.8 kW or more.
You should also pay attention to the living space. The nominal value is taken to be 60 sq. m. If this indicator is exceeded, the calculated load increases by 1 percent for each additional square meter.
Based on the planned power, the cross-section of the wires is also calculated. Basic data is shown in the table:
| Wire thickness, mm. | Copper wire | Aluminum wire | ||
| Current, A | power, kWt | Current, A | power, kWt | |
| 0,75 | 8,0 | 1,8 | - | - |
| 1,0 | 9,0 | 2,0 | - | - |
| 1,2 | - | - | 8,0 | 1,8 |
| 1,5 | 12,0 | 2,6 | - | - |
| 2,0 | - | - | 12,0 | 2,6 |
| 2,5 | 20,0 | 4,4 | 16,0 | 3,5 |
| 4,0 | 25,0 | 5,5 | 20,0 | 4,4 |
| 6,0 | 32,0 | 7,0 | 25,0 | 5,5 |
| 10,0 | 50,0 | 11,0 | 40,0 | 8,8 |
| 16,0 | 65,0 | 14,3 | 50,0 | 11,0 |
| 25,0 | 95,0 | 21,0 | 70,0 | 15,4 |
A three-core copper cable VVG is suitable for a wooden house. When choosing it, you need to pay attention to the markings. For example, if the brand indicates VVG3*2.5, the number 3 here means the number of cores, 2.5 - the cross-section.
The size of the electrical panel depends on the planned number of cables. Standard wiring may include a lighting cable, socket, electric stove, meter (three places required) and an RCD (2 places). In this case, you can install a 12-seat panel.
The choice of outlets is influenced by the aesthetic component. For wooden buildings, switches with a ceramic base and contact groups made of brass or bronze are suitable. Specific models depend on whether the electrical wiring is internal or external.
The electricity meter is selected according to its accuracy class and number of tariffs. Modern devices are divided into single-tariff and two-tariff, which count energy separately according to day and night tariffs. Accuracy class - no less than second.
Preparatory work
Before carrying out work indoors, you need to pay attention to the line input. Over the past couple of decades, the number and power of household electrical appliances has grown exponentially, increasing energy consumption, and the old line may not be able to cope. The second reason is the constant exposure of the cable to sunlight and other external factors outside the home. Metal strands gradually become exposed, which makes the use of electrical wiring less safe.
One of the weak points is the cable entry into the house, which is often routed through the wooden wall of the attic. At one time it was believed that to ensure safety it was enough to place the wire in a rubber hose. It did not take into account that rubber is a conductive material, and as it ages, areas of sparking and local heating may appear.
To install a line in a wooden house, you can use one of two methods: underground and aerial.
The first method is quite expensive. It requires excavation work, placing the cable at a depth of about a meter, and marking the security zone with appropriate signs. Thick-walled metal sleeves are installed in places where they pass through the foundation and enter the house. This method is most often used when constructing a new house.
An overhead line will require an electrical wire with a cross-section of 16 millimeters or more. The so-called SIP (self-supporting insulated wire) is often used, the service life of which exceeds 25 years. The connection of the external line to the input line is carried out exclusively outside the building. The installation of cable channels and wiring is carried out after the initial shrinkage of the house and drying of the wood of the walls. Otherwise, the slightest changes in the “geometry” will lead to deformation and destruction of the box.
Installation work: step-by-step instructions
Installation of electrical wiring in a wooden house occurs in several stages:
- Laying the main cable.
- Installation of distribution boxes.
- Installation of sockets and switches.
- Installation of lighting fixtures.
- Installation of electrical panel.
- Installation of the ground loop.
Let's consider each of the listed stages in more detail.
Cabling
Wiring is usually installed in cable ducts or baseboards. This happens in several stages:

Installation of distribution boxes
At each node where branches for sockets and switches extend from the main cable, a distribution box is installed. In this distributor, the cable is separated and directed to the right places in the rooms.
Inside the junction box, the cable can be connected in several ways:

Installation of switches and sockets
Sockets and switches are attached directly to the wall. A layer of insulation is pre-laid. Aluminum or asbestos is often used for this purpose.
Wiring goes as smoothly as possible
The sockets are screwed on tightly enough. This eliminates further swaying and loosening. If a cable with three wires is suitable for the outlet, the yellow and green go to the ground contact, the last one goes to the power. The connection diagram is shown in the figure below (L - phase, N - zero, PE - ground).
Installation of lighting fixtures
In wooden buildings, several groups of lighting devices are usually used:
- Built-in
- Invoices
- Street.
All lamps, sconces and other similar electrical appliances must be equipped with a special metal platform for attaching the product to the ceiling or wall. Such installation of electrical equipment is considered optimal from a fire safety point of view.
To connect lamps, yellow-green group wiring is used
Connecting the luminaires themselves to the main network is very simple: using wires of the yellow-green group.
Each lighting fixture includes contacts for such a connection.
Distribution panel

After entering the house, the main cable, without any branches, goes to the distribution panel. This device consists of several elements:
Installing the memory
The PE bus, which acts as a grounding bus, is connected to a grounding device.
This device is placed in the ground, next to the wall of the house. Visually, this is several steel rods, usually three or more. Diameter - 1.6 cm, length - about three meters. They are connected using a welded strip 4*40 mm. This device is placed completely underground; a 4*40 mm strip is supplied to the wall for connection to the bus.
To connect the device to the bus, a single-core wire is used, the cross-section of which is greater than or equal to the cross-section of the input cable.
Upon completion of all installation work, the resistance of the charger is measured. For a single-phase network this figure should be less than 8 ohms, for a three-phase network - less than 4.
Closed wiring is installed almost identically to open wiring. The same cables marked VVG are suitable for both types.
Hidden wiring is carried out before the final wall covering. The wires are hidden in a metal pipe; the use of plastic is strictly prohibited. If it is necessary to make a turn, use a curved pipe. As an option - a regular one, and another one is welded to it.
Before final covering of walls and pipes, it is necessary to organize the output of all necessary cables to the outside. In predetermined places, holes are prepared for switches, sockets and distribution boxes. A separate hole is required for the distribution board.
Surface-mounted switches and sockets are attached to the wiring
When drilling holes for branch boxes and sockets, you can use wood drill bits. The main requirement is to be careful, otherwise you may damage the cable.
The opening for the distribution board depends on its type. If it is overhead, the holes have an arbitrary shape, the edges are hidden under the protective material. When installing a built-in panel, the hole in the paneling must correspond to its size and shape, taking into account that the side will hide the edge.
After covering the walls and preparing the required holes, all boxes and sockets are installed. In most cases, overhead devices are used: drilling all the holes in a solid wooden wall is dangerous from a fire safety point of view.
Following the rules of technology and safety precautions will allow you to independently install electrical wiring in a wooden house. In such buildings it is especially important to comply with fire safety rules.
Major repairs or construction of a country house or country house, the construction of service outbuildings are usually completed with the supply of electricity and interior decoration. Do-it-yourself electrical wiring in a wooden house requires special attention, as well as compliance with a number of special instructions, standards and requirements. This is due, firstly, to fire safety rules for electrical installation in wooden houses and, secondly, to the low thermal conductivity of wood and its hygroscopicity.
The installation of electrical appliances and electrical wires in a wooden structure has a number of features that must be taken into account during construction or repair. Electrical wiring in a wooden house, rules for installing and fastening electrical sockets, circuit breakers, and electricity meters have a number of differences compared to the electrical equipment of a brick house.

Correctly installed electrical wiring in a wooden house with your own hands will help ensure trouble-free operation of the power supply system at home or cottage.
Step-by-step instructions for performing the work include a number of mandatory actions:
- determining the type of power supply - overhead line or underground cable;
- production of a power supply diagram for the premises, taking into account the power of all consumer electrical appliances;
- layout plan for the electrical panel, circuit breakers, electric meter;
- marking the location of lighting devices, stationary electrical appliances and electric heaters;
- determining the location and number of electrical sockets and switches. Layout plan for the electrical cable to each connection point, indicating the length and required cross-section of the electrical wire.

Drawing up a diagram and power supply plan
When drawing up a power supply diagram and an electrical cable installation plan, the following must be taken into account:
- The distribution panel with an electric meter and circuit breakers should be installed near the front door at a height of about 1.5 m. This is determined by ease of access to the panel and safety conditions.
- An input safety circuit breaker is installed in front of the electric meter.
- For each group of consumers, a separate circuit breaker is installed to protect against overloads.

The optimal height for lighting switches is 1.5 m; they must be located in the entrance area on the side of the door lock or door handles. Electrical sockets are placed, as a rule, at a height of 0.8 - 1 m above the floor level; their number and location are determined by the number of electrical appliances used. When drawing up a plan for the location of sockets and switches, you should also take into account the arrangement of furniture so that pieces of furniture do not block access to them.
Do-it-yourself wiring in a wooden house imposes increased demands on the electrical cables used in the work. For wooden buildings, it is necessary to use only a cable with a copper core, double or triple insulation, made of non-flammable material, and a cross-section corresponding to the load.

The diagram and layout of electrical appliances will allow you to calculate the total required amount of electrical cable and auxiliary elements. These include distribution boxes, connection blocks, sockets and switches. After purchasing the necessary materials, electrical wiring in a wooden house can be installed quite simply and quickly.
Various installation methods
Electrical wiring in a wooden house (see photo) can be installed in various ways:
- external wiring on brackets or porcelain insulators;
- hidden wiring in cable channels;
- laying hidden cable in a hose or pipe;
- wiring in the cable plinth.
External or open wiring of an electrical cable in a wooden house using fastening brackets or porcelain insulators is one of the simplest and most affordable installation methods. The disadvantages of external wiring include:
- unaesthetic appearance;
- danger of damage to exposed cable;
- possibility of damage to junction boxes.
Most often, external installation of electrical wiring on mounting brackets is used for service and auxiliary premises, as well as for installation of power supply to outbuildings. Fastening wires on porcelain insulators is used like retro wiring in a wooden house when decorating a home in an antique style. More labor-intensive, but the most aesthetic and reliable is hidden wiring in a wooden house. This type of installation includes laying wires in special cable channels fixed to the wall surface. They are easy to attach, have an aesthetic appearance, and you can also purchase channels that have the color and texture of wood. Such products look very good on walls made of timber, logs or boards. Hidden cable routing also includes wiring in the electrical baseboard. This plinth is made of plastic and has compartments for fastening power or signal cables. To route the cable from the baseboard to the socket or switch, use either cable channels or laying between the load-bearing wall and the decorative finishing panel. Laying the cable in a metal hose or plastic corrugated protective pipe is used for hidden power distribution. It is produced in the space between the load-bearing wooden wall and the decorative wall panel. Installation of the house's power supply begins from the main circuit breaker and the input panel according to a pre-drawn diagram and layout plan for consumer electrical appliances. The entire installation is divided into separate sections, each of which is equipped with its own marked circuit breaker. Separate installation sections can be divided into various rooms, outbuildings, street lighting, individual high-power electrical appliances, etc.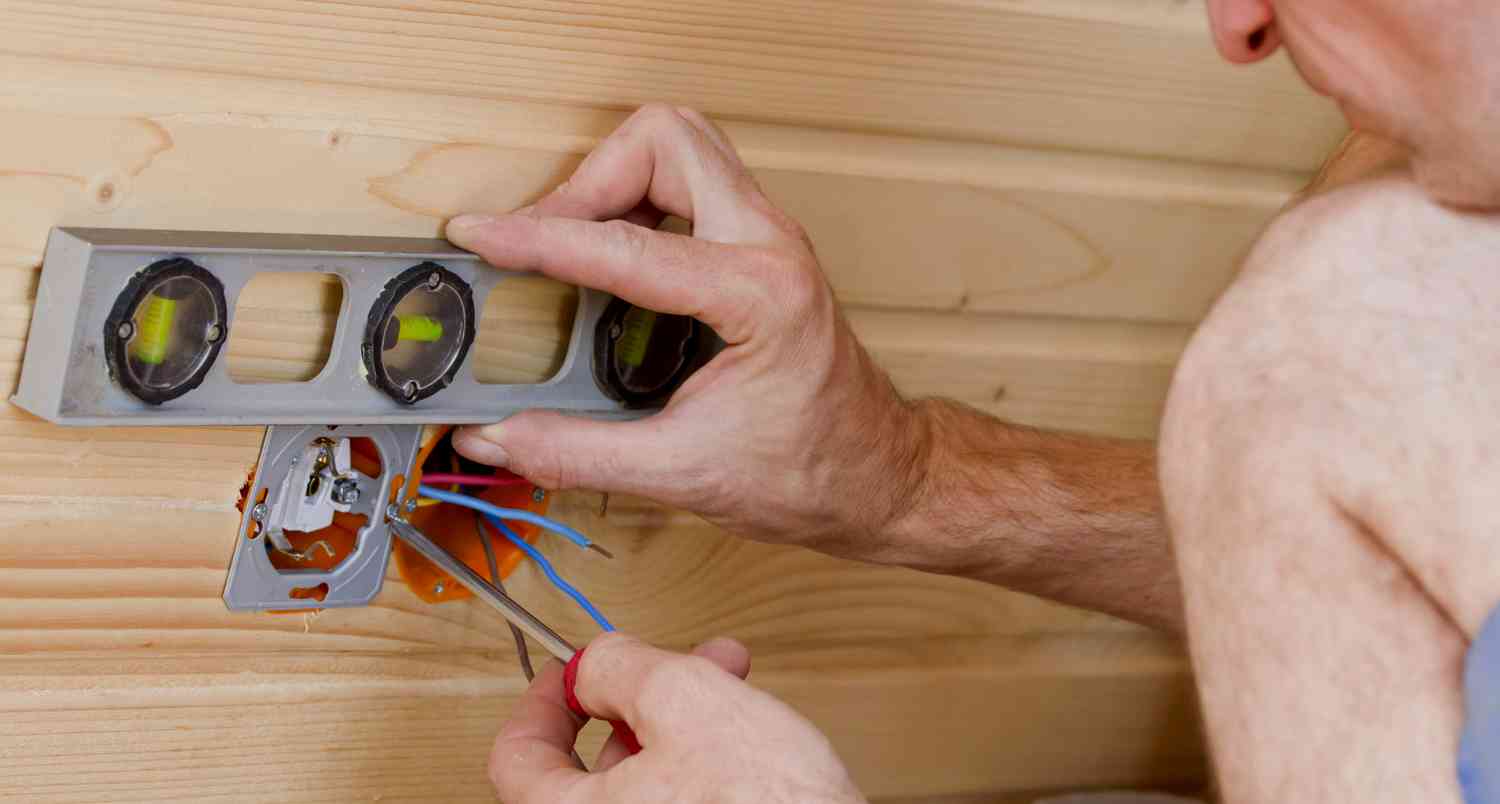
Hidden wiring in a wooden house
Electrical wiring installation procedure