DIY metal scaffolding. How to make scaffolding with your own hands. How to make scaffolding from boards
All high-altitude work is characterized by increased complexity, and in this case it is definitely impossible to do without special devices. One of them is scaffolding. Their price is calculated in rubles/m², and even for the cheapest set (frame) it is about 140 - 145. Besides, where to put it then? Renting can also be expensive (from 55) if repairs or construction take a long time, which is what usually happens in practice.
Plus - there are some problems with transporting forests, since personal transport is not suitable for these purposes. In the field of low-rise buildings (for the private sector), the optimal solution is to make them yourself.
There are opinions that it is better (and cheaper) to rent metal and wood scaffolding than to assemble it yourself. The main argument is that purchasing pipes will cost more. And such judgments are supported by economic calculations. Apparently, the authors of such comments live in city apartments and have a rather vague idea of what it means to maintain their home in proper condition (both the facade and the premises, the height of which, as a rule, exceeds the standard). But the owner has to do this regularly.
Moreover, the combination of materials such as metal (skeleton) and boards (flooring at each level) is considered optimal. One of the advantages of wooden scaffolding is (the second is the low final cost) that the structure after completion of construction (repair) is easily disassembled, and the material is used for other economic purposes. But there is also a significant disadvantage - a limitation in carrying capacity.

That is, such a device can only carry out work such as facade decoration (painting, siding), ceiling treatment, plastering and a number of others. When constructing brickwork or when several people are at a height at the same time, wooden scaffolding is unsuitable. But the assembly of pipes and boards is universal in use.
The only difficulty is in choosing the right scaffolding option and the method of fastening all the structural elements. The cost of manufacturing such multi-level scaffolds is justified only if they can be disassembled and stored in a shed (on site or somewhere else) until the next use. But spending money on a non-separable, welded model is irrational, and hardly anyone will do it. It is impossible not to take into account such factors as the complexity of manufacturing, the strength of the structure and its stability.
Brief description of types of scaffolding
Clamps. Plus - the ability to change the geometry of the skeleton along any of the axes. The downside is the difficulty of installing/dismantling the structure. In addition, if it is necessary to increase the load-bearing capacity, you will have to buy fastening elements. In this case, wire alone, especially rope, is not enough.

Wedges. They differ from all similar models in increased reliability and durability. But manufacturing costs are immeasurably higher (primarily for holders). For the private sector this is not the best option.

Pin. Plus – light weight with the ability to withstand significant loads; ease of assembly (albeit relative). Disadvantage: high cost; increased pressure on the soil. To ensure sustainability, a number of additional measures need to be taken. In the private sector, such forests are usually not used. The main reason is the complexity of manufacturing. This requires precise calculations and a welding machine.

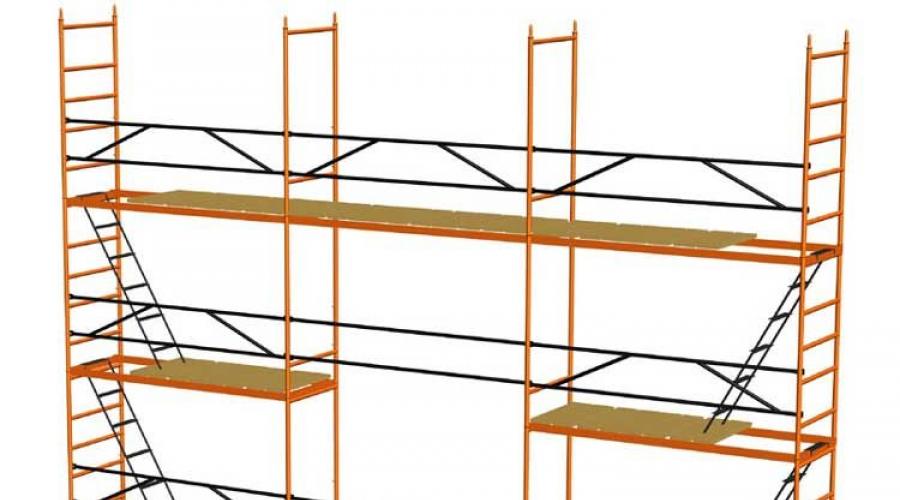
Frame. Plus, the weight of the structure is small, but with proper drawing and assembly, such scaffolding can “carry” a load of up to 200 kg/m². The height limit of 50 m for a private building is not of great importance. It is this model in the field of individual development that is considered the best.

What you will need
It is pointless to designate the exact linear quantities of structural elements - they simply cannot exist. The dimensions of scaffolding are selected based on the specifics of the work being carried out, the availability of space for their installation, the number of craftsmen simultaneously at height, and a number of other parameters.
All numerical values are in mm.

According to the material:
- Duralumin. It costs less than steel, but such scaffolding is only suitable for low structures used for finishing work. They are not suitable for masonry construction due to their low load-bearing capacity.
- Steel. Such scaffolding for the private sector is universal in application. The explanation is quite clear - high strength and reliability of the frame.
By section:
- Vertical racks. Profile pipe 30 x 30.
- Spacers (diagonal, horizontal). Round pipe 15.
- Inserts (supports for fencing and decking). Profile 25 x 25.
To ensure sufficient strength of scaffolding decks - not lower than forty.
- Length – from 1600 to 2000.
- Width – within 1000.
- Height – 1550.
Those home craftsmen who for some reason are not satisfied with the given dimensions can take the following drawings as a basis.

Fasteners
- Bolts + nuts + washers + screws - for fastening metal elements.
- Self-tapping screws (for metal) – for fixing the boards at the place of installation.
Main stages of manufacturing
Preparing parts. First the pipes are cut. Even if a drawing has been drawn up, there is no need to rush with the boards. After assembling the scaffolding skeleton, their dimensions will still have to be clarified. This will eliminate unnecessary work if you need to adjust pre-prepared flooring elements to the location. The ends of the round pipes (about 80) are flattened so that holes for fasteners can then be drilled. To facilitate such “pressing”, it is worth making an axial cut (metal cut) to the specified length.

- Preparation of “horizontals”. Before using them in the frame assembly, inserts from the profile should be welded to each pipe in the places indicated in the drawing.
- Preparation of “verticals”. To ensure greater stability of the racks, a so-called mounting heel is welded on one end of each. Although it can be made removable - plate + profile section.
- Drilling holes in structural elements. Particular attention is paid to vertical and horizontal (racks, lintels). Mismatches will lead to distortions. Therefore, the part will definitely have to be changed, and this is an irrational use of materials.
- Setting up racks. The main thing at this stage is to ensure that they correspond to the vertical plane. The slightest distortion will significantly complicate the further assembly of scaffolding and will sharply reduce its load-bearing capacity. And it’s unlikely to make them more comfortable to work with. That is why all horizontal ties must be extremely identical (in length).
- Strengthening the structure. For this, diagonal spacers are used. The peculiarity of their fastening is symmetry. If this condition is met, then the entire load on the scaffolding will be distributed more evenly over the entire area.
- Making stairs. The practice of using homemade scaffolding shows that portable models are preferable to stationary ones. For efficient work (in relation to the private sector), one removable ladder is quite enough. It is small in size and can be easily removed and installed in another place if necessary. The material is the same - pipe.
- Construction of scaffolding. The boards are laid last, after final adjustment to size. They are attached to welded inserts with self-tapping screws.

To ensure maximum stability of scaffolding it is necessary:
- prepare “shoes” with the help of which the structure is leveled at the installation site. It’s easy to make them from boards with your own hands; preferably several pieces of different thicknesses. In the future, this will simplify the process of adjusting the position of the scaffolding relative to the ground;
- treat the soil in the area where they are planned to be used. It is leveled (if necessary) and compacted. This ensures that during the work there will be no shrinkage of the soil (under load) and distortion of the scaffolding.
- Most often, one section is not enough. In this case, more is done - two, three. To connect them into a single assembly, it is necessary to prepare adapters. The same profile (30 x 30) is suitable, which is cut into pieces of 100 and welded to the racks. To fix the sections, you can use U-shaped metal earrings. To make the connection as reliable as possible, you should also take a pipe for them, but with a slightly smaller cross-section (25 x 25) or diameter.
If you carefully look at the manufacturing process, it turns out that there is nothing complicated in assembling scaffolding. The main thing is correct calculation and accuracy.
From this article you will learn how to properly assemble wooden scaffolding with your own hands - step-by-step instructions have been prepared for you.
The article will talk about the requirements for individual elements and the design in general. You will also learn about additional devices for working at height.Scaffolding is a temporary or permanent system of supports and ladders that is used for lifting and working at heights. They are subject to increased requirements for strength, stability and safety, since working at a height of more than 1.5 m is hazardous.
Regardless of the material and design principle, the following general requirements are imposed on scaffolding:
- Reliability. The system of elements must be able to withstand the weight of workers and material in motion.
- Manufacturability. Implies ease of assembly/disassembly of the entire structure. This job should be handled by a handyman or entry-level specialist.
- Economy. The design must contain an acceptable minimum of elements, but at the same time be stable and reliable.
- Utility. For inventory scaffolding - the ability to reuse the structure and individual elements as much as possible. For wooden ones, it is possible to reuse the material after disassembly for other purposes without significant loss of quality.
Inventory scaffolding is a professional and expensive product. It is not profitable to purchase them for home use; you can only rent them for a large amount of work (for example, on the facade of a house). As a rule, in private construction it is customary to erect conditionally disposable scaffolding that exactly matches the structure of the building.
Standard wooden scaffolding
The design of these scaffoldings came to us from the Middle Ages. The principle of forming the frame and connecting parts has not changed since then. Only the fasteners themselves have improved. They deserve special attention.
Basic elements of wooden scaffolding
 1 - racks; 2 - transverse; 3 - flooring; 4 - braces; 5 - stabilizing slopes
Racks. Vertical supports made of good quality edged boards. They take the normal (according to the gravity vector) load from the entire structure and transfer it to the base (soil). Requirements for racks:
- Edged boards of the 1st grade of any species.
- The thickness of the board is at least 30 mm, the width is at least 100 mm.
- Mechanical integrity of each individual element. The board should not be burst, broken, rotten, crooked, of variable cross-section, with excess wane or holes.
- The board should not be affected by insects.
Particular attention must be paid to the vertical splice of the racks. The elements must be connected end-to-end, not overlay, and clamped on both sides.
Cross members. They take the load from the flooring and transfer it to the racks. The requirements for them are similar to those for racks. One additional requirement: the use of spliced cross members without additional support is unacceptable.
Flooring. Cross ladders that transfer the load from people and materials to the cross members. It can be made of edged or unedged boards, and can also be combined - guides made of boards, sheet material on top. Continuous flooring and a run-up are allowed.
Braces. Diagonal links connecting racks of different rows. The use of slats and slabs is allowed. It is advisable to install braces of maximum length in order to connect the largest number of racks.
Slopes. Diagonal stops that support the structure to prevent deviation from the wall. Usually a 25 mm board is used.
Rules for the construction of wooden scaffolding
There is a set of general rules, following which you can assemble a reliable and safe structure. These rules are derived from safety requirements and the work experience of high-altitude masters:
- The foundation must be reliable. If there is loose earth or sand under your feet, make wooden platforms to support the racks.
- The width of the passage between the racks is at least 500 mm.
- For each node there are at least 3 attachment points. For multi-point fastening - a step of 50–70 mm in a checkerboard pattern.
- Use powerful screws (at least 4.2 mm). In case of assembly on nails (100 mm), bend them from the reverse side.
- Always install handrails on the inside of the rack.
- Use a fascia board (fencing near the deck).
- The racks at the junction must be trimmed.
- The pitch of the posts is from 1 to 2 m, the minimum thickness of the flooring is 25 mm.
Scaffolding assembly
To create a wooden scaffolding structure, you will need a minimum of tools: a saw, a hammer with nails and a tape measure.
Operating procedure:
- The length of the working space should be divided by the optimal pitch (1.5 m) and the number of racks should be obtained.
- We assemble an “envelope” - a frame of racks and crossbars. To do this, lay out two boards in parallel and measure the height of the tier. We sew them together in this place with a crossbar.
Attention! The angle between the post and the cross member should be 90°. Distortions can deform the frame under load.
- We sew the frame with a brace.
- We prepare the required number of “envelopes”.
- Install two “envelopes” vertically, in the design position. Sew them with a diagonal at maximum height so that they stand without support.
- Set the number of envelopes according to the length of the flooring board so that its edges fall on the crossbars.
- Place the flooring board onto the crossbars and secure. Strengthen the bracing with braces.
- Secure the decking on top with self-tapping screws or nails.
- Install the remaining “envelopes” and flooring in the same way.
Attention! Never, under any circumstances, splice decking between supports! The joint of boards or sheets of flooring must be on the crossbar!
- Install the handrail and front board.
- If possible, tie the structure to the wall.
- If the height is more than 2 tiers and it is necessary to build up the racks, you should first install the slopes. To do this, you need to tie the racks at the bottom with a horizontal board of maximum length. Then tie the edge of this board to the top of the rack - you get a reliable triangular stop.
Scaffolding is dismantled in the reverse order - dismantling the flooring, crossbars, extended racks, slopes and envelopes. Disassembly must be carried out by qualified and experienced carpenters.
Devices for constructing wooden scaffolding
Steel cross member - bracket

This element significantly simplifies installation, allowing you to quickly change the level of the flooring. Such a device must correspond to the cross-section of the board.
Triangular bracket

Such a bracket can be wooden or steel. Allows you to attach the scaffold directly to the wall. To build a flooring based on it, a few boards for the ladder are enough. But at the same time, to rearrange it, you have to dismantle it. Installing anything from the bottom up is impossible. The most dangerous type of high-rise scaffolding. The work requires special skill and caution.
Bricklayer's express scaffolding

They are created from pallets on which bricks are delivered. As a rule, rafter boards are used for flooring. It does not require sawing of the material, and is quite reliable if you do not make spans of more than 1.5 m.
Bricklayer's scaffolding on video
Whatever type of scaffolding or scaffolding you choose, remember that your life and health are in your hands. Saving one board or 10 minutes of time to strengthen can result in unpleasant and sometimes serious consequences.
Vitaly Dolbinov, rmnt.ru
If you decide to make scaffolding, you will have to choose from two materials: wood or metal. In the first case, you will get a disposable structure that can be made by anyone who knows how to work with wood, and in the second, it will be reusable, but also quite easy to make. In this article we will tell you how to make scaffolding with your own hands from metal (profile pipes), as well as from wood (boards), demonstrate diagrams, photos and video instructions.
Although metal or wood is predominantly used for the manufacture of scaffolding, they may differ in the method of fastening, and accordingly have different functional elements in their design. So, let's look at the main types of forests.

The component elements are connected by a special wedge fixation. Scaffolds of this design are highly reliable. They are able to withstand quite heavy loads. At the same time, they are easy to use and can be quickly assembled and disassembled. The use of wedge scaffolding is especially important during construction and lifting of heavy materials and components.

The main element of this design is a rigidly mounted frame. They are mainly used for painting or plastering work. The frame in this design is connected to horizontal posts and diagonal braces thanks to node connections. The main advantage of frame scaffolding is its low cost. Their construction does not require large investments.

In these scaffoldings, the connection point, as is obvious from their name, is the pin. This type of scaffolding is very popular among builders, as they are very easy to assemble and disassemble directly on the construction site. It often takes a day or even two to assemble the scaffolding. In this case, assembling the pin scaffolding will not take much time.

If the object where repair work is being carried out has a complex configuration, then clamp scaffolding is an excellent solution. The fastening method used is professional. And for their manufacture, the height and size of the working area, the distance between tiers and the pitch of the racks play an important role. All this is selected individually for each facility.

We invite you to familiarize yourself with a simple guide to making scaffolding from boards. To do this, follow a few simple sequential steps:
- Lay out 4 racks or boards parallel to each other on a flat area. Their size must immediately correspond to the height of the scaffolding.
- The racks are connected to each other by horizontal jumpers, on which the flooring will later be laid.
- Place the 2 frames made horizontally opposite each other, tie them diagonally and horizontally with boards that will serve as ties.
- Lay the flooring from the boards on the horizontal ties and attach it to the lintels with self-tapping screws.
- Attach the railings to the posts and secure the stairs.
If it is necessary to lengthen the scaffolding structure, connect several similar sections of boards together. The boards are placed on the support posts.
When assembling wooden scaffolding, if nails are used, it is recommended to pre-drill holes to prevent the boards from splitting.
Design

All forests consist of the following elements:
- racks;
- diagonal and horizontal struts (they give spatial strength to the structure);
- flooring lintels;
- a flooring made of boards on which a person will stand;
- stops (to create stability of the scaffolding and prevent it from falling away from the wall);
- a fencing element (so that a person standing on the flooring does not fall down);
- ladder (step-ladder) for climbing to the desired level of scaffolding.
Made of wood and boards

You can find quite a lot of advice on how to make scaffolding on the Internet. Moreover, the recommended designs differ mainly from each other only in the thickness of the board and the size of the scaffolding itself. To avoid getting confused in all this “diversity,” try to focus on the following values:

Let's get started:
- Prepare the necessary materials in advance:
- boards with a thickness of at least 50 mm and a width of 100 mm (or round timber, or timber 10x10 cm) - for racks and stops;
- boards for spacers and fencing 30 mm thick;
- boards for lintels and flooring 50 mm thick;
- nails (screws in this case are less reliable).
Photo instructions
We invite you to view a number of photographs on the topic of how to make wooden scaffolding yourself:


From a profile pipe

Now about how to make scaffolding (collapsible) from metal (dimensions of one section: height - 1.5 meters, width 1 meter, length 1.65 meters). Determine the number of sections based on the height of the scaffolding you need.
- Prepare the necessary materials:
- for racks - profile pipe (square section) 30x30 mm - length 1500 mm;
- for spacers - a pipe with a diameter of 15 mm;
- for connecting inserts (adapters) – profile pipe 25x25 mm;
- Make the flooring from boards 40-50 mm thick and 210-220 cm long.
- for diagonal elements – 2 meters;
- for horizontal elements connecting the racks from the sides of the structure - 96 cm each.
"Pros and cons"

Firstly, scaffolding is not a small scaffolding, but a rather bulky structure that will need to be stored somewhere after the need for it disappears.
Wooden scaffolding, of course, can be disassembled later, but the work is labor-intensive, and the boards, if you don’t need them in the near future, also need to be stored somewhere. Do not forget that wooden scaffolding is assembled using nails, not screws, so the boards will no longer be completely intact. In addition, when working on scaffolding, the wood often gets dirty with mortar or paint.
Self-made metal scaffolding can not only be disassembled, but also rented out in the future.
Secondly, non-prefabricated scaffolding is designed to work maximum at the second floor level (from the ground). At higher altitudes, the operation of self-made scaffolding becomes dangerous.
Thirdly, scaffolding is required quite rarely (only for repairing the facade of a building), so the assembly and disassembly of such a temporary structure is not profitable in terms of the time spent on this work.
Fourthly, scaffolding often has to be made long (for example, at least 6 meters for installing siding). Accordingly, their weight increases, and moving homemade wooden scaffolding to the other side of the house becomes a problem even for three or four people.

It is worth thinking about forests at the stage of designing a house.
If you don’t plan to carry out the façade work yourself (but are planning to hire a construction team), then you don’t have to think too much about scaffolding, since builders usually come to the site with their own scaffolding and scaffolding.
However, after construction is completed (and after some time has passed), scaffolding may be needed for minor facade repair work. Can this be avoided?
Certainly. And first, make sure that the facade of your house does not require repairs for many years. To do this, it is enough to use facing bricks when constructing walls. Now it is produced by many manufacturers and in a fairly wide range of colors.
But other facing materials (such as siding, plaster and others) will periodically require your attention and, accordingly, additional costs, since you will not be able to make scaffolding (buy or rent) for free.
Video
From this video you will learn how to make scaffolding for apartment renovation:
Photo
The photographs show various scaffolding designs:


Scheme
The diagrams will help you design your own scaffolding:


When constructing, finishing, and repairing low-rise buildings, you can confidently carry out work upstairs only on scaffolding, which is quite realistic to make with your own hands from wood.
It is not profitable for owners to buy metal structures, because they are expensive and are not used so often.
Homemade scaffolding can be made from material available in garden plots. If there is not enough of this, you can buy boards and beams, and after construction is completed, use them for other needs.
Scaffolding materials
It is important that the wooden blanks are dry and strong, so the presence of knots, cracks, and other defects on them is unacceptable. If possible, it is advisable to buy materials made from spruce; pine usually has more flaws. In principle, you can use any durable wood, the reliability of which must be checked before construction.
To do this, bricks, cinder blocks, and large stones of suitable shape are placed on two low supports.
You should put a board with a thickness of 30 mm, stand on top of it and jump several times. This must be done by a person with good reaction and coordination in order to land safely on the ground in case of failure. If the board passes the test, it can be used to assemble scaffolding.
To erect a building structure with your own hands, you will also need bars with a square cross-section and a side length of 100 mm, a tape measure, and a circular saw will be very helpful.
Screws and nails
Doubts about the choice of fasteners are quite understandable. Nails are easy to drive and provide strength to scaffolding because they have some flexibility to absorb the load. The inconvenience is that the building structure is almost impossible to disassemble without damaging the wood.
Self-tapping screws are convenient in this regard; they can be unscrewed without damaging wooden surfaces, but they are characterized by great fragility. Black self-tapping screws made of hardened steel alloys can break when hit or simply under weight.
Note! Anodized self-tapping fasteners are somewhat stronger; they can be distinguished from ordinary ones by the greenish tint of the coating.
If the owner often works on the site with his own hands and the wood is needed in its most complete form, you can use anodized screws, and to be sure, hammer in only two or three nails at the junctions of the scaffolding, just in case, for insurance.
Design options
You can make different types of wooden scaffolding with your own hands; the choice of a specific option depends on the specifics of the upcoming work.
Scaffold
If you plan to decorate the house with lightweight materials, then scaffolding, the manufacture of which requires less material and time, is quite sufficient. There are two types of attached structures, the diagram of each resembles the letter G.
The location of the construction scaffolding varies:
- in one case, the short horizontal part of the letter L rests on the wall, and its vertical part is slightly recessed into the ground under the working load;
- in the second type of scaffolding, the vertical part of the letter G rests against the wall. The entire weight is concentrated on the thrust elements, the upper part of which is driven into a corner - the junction of the two main bars.
The structure is often called Armenian scaffolding, and the vertical part of them can be shortened, then the scaffolding takes on the appearance of a triangle, the base of which rests on a board. The entire load is concentrated on it.
Despite the fact that the scaffolding does not seem very reliable, in practice their strength and ease of use have been repeatedly proven. Triangular scaffolding should be located every meter; if possible, they are nailed to the wall; if there is none, then they are fixed with stops. To ensure safety, the place where the thrust bars are immersed in the ground is additionally wedged.
To ensure that the scaffolding does not move sideways along the wall, the stops are additionally sewn together with bars, which increases the rigidity of the structure. All thrust bars and boards must have a thickness of at least 50 mm; boards with a thickness of at least 50 mm are also placed on the flooring. The horizontal surface is nailed or secured with self-tapping screws, otherwise it is dangerous to move on them.
Construction trestles
Wooden scaffolding with such an interesting name is known to everyone, because they are often used both on construction sites and during major renovations of apartments. The convenience of construction trestles lies in the fact that they do not rest on the wall and allow covering with siding and many other facing materials.
Standing on top of a trestle, you can attach both the top and bottom of the panels, then move the structure and continue working on an adjacent section of the wall. Cross members are placed between the posts of such wooden scaffolding; they strengthen the structure and at the same time serve as a ladder. The racks on one side can be fixed strictly vertically, which will allow you to place portable scaffolding close to the wall.
Full scaffolding
The structure of traditional wooden scaffolding has not changed over the years. It is well known to everyone from Soviet films and posters in which charming girls, standing on scaffolding, smiled life-affirmingly at enthusiastically working young men.
To make such scaffolding with your own hands, you will need a lot of lumber; the advantage of the design is that it can withstand heavy loads and allows you to carry out work of any degree of complexity.
Before you start assembling scaffolding, you should stock up in advance on boards 50 mm thick and bars for crossbars up to 1 m long. At the first stage, racks are made from long bars or boards connected by crossbars. The scaffolding will be especially stable if the racks are placed at an angle rather than strictly vertically.
Depending on the future load on the flooring, the thickness of the boards on it, the racks are placed at a distance of 1.5 to 2.5 m from each other and reinforced with jibs. There is no such thing as too many crossbars and jibs; the more of them, the more stable the scaffolding will be.
Note! If the height of the structure exceeds 3 m, then additional jibs resting on the ground support the vertical beams of the racks.
Lastly, a flooring of boards is laid on the bars located along the perimeter of the racks on top, which are carefully inspected the day before. The surface is laid in such a way that no cracks or gaps are formed at the joints, so that the result is a canvas similar to the floor in wooden huts. On such a flooring, workers can confidently focus on their immediate responsibilities without fear of failure. At high altitudes, it is safer to work if there are railings; they must be made of durable material without cracks or other defects.
Full-fledged construction trestles from lumber can be made with your own hands in a short time if you have the skills and a minimum set of tools, preferably with an electrical power system.
Features of metal scaffolding
If you don’t have a strong desire to make wooden scaffolding with your own hands, you can purchase a ready-made metal structure. The costs will certainly be noticeable, but such scaffolding can be used to carry out construction work of any degree of complexity with heavy loads on the supports and flooring.
Metal scaffolding is convenient because it can be disassembled with your own hands after construction is completed, stored in a utility room, and then used for future repairs.
The industry produces several types of metal structures:
- pin;
- clamp;
- frame;
- wedge.
In pin scaffolding, loops in the form of pins are welded on vertical posts, and the crossbars end with hooks designed for connection. Assembly is simple and quick; it is convenient to work on such scaffolding with buildings of standard shapes; if you have to finish protrusions and figured bay windows, it is better to choose a different base.
Scaffolding with a height of no more than 40 m is made from metal pipes, which are secured with special clamps. You can do the assembly yourself; if necessary, such scaffolding can be easily moved to a new location. It is not recommended to work with very heavy loads on them, because the clamp fastenings have load restrictions.
Metal scaffolding is often produced in the form of modules from frames, which are welded from pipes and reinforced with jibs. The structure can be extended and increased in height using additional modules. One section usually has a height of 2 m, a length of one and a half to 3 m, and the depth of the horizontal part is usually 1 m.
Wedge scaffolding made of metal has more complex joints, consisting of disks with holes welded to vertical posts, and pipes with special locks reminiscent of the mouth of predators. The lock is placed on the disk, and a wedge is inserted into the through matching hole. Scaffolding can be easily assembled and disassembled with your own hands, moved wherever needed, and it is convenient to perform any work on them.
You need to choose the type of scaffolding carefully, taking into account the specifics of the work ahead, the load and financial capabilities. You can purchase lumber and make the structure entirely with your own hands, or buy ready-made metal products that you just have to assemble.
All photos from the article
Are there any regulatory requirements for scaffolding used for laying walls and finishing facades? In this article we will get acquainted with the documents regulating their construction, and also find out how to properly assemble homemade wooden scaffolding.

Regulations
Scaffolding requirements are mentioned in passing in countless occupational safety manuals; however, any serious attention to their design is given in only two documents:
- GOST 24258-88 describes the use of scaffolding during construction;
- SNiP 12-03-99 is dedicated to labor safety in construction; Scaffolding means are mentioned in section 7.4 of this document.
Let us clarify: the section is devoted not only to scaffolding, but also to safety when using small-scale mechanization equipment and auxiliary devices in general.
Let's dive deeper into the requirements.
GOST 24258-88
First of all, GOST standardizes the design load on scaffolding depending on its type and the height of the site above ground level.