Machinarium passage of crosses. Machinarium: Complete walkthrough. Screen twentieth - Hall
Machinarium is made in best traditions old quest school. The abundance of witty puzzles and rich imagination of the developers pleasantly surprise you. The adventure begins with the delivery of the main character, the janitor Josef, to a landfill. Where you will need to get out and return back to save the city and your friend, who was taken hostage by a gang of Black Hats. A feature of the game is very close interaction with objects, environments and characters. During the passage, all important actions are performed independently, at a close distance from the goals. It is not enough to just guess what needs to be done in a given situation; you also need to clearly indicate what exactly to do and with what. All found items go into the inventory, where they can be viewed and combined with each other. In case of difficulties, two types of hints come to the rescue - brief and detailed. In the first case, only a general picture of what needs to be shown is shown, in the second, after completing a small arcade with a flying key and annoying spiders, step-by-step instructions are given. To call up tips, you need to click on the star icon in the upper right corner of the screen and select either the icon with a light bulb or a terminal. The only drawback of the game is the short duration of the plot.
This walkthrough of Machinarium was compiled based on the mobile version of the game for Android.
Walkthrough of the Garbage Dump (Level 1) in Machinarium:
- Items at the sublevel: head, two arms, two legs, toy, wire, magnet.
- After loading the garbage and leaving the garbage truck, click a couple of times on the bathtub lying on a pile of trash so that it falls down and frees the robot’s body. Click on the body until it is near the robot’s head. A couple of clicks on the head will attach it to the body. We hold the robot's head with our finger, push it up, pick up the mouse toy near the tank, go down and give it from the inventory, in the upper left corner, to the robot rat running around the site. He will bring the missing leg, after which the robot will be almost ready to return to the Machinarium. You will have to remove your left hand from the water. We approach the edge of the cliff, tilt the pole, return to the reel with the wire, click on it and select the wire, tear off the red magnet from the fan. We combine the found items in the inventory. We throw the resulting laso onto a reel on a pole to make a tap. We pull out left hand out of the water and automatically jump over the cliff to the other side, run along the path to the city.
Walkthrough of the city gate (level 2) in Machinarium:
- Items on the sublevel: pin, light bulb, red and white chip, can of blue paint, vat of white paint.
- We approach the checkpoint and pull the rope at the watchtower, just as the patrol robot did, who was let through the bridge a little earlier. The robot guard will refuse to let a stranger through. We return to the lamppost, climb up along it along the protruding pins, take one pin with us, click on it once, take it out of the inventory and insert it into the hole above your head, repeat the action a couple of times, climb up maximum height, pull out the robot and unscrew the light bulb. We screw it into the robot’s head, taking it out of the inventory. At the edge of the cliff we select a striped red and white chip, throw the rest into the cliff and select a can of blue paint under them. We approach the trough with white paint opposite the lamppost, take out blue paint from the inventory and mix it with white. We dip the cap from the inventory into blue paint, and then put it on the head. We pull the rope again, call the guard, who this time will lower the bridge and let the robot through to the city gates.
Walkthrough of the pit (level 3) in Machinarium:
- Items on the sublevel: iron hook, yellow stopper, trolley wheels.
- After falling from the bridge into the hole on the landing, under the lever near the wall where the trolleys come out, we pick up the iron hook. We take it out of the inventory and hook it to the upper end of the railing, at the lever. We approach the water tower, at the door where the trolleys enter, we squeeze, holding our finger on the robot and pulling down, we reach with our hand to the shield. Set the switches to position 2 - A. Climb to landing, stretch the robot by holding your finger on it and pulling it up, double-click on the crossbar above your head and cling to it with your hands. We move to the right end of the crossbar, remove the yellow stopper from the barrel. At the place of the fall, select the stopper from the inventory, place it on the rails directly under the railing, and pull the lever. We remove the wheels from the overturned trolley, jump on them and pull the railing to use the hook at the top to hook the lever and call the trolley.
Boiler room walkthrough (level 4) in Machinarium:
- Items on the sublevel: iron handle.
- Remove the iron handle from the hanger at the right door. In the middle of the boiler, under the explosive sign, press the red button, open the panel, set the switches to the following position: 1 - to the very bottom, 2 - to the very top, 3 - to the very bottom. We press the red button on the shield, compress the robot to its normal size and run to the empty trolley near the left door, jump into it and wait for the bucket to arrive. As soon as he lifts the robot by its head to the ceiling, press a couple of times on the platform above the door to jump onto it. We open the shield with the iron handle, which we took from the right door, and change the position of the first left upper jumper to the opposite one. We go down, press the red button on the shield again, jump into the empty trolley, wait for the bucket when it lifts it to the ceiling and takes it in the opposite direction, jump into the pipe, above the right door, through which the robogotnik escaped with berries.
Walkthrough of prison cells (level 6) in Machinarium:
- Items on the sublevel: a piece of toilet paper, a rusty valve, moss, a brush, a hand.
- We tear off a piece from the roll of toilet paper above the toilet, unscrew the valve from the pipe next to the robot cellmate, turning it a couple of times, and at the same time tear off the green moss from the pipe. We approach the lamp above the toilet, take out the moss from the inventory and dry it on the lamp, having first stretched the robot to reach it. We combine the resulting tobacco in the inventory with toilet paper, and give the resulting cigarette to the cellmate. We receive his hand in gratitude. We approach the hole in the wall next to the toilet, squeeze the robot, extend our hand into the next cell, take out the cellmate’s hand from the inventory and stretch it through the second hole in the wall to the iron safe. We loosen it by the leg so that the brush falls off it, and pick it up. We combine the rusty valve with the brush in the inventory, go to the hatch on the floor and insert the brush-key into the hole, remove the cover and jump down. We move along the sewer to the right.
Walkthrough of the security room (level 7), observation room (level 5) and prison cells (level 6) in Machinarium:
- Items on the sublevel: lead balls, key, plunger, gun with rope.
- We reach the hatch, open it with a brush-key. When the guard leans back on the chair before the shot, we touch the leg of the chair with our hand to knock it over. While he is lying on the floor, we take the lead balls from the plate on the table with our hands. Seeing the empty plate, the guard will rise from his chair and go to the target on the right wall, at this moment we take the key from his belt. While he is busy poking around at the targets, we scatter the balls under the shield and unlock the left lock with the key to release two prisoners from the cell, whom the guard will chase. If we can’t do everything the first time, we repeat the steps with the chair and stealing the cartridges.
We go up the stairs to the door through which the prisoners escaped, to the observation room. We look through the telescope and observe the installation of an explosive charge on the central tower. We activate the switch next to the door to turn off the light in the room. The wall clock will show the time 4:45. We return to the previous room, enter a compartment with prison cells, one of which we were sitting in a little earlier. We go into the middle chamber, stretch the robot, and tear off the plunger from the ceiling. We leave the cell into the corridor, reach the left wall, activate combination lock, enter the number 4:45. There is a safe in the cell with a puzzle; to solve it, you need to collect all the green lights in the central green area, then the lock will open. The combination of lights is random, so you need to choose the solution yourself. From the safe we take out a pistol with a rope, and then in the inventory we connect it with a plunger. We leave the prison through the observation room with a telescope.
Walking through the street in the lower part of the city (level 8) in Machinarium:
- Items on the sublevel: pink umbrella, robotic dog.
- Once on the street, we approach two containers standing on the right side of the door to the prison. We push them all the way to the left, towards the stairs in the next location. We go up the stairs to the robot lady with a pink umbrella. In exchange for an umbrella, she will ask you to find her robot dog. The robot dog hides behind barrels on the site across the river, and is out of reach of pistol shots. To the right of the robot lady, right above the stairs, open the red shield, swap the arrows so that the top ones are in place of the bottom ones, and pull the lever: 3, 5, 6, 4, 2, 1, 3, 5, 7, 6, 4, 2, 3, 5, 4. The hanging magnet will lower from the height and lift the top container. We return the lower container to its original place, to the prison doors. We jump onto it from the bump stop. We stretch the robot and cling to the steps with our hands. We climb into the cabin with the control panel. Use the small red buttons to move the arrow so that the tip of the arrow is just below the right red button. Click the green button above the monitor with the arrow. When the buoy with oil floats to the shore, press the red button with the drop icon to pour oil, which the robotic dog can smell. While he is licking the oil puddle, we go down to the ground. We take out the pistol from the inventory and shoot at it. We take it to the robot lady and pick up the pink umbrella. We select it in the inventory, walk around the corner under the streams of water, then cross the bridge and go up to the streets of the upper district of the city.
Walkthrough of the town square (level 11) in Machinarium:
- Items on the sublevel: bell crank, horn, empty oil can.
- We walk to the stairs, past three musicians and a bar, past a landing with a locked elevator door, and rise even higher. We go out to the round central square with a fountain. We approach the parapet under the fountain, select the crank lever. We speak with the robotic sectarian under the clock dial. He will leave only after he is on the clock right time- infinity. On the wall, on the right side of the massive door, hangs a note with a hint indicating the symbols responsible for infinity. Let's look through it. We take out the crank lever from the inventory and insert it into the round hole by the door. We move the central hand on the dial so that it is at the symbol of incomplete infinity (12 o'clock), and the outer, red hand is at seven o'clock (symbol VII). As soon as the fight starts, the robotic cultist at the door will stand and go inside the building. We look at the remaining note on the wall, above the bench. We approach the lever and move the central hand to 9 o'clock and the red one to 6. As soon as the clock strikes, the guard from the second floor will go down and go inside the building with the clock. We go up to the balcony where the guard was sitting, remove the speaker from the fasteners and take it with us. We go down and talk to the robot in wheelchair at the fountain, who will ask you to bring him oil and take out an empty oil can. We take it, go up the stairs located to the left of the building with the clock.
Walkthrough of the bridge to the slot machines (level 12) in Machinarium:
Walkthrough of the street in the upper part of the city (level 10) and the bar (level 15) in Machinarium:
- Items on the sublevel: plant, broken radio, sticky tape, flies, iron barrel, bolts, oil can with oil.
- Having reached street musicians, speaking opposite the bar, we take out the robotic cat from the inventory and place it in the pipe of the trumpeter so that she smokes the robotic rat. Click on it to start playing. From the second floor, hearing nasty music, an evil robot will look out and throw a flower pot. We go into the passage behind the musicians, take out an empty oil can and put it in the oil puddle, wait until it is filled, and then take it away. We go back and go to the bar. We sit down at the table with the robot player, in the game with him you need to try to make five bolts in one line, it can be either horizontal or vertical, or diagonal ( http://www.youtube.com/watch?v=2m6NhwjFuXU). After losing, the opponent will hit the board with his fist in anger, five cogs will scatter around the room, which must be collected and given to the musician with the trumpet in the square in front of the bar.
Before leaving the bar, we tear off the adhesive tape from the shelf by the door, after stretching the robot to reach it. We give the trumpeter five screws. Out of joy, he will begin to play a melody, which again the robot from the second floor will not like. Out of anger, she will throw the pot, but this time with a plant. We select a plant from the ground. Near the exit from the bar there is a pool with green liquid. We approach him, take out the sticky tape from the inventory and start waving it around his head to catch as many flies as possible. We return to the bar and release flies into the bartender's face. While he waves it off, we steal from the entrance iron barrel. We drag her to the musician drummer. Out of joy, he will start pounding on it, an angry robot will again look out from the second floor and launch a radio at the troublemakers, which will break on the ground. We pick it up and return to the square with the fountain, going up the stairs.
Walkthrough of the town square (level 11) and boiler room (level 14) in Machinarium:
- Items on the sublevel: empty oil can, three red cross-shaped valves.
- We give the full oil can to the robotic disabled person near the fountain, he will lubricate the wheels of the wheelchair with oil and move away from the manhole cover. A moment later, he will again hold out the empty oil can and ask to bring him sunflower oil. We take it and open the hatch cover, go down. In the boiler room there is a robotic plumber sitting on a pipe, we talk to him. He will ask you to get a new gramophone for him, to replace the one that was stolen by the robogotnik. After which he will agree to unscrew the cap of the vat. We combine in the inventory the megaphone with the broken radio that was thrown out of the window by the robot from the square in front of the bar. We put the radio on the table under the robotic plumber and turn to him for help. This time he won't refuse. A red cross-shaped valve will appear in your inventory. We approach the table with the radio, near which a happy robotic plumber is dancing, open the cabinet, leaf through the book, and on the last page we select another red cross-shaped valve. We remove another red cross-shaped valve from the pipe near the ladder. We install the first of them on the first top tap (closest to the vat), the second on the second tap in the top row, the third on the second tap in the bottom row. Water will stop flowing from the vat and filling the pool. We get out of the boiler room onto the square. We jump into the vat, open the door and crawl along the pipe to the elevator on the city wall.
Walkthrough of the elevator on the city wall (level 17) and the bar kitchen (level 15) in Machinarium:
- Items on the sublevel: corn, a hose, a metal rod with a hook.
- Having jumped onto the elevator platform, press the red button on the wall and go down. We look out the window and talk to our girlfriend, who was forcibly made a cook at the bar. Open the wall box and take the corn from the shelf. Remove the pan from the stove and place it on the floor. We place corn on the stove, which will begin to burst and fly out through the hood. When the corn hits the hood cover, a metal rod with a hook will fly off it. We pick it up and pass it to our girlfriend out the window. We stand on the pan on the floor, take out a metal rod from the inventory, and stretch it to the frozen grate near the ceiling. We open it and repeat the action to tear off the frozen hose. We jump off the pan onto the floor, put it back on the stove, and put the frozen hose in it. When it thaws, take it out of inventory and connect it to the oil tank above the door from the room. We refuel the elevator and turn it on by pulling the red handle at the upper left edge of the platform. We activate the control panel, swap the red switches with the black ones, dragging them from place to place in a “circle”. A control lever will appear at the bottom of the panel, which can be used to raise or lower the elevator. Let's go upstairs. We wake up the robo-fan and answer all his questions incorrectly to make him angry. When it breaks, we climb into the pipe where the fan was installed.
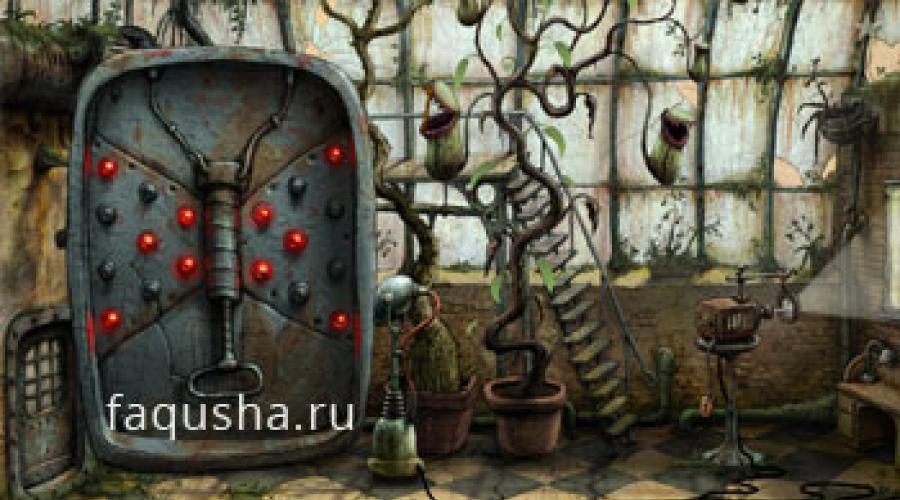
Walkthrough of the greenhouse (level 19) in Machinarium:

Walkthrough of the destroyed bridge in front of the tower (level 20) in Machinarium:
- Items on the sublevel: oil can with sunflower oil, bandage, ticket for slot machines.
- At the exit from the greenhouse, we put sunflower seeds in the oil mill on the wall, and place an empty oil can at the drain. We grab the lever and begin to make sunflower oil with quick up and down movements. We cross the bridge and talk to a huge guard who will ask you to get batteries for him. We go down the pipe, to the right of it, down, to central square with a fountain. We give the robotic disabled person an oil can with sunflower oil. With joy, he will take off his blindfold and hand over a ticket to the slot machines.
Walkthrough of the bridge (level 12), slot machines (level 13) and town square (level 11) in Machinarium:
- Sublevel items: two coins, two batteries.
- We go up to the bridge where the cat was caught (the stairs to the left of the building with the clock in the city square). We pass through the bridge, insert the ticket into the hole by the door. Let's go inside. Slot machines are disabled. A bicycle dynamo will help restore the current supply. The faster you pedal, the more the battery is charged (you need to increase the charge to the red mark). You need to twist in a circle, not horizontally. Which of the machines will be charged can be determined by the lever to the left of the bicycle. We charge all three slot machines, two of which will remain in working order and will allow you to earn money to buy a battery in the city square. In the first slot machine you need to score 1000 points, in the second you need to complete five puzzles. For completing the arcades you are given two coins.
- Solving the first arcade puzzle: from the starting position press the buttons - ↓, →, , →, →.
- Solving the second arcade puzzle: from the starting position press the buttons - →, ↓, ←, , →, →, ↓, ↓, ←, , , ←, ↓, →, , ←, ↓, ↓, →, →, , , ←, ↓, → , →.
- Solving the third arcade puzzle: from the starting position press the buttons - ↓, →, , , ↓, ←, ←, ↓, →, , , ←, ↓, →, ↓, ←, , →, →, ↓, ←, , ←, , →, ↓, ↓, →, , , ↓, →.
- Solving the fourth arcade puzzle: from the starting position press the buttons - , ←, ←, ←, →, →, ↓, →, , ←, ←, ↓, →, , ←, ←, ↓, →, , →, ↓, ←, , →, →, ↓, ←, , ←, ↓, ←, , →, →, →, ↓, , ←, ←, ←, ↓, →, , →, ↓, ←, ←, , →, →, →, → .
- Solving the fifth arcade puzzle: from the starting position press the buttons - , →, ↓, ←, , ←, ←, ↓, ←, , →, →, →, ↓, →, , ←, ←, ←, ←, ↓, →, , →, →, →, ↓, ←, , ←, ←, ↓, ←, , →, ↓, →, , →, →, ←, ←, ↓, ←, , ←, ↓, →, , →, →, ↓ , ←, , →, →, ↓, ←, , ←, ↓, →, →, , ←, ←, ←, ↓, →, →, →, →.
Walkthrough of the tower elevator (level 22) in Machinarium:

Walkthrough of the top floor of the tower (level 23) in Machinarium:
- Items on the sublevel: scissors, chandelier.
- After exiting the elevator, we turn on the electricity in the room through the panel next to the elevator. At the staircase on the wall, we lower the lever down twice so that the vacuum cleaner goes into the bathtub. We stand on the vacuum cleaner, stretch the robot, and take the scissors from the shelf. We return to the hall, pull the lever up twice to return the vacuum cleaner to its original place. We turn off the lights in the hall through the panel near the elevator, stand on the vacuum cleaner, and cut off the chandelier with scissors. We attach it to the back of the vacuum cleaner. We turn on the electricity, raise the lever on the stairs twice, forcing the vacuum cleaner to return to the bathroom. We hook the chandelier to the toilet, return to the hall and pull the lever down once. The vacuum cleaner rips the toilet out of the floor, we return to the bathroom, cling to the toilet paper and go down into the hole to the bomb. We swing towards the bomb and cling to it. We begin defusing, take out all the candles from the bottom row, insert them in the following sequence: D, B, E, A, C. When the bomb is neutralized, we go back to the bathroom, and then up the stairs to the oval room.
Walkthrough of the oval tower room (level 25) in Machinarium:

Walkthrough of the basement under the bar (level 15) and the tower elevator (level 22) in Machinarium:
- Items on the sublevel: key, canister with liquid nitrogen.
- Having said goodbye to the robotic brain, we go down to the elevator. We insert a light bulb into the control panel and draw an eight-pointed star. Once in the basement, we take the hammer in our hands, break the porthole window, and take out the key. We return to the elevator, on the wall, to the right of the entrance, there is a panel with a keyhole. We insert and turn the key, take the canister of liquid nitrogen from the cabinet. Use it to cool the castle and break it with a hammer. Robogopniks will fly into the gutter, the passage to the bar kitchen will be free.
Walkthrough of the oval tower room (level 25) and the tower roof (level 26) in Machinarium:
- Sub-level items: no.
- We take our girl, return back to the robotic brain at the top of the tower. We go outside and approach the panel at the left dead end. We remember the numbers - 7.0, 108. We return inside, there is a yellow receiver on the table to the left of the robotic brain, set the wave to 7.0, 108, listen to the melody. We go out again to the roof of the tower, approach the panel, select the melody we heard by pressing the keys numbered 1, 4, 2, 3, 5, 2, 3. As soon as the ladder to the helicopter appears from the wall, we quickly block it with a cross-shaped stopper, which should activate partner (girlfriend of the main character). We jump into a police helicopter and fly away towards unknown distances.
How to play?
The controls are very simple. Almost all actions are performed with the mouse, only in mini-games you will sometimes have to use the arrow keys on the keyboard and the spacebar. Our main character has a unique ability - he can stretch and shrink. To do this, simply click on the GG with the right mouse button and move the mouse down or up. The inventory opens by moving the pointer to the top of the screen. The menu opens when you move the pointer to the bottom of the screen. We carefully examine everything on location and think with our brains. The game also provides hints, they are located next to the inventory. The light bulb is a small hint, in the form of a picture. The book is a passage of the level; to open the book you need to complete a mini-game. You need to hold the key to the lock, killing spiders along the way.
Start
First of all, click twice on the bathtub, above the head of our hero, then click twice on the torso and once on the head. We enlarge our hero, take the toy from above and give it to the mechanical animal when it runs up to the main character (hereinafter simply GG). We take a magnet and unwind the thread by simply pressing the spool. In the inventory we combine a magnet and a coil. We approach the lake and kick the pillar. We tie a magnet to the post and raise our hand from the bottom. Here, in fact, our hero is assembled. Let's go right.
Checkpoint
Our task is to make the bridge lower so that we can cross it. So, we take the limiting cone, we throw several more cones into the abyss, under the last of them there will be a bucket of blue paint, we take it. Pour the paint from the bucket into the vat and dip the cone into it. We approach the lamppost, go up, when our GG refuses to go higher, pull out the step and under it and insert it into the hole for the steps from above, repeat this procedure again. We rise to the last step, increase our GG to the maximum and take the light bulb. Now we screw a light bulb onto GG’s head, then put the cone on top. We increase the GG to the maximum and pull the handle near the cabin. We cross the bridge, however, because of the puddle at the end we fall down.
Abyss
We go up the steps, take the handle under the lever, attach it to the railing, and go down. We go right, to the tank. We reduce the GG and click on the toggle switch, which is located under the tank. We put the switches in position A2. We return our ward to normal size, climb the stairs, increase the GG to the maximum, and cling to the pipe hanging from above. We crawl along it to the right, grab the block and fall down. We place the block on the rail farthest from the GG. We pull the railing, unscrew the wheels from the rolling trolley, sit on them, pull on the railing and fly into some room with the breeze.
After watching how a large robot, very much like a thief, descends from the chimney and steals a berry from a trolley, our GG remembers that this robot offended him in childhood. We will take revenge on him! We go to the middle of the hall, press the red button, approach the door, which is located on the right side of the hall, take the key hanging next to it. We approach the panel that opens after pressing the button. We put the levers in this position: 1 – down, 2 – up, 3 – down. We press the big red button, make our hero smaller and run to the trolley, jump into it. When the claw lifts us into the air, click on the platform to our left. Use the key to open the panel, rearrange the wires so that only the upper left wires are crossed, and the rest are not. We jump down, again press the big red button on the panel, quickly climb into the trolley, and when the claw picks us up, we wait until the claw reaches the pipe, and then we press on this pipe.
Camera
The impudent bandits imprisoned our little hero into the cell, you need to get out! We talk to our cellmate and he asks for a smoke. Next to it, from the tap, we remove the mold and also click on the tap twice, we get the handle from the tap. We go to the toilet, take toilet paper. We increase the GG, put mold on the light bulb. We wrap the dried mold in paper and give the resulting cigarette to the cellmate, we get his hand. We approach the toilet, make the character smaller, take the cellmate’s hand and stick it into the hole in the wall. Then we push it into the far hole, shake the cabinet three times, and get a broom. We connect the handle and the broom, you get a key. We use this key on the sewer hatch, crawl along the sewer to the next hatch, open it with the key.
Jail break
So, we are right under the table at which the bandit is sitting. The bandit swings imposingly on a chair and shoots at a target. When he swings again, just pull the chair, the bandit will fall. While he has not yet gotten up, we quickly take the bullets from the table. The bandit will see that the bullets have run out and will go to pick them off from the target. We take the key from the bandit, pour the bullets onto the floor and climb out of the hatch. We insert the key into the panel that opens the doors; the key must be inserted into both holes. After this we go down the hatch again. We are waiting for two prisoners to come out, the bandit will run to arrest them and stumble. We get out of the hatch, go up the stairs and go through the door. We look through the telescope, that’s where our bandits are. It turns out that they are not bandits, but terrorists, since they planned to blow up the citadel! We press the little red button next to the telescope, remember the time on the clock - 4:45. We go down to the room where the bandit was sitting and go through the door on the left. We go into the middle chamber, increase the GG and take a plunger from the ceiling. We go out into the corridor and approach the left door. We click on the combination lock, code 4:45, and go into the opened door. Click on the safe. Now you need to solve the puzzle.
Green and red roundels should be placed so that on all edges geometric figure, in the middle of the puzzle, there were only green rounds, and red ones should be on the sides of this figure. If everything is done correctly, the safe will open and we can take the gun from there. We go into the room with the telescope and go out into the street, through the door from above. We approach two large boxes from the right, push them to the left twice. There is a panel next to the robot lady, we approach it. First of all, lower the handle. There are 6 buttons on the panel: 3 yellow, with a “down” icon and 3 red, with an “up” icon. You need to position these buttons correctly, as in the figure.
After this, the top drawer will be attracted to the magnet, and we move the bottom one to the place where it originally stood. We climb the box, increase the GG, climb the stairs. Now you need to place the displacer correctly. Click on the button 4 times to the right of the radar with an arrow. After that, click on the button with a triangle in the middle. When the buoy floats to the ground, press the button with a drop. When the dog drinks the oil, we go downstairs and shoot the dog with a pistol. We take the dog to its owner and get an umbrella. We use the umbrella on the water flowing from the roofs and go forward.
Traveling musicians
In the passage we will meet a company of musicians, each of them has a problem with their instruments. We go to the bar, on the right side of the bar, from the top shelf we take duct tape from flies, having previously increased the GG. We sit down next to a robot that is playing some kind of game. Its rules are very simple: you need to build a chain of five cogs in any direction, and not let your opponent do the same. The game is not easy, but with a little practice, victory will come. Having lost, the opponent will furiously hit the board and all the nuts will fly apart. We collect them all over the bar, look at the door on the right, these nasty bandits are sitting there. We leave the bar, go to the smelly tank and apply sticky tape on it, we get flies. We go into a bar, drop flies on the bartender, and take away the barrel. We give the kick drum to the drummer, and the nuts to the saxophonist. We select the plant that will remain from the fallen pot. We go up the stairs, straight to the main square. From the railing, opposite the fountain, take the handle. We insert the handle into the hole in the wall, next to the girl. We turn the handle so that the red hand on the city clock is at position VI, and the black hand is at the third sign from the top counterclockwise. Moreover, the black hand changes its position when the red hand passes through the 12th hour. The robot sitting in the booth upstairs will leave, go to his place and take the loudspeaker. We talk to the robot in a wheelchair, take Maslenitsa from him. We go down to the musicians, go into the passage to their left. We place Maslenitsa on an oil stain. We take Maslenitsa back to the disabled robot. He will lubricate himself, and again ask to bring oil, again we take Maslenitsa. We go up the stairs, which is located next to the robot girl. We climb the ladder up to the robot and unplug the cord from the socket. When we fall, pull up the red wire from the left hole. We open the electrical panel in the lamppost, here a game of tag awaits us. We move a couple of tiles, suddenly one tile falls out, and then a harmful parrot picks it up. We go to the middle of the bridge, the parrot will follow us. We begin to squat and increase the GG, the parrot will repeat everything. We quickly change the size of our hero, the parrot will swing the wire and break it. As a result, the parrot will fall and give up the tile. We wrap the broken wire around the fence. Open the shield again and collect the tags; in their finished form they should look like this:

If the tags are assembled correctly, then voltage will be applied. We climb onto the robot stepladder and pull the cat’s tail. When the cat shorts out, move any tile in the electrical panel and select the cat. Let's go down to the musicians. We look into the huge tuba of the leftmost musician. Let's put a cat in the tube. We listen to the orchestra and pick up the tape recorder. We return to the disabled person, open the hatch and go down into the sewer. We approach the table on the right, open it and take the notepad. Scroll to last page, take the gas key. We go down into the pool and look into the pipe. We go back up, look at the intricately woven pipes on which another gas key hangs, and take the wire. We go down into the pool, pick around the drain with wire, and find the third gas key. We approach the pipes and block them in this way:

In the inventory we combine a tape recorder and a loudspeaker. We put the tape recorder on the table and unscrew the tank. We get out of the sewer, approach the fountain, and jump down. We unscrew the flywheel and make our way through the pipe. When we stand on the platform, press the red button. Now look at the puzzle in the upper left corner of the platform. Its meaning is to swap the red and gray balls. Here's the solution:

Now we look through the small window in the grille. The girl of our little hero is working in the kitchen. Now you have to play for her. We take the pan from the stove and place it on the floor. We open the pantry, take the corn and put it on the stove. Now our hero takes the hook and uses it on the window. As a girl, we stand on the pan and use a hook to hook the freezer from above twice. We put the pan on the stove and put the battery in it. We put one end of the resulting hose in the sink, and give the other to our hero. We start the platform by pulling the small red handle from below, and on the puzzle we pull the lever up. At the top, click on the huge fan. It's time to answer his questions. We answer incorrectly (A, A, C, B), then he will get angry and explode. Well, we go to the laboratory.
I can't find the walkthrough online. And the passage carefully suggested by the developers does not always help. So I’m writing.
It all starts with the robot being thrown into a landfill. What happened and why we don’t know.
DUMP
Click twice on the bathroom and twice on the body underneath. 1 time on the head and on a mouse running nearby (if it does not run nearby, the click will not occur) So, the mouse needs a toy. We extend our length, take the mouse toy and give it to the mouse. Take the magnet and thread from the spool. We combine them in the inventory. We kick the pillar and use a magnet on a rope on it. Let's go right.
LOCK.
So. they don’t let us in. We take one cap on the right, throw the rest into the abyss, take a bucket of blue paint. Stir a bucket of blue paint in a large bucket and paint the cap. We climb behind the light bulb; when the robot climbs in, we need to take out the bottom step and move it up. We put the light bulb in the head, put on the cap, and go through the checkpoint.
ROOM WITH CARTS.
We go up, take the hook, and put it on the top edge of the railing. Now we can pull the lever from below. Let's go down.
We flatten ourselves next to the barrel and reach two switches. We set it to 2A. We climb up the ladder, lengthen ourselves, crawl along the crossbar and remove the yellow triangle. We place the triangle on the rails approximately in the middle and lower the cart. If the cart fell next to the barrel, the triangle was installed correctly. We tear off the wheels of the cart. We sit on them and call the next cart.
ENGINE ROOM.
We read the instructions on the left, we need the sequence TURN-DOWN-TURN. At the right door we take the squiggle. Push the red flashing button in the middle of the hall. The remote control opens on the right. We set bottom-top-bottom. Press the red button on the right. We shrink and run into the cart. When he lifts us up, an arrow will appear on the left, press and the robot will be on the ground. We insert the lever, click on the upper left pair of wires (it twists), and jump down. We press the red button again, run into the cart and jump into the hatch on the right, where the robo-hop had jumped before.
APD1
JAIL
The person on the right asks for a cigarette. We take the green grass on the right, extend it, and place it on the lantern. We get dried grass. We tear off the waste paper and roll a cigarette in the inventory. We approach the robot and give him a cigarette. We go to the left side of the camera, make ourselves smaller, stick our hand with the robot’s hand into the hole and tickle the nearest fat guy. He jumps into the little one’s arms and we can stick our hand further into the far hole. We shake the closet until the mop falls. We give the robot a hand. We hit the tap that is on the right and get a wonderful key, connect it in the wasps inventory with a mop - and voila, we have a universal master key to the floor of the chamber.
Open the floor with a master key. We crawl to the right and open another similar hatch.
ROOM
Now we are under the table in an illegal position. Now we need to do everything quickly. When the bandit is swinging in a chair, pull the chair so that he falls. Immediately pick up the fraction from the table. When the bandit approaches the target, take the key from him, crawl out from under the table and use the key to open two keyholes on the wall (just open the left one) and scatter shot under the chair. One time I failed to open both wells and I dropped the bandit again. took the fraction...
Now the bandit has escaped, you can easily open a second well. Let's go upstairs.
ROOM WITH A TELESCOPE.
We look through the telescope. If you turn off the light (near the door), the time appears on the clock as 4.45. Let's remember.
STREET.
Let's go left. The rain is preventing us from passing, the aglamorous aunt needs a dog. A glamorous dog digs through the trash cans in the right corner. Next to the aunt on the right on the wall there is a puzzle, you need to move the arrows. If you number the places of the arrows from top to bottom from 1 to 7, then press the places in sequence: 5,3,2,4,6,7,5,3,1,2,4,6,5,3.4. Now the fan at the top starts to suck. Well, this will come in handy. We go right to the dog. We click on it and see that we need a gun with a suction cup. Cool.
We return to the prison. Thankfully, from the room in which the bandit was sitting, you can now go to the left and there will be an entrance to all three cells at once. in the second berm a suction cup from the ceiling. and the third must be opened by setting the required time. set it to 4.45. Now you need to solve the puzzle so that the green ones are inside and the red ones are outside. We twist it, now we have a gun, connect it to the suction cup and go shoot the dog.
STREET.
This stupid animal hides behind the tanks so that it cannot be hit. We need to climb up, but we won’t be able to climb two boxes at once. We push both red boxes to the left towards the aunt. We push them under the suction cup and lower the suction cup down (there was a lever on the puzzle with arrows on the left). Now we have one box, we push it back to the dog. We climb onto the box, then up the stairs into the rusty control room. Point the button and the arrow to the south-east-east and press go. A rusty canister approaches the island on which the dog is sitting. press the oil button. The joyful animal runs out to drink some oil, and we climb out of the cabin. we shoot the dog, get a wonderful packaged dog and take it to the aunt. Auntie for some reason new packaging I didn’t appreciate it and threw out a pistol with a suction cup, okay, at least we can take an umbrella, let’s go into the rain and up.
SQUARE WITH MUSICIANS.
So, we are in the city, we don’t remember anything and everyone will use it. We point at the musicians. One has no drum, the second has no rivets for the pipe, and the third has something with red eyes sitting in the pipe. Well, since we don’t remember anything anyway, we’ll look for rivets, drums and something else. We go right to the repair shop.
REPAIR SHOP.
The bartender chases us and asks us for all the money. Zhmotyara. We sit down at a table and play tic-tac-toe. you need to place 5 crosses horizontally, diagonally or vertically. We win and the guy throws all the screws away. We collect them (5 pieces). Whoops, these are pipe rivets!!! We look through the door window on the right. In the room on the right, bandits are playing cards. We tear off the adhesive tape over your head. We go to the square with the musicians.
SQUARE WITH MUSICIANS.
In the near right corner of the square there is a vat with a smelly green liquid. Apply adhesive tape to neog. Now we have flies (or bees). We give the flies to the bartender and the first barrel.
We give the barrel to one musician and the rivets to another, they play and the aunt throws a pot at us, we pick up a flower. We go up the stairs.
TRANSITION.
We can’t do anything in this transition yet; we rise higher.
SQUARE WITH A FOUNTAIN.
There's a crowd of extortionists here again. The grandmother wants to see the infinity sign, the disabled person wants to be cured. We take away the oil can from a disabled person. Not far from the grandmother hangs a note on which are indicated the symbols that must be entered in order for the infinity sign to appear. But we don’t have anything to turn the clock yet. We go up the stairs to the left from grandma.
ELECTRIC CAT.
Here we see an electric cat that could save the last musician with a trumpet. BUT an evil guy, a mechanic, is stopping us from getting it. There is a door on the pillar, we open it and try to assemble the mosaic. Eventually one of the elements will fall out and the crow will take it. We go to the middle of the bridge and begin to lengthen and narrow, the crow repeats after us and in the end it will break the wire. We take the last part from her and tie the wiring to the fence. Putting the puzzle together. wherein last detail will be on the right top corner, it is better to insert it last - this will make it easier for the tag to assemble. Now there is a live wire. We climb onto the mechanic and pull the drill out of the socket; when he throws us off, we pull the red hanging wire. The fitter moves the stepladder, we climb on top of the fitter again and scare the cat.
We turn off the voltage on the wire, moving aside the blue piece of the puzzle that we assembled before and take the cat. Let's go to the musicians.
SQUARE WITH MUSICIANS.
We direct the cat to the dark end of the pipe, the musician plays even louder and the aunt throws the receiver at us. Let's pick him up. We go into the opening to the left of the musicians and collect oil in an oil can. We return to the square with the fountain.
SQUARE WITH A FOUNTAIN.
We give the oil to the disabled person, he says that he needs not just oil, but mixed with sunflower oil. But now he can roll away from the hatch. We won’t look into the hatch yet. because I found a watch handle. She's on the screen right in front of the fountain. We insert it into the hole next to the door and turn it to one of the signs that will show the granny infinity. The granny leaves, followed by a new note, we introduce new signs on the clock. The granny comes, but the dude from the tower on the right leaves. Let's go to the tower. We tear off the speaker, repair the tape recorder in the inventory, go down to the square, lift the hatch, near the disabled person, jump down.
LUKE
We remove the hook from the pile of pipes, in the box on the right we scroll through the instructions to the end and find the red valve. In the sewer on the left we take out another valve with a hook. Now you need to turn off the pipes with red valves.
The valves need to be placed in the lower right corner. Schematically like this:
ahhhhh
bbaaaa
abaaaa
Now you need to persuade the giant key sitting on the pipe. he needs music. plug the tape recorder into the socket above the box on the right, unscrew it. The water has gone down, we go up. We jump into the dry well, unscrew the valve and crawl along the pipe. We jump onto the cart.
CART.
Press the red button. Click the window. Here she is our favorite.
to be continued
Hello, dear gamers, I present to you a text assistant for passing the game Machinima.
The adventures of a cheerful corrugated robot.
(I would like to add on my own that the game is a lot of fun when you go through it without any hints, using your brain!)
And so let's go.
Scene 1
Dump:
You little robot, who was shamelessly thrown out of a garbage truck, while you lose several limbs, and your head is not quite in place...
We use the bathtub, and part of your body falls out from under it. There is a click on the body, and with a roar it falls to the ground near the head.
We click on the head, click - it’s in place..
(You can only interact with objects and perform certain actions within the robot's reach)
There is a “clown” doll lying above the robot; to get it, point it at the robot, an arrow appears, pull it up, click on the doll. + doll
Something is missing!
We point at the rat, when it comes closer, a dialogue occurs... we understand what the rat wants, and we give it to it - a doll.
There is a magnet nearby, point at it + magnet
Next: Spool of thread, tyts + thread
In the inventory we connect the magnet and the thread.
We approach the bent pipe and point at it
From the inventory we take out a recently riveted device and use it on the pipe, raise our hand from the lake, attach it in place, and find ourselves on the other side of the puddle. - magnet, rope.
We go to the right and admire the scenery...
Scene 2
Next we watch how a tin with a light bulb passes the place of the brains. If you hang around for a while, you can view the pleasant memories of the corrugated man and his girlfriend...
We stomp to the striped cones, poke and 1 in your pocket, continue to poke until a bucket of paint appears.
You have a bucket. +a bucket of blue paint
We approach a large bucket of white paint, dip the cone from the inventory into it... Next, pour the bucket of blue paint into this bucket and dip the white cone into the bluish paint...
We approach the pole, climb up to the limit... Next, we pull out the lowest pin and use it higher, so we rise to the very limit, there we stretch the body and take out the light bulb.
Having landed successfully, we attach the light bulb to our painted cone and put it on.
We approach the dangling handle, pull it and pass through the abyss, but bad luck - the clumsy corrugated robot does not notice the oil under its feet and falls into the abyss...
Scene 3
Landing on soft spot, we study the situation. We go to the barrel, which from a distance resembles a Chinese fireworks display, squeeze the sufferer’s body to the floor and reach with the handle to the control panel under the barrel.
There are two round switches on the remote control, on the left we set it to “2”, on the right we set it to “A”. We go up the stairs again
Next, we go up the stairs and pick up the hook, use it on the nearest end of the railing.
Having stretched to the limit, we take out the pipe that hangs over you and, like an army, we get to the gilded piece of iron.
We install this piece of hardware on railway, to the second rail from the robot.
Standing in the same place, we pull the railing, really, we didn’t do it in vain))
We remove the wheels from the cart and install them on the rails. We pull the railing and off we go.
Scene 4
Here we meet the first offender, he steals ore and hides. The red button next to it is blinking, click on it.
Take the strange-looking key on the right side of the room.
We approach the remote control, which opened after pressing the button.
We install the levers like this: the first is at the bottom, the second is at the top, the third is at the bottom. And we quickly run to the cart to get into it, when the bucket raises the traveler’s grief, he will want to continue his journey according to the schedule you set, at this time you must jump onto the shelf on the left.
We use the key from the inventory on the box next to you.
We open it up and see a bunch of wires, where the bucket needs to move in a different direction, which means we only change the blue contacts.
We return to the remote control and, without changing our settings, launch the bucket and rush to the cart again.
When the bucket rushes past the pipe that is at the top right of the arrow, we jump there.
Scene 5
Here we meet two more bad guys who are forging some kind of bomb. And we end up in prison.
The robot kid ends up in jail, where the goner robot is already languishing; after talking with him, we find out that he wouldn’t mind smoking.
We go to the right, remove the algae from the pipe, also remove the faucet handle, then go to the push and tear off the toilet paper along the perforations (you can sit on the push, but where is it - the robot didn’t eat anything in the morning)
We take out the seaweed from the inventory and, having first stretched out the body, dry it on the lamp above the pusher.
In the inventory, with a quick movement of the hands, we roll up a cigarette and give it to the goner cellmate.
We receive his hand from him, go to the right side of the room and crouch near the hole at the base of the wall.
We use the recently severed hand on ourselves and extend the incredibly raking claw into the right hole of the adjacent chamber, while scaring the neighbors on the right.
Having reached the third cell, we grab the locker and shake it as hard as we can, grab the mop and pull it back, give the hand to the goner, well, that’s right, it’s the right hand, but there are no women in the prison)))
We connect the mop with the previously unscrewed faucet handle, we get an improvised key, with which we open the hatch, which is located on the floor.
We jump down, go to the right and open the neighbors' hatch. It’s already crowded there, so we go all the way to the left and open the hatch there, a mouse, an infection, steals your key, but don’t care, you meet another one of your offenders.
Scene 6
Finding yourself under the table and unable to get out unnoticed, you have to resort to tricks.
When the offender begins to take aim, we take advantage of the leg of his chair, bang - the offender is on his shoulder blades, but there is no time to rejoice, we grab from the table the fraction that is in the plate, having risen, the offender discovers that the fraction is over, he goes to the wall to dig out more bullets, and when he is against the wall, we reach out to his key, quietly remove it from the belt and throw the extracted shot directly under the switch with two red lights. Next, we rise from the sewer and use the key on the left hole of the switch.
Thus, you free your recent neighbors, noticing the escape, the offender rushes after them, falls into the trap you prepared in advance, this gives time for the two prisoners to escape, having recovered, the would-be guard sets off in pursuit of the prisoners.
We get out of the sewer and go left, and what do you think? You fall into your own trap, apparently, the memory for such things is immediately formatted...
We enter the chamber in the middle, remove the plunger from the ceiling...
We go left, use the remote control, dial the time 4:45. We press the red button and go into the room. Having disassembled the easy puzzle, we take out a kind of weapon from the safe, connect it with a plunger, and we get a thunderstorm of toilets!
We return to the right room. We go up the stairs and go into the doors (here you can knock on the barrel on the right, accurately throw a can of machine oil, but this is of no use, and we move on). We go up the stairs and look through the spyglass, there we see how our offenders are installing a bomb on the very tall building, corrugated in panic.
We go left to the switch, with which you can find out the code on the door with the safe 4:45 (but since we have already done this, we can admire how cleverly the developers hid the hint)
We go outside...
Scene 7
You are on the street, to your right there are two vertical installed tank, we go around them to the right and push them to the left until we push the tanks onto the stage with the young lady with a whistle.
We go up to the lady and clearly understand that we cannot pass under the stream of water, we ask the young lady for an umbrella and we clearly understand what is required of us, we go to the control panel and solve the puzzle, we lift one tank, and we push the second one back where it stood. On the right side we climb onto the tank, reach the ladder and enter the oil buoy control panel. We find correct angle and direct the buoy to the opposite bank, press the button with a drop, and the buoy irrigates the ground with sweet oil, which attracts the dog. We go down and shoot the dog with our thunderstorm of toilets. Having tightened the dog and mercilessly devoured it, we return to the young lady. We return her iron Chihuahua and get an umbrella in return. We use the umbrella on the stream of water and move on. Having lost the umbrella, we go up the stairs...
Scene 8
Having risen, we see 3 unfortunate musicians who also suffered from bad robots, what to do - we need to help the street talents who are in trouble.
We go to the bar (we can try to steal a barrel and get some cabbage soup, or order some heady oil and be refused, not only are we not 21 yet, we also have no money) we go to the right door and look out the window, our enemies are having fun there . We remove the adhesive tape hanging above us (tape for flies). We sit down at the table and try to beat the regular of this hole in a simple game. Having won against the loser, we collect the buttons from the sax and leave the bar. At the garbage dump on the right, we catch flies with sticky tape. We return the buttons obtained in fair play to the owner. We return to the bar. Like a messiah, we send a flock of hungry flies to the bartender and, while they are mercilessly tormenting the bartender, we quietly pull out a tank of oil and give it to the drummer. From the top floor, the evil mademoiselle throws pots, after the pot there remains an unfortunate plant that does not fit into the world of iron and rust at all. We pick it up and lie down in a secluded place. We go to the stairs, climb to the next tier.
Scene 9
We rise to the place where something like a fountain is located.
We talk to grandma, and she talks some kind of heresy about the infinity sign over our city. We go down opposite the fountain, there is a handle sticking out there, squeeze it and take it away (you can also break a couple of light bulbs there, oh, mischievous one). We approach the disabled man, he talks about the terrible pain from rust and asks to bring him medicinal oil.
We go to the large door, which is located under a hefty clock. Insert the recently attached handle into the hole to the right of the door. We rotate the knob so that the black arrow in the center points to the squiggle, which is opposite 9 o’clock, and the red one points to 6 o’clock. Then the robot that is reading the newspaper at the top right, clearly a Jew, for sidelocks are visible and the Star of David is above the door, descends and goes to the temple (I did not find the connection), but we are heading to the abode of this devout robot and, in the style of Robin Hood, we remove the thunderphone, what hangs outside the window. We dashingly go down the steps, go to the left, there are another steps leading up.
Scene 10
We see a robot-ladder-welder-electrician, we are imbued with the desire to climb on it (we stretch out our hands to the kitty, but this kitty is so scared), natural interest makes us unplug the cord from the socket, the robot, etc., etc., noticing the loss of voltage, begins to spin, throwing off the would-be assistant, and plugs the plug into the socket. At this time, we want to help the robot, and we pull the red wire, which makes it even more difficult for the “universal robot” robot. Our interest leads us to the base of the pillar, where the lightning bolt is drawn. We open the door and begin to solve the puzzle. Clumsy robotic hands drop one piece of the puzzle, the bird, without wasting time, grabs the thing we need so much. We notice that the bird repeats almost everything we do, we lure it onto the wire, we loosen the bird on the wire by lengthening and shortening the corrugated body of the baby robot. The bird, losing the wire under its paws, hits the pavement with all its might and drops a piece of the puzzle; we wrap the broken wire to the railing of the bridge. Grab the puzzle piece and put it back. We solve the puzzle, and the current is turned on. We climb onto the robot ladder, which is now on the right, and pull the cat by the tail. The stupid animal falls on the railing of the bridge under voltage, it is sausaged, we cut off the voltage, at the same base of the pillar, we simply destroy the puzzle. We pick up the crazy cat and go down to the very bottom, where three gifted but unclaimed musicians are hanging out. We throw the cat into the musical pipe in which the mouse hangs out. And the music began. “Grateful” listeners drop us a mafon, which we successfully connect to the loudspeaker. We go to the left door. And again we see that unfortunate dripping oil! But now we will need it. We put the oil bottle in a puddle of oil and some ball oil is poured out for us, we go to the disabled person.
Having lubricated his compasses, he frees the hatch, into which we climb with our characteristic interest.
We click on the red key, there is a barely noticeable hook hanging among the pipes, we take it too. We go to the right to the bedside table, open it, read the book, leaf through to the end. +2nd key. We go down the stairs into the empty pool, then go left to the drain, click on the drain and use the hook from the inventory to take out the third key. We rise, click on the robot “Key”, after which it comes to our mind interesting idea. At this time, the robot tells us about his loss. We give him our homemade little phone (we point the little phone at the socket above the bedside table), causing the key to start moving in a cheerful way. Once again we ask him to do us a favor. We unscrew the cap and pour in the villains who have settled in the room below (if we poke it a little, our hero will begin to dance to the beat of the music). So, there are 3 keys, and we need to shut off the water that flows into the tank. We use 3 keys on the pipe system and turn off the water.
We go upstairs and jump into the empty fountain. There we open the hatch and crawl into the pipe.
Scene 11
Having jumped from the pipe, we find ourselves on the elevator; there is nothing left to do but press the red button on the wall.
Approaching the window, we see our friend there, who is forcibly forced to cook by the same scoundrels. Now, controlling the girlfriend, we open the sideboard on the wall. We get corn from there. Remove the pan from the stove and place it on the floor. We put the corn on the stove, which makes some nice popcorn. Our womanizer almost gets hit in the head with a huge hook. We take the hook and give it to our friend.
The girlfriend climbs onto the pan and uses a hook to open the icy cooler at the top, who knows what. Using the same hook, pull out the icy hose from the same cooler. We put the pan in place, place the hose in the pan to melt. We connect the hose to the oil supply mechanism on the left in the room. A friend passes a hose through the window, we fill up our elevator, we pull the red handle and we start the elevator. We go to the switch on the right on the elevator. Let's solve the puzzle. Let's go up.
We pull a sleeping fan out of his sweet sleep. We solve his riddles, BUT not correctly... because of which he gets angry and his engine and all the insides fly out with a rattle. We enter the resulting hole.
Scene 12
Greenhouse.
We take out 2 boxes with negatives from the table. On the right is the remote control, we solve 6 puzzles. We plant our plant from the inventory in an empty pot. We move the growth accelerator to our pot. Press the button (left) on the remote control. Shake out the seeds from our sunflower. We move the growth accelerator to the plant with dangerous fruits. At the same time, take the orange stick that is at the base of this plant. Let's turn on the accelerator. We go up the stairs, insert the stick into the mouth of the dangerous fruit and remove the magnifying glass (magnifying glass) from the mouth. We install this magnifying glass into the projector, and we also install the first box into the projector. We click on the remote control and look for a butterfly with red dots on its wings, this is our code to the doors. Both boxes with photos can be put back into the table. We go to the door and type a combination of red dots exactly with the butterfly pattern from the projector.
Scene 13
Big and small inside
We put the seeds into the machine on the right. We go down and put the oil can under the drain. We rise and frantically pull the lever in order to get valuable sunflower oil. We take the oil can.
Let's go to the robot. His pet or child - I don’t know what it is, in general, it needs batteries. We go down the pipe. We go to the disabled person. A grateful disabled person gives us a ticket to the gaming room, we pick up the bandage that the disabled person removed from his leg. We go to where they took the cat.
We go across the bridge to the left and insert the ticket into the slot, the door is open. We sit on something like a bicycle and pedal furiously, gathering energy to operate the first machine, go down, go to the lever on the left, move it to position 2, pedal again (the 3rd machine will break), play slot machines, solve puzzles, get coins .
Let's go where the disabled person is. We go to the machine with a drawn battery, buy 2 batteries and tie them with a strip of fabric that was left to us from a satisfied disabled person. And again into the fountain, we go to the elevator, refuel the elevator again and then to the robot that is running around with a small pink robot.
Having handed over the batteries, the satisfied robot gives way. Click on the elevator call button.
Scene 14
Elevator
We approach the flowerpot. Take a pinch of earth. We grab the vacuum cleaner and a light bulb falls out. We insert the light bulb into the upper right hole. We create a combination of lines to get to floor “11”; the combination can be seen if you stretch out your torso and look behind the sheet.
Scene 15
Hall
We go left to the lever. We pull it down until the vacuum cleaner is in another room. Let's go get a vacuum cleaner. We look into the push and find a bomb. We climb onto the vacuum cleaner and reach for the scissors. We return to the lever and pull the vacuum cleaner so that it stops under the chandelier. We turn off the electricity, the switch is on the right near the entrance to the toilet. We cut the chandelier. We turn on the electricity. We pull the vacuum cleaner back into the toilet. We hook the chandelier to the vacuum cleaner, then we hook the chandelier by the push, we go to the lever. Lever up, the vacuum cleaner burned out. Let's go to the toilet. We approach the hole that has formed, click on the toilet paper (I suspect that it is rubber). We reach for the bomb. Below, place the letters in the correct order (DBEAC).
We rise, go to the steps and up again.
Scene 16
Creator
Having touched the big-headed one, we learn the whole history of the big-headed one... We go left to the cabinet with the red button. Solving puzzles. We grab the cord and connect with the big head. It turns out that he has 33 bad viruses in his head, and he will have to destroy them, we look for the key, open the fluff, bring down the devils... After we share the problem, the tadpole tells us how to solve it and gives 1 light bulb.
We go down to the elevator. We go into the elevator. Screw in the light bulb. We make a combination like on the wall, “-1”.
Scene 17
Basement
We go to the hammer, break the glass, take the key, go into the elevator, open the doors on the left with the key. We take nitrogen in a jar. We return to the basement and spray nitrogen on the castle. We break the lock with a hammer. Thus, flushing all the villains down the toilet somewhere.
Let's return to the big-headed one. We go out onto the roof. The girlfriend remains near the steps, the corrugated lover goes left to music box. We play a musical combination on the keys, the order of playing the keys is 1423523. Steps appear, the girlfriend turns the star, which fixes the steps.
The robot lets his girlfriend go ahead, like a true gentleman, in order to peek at the microcircuits under her glands. That's the end of the story.
I hope my tips helped you! Still, it's more fun to play without them.
Closed by Nois
After the arrival of the garbage unit and dumping the main character's spare parts into a pile of garbage, before setting off on an adventure, it is necessary to assemble our hero.
Double-click on the bathroom under which the main body of the hero is hidden. When the bathtub falls down, you need to click on the hero’s body a couple more times so that it is closer to the head. Now click on the head to screw it to its proper place. We are still missing an arm and a leg. Stretch the robot and pick up the gnome-like Cheburashka lying directly above the robot. Give this Cheburashka to the tin rat with red eyes, for which she will reciprocate your feelings and drag her hand.
Find a magnet in the pile and take it, also to the right of the magnet, pay attention to the spool of thread, take the rope from the spool. Now combine the rope and magnet by dragging one item onto another in your inventory.
Screen two - Block post
We need to return to the city, but to do this we need to deceive the guard by posing as a valiant robot policeman. For complete makeup we will need a striped cone, blue paint and a light bulb.
Go to the striped cones, take one. Click on the remaining cones and under the last one you will find blue paint. Go to the bucket with the white liquid and pour the paint into it. After this, dip the striped cone into the resulting blue liquid - the cap is almost ready.
All that remains is to get a light bulb for the flasher - there is a suitable one in the lampshade on the pole. Go to the lamppost and go up two times. Then move the cursor to the lowest swinging bar and click. Now insert it into the hole in the post above the robot's head. Now take one more step up and repeat the steps with the second bar from the bottom. Up four more times, stretch our friend and unscrew the light bulb.
We combine the light bulb with the already blue cone, put the result on the head, approach the rope calling security, stretch up and pull it.
Screen three - Back entrance
Like white people and robots, we still couldn’t get into the city; we had to go through the back door. To do this, we will need to ride a cart with fuel.
We go up the steps and pull the lever if the cart successfully passes into the city through automatic gates, which means we will be able to do this too. We take the hook under the lever and immediately screw it to the handrail on the stairs. Now we go down and pull the opposite handrail - it’s much more convenient, you won’t have to run to the lever again :) Now let’s approach the tank on the right side of the screen, flatten the robot and reach the pipe regulator. Adjust the position of the handles to 4 -D and press the red button. The pipe should fit into the hole directly above the lever that calls the next cart. We rise up to the lever, stretch our friend to the maximum, and jump up, and then slowly move along the pipe to the yellow “bucket” hanging on a hook on the right side of the screen.
The selected “bucket” is not a bucket at all, but a springboard. It needs to be installed on the rails and the next cart called. Please note that the springboard must be placed on the farthest rail from the hero. When the cart successfully crashes, we unscrew the wheels from it, sit on the bottom and call the next cart!
Screen three - Firebox
After the villain has “gobbled up” all the fuel from the cart, we need to follow him. No, you don't need to consume fuel! You need to climb into the hole where the pot-bellied one came from.
Find the red flashing button on the stove and press it. Run to the right side of the screen. Near the door, do not forget to remove the key from the hook. There is no need to break into the door, it is tightly closed. Now we approach the opened brush and adjust the sliders so that the first one is lowered all the way down, the second is raised all the way up and the third is again lowered all the way down. We press the start button in this shield, quickly compress the robot to normal size and run to the empty cart while the claw makes a revolution around the stove. We jump into the cart and wait for the claw to grab us by the head. When we find ourselves in the mouth of the claw and it has already lifted us to the ceiling, we need to quickly click on the ledge located to the left of the claw above the lamp. Now that we are free and standing calmly on this ledge, we take out the key and use it to open the brushes on the wall. In the brush we swap the wires on the blue terminals. After which we go down and run to launch the claw again. Now the claw does everything in reverse. After launching the claw, we quickly press the robot again and again run to the empty cart and jump into it. Next, when the claw drags us behind the stove, move the cursor over the pipe from which the villain climbed out, and as soon as the cursor accepts an arrow pointing into the pipe, click.
Screen four - Dungeon
Well, who said that follow the villains good idea!? We have to get out of here somehow. The cell mate has clearly been sitting here for a long time, he could use a cigarette.
We sit on the toilet, of course we won’t be able to poop, but a piece of toilet paper will be very useful. Now let’s go to the tap and pull out the green snivels from it, and also don’t forget to unscrew the valve by twisting it a couple of times.
The sniffles are so green and wet that of course no one will smoke them, because the lungs can rust - you need to dry them. To do this, we go to the toilet, stretch our friend up as far as possible and place the domes on a warm light bulb. Dry snivells are a different matter, we wrap them in paper and give them to our comrade, for which he shakes our hand so tightly that we get his hand for a while.
There is a hole in the wall near the toilet, we approach it and shrink almost into a cake. In the next cell we see our wonderful neighbors. Now we get our trophy from our neighbor and use it on the hero. We reach with our hands into the hole farthest from us and grab the leg of the safe, after which we shake it until the mop falls off its lid. We grab the mop and screw the valve that was previously unscrewed from the tap onto it. The result is an excellent tool for opening floor hatches.
The cowardly neighbors have nothing special to do, so you can immediately safely crawl to the right to the next screen.
Screen five - Watched
We crawl along the pipe to the right to the hatch and open it with our broom. There is another villain guarding the dungeon. We need to neutralize it a little and help our cowardly friends get out, for this we need a key that hangs on the old-timer’s belt.
When the old-timer leans on his back and the front legs of the chair come off the floor, we click on the chair and our hero helps the old-timer to roll over from the chair. While the guard is rising, you need to quickly pull the bullets off the table. When the guard discovers that the bullets have run out and goes to pick a new portion from the mess, you need to steal the key from him by clicking on it at the moment when he stands with his back to our hero.
Now that the key is in our pocket, scatter the bullets behind the old-timer’s chair and send him again for a new portion of bullets, while you quickly crawl out from under the table and open the leftmost lock under the stairs with the key.
If everything is done correctly, then our cowardly cell neighbors will distract the old-timer by taking him over. Let's go to the exit.
Screen six - Prison hallway
There is nothing special to do here, you can knock on the remaining tank, try to drink the oil, but do not rush to go outside. Look through the telescope and you will see what these villains are up to. Now go to the door leading outside and click on the switch next to it. Pay attention to the time displayed on the clock in the dark - remember it. Now let's go back to where we came from, to the old-timer's room.
Screen five - Watched
We go down the stairs and go into the passage from which two cowardly friends escaped.
Screen four - Dungeon
We go into the second chamber, stretch our comrade to the ceiling and tear off the plunger from the ceiling. Then we move to the last chamber and click on the castle on the left on the wall. Remember the time that was displayed on the clock in the prison hallway in the dark? Let's introduce it here now.
Here we are at the safe, we need to open it by disassembling a small puzzle. The safe will open only when all the green circles in the center form a green triangle. Here you will have to tinker a little.
The hero will take out a cannon from the safe; it will come in handy later. Now there’s definitely nothing to do here, let’s go outside.
Screen seven - Vodokanal
Coming out of the dungeon, we immediately go to the left; on the second screen of this water canal we need to pass under the broken pipe. But since our hero is made of iron, he cannot pass under water without consequences. There is also a pretty lady with stunning eyelashes standing there, she is ready to give us her umbrella, but in exchange for the umbrella she wants a small favor: we need to find her dog. And her dog is just rummaging behind the barrels on the first screen of the water utility.
To get the dog we just need a gun with a suction cup, which we need to combine. Only the barrel is covering the dog, so you need to lure him out from behind the barrels. Turns out mechanical dogs adore machine oil and here, right in the middle of the water utility, an oil filling station is floating, and the remote control for this oil filling station is at the top of the screen. To get to the remote control, you need to remove one iron container. To do this, push the containers into the adjacent screen by approaching them from the right side and clicking on them with the mouse.
Containers need to be placed under the hanging magnet in the right screen. After that, go to the remote control with the buttons and pull the lever on the remote control on the left - the magnet will lower. Now, to activate the magnet, you need to move all the arrows looking down to the lower part, and all the arrows looking up to the upper part. It's not difficult to do, but you need to concentrate a little. For those who can’t cope with this, I suggest watching the video with the solution:
When the container is successfully magnetized, pull the lever again to raise it, then push the remaining container back to the left screen. When the container is in place, jump onto the stump next to it, and then onto the container itself. Stretch our hero and up the stairs. Here we are in the oiler control cabin. The only thing left to do is to drive it to the opposite bank. Use the red buttons on the remote control to turn the hand to 4 o'clock and press the green button so that the oil can floats to the shore, and then press the red button with a drop to sprinkle a portion of oil. Now run down to the bottom and shoot the suction shot at the dog until it laps up all the oil and again hides behind the barrels.
When we have the dog, we go to the aunt with an umbrella and exchange the dog for her wonderful umbrella, after which we calmly set off along the pier under the broken pipe.
And here we are again on the left screen, only in the background on the bridge, there is nothing to do here, we go to the top of the stairs.
Screen eight - Musicians
Talk to all the musicians, they will tell you about their misfortunes. They need help. The chimney sweep needs buttons for his pipe, the drummer's drum was stolen, and the troubadour has a rat in his pipe.
When you talk to everyone, go to the oil bar, the entrance to which is under a colorful neon sign.
Screen nine - Oil bar
Immediately at the entrance, pay attention to the barrel - this is an excellent replacement for a drum for a drummer, but the barmaid won’t just let you drag this barrel away. Take the fly tape that is hanging on the shelf. And at the same time you can immediately play nuts and bolts with a tin, which is an analogue of the game tic-tac-toe - five in a row. This comrade must be beaten, since it is by beating him that you can get the coveted buttons for the trumpet player. At first glance, it may seem that the most difficult thing is to beat him, but this is not so. Despite the fact that the tin has been sitting here for a long time and, apparently, has already beaten many people, you have every chance of deceiving it. The main thing is to create several lines in a row at once, one at a time, and he will follow you and place bolts in those lines where you last placed a nut.
For those who can’t cope with this game, I suggest watching a video on how to beat the tin:
Don’t forget to look through the window of the door on the right, there you will see the already painfully familiar terrarugs quietly playing cards. Well, if you've already got your thumbtacks and fly tape, head out of the butter bar to the musicians.
Screen eight - Musicians
Give the buttons to the trumpet player. And then go to the drain tank around which swarms of flies are flying and stick as many flies as possible onto the sticky tape. When the flies are collected, return to the oil bar again and release these flies on the barmaid and while she is busy exterminating the flies, quickly and quietly pull off the barrel of oil.
When the dissatisfied aunt throws off another pot, do not forget to pick up a green sprout from it, we will need it later. Now go up the stairs to the city center.
Talk to the disabled person in the wheelchair, he will ask you to bring him oil, giving him an oil can for these needs. Remember, we, disguised as a robot policeman, stomping into the city through the front door, slipped on a puddle of oil!? This is where we will fill the oil can. The main entrance is on a screen with musicians. When you fill the oil can, give it to the disabled person.
Smazov his vehicle and having driven a little back, the disabled person will not calm down and will ask for more sunflower oil. Well, we'll help him, but only a little later. But now there is access to the sewer hatch. Get in there.
Here you will find another victim of the bandits - an adjustable wrench. His gramophone was stolen, and for his help in flushing the fountain, he asks him to help him return the gramophone. But in any case, before releasing the water in the fountain, you need to close the water that constantly enters the fountain through the shower. For this we need 3 keys.
You will find the first key on the pipe with the taps. You will find the second key in the nightstand in a book with instructions if you are patient and leaf through the book to the end. The third key fell into the drain hole under the tank; to get it from there, take the hook hanging on the pipes and use it to pick up the key.
By the way, look into the second pipe and you will see terrarug playing cards, pay attention to the gramophone we need so much on their shelf. But I hasten to disappoint you, we will not be able to get this gramophone, so we will have to find an alternative for our new friend.
When all three keys have been found, turn off the water. To do this, you need to make sure that there is a black dot in the window with an arrow, place the keys as follows:
That's all for now, get out to the city square. And then immediately up the stairs to a new location.
Screen twelve - Near the gaming room
Here we need to get a cat who will help scratch out the mechanical rat that has settled in the troubadour’s pipe. If we climb up the repair bot and try to reach the cat, the cat will immediately notice us and run away. We need to rearrange the bot. Climb onto the bot and unplug its soldering iron from the socket, and then while the bot turns it on again, pull the wires it soldered. After the bot changes position, we can climb on it again and even grab the cat by the tail, but he runs away from us without any problems. Go to the electrical pole to which the socket for the soldering iron is connected and open the shield with the zipper.
Here we need to assemble a picture to supply electricity to the wire. Most likely, almost immediately one part will fall off and fall out of the shield; it will be pulled off by a mechanical bird. Without one detail it will be easier to assemble the picture - collect it. The picture should look like this:

But in order to close the circuit, the chip must be taken away from the bird. Go out onto the bridge - pay attention, birds will fly and perch above you. Now try to stretch the character. It turns out that these are not just birds, but a real parrot - he repeats everything after us :) Go to the left side of the bridge and stretch our friend up and down by swinging the mechanical parrot on the wire until it breaks this wire.
Screen eight - Musicians
Now that the instruments of all the musicians are in perfect order, they will light it up to the fullest, for which the embittered granny will throw her radio at them. This radio is a great alternative to a gramophone, but it's broken. We need to fix it before offering it to the wrench. We stomp to the city square.
Screen ten - City Square
Our task is to find new speaker for radio, he's right here. Hanging above the head of a robot guy with curls reading a newspaper. But you can’t just take him, you have to get rid of the guy. It turns out that robots are also spiritual beings and they have their own religions, and they go to the temple strictly according to the time, which we can influence.
First of all, take the knob for adjusting the large city clock. She hides in plain sight. Sticking out of a hole in the fence in front of the city fountain. By the way, you can misbehave and break almost all the light bulbs sticking out of this fence :)
Insert the handle into the space provided for it near the entrance to the building with the clock. There are also notes with information about when and what religion services take place. Set the time for serving the “Infinity” religion by setting the clock to any of the points indicated in the note at the door. If everything is done correctly, then the red robot robot with an antenna in the form of infinity will go to serve in the temple, and behind her on the wall above the bench you will see another note. Set the service time indicated there. If everything is done correctly, then now the robot guy in the hat with curls will go to serve. We run to his quarters and tear off the speaker. Then we repair the radio by combining the speaker with it and go to give it to the sewer with an adjustable wrench.
Screen eleven - Sewerage
Give the radio to the adjustable wrench and then use it to open the spillway of the city fountain. Thus, you will drown our villains in their little room :) The villains are actually punished, but our work is not finished yet.
Go to the town square, jump into the fountain and crawl along the pipe to the right.
Screen thirteen - Rail elevator
Press the button on the wall to release the emergency brake and go down.
Screen fourteen - Kitchen
Look through the window in the wall and you will see our hero's girlfriend. Since the platform elevator runs on fuel, and at the time of descent the tank is completely empty, until we refuel it we will not be able to get out of here. When you look out the window into the kitchen, you can control the heroine as if you were your own character. On the left, near the door in the kitchen, there is a tank with fuel from it, then we will refuel our elevator.
Remove the cob of corn from the cabinet. Remove the pan from the stove and place it on the floor. Place an ear of corn on a hot stove, the resulting popcorn will knock off the hook we need hanging on the pipe outside. Take this hook and pass it through the window to our heroine. Now jump onto the pan and use your hook to reach the air conditioner hanging from the ceiling. When the air conditioner cover is open, use the hook again to reach the spiral located in it. Jump off the pot, pick it up and place it back on the stove, then place the frozen coil of conditioner in the pan. With the help of such simple manipulations, we now have a long hose at our disposal. Screw it to the fuel valve.
When the elevator platform is locked, pull the handle against the wall on the elevator to start the engine, and then on the elevator control panel, pull the red levers in place of the gray ones, and the gray ones in place of the red ones, and pull the dropped lever up.
Screen fifteen - Good condo
Talk to the air conditioner, he will ask you questions. If you answer them correctly, the air conditioner will happily go to sleep. In order for anything to happen, you need to anger him by answering questions incorrectly. When he gets angry and his motor flies away, get into it.
Screen sixteen - Greenhouse
Here we have to grow a small sunflower in order to subsequently obtain oil from it. Go to an empty pot and plant a sprout there, now move the emitter towards this pot. On the left wall there is a small device that includes an emitter and a slide viewer. This device is a seemingly simple puzzle whose goal is to fill all the space with cubes. How to solve the puzzle completely, watch the video:
Now, to activate the emitter, click on the lowest light bulb on the left and our sprout will grow in a matter of seconds - collect crops from it, now you need to get out of here. Take the stick supporting the far right tree and move the emitter towards it, then activate it again. When the tree blooms and the flowers open, go up to the largest of the flowers and put a stick in its teeth so that it does not bite, then remove the lens from it. Place the lens in the slide viewer and remove it from desk The first drawer is with slides, it should contain slides with mechanical insects. Insert it into the device and scroll through the slides until you see a blue butterfly with red dots on its wings. Now go to the door and click on the lock - it very much resembles a butterfly, activate the lights on the lock according to the butterfly pattern on the wings and pull the handle.
Screen seventeen - Entrance to the tower
Immediately at the exit from the greenhouse you will see an oil press, throw the seeds into it, place the oil can under the tap and pull the handle up and down until the oil flows out of the unit.
Chat with the guard at the tower, he will complain that his little robot does not work properly, it needs batteries, we will get them later. Go down the pipe that is located to the left of the guard and go to the city square, please the old disabled man with the extracted sunflower oil :)
Screen ten - City Square
The old man, having lubricated his knee, will be incredibly happy and will give you a ticket to the gaming room. He will also throw a bandage on the ground - don't forget to pick it up. The batteries your baby needs can be purchased for money from the machine on the play area. To get coins, run to the gaming room, which is located where we caught the mechanical cat. To enter the hall, use the ticket of an old disabled person.
Screen eighteen - Game room
To get coins, you need to complete two games. Apparently, the gaming room has not been working for a thousand years since all the machines are without power and no one is here.
Get on the bike on the right and pedal as fast as you can - this is how we activate the first slot machine. Complete the game in the first machine, it’s a regular shooter, I think you won’t need much effort to complete it. To win you need to score 1000 points.
When the first coin is mined, switch the lever on the bicycle machine to number 2 and pedal again to activate the machine number 2. The toy in the second machine is original and quite complex; if you don’t want to strain your brain, watch the walkthrough video:
You don’t have to turn the pedals a third time, unless of course you want to break the third slot machine :)
When both coins have been successfully mined, we go to the city square to the machine with batteries.
Screen ten - City Square
We exchange coins for batteries, and then rewind both batteries with a disabled old man’s bandage to get one big one. When everything is ready, go to the guard at the tower through the fountain, stop by your friend’s kitchen to fill up the elevator platform, and then up through the greenhouse to the guard at the tower.
Screen nineteen - Elevator
We need to go up to the 11th floor, but the elevator is broken as usual - one light bulb is missing in the control panel. Rummage through the flower pot to make a little mess, when the robot vacuum cleaner appears, grab it. The light bulb we need will fall out of it. Now stretch, go to the remote control and stretch our friend, then move the leaf away to see what symbol you need to draw to get to the 11th floor. Now activate the remote control and insert the light bulb into the hole in the upper right. Draw a symbol and upon arrival at the desired floor, exit the elevator.
Screen twentieth - Hall
And so, we are at the very top of the tower. Approach the lever on the left and pull the lever down until the large iron vacuum cleaner goes into the room on the right. Then run after him.
Interesting: Pay attention to the sitting robot above the vacuum cleaner control lever. This robot came here from the wonderful game Samorost 2 in which he acted as the guardian of a rocket silo on one of the funny planets. And how he got here you can find out from him by clicking on him with the mouse :)
Screen twenty-one - Toilet
Frankly, I still don’t understand why robots need toilets, what’s in prison, what’s here - but everything is planned and looks great :)
Go to the toilet and look into it - there is a bomb that we need to defuse. Now jump on the vacuum cleaner and take the scissors from the shelf above the sink, stretching our friend. Next, we jump off the vacuum cleaner and run back to the hall.
Screen twentieth - Hall
Now we approach the lever and pull it up until the vacuum cleaner is exactly under the swinging chandelier. Now we run to the shield which is located on the right at the entrance to the toilet and turn off all the lights. Then we jump onto the vacuum cleaner again and cut off the chandelier with scissors. We jump down and tie the newly cut chandelier to the vacuum cleaner from the back by the loop. Again we go to the lever and drive the vacuum cleaner to the toilet. Just don't forget to turn the light back on! :) We run to the toilet again.
There we take the tied chandelier and attach it to the toilet and go back - pull the lever up!
When the vacuum cleaner arrives, we run back to the toilet and look at the destruction :) Now pull the toilet paper... oops!
Screen twenty-two - Bomb!
Click on the bomb, and then feel like a sapper! The main thing here is not to rush and concentrate, there is enough time to track where which wires run, there is a hint on the cover.
If you are not a sapper, then the order of the fuses for deactivating the bomb is as follows: D-B-E-A-C
Screen twenty-three - The main guy
Here we find out how it all happened. The main robot is in an unsightly state, grunting and drooling terribly. The whole problem is that he was infected with a virus, he needs to be treated. The box on the left contains the tool we need, but it is protected by puzzles - these are perhaps the most difficult puzzles in this game. Three green balls in both versions must be placed on green squares, watch the video:
When the safe is open, we take out the cable from it and connect to the main robot. Now we have another mini-game in front of us, the goal of which is to find a cannon, and then destroy all the villains in this (labyrinth) brain of the main guy.
When the micro-viral robot cells are destroyed and the guy regains consciousness, he will give the missing light bulb for the elevator remote control and now it’s time to go to save his missus on the minus first floor.
Screen twenty-four - Minus one
The task is to drain the villains and get our hero's love out of captivity in the kitchen. We take a hammer, it is useless to hit the lock with it, we break the window with the key to the right of the hammer. But everything is not so simple, this key is not from the lock, but from the locker in the elevator. We run into the elevator and unlock the locker, from it we take out a bottle with a freezer which we freeze the lock, and now it’s time to hit the frozen lock with a hammer.
Hooray! My friend is saved! But this is not the end, for complete victory you need to fly out of this city on a papelats (this tin with screw). We leave the main man's room onto the roof.
Screen twenty-five - Roof
To get to the papelats, you need to extend the steps; the remote control for activating the steps is located on the left side of the roof. There is a riddle here by ear, pay attention to the frequencies on the top of the device, if you go to the main room and tune the radio to these frequencies, you will hear a melody that needs to be repeated on the roof. If a bear stepped on your ear as a child and you can’t find anything, here’s the key: 1-4-2-3-5-2-3 (keys from left to right from 1 to 5 - press in the indicated order once). When the steps have left, click on the cross next to which your friend is standing to turn it and block them. Now let's jump into the papelats and hooray!
Seems like a happy ending. But no, the heroes are at their most last moment unexpectedly crash, we can only hope that this is a subtle hint at new adventures of the heroes we already love.
Thanks for reading, good luck everyone!
Reproduction of the material is permitted with obligatory reference to the source. Thank you.
To see comments, please enable JavaScript in your browser settings.