Brazier from car wheels: self-made. How to use old disks: master classes on crafts from CDs and DVDs From car disks with your own hands
Another folk craftsman who decided to try his hand at producing alloy wheels deserves our attention. In order to make such discs, he used old junk that was lying around in his garage and some other materials.
For the disks, raw materials were needed, they were the ZMZ-402 engine block made of AK4 cast alloy, as well as other engine parts, a cooking oven, a crucible (a seamless pipe with a welded bottom may work), ordinary charcoal, flasks (wooden frames for shaping) , sifted sand and silicate glue.
First, mix liquid glass with sand and glue. It is best to use a construction mixer. Then we take a cast from the workpiece, leaving a reserve for turning. We leave the cast to dry for several days. We make a fire, put the crucible on high heat, add more coal and turn on the blower. Liquid aluminum is poured into the mold. When the metal hardens, we beat off the crust, sprues and vents. We send the wheels for turning. Next, we assemble the disk; for this you can use 10 M8 screws with an internal hexagon and 10 M8 nuts with a nylon ring.


Many craftsmen make wood-burning stoves and even boilers from thick-walled pipes. But often such a pipe becomes too expensive, while a couple of old car wheels may be at hand. In this case, you can get a wonderful stove from wheel rims, and we will tell you how to make it in this article.
What kind of stoves can be made from car rims?
At the moment, home craftsmen have invented several types of iron stoves assembled from wheel rims. They can be divided by areas of application:
- heating;
- baths;
- for cooking, including barbecue.
These car parts are attractive primarily due to the thickness of the metal. The body of a wood-burning stove made of a steel disk will not burn out very quickly, especially if you take a wheel from a truck. The latter, as a rule, are used for the manufacture of sauna stoves, since they are large in size and metal thick. For a sauna stove, which often operates in extreme conditions, this is an important factor.
Discs from cars and commercial vehicles can make either a good wood-burning heater for the garage or a small barbecue stove. Let's look at them all in order.
Wood-burning heat generator welded from disks
The author of the stove shown in the photo below was inspired by the design of the famous Buleryan type heaters. Only the original costs a lot of money, but such a handmade product costs ten times less, provided that the household has 3 wheels from a UAZ or GAZelle. In addition, you will need some sheet metal and a pipe with a diameter of 100-150 mm, and also a short pipe Ø76 mm.
The most difficult thing is to cut out the inner part of the wheel rims. The grinder is not very convenient, and the metal is thick. A gas cutter is preferable, but if you don’t have one, then a grinder will do. Then, using a welding machine, the disks are hermetically joined to form a housing. The rear part is covered with a metal sheet with a chimney pipe Ø100-150 mm welded to it. If desired, a draft control valve is installed on this pipe, as shown in the photo:

It is not necessary to make a draft control damper if you make a stove from wheel rims with an adjustable air supply. To do this, a pipe with an air damper with a spring-loaded axle is built into the front door. In addition, an additional plate is installed inside the firebox, dividing the space into 2 parts, as in the Buleryan. At the top there is a secondary chamber, into which the chimney pipe pipe is welded.

The furnace can take any diameter, length and orientation in space. It all depends on the number and size of disks, and also on your imagination.
Bath stove
Wheels from passenger cars are not suitable for making a sauna stove - they are too small. The author of the idea, whose diagram is shown below, used 4 old rims from a ZIL-130 truck. Located one above the other, each of them performs its own function:
- the first disk serves as a hood for the combustion chamber. As planned, the sauna stove has a small brick firebox with doors opening into the dressing room;
- the second rim is a heater;
- the third is an additional heat exchanger that takes the energy of the flue gases and transfers it inside the steam room;
- the fourth disk is a tank for heating water.
Note. You can do without a brick firebox by organizing one inside the first rim. But then you will have to heat the sauna from the steam room, and it’s more difficult to make tight-fitting doors in the disk housing.

All additional metal parts required to assemble the stove are shown in the following diagram. A self-made sauna stove works on the following principle: wood burning in the firebox gives off heat through its walls and rim No. 1 with a cut out bottom. It is welded with a second disc where the bottom is left in place so it can be filled with rocks. Inside, a pipe passes through them with the combustion products leaving and heating the heater.

Next, the pipe falls inside the third rim, where a gas divider made of sheet metal is installed instead of the bottom. Combustion products wash the divider, and the disk sauna stove gives off more heat, since this section plays the role of an economizer. Well, the last stage of cooling the flue gases takes place inside the 4th rim, turned into a tank with a lid and a water tap. As a result, the stove works no worse than factory copies, and in terms of durability it will surpass any of them.

Barbecue oven
This wonderful device is made from two rims from passenger car wheels. Although, if someone wants a bigger stove, then there are no restrictions: you can use wheels from a UAZ or GAZ-53. One of them has the bottom carefully cut out and then the rims are welded together.

In order for the unit to be securely installed on any surface, the legs are welded to the lower section, as shown in the photo. By the way, the hole for the hub must also be plugged, but the side holes can be left, air will flow through them into the firebox. To make it easier to carry, handles are welded to the outside of the body, and an opening for the door is cut in the side.

The latter is made from the same piece, mounted on hinges. That's it, the oven made from car rims for barbecuing and cooking is ready. As practice shows, it can accommodate 5 skewers with meat.

Advice. There is no need to throw away the cut-off bottom of the upper disk; it can serve as a stand for a small saucepan, kettle or frying pan.

On the other side of the door, a pipe for the chimney should be welded; a diameter of 50-70 mm is sufficient. The tiles can be modernized a little, since when working, ash spills out through the lower holes, this is not very pleasant. The holes must be plugged, and the air flow must be regulated by the firebox door. Details about the stove are shown in the video:
Conclusion
After studying the essence of the issue, the conclusion suggests itself that making a stove from rims is a very simple matter. This is partly true, especially for people who are familiar with welding and metalworking. Although in the case of a sauna stove you will have to tinker with the brickwork, and the installation in the steam room must be done correctly. Well, for those who are not yet comfortable with a welding machine, there is a great opportunity to practice on stoves.
Some regretfully part with their once beloved CDs. Men are reluctant to give up rims from car wheels. In order not to have to part with your favorite things, the editors of HomeMyHome.ru found many ideas on how to make simple and beautiful crafts from disks.
Many people no longer use CDs or DVDs. But why throw away something that might be useful?
What you can make from disks with your own hands - a general overview
Beauty is nearby and created with your own hands. All you need to do is take a disk, scissors and... imagination. From this material you can build an excellent designer lamp, panel, wall clock. Car wheels serve as a kind of decoration for garden plots or harsh men's garages.
DIY crafts from computer disks
For many, an interesting technique for working with CD discs was a discovery. They are easy to divide into two halves, each of which can be easily cut into small pieces with scissors. But with these shiny mosaics you can already make interesting crafts: decorate any piece of furniture, decorate a photo frame, or line a flower pot.

The shiny iridescent iridescent surface just begs to be remade

Most discs are easy to halve and cut into any shape you like.

Your imagination or our article will tell you what to do with such pieces.
In addition, shiny mugs are used entirely in crafts, covered with fabric or paper, and even made into chic lamps.
What can be made from car rims
People are not always far-sighted when it comes to using old items. Some of them can start a new life, giving the owner good emotions. The same applies to car wheel rims. They lend themselves well to polishing and painting and can turn into very useful products!

Unnecessary wheels can become a great table

Creative lamp? Easily!

A table with lighting will surprise many guests

A charming cauldron stand is an excellent solution for a country house
DIY crafts from CDs and DVDs with manufacturing instructions and photo examples
Thanks to the pliability of the material and its beautiful iridescent surface, seemingly waste products can be used. Blanks can become a highlight in the decor of a room, and it will be especially pleasant that this miracle is made with your own hands.
DIY Crafts for Wall Decoration from CDs
To decorate the walls, you can take the photo below as an example. What can you make from unnecessary CDs for your room? This could be a panel, a screen, or a three-dimensional decoration.

The screen has a decorative and aesthetic function: it is transparent and effectively reflects light
To make a screen, you will need a base assembled from wooden slats or polypropylene pipes. You need to attach longitudinal ribbons to it with self-tapping screws on the lower rod: they can be made from thick rope, crocheted, or take wide satin ribbons. Blanks are glued to each tape at equal distances. Once the glue has set, the tapes are screwed to the top rod.

For such a fish you need a large number of blanks and a base made of thick cardboard. Disks are assembled onto the base, starting from the tail to imitate scales

A wall panel can be made by decorating the discs with bright fabric, tying them or covering them with colored film.
Lamps and lampshades made of disks
Let's try to create a lamp with our own hands.
| Illustration | Description of action |
|---|---|
 |
Let's prepare three pieces of plywood, a threaded rod, a light bulb with a socket, a cord with a switch and plug, washers and nuts. |
 |
We trace the discs on a piece of plywood and cut them out with a jigsaw. |
 |
In one circle we drill a hole for the cartridge and insert it inside. |
 |
Let's make a recess for the wire. |
 |
We connect three circles, the one with the wire in the middle. We drill three holes at equal distances from each other. |
 |
All that remains is to make identical holes in the stack of disks. We string them onto three pins inserted into the base. |
Frames for photos and mirrors from disks
What else can you make from old CDs for your home? We suggest building a beautiful frame for a mirror or photographs. The work process is simple: glue is applied to the base (ready-made flat mirror frame or cardboard) and pieces from the blank are laid. You can cut them into squares or choose any shape.

The work is quick and easy

It is important to coat all the cracks between the pieces. This can be done with decorative putty, acrylic contour, acrylic paint

They also design a frame for the mirror. A light-colored grout will look better in this case.

Another option for a photo frame
DIY watch made from disks
A clock in the house can also be created with your own hands. To do this, you will need an unnecessary DVD blank, a decoupage napkin or rice paper, a wide synthetic brush, hands and a clock mechanism, and craquelure varnish.
| Illustration | Description of action |
|---|---|
 |
Lubricate the surface with craquelure varnish, after wetting the brush in water and squeezing it out. |
 |
Once the varnish has dried a little, apply acrylic paint. Both layers will be ready for further work in 2 hours. |
 |
The drawing is torn out by hand. |
 |
Apply PVA to the surface with a brush, lay out the design and coat it with glue on top. |
 |
After we glued the sequins as numbers, we assembled the clock mechanism. |

Another example of decorating a watch
What can you make for your kitchen from old CDs?
The kitchen is a special place. The housewives spend a lot of time there. To make your time more fun, you can make several DIY crafts for the kitchen. This could be flowers made from disks, panels, a lamp, mosaic on an apron, furniture decoration.

An interesting decorative fabric: the discs are tied together with a thick thread or fishing line and hung

For the kitchen, you can interestingly decorate boxes for household small items. Such things are easy to wash, so they will serve perfectly in the kitchen.

Kitchen furniture decor: original and easy

Interesting screen: a rainbow in the house. You can use glass as a base, and use stained glass paints instead of grout.

Mini organizer: we cover the disc with fabric and equip it with a convenient pocket

The table will attract attention from anywhere in the kitchen. The pieces are applied directly to the table surface, then grout is applied and excess is removed

You can decorate a flower pot in a piecewise rainbow style
Related article:
Weaving from newspaper tubes: new ideas with photo instructions. Let's look at the features of making crafts and step-by-step instructions for several new products.
What crafts for children can be made from disks with your own hands?
Plunging into the world of childhood is useful for many: to see how a child’s eyes sparkle with pleasure and the knowledge that he did everything BY HIMSELF! These are the kind of positive emotions that are easy to get when working with DVD discs: a child can handle the decor with minimal help from adults.

Christmas tree toy: the baby’s fine motor skills will develop faster if he himself cuts everything into pieces and glues them onto the ball provided by his mother

These crafts are done with the help of elders: the lamp needs to be fastened, like the carriage. Young children may not be able to handle this on their own. But they will support the idea

The disc is glued onto colored cardboard. Using scissors, colored paper and PVA glue, a shiny circle turns into a fish

The turtle is based on plastic from a bottle, which can be replaced with cardboard. The disc itself is painted with stained glass paints. To prevent the paint from mixing, you need to purchase an outline

Favorite “Smeshariki” are made simply: adults draw elements of animals on paper, and children’s hands cut them out and paste them onto the disk.
Crafts from disks for May 9
Crafts for the holiday of May 9 come down to decorating the disk space with thematic elements and symbols.

Decorating the base is easy. Such a small panel would be an excellent gift for Victory Day
Take a clean blank as a base. Using PVA glue, an applique made of colored paper, cardboard or satin ribbons will be glued onto it. In order for the panel to hang, a hole is pierced from the edge of the blank using an awl heated over a gas burner. A rope or ribbon is inserted before creating the applique.

Elements for the applique are created separately and then applied without glue - you need to know what kind of composition the end result will be
If you use satin ribbons instead of paper, then it is also worth studying the tutorial on creating flowers from satin ribbons. It is not advisable to touch the finished work until the glue has completely dried.
How to use old disks to make three-dimensional figures
You can build amazing three-dimensional figures from blanks. This work is more difficult than the previous ones, since it requires many pieces cut into elongated triangles and strips. All of them are attached to the base using Titan ceiling tile adhesive. They can use anything as a base, even plastic bottles or unnecessary plastic toys.

Crafts made from disks are perfect for decorating a garden

The ball that many dreamed of in childhood will become a reality

This craft requires a lot of time and effort; it is better for beginners to master simpler products first
DIY crafts from old car wheels with manufacturing instructions and photo examples
Here you may need the help of a man - we involve fathers, husbands, and grandfathers. These are not only decorative products, but also practical ones. Let's try to make an original fireplace and table.
Crafts from wheels for the garden
Instructions for creating a fire pit are shown in the photo below. The construction of such a structure will take less than a day.

You will need to stock up on bricks or stones for finishing, a car wheel (stamped!) and a shovel
For creating a fire, the stamping is ideal: there are holes for the air duct, and there is enough space for both firewood and coals. If desired, you can weld two such disks together by welding 4 legs to them - the design will serve as an excellent barbecue for a cauldron.
DIY crafts from CDs for the home
We make a coffee table from a car wheel with a glass top.
| Illustration | Description of action |
|---|---|
 |
The disc needs to be sawed in half with a grinder. |
 |
We select the parts: a brake disc, two different hubs, a pipe, several bolts with washers. |
 |
We connect the hub to the brake disc. |
 |
We insert the pipe into the brake disc and screw it on. We turn the product over and mount the second hub on top. |
 |
We screw half of the car disk to the hub. You will need to pre-drill holes in it to connect to the glass. Holders are glued to the glass and attached to the rest of the structure. |
Create your own miracles and don't forget to share your ideas with us! The editors of HomeMyHome.ru are sure to answer all your questions on the designated topic.
Video: how to make a mini vase with your own hands
Self-assembly of a barbecue from car wheel rims is a very cheap way to purchase a useful and functional item needed in the garden. It’s no secret that during the summer season, residents of megacities vacationing outside the city find themselves in an environment devoid of their usual comfort. Instead of convenient stoves and multicookers, you have to adapt to electric stoves with 1-2 burners. In the event of a sudden power outage in a holiday village, a primitive period begins. The problem of the inconvenience of cooking over a fire can be solved with the help of an ingenious device developed by folk craftsmen.
It is very easy for car owners to get 1-2 rims. While these parts don't get replaced as often as tires or tubes, you can still find some barbecue material lying around in your garage. Unnecessary rims are thrown into landfills or handed over to scrap metal collection points. A lightweight structure on a metal site can be purchased for a purely symbolic amount. 
In addition to the disks themselves, you will need:

To paint the portable version, you also need to select heat-resistant paint. Painting will give the structure an aesthetic appearance and protect it from exposure to precipitation when stored outdoors.
The easiest way to make a barbecue from rims is to lay the part with the open side up. The standard holes in the cap will serve as a grate for the fuel placed inside. This design can be supplemented with handles and taken with you on picnics: it is lightweight and takes up virtually no space in the trunk, but can reliably prevent forest fires by preventing coals from scattering and limiting the fire to the diameter of the rim. Here is a video instruction on how to quickly do this and what you need to pay attention to when working:
How to make a Finnish hearth from car rims?
A distinctive feature of this type of stove is an open hearth installed in the center of the table. It doesn't take a lot of time or materials to make it. A round metal firebox can be successfully replaced with a wheel rim raised to the desired height. The base for it can be made of stone, cinder block or bricks, not forgetting to leave free space for air flow into the firebox.
Place the disk from the machine on the prepared base and cover it around the circumference with wild stones or bricks, leaving a small hole at the very bottom for ventilation. The height of the masonry should be such as to completely hide the base and the metal hearth. You can improve the design a little by welding a pin with a hook on the side for hanging a kettle or pot. 
On the resulting low column with a recess on top, you need to lay a round tabletop. This could be a cut of a large tree, a specially made slab of artificial stone, a sheet of thick metal, or another available item. There should be a hole in the center of the tabletop, the diameter of which corresponds to the size of the wheel rim. 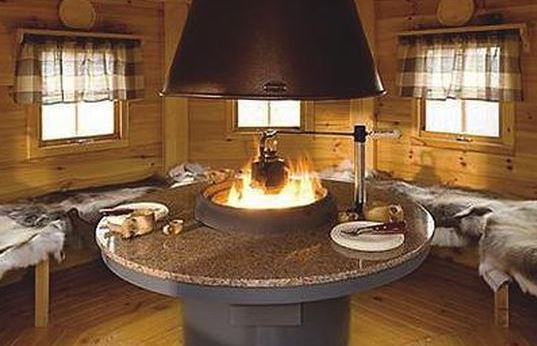
This barbecue made from car wheels is stationary. You can arrange circular seating around it. To protect from rain, it is best to erect a light canopy, and if desired, the master can build a warm gazebo.
Portable barbecue of complex design made from car disks
A metal barbecue made from car rims, made by a craftsman with imagination, can serve as a source of pride for him. Despite the simplicity of its design, such a stove is a multifunctional device: it is a grill or barbecue, a convenient stand for a cauldron, and a decoration for a relaxation area in the garden. In the photo you can see the design of the miracle stove with forged elements, and the fire-breathing Darth Vader. 
Such a fireplace is not very heavy, so it can be installed in any convenient place on the site or taken with you into nature. A special feature of the design is the use of 2 identical disks from the wheels of a passenger car. The material must first be prepared for work: cut out or cut out the middle of one of them so that only the rim remains.
Install the disks from the car in this order:
- place the whole one at the bottom, placing it with the cap down;
- Place the one from which the central part was removed on top.
The upper part of the structure must be positioned so that the rib remaining after removing the hood is located on top, creating a partial overlap of the furnace roof. It is on this that you can lay a grill grate or place a cauldron and a kettle. The sides from the top of the rim will hold the cauldron in the desired position. 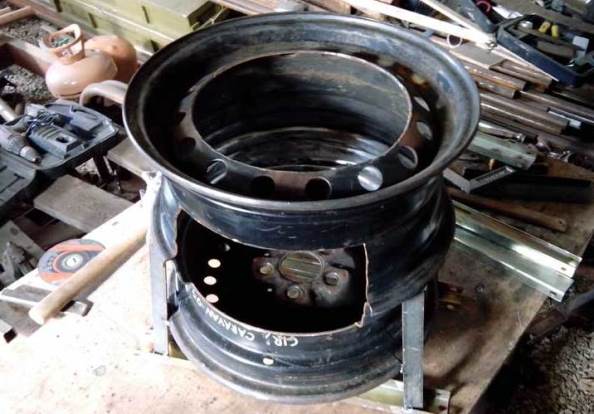
Weld the upper and lower parts of the grill along the circumference. So that when using the product you do not have to remove the dishes placed above the fire each time, you need to cut out a door in the side of the oven. Mark and cut out a rectangle of a convenient size so that there is a threshold about 10 cm high above the grate (bottom of the firebox). This will prevent the coals from falling out when the door is opened.  Other hole parameters can be arbitrary. In principle, everything can be seen in the photos provided.
 The cut piece must be equipped with loops on one side and a latch on the opposite side. For these purposes, you can use ordinary metal fittings (latches, hooks, door hinges, etc.). Small parts can be attached using a welding machine or bolts and nuts.
In order to raise the barbecue to a height convenient for cooking, you need to weld 3-4 legs from the bottom from sections of angle or corrugated pipe. It is most convenient to place these parts inside the rim, the slope of the walls of which will give the structure grace and stability, ensuring the divergence of the lower part of the supports. If desired, the master can solve the problem in another way, by welding a single leg in the center of the structure and complementing it with a wide and heavy base.
Here's another idea on how you can do everything without welding:
After burning off the remaining old paint and applying a heat-resistant coating, the barbecues can be considered ready for use. If desired, you can supplement the design with supports for placing skewers above the neck of the grill, handles for easy carrying and other necessary little things.
Self-made hearths of different types will simplify the process of cooking over an open fire. Each option can become the heart of a friendly company both in nature, in the garden, and in the gazebo. The relatively safe design of portable models requires their installation on non-combustible materials if the floor in the recreation area is wooden. Especially for this purpose, you can lay out the fireplace area with bricks or paving slabs.
We will send the material to you by e-mail
Some regretfully part with their once beloved CDs. Men are reluctant to give up rims from car wheels. In order not to have to part with your favorite things, the editors of the site found many ideas on how to make simple and beautiful crafts from disks.
Many people no longer use CDs or DVDs. But why throw away something that might be useful?
Beauty is nearby and created with your own hands. All you need to do is take a disk, scissors and... imagination. From this material you can build an excellent designer lamp, panel, wall clock. Car rims serve as a distinctive or harsh men's garage.
DIY crafts from computer disks
For many, an interesting technique for working with CD discs was a discovery. They are easy to divide into two halves, each of which can be easily cut into small pieces with scissors. But with these shiny mosaics you can already make interesting crafts: decorate any, decorate, veneer.

| Illustration | Description of action |
|---|---|
 | Let's prepare three pieces of plywood, a threaded rod, a light bulb with a socket, a cord with a switch and plug, washers and nuts. |
 | We trace the discs on a piece of plywood and cut them out with a jigsaw. |
 | In one circle we drill a hole for the cartridge and insert it inside. |
 | Let's make a recess for the wire. |
 | We connect three circles, the one with the wire in the middle. We drill three holes at equal distances from each other. |
 | All that remains is to make identical holes in the stack of disks. We string them onto three pins inserted into the base. |
Frames for photos and mirrors from disks
What else can you make from old CDs for your home? We offer to build a beautiful frame for or photos. The work process is simple: glue is applied to the base (ready-made flat mirror frame or cardboard) and pieces from the blank are laid. You can cut them into squares or choose any shape.


DIY watch made from disks
A clock in the house can also be created with your own hands. To do this, you will need an unnecessary DVD blank, a decoupage napkin or rice paper, a wide synthetic brush, hands and a clock mechanism, and craquelure varnish.
| Illustration | Description of action |
|---|---|
 | Lubricate the surface with craquelure varnish, after wetting the brush in water and squeezing it out. |
 | Once the varnish has dried a little, apply acrylic paint. Both layers will be ready for further work in 2 hours. |
 | The drawing is torn out by hand. |
 | Apply PVA to the surface with a brush, lay out the design and coat it with glue on top. |
 | After we glued the sequins as numbers, we assembled the clock mechanism. |

What can you make for your kitchen from old CDs?
The kitchen is a special place. The housewives spend a lot of time there. To make your time more fun, you can make several DIY crafts for the kitchen. These can be flowers from disks, panels, lamps, mosaics on furniture, furniture decoration.


Kitchen furniture decor: original and easy


Related article:
What crafts for children can be made from disks with your own hands?
Plunging into the world of childhood is useful for many: to see how a child’s eyes sparkle with pleasure and the knowledge that he did everything BY HIMSELF! These are the kind of positive emotions that are easy to get when working with DVD discs: a child can handle the decor with minimal help from adults.


Related article:
This decor is especially popular when creating items in a vintage style. In the article we will look at detailed photo instructions for decoupage: furniture, on glass from napkins, on a box.
Crafts from disks for May 9
Crafts for the holiday of May 9 come down to decorating the disk space with thematic elements and symbols.

Take a clean blank as a base. Using PVA glue, an applique made of colored paper, cardboard or satin ribbons will be glued onto it. In order for the panel to hang, a hole is pierced from the edge of the blank using an awl heated over a gas burner. A rope or ribbon is inserted before creating the applique.

If you use satin ribbons instead of paper, then it is also worth studying the tutorial on creating flowers from satin ribbons. It is not advisable to touch the finished work until the glue has completely dried.
How to use old disks to make three-dimensional figures
You can build amazing three-dimensional figures from blanks. This work is more difficult than the previous ones, since it requires many pieces cut into elongated triangles and strips. All of them are attached to the base using Titan ceiling tile adhesive. They can use anything as a base, even plastic bottles or unnecessary plastic toys.


DIY crafts from old car wheels with manufacturing instructions and photo examples
Here you may need the help of a man - we involve fathers, husbands, and grandfathers. These are not only decorative products, but also practical ones. Let's try to make an original fireplace and table.
Crafts from wheels for the garden
Instructions for creating a fire pit are shown in the photo below. The construction of such a structure will take less than a day.

For creating a fire, the stamping is ideal: there are holes for the air duct, and there is enough space for both firewood and coals. If desired, you can weld two such disks together by welding 4 legs to them - the design will serve as an excellent barbecue for a cauldron.
Article