The best do-it-yourself chicken coops. How to build a chicken coop with your own hands: drawings and photos. Various chicken coop projects photos
Read also
In order for chickens to feel as comfortable as possible in the constructed housing, you need to clearly understand what goals and needs it should satisfy.
The main purpose of such a structure is that it is a place where birds spend the night and where they can safely lay eggs. As a result, the construction of a chicken coop should be carried out in such a way that it serves as a means of protection against:
- unfavorable weather;
- small rodents;
- predatory animals.

Requirements for a chicken house
Chickens, like people, need a cozy and comfortable place to live. Therefore, before starting construction work, you should note important nuances that will make the chicken coop warm and comfortable. This structure must meet the following requirements:

Temperature. If you plan for chickens to live in such a poultry house during the cold season, then you need to take care of maintaining the proper temperature conditions in it. So, in winter, the indoor temperature should not fall below 12°C, and in summer it should not rise above 25°C. In addition, you need to worry about the absence of drafts, since they will adversely affect the well-being of the bird. If the temperature regime is not observed, the process of laying eggs may be disrupted or even stop completely.

No moisture. Many chicken diseases occur due to high humidity. Therefore, you need to make high-quality ventilation in the chicken coop. Moreover, the ventilation system can be either forced or natural.

Lighting. How well the lighting is organized will determine how the chickens will lay eggs. Bulbs with diffused warm yellow light are suitable here. To regulate the lighting mode, many owners use automation (various timers and relays), which turns the light on and off at certain hours. When wiring, you need to try to organize everything so that the wires are inaccessible to birds.

Calm. Peace and quiet are the key to a calm and normal life for all birds. Therefore, you need to choose a place for the poultry house away from a busy house.

Safety. A house for chickens must serve as protection for birds from rodents and predators. Therefore, it is optimal to build it on a columnar foundation.

In addition to the main space where the drinking bowl will be located, you need to think about the location of future nests.

Summer chicken coop design
A summer chicken coop is characterized by ease of execution, low cost, a minimum of materials used, and the absence of a foundation.

Basic construction skills are sufficient for its construction. Such poultry houses are built as an additional measure to protect chickens from small predators.

In addition to the chicken coop itself, a special enclosure must be made, which is equipped with a canopy.

A necessary attribute, it is needed to avoid overheating of birds during their walks, for example, on a hot summer afternoon.

Winter chicken coop
The idea of building a winter chicken coop with your own hands is quite realistic. This type of building for 10 birds must have a foundation. To better retain heat inside in winter, it is advisable to attach a small vestibule to the main entrance to the poultry house.

The interior space must be sufficiently illuminated, insulated and ventilated. Plus, there must be a designated area where the bird will walk. There should be no more than 3 chickens per 1 m². Therefore, if you plan to increase the bird population in the future, then it is better to immediately build a large poultry house.

Technical details you should know
Making drawings of a chicken coop with your own hands is not as difficult as it seems at first glance. Knowing the basic principles of construction will make your work much easier:
- Doors must open inward.
- It is better to build the floor inclined - this will make cleaning much easier and faster.

The size of the object is calculated based on how many birds you plan to place in it. If you intend to maintain a permanent herd, it is not advisable to erect a large structure.

Necessary materials
To build a chicken coop you will need the following materials:
- sand and gravel;
- lumber for formwork;
- reinforcement for the supporting mesh;
- concrete;
- wooden beams and planks for the main building;
- brick (if necessary);
- window frame (if included in the selected sketch);
- cable and light bulbs;
- nails, self-tapping screws and screws.

You should also prepare tools such as a shovel, screwdrivers, a hammer, a stapler for fixing the mesh, and a trowel.

Since the range of building materials is huge, owners of dachas and country houses may have difficulty choosing, so here is a short list of recommendations for selecting everything you need:
- It is better to use wood to build a summer poultry house. Wood has low thermal conductivity, so there is no need to spend significant money on insulation.
- If you plan to use the poultry house for its intended purpose all year round, then it is preferable to choose brick as the main building material. However, the walls will need to be additionally finished with boards in order to improve thermal insulation.
- Do not choose overly powerful light bulbs for the chicken coop; a simple incandescent lamp is enough.

Features of construction and internal arrangement of a chicken coop
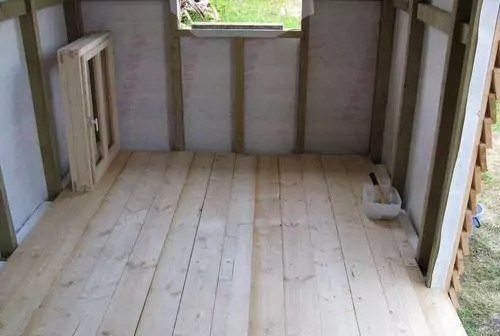
If you are going to build a summer version of the poultry house without a foundation, then you can get by with an earthen floor. However, if you plan to install a permanent structure on a foundation, you will need to lay a flooring made of boards, on which you will then place a bedding made of soft materials, for example, straw or sawdust, 3 cm thick.

The walls can be either wooden or brick. The latter option is more expensive and labor-intensive, as it requires thermal insulation work.

Speaking of roofing, it is preferable to choose a single or gable structure - it will protect the chicken coop from flooding during rainfall. Don't forget about the thermal insulation of the coating. You should also check the finished roof for any cracks, as they are a source of dampness and drafts.

After the chicken coop is ready, care must be taken to create suitable conditions for the birds to live. Let's consider the main criteria that a poultry house for 10 birds must meet:
- The base area should not be less than 4 square meters. m.
- The poultry house needs to be equipped with nests (2 – 4 pcs.).
- The feeder and drinker should be located opposite the perch.
- The floor surface must not slip, otherwise the bird may damage its legs while moving around the room.
- The ideal distance between drinkers and feeders and the floor is 5 – 10 cm.
- The perch should be high, attached approximately 0.5 m from the floor level. If there are several of them, then they should be located on top of each other.
- The total area of the chicken coop windows should not be less than 10% of the floor area.
- It is better to place artificial lighting above the feeders.
- The dimensions of the aviary adjacent to the poultry house are calculated taking into account the fact that 2 square meters are needed for 1 bird. m. of space. A special ladder must be installed between the building itself and the territory of the enclosure.

Building a chicken coop with your own hands only at first seems like an impossible task, but when the construction process has already started, you will understand that everything is not so scary. Good luck and inspiration to you!
Drawings for homemade chicken coops


Many owners raise poultry. The best option is chickens. They are undemanding to living conditions, but it is necessary to build a good chicken coop. For a small family, it is enough to have 10 laying hens. To do this, you will need to make a chicken coop with your own hands for 10 chickens. Drawings and detailed instructions will help you build a quality structure.
You can make a beautiful and spacious chicken coop yourself
Read in the article
How to make a chicken coop with your own hands for 10 chickens: drawings and requirements
To begin construction work, you should familiarize yourself with the basic requirements for such a structure:
- placement of the building. A rectangular chicken coop should be placed from east to west. Chickens lay eggs better if there is enough daylight, so windows should face south;
- When creating a warm chicken coop with your own hands, it is worth remembering that the room should not be hot, since at temperatures above 25 degrees the chickens will not lay eggs. But even in winter it is necessary to create warmth. In cold weather you will also need a structure. The temperature must be at least 12 degrees;
- it is better to locate the building away from noisy places;
- high humidity can cause poultry diseases, so ventilation is necessary;
- The dimensions of the room are selected taking into account the fact that two chickens can be accommodated per square meter. In cramped conditions, chickens lay eggs worse.
Helpful advice! When designing a poultry house, you need to take into account that over time the number of individuals may increase and more space will be required.

When arranging a room, it is worth equipping the windows with shutters made of, and for walking, provide an area under a tree or under.
chicken coop cage
Features of chicken coop design
Drawings and photos will help you create a competent project for a chicken coop with your own hands. It is important to choose the right size of the building, which depends on the planned number of birds. The type of structure depends on how many birds will live in it and on the types of materials.

When designing, it is worth planning to open the door inward, and the floor should be arranged with a slope towards the entrance. This will make the cleaning process easier. It is worth considering the interior design of the room. There must be a sufficient number of drinking bowls and perches. For such a structure it is worth considering heating, lighting, etc.
Features of installing the simplest chicken coop at the dacha with your own hands: stages of construction and photos
When deciding how to make a chicken coop with your own hands, you should familiarize yourself with the main stages of installation.
The table shows the main steps in constructing a simple poultry house.
| Image | Stages |
 | Construction (only for structures with large livestock) |
 | |
 | Selection and installation of flooring |
 | |
 |
You can build a chicken coop from scrap materials. To save money, you can use the room without construction or use a base on posts, for which leftovers or cobblestones will do. The floor can be made of adobe or earthen, and the roof is made of durable plastic, tin or remnants of slate.

Nuances of creating a foundation
For a do-it-yourself chicken coop for 20 chickens, a photo of which can be seen in this review, you will need a more durable one. Depending on its type: or columnar - you will need a concrete mixture, a composition of or.

The foundation is erected in accordance with certain rules:
- the area is cleared and the top layer of soil is removed, about 25-55 cm;
- Sand and gravel are used as a cushion;
- the formwork is made of boards, its width is 25 cm;
- rods are used for;
- Concrete grade M300 is used.

Construction of the building can begin after the concrete mass has hardened. It is worth considering that the size of the site should be equal to the dimensions of the future chicken coop.
To create a columnar base, you will need markings, which are done using metal rods and rope. Then, cabinets are installed around the perimeter, which are placed at a distance of a meter. In this case, the supports should protrude 25-30 cm from the ground. They are strengthened with cement mortar bricks.
Chicken coop walls
When building a chicken coop with your own hands for 10 chickens, you need to prepare drawings of the walls. Wood is in demand as a raw material for walls. They are used for cladding walls. In this case, the joints must be thermally insulated. In addition to boards, you can use plywood or clapboard. Adobe brick is considered a good material. The combination of straw and clay allows you to retain heat.

Installed according to the standard pattern. As insulation to separate the foundation and beams, roofing material is used, which is laid in two layers. Floor joists are also made of timber, which is laid edgewise. In this case, voids and cracks are sealed with remnants of timber and flax-jute fiber.

Roof, ceiling and floor of the building
To create a winter chicken coop with your own hands for 10-20 chickens, high-quality floors and roofing are of great importance.

The arrangement has some features:
- it is better to use a gable roof, which will protect against the accumulation of moisture and snow;
- coating material: roofing felt or slate;
- thermal insulation is performed using mineral wool or.
In a gable roof, you can build a small attic where you can store bedding for chickens and feed. After installing the ceiling beams, the ceiling covering is laid. In this case, boards are used, and expanded clay and coal slag are used for insulation.

When building a chicken coop you need to do well. If they freeze, the room will be cold. It is recommended to use thick boards for the floor. First, untreated boards are laid, then a layer of vapor barrier material is laid, and treated boards are placed on top.
Note! When arranging a pitched roof, it is necessary to ensure that the slope does not point towards the poultry walking area.

How to make ventilation for a chicken coop for 20 chickens with your own hands: drawings
Particular attention should be paid to a do-it-yourself chicken coop. The ventilation device is responsible for supplying fresh air. This is especially important in the cold season, since birds are rarely outdoors. A budget and simple option is natural ventilation, which consists of ventilating the building. In this case, the exhaust window should be small and located on the ceiling or above the door. This scheme has many disadvantages, since heat will leave the room along with the air masses. At the same time, heating will require a large amount of resources.

A more reliable option is an exhaust system. It makes sense to install it if there are at least 20 chickens in the chicken coop. You can build such a structure with your own hands:
- two holes are made for pipes; the entrance for air passage should be located away from the perches;
- Instead of a pipe, you can make special wooden boxes, but they need to be painted and;
- pipes for supplying fresh air are located at a distance of 35-40 cm from the roof, and the pipe for exhaust rises 1.5 meters above the roof;
- To protect against precipitation, the upper ends of the pipes are equipped with small umbrellas.

For uniform circulation, it is better to place pipes on opposite sides of the room. In this case, it is used, which is mounted in the window. You need to turn on such a system manually. There are also special sensors that allow you to control the humidity in the room.

How to arrange a chicken coop inside?
After completion of the main work, the interior of the room is arranged. The construction of comfortable perches is of great importance. In this case, the length of the perches and their number are calculated. These elements are best made from . The perches are ground to a rounded shape so that the chickens do not get injured. Perches should be installed at a height of 65-75 cm, and 55-65 cm should remain between perches. It is recommended to place special pallets or trays under the perches. This will make the cleaning process easier. It is better to make the perches removable to make sanitization convenient.

It is worth equipping nests in the form of boxes, which should be darkened. They are installed in a separate place, and the drawers are covered from above. A separate entrance is recommended for changing bedding and collecting eggs.

Another important element is the feeders. They can be made of wood and installed on a small hill. Bedding is made of peat, straw or sawdust. They come in different depths. When soiled, deeper litter is dug up. In addition, bedding is optional for the chicken coop in winter.

Lighting Features
Good food ensures the growth and physiological development of birds. You can create a well-equipped and lit chicken coop with your own hands for 10 chickens: drawings, detailed diagrams and photos will help you do this. High-quality lighting affects the following parameters:
- number, size, density and weight of eggs;
- chick development;
- digestibility of consumed feed;
- periods of egg laying and their duration.

When planning a lighting system, you need to know some features. Chickens do not see well in the dark, so in the evening, do not turn off all the lamps at once. When all the birds are settled on the perches, you need to turn off the remaining lamps.
For hatched chicks, lighting with a brightness of 35-45 lux is required. Then, as the bird grows, the light intensity gradually decreases to 6-8 lux. An adult bird will need a light of 10 lux.
A device for smooth switching on of the light is recommended, since if the light is turned off abruptly, the bird may become frightened. This is especially true for breeds that are bred to produce eggs. Chickens should also be accustomed to the dark from the third day of life, so that if the lights go out, the birds will not trample each other.
Helpful advice! If birds behave aggressively and pluck each other's feathers, then a reduced lighting intensity will solve this problem.

Heating
Before choosing, you need to take care of the insulation of the fences. There should be no drafts in the poultry house, so if the walls and roof are blown, they will not help.

It is worth insulating doors and windows, since most of the heat escapes through these openings. It is also worth building a deep litter. This design consists of a layer of slaked lime and 10 cm of shavings, sawdust and straw. Natural heat-insulating materials are also used: peat, foliage and even manure. Natural composting allows heat to be released.

If you approach the construction of a chicken coop responsibly, then this building can be made cozy and reliable. Using inexpensive materials, you can create a high-quality and well-equipped house for birds.
Have you decided to start breeding laying hens, but don’t know how to build a suitable room for them? Our article provides a step-by-step guide to building a chicken coop, from choosing a building design to the correct placement of perches and feeders.
Choosing a suitable location
The chicken coop must be installed in a quiet place, away from the noise of traffic and pedestrian roads. The place should be sufficiently lit and well ventilated, but without drafts (and the place where the chickens will roam should be shaded). The ideal option is if the chicken coop and walking area are located in the shade of trees or next to berry bushes.
If you live in a humid climate, you need to take care of draining the soil under the chicken coop or raising the building itself to an elevated position.
Housing for chickens must be correctly oriented to the cardinal points. It is advisable to place the windows on the eastern wall of the building, and the entrance on the southern wall. To ensure the safety of the birds, the chicken coop and walking area are fenced off.
Creating a building project
When designing a chicken coop, you need to decide on the dimensions of the structure, which depend on the number of chickens: for each chicken you need to allocate 1 m2 of internal area of the chicken coop and at least 3 m2 for the run.
Optimal temperature for chickens: 25 °C in summer and 12 °C in winter. Therefore, it is necessary to provide shutters on the windows to protect from the hot sun in the summer or from the cold wind in the autumn-winter period. If the chicken coop will be used in winter, the structure must be insulated. It would not be a bad idea to install electricity there to improve the illumination of the chicken coop when the days become short (good lighting has a positive effect on the egg production of chickens).
Plan two entrances to the house - one for you and one for the chickens. Doors must open outwards. Dimensions for chicken entrance: 20 cm wide and 30 cm high.
Let's look at how you can quickly and inexpensively build a reliable and spacious chicken coop for 10 chickens.
Table. List of consumables
| Name of materials | Unit price, cu. e. | Quantity | Cost, y. e. |
| Wooden beams 50x100x6000 | 3.65 USD e./piece | 15 pcs. | 54,75 |
| Wooden beams 50x100x3000 | 1.88 USD e./piece | 40 pcs. | 75,20 |
| OSB-3 board moisture resistant 10 mm 1250x2500 | 7.80 USD e./piece | 25 pcs. | 195,00 |
| Ruberoid | 0.28 USD e./m2 | 32 m2 | 8,96 |
| Metal plaster mesh 5x5x0.7 | 2.20 USD e./m2 | 10 m2 | 22,00 |
| Profiled sheeting 1100x3000 | 14.00 USD e./sheet | 10 sheets | 140,00 |
| Concrete blocks 200x200x400 | 1.15 USD e./piece | 6 pcs. | 6,90 |
| Foam plastic PSB-50 mm 500x1000 | 52.50 USD u./m 3 | 2 m 3 | 105,00 |
| Vapor barrier film | 0.48 USD e./m2 | 25 m2 | 12,00 |
| Expanded clay 10-20 mm | 45.00 USD u./m 3 | 1 m 3 | 45,00 |
| Total: | 664,80 |
Note: for a more budget-friendly construction, the OSB board can be replaced with plywood, the corrugated sheeting can be replaced with slate, and sawdust or rye straw can be used instead of insulation.
Tools required for work:
- Screwdriver.
- Hammer.
- Nails/screws.
- Self-tapping screws.
- Saw.
- Level.
- Plumb.
- Roulette.
Construction of the foundation and base of the building
A chicken coop is a lightweight frame structure that does not require a solid foundation. You need to start by marking the territory, after which you need to clear an area of 2.5x4 m for the building, removing 10-15 cm of the top layer of soil, and thoroughly level everything.
Concrete blocks must be placed one at a time in the four corners of the base and in the center of the long side and covered with roofing felt.
The area under the floor is covered with a thick layer of sand or gravel - this will provide additional water drainage.
The base of the chicken coop is assembled from 50x100 pine beams. The perimeter piping is made from spliced beams, then transverse beams are attached to them. The step between the crossbars on the short side of the base is 40-50 cm, the step on the long side is 1 m. All wooden structural elements are fastened with screws or nails.

After the base frame is ready, it needs to be covered with a plaster mesh and sheathed with plywood or OSB board.
Next, the base structure needs to be turned over and the niches in the frame need to be filled with expanded clay. Cover the entire floor area with a vapor barrier and sheath it with OSB boards.

Walling
It is more convenient to assemble the wall frame separately, on the ground. The assembly is similar to the base: first you need to make a wall frame, and then secure additional jumpers in it. The distance between the jumpers is 50 cm.
The finished frame is installed on the base and secured with screws. The verticality of the wall installation is checked with a plumb line. In addition, temporary supports can be placed on the wall.

When the frame is ready, you can install windows and doors. For the summer version of the chicken coop, the window openings can simply be covered with metal mesh, and dampers or shutters can be provided on the outside. For the cold season, windows with double frames are needed.
Roof construction
After all the walls are installed, you need to build the upper crown from double beams. Then the ceiling sheathing is attached to it in increments of 50 cm. After installing the roof, the sheathing will need to be covered with a vapor barrier, insulated and sheathed with OSB.
The length of the rafter legs is 3 m, they need to be laid in increments of 60-80 cm. A cut must be made in each rafter for reliable fixation on the outer wall.


At this stage, you need to take care of the ventilation of the room. The best option is supply and exhaust ventilation. Two wooden boxes should be placed in opposite corners of the building. One ventilation hole must be located under the ceiling, and the second - 50 cm below the first. To regulate the amount of supply air, the boxes must be equipped with dampers, and the other end of each box must be brought out.
A sheathing of cross beams is laid on the rafters. The distance between the crossbars is 50 cm. The sheathing is covered with roofing felt and then with corrugated sheeting. Profiled sheets are attached to the sheathing with self-tapping screws and a gasket.
Interior arrangement of the chicken coop
After completing the frame assembly, the finished walls need to be sheathed with OSB boards inside and out, and the cavities insulated with foam plastic.
50x60 beams are suitable for perches. The bars must first be sanded and the corners rounded. The perches should be placed at a height of 40-50 cm. The distance between adjacent beams is 40-50 cm, and between the last beam and the wall of the chicken coop is 25 cm. Under the perches you can place trays that will be convenient to remove and clean - this will greatly facilitate the procedure for cleaning the poultry house . The total length of the roosts depends on the number of chickens. One chicken needs at least 30 cm of free space.

It is also necessary to build nests for birds. To do this, you can use old wicker baskets or put together several boxes from plywood. Box dimensions WxHxD: 30x30x40 cm, a small threshold (3-5 cm) is required. One nest is built for 5 birds. Nests are installed in a distant, secluded corner.

To illuminate the chicken coop, an incandescent lamp with a power of up to 100 W is used. You need to place it high under the ceiling in a place where birds definitely cannot reach.
At the final stage of construction, you need to arrange drinkers and feeders, cover the floor with hay or sawdust, and add a lot of hay to the nests to keep the eggs intact.
So, all stages of construction have been considered, materials have been calculated. All that remains is to get excited about the idea and make sure in practice that a frame chicken coop is a reliable and prefabricated structure in which the birds will be warm and comfortable in any weather conditions.
In winter, chickens can lay eggs no worse than in the warm season. If they are warm enough (ideal regime from -2°C to + 20°C), there is enough light and good (not excessive, but balanced in composition) nutrition, the number of eggs may be the same or slightly less. Plus, knowing that your bird is warm means you don't have to worry. Therefore, we immediately build a winter chicken coop with our own hands with sufficient insulation, or take measures to reduce heat loss if an already finished room is being converted.
A warm barn for chickens and lighting are important for their normal well-being
Let's talk about the size of winter chicken coops. The recommended standards for placing poultry indoors are: from 2 to 5 chickens per square. If you are limited in size, you can “populate” the house more densely. You just need to make more nests and perches. They can be arranged in rows, one above the other. In multi-tiered small rooms, laying hens feel great. With broilers, of course, the situation is worse - it is difficult for them to climb, but they are rarely kept until winter.
Winter walking is also necessary: laying hens can walk outside down to -15°C. Only in calm weather. With height, everything is also more or less clear. A meter and a half height is enough for chickens, but you need to do it in such a way that it is convenient for you to maintain the premises.
What to build from
You can build a chicken coop inexpensively from cinder block or foam concrete. If there is a place nearby where there is clay, you can remove the walls using adobe technology (mud or dried bricks).
If you need a budget warm chicken coop, you can make it like a dugout. The walls can be raised half a meter above the level; in the south, well-insulated windows with double or triple glass can be made. It is good to insulate the piece that protrudes above the ground and the roof. For warmth, all walls except the southern one can be covered with earth. If there is still snow on top, it will be quite warm.

Another perhaps most popular and economical option is a do-it-yourself frame chicken coop. Since the rooms are usually small, the timber for the frame needs a small cross-section and little of it is required. The frame can be sheathed with boards, plywood, OSB and other similar materials. Place insulation between the posts and sew up the other side. To prevent mice from settling in the insulation, people came up with the idea of covering the insulation on both sides with a metal mesh with a fine mesh. This makes construction somewhat more expensive, but fighting mice is more expensive. It turns out to be a warm chicken coop and the thickness of the insulation depends on the region. You can focus on the recommendations for.
A chicken coop made of logs or thick timber can do without insulation in the middle zone. Only the caulking seams need to be sewn up with slats. Not so much from drafts, but from chickens: so as not to pull tow or moss.
Chicken coop foundation
There are options. They most often build on posts - they make a columnar foundation. It happens - they make a shallow pile or strip. But this is the case if the material chosen for the walls is heavy, or which requires a rigid base: brick (ceramic, silicate, adobe), foam and cinder blocks, shell rock, etc. For light buildings made of wood - frames, timber, logs - it is enough to fold the columns or install ready-made foundation blocks (you can make them yourself).

These are posts for a frame barn for chickens
In the case of columnar and pile foundations, supports are placed in the corners and 2-3 meters in between them. The load on the base will be small, so they rarely work too hard.
Insulation
Insulation and heating - these two issues are very closely connected: in a warm chicken coop, even in severe cold, you can do without heating. There are many examples. No matter how economical heating is, it ends up costing a pretty penny. Therefore, it is much more cost-effective to build a well-insulated shed right away than to pay annually for heating it later.
Any modern materials can be used as insulation. They can be stuffed from the inside or outside. The main selection criterion is most often cost. The most optimal is polystyrene foam. It is inexpensive and has excellent thermal insulation ability: a 5 cm thick slab replaces a 60 cm brick wall. Mounted with glue or long nails with plastic washers, you can put pieces of some kind of plastic.

You can also use mineral wool and polystyrene foam. But mineral wool requires membranes on both sides. On the outside they install a wind-hydro-protective one with one-sided vapor permeability (vapors must be removed from the insulation). Steam from inside (indoors) Not permeable.
Expanded polystyrene is definitely good. The characteristics are even better than those of polystyrene foam; even mice don’t like it. But it's expensive. But you don’t even have to sheathe it: the slabs are even, smooth, and can also be colored.
You can also use natural insulation: hammer sawdust between two planes, coat it with clay mixed with sawdust, etc. In terms of heat conservation, such insulation is inferior to modern materials, but costs practically nothing. So such methods are also used. For the southern regions with mild winters, “folk” insulation is more than enough, but even in the central part, and especially in the North, they are probably not enough.
It was about the walls. The ceiling in the chicken coop must be insulated: warm air accumulates under the ceiling. If it is not insulated, it will always be cold. If you line the bottom with cardboard (it holds heat well) or any board material (plywood, OSB, fiberboard, gypsum fiber board, etc.), and throw sawdust or lay hay on top of the attic, it will become much warmer. And if you insulate according to all the rules, it’s generally great.
Floor insulation is done according to the same scheme as for a house: subfloor, joists on it, insulation between them, finished floor on top. Make it as warm as possible: you won’t regret it.
Not everyone makes wood floors. There is also adobe - clay is mixed with straw and allowed to dry, or concrete. The coldest is concrete, but if you add enough sawdust, it will be fine. And if, suddenly, you also make a concrete floor with insulation (at least wall up the bottles), it will be absolutely great.

When you are still planning a winter chicken coop with your own hands, consider the presence of a vestibule. This small extension can significantly reduce heat loss, and therefore reduce heating costs.
Heating
It is difficult to overestimate the importance of properly installed heating for a winter chicken coop. All poultry house owners know this: at above-zero temperatures, laying hens feel great and lay eggs well in winter.
Electricity
If electricity is supplied to the chicken coop, you can heat it with fan heaters or infrared lamps. Fan heaters It's cheaper to buy programmable ones. Not in the sense that they are cheaper, but in the sense that they will use less electricity over the winter. There are two types of automation: temperature and time. Naturally, to heat a chicken coop it is better to take one that reacts to temperature. As soon as it gets cold, say, to 0°C, it will turn on; when it rises to +3°C, it will turn off. In general, you choose the settings yourself. The method is effective and quite popular.
Chickens are also often warmed IR emitters. But they do not heat the air, but objects that fall within the range of the rays. They are hung above perches and several above the floor. If the birds are cold, they gather under them. It can be cold in the chicken coop, the main thing is that its inhabitants are warm. This is exactly what happens with infrared heating. One caveat: IR lamps burn out from frequent switching on/off, so it is advisable to turn them off very rarely. For people, they burn for months, fortunately they “draw” little electricity.
It is also important to know about the operating features of IR heating lamps (they are for lighting, do not confuse them). The surface of the lamps heats up; the design of the lamp itself is not adapted to such loads. Plastic sockets do not hold the lamp well, but finding ceramic ones is a problem. To ensure fire safety, it is better to make a wire cage for the lamp. This way, the chickens won’t get burned, and if the lamp falls out, it won’t break and the litter won’t catch fire.
Oil radiators ineffective: high consumption, little heat. Homemade devices with an open spiral are effective, but very fire hazardous, and you will have to leave them on. This is too much of a risk.

Boiler and stove
There is also a heating option - a boiler and radiators. But these are dreams for most. They also heat it with a potbelly stove, a wood-burning boiler, or build a small brick stove. Moreover, they try to route the pipe through the chicken coop so that it provides maximum heat. If the stove is iron, it can be lined with brick, like an iron pipe. Once heated, the brick retains heat for a long time. With normal insulation, one heating is enough for a couple of days.
Heating a chicken coop by decomposing sawdust
There is a way to maintain positive temperatures without heating - using the heat released during the decomposition of sawdust. But it only works if there is normal (at least) insulation. Sawdust is poured onto the floor. The first layer is poured in the fall, before the first cold weather. The layer is about 10-15 cm. It lies for a month and a half.
This bedding is much better than hay: chickens do not get sick, since sawdust regulates humidity well. They also love to rummage in the litter, and are constantly busy with this, so the laying hens do not get fat even with plenty of food and limited walking.

After 30-50 days, add a fresh portion of sawdust (you can tell by the smell and appearance). And this time, too, about 10 cm. Then - again. By the end of winter, a layer of about 50 cm has accumulated. Moreover, even in decent cold weather, the temperature inside the chicken coop remains at least 0°C, which is enough for laying hens. If you bury yourself in such litter, it will be about +20°C. What chickens do in the cold: they dig holes and sit in them. This is sawdust: a decomposition reaction occurs, releasing a large amount of heat.
In the spring, the entire mixture is taken to the compost heap, after some time it will become an excellent fertilizer. But one more thing: in the fall, you have to put a high board in front of the door so that the bedding doesn’t spill out. Walking is uncomfortable, but the draft from under the door is eliminated.
Ventilation in a winter chicken coop
To maintain a normal microclimate in the chicken coop, ventilation is necessary. This is usually a plastic pipe that is located under the ceiling, passes through the roof and sticks out above it at a height of about a meter. With such a difference, natural traction may be enough. The influx usually occurs through cracks, but if you have done everything properly, you can install a piece of plastic pipe into the wall just above floor level. From the side of the room, the pipe is covered with a metal mesh, and dampers are made that regulate the intensity of air movement.
Another option without an exhaust pipe on the roof: install a small exhaust fan directly into the wall. But such a system works forcibly even in the presence of electricity. The pipe is energy independent))

Fan in the chicken coop
The optimal humidity in the chicken coop is about 60-70%. Deviations in either direction are undesirable. It’s not very difficult to increase the humidity - add more water, but reducing it can cause problems. The IR lamp dries condensation very well: it dries drops on the walls and ceiling in a couple of hours. So at least one is needed to regulate humidity.
Lighting
Any chicken coop should have windows. And although heat escapes through them, it is impossible to do without them: to maintain a normal state, the bird needs sunlight. And to keep it warm, the frames are made with two or three glasses. And they must be sewn up with mesh from the inside, although it wouldn’t hurt from the outside, but not for the safety of the bird, but for its safety.
In order for chickens to continue laying eggs in winter, they need to extend the daylight hours: at least it should be 11-12 hours. That’s why they turn on the lighting for them. Here it is better to immediately install a controller that will turn the light on and off automatically. You'll spend more money, but you'll spend less time at the coop.
At first, some chickens will stay overnight on the floor (those that have not climbed into perches and nests), but if the floor is warm, with sawdust, it’s okay. Gradually they will get used to it and by the time it is turned off they will sit still.
There is an option - make them wake up early and leave the evening natural. Then the light will be on in the morning, and in the evening, at dusk, they will go to bed according to the sun.
How to build a chicken coop: video
In this video, a chicken coop is built with his own hands by a city dweller who fled to the village. The video series contains photographs of the process, so that all stages are visible.
Another video with a clear sequence of assembling a chicken coop from timber
If you have the desire and minimal experience in keeping chickens and are thinking about how to build a chicken coop with your own hands, then we will tell you how to build a winter chicken coop for 10 chickens.
The small size and thermal insulation of the chicken coop will allow the birds to warm the room with the heat of their bodies. At the same time, building such a chicken coop is within the power of every householder! This project will not take too much time and will not require expensive tools.
DIY chicken coop for 10 chickens.
When designing and building a chicken coop, it is important to keep many components in mind. After all, a chicken coop is both a comfortable home for birds and an outbuilding designed to make it easier for people to care for animals and increase labor productivity. Therefore, before making a chicken coop with your own hands, let's figure out what design elements and features should be inherent in every good chicken coop.
1. We rise above the ground
Dampness and moisture are the main enemies of any chicken coop. In a damp room, birds begin to get sick, so the chicken coop is always raised above the ground. Some designs provide for a very high lift - up to a meter, and sometimes higher. If your area, like ours, does not have excessive humidity, then 25-40cm should be quite enough.

Speaking of the area! Choosing the right place for the chicken coop is 50% of success. Here are some tips to help with this:

3. Inputs and outputs for chickens and people
Each chicken coop must have an entrance for birds, as well as access for cleaning the premises. In our chicken coop, the passage for the chickens is made behind the back wall, and two doors provide the possibility of cleaning the chicken coop.

4. Nests and roosts
Chickens will lay eggs in the nests, and you will take these eggs from the nests, so the nests should be comfortable for both you and the chickens. It is believed that The ideal nest size is 30x30cm in length and width, and 30-40cm. in height. In this case, it is recommended to make the entrance to the nests narrower.

There should be easy access to the nests from the outside.

The lid opens, so you don't have to climb inside the coop to collect eggs.

The lid must be inclined so that water flows freely from it and does not fall into the nests.

Total The length of the perch is calculated based on 25 cm per chicken. Since we are planning our chicken coop for ten chickens, we have enough crossbar for the entire length of the chicken coop (almost 2.5 m).

5. Lighting and ventilation of the chicken coop
Chickens simply need light. Reduced daylight hours are one of the main reasons why chickens stop laying eggs in winter, and experienced owners know that this problem can be solved by turning on a light bulb. Therefore, there should be windows in the chicken coop!

It is better to make windows on at least three sides so that light penetrates into the chicken coop throughout the day. Also note the hinged ventilation window on the back wall. In wet weather it can be opened for additional ventilation. The windows above the slots on the front wall also open. Ventilation is very important, but remember: no matter what tricks you use to ventilate your winter coop, be sure to provide the ability to adjust the air flow up to its complete blocking - this will be useful to you in winter, when ventilation will suck out precious heat.

Chicken coop drawing.
Below we provide drawings of our chicken coop. For construction, we used softwood timber and boards, as well as 15mm thick plywood. It is quite possible to use OSB for the floor and roof underlay. When specifying the pitch between joists and rafters, the distances are indicated between the centers of the beams.


How to insulate a chicken coop with your own hands
So we built a chicken coop. Now we have to insulate it. Various materials can be used as insulation. Mineral wool is perfect for this.

As well as polystyrene foam and polystyrene foam.

At worst, you can line the walls with cardboard and old blankets.

The insulation is placed between the beams and then covered with plywood. Otherwise, birds may peck it off (they especially love polystyrene foam).

In winter, it is also worth covering the windows with insulation. It is important to provide artificial lighting.

In case of severe frosts, infrared lamps can be provided. At the same time, their operation can be controlled by a timer or even a thermal relay - this eliminates unnecessary hassle, eliminates the human factor (forgot to turn it on/off) and saves money.

DIY chicken coop. Summer paddock.
During the warmer months, chickens need more space and will happily spend most of their time outside. Therefore, when making a chicken coop with your own hands, you need to make an open summer pen for chickens. The paddock area is calculated using the formula 1 sq.m. for every chicken.

Pay attention to the mesh at the bottom of the coop - it protects against predators. It should be buried 20-30cm into the ground, since some predators are quite capable of making a tunnel. And if there are large birds of prey in your area, then the enclosure must also be protected from above.

It is also very important that at least part of the pen is in the shade - the chickens should be able to hide from the scorching sun. If there is no natural shade, then build a small canopy.

So that birds can freely enter and exit the chicken coop raised above the ground, a simple ladder is usually built for them.

Do-it-yourself chicken coop from scrap materials.
A German farmer turned an old kitchen cabinet into a small chicken coop.

This scrap coop is fully compliant with EU chicken housing specifications and provides enough space for three hens to collect and lay eggs.

Chickens need space to roam, so the coop is placed in the backyard to give them plenty of room to roam.

A chicken coop made from scrap materials shows how modern methods of keeping chickens can be implemented using non-standard means.

As you can see, in the construction of such a seemingly simple thing as a chicken coop, there are many nuances and important points, lack of knowledge of which can negate all efforts.

But despite this, anyone can build a good chicken coop with their own hands.

The main thing is to arm yourself with the right knowledge and think through all aspects of the design in advance. You can build a chicken coop according to our drawings, or, taking their basis, modify its structure to suit your needs.
Please share your experiences and tips on this topic in the comments!