Summer kitchen in the country. Projects, photos, ideas and recommendations. DIY summer kitchen. Construction instructions Options for building a summer kitchen
A simple version of a summer kitchen for a summer house is available for any budget and level of your skill.
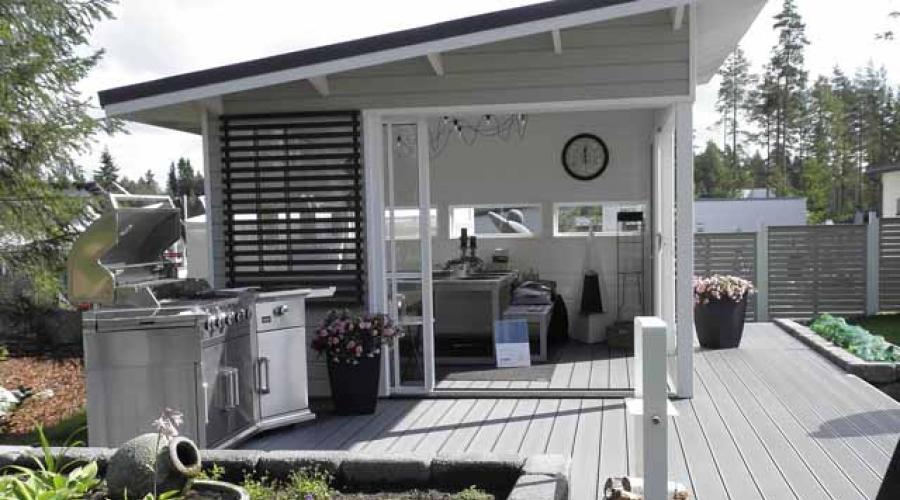
If desired, the kitchen can be made completely closed, but then you can only use gas and electric ovens, and the barbecue and wood-burning barbecue can be located next to the kitchen.

A simple summer kitchen with a barbecue and barbecue with your own hands.
This version of the summer kitchen is used only for cooking over an open fire. It includes a barbecue, work table and sink under cover. The dining area and barbecue are located on the adjacent area.

To build a summer kitchen, the site was first leveled, a layer of gravel and sand was laid on it, and the pillars under it were concreted. support pillars canopy

At the next stage, we lay the tiles on the prepared area. There will be no tiles in the area intended for the barbecue, it will be with sand, we will simply decorate the edges of the area with border tiles. Then we lay out the circular masonry under the barbecue using refractory bricks.

We install the canopy: first the support pillars, then we connect them with floor beams; the roof of the canopy has a slope away from the site. We cover the frame of the summer kitchen with wooden planks.

We cover the grill with decorative masonry made of natural stone.

We install a slate roof and cover the inside of the summer kitchen with magnesite slabs intended for outdoor use. We install a work table, sink and barbecue.

Such summer cuisine can be done with your own hands in just a couple of weekends.
Summer kitchen with bar counter.
The design of this summer kitchen included a canopy for the summer kitchen itself and a pergola for the dining area. The summer kitchen includes an oven, barbecue and, in the future, a pizza oven. 
Using this kitchen as an example, you can see that a do-it-yourself summer kitchen can be built in several stages. At the first stage, everything is built except for the pizza oven, which is still only in plans, but there is no ability to build it and no money to hire a craftsman to build it. It was postponed until next year.

The work procedure is standard - we level the site, concrete the pillars for the supports, lay a gravel-sand cushion on the site, and pave the site.

Because Since the summer kitchen is located in a quiet corner of the garden, we decided not to close it on three sides, but to make only a blank back wall. Simple masonry their cinder blocks form work surface. The tabletop was made of wooden beams.

The process of building such a kitchen is not very labor-intensive and any summer resident can afford such a summer kitchen project.
A simple summer kitchen near the house with your own hands.
Unlike summer residents, owners of a private house have a serious advantage - they do not have to travel anywhere and the construction process can be calmer and more measured. The construction of this kitchen began with paving this beautiful area in front of the house natural stone in combination with cobblestones. When the site was ready, it was decided that it could also be used for a summer kitchen next to the house.

First, the pillars for the canopy supports were concreted and installed. The entire kitchen will be made from concrete slabs and the support platforms under them were also concreted.

In order to do concrete countertop, made formwork, covered it with film, laid reinforcement. Places for the sink and barbecue were marked with containers of appropriate sizes. After the concrete had hardened, the formwork was removed and the edges sanded.

We are constructing a work table for our summer kitchen from concrete blocks, and connecting the water supply to the place intended for the sink.

Our do-it-yourself summer kitchen is almost ready - a sink is installed, on the right side of the countertop there is a place for a barbecue, on the lower left side there is a place for a barbecue.

Additionally, a storage cabinet was built next to the summer kitchen.

Pillows from furniture that will be in the dining area will be stored here.

Covered the roof of the summer kitchen with transparent polycarbonate, finished decorative fence around the kitchen to give the building a more finished look.

Simple and beautiful kitchen It can really be done inexpensively and easily with your own hands.

But how nice it is to enjoy dinner outdoors in the garden!

DIY summer kitchen next to the gazebo.
A small canopy next to the main gazebo can be turned into a small summer kitchen.

Stylized wooden furniture made from scrap materials will add a relaxed atmosphere of comfort to this corner of your garden.

If necessary, you can take enough here big company- you just need to put a big table.

So a simple canopy next to the gazebo can turn it into dining area for a summer kitchen.

DIY summer kitchen with stove.
If you know how and love to cook in an oven, you don’t have to follow the general fashion for grills and barbecues. Build an extension to your gazebo, make a stove in it - and you have a wonderful summer kitchen, not like others.

By the way, the grill and barbecue may well find their place in your summer kitchen.

This option is great for areas with cold summers, where it’s warm while you’re standing near the stove, but when you’re sitting and having lunch, you want comfort, not refreshing coolness.
You already have a gazebo - it can be used as a dining room on cool days. And for summer days you can simply install a table between the house and the gazebo.

For the barbecue itself, you will only need a regular canopy attached to the gazebo and a small work table next to it for cooking.

So, if you think creatively about what you already have, then you don’t have to build a new free-standing structure for a summer kitchen. By intelligently adding small elements, you will significantly increase the functionality of existing buildings.

A simple do-it-yourself summer kitchen can be built on a very modest budget, you just need to include your creativity and it can be built quickly and inexpensively.

If you approach this process wisely, then you can always expand, complete and improve your summer kitchen.

Do you agree that a simple DIY summer kitchen is within the power of each of us?
At the dacha you just need a room where in the warm season you can cook dinner or do preserving for the winter. And even if there is a big house, every housewife just dreams about summer option kitchens closed type.
But users will learn how to inexpensively make such a design with their own hands by reading this article.
Features and types of buildings
A closed summer kitchen is a full-fledged one separately standing building with running water and electricity. An excellent place for receiving guests in the warm season, family dinners and friendly gatherings in the evenings. This is the right solution for regions with rainy summers and early frosts. However, to use such a construction in winter time It’s not worth it unless the owners have taken care of heating in advance.


Such a kitchen could be independent construction or an extension to the main house, utility block or bathhouse. It can be equipped with a fireplace, barbecue or stove.
An interesting layout option is a kitchen-house with a terrace or veranda. Everything you need is compactly placed inside kitchen appliances and equipment, and a dining area is formed under the canopy.


In villages, preference is given to a type of structure with a cellar and barbecue. But you need to take into account the fact that the walls basement will become the top part of the kitchen foundation, so they should be made of the most durable material possible.


It is important to note that if it is not possible to conduct electricity on the site, then the right decision will be the purchase of a generator running on diesel fuel, which will provide light to both the building and kitchen electrical appliances.
The construction of a closed type structure is a labor-intensive process that requires accurate calculations and drawings of every detail of the building. Project development with correct application sizes will speed up construction and help avoid mistakes.
Site selection and structure design
The initial stage of constructing a summer kitchen on summer cottage is the choice of location, and then the design of all its components. And so that the result of the work does not disappoint, you need to remember several features.


The best options for building materials
The choice of building materials directly depends not only on the service life, preferences of the owners, but also on financial capabilities. But today there are many practical examples of successful combinations of cheap materials with more expensive ones.
During construction summer building The most in demand are:
- brick;
- concrete;
- polycarbonate;
- natural stone;
- corrugated sheeting;
- tree;
- lining;
- aluminum.
We must not forget that the summer cottage should emphasize the beauty future design, so it would be appropriate to lay out gravel or tile paths, plant flowers and perennial shrubs. And if you have the financial means, build an artificial pond.


If the area is fenced with a brick fence, it is good to make a kitchen from the same material or using natural stone. Such a structure is not afraid of influence external environment and will last for more than a decade.
It is much easier to make a prefabricated indoor version of the kitchen from timber. Such a project will be less expensive, but every detail of the building will require ongoing care and processing. In addition, wood wears out much faster than brick or stone.

To cover the floor use:
- laminate;
- parquet;
- linoleum;
- decorative tiles.
The roof can be covered with:
- corrugated sheets;
- soft roof;
- metal tiles.
Exterior decoration of the building with siding elements will give the kitchen a modern look.
Laying the foundation
Having decided on the location and formed the design of the structure, it is necessary to begin constructing the foundation of the building.
When planning open version For a summer kitchen, you could simply make a small depression in the ground over the entire area of the future structure and fill it with sand. Allow time to stand a little, and lay out a layer of bricks or boards. But the basis of a closed kitchen should be a durable and strong foundation, requiring phased installation.

If the floor covering is made from decorative tiles, the working surface must first be sanded or smooth screed from cement.

Photo: monolithic foundation ready for construction
Construction of walls
If the owners of a summer kitchen plan to use it late autumn at the first frost, you need to take care of strong walls so that the room inside does not freeze under the influence low temperatures. Therefore, in such cases, it is better to build masonry half or a whole brick thick.

Photo: process brickwork using laces
Lovers of wooden house structures will assemble the walls much faster. Their basis will be a frame made of timber. And for fastening elements it is better to use metal corners and self-tapping screws. Outer part walls can be sheathed thin layer boards
Interior finishing is done using plasterboard, plastic, lining or plastering.
Roofing installation
The roof of an enclosed kitchen should be durable and practical. Therefore, when purchasing materials for its installation, you can choose:

The shape of the roof depends on the preferences of the owners. A reliable option would be a gable roof.

Photo: log building with a gable roof
If the building will be used in winter, insulation is recommended mineral wool or other heat-insulating material.
One wing roofing covering or it is better to make the visor longer to create additional protection for walls during precipitation, thereby extending the life of the entire building.
Interior decoration and interior design
High-quality interior finishing and well-chosen interior design will create a pleasant atmosphere of home comfort.


When starting the arrangement, it is worth paying attention to such nuances.

When creating an enclosed summer kitchen, it is necessary to accurately calculate every detail of the structure and correctly combine the selected building materials with general style premises, then the resulting structure will become not only a source of pride, but also a favorite place for the family for many years.
Order a gazebo from professionals
Don't have time to build yourself? Contact the following organizations.
At the dacha you just need a room where in the warm season you can cook dinner or do preserving for the winter. And even if there is a large house on the site, every housewife simply dreams of a summer version of a closed kitchen.
But users will learn how to inexpensively make such a design with their own hands by reading this article.
Features and types of buildings
A closed summer kitchen is a full-fledged separate building with running water and electricity. An excellent place for receiving guests in the warm season, family dinners and friendly gatherings in the evenings. This is the right solution for regions with rainy summers and early frosts. However, it is not worth using such a design in winter, unless the owners have worried about heating in advance.
Such a kitchen can be an independent structure or an extension to the main house, utility room or bathhouse. It can be equipped with a fireplace, barbecue or stove.
An interesting layout option is a kitchen-house with a terrace or veranda. All the necessary kitchen appliances and equipment are compactly placed inside, and a dining area is formed under the canopy.
In villages, preference is given to a type of structure with a cellar and barbecue. But you need to take into account the fact that the walls of the basement will become the upper part of the kitchen foundation, so they must be made of the most durable material.
It is important to note that if it is not possible to provide electricity on the site, then the right solution would be to purchase a generator running on diesel fuel, which will provide light to both the building and kitchen electrical appliances.
The construction of a closed type structure is a labor-intensive process that requires accurate calculations and drawings of every detail of the building. Developing a project with correct dimensions will speed up construction and help avoid mistakes.
Site selection and structure design
The initial stage of constructing a summer kitchen at a summer cottage is choosing a location, and then designing all its components. And so that the result of the work does not disappoint, you need to remember several features.
The best options for building materials
The choice of building materials directly depends not only on the service life, preferences of the owners, but also on financial capabilities. But today there are many practical examples of successful combinations of cheap materials with more expensive ones.
When constructing a summer building, the following are in greatest demand:
- brick;
- concrete;
- polycarbonate;
- natural stone;
- corrugated sheeting;
- tree;
- lining;
- aluminum.
We must not forget that the summer cottage should emphasize the beauty of the future structure, so it would be appropriate to lay out gravel or tile paths, plant flowers and perennial shrubs. And if you have the financial means, build an artificial pond.
If the area is surrounded by a brick fence, it is good to make the kitchen from the same material or using natural stone. Such a structure is not afraid of the influence of the external environment and will last for more than a decade.
It is much easier to make a prefabricated indoor version of the kitchen from timber. Such a project will be less expensive, but every detail of the building will require constant care and treatment. In addition, wood wears out much faster than brick or stone.
To cover the floor use:
- laminate;
- parquet;
- linoleum;
- decorative tiles.
The roof can be covered with:
- corrugated sheets;
- soft roof;
- metal tiles.
Exterior decoration of the building with siding elements will give the kitchen a modern look.
Laying the foundation
Having decided on the location and formed the design of the structure, it is necessary to begin constructing the foundation of the building.
When planning an open version of a summer kitchen, you could simply make a small depression in the ground over the entire area of the future structure and fill it with sand. Allow time to stand a little, and lay out a layer of bricks or boards. But the basis of a closed kitchen should be a durable and strong foundation, requiring phased installation.
If the flooring is made of decorative tiles, the working surface must first be sanded or a smooth cement screed must be applied.
Photo: monolithic foundation ready for construction
Construction of walls
If the owners of a summer kitchen plan to use it in late autumn during the first frosts, you need to take care of strong walls so that the room inside does not freeze under the influence of low temperatures. Therefore, in such cases, it is better to build masonry half or a whole brick thick.
Photo: bricklaying process using strings
Lovers of wooden house structures will assemble the walls much faster. Their basis will be a frame made of timber. And for fastening elements it is better to use metal corners and self-tapping screws. The outer part of the walls can be sheathed with a thin layer of boards.
Interior finishing is done using plasterboard, plastic, lining or plastering.
Roofing installation
The roof of an enclosed kitchen should be durable and practical. Therefore, when purchasing materials for its installation, you can choose:
The shape of the roof depends on the preferences of the owners. A reliable option would be a gable roof.
Photo: log building with a gable roof
If the building will be used in winter, it is recommended to insulate it with mineral wool or other heat-insulating material.
It is better to make one wing of the roof covering or canopy longer in order to create additional protection for the walls during precipitation, thereby extending the life of the entire building.
Interior decoration and interior design
High-quality interior finishing and well-chosen interior design will create a pleasant atmosphere of home comfort.
When starting the arrangement, it is worth paying attention to such nuances.
When creating an enclosed summer kitchen, it is necessary to accurately calculate every detail of the structure and correctly combine the selected building materials with the overall style of the room, then the resulting structure will not only be a source of pride, but also a favorite place for the family for many years.
Order a gazebo from professionals
Don't have time to build yourself? Contact the following organizations.
Construction companies
Where else, if not on a summer cottage, can you take a complete break from routine city problems? How nice it is fresh air have a barbecue and pleasant evening in the circle of relatives and friends. The place where the oven for cooking is installed everyday food and barbecue, and will also equip a convenient area with dining table, many of us are familiar with as a summer kitchen. A cozy summer kitchen in the country, equipped and originally decorated with your own hands, often becomes a favorite place to spend time together for all family members.
There are dozens of types of buildings for preparing and eating food. If we take the degree of openness as a starting point kitchen space, then kitchens are divided into open and closed.
Open kitchens look like gazebos or verandas attached to the house
An open summer kitchen with your own hands, due to the absence of walls, allows you to visually create the effect of freedom. Main elements open kitchen The stove, dishwasher and kitchen furniture are in front.
The material used for the manufacture of such structures is often: stone for the foundation, and wood for the building itself. The roof is arranged according to the owner's wishes. Some of them do not specifically make a canopy in order to achieve maximum unity with nature on the site. Wanting to build a summer kitchen in a country house without a roof, the owners set aside a place for construction under the crown of a tree.
The main advantage of open kitchens is that they are well ventilated and are not hot in the hot summer.

Closed kitchens look like a full-fledged house. Such designs can be used not only in summer period, but also throughout the year
Equipped indoor summer kitchens can serve convenient place for overnight guests, unique hunting lodge for lovers of outdoor activities and just temporary storage. Closed kitchens are built mainly from plywood, lining and plasterboard. Wanting to create more robust construction, which will last for several decades, stone, brick and foam blocks are chosen as the manufacturing material.
Building a summer kitchen with your own hands in addition to saving financial expenses has another advantage - the ability to combine Construction Materials, experimenting and creating original designs.

The kitchen is successfully combined with a grill and barbecue, as well as a veranda or gazebo
Regardless of what materials the structure will be built from, the main thing is that the kitchen is convenient and comfortable. It would be great if you provide a water supply to the kitchen and equip it with a drain through a pipe outside the building.
Setting aside space for a cozy corner
The place for the kitchen, where the whole family will spend enough time every day at the dining table, is chosen so that it is convenient for supplying electricity, water supply and other communications. It is most preferable to arrange the kitchen away from the utility area with pets, as well as the toilet and compost heaps.

When planning the construction of a summer kitchen, the material of which will be wood or other non-fire-resistant material, it is advisable to maintain a distance of 8-10 m between easily flammable buildings
Very good option when the kitchen is located directly above the cellar. This solution will allow you to arrange everything necessary products at hand. And during the preserving period, it is easy to lower the cellar until cold times. The location of the kitchen on a slight slope will ensure independent drainage of rain and melt water.
Brief overview of construction technology
The construction of the foundation begins with choosing a location, leveling the surface and marking the future construction site. If we are building a summer kitchen with our own hands in an open design, then an alternative to the foundation can be a simple platform, buried literally 10-15 cm. To equip it, it is necessary to remove the specified layer of earth, filling the bottom of the resulting pit with sand. After this, thoroughly compact everything and cover it with paving slabs, bricks, and boards.
Under a more durable structure, a strip or columnar type of foundation is laid, which is deepened to 50-80 cm. For relatively light buildings made of timber beams, a columnar foundation. It consists of stone or brick columns equidistantly located along the entire perimeter of the building, which accept and distribute the load created by the structure.
The tape type of base is capable of taking the load of heavier structures made of stone, brick and foam blocks. It is a trench filled with concrete, which is located around the perimeter of the entire building.
And this is what a slab foundation looks like:

A slab foundation is one of the most durable types of foundation. But it will also require the most resources
The stages of foundation construction directly depend on the design you have chosen. Basically, this process takes place in several stages:
- Excavation. A layer of soil at least half a meter deep is removed along the marked perimeter.
- Compacting a sand cushion, the thickness of which is 15-20 cm.
- Building the very foundation. In favorable weather conditions, the poured foundation hardens within a week.
- Arrangement of the floor, the basis of which is a 15 cm sand cushion. The compacted sand is covered with a layer of crushed stone and poured cement mortar. If you want to lay the floor with tiles, you can lay it directly on the concrete screed.
An example of constructing a strip foundation:
The floor level of the summer kitchen should be at least 5 cm above the ground level. This will prevent water from entering and spreading across the floor open space during the rain
Stage #2 - erecting walls and installing a stove
Wooden structural elements are fastened with screws and self-tapping screws. Beam structures it is advisable to perform from metal corners. The outer walls of the building can be sheathed with 20 mm boards, and the inner walls with plasterboard, clapboard or the same board.

The easiest way to build a kitchen is from wood or metal frame covered with boards
When thinking about how to build a summer kitchen from brick, stone or foam blocks, you should take into account that the construction of the building will require knowledge of masonry materials and wall construction skills. For the construction of summer kitchens, the technology of laying one brick or even half a brick is often used.

If you want to install a stove inside the room, you need to line this area with bricks at this stage of construction
The same work can be carried out on arrangement working area rooms with barbecue oven:
In the future, when constructing a roof, it is necessary to provide for the installation exhaust pipe to remove heat and smoke from the working area.

A wood-burning stove can only emphasize unique interior summer kitchen, using it for cooking will significantly save energy resources
To equip the furnace, special fireclay bricks are used, which are resistant to high temperatures, but at the same time it is an excellent heat conductor, warming up the room quite quickly.

When erecting the walls of a building, do not forget that for closed version kitchens must have one or more windows
Floor-to-ceiling windows – the entire height of the wall – look very impressive in a summer kitchen. This solution allows not only to bring additional sunlight into the room, but to visually expand the space. Seams between openings and frames can be sealed using silicone gaskets.
Stage #3 – installation of the roof, insertion of windows and doors
The simplest option to implement is a flat and pitched roof configuration. In addition to the ease of construction, the arrangement pitched roof is a less expensive activity. However, most often the roof is made with a gable roof.

The most widespread in the construction of summer kitchens is gable roof, which allows you to give the building greater harmony and completeness
The roof frame is constructed from longitudinal and transverse beams. The roofing material of a building is often slate, tiles and metal tiles. The choice of material is based on a harmonious combination with other structural elements. When planning to equip a room that can be used during the cold season, it is advisable to provide for the use of a thermal insulation layer, which can be polystyrene foam or mineral wool.

If you plan to build a canopy instead of a roof, then roofing material you can use roofing felt, corrugated glass or polycarbonate
During installation, it should be taken into account that the sheets of material must extend beyond the perimeter of the structure in order to ensure proper water drainage. At the final stage, windows and doors are installed.
Room finishing options
The floors in the room can be laid with 20 mm boards, which are subsequently varnished and painted in an interesting shade of paint. The ceilings of the room can also be sheathed with boards and covered with a layer of drying oil. Using as ceiling covering drywall, you can diversify the design by working with color combinations interior
When choosing items for the interior, it is advisable to give preferences original things made of porcelain and clay, forged elements and carved wood that can highlight the taste of its owner.

The design of a summer kitchen in a country house should be combined with other buildings on the site. It’s great if they are made from the same materials and in the same color range

A carefully varnished plank floor will become a worthy alternative parquet floor covering. Floor tiles also look no less interesting in the design of a summer kitchen.

The crossbars and beams supporting the roof will look interesting, similar to those that were previously used in villages

Besides functional element interior - stoves, you can complement the design by choosing products made in ethno-style
When deciding for themselves how to make a summer kitchen, site owners have an excellent opportunity to build original design, which will allow you to enjoy your meal and have a good time in cozy room while feeling one with nature.
Summer kitchens in the country, the projects of which are presented in our photo gallery, are as individual and varied as the traditions of each individual family.
By appearance they may differ from the buildings already existing at the dacha or be harmonious and complement them. And for the price - to demonstrate “chic and brilliance”, to be quite budget option or the golden mean.

Since you are interested in this topic, most likely you already have a rough idea of what a summer kitchen at your dacha will look like. We will help you not to lose sight important details, let's share interesting ideas, and a selection of photos will charge you with the enthusiasm necessary to implement them.
Where to start working on your own project? To begin with, we would recommend defining a list of tasks that the summer kitchen will perform.
Functions of a summer kitchen
The size, type, layout, content of the summer kitchen in the country, and many other points depend on the purpose of this building.


After all, it is used for cooking, as well as for placing:
- dining room;
- recreation areas;
- areas for washing and storing dishes;
- guest;
- barbecue or grill areas;
- kitchen utensils that you don’t use very often in the main house;
- dryers for clothes, linen, mushrooms, berries, fruits and herbs;
- gardening, fishing or hunting equipment.
You can move the washing or dishwasher, if they have no place in the house.


Considering that not many buildings can fit on a standard 6 acres, it would be rational find a use for the space above or below the kitchen.
The cellar is useful for storing twists and preserves, seeds, frost-resistant tubers, plant rhizomes and country house equipment. In the attic you can create a place for drying fruits, mushrooms or fish.


It is better to think about the summer kitchen project at the stage of construction of the dacha itself (if possible). First of all, it is cost-effective and reduces the cost of repairs.
The attic can always be completed, but with the cellar everything can be much more complicated. An insulated and waterproofed cellar is useful for storing a variety of things, including firewood.
Stove selection
Even in ancient times, the construction of a house began with a stove. Today this is not the case, because there are a lot of heating devices, and their use is often limited only to cooking.
With type kitchen stove you need to decide in advance - since this determines what to do gas pipes or cable.
Most often at the dacha they install an ordinary gas stove. According to the older generation, it is easier to cook with it and costs less. If it is not possible to supply gas, you can use propane tank or opt for an electric stove.


For lovers of barbecue and grilling there are portable kitchens that can be rearranged from open air under the canopy and vice versa.
Lovers multifunctional items will appreciate heating and cooking stoves or stove complexes. After all, a Russian, Swedish or Dutch stove can be not only a fireplace and a means of cooking, but also effective way heating adjacent rooms of the house - for example, a bathhouse, sauna or shower.


By installing a metal tank near such a stove, you will provide a kitchen in the country hot water(which is very convenient when washing dishes and jars).
If purchasing new equipment or building complex structures is not part of your plans, and even more so when you strive for maximum closeness with nature and want to build a fire source with your own hands, make a barbecue.
- do not intend to purchase new technology for a summer residence;
- you do not plan to build complex structures;
- do not trust portable structures;
- if you want to arrange a place for fire yourself -
Build a grill. This useful prop for the dacha can be made with your own hands.


Country life is unimaginable without a barbecue, which you can easily make with your own hands. (the word “construction” appears in other parts of the text).
To lay out the area in contact with fire, you will need a fireproof material - for example, fireclay brick, mortar or clay. Outer layer the barbecue can be decorated with river or facing stone.
An alternative eco-fuel to gas and electricity - firewood - will definitely reduce your heating costs, especially if a forest is nearby. But, as with everything, it also has its drawbacks, because cooking with wood requires:
- regular cutting and harvesting;
- storage;
- annual chimney cleaning.
Now we move on to the next step: choosing the type of construction.
Closed summer kitchens
A closed summer kitchen, completely protected from the wind and other weather surprises, will perfectly serve as a guest house. And if you provide good heating, it will be adapted for housing in winter. Examples of closed summer kitchens in the country are in the photo below.


A closed summer kitchen with a sofa and a dining area is a complete, durable home with obvious advantages. Neither rain, nor snow, nor mosquitoes will drive you away from the table, will not disrupt your plans, and even more so, will not damage the furniture and equipment. But more materials are needed for its construction.
The walls are built from brick, stone or foam concrete, and the roof is made from tiles, slate or corrugated sheets. And for all this you need a solid foundation with a depth of at least 50 cm.


Properly designed and built closed kitchen will function all 4 seasons, regardless of the climate zone.
If the guest room is located in the main house or is not included in your project at all, the size of the kitchen can be reduced. Necessary minimum for a kitchen-dining room an area of 8-9 is considered square meters, but who better than you knows the exact figure.


Tip: in order not to suffocate while cooking on hot summer days, consider the possibility of turning a closed kitchen into a semi-open one by opening windows or additional doors.
Outdoor summer kitchens
Open buildings are those in which walls, and sometimes even a roof, are completely or partially absent. These include gazebos, pavilions, canopies, patios or pergolas.


This is a great opportunity to organize a kitchen with a barbecue or other source of fire. An open kitchen won't cost you much. It is quickly erected and does not require exhaust hood, heating, a strong foundation or professional construction skills.
Having dug a pit 15-20 cm deep, you fill it with sand or crushed stone, compact it, and then lay terrace boards, brick, stone or paving slabs- that's the foundation.


Important: the roof in an open structure must extend beyond the boundaries of the building - this way it will save you as much as possible from slanting rain.
The absence of windproof walls and free circulation of air masses is both an advantage and a disadvantage of an open kitchen in the country. On the one hand, the wind saves from the heat and fans the fire. But in the company of rain and cold, it makes your stay in nature uncomfortable, and open structures - short-lived buildings for seasonal purposes.


Often kitchens open type used for arranging cozy outdoor dining areas. The walls will be filled with partitions decorated with curly garden plants or trees.
Clematis, bindweed, grapes, kiwi, vines - select plants so that they bloom one after another, and your kitchen is constantly transformed in color. A beautiful and useful wall substitute for the dining room would be mosquito net with a pattern, long curtains or roller blinds.
To get an idea of the variety of open summer kitchens, take a look at these photos.


Combined
Semi-open summer kitchens combine positive traits closed and open buildings. You are still in the fresh air, but no longer exposed to all four winds.


One of the walls can be adjacent to a house or other building, allowing you to save on materials. Two stone walls provide an opportunity to arrange corner kitchen, convenient in terms of ergonomics and placement of the dining room.
Combined kitchens are also called kitchens made from different materials– for example, there is stone or brick up to the level of the windows, and timber above, frame technologies or panels.


Having decided on the functions and choosing the degree of “closedness” of the planned building, we proceed to the search best place for its location.
Optimal place
Finding the best location for a new building is perhaps one of the most complex parts project. Based on placement, summer kitchens are divided into two types: free-standing structures and extensions to the main house.


But here's what you need to consider. On the one hand, the summer kitchen in the country should be closer to the house, because it will be easier to establish communications. But then smoke and heat can enter the house, causing inconvenience. Therefore, it is important to find out in which direction air masses are most often directed.
Like any place for preparing or eating food, the kitchen should be located away from the toilet, chicken coop, doghouse, roadway, compost pit and other sources of unpleasant odors.


Cooking in the sun is not a pleasant task, so the proximity of a dense tree crown will not hurt.
And, of course, everyone would like to enjoy a magnificent landscape, garden or vegetable garden, and not the wall of a neighboring house. At this point, a compromise is possible - decorated climbing plants, textiles, stained glass or decorative partition that will hide the unsightly appearance.
It is also necessary to take into account that a closed summer kitchen requires a deep foundation.
Economy options
Many people dream of a summer kitchen in their country house, but often the prices for the stone most suitable for its arrangement direct our enthusiasm to something else. But in vain...


After all, a kitchen can be made from scrap materials, you just need to use your wits. For example, old window frames will reduce the cost of building an enclosed kitchen.
True, this will not save you from the need to lay the foundation.
Alternatively, a summer kitchen can be made from a railway container. It is possible that purchasing a ready-made change house that does not require additional finishing will cost much less than construction.


But still, a summer kitchen project in a country house, which falls under the category of economy class, most often involves an open-type construction. And since the concept of “simple summer kitchen” is very individual and flexible, let’s look at several different options.
1. United by an island, the stove, sink and work surfaces are located on a common foundation with the house under open air. Stone, plastic, stainless steel and thoughtful design will protect the island from the influence of moisture, but the awning installed nearby will save you and the prepared dishes.
2. Conversion of a gazebo, veranda or terrace into a summer kitchen.
3. Connection of two existing buildings common roof made of tarpaulin or lighter waterproof materials.
4. Stakes or metal supports, braided grapevine as walls and a thatched roof.
5. Arrangement of a summer kitchen near the fence wall: all that remains is to add an awning or a pitched roof.
6. Open or closed kitchen made of adobe - a mixture of earth, clay, hay and other available materials. True, adobe is suitable for buildings in hot, arid climates.
And here are some more examples interesting projects lastly.


We hope our article inspired you to create the outdoor kitchen of your dreams!