Ladder support for plants technology 4. Supports for climbing plants - how to choose the right ones for landscape design? Plastic plant support
Read also
Technology lesson notes
Topic: LADDER - SUPPORT FOR PLANTS
Goals of the teacher:to cultivate a caring attitude towards trees and wood products, to instill an interest in the profession of carpenter; introduce the technology of making a ladder-support for plants; develop children's knowledge, activity, and diligence.
Planned results:
subject:
- find and select information about wood, its properties, lumber production technology;
- consolidate skills in working with wood, learn how to make a ladder - a support for plants.
personal:
- development of aesthetic taste, development of independence, education cognitive interest to the subject.
Lesson type: discovery of new knowledge.
Teacher Equipment:Technology: 4th grade: Rogovtseva N.I., Bogdanova N.V. Textbook. UMK "Perspective", 2013; projector; computer; board; finished ladder - support for plants, materials and tools necessary for work.
Equipment for students:Technology: 4th grade: Rogovtseva N.I., Bogdanova N.V. Textbook. UMK "Perspective", 2013; support posts- cardboard ladders, ruler, pencil, scissors, glue, yarn, color. paper.
Lesson stages, methods and techniques | Time | Student activities | UUD |
||
Preparing for the lesson. | Control over the preparation of workplaces. | Preparing your personal workplace. | R: self-control. |
||
Org. moment. | ~1 min |
| Greetings from the teachers. Getting ready for work. | ||
Formulation of the topic and purpose of the lesson. | ~ 3-5 min |
| The teachers are listening. Answer questions. | P: extracting the necessary information from the listened text. K: correctly formulate the purpose of the lesson. |
|
Explanation of new material. | ~5 min |
| The teachers are listening. | P: process the information received, draw conclusions. K: listen and understand the speech of others. |
|
Initial check of understanding. | ~ 3 min |
| Answer questions. | K: engage in conversation, express your opinion, listen to the opinions of others. |
|
Ped. show | ~ 3-4 min |
Rules for handling scissors
| The teachers are listening. Check your readiness for work. Repeat the rules for working with scissors. | P: observation and analysis of work, extraction of necessary information. |
|
Physical exercise. | ~1 min |
| They stretch their hands. | L: installation on healthy image life |
|
Independent creative work. | ~20 min |
| They make a ladder - a support. | R: be able to organize your activities |
|
Exhibition finished works. Evaluation of the work done. | ~ 3-5 min |
| Analyze the work. | R: be able to evaluate the correctness of the work |
|
Summing up the lesson. | ~3 min |
| Summarize the results of their activities. | R: observation and comparison |
|
Cleaning the workplace. | Turn |
|
Preview:
To use presentation previews, create an account for yourself ( account) Google and log in: https://accounts.google.com
Slide captions:
Wood is the dense material found beneath the bark, which mainly consists of the roots, trunk and branches of a tree.
What is made from wood?
Objectives To get acquainted with woodworking production; Learn how to make a ladder to support plants.
Lumber - wood materials obtained by longitudinal sawing of logs.
Bars Boards unedged boards edged
Plywood Chipboards (chipboards)
Pine Spruce Oak Birch Alder Linden
Hacksaw File Jigsaw Planer Clamp Sandpaper Hand drill Gimlet Carpenter's knife
Let's answer the questions! What is made from wood? Houses, dams, musical instruments, doors, furniture, sports equipment, ships, matches, etc. What is lumber? Wood materials obtained by longitudinal sawing of logs. What do you call a person who is engaged in manual wood processing? Carpenter. What tools and devices do woodworkers use when working with wood? Hacksaw, file, jigsaw, plane, clamp, sandpaper, hand drill, drill, carpenter's knife.
Don't hold them upside down, don't carry them in your pocket. Do not cut with scissors on the go, do not approach your friends while cutting, do not leave the scissors open. Pass the scissors only closed, with the rings facing your friend. When working with scissors, watch the fingers of your left hand. Place the scissors on the desk so that they do not hang over the edge of the desk. When cutting out circle-shaped parts, rotate the paper. Leave the marking line on the parts to be cut out. Rules for handling scissors
Plan for making a ladder-support for plants Take a sheet of cardboard and measure 1 cm from the upper left edge. Mark a dot with a pencil. Measure 1 cm from the bottom left edge and place a dot. Connect two dots. Make two more of the same stripes. Cut the third strip in half. Glue the strips, as shown in the textbook on page 68, Figure 4. Cut four identical threads 15 cm long and tie the support posts with thread, as shown in Figure 5. Decorate the product.
Thank you for the lesson!
Preview:
Climbing vines can enhance any corner. IN natural conditions nature itself takes care of their support and nutrition. And in gardens, houses and on window sills, a support for climbing plants – necessary condition their proper development and the opportunity to maximize decorative qualities.
A bunch of various options can be purchased in stores, but making flower supports with your own hands is much more interesting and cheaper.
The material from which the support for climbing plants will be constructed depends on the type of vine and the installation location.
Supports can be constructed from both synthetic and natural materials. Products made from bamboo, dry processed branches, willow twigs. But they are short-lived when installed outdoors. In a rainy summer, bacteria and mold will quickly develop, which can destroy not only the support, but also the plants themselves.
It is widely believed that bamboo is very durable material, can last up to 8 years. But the bitter experience of many flower growers has proven the opposite. Therefore, it is better to install bamboo support in the house or in a covered gazebo.
Structures made of wire, processed wood, plastic, metal, stone will last for a long time. But if everyone can do wooden and wire products, then to work with other materials you will need skill and a special tool.

Regardless of the material chosen, the support for climbing plants must be stable and durable. Otherwise, it will collapse along with the vegetation.
There are many ideas on how to make flower supports. Below are a few ways to implement them for indoor and outdoor plants.
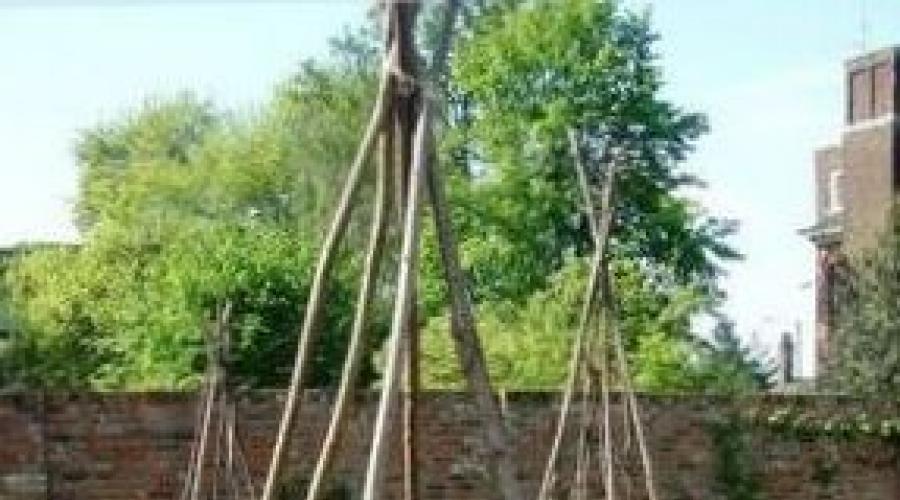
Cone
The simplest structure is a support in the form of a cone or “wigwam”.
It is made as follows:
- markings are made on the ground in the form of a square;
- 4 long, relatively even sticks are pressed into the corners at an angle and tied together above the center of the square;
- small twigs or branches are attached crosswise to the resulting frame; you can tie a mesh of soft wire or twine.
This design without plants looks a little rough, but entwined it is very beautiful. Annual vines grow quickly, so the support will be transformed in two weeks.
Using the same scheme, you can make a more durable support from wooden slats, fastening them with nails.
This design is suitable for, sweet pea, morning glory and other plants with not too much weight. It is best to focus on two main contrasting colors.
Cone support large diameter, which cucumbers will happily “climb” on, is not only a decoration for the garden, saving space, but also clean fruits.
Column
It is appropriate to place such structures on both sides of the porch of the house or garden bench. The manufacturing technology can be extremely simple: stick long, even poles or rods into the ground in a circle and tie them with wire.
And you will have to work hard to create a tall and durable column:
- 4 metal rods are fixed in the cement-filled foundation;
- Several rings of wire are welded to them parallel to each other. Or one long rigid wire in a spiral, fixed at the points of contact with the supports.
Mesh, trellis
Another simple one a budget option DIY supports for climbing plants are a mesh stretched between two posts. Indispensable if there is a need to decorate an unsightly fence or wall. Or maybe just create a beautiful backdrop next to a gazebo, bench, or shade an area.
A trellis (or screen) is essentially the same type of support as a mesh, but more durable and decorative. It can be oriented towards the wall, or it can serve as a kind of territory delimiter.
On the picture simplest option trellises: wire stretched over a frame of poles.

A wooden screen is made quite easily: slats are placed on the frame in the form of a lattice.


The trellis-shaped screen looks interesting.

Arch
Arched supports, entwined blooming vines, always look festive and elegant. Despite the complexity of the design, this support for climbing plants can also be made with your own hands. Suitable materials are metal, wood, plastic, brick or stone.
The easiest and fastest way to assemble from plastic pipes, which are buried at their ends into the ground, and fastened with wire on the sides and center. But cold winter such an arch will not survive, so it must be dismantled and sent for storage in a barn or garage.
More complex, but more durable and decorative, is a metal arch.
To make it you will need:
- steel rod with a cross section of 10*10 mm;
- pipe with a diameter of 31-33 mm;
- welding machine.
4 are cut from the pipe supporting pillars, arcs from a rod are welded to them. For convenience everything welding work are carried out on the ground. Then the structure is raised, leveled, and the support posts are concreted into the ground. All that remains is to paint.


You can fasten the halves of the arch not in parallel, but crosswise. Then it will be more durable and unusual.
Arches made of logs or beams are less common, but they look original.


Pergola
Perhaps the pergola is the most exotic and freshest trend in the world. garden plots. The word itself is of Italian origin and means “canopy” or “stand”. Since ancient times, these structures have served as support for grape vines, absolutely not pursuing the purpose of decoration.
It is best to make such a support for climbing plants from wood.


It is quite possible to reproduce a version of a simple design with your own hands. You will need 8-10 wooden beams measuring 50x100 mm, 4 beams for pillars 100x100 mm and concrete mortar.
Sequencing:
- a square area with a side of 2000 mm is marked;
- holes about 60 cm deep are dug in the corners;
- support beams are installed in the holes, leveled and filled with concrete;
- grooves 35 mm wide and 50 mm deep are cut into the beams;
- the beams at the edges are cut at an angle of 45 degrees for decoration;
- After the concrete hardens, two beams are attached to the supports, and the rest are laid on them.
The result is a design like in photo 11.
Bush holders
When designing a site, do not forget about such plant supports as bush holders. They not only give a neat appearance to ornamental and fruit bushes, but also save them from root rot and fungal development by providing ventilation. Similar designs can be bent from wire and installed on one or both sides.

Phlox and peonies also feel comfortable in such a frame, and you can learn about growing them from seeds. And if you deepen the frames further, you can raise the nasturtiums and petunias growing on the ground.
DIY flower supports will undoubtedly fill the house and area with warmth and comfort, regardless of the complexity of the design, but only if they are appearance harmonizes with the general background.
People who grow indoor plants often face the problem of strengthening flower stems. Those. additional support for plants is required. This is especially true for parts of the flora that have a fragile and tall trunk, or a climbing flower.
To perform a similar support function, you can buy special device at any gardening store. But you can take a different route and try to save money family budget– make a ladder for plants with your own hands. Wherein, self-production construction is a very simple matter. So, let's figure out how it's made simple support for plants with your own hands.
The product will require the following equipment:
Step-by-step manufacturing process


This simple plant support is easy to make with your own hands. And, despite its simple appearance, it effectively copes with the functions assigned to it. In addition, self-production supporting structure allows you to create a ladder of exactly the dimensions that are ideal for each specific plant.
Technology. 4th grade. Lesson plans.

M.: 2016. - 288 p.
The manual presents lesson developments for the course “Technology” for grade 4 educational institutions to the teaching materials of the educational systems “Perspective”, “School of Russia” and “Harmony”, as well as thematic planning according to the current textbooks of the system “ Primary School XXI century", meeting the requirements of the Federal State Educational Standard for Primary general education. The publication is addressed to primary school teachers of general education institutions, teachers of extended day groups, students pedagogical universities and colleges, IPK students.
Format: pdf
Size: 5.2 MB
Watch, download: drive.google
CONTENT
From the author 3
LESSON DEVELOPMENTS ON THE EDUCATIONAL COMPLEX "PERSPECTIVE" AND "SCHOOL OF RUSSIA"
Thematic planning 6
Introducing Tutorial 7
Lesson 1. How to work with textbook 8
Man and earth 13
Lessons 2, 3. Carriage Works. Products “Chassis (bogie)”, “Car body”, “Passenger car” 14
Lesson 4. Minerals. Product "Drilling rig" 24
Lesson 5. Minerals. Product “Malachite box” 31
Lessons 6, 7. Automobile plant. Product "KAMAZ" 36
Lesson 8. Mint. Project "Medal". Product “Sides of a Coin” 44
Lesson 9. Mint. Project "Medal". Product “Medal” 50
Lessons 10, 11. Earthenware factory. Products “Base for a vase”, “Vase” 53
Lesson 12. Sewing factory. Product "Tack" 61
Lesson 13. Sewing factory. Products « New Year's toy", "Bird" 68
Lessons 14, 15. Shoe factory. Product “Model of children's summer shoes” 73
Lessons 16, 1 7. Woodworking production. Product “Ladder-support for plants” 83
Lessons 18, 19. Confectionery factory. Products “Potato cake”, “Chocolate cookies” 93
Lesson 20. Appliances. Product “Table lamp” 101
Lesson 21. Household appliances. Product "Lampshade". Assembly table lamp 108
Lesson 2 2. Greenhouse farming. Product “Flowers for a school flowerbed” 114
Man and water 119
Lesson 23. Vodokanal. Products “Filter for water purification”, “Streamer” 120
Lesson 24. Port. Product “Rope ladder” 125
Lesson 25. Knot weaving. Product “Bracelet” 131
Man and air 136
Lesson 2 6. Aircraft construction. Rocket science. Product "Airplane" 138
Lesson 2 7. Launch vehicle. Product "Boost rocket" 144
Lesson 28 Aircraft. Product " Kite» 148
Man and information 152
Lessons 2 9, 3 0. Publishing. Products « Title page", "Table" 154
Lesson 31. Creating book content. Practical work"Contents" 162
Lessons 3 2, 3 3. Bookbinding. Product “Traveller's Diary” 166
Lesson 34. Summing up the year. Presentation of completed works 168
LESSON-LESSON DEVELOPMENTS ON MC "HARMONY"
Thematic planning 171
From time immemorial - to the present day 172
Lesson 1. Introduction. Ceramics in the culture of the peoples of the world 173
Lesson 2. Vessel with a magical ornament (tear-off applique, painting) 177
Lessons 3, 4. Architectural ceramics. Tile. Decorative tiles. Collective panel (modeling, painting) 181
Lessons 5, 6. Weaving from strips of birch bark, wood chips, bast or paper. Wicker box 185
Lessons 7, 8. Jewelry in the culture of the peoples of the world. Making jewelry based on traditional canons of rhythm and symmetry 192
Traditions of craftsmen in products for the holiday 198
Lesson 9. Paper plastic. Making molds using corrugation 199
Lesson 10. Paper plastic. Folding card 202
Lesson 11. Gift packaging 206
Lesson 12. Packaging design New Year's gift 210
Lesson 13. Traditions New Year's holidays and carnivals. Carnival hats (origami) 213
Lesson 14. Traditional folk holidays. Christmas gingerbread according to traditional canons (modeled from salt dough) 217
Lessons 15, 16. Bas-relief in decorative product. Design and sculpting of a decorative frame 223
Masters and apprentices. Winter crafts 227
Lesson 17. Knitting as a type of needlework. Simple crochet techniques 227
Lessons 18, 19. The simplest crochet techniques. Knitting panels 232
Lesson 20. Loop stitch: techniques 235
Lessons 21, 2 2. Loop stitch and its use in finishing products. Decorative pockets 239
Lessons 2 3, 2 4. Cardboard edging 242
Lessons 2 5, 2 6. Hardcover 246
Every business has its own secrets 250
Lesson 27 Techniques and technologies for applique from straw 250
Lessons 2 8, 2 9. We give people our skills. Toys made of straw and thread 254
Lessons 3 0, 31. Metal in the hands of a master. Foil stamping 257
Lesson 32. Secrets of the paper sheet. The ancient art of origami. Kusudama 261
Lesson 33. Secrets of the paper sheet. The ancient art of origami. Sanbo box 265
Lesson 34. Summing up the year. Exhibition creative works students 269
APPLICATIONS
Thematic planning according to teaching materials “Primary school of the XXI century” 271
Safety rules for technology lessons 276
Physical education minutes 278
References 283