Band saw for wood drawing. DIY wood band saw. What you need for a homemade sawmill
Owners of country plots and summer residents who like to do crafts and handmade, you often have to deal with wood. It has always been considered one of the most popular materials for DIY work. Even today, when manufacturers around offer different composites, synthetic materials, the tree remains relevant.
If a large construction project is planned, then a band saw will “free up” your hands when working with wood and lumber.
To process lumber, you have to use special tools. For some buildings and workpieces, simple tool kits that can be bought at any hardware store. But some craftsmen have to design different ones with their own hands. useful devices, for example, a band saw. Even if it seems difficult at first, it really isn't. It’s quite simple to make even in makeshift conditions.
Frame
In order to make a band saw with your own hands, you will first have to master the frame construction scheme. To construct it, it is worth choosing fairly hard wood.
Main components of the frame:
- table top;
- support rod;
- pulleys;
- saw blade.
To make a homemade frame more stable and stronger, you must first prepare a drawing according to which the entire structure will be made. It is best to make detailed drawings, but if you have some knowledge, you can get by with a schematic representation of the structure. It is important to first calculate optimal length canvas, other sizes can be adjusted.
It must be taken into account that the finished band saw is quite tall and requires certain conditions in the room where it will be installed.
Therefore, you need to calculate the optimal height with the possibility of installation in a workshop or other place where it will be located. It is also recommended to choose a tabletop height that is convenient for a particular craftsman. The working surface (tabletop) can be made from ordinary plywood.

Hardwood is used for the frame.
The main supporting rod of the structure can be made of durable timber, for example, maple or other wood.
In order to give additional stability to the frame, it is edged with slats. In some cases, you can even use parts from old furniture.
The diameter of the pulleys should be selected in such a way that the design is not too bulky, but at the same time ensures sufficient speed of movement of the blade.
Rod and pulley supports
The support rod must support 2 pulleys - bottom and top. Therefore, it is better to make it from timber with a cross-section of 80x80 millimeters or thicker. The wood must be strong and dry enough.
Supports for the pulleys are attached to the bottom and top of the rod. Such supports can be made from different materials. One option is reinforced plywood made of several layers. Both supports must be at a sufficient height from each other so that the largest logs that will be worked with can pass through this distance. It is better to leave some reserve with the prospect of future use. The pulley axes are selected based on the characteristics of the blade and the motor, as described below.
Desktop
Main requirements for work surface- it is her optimal height. Working at the countertop should be comfortable for the master, so it should be high enough, but not too high.
You can also make the tabletop in the form of a closed cabinet, then it will be able to accumulate sawdust remaining after processing the logs. To make cleaning the sawdust collector easier, you need to make the table in such a way that the accumulated waste is accessible, for example, using a door.
The tabletop in a wood band saw is usually installed on the lower support of the bar and additional supports; in some cases, you can get by with a simple additional support or supports connected to the bar. The main thing is that the weight distribution is optimal and the tabletop does not tip over.
Pulleys
Recommendations for selecting pulleys usually concern their diameter. It is better to use larger pulleys as this will ensure a longer life for the saw. The thickness of the blade will also depend on the diameter of the pulley. Typically, a blade with a thickness 1000 times smaller than the diameter of the pulley is used.

Pulley for circular
Thus, for a 35-centimeter pulley, a blade with a thickness of 3-4 millimeters is suitable. Experts say that in some cases it is possible to take thicker sheets (for example, up to 5 millimeters in in this case), subject to proper use.
In addition, you need to choose the right pulley for the belt drive, and this depends on the size of the main pulleys, the engine speed in revolutions per minute and the length of the belt itself. It is calculated as follows:
- First calculate the length outside circle C, for which its diameter D is multiplied by Pi (3.14): C=3.14*D.
- It is taken into account that the optimal speed of the saw should be about 28-32 meters per second (the average value is 30).
- The number of required full revolutions per second is determined by dividing the number 30 by the resulting circumference O=30/C.
- After this, you need to calculate the gear number, which is obtained by dividing the engine speed W by required quantity pulley revolutions O: K=W/O.
- The gear ratio K serves as a divisor to determine the diameter of the drive pulley, that is, the diameter of the drive and working pulleys is related to the same number K: d=D/K.
The pulley rims must be convex with a curvature of up to 10 degrees. This allows the canvas not to fly off, being centered on the circles. On the contrary, a small depression is prepared on the drive pulley so that the rubber does not slip out.
The manufactured pulley and its edge are usually tightly covered with rubber, for example, from a bicycle wheel (inner tube).
To ensure optimal and adjustable web tension, the upper pulley is usually mounted on a block capable of moving in a horizontal direction. To do this, use a fastening using a spring and a lever that acts on the block, lifting it. This ensures proper cushioning and no kickback. In this case, the lever must be secured, for which bolts are used at a certain height.
The lower block contains two pulleys at once - the so-called driven and driving, which are located on 1 axis and are rigidly fastened. If their diameters are different, then when calculating the gear number, instead of the driving one, it is necessary to take into account the diameter of the driven pulley, because since the number of revolutions for them is the same, the gear depends on the diameter of the pulley that directly interacts with the motor.
When installing the upper and lower blocks, it is extremely important to install the pulleys under the blade in the same plane. In this case, imbalance in the movement of each of them should be avoided. They should spin smoothly and smoothly.
Sometimes for upper block A bearing is used to aid centering, making it easier to put the wheel in place and to remove it.
Blade guides
To ensure that the homemade band saw does not break, and that the band does not slip out of the pulley when pressure is applied to it, guides are installed under the blunt edge of the saw. This is usually done using roller bearings that are mounted on wooden slats or bars. In this case, the bearings must both guide the tape from the sides and hold it from the back.
It is better to install the guide bar at the highest tension of the tape, selecting the best place for fastening the bar itself. This will avoid deviations during work.
Sometimes instead of bearings they are used wooden beams. For any version of the guides, a good addition would be to duplicate the guides from below under the tabletop.
To avoid even the smallest deviations during saw operation, the guides should be installed as close as possible to the workpieces being processed. The best option The guides will be a design with removable bars and their adjustable height.
End of work
The top of the pulley should be covered with plywood, which will protect the canvas when it falls. Thanks to this, the saw stays in the body and does not injure those working behind the installation.

The belt drive must be protected with a protective cover.
If there is a collection box for sawdust and shavings at the bottom, then it is better to place a bucket in it or make a separate container to make it easier to get rid of waste.
It is extremely important to protect against various waste to the transmission belt. In order to do this, it should be taken outside, away from the table, while covering it with a protective casing. The same should be done with the engine to prevent contamination.
Wooden surfaces can be treated using paint and varnish materials. This will help the tree to be used longer, and will protect the craftsman’s hands from splinters. Preliminary processing impregnation, grinding and antiseptics are welcome.
It is used for sawing boards, beams and other similar materials. It is manufactured by many manufacturers who provide the equipment with the best performance characteristics. To save money, you can make this unit yourself.
What does it take to have an efficient band press?
A homemade tape machine is made according to ready-made drawings that are in the public domain. To perform this work, you need other things:
- find several car parts;
- select the appropriate rolled section type;
- correctly carry out all the necessary metalwork and turning work;
- carry out some manipulations using a welding machine.
To assemble band press, you can use unnecessary pulleys removed from old agricultural equipment. It is best if their diameter reaches 300 mm. It is recommended to use as guides metal pipes two different diameters. The first should be half an inch in size and the second a little larger. As a result, one pipe can be put on another and obtain the required gap of 0.5 mm.
Making a base for the machine
A do-it-yourself woodworking machine is installed on a base made of metal corners. They are mounted in such a position that the vertical shelf faces upward. It is necessary to achieve maximum accuracy, which will prevent rapid wear of the impellers.
TO established corners racks are welded in a perpendicular direction from profile pipes(2.5x2.5 mm). Another element is mounted between them. It is a half-inch diameter pipe. It is on this that the claws are installed, designed to secure the logs. These devices must move freely in different sides. To fix the material, you must hit the clamp with a hammer, which will cause it to jam.

Installation of pulleys for the machine
The presented homemade product cannot work without pulleys. During assembly of this element the design must adhere to the following rules:
- homemade pulleys are sharpened so that when the belt is put on, it protrudes a few centimeters;
- the manufactured structure must move, which is ensured by the presence of horizontal pipe guides;
- to increase the reliability of the unit, it is additionally fixed with bolts;
- pulleys are installed under small angle, which will prevent the tape from slipping during operation of the equipment;
- the right pulley is driven, so a spring is attached to it. During operation, it automatically tightens it;
- the left pulley is fixed rigidly, since it is considered the leading one;
- the diameter of the element is chosen arbitrarily, but the larger it is, the longer it takes not to change the saw;
- You can use a regular bicycle frame as a belt;
- For efficient work the machine needs to place two pulleys in the same plane as accurately as possible;
- for fastening top element in a given position, it is best to use a self-aligning type bearing.

Recommendations for installing a roller assembly for a machine
A homemade wood band saw will work correctly and without failure when using hardened rollers. It is best to make the assembly that they are part of yourself. In this case, you can be confident in its reliability, which cannot be said about a ready-made mechanism. The design of this unit has the following features:
- The mechanism includes three bearings. Two of them are brand 202, the third is a little larger;
- the shaft and rollers are machined taking into account the use of saws different widths. If necessary, install a washer between the bearings;
- the shaft fits into two tubes installed one inside the other, with a slight displacement of the axis;
- the roller assembly is installed on homemade machine with the ability to adjust in height or move to the sides.
Tabletop
Types of cutting elements
- wide saws provide high accuracy cutting They are used for longitudinal sawing;
- The thickness of the cutting element must correspond to the thickness of the workpiece. Thick saws can damage thin material;
- by doing figure cutting the saw must have optimal thickness and width to process the workpiece at different angles.

Machine frame and other additional elements
To obtain a band saw machine, it is necessary to make a frame. For this, use 100 mm. The height of the structure is 1.5 m. To strengthen the frame, gussets are additionally used. The block itself, with which the logs are cut, will move along the channels due to the presence of pin screws. To securely fasten the cutting unit of the machine to its base, bolts with locknuts are used.
Other elements that must be present in the design of cutting equipment include:
- Electrical engine. You can use an old power tool (drills, hand-held power saw) as a drive;
- box for collecting shavings and wood dust. Made from ordinary wood or plywood sheet;
- a casing made of wood or metal that covers the upper pulley. Increases equipment safety.
Setting up the saw
A homemade bandsaw machine driven by a drill or a conventional electric motor will not work effectively unless the saw is adjusted.
This process follows the generally accepted scheme:
- the parallelism of the wheels relative to each other is ensured;
- to prevent displacement in the vertical direction, fluoroplastic washers are used, mounted on the shafts;
- the system is launched in trial mode without installing guides;
- test cutting is carried out without load;
- After completing the adjustment operations, a block is installed to form the direction of movement of the belt.
If the saw of the machine is adjusted correctly, the wheels move smoothly without jerking. Such equipment will delight you with its high productivity and accuracy, which is especially valued among craftsmen.
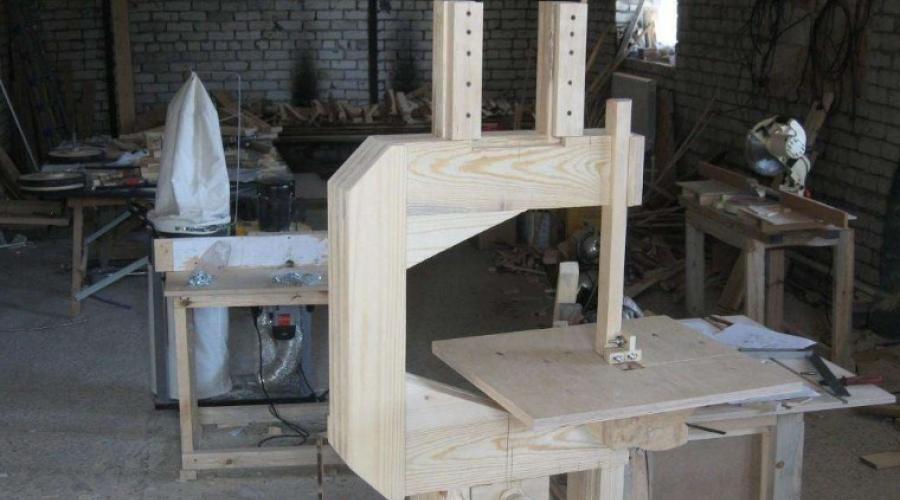
An excellent homemade product from our subscriber Denis Dd. This is a plywood band saw with minimum cost such a unit costs 8,000 rubles, I think this article may be useful.
The upper part of the frame (the most difficult part) is assembled from 4 sheets of plywood (15 pieces) with glue and screws; in the center of the sheets there is a groove 100 mm wide. and 30 mm deep (2 sheets of plywood) a tape tensioner runs in this groove. You can see it in the photo.
There is no separate photo of the tensioner, but the design is simple: a pin is screwed to 100 by 30 plywood and a nut is attached to the top; we tighten the nut; the tensioner rises and the tape is tensioned. The tensioner stroke is about 15 cm. I made the tensioner stroke specifically larger so that it would be possible to use both 2300mm and 2500mm belts.  The upper shaft pulley is secured to the same block. I did not adjust the angle of the shaft, which allows you to center the saw blade (although it was in vain) I set the shafts a little out of alignment, when the tape is tensioned, the shafts fall into place, respectively, the tape moves along the centers of the shafts +-. It was necessary to put the shafts in camber due to the insufficiently rigid structure of the frame precisely in the place of the tensioner. You need more layers of plywood then there will be no walking. The rest of the frame is made of 150/50 boards joined in two. Everything is fine here with rigidity.
The shafts were sharpened from the same plywood 15 shki in two layers. Shaft dimensions 350mm. I placed 2 bearings in the center for each shaft, the shafts were secured to the frame through a 16 mm pin that approached the bearings.
After turning the shafts and assembling the frame, I turned on the motor and sanded/centered it with sandpaper and a chisel. There were no problems with the lower shaft (the motor spins it because I don’t want to), but the upper one had to be forced to be baptized after putting a ribbon on it. In principle, the shafts were centered in this way.
As a result of this, vibration during rotation went away to a significant extent (without such alignment, the unit swung from side to side). Next is balancing the shafts. We remove the tape and belt, turn the shaft and see which side it goes to the bottom, respectively, it is heavier, remove it a little with a drill and turn it again and so on until the shaft stops at different positions, and he won’t be pulled anywhere. The following photo shows these holes. 
The shafts are shaped like an egg, so the tape does not touch the shaft itself with its teeth. You also need to put rubber on the shafts. Bike cameras are an option.
The motor was taken from an old washing machine, weak but saws). The pulley for the motor was also machined from the same plywood. Ribbed belt from the generator.
It’s difficult to describe the guides for the tape; you can see it in the photo. 1 guide from the top with the ability to change the height, the second is fixed under the tabletop. 
On the guides there is a thrust bearing at the back on the sides, 2 beech crackers, everything is assembled with bolts, with the ability to adjust. 
When assembling, be sure to pay attention to the upper assembly; use at least 6 layers of plywood. Those. 2 solid sheets, then 2 for the tensioner, they are cut in the middle (space for the tensioner) and again 2 solid sheets. I think that such rigidity will definitely be enough so that the shafts do not move away when the tape is tensioned.


It is worth noting that this saw has some shortcomings, for example, the lack of operator protection, which is simply NECESSARY on such units, otherwise everything could end in disaster.
The same plywood is used to make guards for the saw blade, leaving only the working section of the band free.
Engine from washing machine rather weak.
There is no adjustment of the position (tilt) of the pulleys to regulate the position of the belt.
Residents of their own homes, who prefer to do everything on the farm with their own hands, often have the need to saw wood blanks. Buying a ready-made device for these purposes is quite expensive. Making a wood band saw with your own hands is not the most simple task, but quite doable for a hardworking person. The main motivation is saving Money, since old disassembled furniture and other available materials can be used to create structural elements.
Design and scope of band saw
Band-saw, assembled using the provided technology, can be used both at home and for industrial purposes, for example, at a private sawmill or a small woodworking enterprise.
Depending on the specific application, the design of the tape apparatus may vary slightly, but the main elements are always the same:
- Stable frame– predominantly wooden, since its manufacture does not require welding, which greatly facilitates the assembly process.
- Electric motor– ensures the functioning of the device (for a home band saw, a drill attached to the pulley shaft is suitable).
- Pulleys– rotating mechanisms that are installed on the frame of the device provide fastening and movement of the saw blade.
- Cutting tape– a sharp saw blade that moves quickly and cuts wooden blank(there are types for metal and polypropylene).
- Rest structural elements – belts, tabletop, guides, protective cover, container for collecting sawdust and others.
The main advantages of a wood band saw
Compared to other types of sawing machines, a wood band saw has a number of significant advantages:

- High performance and low heat dissipation.
- High speed, accuracy and cutting quality.
- Excellent maneuverability, allowing you to cut not only straight, but also shaped workpieces.
- Safety – using a band saw is much safer than its disk or chain version.
The main advantage of a homemade band saw is that it is cheap to manufacture and use.
The process of making a wood band saw with your own hands
Making band saws with your own hands is a responsible and time-consuming process, but the savings in money, availability and quality of the work performed compensate for this.
Frame requirements and preparation

For the manufacture of supporting frame You should choose a thick beam made of hardwood (maple is perfect). This is necessary so that the design of the device can withstand future loads and does not vibrate during sawing work.
Initially, you need to develop a drawing of the future band saw. It can be schematic or detailed, indicating the dimensions of each element of the apparatus. The height of the frame directly depends on the size of the room and the characteristics of the planned use. It is necessary to consider the height of the table, its dimensional characteristics, the diameter of the pulleys and the length load-bearing beam. After all the calculations have been carried out, individual elements are made from available material.
Frame installation
The band saw frame is a C-shaped base consisting of a supporting beam and two supports for pulleys attached to it, for the manufacture of which thick multi-layer plywood can be used. The supports must be installed at a sufficient distance from each other, taking into account the specifics and dimensions of the materials planned for cutting on the machine.

Table assembly
The dimensions and height of the work table are selected individually for each master. Important Requirement– two pulleys (driven and driven), an electric motor and a chip box must be placed under the table. Often workplace They are made in the form of a closed cabinet containing all the described parts. The tabletop must have a slot for the cutting tape.
Pulley installation
The diameter of the pulleys can be any, but it must correspond to the dimensions of the entire apparatus. To work with wide canvases, you should choose wheels with a large diameter and thickness. The ends of the driven wheels must be convex, which ensures self-centering of the cutting blade, and the drive wheels (belt drive pulley) must have a recess that guarantees reliable fastening belts

To protect the wood, you need to stretch bicycle inner tubes over the ends of the wheels, or you can wrap them in several layers of electrical tape, but this method is only suitable for small devices.
To adjust the belt tension, the upper pulley must be mounted on a movable block equipped with a handle, which, when rotated, pulls the wheel up, as well as a special screw that loosens or fixes the structure. Lifting mechanism It can be anything that is left to the discretion of the master. Instead of a bar, handle and screw, a lever, a very tight spring and bolts provided at different levels may well be used.
The lower part of the device consists of two wheels mounted on one shaft. The cutting blade is pulled onto the first wheel, located parallel to the upper one, and the second one acts as a drive and is connected by belts to the electric motor.
Selecting a canvas
You can make a cutting tape yourself, but this is unnecessary and unjustified work. The accuracy and aesthetics of the cut is influenced by the quality of the tape sharpening. Therefore, it is better to purchase ready-made tape. The choice of their varieties in stores is huge; they differ in the number of teeth, the spread of the teeth and their sizes (small, medium or large).

Device settings
Before starting work, the band saw is carefully prepared and tested at idle speed. You need to check that:

- the wheels are located strictly parallel to each other, and their rotation is easy, smooth, without jerking or beating;
- the cutting belt is well tensioned and is strictly perpendicular to the working plane.
Failure to comply with the specified requirements can lead, at best, to a distortion of the cut, and at worst, to the tape jumping off the wheels, which is dangerous to the health and life of the master. Excellent constructive solution– installation of guides made in the form of a bar and three roller bearings holding the tape (instead of two side ones, they can be used wooden blocks- limiters). The safety of the entire structure will be ensured by a special casing consisting of two separate parts covering the pulleys.
Possible problems
When manufacturing a band sawing machine, some difficulties may arise:
- You need to be able to prepare drawings and work with them.
- You will need a variety of equipment, such as a jigsaw, a circular saw, drill, screwdriver and more.
- It is necessary to ensure the stability of the entire structure in order to subsequently process heavy materials.

List of disadvantages of a band saw for wood
A DIY wood band saw, in addition to its advantages, also has several disadvantages:
- This sawing machine can only be stationary and is not suitable for transportation to different places.
- He has big sizes and takes up a lot of space.
- The device makes a lot of noise when operating.
- The cutting area is limited.

There are many various instruments for sawing workpieces - these are hand saws, cutting saws, jigsaws, etc. But a band saw occupies a special place among them. This article will focus on making a homemade bandsaw.
Introduction
In the workshop, everything should be at hand and the abundance of tools makes the master truly free to choose methods and techniques of work. One of the most basic operations in any workshop is sawing workpieces. Moreover, sawing can be different - somewhere you need to saw off quickly and the quality of the cut is not important, somewhere you need a blind saw and a special one will do the job, somewhere you need an extremely even saw, and so on.
A DIY wood band saw deserves pride of place in the workshop. Not everyone has it, however, the ease of its use is undeniable. Its advantages include the following features:
- High cutting quality, as there is no return movement of the cutting blade.
- High sawing speed, as the cutting band moves at high speed.
- High maneuverability when sawing due to the small thickness of the cutting blade.
- High versatility and flexibility of tool use.
- High operational safety.
However, the band saw also has disadvantages. Let's list them:
- This is a stationary saw, so there is no possibility of its mobile movement.
- Limited sawing area due to design features.
- Large dimensions.
Making a band saw
Preparing for work
When starting work, you need to prepare all the tools and materials, as well as a place where it will be comfortable and safe to make a homemade band saw.
Tools:
| Basic tool | Descriptionoperation | Alternative tool |
| Performing longitudinal cutting of workpieces |
|
|
| Sawing out a niche, groove and top bolt. Making pulleys. |
|
|
| Clamps | Fixation of workpieces during gluing, as well as during other operations | There are no worthy alternatives, but you can adapt and try using a carpenter's vice or some heavy object as a press. |
| Drilling machine (+) | Drilling holes |
|
| Sanding the surface of workpieces and edges |
|
Materials, fittings, fasteners
- 15 mm thick;
- Solid wood block;
- Bolts for horizontal and vertical adjustment;
- PVA carpentry glue;
- Wing for adjustment bolts;
- Insulating tape;
- Bearings for the upper axle;
- Two bearings for the drive axle;
- Two shafts;
- Cutting blade;
- Two bushings with internal thread;
- Self-tapping screws, nuts, washers, fittings, studs;
- Tapes or attachments for or.
Main structural elements
The band saw drawing will include the following components:
- Base;
- Tape tension mechanism;
- Pulleys;
- Saw blade (cutting tape).
Manufacturing of structural elements
The manufacturing instructions will be divided into 5 points and include steps to produce a homemade bandsaw. The article provides photo and video materials that will help you not make mistakes during production.
Base
- Since the band saw must be strong, it is necessary to prepare a thickness of at least 15 mm. We cut four blanks 550 mm long and 23 mm wide.

- Next, we make markings using a previously created stencil, or you can make markings directly on the workpiece. The two plates located inside must have a niche for the adjustable mechanism. For external parts it is necessary to draw a through groove. The amount of vertical adjustment will depend on the size of this groove. Next, you need to mark a through hole for the lower drive shaft. In addition, we will need a surface for a saw table, the dimensions of which in terms of table width will not exceed 150 mm. In all workpieces, it is necessary to cut a square between the circles in height equal to 15-20 cm, and not exceeding 15 cm in width.
- With help you need necessary details, as well as the adjustment groove for the upper pulley, then drill a hole for the lower drive shaft.

- Next, you need to assemble the future foundation. For assembly, use PVA glue or any other wood glue. We apply it in an even layer on all the surfaces to be glued, then we apply the parts to each other, avoiding inaccuracy. Fixation of products must be done with clamps, since for high-quality gluing, a tight fit of the workpieces is necessary. Before completely dry The glue must be left in place for 24 hours.

- We install bearings for the lower drive shaft.

Saw blade (band) tension mechanism
- To make a tensioning mechanism for a band saw, you need to make a block, the dimensions of which will correspond to the niche in the saw body. A hole is drilled at the end of the block for the pin and fitting. Sockets for bearings are cut out on both sides.

- We insert the pin and secure it in the block. It should stay firmly in the hole. To increase the strength of the fastening, before inserting the pin, apply PVA glue to its surface, and you also need to additionally secure the pin with a self-tapping screw or screw.


- It is necessary to install a handle on the pin, the rotation of which will allow you to change the depth of immersion of the bar into the base, thereby changing the distance between the pulleys - this is how the belt is tensioned.
Pulleys
While the base glue dries, we begin to manufacture the moving elements, namely the pulleys. The entire process of their manufacture is reflected in the photographs provided.
- On a sheet 15 mm thick, you need to mark the contours - a circle with a diameter of 150 mm.
- Cut the blanks along the outlined contours and drill a hole in the center of the circle.

- Even the most precise and careful sawing will not give the workpiece perfect correct forms, so it is necessary to grind the ends. To do this, it will be used with a table at 90 degrees relative to the plane being processed. If you don't have a suitable tool, you can sand the edge by hand grinder or homemade device for with a grinding attachment. The workpiece is fixed with a bolt or self-tapping screw to a certain base. Thus, when it is fed to the grinding wheel and rotated around its axis, a perfectly smooth circle is obtained.

- After processing the pulley on a grinder, you need to wrap its ends insulating tape in several layers, and you can also use rubber from bicycle inner tubes.

The saw table will be 15 cm wide. It will be installed on a special end face of the base of the machine between the pulleys. You need to make a cut in the table for free movement of the saw blade. The dimensions of the table being manufactured depend on the needs and preferences of the craftsman. You can make a small table that only slightly protrudes beyond the machine and saves space, or you can make the upper surface area larger for ease of work. As always, in life you need to choose " golden mean", so the final decision is up to the master.

Saw blade (cutting band)
It is best not to make the cutting blade yourself, but to buy a ready-made one. In stores you can find the most various options, which differ in type, size, type of steel used, hardening of the material, shape of the teeth, their setting, etc.
Below is a table with some parameters of saw blades.
| International marking | Decoding | Body hardness | Teeth hardness | Application Feature |
| Constant hardness | with equal hardness over the entire area | 45 - 48 units. HRc | 45-48 units HRc | This type is used on small diameter pulleys. |
| Flex back - Hard Edge | with high levels of tooth hardness, but a flexible body | 30-33 units HRc | 63-65 units HRc | The upper part of the tooth is hardened, while the rest of the product is flexible. Able to withstand larger feeds compared to the previous type. |
| Hard Back | blades hardened over the entire area | 48-53 units HRc | 63-68 units. HRc | The saw band production technology is the most modern and is used in industry. Capable of performing a larger volume of work, but the price is significantly higher. The canvas is used in professional machines. |
In addition, band saws differ in tooth size:
- with small tooth
- with middle tooth
- with large teeth
The greater the hardness of the tape, the greater its resistance to dulling. The rigid blade allows you to cut material at high feed rates without reducing performance characteristics work.
In this case, for our band saw, the best option was to choose a blade 1065 mm long made of carbon steel, marked Constant Hardness.
Assembly
- Processing the base. After the glue has completely dried, you need to remove the clamps and treat the gluing area, ends and other surfaces.
- Installation of the saw blade tension mechanism. It is installed in the mounting groove, and a thrust element must be placed on top. During operation, the mechanism must be firmly fixed.

- Installation of pulleys. It is necessary to pay attention to the fact that the installed pulleys must be parallel to each other and rotate easily around their axis, while the axis must be absolutely static. Strong beating of the wheels is not allowed, as this can lead to the saw blade slipping off the pulley and injuring the operator. The lower drive shaft must pass through the housing and have reverse side end long enough to be clamped into the drill chuck. The upper pulley is installed in the saw blade tension mechanism.

- Installation of the cutting blade. The saw blade should be installed over the ends of the pulleys. First, it should fit freely onto this structure, and by rotating the adjustment knob, the block with the axis of the upper pulley moves upward, thus increasing the distance between the centers of the pulleys. In this case, the tape is tensioned. After tensioning, you need to tighten the screw in the fitting to firmly fix the tension mechanism.

- Installation of the saw table. The saw table is located on the horizontal surface of the base, as shown in the photo. Its area must be sufficient for comfortable process sawing the workpiece. It should be noted that the perpendicularity of the table is very important saw blade, and in two dimensions – longitudinal and transverse. The table is fastened with self-tapping screws. Although there is an option to “plant” it with glue, and install dowels for strength.
- Installation of power tools. Actually last stage we need to make this design come to life. To do this, you need to clamp the shank of the drive shaft of the lower pulley into the drill chuck. Alternatively, you can use a hammer drill or. But the power will be clearly insufficient, so still use a drill or hammer drill.

- Setting up and commissioning. Before you begin, turn on the band saw to idling. Make sure that the tape does not slip and runs smoothly. Check its tension and fixation of the saw blade tension mechanism.
Rules for working on a band saw
A large volume of processed materials requires the installation of a blade with large teeth on the machine. The best option– use of universal band saws.
- at large size the workpiece to be processed should be mounted on a band saw with large teeth; It is better to use cutting tapes universal type. This way there will be no need to change the blade when processing different materials;
- Decide on the installation location of the machine and securely mount it on a static surface, avoiding vibrations during operation. The room in which the band saw will be installed must be well ventilated.
- After finishing work, remove the sawing band and, accordingly, tighten it only before work. This will extend the period beneficial use canvases
- Every two hours of operation, turn off the band saw and give the motor, in this example the drill, a rest, and at the same time check for malfunctions. Compliance with this rule will protect the worker from injury and the tool from overheating.
- Check the set of cutting teeth from time to time.
Conclusion
At correct assembly and use, the band saw has a long service life. You should only sharpen the belt from time to time and monitor the condition of the main parts.
Video
Video this review is based on: