DIY tire swans. How to make a swan from a tire with your own hands. How to make a swan from a tire using additional materials at hand
I live in a village in New Moscow. Most of all, our village looks like a large construction site; in some places we have roads, but we have no amenities at all. That is, we don’t have everything that the eye in Moscow doesn’t notice, all these flower beds, lawns and even sidewalks. But we want it too.
One day I was walking from a stop and saw that the entrance to our village was decorated with six car tires. Our administrator could no longer look at the solid liquid clay in which our village was buried, and decided to create beautiful flower beds made from tires, and then plant flowers there. I'm going to swear. What, I say, are we a motorcade, a bus depot, why are we so scared that we decorate ourselves with tires?
The administrator looks at me and doesn’t understand. And he says that if you paint it white and bury it, it will be beautiful. That, they say, neighbors pass by and everyone approves of the initiative.
And then I understand that “beautiful” is different for everyone and I don’t need to argue. From my point of view, this is absolute poverty, all these flower beds are made of painted tires, but I won’t undertake to explain it to anyone who thinks this is normal. Labor intensive.
If you walk around our surroundings, you can collect a large collection of this “beautiful”.
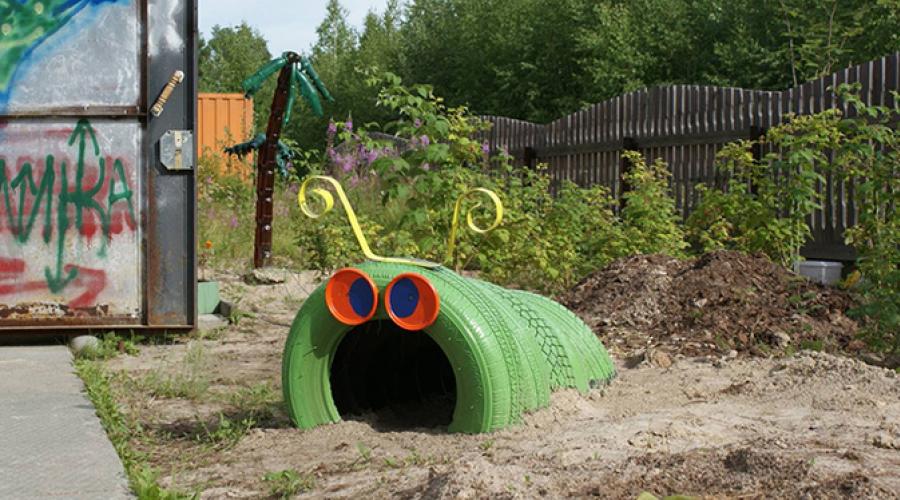
I see bird feeders made from milk cartons. Someone made a mini-greenhouse from a five-liter plastic bottle with the bottom cut off, and someone nearby fenced off the lawn with a multi-colored fence made from buried plastic soda bottles. But the star of landscape architecture is a swan carved from a tire.
And so I’m thinking, guys, why don’t you take this garbage to the trash heap and make a birdhouse out of wood and a fence out of a picket fence?

And you can fence a flowerbed with even larger real stones or make a fence from real branches, do you know about that?
Probably, I think, people do this to save money. And so I put “tire flower beds” into the search engine. The search engine corrects me: “beds made of tires.” And I am bombarded with a hundred recipes on how to make a beautiful composition from unnecessary summer tires.
“Every owner of a country house strives to decorate the area adjacent to it. Buying industrial flowerpots made of concrete or plastic modules quickly solves this problem, but is accompanied by serious costs. In order to save money, you can use a step-by-step guide to create such a simple product as a flower bed made of tires with your own hands: a photo of a flower bed made from wheel tires and practical recommendations will help you navigate this issue.”
I have a question, guys, what about you, who decorate the site with tires, what did you use to build the house? Did you find money for it? Why do you suddenly need to save money on flower beds?
There is no need to create from garbage, you are not recycling it for humanity, you just take the garbage and throw it away
A large terracotta clay pot, twice the size of a tire, cost me a thousand rubles. We agreed that I would buy several of these pots for the village, and the administrator would throw away his tires and I would never see them again. This is about my personal history and the village.
Well, in short, everyone who plants flowers in such rubbish, does he spend every thousand rubles wisely? Now we won’t talk about pensioners, but let’s talk about all the strong and normally earning men and women who couldn’t find 100 rubles for a small plywood birdhouse and 50 rubles for greenhouse film, but instead placed a milk carton and a plastic bottle in their yard. I just want to say that saving has nothing to do with it.

People do this not to save money, but because they think it’s normal to live this way. Because, regardless of their income level, they have poverty in their minds. Because this aunt or uncle simply cannot imagine how they would go and buy something with their own money. They’d rather take something out of a trash bag and make it “beautiful.” And money equivalent to a normal flower bed would be better spent drinking or buying cigarettes.
Well, let’s also take into account the rogue standard that reigns around. There are so many attempts around to make candy out of shit, we call it “do-it-yourself”, so many swans out of rubber, that it seems that this is our norm.
I even came across a whole guide on the Internet called “Creating from trash.” A tin can turns into a box, a DVD into a curtain clip, a rug made from garbage bags and an apartment decorated from egg trays. If you think that the authors did all this beautifully, no, it’s not beautiful. It's just that for some reason it's very difficult for people to do a simple thing. Take and throw away the trash, get rid of the tires and put old wheels and egg cartons in the trash.
There is no need to create from garbage, you don’t create innovations or recycle it for humanity, you just take the garbage and throw it away.
Very often you can see various figures decorating the garden in garden plots. They are part of landscape design, make the garden more expressive, original and attract many interested glances. Perhaps the most popular and most frequently encountered figure is the swan. You can make such a figure with your own hands from old car tires. Read about the features of drainage on the site.
Swans made from car tires in the photo


To create a swan from a tire and plastic bottles you will need a little free time, patience, diligence and, of course, materials to create the figure:
- An old tire, preferably well worn and without spikes, will be easier to work with;
- To make one swan you will need about 40 plastic bottles;
- Metal grid
- A plastic hose, you can take from a vacuum cleaner, it will replace our neck;
- The wire for the neck must be thick and strong enough, with the help of it the main part of the structure will be held;
- A small piece of foam for the head.
- The tire must be cut in one place, and the swan's tail in the form of a sharp triangle should be cut from one edge.
- The edges are fastened with bolts; on the other hand, for convenience, you can cut the edges of the tire.
- We attach the wire to the tire on the side where the neck will be located, one end of the wire will be the base for the neck, and the other is necessary to secure the figure of the earth, it must be left a little on the underside of the future swan. Read how to choose and how much the seeds will cost.
- To make feathers:
- It is necessary to cut feathers from plastic bottles and attach them to a metal grill.
- The feathers are secured to the grid on the outside and slightly along the top edge on the inside, so that the grid is not visible when finished.
One bottle yields approximately 6 feathers.
This creates two wings.
- A swan's head with a beak is cut out of foam plastic and attached to a wire
- The hose is also put on the wire and attached to the tire using a self-tapping screw, which it is advisable to dip in glue.
The swan model is ready, now the bird needs to be painted white. The wings can be attached to the tire on both sides using self-tapping screws, or by pulling them together with wire. Using the piece of wire left below, we stick the swan into the ground.

Step-by-step instructions - how to make a swan from a tire?
Prepare tools:
- jigsaw,
- electric drill,
- wire cutters,
- pliers,
- saw for metal.
Additional materials:
- a metal rod or wire a little more than a meter,
- several pieces of thin wire,
- chalk for marking,
- paint black or white, red for the beak;
- brushes
After completing all the preparatory work, we proceed to the actual creation of the swan:
- The tire in its original form is marked with a head, beak and neck. The length of the neck should be more than half the circumference of the wheel, the length of the beak in length will be shorter by about a cm than the length of the head. These are approximate proportions as tire sizes may vary. Read how to set up a utility block with a shower and toilet at your dacha.
- Next, use a knife or drill to make a hole so that you can insert a jigsaw and start cutting out the shape.
- The sawing process should take place in a mode below average with a reverse tooth, then the rubber does not burn and the metal cord in the tire breaks.
It is necessary to cut out the pattern according to the markings evenly and sequentially, a little on each side, since if you cut out one side at once, it will be more difficult to cope with the second, it will constantly bend.
- After cutting out the neck and head, you need to make a tail for the swan. Its length is approximately 25 cm from the base. Having made this length, the further process of turning the tire out will be easier.
- The metal cord protruding from the cuts must be rubbed down with a grinder or sandpaper so that they do not injure your hands.
- Now the tire product must be turned inside out.
- Along the length of the neck, in increments of 15 cm, it is necessary to drill double holes for staples, with the help of which the rod will be secured from the base of the neck to the head.
- We make staples about 10 cm long from pieces of wire and insert them into the drilled holes.
- Next, take a thick wire or rod and fasten it along the swan’s neck using pre-prepared staples. There should be a small piece of wire left free from the base of the neck, about 10 cm. Then we bend the swan’s neck as needed.
- Next comes painting the swan in the chosen color. To do this, you can use any weather-resistant paint.
- For a stable position of the swan, it is necessary to place stones at the base or substitute another tire. You can also organize a flower bed at the base of the swan.
How to color a tire swan?
You can use additional decorative elements, for example a crown, which you can make yourself from a plastic bottle, the base of which will be the neck. Paint the crown gold, secure the base to the head of the figure - and then the magical bird Princess, the swan, will settle in your garden. If the base for the figure is another tire, it can be painted in a contrasting color, for example blue, as if a swan is swimming on water, or green. If you don’t want to be like most gardeners who have white swans in their garden, then the swan can be painted black, it will look very impressive.
When several swan figures are made in the garden, black and white swans together will look very original.
In this case, everything depends on the person’s personal preferences and his imagination.
Video
You can decorate your site inexpensively and effectively by making beautiful swans. Video instructions for cutting swans from car tires:
Each of us would like to have cleanliness and order around his house or dacha. Not everyone manages to achieve this; moreover, caring for the flowers that adorn their garden plot is not so easy. Everything requires a lot of time and effort. However, there is a solution to this problem! You can make crafts from scrap materials that would delight you every day and would absolutely not require constant care. Very simple and at the same time looks beautiful craft - swan from a tire.

Materials for making a swan with your own hands:
- tire;
- jigsaw;
- drill;
- plate;
- screws;
- water-based paint.

The process of making a swan from a tire:
1) First you need to prepare the tire for work. It is desirable that the tire be bald and without unnecessary bends.
2) It is necessary to draw the swan’s head along its width along the lines, starting with the beak, which is a rectangle 9 cm long and 2 cm wide. We continue, without lifting our hands, to draw the head. It is 2 times wider than the beak, but the length remains the same - 9-10 cm.

3) Smoothly move on to drawing the neck on the tire. You need to draw lines from the head to more than half the circumference of the tire. Often, the cut line of the tire itself does not coincide with the image of the neck, so it is necessary to draw straight lines very carefully so as not to fall into the cut.

4) Where you drew the beak, you need to mark the swan’s tail with a line, measuring 20 cm.
5) The most difficult stage in the work begins: cutting out the drawn key, neck and head. This must be done first with a drill, and then with a jigsaw file, and cut 5 cm alternately on each side.
6) After this, you need to turn the tire out, giving it the shape of a swan. The widest part that remains bends inward, and this is the support of your craft.

7) Without fastenings, the swan’s neck will not hold, so it is necessary to drill holes in the neck and head and attach the bird’s head to the plate.
8) The swan's eyes are cut out of rubber and screwed into inconspicuous screws.

9) The swan is ready, you can show your creativity and start painting it. In order for the craft to become crystal white, you will have to paint it several times, each time waiting until it dries completely.
If you want your swan to look as natural as possible, you can make a lawn around it, and also put it in another tire, painted the color of water.
This concludes our master class, more crafts for the garden can be seen in
Many car owners have old tires gathering dust in their garage - they are either too lazy to throw them away, have no time, or they are deliberately kept in case they “suddenly come in handy”. Old tires are most often used to create borders, decorative flower beds, equipment for sports and courtyards, or they are used to create original decorations for the garden and yard. One of the decor options is swans made from old car tires. Any craftsman can make them with his own hands; the only materials you will need are tires and some available tools and a couple of hours of your time.
Tire swans: an original garden decoration
There is probably no town in the countries of the former USSR that does not have garden or yard decor in the form of car tires. When done skillfully, such crafts look aesthetically pleasing, original, and their creation is quick, simple, and economical from a financial and time perspective. A decorative swan, or better yet, a composition of a pair of swans will add zest to your site and will invariably attract the attention of guests.

Did you know? The history of the appearance of car tires goes back almost 200 years - the first such invention was patented and presented to the public in 1846.
How to make a swan from a tire: step-by-step instructions
It is advisable to create an original garden decoration outdoors, because during the cutting process the rubber will heat up, releasing hazardous chemicals that will not be easy to remove from the room. If you work in a garage, it is advisable to wear a respirator.
Required materials and tools
The tools you will need are:
- drill (can be replaced with a sharp knife);
- jigsaw;
- Bulgarian;
- work gloves;
- roulette.
- tires in the desired quantity;
- thick wire (1.5-2 m);
- thin wire (20 cm);
- paints for decoration (white, red, black), resistant to sunlight and precipitation.
Important!It is advisable to choose “bald” tires and with nylon cord reinforcement rather than metal - this will greatly simplify the process of working with them, and will also protect you from possible injury.
Manufacturing process
First, let's look at the features of applying markings, because without it it will hardly be possible to cut a beautiful swan. First, you need to draw two lines parallel to the inner hole of the tire, exactly half of the product - these will be the wings. Along the outer edges, the distance from the beginning to the end of these lines will be equal to the length of the neck and head. The head will rest against the tail.
Main dimensions of swan parts:
- beak (length 9 cm, width 4 cm);
- head (length 11-12 cm, width 8 cm);
- neck (width at the head 4 cm, at the base 10 cm).
When all the materials are prepared, you can begin the process of creating a garden decoration:
- Wash your tires thoroughly to remove dust and other contaminants. This will make further work with them easier and more enjoyable, and the paint will adhere to a clean product and stick to it much better.
- When the tires are dry, apply markings using chalk and a tape measure. Wings can be made in the simplest way - by drawing semi-ovals, or you can make them curly.
- It's time to put on glasses and thick protective gloves or gloves. At this stage, you need to use a knife or drill to make several holes on the head and beak of the swan so that a jigsaw can be inserted into the opening. If you make these holes throughout the pattern, cutting will be much easier.
- The most important, labor-intensive and traumatic stage is cutting out the pattern. It is best to work with a jigsaw at medium speed, moving from the base of the neck to the bird's head.
- When the swan is cut out, it is necessary to process the cuts using a knife or grinder: make them smooth and more accurate.
- The product must be turned inside out so that the swan takes a more believable position.
- Now you need to work with the head and neck of the product, since without a frame they will not be able to take the desired graceful shape. To do this, you need to make double holes in the center of the neck every 15-20 cm and insert thin wire staples into them. Next, all that remains is to thread a thick wire through them, which serves as a frame, and give the sculpture the desired position.
- The final stage is painting the swan white or another desired color.


Important! In the process of cutting according to the pattern, you need to work with a jigsaw in parallel, in small sections of 5-10 cm, immediately cutting out both sides of the swan.
To make the decor look more organic in the garden composition, you can additionally make a simple stand for the swan from the same tires. The heads of large bolts, which can then be painted black, work well to imitate peepholes.
Three years ago the first flowerpot was cut out of a car wheel. And literally the next request from the relatives was - make a swan. As the proverb says, a promise is waited for three years. It's time to make a swan. I’m sharing my experience, but it appeared here because the swan was in agony and I wanted to give up everything in just five minutes.
The success of the event largely depends on the tire used. The tire, as when cutting out flower beds, must be old and as worn out as possible, that is, be bald and, to make everything completely simple, the cord must be nylon, not metal. With such a tire you can easily work with a knife and not have to worry too much. But apparently, in order to gain experience, I got a slightly worn studded tire made in Japan and with a very good metal cord. Full step-by-step instructions with photo and video are given below.
Instructions on how to make a swan from a tire with your own hands
1. Before work, it is better to immediately wash and dry the tire. Organize an outdoor workplace in a place where the tire will not become dirty. For work you will need the following tools: an electric jigsaw, the more powerful the better, a jigsaw file with a reverse tooth, a knife, an electric drill with a 3 mm drill, wire cutters - pliers and a metal saw, you may also need a grinder. The materials needed are: a metal rod 1-1.2 meters long, pieces of thin wire, chalk for markings, brushes and paint, black (if the swan is black), white (if the swan is white) and red for the beak.
2. Mark the tire with chalk. The appearance of the carved swan and, most importantly, the amount of effort you will spend on turning the tire out will depend on the marking scheme. The main relationships of the scheme are given below. The swan was made from an R13 wheel with a circumference of 180 cm. The length of the neck from the base to the tip of the beak should be more than half the length of the circumference, that is, 95 cm. For orientation, the length of the beak is 9 cm, the head is 10 cm.
3. After marking, we use a knife to punch a hole for winding the jigsaw blade. I spent about seven minutes getting the hole and got a notch from the effort and steel cord on the knife. It would probably be better to drill out the insertion point for the file.
4. Having inserted the file, the sawing process began; it was very different from sawing. Files with small teeth quickly became dull and became clogged with burnt rubber; files with long teeth also lost their sharpness over time. Working at high speeds accelerated the wear of the saw blades due to heating of the rubber with smoke and smell. For environmental reasons, I don’t recommend cutting rubber with a grinder; yes, it’s faster, but the ruined tool, the fumes and the stench are probably not worth it. With the loss of two files, one half of the neck was sawn through. And it was mine blunder! Unfortunately, no one suggested that this should not be done! Now, when sawing the second side of the neck, the rubber bent in time with the work of the jigsaw blade and the process hardly moved; I had to make a stand for the sawing site in order to somehow fix the rubber. The work was further complicated by sharp wires of metal cord from the cut, stinging the fingers through the gloves. But on the other hand, the sawing mode was selected at lower than average speeds with a saw with a reverse tooth; in this mode, the rubber does not burn and the metal cord breaks on the reverse stroke of the saw. Correctly you need to cut 4-5 cm sequentially on each side, this will make the work easier and faster. Having cut out the swan's neck, let's work on the tail. The proven sawing process is shown in detail in the video of making the second swan; a little more than half an hour was spent cutting out the workpiece. Moreover, the file used was from the making of the first swan.
5. The length of the tail from tip to base is 25 cm. This length will also make it easier to turn the tire out.
6. It is clear that a swan made from a tire with metal cord is under no circumstances intended for children to play with - only a decorative element. Sticking threads of steel cord injure your fingers and act like brushes, catching any debris when touching the ground. The length of the wires can be reduced by processing the edges of the cuts with a grinder.
7. Turn the tire inside out; with such damage, the tire will not resist for long.
8. After 15-20 cm, we drill two holes along the length of the neck next to the center line. We drill holes at the base of the tire to the tail. We prepare brackets from pieces of thin wire about 10 - 15 cm long and insert them into the holes.
Tire is inverted9. Take a thick steel wire or strip 120-150 cm long. In the example, a bimetallic wire from external power wires is used. One end of the rod should be at the base of the tire. We bend this end along the profile of the tire and place it along the neck. From the last fastening on the head to the edge of the rod there should be 9-12 cm.
10. Twist the ends of the staples over the rod and bend them towards the surface. We arch the swan's neck.
Shortening the rod The rod is installed