DIY forge gas forge. Forging furnace: do-it-yourself process Forge forge at home
If you are one of those people who melts metal in your hands and you dream of having your own forge, then you need a forge. We invite you to use our example, and you will be able to make a forge for yourself with your own hands, which will help you master the art of blacksmithing.
Carpentry or carpentry is, of course, good. Wood processing is traditional for Rus'. But we want to talk about metal. More precisely, about metal forging. What do you need to start forging? The first is the blacksmith's forge.
You might be surprised, but the forge is the easiest thing to organize a forge.
The task of the forge is to heat a piece of metal to a temperature that will allow it to be crushed without destruction.
The forge is, of course, fire. You can burn gas, liquid fuel, fuel oil or crude oil, coal and firewood. Only the firewood produces little heat until it turns into coal. Firewood can only be considered as a raw material for producing charcoal, but charcoal is an excellent fuel for a forge. Perhaps the best, but also the most expensive, although also the most accessible. Charcoal for grills and barbecues is sold in any supermarket. So we’ll stick to the coal option.
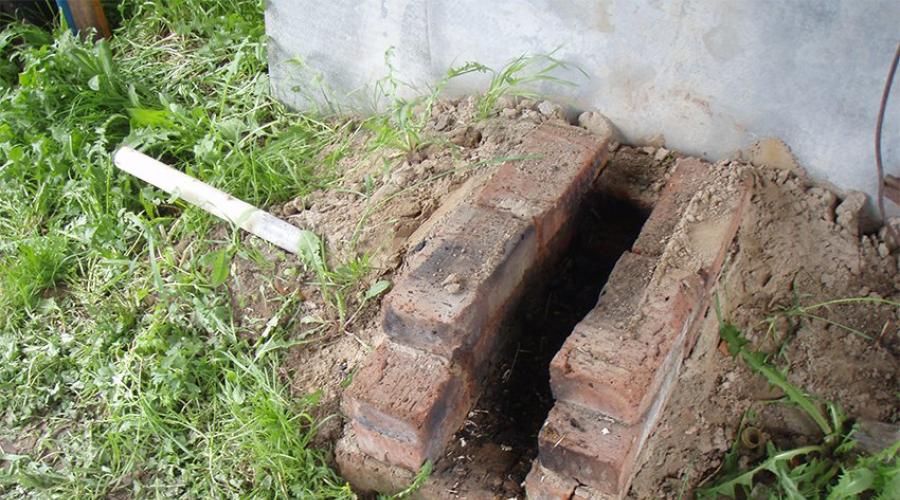
If we talk about a coal-fired forge, then there are two options: with side blast and with bottom blast. Side blowing is ideal for charcoal, and is also the easiest to implement. The simplest option is a hole in the ground where air is supplied through a pipe. You can also line the forge out of brick and cover it with earth.

With the help of such a forge, novice blacksmiths try their hand. A hose is inserted into the pipe and connected to the blowing hole of the vacuum cleaner.
The disadvantage of this forge is that you have to work while squatting, and this is not very comfortable. However, you can put together a box of the required height, fill it with earth and make a forge in it. But since we are going this route, it is worth doing something more thorough. There is one more point. A forge with side blast is not very suitable for coal, while a forge with bottom blast through a grate is more versatile in this regard. That is, a forge with bottom blast can work on both charcoal and stone. But the design will be more complicated.
We will need:
- steel sheet five millimeters thick, about 100x100 cm;
- sheet steel 2 mm thick;
- corner 30x30;
- six fireclay bricks ШБ-8;
- angle grinder, popularly called “grinder”;
- cleaning wheel;
- cutting wheels for cutting steel and stone;
- welding machine and electrodes;
- two wing screws (eye nut).
The forge consists of a table with a forge nest. Below, under the furnace nest, there is an ash chamber into which air is supplied. The table is made of steel sheet five millimeters thick. The size of the table is arbitrary, but it is more convenient when you can freely place working pliers, a poker and a scoop on it so that they are at hand. We cut a strip 125 mm wide from a five-millimeter sheet; we will need it later, and from the remaining piece we make a table.
 Scheme of a forge with a forge nest
In the middle we cut out a square hole for the future forge nest. You need to decide on the size of the nest. A large nest will require a lot of coal. A small one will not allow heating large workpieces. The depth of the nest to the grate also matters. Without going into details, let's say that a depth of ten centimeters will be optimal, regardless of the size of the nest in plan.
To prevent the metal from burning through, it must be lined (covered) with fireclay bricks. We use ShB-8 brick. Its dimensions are 250x124x65 mm. These dimensions will determine the size of the forge nest - 12.5 cm at the grate, 25 at the top, 10 cm deep. Considering the thickness of the brick, the size of the hole in the table will be 38x38 cm.
From the cut piece we cut out a square with a side of 25 cm. In the center of the square we cut out a square hole with a side of 12 cm. We also need four plates in the shape of an isosceles trapezoid with base lengths of 38 and 25 cm, a height of 12.5 cm. So the previously cut strip came in handy . Now you need to cook it all.

From two millimeter steel we roll up a square pipe with a side of 12 and a length of 20-25 cm. This will be the ash receptacle. In the middle of one of the walls we make a hole for the air duct. We weld a pipe into the hole. We use a piece of ordinary water pipe 40.

The ash receptacle from below is closed with a lid. We do it with thumbscrews.

The table is ready. All that remains is to place it on the base or weld the legs from the corner to it. You can make the base from foam concrete blocks.

Pay attention to the opening. An air duct will pass through it.
Using a grinder with a stone cutting disc, we cut out the lining from the brick. Be sure to use a respirator and safety glasses. And follow safety precautions when working with angle grinders.

You can connect a vacuum cleaner and try to light the forge.

First, we lay down wood chips and finely chopped firewood. We set them on fire with a weak blow, and when the wood burns well, add coal. Now you can increase the blowing.
The vacuum cleaner can be connected not directly to the air duct of the forge, but through a homemade air supply regulator. This device allows you to regulate the amount of air supplied to the forge, that is, reduce or increase the blast.

Typically, a damper is installed to regulate the air supply into the duct. But blocking the flow increases the load on the vacuum cleaner motor. An old vacuum cleaner is usually used, and in order not to overload it, an air supply regulator is built. The air flow is not blocked, but is diverted into another duct. For this purpose, a box with three pipes was made. Two opposite each other - the entrance from the pump and the exit to the furnace. The third pipe, on the top wall, is where excess air is discharged. The third pipe is shifted relative to the first two by the diameter of the holes.

Inside is a plate bent at a right angle, half the length of the box wide. The plate can be moved from one extreme position to another using a wire rod. As far as the air supply hole into the forge is blocked, the discharge hole will open to the same extent.

The box is closed with a lid with a hole for traction.

We now have a working forge suitable for outdoor use. To protect from rain, you need a canopy, which must be non-flammable. And the forge needs an umbrella and a pipe to collect and remove smoke.
We make the umbrella from sheet iron two millimeters thick. Firstly, such an umbrella will last longer, and secondly, it is more difficult to weld thinner iron using manual arc welding.
For an umbrella to be as effective as possible, the slope of its walls must be at least sixty degrees to the horizon. The umbrella should be positioned above the fireplace so that an imaginary beam directed from the point closest to the edge of the fireplace, inclined outward at an angle of sixty degrees to the plane of the table, falls inside the umbrella. This means that the higher the umbrella is above the fireplace, the larger it should be. On the other hand, the lower the umbrella is above the table, the more inconvenient it is to work. Here you need to proceed from the available material and your anthropometric data.

The umbrella is supported by angle steel posts. We place a pipe on top of the umbrella, which we also weld from a two-piece steel sheet. The pipe must be covered with a spark arrestor, which is made from metal mesh.

If you direct the air discharged from the throttle through an air duct (a 1-inch water pipe will go) to the beginning of the chimney, you will get an ejector that increases the efficiency of flue gas removal.
That's all. Your forge is ready. Forge to your health, forge like us, forge better than us!
Hand forging is becoming increasingly popular - both to meet your own needs and to produce various products to order. Heating of metal, in order to increase its plastic characteristics, must be performed in special heating devices, the simplest of which is a forge. The main task of the forge is to ensure a stable increase in the temperature of the metal to forging temperatures, i.e., no less than 1200 °C. How to make a homemade forge, and whether it is possible in principle, is discussed below.
Classification of types of forges
It can be carried out according to the following main indicators:
- According to the type of fuel used. There are gas furnaces, as well as devices operating on solid (coal) or liquid (fuel oil) fuel.
- According to the design features, open and closed forges are built.
- By hearth size (effective surface) – small, medium and large.
Solid fuel furnaces, which require the use of coking coal, are an effective technical solution for video shooting, but an outdated one. This will require not only ensuring a continuous supply of high-quality charcoal, but also coming to terms with technological shortcomings, including:
- uneven heating;
- inability to control the process;
- increased sulfur content, which will increase fragility during the forging process;
- increased fuel consumption, it can be up to 120 - 150% of weight;
- low efficiency of the device, accompanied by significant waste.
Nevertheless, such designs, in conditions of single production of products, can be used at home, especially if they are mini-forges running on cheap fuel oil.
Forge design
To create more favorable working conditions for a blacksmith, it is more advisable to build closed forges. Although they are somewhat more difficult to manufacture, they are more efficient and provide uniform heating of workpieces, in particular, those with a round or rectangular cross-section. Open forges remain insignificant in terms of product size for artistic forges.
A closed-type forge consists of the following elements:
- steel support frame with racks;
- hearth;
- linings;
- gate valve;
- fan;
- chimney pipes.
If during forging it is necessary to heat the metal not completely, then technological holes are made in the damper. They are equipped with closing eyes, necessary to reduce fuel losses and speed up the heating process.
When setting up a workshop, it is economical to equip the forge with a simple recuperator - a unit that increases the temperature of the exhaust furnace gases. Furnaces with recuperators have a higher efficiency, and the generated heat can be used, for example, for a furnace that performs subsequent processing of forged products - their forge welding, bluing, etc.
Stages of making a homemade forge
How to make a blacksmith's forge, and where to start? To make a closed furnace, you will first need to determine the dimensions of its hearth. They are determined by the desired performance, and depend on fuel consumption and the intensity of the forge. For the gas option, the optimal fuel supply speed can be taken to be 1 - 1.5 m/s: in this case, heat transfer processes in a closed space will proceed quite efficiently.
The hearth tension N is related to the productivity of the furnace N by a simple ratio:
where F is the hearth area.
Taking into account the area allocated for the forge, as well as the expected forging productivity (for example, in kg of products), it is possible to establish the actual minimum tension of the hearth (it should not be less than 100 - 150 kg/m2 ∙h, otherwise the arrangement of even a mini-version of the heating installation turns out to be unprofitable).
In order to make a forge with your own hands, you will need the following materials:
- thick sheet heat-resistant steel;
- refractory brick (fireclay or dinas);
- rolled steel profiles (angles, channels) for mounting the hearth frame, manufacturing the damper and support posts;
- steel chimneys for removing gases generated during the heating process of products;
- fireproof coating for sealing cracks;
- sheet or wide steel for external lining.
The design of an open hearth is much simpler - it only needs to be equipped with a grate system and provide an air supply that intensifies the heating process. In this case, a conventional ventilation hood made of heat-resistant steel is sufficient to remove combustion products.
In addition, during construction it makes sense to use standard units. Here we should mention a fan for the furnace, which can be used as units produced for high-power double-circuit boilers. Also suitable are ventilation pipes and steel chimneys designed for smoke removal of gases at 300 - 400 °C. You can set up a forge with your own hands using burners from powerful double-circuit boilers.
Making the support frame
Since the forge is a stationary unit, you should clearly determine its location. At home, not the entire part of the workshop can be used as a forge. But, of course, the forge should be adjacent to one of its walls, preferably one that does not communicate with adjacent buildings, since in this case it is much more difficult to arrange chimneys and install a fan for the forge.
According to fire safety conditions, the structure must be at least 1 m from the main wall of the workshop, and any use of materials with reduced fire resistance (including GKLO plasterboard) is excluded.
When making a support frame, it is advisable to use ready-made drawings that can be purchased or downloaded on the Internet. The dimensions of the forge/mini-forge are consistent with your own capabilities. It would be good if the drawings also included photos and/or videos of the forge in operation.
The support posts and frame are made welded, for which low-alloy steel 09G2S is usually used. It has sufficient strength, is easily and reliably welded, and is resistant to high-temperature corrosion. The pitch of the plate cells of the support frame is determined by the dimensions of the refractory. The finished frame is provided with holes for subsequent fastening of external lining elements.
Manufacturing of hearth and roof
When choosing refractories for arranging the upper part, they are guided by considerations of durability, the type of heated products, as well as the intensity of use of the forge. Fireclay and dinas are used most often.
Fireclay is manufactured according to the technical specifications of GOST 390-79. Buying uncertified products is very dangerous, since it is sometimes difficult to distinguish fireclay bricks by color from ordinary ones, which melt at 1200 ° C. Fireclay bricks suitable for masonry must be cream-colored and have low porosity. In this case, its weight is at least 5 kg. There are plenty of demo videos on the Internet that can help you identify quality products. The brands ShPD, ShA and ShB are suitable for the construction of the forge.
Download GOST 390-79 “Fireproof fireclay and semi-acid products for general use”
close ×
A forge is equipment that allows you to heat metal to a temperature of 1200 degrees. Its dimensions vary widely. Some are large and stationary, others are small and portable.
You can make a forge with your own hands of any design, which will work on both solid and gaseous fuel.
In order to understand how to make a forge with your own hands, you need to understand its design. Physical processes are based on the combination of carbon and oxygen. In other words, the process of carbon combustion occurs, releasing heat.
To prevent complete combustion of the metal, the amount of oxygen is not supplied in full. This is regulated by air blowing. You shouldn’t overcook the workpiece in the forge either. The metal will dry out and become hard but brittle. A classic example is cast iron.
A homemade forge for forging consists of the following parts:
- Table made of refractories.
- A firebox or hearth with a grate.
- Air chamber.
- Air drainage.
- Supply air duct.
- Air valve.
- Camera.
- Window through which workpieces are fed.
- Umbrella.
- Chimney.
- Crucible.
- Quenching bath.
- Gas-air chamber.
 Figure 1: Forge drawing
 To line the table with your own hands, refractory bricks are used. The hearth is based on a form that includes a firebox, grate bars and an air chamber.
With the help of air drainage, the blowing is adjusted. The chimney is designed to remove accumulated gases.
A hardening chamber is not always necessary. It is required in the case of forging damask steel so that the product undergoes the necessary heat treatment.
The crucible is the place where the maximum temperature is maintained. At home, it is made of fireclay bricks.
Fuel
The following can be used as fuel:
- Small coke. Pre-kindling is done with firewood, on which coal is placed. The ignition temperature of coke is up to 600 degrees, so it is placed last.
- Charcoal burns better because it has a microporous structure.
- Coal. When burned, it should reach the carbon stage. It burns worse than coke, so less critical products are used when forging.
- Firewood. They are burned in the shell so that harmful impurities do not reach the metal.
- Working with waste oil.
Solid fuel forges

To figure out how to make a forge that runs on solid fuel, you need to study the instructions and decide on the type. A closed-type forge furnace is better suited for working on coal or wood. It is made at home from scrap materials. A charcoal forge does not require special equipment.
Necessary materials:
- Availability of refractory bricks.
- Injection burner.
- Hood.
Manufacturing procedure:
- At the preparatory stage, drawings for the forge are developed.
- A cube is being made from bricks. There remains a cavity with a hole inside.
- Using reinforcement, the frame is secured.
- A burner is installed in one of the side bricks.
- There is a hood on top, which creates safe working conditions.
 Figure 2: Drawing of a solid fuel forge
 Making a forge for heating metal with your own hands makes it possible to adjust it to the necessary conditions. The material used must only be of high quality to ensure fire safety is maintained.
Gas horn
A DIY gas forge should be practical. Its walls are made of fireclay bricks.
- Refractory bricks are being prepared.
- The walls of the forge are folded. The amount of material varies depending on the complexity and size of the case.
- Surfaces are processed using a hacksaw.
- All elements fit tightly. The presence of cracks is not allowed.
- A threshold is installed in the front part.
- A rectangular hole is cut at the back. It serves both for ventilation and for working with long workpieces.
- A hole of the appropriate diameter is cut out on the side for the gas burner.
- The gas burner is made of stainless steel. This is a pipe welded at one end and with a metal mesh at the other.
Such a forge has its advantages:
- The furnace is structurally simpler than a coal forge.
- Simple fuel supply and simple temperature adjustment.
- Light weight.
- Low cost.
There are other types of gas forges made of metal. There are no fundamental differences between them.
 Figure 3: Burner drawing for a gas forge
 Waste oil furnace
Considering that petroleum products are expensive, it is beneficial to use a forge using waste oil. To make the forge during mining, parts that have served their useful life are used. After processing the furnaces, a significant drawback emerged - the spent mixture did not ignite well. To eliminate this problem, an additional compartment was built into the mining forge. Here the oil is preheated with coal or wood. To improve combustion, waste fuel passes through filters and diesel fuel or gasoline is added to it.

As a result, the mining forge has the advantages of a yellow flame and stable temperature.
You can make it yourself:
- It is made from fireclay bricks, dimensions: 85×48×40 cm.
- The vault is made in the form of an arch to maintain temperature.
- The body is completely covered with sheets of iron. A thickness of 1.5 mm is used on the sides, and the top and bottom are lined with 2 mm sheets.
- The supports are made from angles based on the weight of the structure.
Air is pumped into the chamber by a fan. A waste tank is installed on a hill. From it, the oil enters the chamber through a pipeline, where it is picked up by air, which moves under a pressure of 2 atm. The waste is broken up and fed into the nozzle.
To reduce the ignition time, a heating element is installed in the forge during testing. Ignition time may take up to 30 minutes. But the hot mixture burns well. Now you need to make sure that the fireclay does not melt.
Scheme of the furnace during development:
Aluminum smelting
Aluminum, which has a high degree of ductility, is a low-melting non-ferrous metal. A forge for melting aluminum is easy to make with your own hands. There are many designs that use furnace smelting. They have no fundamental differences between themselves.

Step-by-step instructions for creating a forge for melting aluminum:
- The body is made of brick. The material is selected without cracks to avoid heat loss.
- By selecting scraps of steel pipes, shelves for grate bars are made from them. Low-melting material cannot be used here.
- Steel strips up to 6 mm thick are selected and used as grates.
- The grate bars are screwed on.
- Both coke and coal can be used as fuel.
- Ignition is carried out using a blowtorch or gas torch.
This homemade blacksmith's forge can only be used in open space, due to the absence of a chimney. During operation, a lot of gases are released, which should not accumulate in a confined space.
Mini horn
A small, portable forge is often useful on the farm. It can be used not only in the forge, but also in the garage or at the dacha.
To make a mini-forge with your own hands, you need to have 2 refractory bricks, a hacksaw, a drill with a diameter of 8 cm and a length of 15 cm. It is advisable to have a pobedite tip at the end. To fasten the structure, 2 pins are prepared, 8 cm in diameter and 21 cm long. During the work, you will need 2 hole saws, 63 and 26 mm in diameter.
The operating procedure is as follows:
- 2 bricks, 250 mm long, are sawn in half.
- Two halves of one brick are laid on top of each other and 2 through holes with a diameter of 63 mm are drilled using a hole saw.
- Placing the third half under them, through holes for the studs are drilled in two corners, diagonally.
- Using pins, a block of three bricks is assembled and pulled together. First, washers are put on the ends of the studs and nuts are screwed on.
- A hole for the burner is drilled between the first two bricks using a 26 mm ring drill. It connects to the main passage, but does not touch the second wall.
The burner is inserted into this hole and ignited. Any metal is fed into the main passage, which falls under the flame and heats up in a few seconds.
Making a forge from a potbelly stove
Essentially, this is the same potbelly stove, only without the grate. The appearance of blacksmiths can be in the form of a cube, parallelepiped and cylinder. After cleaning the grate, the air does not come from the space below, but is blown through a side channel, which can be adjusted. As a result, the oven heats up better. It retains gases longer, which also increases the heat.
The manufacturing procedure is as follows:
- From a pipe with a diameter of up to 300 mm, a ring 100 mm wide is cut. This part is called a collar.
- A sheet 4 mm thick is taken and a circle equal to the diameter of the collar is cut out of it. This will be the door.
- A piece of pipe for air supply is cut off. It can be from 76 to 102 mm.
- The damper is inserted into it using a handle, a spring and a nut.
- A strip 30 mm wide and length equal to the perimeter of the door is cut out of a 3 mm sheet.
- The strip fits around the door and gets scalded.
- A hole is drilled in the side of the door and a pipe for air supply is welded there.
- Using a locking device, the door is attached to the collar.
- This unit is installed on the firebox with a distance of 100 mm from the bottom.
- In the back part, at the top, a hole is cut and a chimney is installed.
The disadvantages of such a stove include the absence of an ash pan. However, longer combustion results in improved combustion of solid waste. Ash removal can be done less frequently.
Making a forge from a bucket
The bucket forge is also designed for melting aluminum. To do this, you need a bucket with a capacity of 10 to 20 liters. In addition, gypsum and sand. This mixture is placed at the bottom of the bucket.
Step-by-step instructions for a forge made from a bucket with your own hands:
- The selected bucket must not be galvanized. This is due to the fact that zinc, when heated, releases harmful gases. The container is made of ordinary metal.
- A mixture of gypsum and sand, 5 cm thick, is placed on the bottom. The ratio is 1:2. First, such a mixture is formed at the bottom. After drying, the inner walls of the bucket are treated with it. Drying time is 15–20 minutes.
- A water squeegee is installed below, through which air is supplied with a hairdryer.
- A crucible is inserted into the bucket.
- The ignition process begins.
- Aluminum is placed in a crucible and melts under heat.
Small items can be cast in this way.

A hand-made blacksmith's forge is a necessary household device. However, first, you need to read the instructions for its use. Purchase the necessary drawings. The risk of fire must be completely eliminated. The right place has been chosen for it. Working with hot metal will bring not only pleasure, but also benefits.
The forge is indispensable in workshops and forges for creating steel products by forging hot metal at temperatures up to +1200°C. There are many different models with a simple design and for different types of fuel with different characteristics. How not to make a mistake in choosing them and build them correctly?
Structurally, the forge consists of the following elements:
- a base made of non-flammable material and highly durable;
- fireproof table;
- fuel chamber with grate;
- air chamber and drainage;
- inlet duct;
- air valve for adjusting air supply;
- tent-shaped chambers;
- opening for feeding long workpieces;
- bugle umbrella;
- gas-air chamber;
- baths for hardening workpieces;
- chimney for removal of combustion products;
- removable furnace.
Principle of operation
The principle of operation of the forge is based on the chemical reaction of combustion of carbon, which, when reacting with oxygen, forms carbon dioxide with the release of heat. In addition, metal recovery occurs, which is a very important aspect for the formation of homogeneous, high-strength parts.
To maintain an optimal level of combustion and temperature, air ducts and air chambers are installed inside the fuel chamber, which forcefully pump pure oxygen. Due to this, it is possible to obtain temperatures above +1000°C, which are unattainable with conventional combustion of solid fuel (coal or wood).
At the same time, using the inflation technology, the volume of air is selected so that there is always a slight lack of oxygen for the oxidation reaction to occur. In other words, it is necessary to select an operating mode to prevent metal combustion.
The time the smelted part remains in the furnace should also be limited, since in an atmosphere of carbon dioxide the metal will begin to react with it and form a high-strength alloy with increased fragility. These negative consequences can be avoided by introducing additional oxygen into the chamber in such an amount that carbon dioxide has time to completely react.
Purpose and uses
A DIY forge is made depending on its main application and can be configured accordingly for specific tasks. Therefore, it is important to understand what each of its structural parts are intended for:
- a firebox with a grate, an air chamber, a valve and a pipe are used to burn fuel and heat the metal workpiece; depending on the temperature requirements, they can have an open or closed design, and also not be equipped with air pressurization;
- air drainage is used to regulate the supply of oxygen and prevent embrittlement of the metal, allows you to create optimal conditions when heating and melting the workpiece;
- a tent or umbrella with a chimney is used to remove carbon monoxide and other combustion products that can harm human health;
- a quenching bath is necessary for rapid cooling of the metal and its acquisition of optimal plastic and strength properties;
- a heat-resistant cap or crucible, used to expand the zone of uniform heating, which allows you to effectively melt metal (usually non-ferrous precious metals) in a crucible;
- gas-air chamber, used for drying air, purifying it from impurities, as well as for introducing alloying elements, designed to produce high-quality products with specified characteristics in accordance with a specific reference diagram of states and phases;
- the table serves to place all the elements of the forge on it, as well as for partial cooling of the workpieces; it is a mandatory part of the design.
The forge is used for the following purposes:
- heating the metal for subsequent forging or other types of processing;
- melting in special forms;
- heat treatment to improve certain properties.
Classification of forges
Before making a forge, you need to familiarize yourself with their classification in order to select the most suitable design option. Classification is carried out according to the following criteria:
- by type of fuel used;
- by type of construction;
- according to hearth size.
Types of forges by type of fuel used
According to the type of fuel used, forges are divided into the following types:
- gas;
- solid fuel;
- on liquid fuel.
 Solid fuel forge
 Gas furnaces have the simplest design and are cheap to repair and maintain. They are characterized by minimal weight, which allows them to be made portable or compact.
Solid fuel furnaces are distinguished by the ability to obtain the highest possible heating temperatures, the relatively low cost of building materials for construction and ease of operation. For their kindling, it is permissible to use the following types of fuel:
- carbon or coke, characterized by high cost and increased efficiency (consumption up to 5 times less than coal), it does not contain foreign impurities, ignites at temperatures above +450°C;
- Coal, the most common and efficient fuel, emits coke gas when burned, so when lighting it is necessary to wait until it has completely evaporated; it is suitable for forging various decorative elements or parts of medium quality;
- charcoal has a minimum ignition temperature compared to other types of fuel, but burns out quickly and is characterized by increased consumption, so it is effectively used for kindling.
It is permissible to use diesel fuel, fuel oil or waste oil as liquid fuel. At the same time, it is important to pre-clean it, since the presence of impurities will cause an unstable flame and release of harmful compounds into the atmosphere.
This also makes it difficult to maintain equipment due to frequent blockages.
Classification by design features
A homemade forge can be classified according to its design features as follows:
- by installation method: portable or stationary;
- according to the design of the combustion chamber: closed or open type;
- according to the placement of the boost: with a side or central nozzle.
Types of forges by hearth size
There are different sizes of hearth forges: small, medium and large. They are determined by the operating efficiency of the installation and completely depend on the intensity of fuel consumption and operating modes of the fuel chamber. The optimal efficiency of fuel flow rate is from 1 to 1.5 m/s.
The productivity of the forge is directly proportional to the amount of tension and hearth area. In this case, the minimum tension is considered to be in the range from 100 to 150 kg/m 2 h. Values outside this range are not economically viable.
How to make a blacksmith's forge?
Before you make a forge with your own hands, you need to prepare the necessary materials and tools. This will minimize time costs
Instructions for creating a solid fuel mobile forge
Before starting work, you must collect the following tools:
- welding machine;
- drill;
- file;
- set of wrenches;
- putty knife;
- roulette;
- level;
- clamp;
- marker;
- Bulgarian

Having prepared a drawing of a forge, you need to purchase materials for its construction:
- sheet steel 2-3 mm thick (recommended 09G2S);
- swivel wheels 4 pcs.;
- profile pipes of square section with a wall thickness of at least 2 mm;
- refractory cement;
- air snail;
- fastening elements: bolts and nuts;
- stainless steel pipe along the diameter of the cochlea outlet;
- adapter.
A mobile open-type coal forge is manufactured step by step as follows:
- We take a steel sheet and mark it with a marker according to the size of the desktop.
- We cut out the tabletop with a grinder and clean the edges with a file.
- We mark a rectangular hole on the cut sheet for the mouth of the forge and cut it with a grinder.
- We take the second steel sheet and mark the elements of the parts for the trapezoidal mouth of the forge.
- We cut out the vent elements and then weld them into a single structure.
- We weld the muzzle to the working surface of the table in the place of the cut hole.
- We turn the structure over with the mouth down, mark the places for the location of the walls for the placement of coals.
- We cut out the sides for the working surface of the table from steel.
- We weld the sides so that there are no gaps at the seams, and the seam itself is strong and continuous, we accurately center the structural elements.
- For the lower part of the vent, we cut out walls from steel for supplying air ducts, and then weld them.
- We make a removable bottom for the vent, designed to remove ash.
- We attach the pedal to it using levers.
- On the wall for supplying a pipe with air, we make a hole along the diameter of the pipe.
- We cut out elements from steel profile pipes and weld a frame for fastening the working surface.
- At the bottom of the frame we weld a bar for attaching the snail, and then fasten it with bolts.
- We prepare the pipe for the air duct.
- We attach the air duct to the cochlea and the vent; if necessary, we provide additional fastening to strengthen the structure.
- We attach swivel wheels to the bottom of the frame with bolts.
- We coat the joining seams with fireproof putty.
- We form a refractory layer on the working surface of the hearth based on refractory cement mortar.
A forge on coal must be tested by heating it to operating temperatures, but only after the cement layer has completely hardened.
Step-by-step instructions for making a gas forge
To make a gas forge, you need to prepare the following materials in advance:
- fire brick;
- sheets of heat-resistant steel with a thickness of at least 5 mm;
- thin stainless steel sheets (thickness up to 2 mm) for external cladding;
- steel profile pipes;
- chimney pipes made of stainless steel;
- fireproof putty;
- standard burners used in gas heating boilers;
- fan for pumping air.
You will also need the following tools:
- welding machine;
- Bulgarian;
- drill;
- file;
- roulette;
- marker.

A gas forge is manufactured in the following sequence:
- We take refractory bricks and build the body of the forge out of them. If necessary, we process the ends with a grinder with a special attachment for concrete to ensure a tight joint.
- At the front of the structure we create a small step made of refractory bricks, designed to maintain the optimal temperature.
- We make a rectangular hole in the back for ventilation.
- We make a base from a thick sheet of steel to the size of the brick body of the forge.
- We weld profile pipes at the end parts of the sheet so that the bricks inside them are motionless.
- In the side of the combustion chamber we cut a hole for supplying a gas pipe with an installed burner.
- We cut out the upper part for the forge from thick sheet steel.
- We weld the corners of the body at the bottom and top.
- We drill one hole in the corners and tighten the lower and upper parts of the forge with pins.
- We cut out a stand for the forge from profile pipes, and then weld all the parts in accordance with the drawing.
- We install the forge on the stand.
- We attach a pipe to the chamber to remove combustion products.
- We place a gas burner inside the chamber and attach it to the point of entry into the chamber.
- The outside of the body is sheathed with thin-sheet steel, having previously cut out parts with the required dimensions from the sheets. We weld all seams with a continuous seam.
Making your own forge is not only an inexpensive and relatively uncomplicated process, but also allows you to get an installation for specific needs.
A forge is a very useful piece of equipment that can help a craftsman make various metal products. Having a forge can solve many problems related to repairing old or making new products.
Of course, there is always the opportunity to purchase factory equipment of this type if there is a need for it. You can also resort to the help of blacksmith workshops, which can definitely be found in almost every locality. But there is an opportunity to create a forge with your own hands. Having certain skills in handling tools that will help in this matter, there will be nothing difficult in this. You need to make an effort, find all the components, the necessary tools, spend time, but you will have your own forge to use, which you can put in your workshop.
This device is used by craftsmen for the following operations: heating the metal before forging, cementing, as well as other operations. In artisanal conditions, a master using a forge is able to achieve temperatures of up to 1100 degrees, in some cases even up to 1200. Forges are usually large stationary equipment, but there are also small portable examples. In principle, creating your own forge is not that difficult. Tips for creating such a forge will be given in the article below.
To use a forge of a traditional design, you need to have certain skills and experience, and also be sure to have the necessary knowledge about what is the most appropriate fuel to choose. If you use a fuel such as natural gas for heating, this is unlikely to allow you to forge anything significant, but it will help significantly simplify the design. The fact is that a gas forge can be assembled in half an hour or an hour, using only six fireclay bricks and some steel scraps. At the same time, the quality and temperature of heating will allow you to work with non-ferrous metals and small products.
Horn device
In order to move on to tips on creating a homemade forge, you should first familiarize yourself with the traditional structure of such a device:
How the forge works
In order for a user to make a forge on his own, he first needs to understand the principle of its operation, so that he can subsequently work with what he has without losing quality. There is a chemical reaction for the combustion of carbon: 2C+O2=2СО2+188.1 kcal. It is this that underlies the operation of any device. The reaction immediately shows that carbon is a fairly strong reducing agent, that is, it greedily combines with oxygen.
This reducing ability of carbon is partly used in the forge to prevent the oxidation of the workpiece, that is, to prevent the metal in the device from burning. Another very important property of carbon is its high calorific value. This property is that if you blow enough air into the fuel mass, which would be enough for carbon, then you can burn it quite quickly, which will lead to more heat being released. This will allow it to develop a higher temperature.
To prevent metal oxidation, the blast in the forge should be adjusted so that the fuel lacks a little oxygen. But it should be remembered that if the workpiece is overexposed, carburization will occur. This means that the metal will become overdried, that is, brittle.
A few words should be said about the different types of fuel that can be used to operate a forge. These are tips that will help better deal with forges:

DIY forges
You can proceed to the procedure for making your own device of this type. Below are some of the most popular options for making a forge with your own hands. They differ in structure, but the principle of operation is similar for all of them.
Mini horn
Such a small blacksmith's forge made of six bricks is the best option for beginner blacksmiths.
The shelves of the grate can be made from ordinary scraps of steel pipes, while the grates themselves can be made from steel strip 4-6 mm thick. The figure shows that the grate bars must be twisted at an angle with a screw in order to capture the blast flow. The following types of fuel are suitable for this option: coal or coke. Blowing and ignition are carried out with a blowtorch, gas or gas-air burner.
It should be remembered that when using a blowtorch, you need to put a partition, with a window under the nozzle, made of asbestos between the lamp and the device. This must be done because the forge intensely emits heat, which can cause the lamp to explode. This homemade forge should be used outdoors, since it does not have an umbrella with a chimney.
 You can make a portable blacksmith's forge with your own hands from a gooseneck. The design can be understood from the figure attached below. The lining here is fireclay sand, which is mixed with fireclay marl.
Supercharging does not have to be done with a fan from a manual siren, as shown above. In principle, you can use any suitable one that is at hand. It can be attached using a metal corrugator. This, by the way, will make working with long items somewhat more convenient. In this case, you will need to use an air drain at the blind end of the duct.
Of course, such a portable forge has more capabilities than the homemade six-brick forge described above, since its workspace is larger and open at the top. But it is worth mentioning the existing disadvantages of such a device:
- Such a forge has a non-separable design, and when cleaning the tuyere, carbon deposits fall down. As a result, the air duct is perforated. To clean, you have to break the lining.
- This homemade forge can only burn charcoal or coke.
- Its operation is very expensive: carbon consumption is comparable to the same consumption of coal in real forges.
- It can operate at relatively low temperatures: only up to 900 degrees.
Stationary
This is the most serious, complex and productive version of a homemade forge. It allows you to perform more complex manipulations.
Design
 The manufacturing sequence can be identified by examining the figure below.
The photographs are numbered so that you can track the entire process of constructing such a homemade forge.
A little advice for craftsmen who will make such a forge: you should not pressurize the air shower with a vacuum cleaner. In this case, there is a possibility that the fuel will blow out. It is better to find a snail from a car stove and subsequently use this particular device. Drainage for regulating the blowing is also not suitable, since the boost will be too weak. It is better to integrate the throttle valve into the air duct, and the lower cover of the tuyere should be made removable only for subsequent cleaning.