Rocking chair made of metal pipe. We make a rocking chair with our own hands using a video tutorial and advice from experts. Features of fastening using the tongue-and-groove method
The rocking chair is rightfully one of the most popular pieces of furniture. It gains even more popularity if there is country house. It can be different models, made from different materials. But more preference is given wooden products. You can buy it ready-made, or you can make it yourself. How to make a rocking chair with your own hands and what materials to choose, read further in the article.
Advantages and disadvantages of wooden structures
Wood is the most common material for making furniture. Wooden rocking chair is no exception, thanks to numerous advantages:
- Ecologically pure material emitting a pleasant forest scent.
- Considerable strength.
- Long period of operation.
- Possibility of implementing design solutions.
- Easy to process, including manual processing.
- Wide selection of wood of any brand and anywhere.
- Wide color spectrum of material.
The finished rocking chair fits well into any architectural ensemble of the building. It can be installed at any time in convenient place: in the clearing, by the pool, by the fireplace, near the barbecue, etc. Rocking in a chair relaxes, creates comfort for the body and benefits the body. This is a comfortable and safe swing for children.

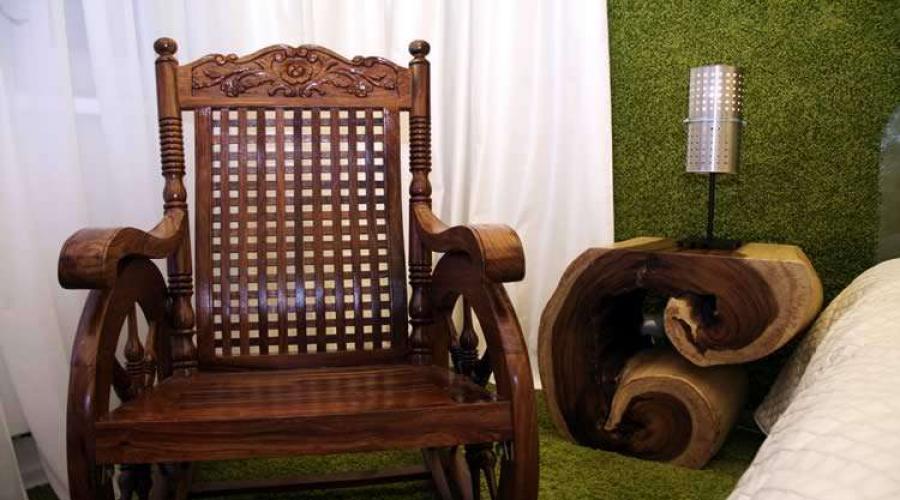
Photo: rocking chair in interior design
Along with numerous advantages, there are a number of disadvantages, the main one of which is the significant cost of any rocking chair. In addition, the structure is characterized by loss of its qualities and characteristics if it is exposed to rain, fog, and other precipitation. It is also undesirable to keep the rocking chair exposed to the sun for a long time.


Material and its characteristics
To make rocking chairs from solid wood, coniferous species are preferably chosen. It can be pine, spruce, alder or larch. These rocks are characterized by their low mass and low density. Homemade designs with significant mass it will be inconvenient to move. The high density of the material will create difficulties in work.


Coniferous trees have a light gray structure. Easy to process. A significant disadvantage of such wood is that as the humidity level increases, it increases in size. Despite this, conifers are a budget option, widely used in trading network and have little cost.
The chair can be made from more expensive types of wood. It could be oak, ash or beech. These types of wood have almost no pores, resulting in high level strength. Finished structures are reliable and durable, but have high cost. Tree species have a light or light yellow color.

To make a chair that rocks, we use high-quality wooden blanks first grade. The moisture content of these workpieces should not exceed 10% at the start of work. If this indicator is higher, then wood is not recommended. It is better to let it dry, since a structure made of wet wood will subsequently dry out and be subject to deformation. The consequence will be its nondescript appearance or complete destruction.
Blueprints
To make a wooden swinging structure, you need to draw up a drawing of the chair. It is better to do it on graph paper, drawing all the structural elements with dimensions. To make a simple rocking chair from wood with your own hands, it is recommended to take an ordinary chair as a basis.

Drawing of a rocking chair made of wood
The simplicity of the design lies in the fact that all elements are attached at right angles and there is no need to cut additional parts. The basis for the entire structure is the size of the seat and the height of the legs. The connecting elements will be cut to these dimensions. The next stage of manufacturing a rocking chair, according to the drawing and the required dimensions, is to cut the wooden parts.
Seat square shape with a side length of 53-56 cm, it can be made of plywood or a solid piece of wood. The thickness of the seat should be 1.0-1.5 cm. For the rear and front legs, a beam with a section of 4.5x4.5 cm is used. The rear legs are cut to a height of 105-110 cm, the front ones - 55-60 cm. To connect the entire structure, transverse slats are used, with the size length, height and thickness 57x4x1.5 cm, respectively.
This design and dimensions are not a dogma. Based on preference, the shape and size of the parts may vary.

Another example of a drawing
Tool
Making a chair requires tools. To complete the work you will need:
- fine-toothed wood saw or electric jigsaw for cutting workpieces;
- simple or electric plane for processing structural parts;
- grinding or draw machine for grinding parts;
- manual milling machine for making grooves and processing connecting strips;
- right angle or plumb line;
- screwdriver;
- hammer;
- tape measure and pencil;
- clamp or rubber band;
- brush or spatula for filling mounting holes.
Considering that the structural elements will not be fastened with nails, a hammer will be needed to fit the parts to each other.
Connecting parts
To attach the seat and legs to each other, you can use two options:
- tenon fastening;
- connection with glue.
When fastening into a tenon on wooden elements Rocking chairs are marked. According to it, grooves are cut out in the legs, measuring 2.0x1.5 cm, 2 cm deep. The shape of the connecting slats is prepared for the grooves. Before fastening the parts, the groove and ends of the slats are treated with construction adhesive.
Users often search:
In the second option, the fastening points are treated with glue and connected to each other. For reliability, epoxy glue is often used. The joints are reinforced with self-tapping screws. The seat is mounted on transverse slats and is also fixed with self-tapping screws.
In both options, a clamp and gaskets are used to finally fasten all the elements of the wooden rocking chair. The cushioning material is installed between the clamp and the rocker. After installation, the clamp is tightened and the rocking chair is left for 24 hours for the glue to completely harden. In the absence of a clamp, the screed is carried out using a rigid rubber band.
Installation of runners
The manufacture and installation of runners can be done in two ways.

First way
It is characterized by simplicity and speed of execution. It is as follows:
- To make the runners, a sheet of plywood 1.5 cm thick is used.
- Using a pattern, two pieces of equal curvature, about 1 m long, are cut out of plywood.
- Slots are made in the legs of the chair, 1.5 cm wide to match the thickness of the plywood runners. The depth of the slots can be 7-10 cm.
- The runners are ground along the edge and installed in the slots. During installation, it is necessary to achieve the most identical level of their installation.
- A through hole with a diameter of 2 cm is made in the places where the runners land.
- The hole is treated with glue and a wooden spike is inserted into it.
Second way
More labor intensive. A block of wood is used as a ski. To equip a rocking chair with skis you need:
- IN wooden block, with a cross section of 4.5x4.5 cm and a length of about 1 meter, cut grooves.
- Treat the ends of the chair legs to fit into the grooves of the runners.
- Place the runner bars in boiling or hot water until the wood becomes pliable.
- Using a tool, bend the skis to a certain radius and leave them in this state until completely dry.
- Place the dried runners on the legs, having previously treated the grooves with glue.
In order for the runners to serve for a long time, it is necessary to use wood with high wear resistance.
Balance check
A rocking chair made of wood may be uncomfortable when sitting down or standing up. This occurs as a result of the difference in the weight of the structural elements that are located in its front and rear parts. To avoid discomfort, it is necessary to balance the swinging structure.
If the structure is significantly tilted forward, transverse strips can be mounted on the runners behind the backrest. If necessary, the weight on the slats can be increased by installing decorative elements.

Balanced Rocking Chair
When tilting backwards, the same counterweight must be equipped in the front part of the rocking chair. It could be additional shelf for legs. If this weight is not enough, then you can install a niche under the shelf for additional counterweight.
Treatment
The finished structure will be used in different places at different temperatures. Operation in winter and summer, under the sun and in the cold, indoors and outdoors can lead to rapid aging of wood and various diseases. Processing the material will save you from this.
Before assembling the structure, the wood can be treated with stain. Due to its concentration, the rocking chair can take on any shade.

The chair is varnished in 3 layers
To prevent diseases, the tree must be coated with a special antifungal liquid, as well as a remedy against tree insects and pests.
To protect the wood from getting wet, it is recommended to treat it with a special water-repellent liquid.
The finished chair will serve not only as a piece of furniture, but also as a separate design element that will always attract everyone's attention.
ABOUT beneficial influence A lot has been written about relaxing in a rocking chair. It also helps to concentrate during intellectual work. Finally, it’s just convenient, after pumping, to take books from the rack behind your back or a cup of coffee from coffee table. Prices ready-made rocking chairs, as it should be in a consumer society, they react to such advantages in their own adequate way: a rocking chair for 5,000 rubles. it's still cheap. And people are artisans and also respond adequately in their own way: there are more and more people wanting to make a rocking chair with their own hands. However, the rocking chair differs from other pieces of furniture, firstly, in that the whole thing moves and swings. Secondly, so that it does not turn from a rocking chair into a kicker or tipper, the entire product with the person seated in it must have a precise balance, which must be maintained within acceptable limits for riders of different weights and builds. This publication is devoted to consideration of issues of how to achieve the required qualities of a rocking chair.
Types of rocking chairs
You need to comply with your own needs already at the stage of choosing a prototype. There are several types of rocking chairs, aimed at users with different habits and needs. The main types of rocking chairs are shown in the photo. Rocking chairs on simple radius runners (arches, rocker arms, skis) were the first to appear in everyday use. They are in use to this day, both in modern and classic appearance, pos. 1 and 2. Their main advantage is constructive and technological simplicity.

Radius runners provide smoothness and softness of rocking only with relatively small swings, and with strong swings they do not guarantee against tipping over. Therefore, rockers “on radii” are made with a low landing, ensuring a large excess of the center of the generating circle (GC) above common center gravity (CG); For more details on the kinematics of rocking chairs, see below. If a seat of normal height is required, then the runners are equipped with bumpers, pos. 3. The shocks of the bump stops on the floor are noticeably felt at the “fifth point”, and in any case you have to get out of the rocking chair on the radius runners, straining somewhat.
Note: Stability when swinging with a slightly larger amplitude at a normal landing height is provided by rockers on radius runners with a closing horizontal arc, see fig. on right. But, suddenly the limit is reached, the supporting surface instantly reduces to a point and a sharp push follows in the back.

Tipping is excluded in rocking chairs on runners of variable curvature, pos. 4. All of them are comfortable enough for riders of different body types. They themselves gently unseat the rider of a rocking chair of the Nirvana type who has stood up and leaned forward on runners of variable curvature, pos. 5 and 6. It is also possible, by changing the progression indicator in the law of change of the generating radius (also see about kinematics), to design them for any landing height, within acceptable limits.
Note: mother and baby are given complete rest with complete unity of souls in the rocking cradle. Reliable rockers with a cradle are made only on runners of variable curvature, see fig. on right. Otherwise, suddenly the little one will get worried and the mother will perk up, and we can tumble together. Which is simply dangerous for a baby.

Nirvana rockers on elliptical runners, pos. 7, provide a gentle, truly blissful rocking, but do not prevent tipping over during strong swings, so they are equipped with bump stops; the front one is often combined with a footrest. Garden rocking chairs with ellipse awnings never tip over, pos. 8.

Nirvana rockers on springs, see fig. on the left, they swing as softly as on ellipses, because mechanical characteristics progressive springs. But making a spring chair with your own hands is difficult: you need either high-quality boards of special types of wood (teak, boxwood, dogwood) or a rubberized strip of spring steel so that it does not scratch the floor. In addition, dirt gets packed into the gap between the spring and the runner and it can be very painful to pinch your finger. For the latter reasons, spring chairs are now very rare on sale.

Rocking chair 3 in 1
Finally, there are also multifunctional “3 in 1” rockers on runners with smooth bends, see fig. on right. When seated upright, this is a regular chair; by leaning back, it can be switched to rocking mode on radii, and by leaning back even more, it can be turned into a sun lounger. But the dimensions of the 3 in 1 rocking chair are too large for apartments below business class, and transitions from mode to mode are accompanied by rather sensitive shocks. In unsuccessful models, you either have to stand up or twitch, squirm and fidget like a puppet on strings. Therefore, 3 in 1 rocking chairs are a piece of furniture for everyone.
To start
Without any special pretensions, just to relax after work, a rocking chair on radius runners will help. Drawings of a simple sample, made, with the exception of the runners, only from straight parts, are given in Fig. This chair can be made for the dacha, veranda or garden in half a day, using only a jigsaw, a drill and a couple wrenches(assembly - bolted). And having rocked to your heart’s content, you may already think about a home rocking chair for the more sophisticated; then you will need a more thorough tool and knowledge.

How does it swing?
Most home craftsmen make rocking chairs according to ready-made drawings, but prototypes often turn out to be developed and tailored to a specific person, and an exact replica is not so convenient. Therefore, before making a rocking chair, it is necessary to obtain at least initial information about its kinematics.
CG straight standing man normal build located on the border of the lumbar and sacrum with inside spinal column. In a sitting individual, it will blend somewhat forward and even less downward. In the chair-seat system, the overall CG shifts back almost to its original position and a little further down. The downward shift of the general CG for the design of a rocking chair is not particularly significant and we can assume that the projection of the general CG onto the supporting surface (floor) is approximately the same as that of a standing person. In the future, the resulting error can be easily compensated by final balancing of the chair, see below.
The vertical location of the central center relative to the central center has a much stronger effect on the stability and comfort of the rocking chair; the latter is also a determining factor when designing rocking chairs on runners with variable curvature. If the CG and CO coincide, this is an indifferent equilibrium: for any physically possible tilt of the chair, the projection of the CG on the floor falls on the point of contact of the runners O, pos. 1 and 1a in Fig. The chair does not rock, and if you lean back too much, you will instantly somersault with the risk of breaking your neck. Fortunately, an exact match between the CG and the CO is only theoretically possible.

If the CG is higher than the CO, then its projection, at any inclination, “runs” outward, backward or forward, from the point of contact. At the slightest tilt, a tilting moment Mo occurs (positions 2 and 2a), and the rocking chair turns out to be unstable. To avoid such a situation for a family rocking chair, it is designed and balanced for the tallest, heaviest and pot-bellied rider possible so that its CO is 450 mm or more higher than the CO. Then, when the chair is tilted, the point O will “run away” from the CG projection, the restoring moment Mv will constantly act (positions 3 and 3a) and the chair will not tip over when rocking within acceptable limits. For those who are smaller, the excess of the CO over the CG will be too large, and the swaying will be harsh, but this can be easily compensated for by pillows under the back and seat. In general, the lower the elevation of the CO above the CG, the softer and smoother the swaying, but the likelihood of capsizing, sharply straightening up and standing up in a chair, is higher. Therefore, it is better for novice carpenters to exceed the CO within 600-700 mm.
Note: if it is impossible to determine the position of the CG of the largest of the riders (say, in his absence), the radius of the generating circle R is taken equal to the average height of the users minus 5 cm. Suddenly the rocking turns out to be harsh, this can be corrected by placing a permanent pillow on the seat.
There is no need to drag your own pillows with you into a chair on runners of variable curvature: it will itself rise to the position of greatest comfort. At the same time, the big guy will lean back more, and the slender one will sit straighter. When swinging backwards, the point O will run away from the CG projection the further, the greater the angle of inclination, and it will simply not be possible to swing until it capsizes. And if you “pump” forward, which is actually difficult, the chair will smoothly drop the hyperactive person onto the floor: where should you rest? Go do something.
To construct a profile of runners of variable curvature, the radius of the generating circle (it is determined as in the previous case) will have to, firstly, be rotated several times by a fixed angle α; usually take α = 10 degrees. Secondly, to build the rear branch of the runner, R increases at each turn according to the law geometric progression with k = 1.02-1.03. That is, it will be (see position 4 in Fig.) R1 = kR; R2 = kR1; R3 = kR2; R4 = kR3, etc., if required. Actually, R changes according to some trigonometric function, but for furniture accuracy and the size of the rocking chair, it is more convenient to replace it with a progression, so it’s easier to count.
The construction of the anterior branch is carried out at a constant R, but with each rotation of the generatrix of the circle, the CO is raised vertically (ibid., in position 4 of the figure). The initial elevation Δh1 is taken equal to 2-3% R, i.e. (0.02-0.03)R, and the subsequent ones also follow a geometric progression with the same indicator as for the posterior branch. Δh1 in in this case the value is quite critical; its smaller value should be taken for thin people, and its larger value for fat ones.
Finally, the resulting points are connected using a pattern with a smooth curve. Do not be embarrassed if the tangents to it turn out to be not perpendicular to the radii: in order for the chair to be stable, at each moment of rocking it should appear to be on reverse slope. When constructing, it is advisable to take the scale no smaller than 1:5.
Note: if a nirvana chair is designed, but the front ascending branch of its runners will be an elliptical arc (green dotted line in position 4), tangent to the constructed profile of the runner in volume I there.
Final balancing
It is unlikely that a novice craftsman will immediately find a rocking chair comfortable enough. Most likely, the product will need to be balanced. If the chair doesn't rock well, and when you get out of it it pushes, you need to make the rear overhang heavier. The easiest way to do this is to connect the ends of the rear branches of the runners with a low U-shaped beam of boards, with the notch facing down. Weights are placed in the recess. The lever arm in this case is long, so there is no need to hang weights. Another option, depending on the design, is a transverse pipe beam with a weight inside. But during the balancing process it will have to be removed and put back several times. If the rocker tends to fall back, you need to make the front overhang heavier. The easiest way to do this is by placing a step and attaching weights to its underside.
About materials
Rocking chairs are made primarily of wood. Metal, for all its manufacturability, low waste and greater resistance to outdoors, too heavy. The influence of the chair on the overall CG turns out to be significant, the moment of inertia of the system is large and, as a result, the rocking is too sharp. Or you have to set an extremely small initial elevation of the CO above the CO, risking that the rocking chair will tip over under someone. However, we will return to metal rockers when considering individual samples.

Plywood is a completely different matter, especially for novice woodworkers. Firstly, when making the parts of the rocking chair with 3-layer glued ones, you can only use a jigsaw to make accurate and strong tongue-and-groove joints, on the left in the figure, if you follow the following. rules:
- Plywood for the middle layer is taken twice as thick as for the outer layers. For example, if you need a total thickness of 20 mm, then glue 5-10-5 mm.
- The parts are assembled from blanks using 2-component waterproof glue. If it is on PVA, be sure to reinforce it with small nails.
- The connections are assembled with gluing (wedging in this case is unacceptable) and reinforced with diagonal pairs of self-tapping screws on both sides.
- The supporting surfaces are protected with linings made of thin (6-10 mm) strips of hard, durable wood or dense sheet rubber 4-5 mm thick. Plywood under concentrated load splits very well at the end.
Secondly, plywood makes it possible to use non-standard technical solutions, eg. as on the right in Fig. Such a rocking bowl can be made from plywood, again using only a jigsaw. Convenience is high, stability is absolute, and can serve hanging hammock chair or a swing chair. The thickness of the lamella boards is from 12 mm; connecting half-washers on poles – from 24 mm.
Note: in any case, the finished plywood rocking chair must be soaked twice with a water-polymer emulsion or liquid acrylic varnish on water based. This will not only increase the strength of the product and its resistance to external influences, but will also relieve excess residual stresses in joints and bent parts.
How to install overlays
Wear-resistant wooden pads are installed on the rocking chair runners. way:
- Turn the chair over with the runners up;
- We warm the blank plank thoroughly with a hairdryer;
- We place the workpiece on the runner and wrap it tightly along the entire length with cotton braid. Don't get burned, the wood is very hot!
- We also grab the second workpiece onto another runner;
- Once the strips have completely cooled, remove the braid bands and glue the pads with PVA on wood or with 2-component glue;
- We attach the ends of the planks with small nails until the overlays fit snugly along the entire length. Place washers or pieces of plywood under the nail heads;
- By completely dry glue (2-3 days), temporary fasteners are removed. We drill blind holes for screws and secure the ends completely;
- We rub the holes with the fastener heads with putty made from sawdust of the same tree, thickly mixed with PVA.
Note: The linings need to be secured with metal hardware only at the ends. Otherwise, when the lining wears out during use, the fastener heads will stick out and begin to scratch the floor.
Examples of rocking chairs
Metal
Let's start our review of rocking chairs with metal ones, because... making rocking chairs out of it is justified in few cases. Forged rocking chairs imitating classic wicker ones from wicker or rattan, as required special equipment, forges and resp. We don’t touch qualifications. But metal rocking chair“like a braid” can be made by welding from profile pipe; preferably elliptical section. In this case, you need to choose the kinematic diagram of the nirvana rocking chair as the least sensitive to the excessive elevation of the CO above the CO; it also corresponds well in design to wicker rocking chairs, see Fig. In order not to increase the moment of inertia, the seat is made of braided cables, belts, etc.

It also makes sense to make garden tumbler rockers from metal, see below, due to its strength and resistance to wear. But a welded frame like the one in pos. 1 pic. on the right – the solution is not optimal, it is too complex, labor- and material-intensive. It is much easier to make a steel frame for a garden rocking chair of the Concept type, pos. 2. Pipe – round from 40x2. The bed itself can be sewn like a hammock; balancing - by changing its tension and, accordingly, sagging. As a result, the work and costs are much less than repeating the established forms of rocking chairs that come “from the tree,” and the comfort is no worse.

Here we can see another interesting option: the frame of a rocking chair Concept made from... gymnastic hoops. Just not aluminum or propylene, but carbon fiber (carbon). Strength is monstrous, durability is absolute, weight is negligible. The same cannot be said about the cost, however.
Vanka-Vstanka
Recently, garden rocking chairs - tumblers - have gained popularity. If you lean back completely in this one and tuck your legs, it falls back almost 90 degrees without losing stability; the rider will find himself lying on his back with his knees at the zenith. And if you stretch your legs forward, the rocking chair - the vanka-stand-up chair becomes its normal position and then you can rock as always.

The Vanka-Vstanka toy with a spherical bottom sways quite sharply. Comfortable rocking of the tumbler rocker is achieved by profiling its runners according to a complex law. It will not be possible to build their sidewalls “school style”, as described above. You need to be guided by proven samples and draw markings on the grid, see fig. The inset version, with cladding made of planks 30-40 mm thick, is more expensive, but less labor-intensive. It also allows you to increase the length of the rocking chair by installing intermediate supports-runners.
Note: wooden balls are placed on the protruding ends of longer rods (1050 mm) and form handles for rocking and carrying.
Rocking bench
Rolling your heels into the sky, throwing your hands behind your head and admiring the clouds floating in the blue heights through the fluttering foliage is a heavenly pleasure, but it doesn’t suit everyone. Some people want to look more impressive while relaxing. This is more suitable garden bench– rocking chair, see fig. It is a little difficult to swing on it, its own moment of inertia is large, but it also swings for a long time. The maximum span between supports with runners is 750 mm with cladding made of 40 mm thick slats. The back covering is decorative.

Sun lounger with awning
Both those and other requests will be satisfied by a garden rocking chair on elliptical runners and with an awning. The dimensions of its sidewalls are given in Fig. their material is 24 mm plywood. The width of the bed is up to 900 mm, its covering is made of 50x50 slats. The sidewall areas, indicated by gray circles, are connected by round wooden crossbars with a diameter of 60 mm.

Rocking chair
Here we're talking about not about rocking horses, they are toys, not furniture. But it’s also not harmful for children to rest while rocking, so it makes sense to give your child a rocking chair. Its proportions will be slightly different than for adults, due to the influence of the square-cube law.

The structure of a children's rocking chair, its assembly diagram and specification of parts are given in Fig. material – wood. It will not be difficult for a more or less experienced home craftsman to build a rocking chair for a child, guided by these data, and beginners can first watch a master class on making an almost identical children’s rocking chair.
A successful invention for those who value the opportunity to relax and unwind without leaving home is a rocking chair. And if you put it in the garden, you can enjoy it twice as much.
The traditional material for such chairs is willow vine and its analogue is rattan. Products made from this material weigh little, are distinguished by elegant lines and a respectable price.
Modern materials can also be used in the manufacture of wicker chairs - there are options made from synthetic wicker. They are no worse than natural ones, are not at all afraid of moisture and have very long term services.
Metal chairs, despite the reliability and plasticity of the material, are too heavy. A wrought iron chair will look great in the garden, but you will have to make a platform for it. In addition, working with metal requires certain skills; it is difficult for a beginner to make a metal chair.
Rocking chair made from pipe scraps
 Rocking chair made of metal profile
 Plastic chairs are affordable and attractive in appearance. To these advantages we can add resistance to wet weather, durability, and bright, non-fading color. In addition, they do not have to be repainted or processed.
For self-made Wood is best suited - an inexpensive, easy-to-work material. Upon completion of work wooden chair You can give it any color or keep its texture. For those who are thinking about making their own furniture for the first time, wood is best suited.
There are many models for home craftsmen, the simplest ones are presented below.
When designing a homemade rocking chair, the main thing is that it does not tip over when the sitter leans back. It is also important that the rocking process itself, for which the chair was made, does not force the person to strain too much.
Types of rocking chairs
 The simplest type is chairs built according to the radius principle. These are the most affordable products for self-production; they are distinguished by the simplicity of manufacturing technology and design. The model presented below has a somewhat heavy and awkward appearance; this chair is suitable for the garden.
Chairs of this type are designed with a fairly low seating position, which ensures smooth rocking and safety for the seated person. If the seat is installed at a normal height, then the chair runners are equipped with bumpers - limiters of the swing amplitude. To get up from such a chair, you need to make a physical effort. And the swing itself requires some tension. 
Much more stable than chairs on runners of variable curvature; they do not tip over.
Nirvana chairs are very comfortable; if you lean forward a little, it will gently “land” a person on his feet. Rockers on elliptical runners, despite their comfort, can tip over, so they are equipped with bump stops; the front one usually serves as a footrest.
There is no possibility of tipping over when rocking on reclining chairs with awnings or on elliptical runners.
Where to begin
Below is a rocking chair for the garden, which even a beginner can make with some effort. On  You can try your hand at such a model before moving on to a complex home version.
In any case, the drawing should be as simple as possible so that it can be reproduced even without much experience.

 This compact chair will look great in the garden and can be placed at home without taking up much space. This simple model will be used to describe the process.
You should start with a drawing
The drawing is made on a scale grid, on which each cell corresponds to 10 cm. All markings on the cut parts must be made in accordance with the drawing, taking into account the scale.
What can a chair be made from?
Euro plywood 3 cm thick is suitable for work.
- You need to cut out the sidewalls exactly according to the pattern, three parts for each side;
- The remaining parts are made from timber 50 mm wide and 25 mm thick. For the seat and backrest you need 35 elements made of timber, each length 120 mm;
- In order to correctly calculate how much timber you will need, you must first visit the store and see what beams are available and what their length is. Knowing the initial size of the material, it will be possible to minimize waste by varying the width of the chair;
- For example, if beams are available for sale required thickness 2.3 meters long, then you can make the chair a little narrower - cut the bars for the back and seat to 115 mm each. If the beams are slightly wider, then the chair can be made a little wider so that there are not a lot of scraps left;
- You will also need three crossbars made of timber; when making them, you should proceed from the width of the chair - that is, the length of the bars for the back and seat.
Small variations in width will not affect the stability of the chair, so you can do this without worrying about the result.
When the parts are ready
After the parts are cut, they will need to be processed. There should be no roughness on them.
In addition, carefully processed surfaces will give the product a finished look and facilitate finishing.
The surfaces are processed using a grinding machine; each part must be sanded on both sides with sandpaper of different grains. If you have the skill, you can use a router attachment to soften and round the sides of each part. If this is not possible, you can simply process the cuts with a grinder or sand them manually.
Treatment with hot drying oil should be carried out in at least two layers. This is one of the most unmodern methods, but after this the product can be painted with oil paint and used even outdoors, without losing its quality and appearance.
Small parts can be dipped entirely into boiling drying oil, but you should not hold them with your hands. It is better to make improvised tongs from wooden slats. Larger parts should be generously coated with a brush, laying them out on cardboard, each side in turn, and dry the remaining parts in the same way. Working with hot drying oil requires great care; this should be kept in mind during the impregnation process. You must not bend over a container with a boiling substance; you must wear thick work gloves.
As an option, the parts can be treated with antiseptics, stains, and other impregnations, of which there are a great variety in stores. They should be selected based on the intended purpose of the item: where it will be used.
At the end of the work, you can go through it with fine sandpaper again by hand, bringing it to complete smoothness.
Assembly
- Be sure to mark the connection points cross beams– these places are marked on the drawing; their location on the finished parts should be calculated based on the scale grid step.
- Having assembled the sides, you can begin to attach the seat and back parts. The back will be attached to the stand, the seat to the drawers.
We need to pay attention to this again. that the drawers must be fixed strictly symmetrically, and the assembled side parts, if placed on top of each other, must completely coincide, without the slightest deviation.
- Now the side parts are fastened together by crossbars; they should be attached at the legs, in the middle and at the top of the chair. For attachment, it is better to use confirmats (a type of connecting fastener);
- To attach the back and seat parts, four holes should be drilled in each block, two on each side. To ensure that the heads of the screws are not visible, each hole must be slightly widened from above with a drill of a larger diameter (it must be selected according to the diameter of the heads). When screwed on, the caps will end up in recesses, which can then be masked with furniture putty.
Such careful completion of the first part of the work will ensure the fulfillment of the following indispensable condition - all parts of the seat and back, all 35 bars must be positioned strictly horizontally.
Final processing
After assembly, the product must be processed again to give it a finished look. In addition, this will significantly extend its service life and maintain its aesthetic appearance.
If the parts were treated with drying oil, then after assembly the chair should be coated with oil paint, thin layers in two or three layers.
If you want the product to have the natural texture of wood, it should be treated with stain of the desired shade and varnished.
The varnish should be waterproof, just like the stain. There are varnishes that create special durable coating resistant to abrasion and cracking. If the chair will be placed outside, it is better to take yacht varnish or something else with increased durability. In any case, it is better to keep the product under a canopy, this will extend its functionality, or at least bring it into the house during precipitation.
- For the chair you need to use strong types of wood. These are oak, larch, conifers;
- Europlywood, a 3 cm thick laminated wood material, also has sufficient strength to make the chair reliable;
- Sheets of plywood must be carefully inspected before purchasing to ensure there are no surface damage or cracks. This will eliminate difficulties when cutting the product and its subsequent processing;
- The more time is spent on processing the product and impregnating it with drying oil or compounds, the longer its service life will be;
- The chair does not need to be upholstered with foam rubber and dense fabrics, this will contribute to the accumulation of moisture under the upholstery, which will quickly render it unusable. It is better to get removable pillows for the seat and backrest;
- If ready product it leans too far back or, conversely, is oriented forward; after finishing the work, it will have to be balanced. To do this, an additional cross member is installed at the rear ends of the sidewalls. Previously, recesses are cut into it, where weights are attached according to the inclination. Also, if necessary, the front part of the chair is loaded. By adding and subtracting them, trying to sit and rock in a chair, you can achieve the ideal balance of the product.
Making a rocking chair is a rather complicated process, but quite doable. If you carry out all the steps correctly and carefully, following the drawing and the tips outlined in the article, the result will be a beautiful and functional product that will last. for a long time.
For inspiration, you can watch the video at the link below. The video contains incredibly simple models that you can make yourself, using affordable materials.
In order for the long-awaited holiday in the garden to bring maximum pleasure, you need to take care of what furniture you will relax on. It’s clear that you can rest on a small wooden stool for no more than 5 minutes, after which you just need to get up and warm up. This option garden furniture like a rocking chair will allow you to relax for hours with a cup of coffee and a book, so be sure to make this device with your own hands, and now we will help you with this a little!
- Article
- Video
Rocking chair: buy or make it yourself?
To date furniture stores provide a wide range of inexpensive garden and indoor furniture, among which you can find a rocking chair. This is not to say that buying a rocking chair is a bad option, because in addition to the fact that the manufacturer makes a high-quality and stable design of the chair, its design can be very diverse and more decorative than you can make it. Therefore, if you have sufficient financial resources and do not have a minimum knowledge base on working with wood, purchasing a rocking chair will be a more reasonable action for you.
But still, if creating a rocking chair with your own hands is your dream, then be sure to make it come true, because... There is nothing complicated in this work.
You can make a rocking chair with your own hands in one day, spending money only on a sheet of plywood (or planed boards), wood glue and wood screws, in general, the costs are minimal.
Providing detailed instructions will be very difficult, and you are unlikely to understand it, so it is best to explain how to make a rocking chair with your own hands using the example of drawings, a few important tips and a video tutorial. Let's not waste any time and start looking at all these components!
What to make a rocking chair from?
In order for the rocking chair to be strong, reliable and durable, it is best to use higher quality types of wood - larch, oak, pine needles. Sheets of plywood are also often used to create rocking chairs with their own hands, which are not only easy to saw, but also have plasticity and are easy to process.
First of all, no matter what material you choose for the rocking chair, it must be processed protective equipment, because this furniture will be placed outdoors and exposed to adverse influences natural features(rain, snow, frost) can quickly lose its attractive appearance or even rot.

It is not recommended to cover an outdoor rocking chair with fabric, foam rubber or other materials, because... if they get rain (and this will definitely happen), the fabric will begin to fray and then it will have to be altered. In this case, it is better to use softer types of wood, and when you get ready to relax on a rocking chair, just take a blanket with you to cover the chair, that’s all.
Many designers create a rocking chair frame from forged metal, and the seat is made of wood - this option is also good for a summer house, because the durability of the furniture will be even greater.

Furniture stores even provide plastic rocking chairs, the advantage of which is their high immunity to influence weather conditions, ease of construction and inexpensive price.

Where to place a rocking chair at your summer cottage?
If you still want to relax under open air, then bring the rocking chair under the canopy for the evening.
The rocking chair will find a place anywhere: near, on the porch, near the pool, next to the area.
The main thing is that during your vacation you can observe the most beautiful places on summer cottage such as garden, fountain, etc.
Before we provide a video tutorial on how to make a rocking chair, I would like to give you some tips on making a rocking chair with your own hands, so:
- The thickness of the material to create a chair must be at least 15 mm; for the frame it is better to use even a 20 mm board.
- As mentioned earlier, it is better to use types of wood such as oak, larch and pine needles.
- Be sure to treat the material with antiseptic agents and treat the metal with anti-corrosion agents.
- To fasten structural elements, it is better to use a tenon connection, which must be provided for in advance in the drawing. If for some reason the tenon joint cannot be made, then use wood glue and self-tapping screws.
- Choose self-tapping screws of a suitable length so that they do not come out from the opposite side of the board and at the same time reliably connect the structure.
- To hide the screw heads, use special plugs wooden color which can be purchased on the market.
- Before making a rocking chair with your own hands, prepare a drawing on graph paper, on which you will outline all the structural elements on a scale of 1:1. Next, cut out all the structural elements and lay them out compactly on a board or sheet of plywood, then trace them with a simple pencil and carefully cut them out with a jigsaw.
- After applying the antiseptic, the boards should dry thoroughly. Before as finished design will be assembled, open all the constituent elements with a primer and apply paint.
By using these drawings to create a rocking chair, you will not only reduce total time construction, but you won’t have to suffer for a long time choosing the design and correct sizes details!


Furniture made with your own hands not only pleases the eye, but also brings tangible pleasure. This is especially true, where it is so nice to relax after a hard working day or spend an evening in a country house by the fireplace. In addition, by making furniture yourself, you save on purchases and give the product a unique originality. And our article will help you navigate the whole variety of models made from a variety of materials, and will give you practical advice on working with them.
You should always start making a rocking chair by choosing a model and material. After all, furniture should be reliable, durable and delight your household for a long time. Let's tell you more about the most popular products.
From plywood
Plywood is one of the most common materials used in furniture making. It is easy to bend, easy to saw and easy to process. Designers often work with plywood, so finding sketches of furniture models on the Internet is not at all a problem. By the way, the strength of the rocking chair will be at the same level, because plywood is twice as strong as wood, and its cost is low.
Before you start making anything from the prepared material, we recommend treating it with protective agents. This measure allows you to use the rocking chair not only in the house, but also take it outside if you decide to send the product to the country.
So let's get started. Let's go to hardware store and buy:
- three sheets of plywood measuring 1520x800 millimeters. All sheets different thicknesses: four, ten and fifteen mm;
- a set of screws or self-tapping screws;
- wood glue;
- jigsaw
Steps for making a rocking chair with your own hands:
- After purchasing the necessary materials, we take the drawing and make the templates. To do this, transfer the drawing onto thick cardboard and cut out the outlines of the chair parts;
- Use a pencil to mark a sheet of plywood using our patterns;
- Using a jigsaw we cut out parts from plywood. From the thickest sheet, cut out two side elements, two racks, two seat supports and two strips measuring 470x45 mm. We will also have to make a cross member 540x45 mm and a bar 485x45 mm. A ten-millimeter sheet will be used to cut eighteen 540x30 mm slats for the back and sixteen 500x30 mm crossbars for the seat. From the thinnest sheet we cut out square bases for the back and seat;
- be sure to clean all parts with sandpaper;
- glue the cut crossbars onto the thin bases of the seat and backrest;
- We cover all the parts with stain and varnish, if desired, you can also use special paint - it’s up to your taste. Allow the parts to dry completely;
- We assemble all the resulting parts together, not forgetting to first drill holes for screws or self-tapping screws. We hide their caps under special plugs;
- When making a footrest, use an old handle from a rake or shovel. The length of the stand should be five hundred and thirty millimeters.
Read on to learn how to make a metal rocking chair with your own hands.
The video below shows another interesting and fairly simple way to make a rocking chair with your own hands from sheets of plywood:
Made of metal
Metal structures, although more difficult to manufacture, are much stronger, and a rocking chair made from it is more durable. But at home, many of us cannot cope with metal work, because not everyone knows how to use welding, with which parts are connected.
To begin with, they purchase from a construction market or store necessary materials and tools:
- steel rods with cuts of 20x20 millimeters;
- two-millimeter steel sheet;
- steel corners 40x40x3 mm;
- welding machine;
- drill;
- grinder or hacksaw;
- set of screws for metal.
Manufacturing instructions:
- we make a drawing. It looks like an ordinary chair, but there is a wide arc around the lower ends of the legs. Please note that all dimensions are taken from the same chair. As for the arch, the wider it is, the safer the rocking chair;
- We cut the steel rods into pieces one meter long and weld them to the main frame. The frame pitch is five or six millimeters. It is necessary to bend the steel into an oval and weld it to the base;
- The two-millimeter steel sheet we purchased is screwed to the seat part with metal screws. In principle, the rocking chair is ready.
Don’t forget to clean everything after making the rocking chair. welds grinder or file. Also, the finished product should be treated with an anti-corrosion agent or painted.
It is worth noting that sitting on metal is not very comfortable. Therefore, pillows are often placed on the seat or it is finished on top of the metal with wooden planks.
DIY metal rocking chair
Made of wood
- lower bench. It consists of a covered leg, a supporting crosspiece, a support and a frame for supporting the seat;
- seat;
- back;
- armrests.
Process description:
- we prepare about twenty-five long willow twigs with a diameter of three centimeters and many thin ones, five millimeters thick;
- using a jammer ( special tool) bend the thick ones;
- Using thin rods we fix the legs of the frame on the crosspiece and the seat frame;
- we tighten the leggings;
- set up strikes;
- we mount the upper part of the backrest and the transverse rods of the seat;
- we weave armrests from twigs and attach them to the shooters using nails;
- We attach the upper ends of the armrest rods to the side supports;
- Having prepared the inlaid rods, we place them on the back of the seat;
- We decorate all elements of the chair with decorative weaving from thin cut ribbon.
Photo of a DIY rocking chair made from wicker

Drawings, videos and photos
Our review presents all the most popular models rocking chairs with dimensions that you can make with your own hands. For greater clarity, we have provided all descriptions with drawings, photographs and video reviews. We really hope that the materials selected specifically for you will help you design the rocking chair of your dreams. And you and your family members will enjoy using it.
Drawings of rocking chairs for making your own
 Like a boomerang
 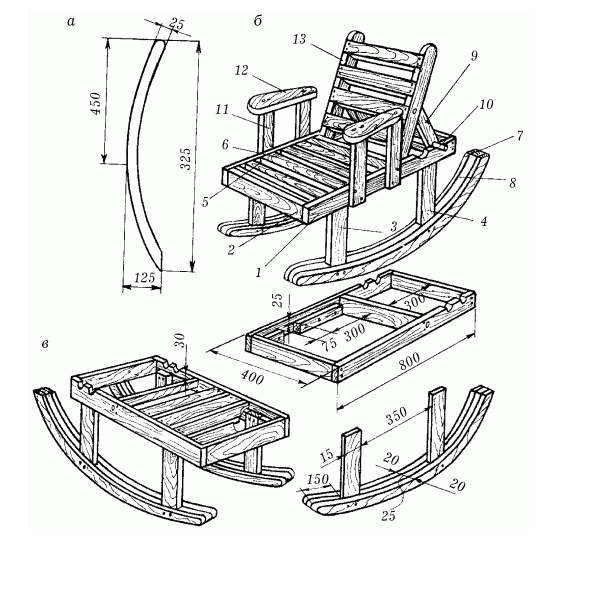 Beech
Beech  From plywood
 Ornate