Creative DIY epoxy resin table. Creative table made of epoxy resin with your own hands Technology for the production of tabletops with epoxy
There are different versions of kitchen tables on sale - classic and original, made of wood, MDF, glass and other materials. You can make such furniture with your own hands. The table looks incredibly beautiful epoxy resin, because this material allows you to create unique designs, real objects of art.
Features of the material
Epoxy resin is often used in workshops on making jewelry, crafts, sculptures and interior items. Particularly popular is transparent epoxy, which has enormous scope for imagination. The composition of epoxy for pouring includes synthetic oligomer compounds, alcohols, and a number of other components. To obtain the desired properties, it is necessary to pour a hardener into the product - only after this can the resin harden.
Depending on the amount of hardener and the introduction of other substances, the resin for products may acquire different characteristics. It has the ability to harden or turn into glue, be super strong or rubber-like. For the bay dining tables It is necessary to use hard resins, both for creating new furniture and restoring old ones. It is this coating that will be abrasion resistant and durable.
Advantages and disadvantages of epoxy countertops
A huge advantage of the products is their unique design. The tabletop can have any appearance that the user desires. For decorating chairs, coffee tables, kitchen and even desks use different materials- pieces of wood and glass, stump cuts, stones, foil and glitter, sawdust and sand. Shells are also used marble chips, pebbles, souvenirs and money, dried flowers and leaves. The resin can be painted in any color, up to the most saturated tone, to achieve the effect of a landscape, sea, river, etc.
Other advantages of the products are:
- completely waterproof, washable;
- tolerance of many household products;
- no shrinkage during operation, preservation of shape and original color;
- absence of deformation and reaction to moderate mechanical stress.

When choosing this technology, you need to take into account its disadvantages. The cost of a table for the kitchen, living room, countertops for the bathroom will be high. The consumption per 1 m2 of epoxy is high; it can take 10-20 liters of resin or more. If the sequence of actions is violated, at the slightest mistake air bubbles will appear inside, which are difficult to get rid of.
Types and design features of tables
Typically, countertops are made using epoxy. It is better to make table legs from a different material, although they can also be cast. There are different table options:
- transparent without base;
- with a base of saw cuts, boards, and other parts of wood;
- combined;
- with different fillings.
Structures without a supporting surface
If we are making a massive or miniature transparent tabletop without support, we need to make a mold for it. Its appearance can be anything, even bizarre. It is in such tables that it is often used LED lights, glowing neon elements, “lightning”. The pouring table with the addition of water looks original - you get real space objects on the surface. The disadvantage of baseless tables is the need for careful operation.
Wood and epoxy resin countertops
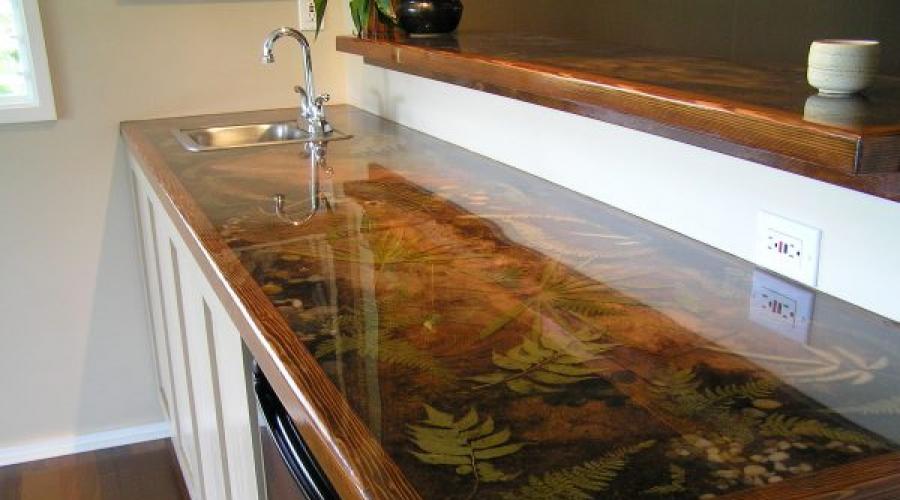
The combination of oak, elm (elm), pine and other wood with epoxy is very popular. The resin can be used in transparent form or color as desired. Matte bases look worse because wooden inserts poorly visible. Can be treated with paint wooden cut, make it brighter or glowing.
Another option for making a table is to fill a wooden base with resin; boxes and old boards will do. For the base for the table, you can use a paint-painted plywood surface or marbled chipboard. You can even base it on a painting, still life, or drawing.

Wooden tables with epoxy coating
Such products involve the manufacture of a full-fledged wooden table - round, square, original. Decor is scattered on it (colored pebbles, shells, plants, cones, painted bolts and nuts, coffee beans, buttons). Cut hemp with moss and bleached pieces of logs look beautiful. Next, the table is filled with a thick layer of epoxy mixture, adding edges along the edges.
Slab and epoxy tables
A slab (blind) is a solid solid slab of wood or stone. A stone table filled with epoxy resin will be too heavy, but the product made from a wooden slab will be successful. It is required to prepare a slab with the following characteristics:
- wood thickness - 5-15 cm;
- cut - longitudinal, without processed edge;
- the array is solid, there are no gluing points;
- the pattern is beautiful, rich, with knots and interesting texture.
Ready-made slab can be purchased or ordered from a woodworking company. How much it will cost depends on the size, type of wood, and quality of the material.

Table in the form of a river
River on the table - interesting option decor, it is often adjacent to volcanic lava. In the center of the tabletop there is an insert reminiscent of a river flowing through a mountain gorge. The insert has a blue, blue-green color, the base is usually made of solid wood. At the bottom of the “reservoir” you can put pebbles and shells. The table can be made in any shape - rectangular, oval, round or square.
Choosing a resin for making a table
Which resin to choose for creativity? There are different brands of epoxy, the best is the one that has a long period until hardened and completely transparent. If the properties of the material are different, the time for layer-by-layer pouring will increase, the resin itself may boil - overheat and deteriorate. Base resins such as ED-20 are not suitable due to their thickness. After curing, there will be air bubbles on the table. The transparency of cheap base resins leaves much to be desired, and their strength is not always the best.
What kind of resin would be better suited for the table? A number of products are suitable for furniture production:
- Art-Array. Low-viscosity composition based on modified epoxy resin. Allows you to pour a layer 60 mm thick.
- "Epoxy Master". This resin hardens easily in a 5 cm layer and fills perfectly hard to reach areas. The reactivity of the product is average, so you can work with it on large products.
- "Art-Eco" from Ekovanna. This material is poured only thin layers, but it is resistant to the formation of cracks and allows the use of acrylic colors.
- Epoxacast 690. Transparent jewelry resin, great for filling small elements on a table.
- PEO 610KE. Russian resin does not turn yellow, does not become cloudy, and has no darkening from ultraviolet radiation.

Counting the amount of epoxy resin
To avoid mistakes, you need to carefully calculate the volume of resin consumed. Each manufacturer indicates the exact material consumption, but the differences between brands are small. On square meter surface, 1-1.1 kg of mass is consumed per layer 1 mm thick. You need to multiply this amount by the estimated thickness in millimeters and quadrature, adding a little material for the error.
DIY table - technology
To make a table, you need to read the instructions and follow all the steps step by step. It is important to remember that epoxy hardens quickly at room temperature, so you should work with it quickly. Some people wonder whether and why it is possible to heat resin with a burner? It is forbidden to heat the fill from above; it will immediately become deformed. Other rules for working with epoxy:
- do not forget about safety measures, use a respirator, gloves, goggles, so as not to harm your health;
- work only in a well-ventilated area;
- prevent contact sun rays before the resin hardens, it may turn yellow;
- do not make sweeping movements when mixing two components (resin and hardener), otherwise the appearance of air bubbles will not be avoided;
- Do not freeze the tabletop until it is completely ready - the material will delaminate;
- do not forget about polishing and coating with protective varnish.
The composition hardens poorly when high humidity, therefore it must be adjusted in the workroom. To increase the speed of curing of the solution, increase the temperature in the room, but without directly heating the product.
Necessary materials
Depending on the selected model, different accessories may be required for operation:
- resin in the required quantity;
- acrylic paints, interior;
- masking tape;
- wooden sticks for dividing the tabletop into sectors;
- jars (containers) for mixing resins of different colors;
- spatula for spreading resin over the countertop;
- fine sandpaper for sanding or a sander;
- construction level, laser;
- desired decor;
- boards;
- self-tapping screws, wood screws;
- stain;
- plywood for the form;
- individual protection means;
- wood hacksaw;
- cellophane for covering the filled product.

Sketching
To complete a sketch, it is better to contact someone who has experience in modeling if you decide to prepare a complex product. Beginners should start making tables with simple designs. You need to calculate the size, all sides of the product, draw them on paper, not forgetting to mark the location of the decor.
Fabrication of the supporting structure
Step-by-step instructions for building a table begin with creating a support. When the technology does not provide support, this point is skipped. Usually the frame is made of plywood, wood, or less often metal. In the latter case you will need welding machine, therefore this technique is used infrequently. The shape and size of the structure are chosen taking into account the dimensions of the future table.
Preparation of formwork and filling
The tabletop can be whole or consist of separate parts. Depending on the needs, formwork is prepared, the edges of which should be as smooth as possible. All joints are sealed with silicone to prevent resin from leaking through the holes. The formwork is installed on the base and placed inside decorative elements. Next, they are carefully glued individually to the base, not allowing the glue to protrude, otherwise it will be visible in the transparent resin.

Before pouring the countertop, the mold must be degreased. How to coat the support to prevent the resin from sticking? For this purpose, special primers or wax compositions. Also inner surface can be covered transparent film made of polyethylene.
Preparation of epoxy
Epoxy resin is mixed strictly according to the attached instructions. Any composition is two-component. Colors are added only to the resin before adding the hardener and mix well. The paint should first be heated to +30-35 degrees so that it can better integrate into the composition. You can’t heat it up too much - it can ruin the resin!
Next, a hardener is added to the main component. Typically the ratio is 10:3.5, but may vary depending on the brand of resin. The mass is thoroughly kneaded, but without sudden movements, so that bubbles do not appear. If they are present, carefully blow on the epoxy. warm air from a hair dryer while stirring. The composition should be poured within 5-7 hours; it has a limited shelf life, so mixing the mixture into several layers at once will not work.

Correct filling
You should start pouring depending on the thickness of the solution and the needs of the master:
- liquid texture - used to fill multiple depressions and corners, such a mass easily flows off the stick;
- “liquid honey” is a more viscous epoxy, allows you to create drops, lenses, small decor, also used for filling round tabletops;
- “thick honey” - better suited as glue, not suitable for pouring;
- “rubber” resin is already a half-hardened material, but you can sculpt products from it, like plasticine.
Epoxy up to 5-6 cm thick is poured into one layer. Otherwise, you will have to do the work in several passes, but only after the first layer has completely cured. Pour the resin in a thin stream from the center, for which it is lowered into the solution wooden stick. Then they force the mass to flow down it. The solution is leveled on top with a spatula.
Sanding and varnishing
Some resins do not require sanding, others require sanding. finishing. For polishing, only the finest sandpaper is useful; coarse material should not be used. Work is carried out at a slow pace so that the surface does not overheat. It is better to add water little by little to remove heat in a timely manner. To complete the work, the base is coated with a protective varnish.

Tabletop care
You cannot place hot pots or dishes on the countertop - they will melt. For care, use only soft fabric - wool, flannel. Clean with a damp cloth heavy pollution, then wipe dry. Do not use abrasives, aggressive agents, acetone, or alcohol. Harmful to countertops and heavy objects- If dropped, the product may be damaged. If you follow these tips, the table will serve for a long time without any complaints!
The furnishings in the house reflect the taste and artistic ingenuity of the owners. A person decorates the interior of his home so that he feels cozy and comfortable in it. Anyone who pays great attention to this uses the most original and modern technology furniture manufacturing, surface decoration. Serial furniture from the store does not satisfy many people artistically. Apartment owners who want their home to be unique, original and comfortable are looking for custom designer items. Wooden items furniture and household items made from modern technologies, will certainly surprise guests and delight the hosts. So refined and unusual item Interior design can include tables made of wood and epoxy resin, striking in their splendor and originality.
DIY table made of epoxy resin and wood
This product will decorate the kitchen, living room country house, garden gazebo. Epoxy resin is an easy-to-work material. With a little skill you can make an exclusive table with your own hands from epoxy resin and wood.
Epoxy resinThe good thing about the pouring mixture is that after hardening it retains its shape, is resistant to moisture, and does not chip or scratch. The surface does not deform and does not change color. A kilogram of components costs approximately 200 rubles.
You can place any design blank under the transparent fill layer. The fill is a mixture of resin and hardener. Proportions should be strictly observed, since the hardening process can be unpredictable. After mixing the components, the epoxy resin must be allowed to sit for some time. Different products require different pouring consistency. Liquid composition fill forms with precise corners and small recesses so that all the smallest cracks are filled. The density of the “liquid honey” stage creates picturesque drops, smudges, and lenses. Epoxy resin is used as an adhesive; a thicker mass can be formed into fancy shapes. The resin is paintable.
Nuances of the product manufacturing process:
- The resin hardens poorly when high humidity- condensation may enter from the air and small bubbles will form in the resin. To avoid such troubles during the curing of the material, it is necessary to make a canopy of film over the tabletop;
- the composition will quickly become hard if the product is placed on warm battery. It is not recommended to heat from above, as the surface may become uneven.
Features of using items made of epoxy resin:
- from ultraviolet rays or proximity to a heat source, the countertop may turn yellow. For such products, it is recommended to take a composition with protection from heat and sunlight;
- from cold, the resin can delaminate and change its internal structure. You can return it to its original appearance by heating it to 50 C;
- Do not place hot metal kettles and pots on the surface of the countertop; traces of deformation may remain;
- the resin is toxic - if the table is made for the kitchen, it must be coated with a protective varnish so that when heated, toxins are not released into the air.
To make a custom-made wooden table according to your project, contact the Imperial Forest carpentry workshop. Professionals in their field will make your order a reality and you will be satisfied.
Variety of countertop surfaces
For creating original furniture you can use any wood - scraps of planks, round cuts different diameters, just beautiful chips. Looks good in epoxy filling old wood, roughly split logs.
Instead of wood for decoration, you can take beautiful river pebbles, shells, pine cones, old coins and other investments. By mixing fluorescent powder with epoxy resin, you can make shelves or tables glow.
Solid board table
A tree eaten away by fungus or bark beetles looks unusual. Natural holes, “paths” filled with colored resin create an unreal cosmic pattern. Flaws in wood can be made artificially. Any type of wood will do. If you take solid boards or a tabletop made from several glued strips, with reverse side The holes are sealed with mounting tape to prevent the epoxy resin from leaking out. Holes and cracks are filled with prepared filling with highlighting powder using a spatula or brush.
After the substance has hardened, the excess must be cleaned off. grinder. The resin should only remain in the imperfections of the wood. Then the tabletop must be coated with a protective varnish. It will make the drawing bright, wooden table will be invulnerable to moisture.
Filling table method
There is another way to make a tabletop using resin and wood. This method manufacturing the product is more labor-intensive. It requires accuracy and cleanliness of execution. Should not get into the resinous mass foreign objects, specks, hair.
If lightweight attachments are used, they should be secured to the base so that they do not float in the resin. These are elements of wood chips, shavings, bark, and birch bark.
The basis for applying the decor can be thick glass or plywood. The outline of the tabletop is cut out of it. A side is made to hold the fill. TO wooden base You can nail strips of plastic with furniture nails.
The base must be dry. To prevent the mixture from being absorbed into the pores of the base, it must be primed with resin and allowed to dry. Investments must also be dry and clean. When moisture gets into the epoxy resin, it becomes whitish and loses transparency. We put the prepared decor into a “box”.
If the thickness of the fill does not exceed 0.5 cm, then the entire operation can be done in one go. If three-dimensional objects are used as decorative filling - stones, small figurines, keys, the resin is applied in several layers so that it evenly fills all the depressions and bulges. Each subsequent stage is carried out with a break of 48 hours.
Prepare the mixture according to the instructions. Fill the mold in an even layer, making sure that the attachments do not move. If air bubbles are released during the process, the surface must be heated with a hairdryer, the air will come to the surface. To reduce the release of air, each decorative item must be treated with resin.
Complete hardening of the tabletop after applying the last layer under conditions room temperature ends in 7 days. If you heat the room to +25 C, the time will be halved. The sides are removed after the composition has dried. The tabletop is treated with a grinding machine, removing upper layer resin. When the entire drawing is completely visible, the surface is cleaned of dust and then varnished. The edges also need to be sanded.
 Preparing the tabletop
  The tabletop must have a side
 Ready frame
 Assembling the table Preparing epoxy resin
  Carefully fill the surface of the tabletop
  Heat the surface to remove air bubbles
 Renewal idea
An old wooden table can be used as a base for a trendy tabletop. To do this, you need to clean the surface, remove a layer of paint or varnish. You can paint it with fresh paint, or you can leave the cleaned wood untouched.
The edges of the table should be filled with low edges, and prepared decorative items – coins, beads, badges – should be laid out on its surface.
Dilute a small amount of liquid fill and cover the decor with it. Wait for the required curing time and treat the countertop as described above. You can make fashionable exclusive furniture with your own hands.
Video about creating a table from wood and epoxy resin
The video shows how you can use epoxy resin to create original look wooden table.
Beautiful and comfortable kitchen- this is the desire of every person. Some realize this dream with the help of designers and expensive building materials, while others use personal imagination and skill. For example, a DIY concrete countertop is absolutely doable. In addition, it will be no different from similar countertops made of marble. And the use of the countertop can be found in any home. You can simply be proud of your product.
Advantages of concrete products
Such a design solution kitchen space helps to solve several problems related to product durability, cost and uniqueness. If you still decide to make a concrete countertop, then it is important to follow the technology. In this case, the resulting product will be strong and durable, because concrete is not too susceptible to the influence of environmental factors.
The cost also speaks in its favor; it will help you save significantly when performing kitchen decorating work. But the resulting countertop can be visually almost indistinguishable from marble. And those who love original things will love that you can make such a unique thing that there simply won’t be another one like it again.
The resulting concrete countertops for the kitchen can be finished and decorated with any different components - stones, shells, coins, tiles. The scope of elements for decoration can be limited only by your imagination and taste preferences.
It is worth knowing that at the drying stage of the concrete solution everything decorative materials will be influenced by liquids. Therefore, all finishing elements must be resistant to such influence. If you want to use different photos or pictures in the decoration, they must first be laminated. After decoration, the film will be invisible, but it will help preserve the contents.
Design

Regardless of the final outcome of the manufacturing process, you first need to create a design. The completed drawing will facilitate the presentation of the entire production process, will help to foresee and eliminate possible mistakes and difficulties. Generally speaking, the drawing will greatly facilitate the execution of all work.
Initially, it is worth finding out what components your kitchen set. To do this, you need to study the available list of similar products and opt for required option. After this you need to find out exact dimensions upcoming countertops under concrete. To find out, you need to measure the length and width of the empty area, taking into account the pieces of furniture that are nearby. In the event that the product will come into contact with a corner, you also need to measure the angle, since in reality it may not be straight.
For normal and full functioning, the thickness of the concrete countertop should not be less than 5 centimeters. But you shouldn’t make it much thicker, because in this case the weight of the product increases significantly.
The location of the sink in the kitchen, its size and shape are of great importance. It would be much better to purchase the sink before starting to manufacture the product. In this case, it will be easier to make the hole, and the result will be more accurate. No less important detail- the location of the tap, because a hole will be needed for it too.
In the case of a built-in sink, you need to check whether it overlaps the countertop. If everything is in order, then you can start making a template for the hole. To do this, turn the sink over and outline it with a construction pencil.
In the case of an overhead sink, it is necessary to measure inner part where it will come into contact with the applied part. If the internal part does not have rectangular shape, then it is worth making a rectangular template according to the largest measurements of the internal part. The main thing is to make such a hole that the sink will fit. It is even allowed for the hole to be slightly larger than required.
Now you can complete the drawing actual size using the obtained data. To do this, you will need a sheet of plastic or chipboard. We carry out the design on it. We apply everything required sizes and holes very carefully and carefully, everything should be as close as possible to the intended product.
Required materials and tools
Before you go shopping, you should determine everything that will be needed. Even with exact knowledge of the dimensions of your countertop, it would be better to purchase building materials with a small supply. Situations may be different, so it is better to be prudent.
 Processing the tabletop with a grinding machine.
 A concrete countertop for its manufacture may require the following list necessary materials and tools:
- concrete mortar(components for mixing it - cement, sand, water);
- mixing container;
- an industrial mixer or drill with a special attachment;
- roulette;
- Master OK;
- rule;
- building level;
- putty knife;
- you can purchase ready-made concrete mortar, but then the components for mixing are not needed;
- profiles will be needed to finish the edge of the tabletop;
- wooden blocks and MDF board for creating formwork;
- reinforcing bars;
- formwork will be required for assembly;
- plasticizer for solution;
- electric jigsaw;
- liquid Nails;
- grinder with a set of attachments;
- materials for decoration and finishing;
It’s definitely worth preparing special shoes and clothing, because the process of making the structure is quite complicated. To avoid breathing concrete dust over the countertop, you should prepare a protective mask with goggles. It is better to overdo it initially than to get damaged later.
It is necessary to realize that the original color of the building material is the shade of the manufactured countertop. To recreate some special shade or color, you can use a special color for concrete.
Stages of work
Regardless of the product being manufactured, you first need to find out its size and shape. If you need to replace an old countertop, you can use its measurements. If a completely new product is being manufactured, then it is worth taking measurements of the base, and also taking into account existing requirements for the selected room.
In order to have a template in front of your eyes, you can try to make a drawing of the table top on paper; you are even allowed not to make marks for different types holes. Next you will need a full-fledged life-size template. To do this, you need to take a sheet of thick cardboard, of such a size that you end up with a full-fledged template. If cardboard small size, then for the actual volume of the product you will have to glue the parts together. If you have large cardboard, then simply cut out the required layout. When the template is ready, you need to check that it fully matches the dimensions. To check, you should attach it to required area and make sure that everything is accurate and there are no distortions. After such checks concrete countertop it will be quick and easy. Now you need to divide the template into separate parts. Once you have ready-made detailed templates on hand, you can begin production of the product itself.
Preparation of formwork
 When you make your tabletop, it is important to complete this area of work with the utmost precision and accuracy. After all, the strength of the product and its appearance in general will depend on the quality of the workpiece.
After a decision has been made regarding the height of the structure, parts of the required length need to be cut from the beams - these are the vertical parts of the future formwork. They will need to be secured to the floor. To do this, you will need profiles. If the contact with the walls is direct, then the racks must be drilled through. They are secured using anchor dowels. After fixation, the vertical parts are connected to the horizontal ones. Thus, the formwork frame is ready.
To make bottom part will be needed wooden sheet MDF. The formwork must be made in such a way that the concrete can be pulled out later without damaging it. If the countertop has a sink, then inside in the right place you need to lay out a metal ring. Also, with further use hob, it is also necessary to mark this place.
The technological features of liquid epoxy-diane resins allow them to be used not only as technical material,
but also as a means for creating unique products, unusual and fascinating - real works of art.


In particular, high-quality transparent resin is used to fill countertops, with the end goal being:
manufacturing exclusive furniture from scratch, as well as restoration of an existing one. In all cases, casting resin can provide amazing results.
VARIETY OF RESIN CASTING SOLUTIONS
Countertop resin can be used in different options. Its strength is transferred to the product, and its transparency creates an unusual effect.
Here are some basic examples:
 |
 |
SOLID RESIN TABLETOP |


The decision to use a solid solid cold-curing resin as a tabletop is appropriate for an elegant coffee table or coffee table, i.e. furniture that is not subject to serious mechanical stress.
The tabletop can be left completely transparent, or you can decorate it with dyes, mineral or artificial fillers, decorative inclusions, patterns of dried flowers, sea pebbles, etc.
 |
|
FILLING FOR WOODEN BASE
|


This is exactly the case when liquid quick-drying resin High Quality can give new life old furniture or become material for a new original product.
There are also rich possibilities for decoration here. Under a layer of transparent fill, you can place coins, shells, dry plants, creating a 3D effect.
 |
|
COMBINED WORKTOPS |


Tables where solid solid wood alternates with volumetric fillings of transparent resin. Often as wooden base slab is used - a rough longitudinal cut of large trees. This is perhaps the most spectacular and unusual-looking solution, while being appropriate for any interior. This product is also called a “river table”.
Particularly impressive is the use of LED lighting or the use of phosphorescent additives, which are available for sale in our store.
RELIABILITY, DURABILITY, SAFETY
Epoxy Tabletop Coating premium inherits all the advantages of products made from liquid resin.
 |
|
An easy-to-use, two-part epoxy resin that does not shrink when dry, allowing |
|
|
|
The coating is resistant to mechanical damage. And if a scratch or crack appears, it is easily |
|
|
|
The epoxy countertop has high degree chemical and biological neutrality, which allows |
|
|
|
Easy to care for, resistant to contact with most detergents and cleaning products. |
ABOUT THE CHOICE OF RESIN FOR FILLING AND LAMINATION
The online store website presents different kinds and grades of 2-component resin, and the choice depends on the task at hand.
For simple table restoration, creating protective surface It is advisable to buy inexpensive transparent resin made in accordance with GOST 10587 84. It is presented in packaging from 0.5 kg and meets necessary standards quality and safety.
Just remember to order the plasticizer in a separate package so that the surface is not too fragile.
For creating decorative surface You will need a high quality clear epoxy resin such as .
It is easy to use and is supplied in containers from 1.3 to 8 kg, both retail and wholesale. The greater the packing weight, the cheaper the material is.
RESIN FROM THE MANUFACTURER - A GREAT PURCHASE
|
|
|
Everyone knows that buying or ordering material from a manufacturer is, first of all, cheap! |
|
|
|
Our online store purchases resin at minimal wholesale prices. Accordingly, you get |
|
|
|
When ordering goods with delivery from us, you can be sure that we will promptly respond to possible complaints, |
|
|
|
We deliver goods throughout Russia, as well as to Belarus and Kazakhstan. When purchasing for an amount of RUB 5,000 or more. - delivery |
|
|
|
In Moscow, St. Petersburg and other Russian cities, delivery is possible not only to the point of issue, but also to the door. |
|
|
|
There is a bonus program for buyers. |
Epoxy resin is an exceptional material that consists of a hardener and resin. The main property of filling is that the original volume is retained after completely dry, because hardening occurs due to chemical reactions. The surface is covered with an even layer, cracks and bulges are not formed. This is what makes it possible to use epoxy resin for any surface with any complex configuration.
It makes it possible to cover a surface on which a pattern or ornament has been previously applied, or small decorative elements have been laid out. Making a tabletop with your own hands from epoxy resin is an excellent opportunity to show your abilities and imagination. Your table will look like  3D image with a unique design.
The table surface is not susceptible to damage, and it will not be deformed, chips or cracks will not appear during use. This material is affordable. Even an amateur can work with epoxy because it is easy to use. You don’t need any special skills, you just need to strictly follow the instructions.
For the work you need to purchase a special painting paper suit, rubber gloves and a hat (you can take a shower cap). Such precautions  are needed to prevent hair from getting into the resin, because it is almost impossible to remove it from there.
Let us highlight the main advantages of the material:
- after drying, the fill retains the same volume and remains perfectly smooth;
- practically not scary mechanical damage– dents, cuts and chips;
- has excellent moisture resistance, which is necessary for kitchen surfaces;
- is not exposed to the aggressive effects of cleaning chemicals;
- does not require expensive purchase household chemicals self-care.
Among the disadvantages we highlight:
- if the temperature drops sharply, “white flakes” appear in the pour;
- at high temperatures Toxins may be released due to evaporation;
- To obtain desired result, it is necessary to maintain exact proportions;
- All precautions must be taken during operation.
When using different decor items, keep the following in mind. The base poured with epoxy must be absolutely dry and clean, so the decorative elements must also be dry. If the filler contains droplets of moisture, then whitish spots will appear in the resin, this is how the resin reacts with water. Light decor you need to glue it so it doesn't float up. When it  the height is no more than half a centimeter, then one layer of resin is enough. Complex shape items for decoration will require pouring resin in several layers, between which you need to wait no more than two days. When pouring resin, keep in mind that when the object being poured has pores and depressions, air will appear in the resin in the form of bubbles, which can be removed by heating (use a torch or hair dryer). The resin penetration time lasts about three hours. Therefore, it is best to dip the object into the material in advance, and only after that place it on the surface to be poured.