Beautiful boxes for things with your own hands. Storing things at home: ideas, DIY, photos. How and what to decorate storage boxes
Textile boxes as systems storage units are very convenient and functional: they can be placed on a shelf in a closet, where you can place clothes, bed linen, and towels. I often use these boxes to store sewing supplies and fabric. Sewing a fabric box with your own hands is quite simple and quick - it took me about 10 minutes to sew, and I used leftover fabrics, so we can say that this is the most economical and quick option creating a storage system that allows you to keep everything you need in order and at hand.
You will need:
- 10 squares thick fabric(I have squares 22x22 cm);
- scissors;
- threads;
- pins;
- sewing machine.
I’ll say right away that the density of the fabric in this matter is the most important thing. If you don’t have thicker fabrics, it’s better to add to the list necessary materials dublerin, non-woven fabric or any other fabric sealant.
Step 1
First, you need to decide which squares you will have on the outside of the box and which on the inside, especially if you are using different colors of fabrics. Out of a total of 10 squares, you should have 4 squares for the front of the box, 4 squares for the inside and 2 for the bottom. So, the first step: sew on sewing machine 4 parts of the front side and separately 4 parts of the inside. You get two boxes like this without a bottom.

Step 2
Now carefully attach the bottom to each box. I specially turned the boxes upside down so that it would be clear what all the stitched parts should look like.

Step 3
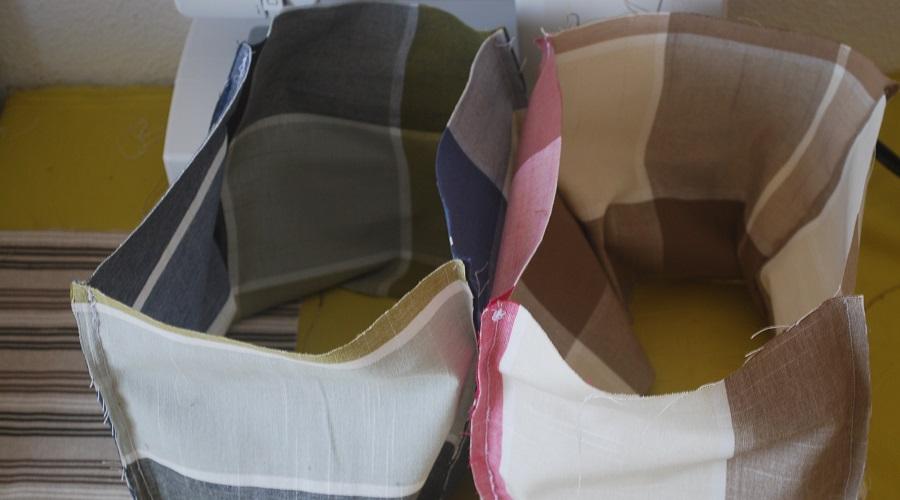
Then we turn both parts inside out, iron the seams and place one inside the other. It already looks quite like a textile box. Just a few touches left!

Step 4
We fold the inside of the box over the front to create a beautiful lapel. To make it neat and even, first we pin it with safety pins.


Step 5
We use a huge number of things in everyday life. To make their storage more convenient, you can use beautifully designed boxes and organizers. We offer you several master classes on how to make a decorative box for storing things. Such containers can be used both for small items (children's toys, sewing accessories, jewelry) and larger ones (books, towels).
DIY book storage box
To work you will need cardboard box from small household appliances(kettle, hair dryer, juicer), a small piece of cute fabric, Moment glue or hot glue gun, and sewing supplies - needle, thread, scissors.


Design of a double-sided storage box
This box can be used to store small supplies (stationery, handicrafts, kitchen supplies, etc.). It is convenient precisely because it consists of two parts: in one you can put, for example, pencils, in the other - felt-tip pens for the child.


How to sew a fabric storage box?
This fabric box is suitable for storing fabric products (towels, bed linen) and large toys (dolls, cars). Such a container turns out to be quite stable, and it can also be made in absolutely any size and color.
Every apartment must have such things that are required quite often, but, being in a visible place, spoil the impression of the interior.
Even if you put them away or hide them somewhere, after a while they will be needed again, and after use they will remain in plain sight for everyone. The salvation in this case is decorative boxes in the interior, which add zest to the room and at the same time cope with the function of storing things. A special joy for those who like to decorate their home themselves is that you can easily make various decorative boxes with your own hands. These can be large boxes for storing large items or small boxes for various small items.

Storing things in boxes not only allows you to hide things not intended for view. foreign objects, but also wonderfully organizes space. Putting things in different chests, boxes and caskets will allow you to quickly find them if necessary. Such storage of things teaches children to be neat and orderly, and some adults too. To prevent numerous containers for storing things from looking shabby, you can make or decorate decorative boxes with your own hands.

There are a lot of options for how to use boxes: many fashionistas store jewelry in special chests, shoes are already sold in boxes, stationery for children and adults easily fits into candy or cookie boxes, craftswomen and needlewomen try to put away sewing supplies, beads, fabrics etc. in different packages. It is also better to put away numerous chargers for phones, tablets and other gadgets. separate place so that they are not distributed around the house in a chaotic manner. The same applies to children’s toys or other necessary and important little things. Large decorative boxes in the interior can serve as a chest of drawers or ottoman if they are made of fairly durable materials.

Application in different rooms and interior styles
Boxes and caskets will become an indispensable assistant in any room: from the living room to the bathroom. In the living room, large boxes can be used to store entire sets for parties with friends, where they will fit Board games, cards or other entertainment accepted in the company. You can also store photo albums or individual photo cards, rarely used dishes, tablecloths or craft kits. The advantage will be that you will not need to separately take out various items from the drawers of the table or cabinet, everything will be in one box.

In the kitchen there are even more things to store in boxes: dishes, towels, food supplies in the form of cereals, tea, coffee, etc. By the way, decorative baskets look especially good in the kitchen interior, for example, for storing fruits, seasonings or as flower stands.

In a nursery, bright decorative cardboard boxes can be used for toys, cubes, construction sets, clothes and shoes, books, coloring books and many other things. It’s better to sign the boxes together with your child to teach your child to put things in order. to the right places. But a timely parental inspection of his boxes will never hurt.

In the bedroom, you can store bed linen, various cosmetical tools for use before bed, magazines or some intimate items. If the bedroom is combined with a dressing room or boudoir, then some kind of “storage” for cosmetics, jewelry, accessories, hats, etc. would be appropriate. If numerous things are stored in closed or even open boxes, any room will not look cluttered.

Open decorative boxes look great in the hallway interior. They can be placed on shelves or even hung on the wall. Here you can store various little things in the form of keys, umbrellas, players, without which it is impossible to go outside, shoe care products, newspapers, torn buttons and replacement laces. What might get lost if left in the depths of the apartment will never be lost in a basket in the hallway.

In the bathroom, boxes and baskets can be used to store towels, some washing supplies, and household cleaning products, if they are stored here and not in the pantry or hallway. The only thing is that it is better not to use decorative cardboard boxes in the bathroom, because high humidity will negatively affect them.

The decorative function of boxes is very important: by choosing a certain color, shape and pattern, you can successfully emphasize the style of the interior. So, soft pink tones round boxes will perfectly emphasize the femininity and tenderness of a bedroom or boudoir, plastic translucent containers will fit well into a high-tech or minimalist style, boxes with interesting and voluminous decor will look harmonious in classic interiors, a certain ethnic pattern can be selected for interiors in Japanese, African or Scandinavian style. Wicker decorative baskets look appropriate in the interior village house or in an eco-style city apartment.

For almost any interior style and any room, you can create decorative boxes with your own hands by choosing suitable material or decorating an existing container.
Decorating ready-made boxes
It’s easier, of course, to decorate already ready box. Thus, decorative cardboard boxes can be made from existing packaging for shoes, paper, dishes, household appliances and electronics. If you need more durable materials, you can use old buckets and basins, plastic or wooden fruit containers and even beer crates.
You can decorate decorative boxes with your own hands using any materials: paper for appliques or decoupage, cardboard, beads, sparkles, shells, coins or natural material. It all depends on the author’s imagination and the style of the room in which such a box will be located.

Most often, of course, fabric decor is used for the interior of an apartment. You can make the box softer by attaching foam rubber to the lid, sheathing or pasting the box with fabric, dividing it with cardboard inner space into several compartments and beautifully store various small items. This option is sometimes considered as gift wrapping, although it often looks better than the gift itself.

Variety of materials
If all the existing boxes in the house have mysteriously disappeared, you can make them yourself using the materials you have on hand.
Cardboard or thick paper
The most common option from which you can make decorative boxes with your own hands is products from cardboard or thick paper. Interestingly, the shape of such boxes can be very different - from a traditional parallelepiped or cube to a heart- or star-shaped box.

The principle of operation here is as follows: first, a development of the future box is drawn, and then it is cut out and glued together. If information about what a development is has remained in the distant past since geometry lessons, you can simply cut out individual sides of the box with allowances for gluing or fastening, and then connect them one by one. The box can be closed using a magnet or Velcro, but a simpler option with a completely removable lid has also not been canceled. Further decoration of such a container is entirely up to the conscience and imagination of the creator.
Tree
Making a box or box out of wood is quite easy if there is a man nearby who will do it. You can use small boards or plywood, but fasten the parts together and cut them yourself original decor, for example, on the lid, it will still be quite difficult for young ladies to do it on their own.
Each of us has things that are used quite rarely. These can be a variety of items: jewelry, seasonal clothing, shoes, bedding, tools, dishes. The question arises: how to place them so that they do not interfere and are always at hand?
Boxes for things differ in manufacturing technique, material and other nuances
Of course, you can buy a new wardrobe, but what to do if there is a catastrophic lack of space in the apartment? Fortunately, there is a more economical and less voluminous option - create a convenient box for things.
Types of storage boxes and their features
Boxes for things differ in manufacturing technique, material and other nuances. Some of them can only be bought in the store, while others are so simple that you can make them yourself.
Under-bed
Underbed boxes (or drawers) are called large containers made of plastic, wood or other materials that can accommodate clothes and shoes. You can place them not only under the bed, but also, for example, in the closet. Under-bed drawers can be universal or designed for specific items, such as tools or household supplies. The range of such products is very wide, so it will not be difficult for you to find one that suits your needs. appearance and capacity option.
Fabric
Boxes of this type are most often used to store clothes, children's toys and home textiles. They are made from any fabric, but most often from felt - a material that holds its shape perfectly. Textile boxes are sold in stores, but you can sew them yourself, just find suitable patterns.
Cardboard
Cardboard boxes are practical and easy to use, but they are only suitable for storing lightweight items. They are done very quickly. When decorating, they can be covered with beautiful paper or wrapped in fabric.
Folding
Folding boxes are a stylish and functional accessory for your apartment. Their main advantage is that when the box is not needed, it can be folded (fastened) and hidden in a matter of seconds.
Folding boxes have zippers or other fasteners on the sides. It is relatively difficult to create such a product with your own hands.
Wicker Wicker boxes made from rattan can harmoniously complement any interior.
They can have any size and any number of compartments for storing items of various sizes.
Decorative This is interesting: Such boxes are used to store small accessories. Another function is to serve as interior decoration. They have small sizes , so you won’t be able to fit a lot of things in them. Can be made from wide range
bright and colorful materials.

Photo: modern containers and boxes for the home

This drawer is convenient for storing, for example, bed linen.

Tissue boxes are often made from felt

Multi-colored cardboard boxes

The advantage of a folding box is that it can be closed or zipped if necessary.

Rattan boxes are not cheap
Many girls will like this option.
Creation Instructions To small items
Cardboard with handle and two sections

This box has a convenient partition with a handle and 2 compartments
Necessary materials
- Cardboard 3 mm thick;
- Whatman;
- Cotton fabric in several colors;
- Ruler;
- Pen or pencil;
- Self-healing cutting mat;
- Scissors (or stationery knife);
- Glue (you can use PVA or transparent polymer).
- A brush 1-2 centimeters wide.
- In addition to all of the above, we recommend preparing paper tape and several cotton napkins. We'll need them to clean up. excess glue and smooth the fabric.

Here's what we need for work
Step-by-step instruction
- We collect the box. We cut out the box parts from thick cardboard (see illustration 1).
- To create cardboard boxes, it is better to use thick, even cardboard. In our example, cardboard with a thickness of 0.3 centimeters was used.
- We take a blank for the bottom and mark the middle. Glue the partition in the center. This way we will have two compartments for things. We cut paper tape into strips 2 centimeters thick and glue the joints with it. Next we attach side walls. We also glue their joints with tape or craft paper.
- We glue the front side of the box. We cut out a blank from whatman paper. We lay it on the fabric.
- We cut the fabric and leave a small allowance of 1-2 centimeters.
- Glue the fabric on top of the Whatman paper. Smooth out wrinkles and irregularities with a napkin.
- We bend the side allowances of the fabric and glue them to the box.
- Cut the top corners diagonally.
- We fold the fabric and glue it to the inside of the box.
- Trim the seam allowance by 2 millimeters perpendicular to the side.
- We fold the fabric again and glue it to the inside of the box.
- Now you need to glue the allowances on the bottom. To do this, we cut the corners diagonally, fold the fabric and glue it to the bottom of the box.
- At this stage, the workpiece should look like in illustration 13 (see gallery).
- Glue the opposite side in the same way. To complete the top finishing, we cut out a rectangle of 20x14 centimeters from whatman paper, and 22x16 centimeters from fabric.
- Cut off the excess corner of the fabric.
- Fold and glue the fabric to the smaller sides of the rectangle.
- Glue the blank to the box.
- Then we attach the fabric allowances (top and bottom) to the cardboard.
- We design the opposite side in the same way.
- We glue the partition. First, we'll outline the top edge of the part. Let's cut a fabric strip 32 centimeters long and 2 centimeters wide, bend it in the middle, then iron it in this position and cut off the corners. Glue it to the cardboard, cutting off the corners on the folds.
- To make the holes, cut out a rectangle 25 centimeters long and 2.5 centimeters wide. We retreat 1.5 centimeters from the edge and make cuts on the next 4 centimeters. We retreat 13.5 centimeters from the beginning of the fabric and repeat the cuts on the next 4 centimeters. We cover the hole in the partition with fabric. This must be done so that the area with the cuts is above the semicircles.
- From whatman paper we cut out two parts of the partition of a size corresponding to the cardboard part. Near the window we remove another 3 millimeters.
- Glue the piece to the fabric and cut it with a small allowance. Cut the corners and cut out the window.
- Glue the top allowances and the fabric itself around the window.
- Glue the part to the partition, leaving allowances on the inside of the box.
- We design the second side of the partition in the same way.
- The next step will be gluing the internal sectors of the box. Since the partition is already pasted over, you first need to decorate the opposite side. To do this, cut out a rectangle from whatman paper. It should be 2 millimeters smaller inside. We cover it with fabric, leaving a small allowance for the hem. We cut off the corners and glue the seam allowance on top to the Whatman paper.
- We glue the workpiece to the box, and attach the allowances to the bottom and adjacent sides.
- We glue the sides. Now the allowances need to be glued to the Whatman paper on the top and sides. We let the allowance that remains go to the bottom.
- We glue a rectangle to the bottom with allowances bent inward.
- We design the other sector of the box in the same way.
- All that remains is to decorate the bottom of the box from the outside. Cut out a rectangle measuring 23x20.3 centimeters from whatman paper. We cover it with fabric, cut it diagonally and glue the allowances inside. We attach the workpiece to the box. That's all!
Photo gallery: Making a beautiful two-section container

Beginning of work

Illustration for point 1

Illustration for point 2

Illustration for point 3

Illustration for point 5

Illustration for point 6

Illustration for point 8

Illustration for paragraph 9

Illustration for point 10

Illustration for paragraph 11

Illustration for paragraph 13

Illustration for paragraph 15

Illustration for paragraph 17

Illustration for paragraph 20

Illustration for paragraph 21

Illustration for paragraph 24

Illustration for paragraph 25

Illustration for paragraph 29

Illustration for paragraph 32

This is what our box will look like
Decorative box for linen

These laundry boxes are convenient to place on shelves
A box for things can look like anything. We bring to your attention another option for storage products. various items. The compactness of the box will allow you to store it anywhere in the house.
What you need to create it yourself
- An ordinary cardboard box (ideally with high sides);
- Fabric for decoration;
- Paper;
- Scissors or clerical knife;
- Braid;
- Scotch.
How to do it yourself step by step
- First, we cut off all the sashes from the top of the box. Next, we cut small holes for the handles on both sides. It is better to make them at the top of the box.
- Cover the box with paper. This must be done so that the drawings on the box do not show through the fabric. We take album sheets and fix them with tape on the box.
- The upper edges of the album sheets must be folded towards the inside of the box.
- The paper must also be glued to the bottom of the box.
- The inside of the box is ready. It should look like in picture 5.
- Next, we decorate the box with fabric. We cut out two rectangles of fabric so that they are slightly larger than the sides of the box.
- We apply the fabric to the box and secure it around the edges with tape.
- We wrap the edges of the fabric towards the inside of the box.
- We glue the other sides of the box in the same way.
- It is important to wrap the material at the corners and sides of the box, otherwise the fabric will begin to “slip” and the box will serve you much less.
- We bend the corners of the fabric in 2 steps so that there is no excess fabric left (the diagram is shown in the picture).
- Before attaching this section, its edges must be processed. To do this, secure it with pins from the inside.
- Next, we sew the workpiece on the sides so that the threads at the edge of the fabric do not fray.
- In the place where we previously made holes, we also cut a hole in the fabric.
- We pull back and tuck the upper part of the fabric with the hole inward.
- Press the cut edges against the holes in the box.
- Next, we fix the fabric with tape from the inside.
- Now we decorate the upper edges of the box with braid.
- We wrap the sides of the box and secure with double-sided tape.
- The side should look as shown in photo 20.
- We pay special attention to the inner corners of the braid. We fold the material and sew it with several stitches.
- The tape should be located around the entire circumference of the sides on the box.
- We work with the braid extremely carefully, because it will serve as a decorative element.
- The top edge of the box is ready.
- Next we decorate with braid bottom part boxes.
- By using double sided tape glue the tape to the bottom of the box.
- We also decorate the holes for the handles with braid. We secure it with tape.
Photo gallery: Master class on making cardboard products

Illustration for point 1

Illustration for point 2

Illustration for point 4

Illustration for paragraph 9

Illustration for point 1

Illustration for paragraph 16

Illustration for paragraph 22

Illustration for paragraph 25

Illustration for paragraph 26

Illustration for paragraph 27

Convenient product for storing linen and other things
We are buying for an apartment new furniture and equipment, but often a small thing like a storage box is missing. As you can see, this product can look very creative. We hope our article will help you create a convenient and beautiful box for things.
A box for medicine, craft supplies or important papers... If you tend to sort and organize everything, you know that keeping your home organized requires lots of small storage spaces. So why not save on buying boxes and make some yourself?
1. Felt
We like felt basket-boxes from Danish Emma, author of the blog Design and form, because they are very easy to make, and they are guaranteed to look good. Suitable for storing magazines or some small items on shelves in any room.
You will need:
- felt;
- scissors;
- ruler;
- breadboard knife;
- pencil.
Step 1. Take a piece of felt measuring 48 x 43.4 cm. Make 4 rectangular cutouts in the corners, measuring 12 cm horizontally and 14 cm vertically from each corner.

Step 2. Make cuts 2 cm long horizontally from the resulting internal corners(In the photo, the incision site is indicated by purple lines).

Step 3. Make a template out of paper measuring 2 x 14 cm - it will help you mark the seams. Mark on the template the width of the strip of fabric that will serve as a “thread” (in the example - 0.7 cm). The length of the stitches and the distance between them can be made to any size, for example 1.5 cm. Make sure that all stitches are completed, that is, the number of cuts for them is even. This way the ends of the “thread” will be inside the box.

Step 4. Place the template on the edge of the future box wall (along the edge of the cutout you made at the very beginning) and begin making cuts for the seams. They should be a couple of millimeters wider than the width of the “thread”. Repeat 8 times, along all edges.

Step 5. Cut four strips of “thread” from the fabric, about 16 cm long. When they are ready, start sewing the walls together with them. Move from bottom to top and do not forget that the tip of the strip should remain on the wrong side.

Step 6. Continue sewing the boxes together, carefully threading the strips of fabric through the slits. You can use the tip of a pencil or other sharp object to push them through. When the seam is finished, secure the thread and cut off the excess. Instead of strips of fabric, you can use leather laces, braid or other dense material.

The box is ready!
2. From shoe boxes
A very simple lesson from Helen Nor, who runs her Mormorsglamour blog on the Swedish ELLE Decoration portal. The result will depend on the quality of paint you use, so we would make these boxes with the expectation that they will become modules in a white shelving unit, rather than standing on their own in a prominent place, as in the photo.

You will need:
- shoe boxes;
- dye;
- brush;
- awl;
- strip of leather;
- breadboard knife;
- rivets;
- ruler;
- hammer;
- cutting board.

Step 1. Paint the boxes. You can take acrylic paint - regular or for fabric. Depending on the density of the paint and the color of the boxes, 1-3 layers will be needed.

Step 2. Cut strips of leather measuring approximately 2.5 x 13 cm. To make it even, use a ruler (preferably metal) as a guide for the knife.

Step 3. Make holes at both ends with an awl (or drill).

Step 4. Make a hole in the lid of the box.

Step 5. Fold the leather strip in half and insert a rivet into the hole. Insert the rivet into the lid.

Step 6. Secure the rivet using a hammer.
Place something in a box and close the lid. Ready!
3. From an old sweater
Finally, the last project, not the most stylish, but very cozy. Author of the blog Thrifty and chic Alisha is a mother of two children, a lover of order and an opponent of throwing away boxes. It's no surprise that she decided to turn diaper boxes into cute storage containers.


You will need:
- box;
- sweater;
- scissors;
- breadboard knife;
- glue gun;
- cotton ropes.

Step 1. Cut off the top of the box. It's easier to do this with a cutter or sharp knife, not scissors.

Step 5. Fold the excess fabric inside the box and secure with glue gun. If you decide to fold the neat bottom edge of the sweater to the bottom and turn the freshly cut one inward, you can glue a braid along the edge so that the fabric does not fray and the edge looks neater.

Step 6. Handles can be made from cotton rope. If they are just for decoration, glue them directly to the fabric. If you want more functionality, you should sew handles to the box.
